Posts Tagged ‘multiple’

Must have software on freshly installed windows – Essential Software after fresh Windows install

Friday, March 18th, 2016

Install-update-multiple-programs-applications-at-once-using-ninite

If you're into IT industry even if you don't like installing frequently Windows or you're completely Linux / BSD user, you will certainly have a lot of friends which will want help from you to re-install or fix their Windows 7 / 8 / 10 OS. At least this is the case with me every year, I'm kinda of obliged to install fresh windowses on new bought friends or relatives notebooks / desktop PCs.

Of course according to for whom the new Windows OS installed the preferrences of necessery software varies, however more or less there is sort of standard list of Windows Software which is used daily by most of Avarage Computer user, such as:
 

Not to forget a good candidate from the list to install on new fresh windows Installation candidates are:

  • Winrar
  • PeaZIP
  • WinZip
  • GreenShot (to be able to easily screenshot stuff and save pictures locally and to the cloud)
  • AnyDesk (non free but very functional alternative to TeamViewer) to be able to remotely access remote PC
  • TightVNC
  • ITunes / Spotify (for people who have also iPhone smart phone)
  • DropBox or pCloud (to have some extra cloud free space)
  • FBReader (for those reading a lot of books in different formats)
  • Rufus – Rufus is an efficient and lightweight tool to create bootable USB drives. It helps you to create BIOS or UEFI bootable devices. It helps you to create Windows TO Go drives. It provides support for various disk, format, and partition.
  • Recuva is a data recovery software for Windows 10 (non free)
  • EaseUS (for specific backup / restore data purposes but unfortunately (non free)
  • For designers
  • Adobe Photoshop
  • Adobe Illustrator
  • f.lux –  to control brightness of screen and potentially Save your eyes
  • ImDisk virtual Disk Driver
  • KeePass / PasswordSafe – to Securely store your passwords
  • Putty / MobaXterm / SecureCRT / mPutty (for system administrators and programmers that has to deal with Linux / UNIX)

I tend to install on New Windows installs and thus I have more or less systematized the process.

I try to usually stick to free software where possible for each of the above categories as a Free Software enthusiast and luckily nowadays there is a lot of non-priprietary or at least free as in beer software available out there.

For Windows sysadmins or College and other public institutions networks including multiple of Windows Computers which are not inside a domain and also for people in computer repair shops where daily dozens of windows pre-installs or a set of software Automatic updates are  necessery make sure to take a look at Ninite
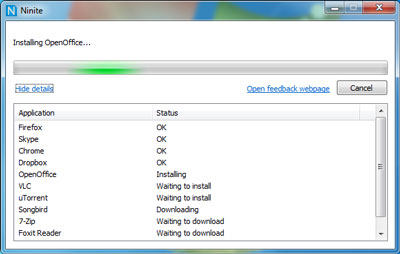
ninite-automate-windows-program-deploy-and-update-on-new-windows-os-openoffice-screenshot

As official website introduces Ninite:

Ninite – Install and Update All Your Programs at Once

Of course as Ninite is used by organizations as NASA, Harvard Medical School etc. it is likely the tool might reports your installed list of Windows software and various other Win PC statistical data to Ninite developers and most likely NSA, but this probably doesn't much matter as this is probably by the moment you choose to have installed a Windows OS on your PC.

ninite-choises-to-build-an-install-package-with-useful-essential-windows-software-screenshot
 

For Windows System Administrators managing small and middle sized network PCs that are not inside a Domain Controller, Ninite could definitely save hours and at cases even days of boring install and maintainance work. HP Enterprise or HP Inc. Employees or ex-employees would definitely love Ninite, because what Ninite does is pretty much like the well known HP Internal Tool PC COE.

Ninite could also prepare an installer containing multiple applications based on the choice on Ninite's website, so that's also a great thing especially if you need to deploy a different type of Users PCs (Scientific / Gamers / Working etc.)

Perhaps there are also other useful things to install on a new fresh Windows installations, if you're using something I'm missing let me know in comments.

How to configure multiple haproxies and frontends to log in separate log files via rsyslog

Monday, September 5th, 2022

log-multiple-haproxy-servers-to-separate-files-log-haproxy-froentend-to-separate-file-haproxy-rsyslog-Logging-diagram
In my last article How to create multiple haproxy instance separate processes for different configuration listeners,  I've shortly explained how to create a multiple instances of haproxies by cloning the systemd default haproxy.service and the haproxy.cfg to haproxyX.cfg.
But what if you need also to configure a separate logging for both haproxy.service and haproxy-customname.service instances how this can be achieved?

The simplest way is to use some system local handler staring from local0 to local6, As local 1,2,3 are usually used by system services a good local handler to start off would be at least 4.
Lets say we already have the 2 running haproxies, e.g.:

[root@haproxy2:/usr/lib/systemd/system ]# ps -ef|grep -i hapro|grep -v grep
root      128464       1  0 Aug11 ?        00:01:19 /usr/sbin/haproxy -Ws -f /etc/haproxy/haproxy.cfg -p /run/haproxy.pid -S /run/haproxy-master.sock
haproxy   128466  128464  0 Aug11 ?        00:49:29 /usr/sbin/haproxy -Ws -f /etc/haproxy/haproxy.cfg -p /run/haproxy.pid -S /run/haproxy-master.sock

root      346637       1  0 13:15 ?        00:00:00 /usr/sbin/haproxy-customname-wrapper -Ws -f /etc/haproxy/haproxy_customname_prod.cfg -p /run/haproxy_customname_prod.pid -S /run/haproxy-customname-master.sock
haproxy   346639  346637  0 13:15 ?        00:00:00 /usr/sbin/haproxy-customname-wrapper -Ws -f /etc/haproxy/haproxy_customname_prod.cfg -p /run/haproxy_customname_prod.pid -S /run/haproxy-customname-master.sock


1. Configure local messaging handlers to work via /dev/log inside both haproxy instance config files
 

To congigure the separte logging we need to have in /etc/haproxy/haproxy.cfg and in /etc/haproxy/haproxy_customname_prod.cfg the respective handlers.

To log in separate files you should already configured in /etc/haproxy/haproxy.cfg something like:


global
        stats socket /var/run/haproxy/haproxy.sock mode 0600 level admin #Creates Unix-Like socket to fetch stats
        log /dev/log    local0
        log /dev/log    local1 notice

#       nbproc 1
#       nbthread 2
#       cpu-map auto:1/1-2 0-1
        nbproc          1
        nbthread 2
        cpu-map         1 0
        cpu-map         2 1
        chroot /var/lib/haproxy
        user haproxy
        group haproxy
        daemon
        maxconn 99999

defaults
        log     global
        mode    tcp


        timeout connect 5000
        timeout connect 30s
        timeout server 10s

    timeout queue 5s
    timeout tunnel 2m
    timeout client-fin 1s
    timeout server-fin 1s

    option forwardfor
        maxconn 3000
    retries                 15

frontend http-in
        mode tcp

        option tcplog
        log global


        option logasap
        option forwardfor
        bind 0.0.0.0:80

default_backend webservers_http
backend webservers_http
    fullconn 20000
        balance source
stick match src
    stick-table type ip size 200k expire 30m

        server server-1 192.168.1.50:80 check send-proxy weight 255 backup
        server server-2 192.168.1.54:80 check send-proxy weight 254
        server server-3 192.168.0.219:80 check send-proxy weight 252 backup
        server server-4 192.168.0.210:80 check send-proxy weight 253 backup
        server server-5 192.168.0.5:80 maxconn 3000 check send-proxy weight 251 backup

For the second /etc/haproxy/haproxy_customname_prod.cfg the logging configuration should be similar to:
 

global
        stats socket /var/run/haproxy/haproxycustname.sock mode 0600 level admin #Creates Unix-Like socket to fetch stats
        log /dev/log    local5
        log /dev/log    local5 notice

#       nbproc 1
#       nbthread 2
#       cpu-map auto:1/1-2 0-1
        nbproc          1
        nbthread 2
        cpu-map         1 0
        cpu-map         2 1
        chroot /var/lib/haproxy
        user haproxy
        group haproxy
        daemon
        maxconn 99999

defaults
        log     global
        mode    tcp


2. Configure separate haproxy Frontend logging via local5 inside haproxy.cfg
 

As a minimum you need a configuration for frontend like:


frontend http-in
        mode tcp

        option tcplog
        log /dev/log    local5 debug
…..
….

..
.

Of course the mode tcp in my case is conditional you might be using mode http etc. 


3. Optionally but (preferrably) make local5 / local6 handlers to work via rsyslogs UDP imudp protocol


In this example /dev/log is straightly read by haproxy instead of sending the messages first to rsyslog, this is a good thing in case if you have doubts that rsyslog might stop working and respectively you might end up with no logging, however if you prefer to use instead rsyslog which most of people usually do you will have instead for /etc/haproxy/haproxy.cfg to use config:

global
    log          127.0.0.1 local6 debug

defaults
        log     global
        mode    tcp

And for /etc/haproxy_customname_prod.cfg config like:

global
    log          127.0.0.1 local5 debug

defaults
        log     global
        mode    tcp

If you're about to send the haproxy logs directly via rsyslog, it should have enabled in /etc/rsyslog.conf the imudp module if you're not going to use directly /dev/log

# provides UDP syslog reception
module(load="imudp")
input(type="imudp" port="514")


4. Prepare first and second log file and custom frontend output file and set right permissions
 

Assumably you already have /var/log/haproxy.log and this will be the initial haproxy log if you don't want to change it, normally it is installed on haproxy package install time on Linux and should have some permissions like following:

root@haproxy2:/etc/rsyslog.d# ls -al /var/log/haproxy.log
-rw-r–r– 1 haproxy haproxy 6681522  1 сеп 16:05 /var/log/haproxy.log


To create the second config with exact permissions like haproxy.log run:

root@haproxy2:/etc/rsyslog.d# touch /var/log/haproxy_customname.log
root@haproxy2:/etc/rsyslog.d# chown haproxy:haproxy /var/log/haproxy_customname.log

Create the haproxy_custom_frontend.log file that will only log output of exact frontend or match string from the logs
 

root@haproxy2:/etc/rsyslog.d# touch  /var/log/haproxy_custom_frontend.log
root@haproxy2:/etc/rsyslog.d# chown haproxy:haproxy  /var/log/haproxy_custom_frontend.log


5. Create the rsyslog config for haproxy.service to log via local6 to /var/log/haproxy.log
 

root@haproxy2:/etc/rsyslog.d# cat 49-haproxy.conf
# Create an additional socket in haproxy's chroot in order to allow logging via
# /dev/log to chroot'ed HAProxy processes
$AddUnixListenSocket /var/lib/haproxy/dev/log

# Send HAProxy messages to a dedicated logfile
:programname, startswith, "haproxy" {
  /var/log/haproxy.log
  stop
}


Above configs will make anything returned with string haproxy (e.g. proccess /usr/sbin/haproxy) to /dev/log to be written inside /var/log/haproxy.log and trigger a stop (by the way the the stop command works exactly as the tilda '~' discard one, except in some newer versions of haproxy the ~ is no now obsolete and you need to use stop instead (bear in mind that ~ even though obsolete proved to be working for me whether stop not ! but come on this is no strange this is linux mess), for example if you run latest debian Linux 11 as of September 2022 haproxy with package 2.2.9-2+deb11u3.
 

6. Create configuration for rsyslog to log from single Frontend outputting local2 to /var/log/haproxy_customname.log
 

root@haproxy2:/etc/rsyslog.d# cat 48-haproxy.conf
# Create an additional socket in haproxy's chroot in order to allow logging via
# /dev/log to chroot'ed HAProxy processes
$AddUnixListenSocket /var/lib/haproxy/dev/log

# Send HAProxy messages to a dedicated logfile
#:programname, startswith, "haproxy" {
#  /var/log/haproxy.log
#  stop
#}
# GGE/DPA 2022/08/02: HAProxy logs to local2, save the messages
local5.*                                                /var/log/haproxy_customname.log


You might also explicitly define the binary that will providing the logs inside the 48-haproxy.conf as we have a separate /usr/sbin/haproxy-customname-wrapper in that way you can log the output from the haproxy instance only based
on its binary command and you can omit writting to local5 to log via it something else 🙂

root@haproxy2:/etc/rsyslog.d# cat 48-haproxy.conf
# Create an additional socket in haproxy's chroot in order to allow logging via
# /dev/log to chroot'ed HAProxy processes
$AddUnixListenSocket /var/lib/haproxy/dev/log

# Send HAProxy messages to a dedicated logfile
#:programname, startswith, "haproxy" {
#  /var/log/haproxy.log
#  stop
#}
# GGE/DPA 2022/08/02: HAProxy logs to local2, save the messages

:programname, startswith, "haproxy-customname-wrapper " {
 
/var/log/haproxy_customname.log
  stop
}


7. Create the log file to log the custom frontend of your preference e.g. /var/log/haproxy_custom_frontend.log under local5 /prepare rsyslog config for
 

root@haproxy2:/etc/rsyslog.d# cat 47-haproxy-custom-frontend.conf
$ModLoad imudp
$UDPServerAddress 127.0.0.1
$UDPServerRun 514
#2022/02/02: HAProxy logs to local6, save the messages
local4.*                                                /var/log/haproxy_custom_frontend.log
:msg, contains, "https-in" ~

The 'https-in' is my frontend inside /etc/haproxy/haproxy.cfg it returns the name of it every time in /var/log/haproxy.log therefore I will log the frontend to local5 and to prevent double logging inside /var/log/haproxy.log of connections incoming towards the same frontend inside /var/log/haproxy.log, I have the tilda symbol '~' which instructs rsyslog to discard any message coming to rsyslog with "https-in" string in, immediately after the same frontend as configured inside /etc/haproxy/haproxy.cfg will output the frontend operations inside local5.


!!! Note that for rsyslog it is very important to have the right order of configurations, the configuration order is being considered based on the file numbering. !!!
 

Hence notice that my filter file number 47_* preceeds the other 2 configured rsyslog configs.
 

root@haproxy2:/etc/rsyslog.d# ls -1
47-haproxy-custom-frontend.conf
48-haproxy.conf
49-haproxy.conf

This will make 47-haproxy-custom-frontend.conf to be read and processed first 48-haproxy.conf processed second and 49-haproxy.conf processed third.


8. Reload rsyslog and haproxy and test


root@haproxy2: ~# systemctl restart rsyslog
root@haproxy2: ~# systemctl restart haproxy
root@haproxy2: ~# systemctl status rsyslog

● rsyslog.service – System Logging Service
     Loaded: loaded (/lib/systemd/system/rsyslog.service; enabled; vendor preset: enabled)
     Active: active (running) since Thu 2022-09-01 17:34:51 EEST; 1s ago
TriggeredBy: ● syslog.socket
       Docs: man:rsyslogd(8)
             man:rsyslog.conf(5)
             https://www.rsyslog.com/doc/
   Main PID: 372726 (rsyslogd)
      Tasks: 6 (limit: 4654)
     Memory: 980.0K
        CPU: 8ms
     CGroup: /system.slice/rsyslog.service
             └─372726 /usr/sbin/rsyslogd -n -iNONE

сеп 01 17:34:51 haproxy2 systemd[1]: Stopped System Logging Service.
сеп 01 17:34:51 haproxy2 rsyslogd[372726]: warning: ~ action is deprecated, consider using the 'stop' statement instead [v8.210>
сеп 01 17:34:51 haproxy2 systemd[1]: Starting System Logging Service…
сеп 01 17:34:51 haproxy2 rsyslogd[372726]: [198B blob data]
сеп 01 17:34:51 haproxy2 systemd[1]: Started System Logging Service.
сеп 01 17:34:51 haproxy2 rsyslogd[372726]: [198B blob data]
сеп 01 17:34:51 haproxy2 rsyslogd[372726]: imuxsock: Acquired UNIX socket '/run/systemd/journal/syslog' (fd 3) from systemd.  [>
сеп 01 17:34:51 haproxy2 rsyslogd[372726]: [origin software="rsyslogd" swVersion="8.2102.0" x-pid="372726" x-info="https://www.

Do some testing with some tool like curl / wget / lynx / elinks etc. on each of the configured haproxy listeners and frontends and check whether everything ends up in the correct log files.
That's all folks enjoy ! 🙂
 

Create and Configure SSL bundle file for GoGetSSL issued certificate in Apache Webserver on Linux

Saturday, November 3rd, 2018

gogetssl-install-certificate-on-linux-howto-sslcertificatechainfile-obsolete

I had a small task to configure a new WildCard SSL for domains on a Debian GNU / Linux Jessie running Apache 2.4.25.

The official documentation on how to install the SSL certificate on Linux given by GoGetSSL (which is by COMODO was obsolete as of time of writting this article and suggested as install instructions:
 

SSLEngine on
SSLCertificateKeyFile /etc/ssl/ssl.key/server.key
SSLCertificateFile /etc/ssl/ssl.crt/yourDomainName.crt
SSLCertificateChainFile /etc/ssl/ssl.crt/yourDomainName.ca-bundle


Adding such configuration to domain Vhost and testing with apache2ctl spits an error like:


root@webserver:~# apache2ctl configtest
AH02559: The SSLCertificateChainFile directive (/etc/apache2/sites-enabled/the-domain-name-ssl.conf:17) is deprecated, SSLCertificateFile should be used instead
Syntax OK


To make issued GoGetSSL work with Debian Linux, hence, here is the few things done:

The files issued by Gogetssl.COM were the following:


AddTrust_External_CA_Root.crt
COMODO_RSA_Certification_Authority.crt
the-domain-name.crt


The webserver had already SSL support via mod_ssl Apache module, e.g.:


root@webserver:~# ls -al /etc/apache2/mods-available/*ssl*
-rw-r–r– 1 root root 3112 окт 21  2017 /etc/apache2/mods-available/ssl.conf
-rw-r–r– 1 root root   97 сеп 19  2017 /etc/apache2/mods-available/ssl.load
root@webserver:~# ls -al /etc/apache2/mods-enabled/*ssl*
lrwxrwxrwx 1 root root 26 окт 19  2017 /etc/apache2/mods-enabled/ssl.conf -> ../mods-available/ssl.conf
lrwxrwxrwx 1 root root 26 окт 19  2017 /etc/apache2/mods-enabled/ssl.load -> ../mods-available/ssl.load


For those who doesn't have mod_ssl enabled, to enable it quickly run:


# a2enmod ssl


The VirtualHost used for the domains had Apache config as below:


NameVirtualHost *:443

<VirtualHost *:443>
    ServerAdmin support@the-domain-name.com
    ServerName the-domain-name.com
    ServerAlias *.the-domain-name.com the-domain-name.com

    DocumentRoot /home/the-domain-namecom/www
    SSLEngine On
#    <Directory />
#        Options FollowSymLinks
#        AllowOverride None
#    </Directory>
    <Directory /home/the-domain-namecom/www>
        Options Indexes FollowSymLinks MultiViews
        AllowOverride None
        Include /home/the-domain-namecom/www/htaccess_new.txt
        Order allow,deny
        allow from all
    </Directory>

    ScriptAlias /cgi-bin/ /usr/lib/cgi-bin/
    <Directory "/usr/lib/cgi-bin">
        AllowOverride None
        Options +ExecCGI -MultiViews +SymLinksIfOwnerMatch
        Order allow,deny
        Allow from all
    </Directory>

    ErrorLog ${APACHE_LOG_DIR}/error.log

    # Possible values include: debug, info, notice, warn, error, crit,
    # alert, emerg.
    LogLevel warn

    CustomLog ${APACHE_LOG_DIR}/access.log combined

#    Alias /doc/ "/usr/share/doc/"
#   <Directory "/usr/share/doc/">
#       Options Indexes MultiViews FollowSymLinks
#       AllowOverride None
#       Order deny,allow
#       Deny from all
#       Allow from 127.0.0.0/255.0.0.0 ::1/128
#   </Directory>
SSLCertificateKeyFile /etc/apache2/ssl/the-domain-name.com.key
SSLCertificateFile /etc/apache2/ssl/chain.crt


</VirtualHost>

The config directives enabling and making the SSL actually work are:
 

SSLEngine On
SSLCertificateKeyFile /etc/apache2/ssl/the-domain-name.com.key
SSLCertificateFile /etc/apache2/ssl/chain.crt


The chain.crt file is actually a bundle file containing a bundle of the gogetssl CA_ROOT and RSA_Certification_Authority 3 files, to prepare that file, I've used bundle.sh small script found on serverfault.com here I've made a mirror of bundle.sh on www.pc-freak.net here   the script content is as follows:

To prepare the chain.crt  bundle, I ran:


sh create-ssl-bundle.sh _iq-test_cc.crt chain.crt
sh create-ssl-bundle.sh _iq-test_cc.crt >chain.crt
sh create-ssl-bundle.sh COMODO_RSA_Certification_Authority.crt >> chain.crt
sh create-ssl-bundle.sh bundle.sh AddTrust_External_CA_Root.crt >> chain.crt


Then I copied the file to /etc/apache2/ssl together with the-domain-name.com.key file earlier generated using openssl command earlier explained in my article how to install RapidSSL certificate on Linux

/etc/apache2/ssl was not previously existing (on Debian Linux), so to create it:


root@webserver:~# mkdir /etc/apache2/ssl
root@webserver:~# ls -al /etc/apache2/ssl/chain.crt
-rw-r–r– 1 root root 20641 Nov  2 12:27 /etc/apache2/ssl/chain.crt
root@webserver:~# ls -al /etc/apache2/ssl/the-domain-name.com.key
-rw-r–r– 1 root root 6352 Nov  2 20:35 /etc/apache2/ssl/the-domain-name.com.key


As I needed to add the SSL HTTPS configuration for multiple domains, further on I've wrote and used a tiny shell script add_new_vhost.sh which accepts as argument the domain name I want to add. The script works with a sample Skele (Template) file, which is included in the script itself and can be easily modified for the desired vhost config.
To add my multiple domains, I've used the script as follows:
 

sh add_new_vhost.sh add-new-site-domain.com
sh add_new_vhost.sh add-new-site-domain1.com


etc.

Here is the complete script as well:


#!/bin/sh
# Shell script to add easily new domains for virtual hosting on Debian machines
# arg1 should be a domain name
# This script takes the domain name which you type as arg1 uses it and creates
# Docroot / cgi-bin directory for the domain, create seperate site's apache log directory
# then takes a skele.com file and substitutes a skele.com with your domain name and directories
# This script's aim is to easily enable sysadmin to add new domains in Debian
sites_base_dir=/var/www/jail/home/www-data/sites/;
# the directory where the skele.com file is
skele_dir=/etc/apache2/sites-available;
# base directory where site log dir to be created
cr_sep_log_file_d=/var/log/apache2/sites;
# owner of the directories
username='www-data';
# read arg0 and arg1
arg0=$0;
arg1=$1;
if [[ -z $arg1 ]]; then
echo "Missing domain name";
exit 1;
fi


# skele template
echo "#
#  Example.com (/etc/apache2/sites-available/www.skele.com)
#
<VirtualHost *>
        ServerAdmin admin@design.bg
        ServerName  skele.com
        ServerAlias www.skele.com


        # Indexes + Directory Root.
        DirectoryIndex index.php index.htm index.html index.pl index.cgi index.phtml index.jsp index.py index.asp

        DocumentRoot /var/www/jail/home/www-data/sites/skelecom/www/docs
        ScriptAlias /cgi-bin "/var/www/jail/home/www-data/sites/skelecom/cgi-bin"
        
        # Logfiles
        ErrorLog  /var/log/apache2/sites/skelecom/error.log
        CustomLog /var/log/apache2/sites/skelecom/access.log combined
#       CustomLog /dev/null combined
      <Directory /var/www/jail/home/www-data/sites/skelecom/www/docs/>
                Options FollowSymLinks MultiViews -Includes
                AllowOverride None
                Order allow,deny
                allow from all
                # This directive allows us to have apache2's default start page
                # in /apache2-default/, but still have / go to the right place
#               RedirectMatch ^/$ /apache2-default/
        </Directory>

        <Directory /var/www/jail/home/www-data/sites/skelecom/www/docs/>
                Options FollowSymLinks ExecCGI -Includes
                AllowOverride None
                Order allow,deny
                allow from all
        </Directory>

</VirtualHost>
" > $skele_dir/skele.com;

domain_dir=$(echo $arg1 | sed -e 's/\.//g');
new_site_dir=$sites_base_dir/$domain_dir/www/docs;
echo "Creating $new_site_dir";
mkdir -p $new_site_dir;
mkdir -p $sites_base_dir/cgi-bin;
echo "Creating sites's Docroot and CGI directory";
chown -R $username:$username $new_site_dir;
chown -R $username:$username $sites_base_dir/cgi-bin;
echo "Creating site's Log files Directory";
mkdir -p $cr_sep_log_file_d/$domain_dir;
echo "Creating sites's VirtualHost file and adding it for startup";
sed -e "s#skele.com#$arg1#g" -e "s#skelecom#$domain_dir#g" $skele_dir/skele.com >> $skele_dir/$arg1;
ln -sf $skele_dir/$arg1 /etc/apache2/sites-enabled/;
echo "All Completed please restart apache /etc/init.d/apache restart to Load the new virtual domain";

# Date Fri Jan 11 16:27:38 EET 2008


Using the script saves a lot of time to manually, copy vhost file and then edit it to change ServerName directive, for vhosts whose configuration is identical and only the ServerName listener has to change, it is perfect to create all necessery domains, I've created a simple text file with each of the domains and run it in a loop:
 

while :; do sh add_new_vhost.sh $i; done < domain_list.txt


Ansible Quick Start Cheatsheet for Linux admins and DevOps engineers

Wednesday, October 24th, 2018

ansible-quick-start-cheetsheet-ansible-logo

Ansible is widely used (Configuration management, deployment, and task execution system) nowadays for mass service depoyments on multiple servers and Clustered environments like, Kubernetes clusters (with multiple pods replicas) virtual swarms running XEN / IPKVM virtualization hosting multiple nodes etc. .

Ansible can be used to configure or deploy GNU / Linux tools and services such as Apache / Squid / Nginx / MySQL / PostgreSQL. etc. It is pretty much like Puppet (server / services lifecycle management) tool , except its less-complecated to start with makes it often a choose as a tool for mass deployment (devops) automation.

Ansible is used for multi-node deployments and remote-task execution on group of servers, the big pro of it it does all its stuff over simple SSH on the remote nodes (servers) and does not require extra services or listening daemons like with Puppet. It combined with Docker containerization is used very much for later deploying later on inside Cloud environments such as Amazon AWS / Google Cloud Platform / SAP HANA / OpenStack etc.

Ansible-Architechture-What-Is-Ansible-Edureka

0. Instaling ansible on Debian / Ubuntu Linux


Ansible is a python script and because of that depends heavily on python so to make it running, you will need to have a working python installed on local and remote servers.

Ansible is as easy to install as running the apt cmd:


# apt-get install –yes ansible
 

The following additional packages will be installed:
  ieee-data python-jinja2 python-kerberos python-markupsafe python-netaddr python-paramiko python-selinux python-xmltodict python-yaml
Suggested packages:
  sshpass python-jinja2-doc ipython python-netaddr-docs python-gssapi
Recommended packages:
  python-winrm
The following NEW packages will be installed:
  ansible ieee-data python-jinja2 python-kerberos python-markupsafe python-netaddr python-paramiko python-selinux python-xmltodict python-yaml
0 upgraded, 10 newly installed, 0 to remove and 1 not upgraded.
Need to get 3,413 kB of archives.
After this operation, 22.8 MB of additional disk space will be used.

apt-get install –yes sshpass


Installing Ansible on Fedora Linux is done with:


# dnf install ansible –yes sshpass


On CentOS to install:
 

# yum install ansible –yes sshpass

sshpass needs to be installed only if you plan to use ssh password prompt authentication with ansible.

Ansible is also installable via python-pip tool, if you need to install a specific version of ansible you have to use it instead, the package is available as an installable package on most linux distros.

Ansible has a lot of pros and cons and there are multiple articles already written on people for and against it in favour of Chef or Puppet As I recently started learning Ansible. The most important thing to know about Ansible is though many of the things can be done directly using a simple command line, the tool is planned for remote installing of server services using a specially prepared .yaml format configuration files. The power of Ansible comes of the use of Ansible Playbooks which are yaml scripts that tells ansible how to do its activities step by step on remote server. In this article, I'm giving a quick cheat sheet to start quickly with it.
 

1. Remote commands execution with Ansible
 

First thing to do to start with it is to add the desired hostnames ansible will operate with it can be done either globally (if you have a number of remote nodes) to deploy stuff periodically by using /etc/ansible/hosts or use a custom host script for each and every ansible custom scripts developed.

a. Ansible main config files

A common ansible /etc/ansible/hosts definition looks something like that:


# cat /etc/ansible/hosts
[mysqldb]
10.69.2.185
10.69.2.186
[master]
10.69.2.181
[slave]
10.69.2.187
[db-servers]
10.69.2.181
10.69.2.187
[squid]
10.69.2.184

Host to execute on can be also provided via a shell variable $ANSIBLE_HOSTS
b) is remote hosts reachable / execute commands on all remote host

To test whether hour hosts are properly configure from /etc/ansible/hosts you can ping all defined hosts with:


ansible all -m ping


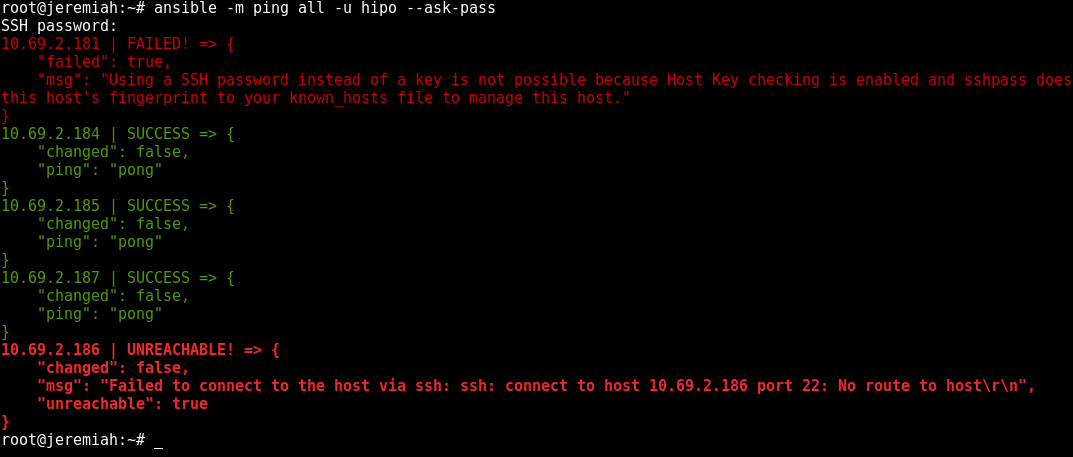
ansible-check-hosts-ping-command-screenshot

This makes ansible try to remote to remote hosts (if you have properly configured SSH public key authorization) the command should return success statuses on every host.


ansible all -a "ifconfig -a"


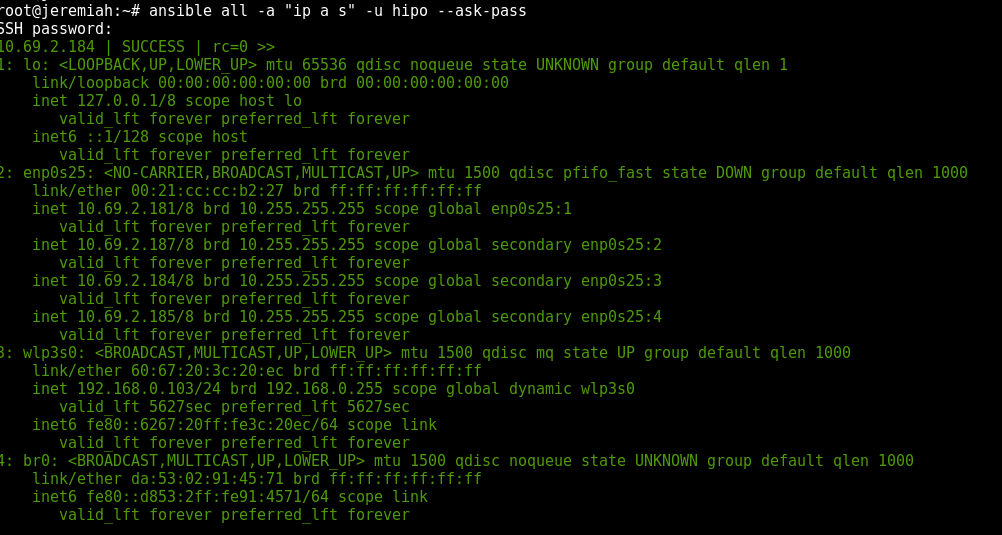
If you don't have SSH keys configured you can also authenticate with an argument (assuming) all hosts are configured with same password with:


ansible all –ask-pass -a "ip all show" -u hipo –ask-pass


ansible-show-ips-ip-a-command-screenshot-linux

If you have configured group of hosts via hosts file you can also run certain commands on just a certain host group, like so:


ansible <host-group> -a <command>

It is a good idea to always check /etc/ansible/ansible.cfg which is the system global (main red ansible config file).

c) List defined host groups
 

ansible localhost -m debug -a 'var=groups.keys()'
ansible localhost -m debug -a 'var=groups'

d) Searching remote server variables


# Search remote server variables
ansible localhost -m setup -a 'filter=*ipv4*'


ansible localhost -m setup -a 'filter=ansible_domain'


ansible all -m setup -a 'filter=ansible_domain'


# uninstall package on RPM based distros
ansible centos -s -m yum -a "name=telnet state=absent"
# uninstall package on APT distro
ansible localhost -s -m apt -a "name=telnet state=absent"


2. Debugging – Listing information about remote hosts (facts) and state of a host


# All facts for one host
ansible -m setup
  # Only ansible fact for one host
ansible
-m setup -a 'filter=ansible_eth*'
# Only facter facts but for all hosts
ansible all -m setup -a 'filter=facter_*'


To Save outputted information per-host in separate files in lets say ~/ansible/host_facts


ansible all -m setup –tree ~/ansible/host_facts


3. Playing with Playbooks deployment scripts


a) Syntax Check of a playbook yaml


ansible-playbook –syntax-check


b) Run General Infos about a playbook such as get what a playbook would do on remote hosts (tasks to run) and list-hosts defined for a playbook (like above pinging).


ansible-playbook –list-hosts
ansible-playbook
–list-tasks


To get the idea about what an yaml playbook looks like, here is example from official ansible docs, that deploys on remote defined hosts a simple Apache webserver.


– hosts: webservers
  vars:
    http_port: 80
    max_clients: 200
  remote_user: root
  tasks:
  – name: ensure apache is at the latest version
    yum:
      name: httpd
      state: latest
  – name: write the apache config file
    template:
      src: /srv/httpd.j2
      dest: /etc/httpd.conf
    notify:
    – restart apache
  – name: ensure apache is running
    service:
      name: httpd
      state: started
  handlers:
    – name: restart apache
      service:
        name: httpd
        state: restarted

To give it a quick try save the file as webserver.yml and give it a run via ansible-playbook command
 

ansible-playbook -s playbooks/webserver.yml


The -s option instructs ansible to run play on remote server with super user (root) privileges.

The power of ansible is its modules, which are constantly growing over time a complete set of Ansible supported modules is in its official documenation.

Ansible-running-playbook-Commands-Task-script-Successful-output-1024x536

There is a lot of things to say about playbooks, just to give the brief they have there own language like a  templates, tasks, handlers, a playbook could have one or multiple plays inside (for instance instructions for deployment of one or more services).

The downsides of playbooks are they're so hard to write from scratch and edit, because yaml syntaxing is much more stricter than a normal oldschool sysadmin configuration file.
I've stucked with problems with modifying and writting .yaml files and I should say the community in #ansible in irc.freenode.net was very helpful to help me debug the obscure errors.

yamllint (The YAML Linter tool) comes handy at times, when facing yaml syntax errors, to use it install via apt:
 

# apt-get install –yes yamllint


a) Running ansible in "dry mode" just show what ansible might do but not change anything
 

ansible-playbook playbooks/PLAYBOOK_NAME.yml –check


b) Running playbook with different users and separate SSH keys


ansible-playbook playbooks/your_playbook.yml –user ansible-user
 
ansible -m ping hosts –private-key=~/.ssh/keys/custom_id_rsa -u centos


c) Running ansible playbook only for certain hostnames part of a bigger host group


ansible-playbook playbooks/PLAYBOOK_NAME.yml –limit "host1,host2,host3"


d) Run Ansible on remote hosts in parallel

To run in raw of 10 hosts in parallel
 

# Run 10 hosts parallel
ansible-playbook <File.yaml> -f 10            


e) Passing variables to .yaml scripts using commandline

Ansible has ability to pre-define variables from .yml playbooks. This variables later can be passed from shell cli, here is an example:

# Example of variable substitution pass from command line the var in varsubsts.yaml if present is defined / replaced ansible-playbook playbooks/varsubst.yaml –extra-vars "myhosts=localhost gather=yes pkg=telnet"


4. Ansible Galaxy (A Docker Hub) like large repository with playbook (script) files


Ansible Galaxy has about 10000 active users which are contributing ansible automation playbooks in fields such as Development / Networking / Cloud / Monitoring / Database / Web / Security etc.

To install from ansible galaxy use ansible-galaxy

# install from galaxy the geerlingguy mysql playbook
ansible-galaxy install geerlingguy.mysql


The available packages you can use as a template for your purpose are not so much as with Puppet as Ansible is younger and not corporate supported like Puppet, anyhow they are a lot and does cover most basic sysadmin needs for mass deployments, besides there are plenty of other unofficial yaml ansible scripts in various github repos.

How to merge two or more wordpress sites from separete domains into one without impacting SEO

Monday, October 23rd, 2017

merge-multiple-wordpres-websites-howto-merge-two-or-more-websites-together-without-loosing-seo-credability

If you run multiple WordPress websites or blogs, but one of the websites is much more developed at a certain point you might decide that the best of the two worlds would be two merge two WordPress blogs into one.
 

So how can we do merge your multiple wordpress websites into single ?


1. Export content from each of the old websites you will be closing soon

First thing to do is to immediately create SQL data and WordPress sites backup, so if something goes wrong you can easily restore.


Next From wordpress admin area wp-admin

export-content-wordpress-website-screenshot-howto

Visit

Tools -> Export

Make sure, the All Content option is selected like shown in above screenshot and click on

Download Export File button

The downloaded files will have a copy of all yours

– Posts and pages
– Custom Post Types
– All included categories and tags

Once we have transferred the file to the Website with which we're going to merge old WP content, we need to install the Import plugin

install-wordpress-importer-to-merge-multiple-wordpress-sites

To do so navigate to:

Tools -> Import -> (Intall now)

wordpress-merge-two-or-more-websites-run-importer-screenshot.

Tools -> Run Importer

You will be asked for the file you just dumped into the second wordpress install which you'll be merging

export-and-import-wp-file-screenshot

Wordpress will start importing, your Export file and analyze it, then you will be redirected to

Import Settings Page
 

wordpress-import-settings-page-screenshot-howto-merge-sites

Assign Authors (that should be your account or the account with which the primary blog has most posts and with which you'll be merging).

Hopefully all will be fine with import and you will get the success page:

wordpress-success-page-importing-two-websites

One last step is to set properly redirects so that the transition merge from the Old Website to the New one does not impact your website Search Engine Optimization Ratings.

The redirects are made via .htaccess file it will be located in the Document Root (Or main directory) of your wordpress installed websites for example if your website is located under /var/www/wordpress-site your .htaccess file will be located under /var/www/wordpress-site/.htaccess

Open the file (SITUATED ON THE OLD WORDPRESS WEBSITE THAT YOU'LL BE MERGING) with editor directly on the server or if it is a shared hosting, download it and edit it at your side.

To the beginning of it add the following Apache ModRewrite code:
 

#Options +FollowSymLinks
RewriteEngine on
RewriteRule ^(.*)$ http://www.newsite.com/$1 [R=301,L]


Replace inside above example http://www.newsite.com with the name of the primary domain name to which we're merging (e.g. the merging domain and not the one we merge).

If you experience some problems with pictures or you like to Merge Bulk Edit categories  and tags  read import external images to wordpress as well as how to merge bulk edit categories in tags in WordPress


chmod all directories permissions only and omit files (recursively) on Linux howto

Friday, March 11th, 2016

execute-write-read-of-user-group-and-others-on-linux-unix-bsd-explanationary-picture

If you mistakenly chmod-ed all files within directory full of multiple other subdirectories and files and you want to revert back and set a certain file permissions (read, wite execute) privileges only to all directories:
 

find /path/to/base/dir -type d -exec chmod 755 {} +


If there are too many files or directories you need to change mod use
 

chmod 755 $(find /path/to/base/dir -type d) chmod 644 $(find /path/to/base/dir -type f)

Above willl run evaluate $() all files searched and print them and pass them to chmod so if you have too many files / directories to change it will drastically reduce execution time.

An alternative and perhaps a better way to do it for those who don't remember by heart the chmod permission (numbers), use something like:
 

chmod -R u+rwX,go+rX,go-w /path

Below is arguments meaning:

    -R = recursively;
    u+rwX = Users can read, write and execute;
    go+rX = group and others can read and execute;
    go-w = group and others can't write

If like piping, a less efficient but still working way to change all directory permissions only is with:
 

find /path/to/base/dir -type d -print0 | xargs -0 chmod 755
find /path/to/base/dir -type f -print0 | xargs -0 chmod 644


For those who wish to automate and often do change permissions of only files or only directories it might be also nice to look at (chmod_dir_files-recursive.sh) shell script

Tadadam 🙂


How to find and Delete Duplicate files in directory on Linux server with find and fdupes command

Monday, March 16th, 2015

search-duplcate-files-linux-command-and-graphical-tools-how-to-find-duplicate-files-on-linux-mac-and-windows-os

Linux / UNIX find command is very helpful to do a lot of tasks to us admins such as Deleting empty directories to free up occupied inodes or finding and printing only empty files within a root file system within all sub-directories
There is too much of uses of find, however one that is probably rarely used known by sysadmins find command use is how to search for duplicate files on a Linux server:
 

find -not -empty -type f -printf “%s\n” | sort -rn | uniq -d | xargs -I{} -n1 find -type f -size {}c -print0 | xargs -0 md5sum | sort | uniq -w32 –all-repeated=separate

If you're curious how does duplicate files finding works, they are found by comparing file sizes and MD5 signatures, followed by a byte-by-byte comparison.

Most common application of below command is when you want to search and get rid of some old obsolete files which you forgot to delete such as old /etc/ configurations, old SQL backups and PHP / Java / Python programming code files etc.

If you have to do a regular duplicate file find on multiple servers Linux servers perhaps you should install and use  fdupes command.
On Debian Linux to install it:

root@pcfreak:/# apt-cache show fdupes|grep -i descr -A 4
Description: identifies duplicate files within given directories
 FDupes uses md5sums and then a byte by byte comparison to find
 duplicate files within a set of directories. It has several useful
 options including recursion.
Homepage: http://code.google.com/p/fdupes/


root@www.pc-freak.net:/# apt-get install –yes fdupes

To search for duplicate files with fdupes in lets /etc/ just run fdupes without arguments:


root@pcfreak:/# fdupes /etc/
/etc/magic
/etc/magic.mime

/etc/odbc.ini
/etc/.pwd.lock
/etc/environment
/etc/odbcinst.ini

/etc/shadow-
/etc/shadow


If you want to look up for all duplicate files within root directory:
 

root@pcfreak:/# fdupes -r /etc/
Building file list /


You can also find duplicate files for multiple directories by just passing all directories as arguments to fdupes


root@pcfreak:/# fdupes -r /etc/ /usr/ /root /disk /nfs_mount /nas


The -r argument (makes a recursive subdirectory search for duplicates), if you want to also see what is the size of duplicate files found add -S option


fdupes -r -S /etc/ /usr/ /root /disk /nfs_mount /nas


If you want to delete all duplicate files within lets say /etc/


root@pcfreak:/# fdupes -d /etc/

fdupes is also available and installable also on RPM based Linux distros Fedora / RHEL / CentOS etc., install on CentOS with:
 

[root@centos~ ]# yum -y install fdupes


There is also a port available for those who want to run it on FreeBSD on BSD install it from ports:


freebsd# cd /usr/ports/sysutils/fdupes
freebsd# make install clean


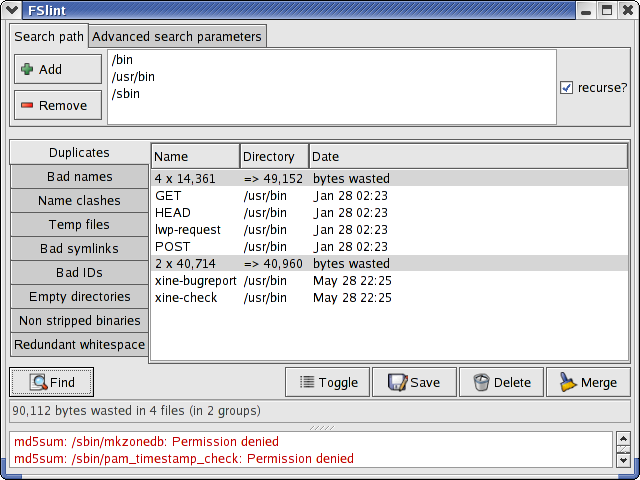
If you have a GUI environment installed on the server and you don't want to bother with command line to search for all duplicate files under main filesystem and other lint (junk) files take a look at FSlint

FSlint-2.02-search-for-duplicate-and-lint-files-linux-gui-tool

If you're looking for a GUI cross platform duplicate file finder tool that runs on all major used Operating Systems Mac OS X / Windows / Linux take a look at dupeGuru


Putty Connection Manager A Handy tip to make your PuTTY multi tab enabled

Wednesday, September 30th, 2009

Some time ago, I asked myself if there is a SSH/Telnet supporting Terminal program
for Windows which enables you to have a tabs with the opened connections to a number
of servers. Well after some time spent looking, I’ve came across the solution
which concludes to a nice PuTTy wrapper program called Putty Connection Manager .
Putty Connection Manager requires you to have PuTTY installed all it does it runs a multiple putty instances
each one opening in a nice multi tab windows, like the good old linux gnome-terminal.
Cheers!END—–

How to take multiple screenshots with scrot and ImageMagick import commands in terminal on GNU / Linux and FreeBSD

Friday, January 13th, 2012

scrot and import are two commands, which can be used to take screenshot in terminal on Linux and FreeBSD:

To use scrot cmd to take screenshots on Ubuntu and Debian the scrot package has to be installed:

noah:~# apt-get install scrot
...

scrot should also be available on most other Linux distributions in the main repositories, I'll be glad to hear if someone has used it on Fedora, SUSE etc.

On FreeBSD, there is a port called scrot , to install on FreeBSD:

freebsd# cd /usr/ports/graphics/scrot
freebsd# make install clean
...

Scrot has plenty of nice arguments one can use to make a screenshot. Maybe the most handy one in my view is after a preliminary set delay before screenshot is taken.

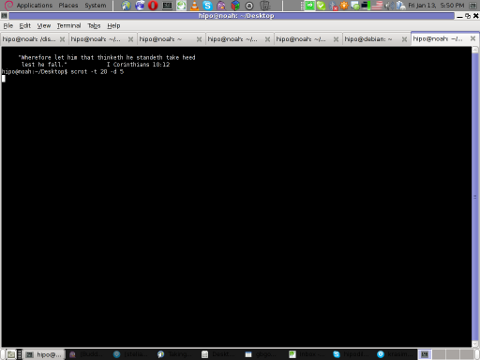
To take screenshot with it after lets say 5 seconds delay before the screenshot:

hipo@noah:~/Desktop$ scrot -t 20 -d 5

Screenshot scrot my debian Linux gnome-termina

To put an year, month and day and year followed by screen resolution with scrot :

hipo@noah:~$ scrot '%Y-%m-%d_$wx$h.png'

Another way to take a screenshot of screen with command is by using ImageMagick'simport image manipulation package.
To take screenshot of the current screen via terminal using import , type in xterm, gnome-termina or Gnome's Run Application (ALT+F2)

hipo@noah:~$ import -window root ScreenShot.png

To make import command to save the taken screenshot in a format (minute:hour:day:month:year)i :

hipo@noah:~$ import -window root $screenshot_dir/screenshot-$(date +%M_%k_%d_%m_%Y|sed -e 's/^ *//').png

Taking a delayed screenshot is also possible via The GIMP via menus File -> Create -> Screenshot

GIMP Screenshot 15 seconds delay GIMP window screenshot

Now here is an interesting question, what if I would like to take periodic screenshots of what I do on my Desktop to take random movie scenes from a movie I watch with totem or vlc??

This task is quite easily achiavable with a little bash shell script, I wrote:

screenshot_dir='Screenshots';
seconds='60';
if [ ! -d "$screenshot_dir" ]; then
mkdir $screenshot_dir;
fi
while [ 1 ]; do
sleep $seconds;
(import -window root $screenshot_dir/screenshot-$(date +%M_%k_%d_%m_%Y|sed -e 's/^ *//').png) &
done

This script will take screenshot automatically to Screenshots/ directory every (1 min – 60 seconds)
You can also my downloads take_screenshot_every_60_secs_import.sh here

To use take_screenshot_every_60_secs_import.sh just issue the script inside xterm or gnome-terminal, after that simply use your computer as you normally would.
The script will take snapshots every minute and store all taken screenshots in Screenshots dir.

If you prefer to use scrot to take automatically the screenshots every lets say 5 minutes, you can use a script like:

screenshot_dir='Screenshots';
# 300 secs (5 mins)seconds='300';
if [ ! -d "$screenshot_dir" ]; then
mkdir $screenshot_dir;
fi
while [ 1 ]; do
sleep $seconds;
(scrot $screenshot_dir/'%Y-%m-%d_$wx$h.png') &
done

You can fetch take_screenshot_every_60_secs_scrot.sh here

The script using scrot is better in terms of efficiency, the system load scrot will put on your machine will be less.
Using some of this scripts will be handy if you need screenshots to Movies, Programs and favourite Free Software games.
Hope this is educative to someone 😉