Posts Tagged ‘openssl’

How to update expiring OpenSSL certificates without downtime on haproxy Pacemaker / Corosync PCS Cluster

Tuesday, July 19th, 2022

pcm-active-passive-scheme-corosync-pacemaker-openssl-renew-fix-certificate

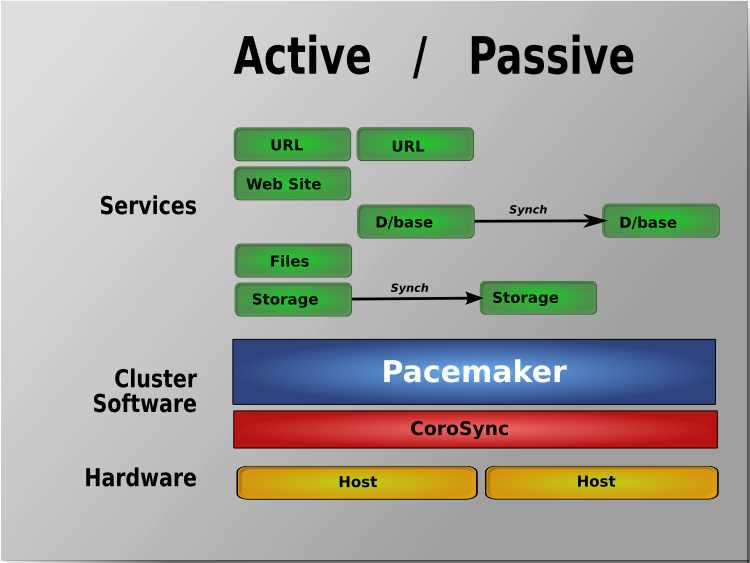
Lets say you have a running PCS Haproxy cluster with 2 nodes and you have already a configuration in haproxy with a running VIP IP and this proxies
are tunneling traffic to a webserver such as Apache or directly to an Application and you end up in the situation where the configured certificates,
are about to expire soon. As you can guess having the cluster online makes replacing the old expiring SSL certificate with a new one relatively easy
task. But still there are a couple of steps to follow which seems easy but systemizing them and typing them down takes some time and effort.
In short you need to check the current certificates installed on the haproxy inside the Haproxy configuration files,
in my case the haproxy cluster was running 2 haproxy configs haproxyprod.cfg and haproxyqa.cfg and the certificates configured are places inside this
configuration.

Hence to do the certificate update, I had to follow few steps:

A. Find the old certificate key or generate a new one that will be used later together with the CSR (Certificate Request File) to generate the new Secure Socket Layer
certificate pair.
B. Either use the old .CSR (this is usually placed inside the old .CRT certificate file) or generate a new one
C. Copy those .CSR file to the Copy / Paste buffer and place it in the Website field on the step to fill in a CSR for the new certificate on the Domain registrer
such as NameCheap / GoDaddy / BlueHost / Entrust etc.
D. Registrar should then be able to generate files like the the new ServerCertificate.crt, Public Key Root Certificate Authority etc.
E. You should copy and store these files in some database for future perhaps inside some database such as .xdb
for example you can se the X – Certificate and Key management xca (google for xca download).
F. Copy this certificate and place it on the top of the old .crt file that is configured on the haproxies for each domain for which you have configured it on node2
G. standby node1 so the cluster sends the haproxy traffic to node2 (where you should already have the new configured certificate)
H. Prepare the .crt file used by haproxy by including the new ServerCertificate.crt content on top of the file on node1 as well
I. unstandby node1
J. Check in browser by accessing the URL the certificate is the new one based on the new expiry date that should be extended in future
K. Check the status of haproxy
L. If necessery check /var/log/haproxy.log on both clusters to check all works as expected

haserver_cluster_sample

Below are the overall commands to use to complete below jobs

Old extracted keys and crt files are located under /home/username/new-certs

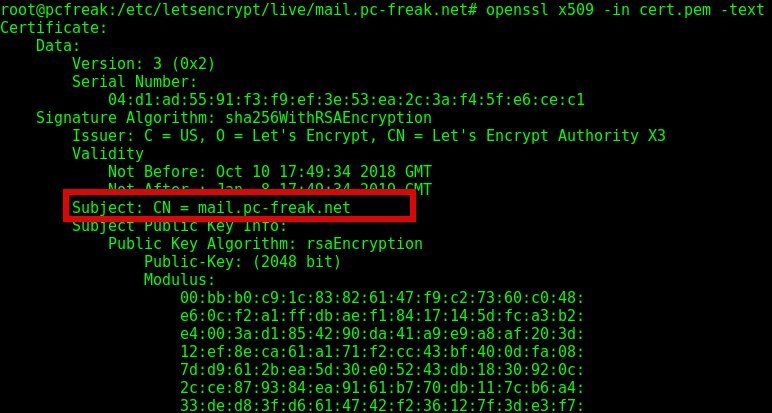
1. Check certificate expiry start / end dates


[root@haproxy-serv01 certs]# openssl s_client -connect 10.40.18.88:443 2>/dev/null| openssl x509 -noout -enddate
notAfter=Aug 12 12:00:00 2022 GMT

2. Find Certificate location taken from /etc/haproxy/haproxyprod.cfg / /etc/haproxy/haproxyqa.cfg

# from Prod .cfg
   bind 10.40.18.88:443 ssl crt /etc/haproxy/certs/www.your-domain.com.crt ca-file /etc/haproxy/certs/ccnr-ca-prod.crt 
 

# from QA .cfg

    bind 10.50.18.87:443 ssl crt /etc/haproxy/certs/test.your-domain.com.crt ca-file /etc/haproxy/certs

3. Check  CRT cert expiry


# for haproxy-serv02 qa :443 listeners

[root@haproxy-serv01 certs]# openssl s_client -connect 10.50.18.87:443 2>/dev/null| openssl x509 -noout -enddate 
notAfter=Dec  9 13:24:00 2029 GMT


[root@haproxy-serv01 certs]# openssl x509 -enddate -noout -in /etc/haproxy/certs/www.your-domain.com.crt
notAfter=Aug 12 12:00:00 2022 GMT

[root@haproxy-serv01 certs]# openssl x509 -noout -dates -in /etc/haproxy/certs/www.your-domain.com.crt 
notBefore=May 13 00:00:00 2020 GMT
notAfter=Aug 12 12:00:00 2022 GMT


[root@haproxy-serv01 certs]# openssl x509 -noout -dates -in /etc/haproxy/certs/other-domain.your-domain.com.crt 
notBefore=Dec  6 13:52:00 2019 GMT
notAfter=Dec  9 13:52:00 2022 GMT

4. Check public website cert expiry in a Chrome / Firefox or Opera browser

In a Chrome browser go to updated URLs:

https://www.your-domain/login

https://test.your-domain/login

https://other-domain.your-domain/login

and check the certs

5. Login to one of haproxy nodes haproxy-serv02 or haproxy-serv01

Check what crm_mon (the cluster resource manager) reports of the consistancy of cluster and the belonging members
you should get some output similar to below:

[root@haproxy-serv01 certs]# crm_mon
Stack: corosync
Current DC: haproxy-serv01 (version 1.1.23-1.el7_9.1-9acf116022) – partition with quorum
Last updated: Fri Jul 15 16:39:17 2022
Last change: Thu Jul 14 17:36:17 2022 by root via cibadmin on haproxy-serv01

2 nodes configured
6 resource instances configured

Online: [ haproxy-serv01 haproxy-serv02 ]

Active resources:

 ccnrprodlbvip  (ocf::heartbeat:IPaddr2):       Started haproxy-serv01
 ccnrqalbvip    (ocf::heartbeat:IPaddr2):       Started haproxy-serv01
 Clone Set: haproxyqa-clone [haproxyqa]
     Started: [ haproxy-serv01 haproxy-serv02 ]
 Clone Set: haproxyprod-clone [haproxyprod]
     Started: [ haproxy-serv01 haproxy-serv02 ]


6. Create backup of existing certificates before proceeding to regenerate expiring
On both haproxy-serv01 / haproxy-serv02 run:


# cp -vrpf /etc/haproxy/certs/ /home/username/etc-haproxy-certs_bak_$(date +%d_%y_%m)/


7. Find the .key file etract it from latest version of file CCNR-Certificates-DB.xdb

Extract passes from XCA cert manager (if you're already using XCA if not take the certificate from keypass or wherever you have stored it.

+ For XCA cert manager ccnrlb pass
Find the location of the certificate inside the .xdb place etc.

+++++ www.your-domain.com.key file +++++

—–BEGIN PUBLIC KEY—–

—–END PUBLIC KEY—–


# Extracted from old file /etc/haproxy/certs/www.your-domain.com.crt
 

—–BEGIN RSA PRIVATE KEY—–

—–END RSA PRIVATE KEY—–


+++++

8. Renew Generate CSR out of RSA PRIV KEY and .CRT

[root@haproxy-serv01 certs]# openssl x509 -noout -fingerprint -sha256 -inform pem -in www.your-domain.com.crt
SHA256 Fingerprint=24:F2:04:F0:3D:00:17:84:BE:EC:BB:54:85:52:B7:AC:63:FD:E4:1E:17:6B:43:DF:19:EA:F4:99:L3:18:A6:CD

# for haproxy-serv01 prod :443 listeners

[root@haproxy-serv02 certs]# openssl x509 -x509toreq -in www.your-domain.com.crt -out www.your-domain.com.csr -signkey www.your-domain.com.key


9. Move (Standby) traffic from haproxy-serv01 to ccnrl0b2 to test cert works fine

[root@haproxy-serv01 certs]# pcs cluster standby haproxy-serv01


10. Proceed the same steps on haproxy-serv01 and if ok unstandby

[root@haproxy-serv01 certs]# pcs cluster unstandby haproxy-serv01


11. Check all is fine with openssl client with new certificate


Check Root-Chain certificates:

# openssl verify -verbose -x509_strict -CAfile /etc/haproxy/certs/ccnr-ca-prod.crt -CApath  /etc/haproxy/certs/other-domain.your-domain.com.crt{.pem?)
/etc/haproxy/certs/other-domain.your-domain.com.crt: OK

# openssl verify -verbose -x509_strict -CAfile /etc/haproxy/certs/thawte-ca.crt -CApath  /etc/haproxy/certs/www.your-domain.com.crt
/etc/haproxy/certs/www.your-domain.com.crt: OK

################# For other-domain.your-domain.com.crt ##############
Do the same

12. Check cert expiry on /etc/haproxy/certs/other-domain.your-domain.com.crt

# for haproxy-serv02 qa :15443 listeners
[root@haproxy-serv01 certs]# openssl s_client -connect 10.40.18.88:15443 2>/dev/null| openssl x509 -noout -enddate
notAfter=Dec  9 13:52:00 2022 GMT

[root@haproxy-serv01 certs]#  openssl x509 -enddate -noout -in /etc/haproxy/certs/other-domain.your-domain.com.crt 
notAfter=Dec  9 13:52:00 2022 GMT


Check also for 
+++++ other-domain.your-domain.com..key file +++++
 

—–BEGIN PUBLIC KEY—–

—–END PUBLIC KEY—–


# Extracted from /etc/haproxy/certs/other-domain.your-domain.com.crt
 

—–BEGIN RSA PRIVATE KEY—–

—–END RSA PRIVATE KEY—–


+++++

13. Standby haproxy-serv01 node 1

[root@haproxy-serv01 certs]# pcs cluster standby haproxy-serv01

14. Renew Generate CSR out of RSA PRIV KEY and .CRT for second domain other-domain.your-domain.com

# for haproxy-serv01 prod :443 renew listeners
[root@haproxy-serv02 certs]# openssl x509 -x509toreq -in other-domain.your-domain.com.crt  -out domain-certificate.com.csr -signkey domain-certificate.com.key


And repeat the same steps e.g. fill the CSR inside the domain registrer and get the certificate and move to the proxy, check the fingerprint if necessery
 

[root@haproxy-serv01 certs]# openssl x509 -noout -fingerprint -sha256 -inform pem -in other-domain.your-domain.com.crt
SHA256 Fingerprint=60:B5:F0:14:38:F0:1C:51:7D:FD:4D:C1:72:EA:ED:E7:74:CA:53:A9:00:C6:F1:EB:B9:5A:A6:86:73:0A:32:8D


15. Check private key's SHA256 checksum

# openssl pkey -in terminals-priv.KEY -pubout -outform pem | sha256sum
# openssl x509 -in other-domain.your-domain.com.crt -pubkey -noout -outform pem | sha256sum

# openssl pkey -in  www.your-domain.com.crt-priv-KEY -pubout -outform pem | sha256sum

# openssl x509 -in  www.your-domain.com.crt -pubkey -noout -outform pem | sha256sum


16. Check haproxy config is okay before reload cert


# haproxy -c -V -f /etc/haproxy/haproxyprod.cfg
Configuration file is valid


# haproxy -c -V -f /etc/haproxy/haproxyqa.cfg
Configuration file is valid

Good so next we can the output of status of certificate

17.Check old certificates are reachable via VIP IP address

Considering that the cluster VIP Address is lets say 10.40.18.88 and running one of the both nodes cluster to check it do something like:
 

# curl -vvI https://10.40.18.88:443|grep -Ei 'start date|expire date'


As output you should get the old certificate


18. Reload Haproxies for Prod and QA on node1 and node2

You can reload the haproxy clusters processes gracefully something similar to kill -HUP but without loosing most of the current established connections with below cmds:

Login on node1 (haproxy-serv01) do:

# /usr/sbin/haproxy -f /etc/haproxy/haproxyprod.cfg -D -p /var/run/haproxyprod.pid  -sf $(cat /var/run/haproxyprod.pid)
# /usr/sbin/haproxy -f /etc/haproxy/haproxyqa.cfg -D -p /var/run/haproxyqa.pid  -sf $(cat /var/run/haproxyqa.pid)

repeat the same commands on haproxy-serv02 host

19.Check new certificates online and the the haproxy logs

# curl -vvI https://10.50.18.88:443|grep -Ei 'start date|expire date'

*       start date: Jul 15 08:19:46 2022 GMT
*       expire date: Jul 15 08:19:46 2025 GMT


You should get the new certificates Issueing start date and expiry date.

On both nodes (if necessery) do:

# tail -f /var/log/haproxy.log

Short SSL generate new and self-signed certificates PEM, view and convert to and from PKCS12 to java key store cookbook commands cheat sheet

Tuesday, January 12th, 2021

OpenSSL-logo

Below is a short compilation of common used openssl commands (a kind of cookbook) helpful for sysadmins who has to commonly deal with OpenSSL certificates.

Lets say you have to generate new certificate / key and a PEM files, prepare self-signed certificates, show CSR / PEM or KEY ssl file contents, get information about certificate such as expiry date a type of encryption algorithm or sign certificate with self-signed authority convert PEM to PKCS12, convert from PKCS12 file format to .PEM, convert java X509 to java key store SSL encryptionor convert java key store format certificate to PKCS12, then below will be of use to you.

1. Generate Private RSA Key with 2048 bits

# openssl genrsa -out $ (hostname -f) .key 2048

2. Create CSR file

# openssl req -new -key $ (hostname -f) .key -out $ (hostname -f) .csr

3. Create a Self Certified Certificate:

# openssl x509 -req -days 30 -in $ (hostname -f) .csr -signkey $ (hostname -f) .key -out $ (hostname -f) .crt
Enter password:

# openssl rsa -in key.pem -out newkey.pem


4. Show CSR file content

# openssl req -in newcsr.csr -noout -text


5. Get Certificate version / serial number / signature algorithm / RSA key lenght / modulus / exponent etc.

# openssl x509 -in newcert.pem -noout -text


6. Server certificate as CA self signeded

# openssl ca -in newcert.csr -notext -out newcert.pem


7. Generate a certificate signing request based on an existing certificate

# openssl x509 -x509toreq -in certificate.crt -out CSR.csr -signkey privateKey.key


8. Convert .pem / .key / .crt file format to pkcs12 format
 

# openssl pkcs12 -export -in newcert.pem -inkey newkey.key -certfile ca.crt -out newcert.p12


9. Convert pkcs12 pfx to common .pem

# openssl pkcs12 -in mycert.pfx -out mycert.pem


10. The Formats available

# openssl x509 -inform the -in certificate.cer -out certificate.crt


11. Convert a pkcs # 7 certificate into PEM format

# openssl pkcs7 -in cert.p7c -inform DER -outform PEM -out certificate.p7b
# openssl pkcs7 -print_certs -in certificate.p7b -out certificate.pem


12. Convert X509 to java keystore file

# java -cp not-yet-commons-ssl-0.3.11.jar org.apache.commons.ssl.KeyStoreBuilder pass_for_new_keystore key.key certificate.crt

13. Convert java keystore file to pkcs12

# keytool -importkeystore -srckeystore keystore.jks -destkeystore intermediate.p12 -deststoretype PKCS12

Create and Configure SSL bundle file for GoGetSSL issued certificate in Apache Webserver on Linux

Saturday, November 3rd, 2018

gogetssl-install-certificate-on-linux-howto-sslcertificatechainfile-obsolete

I had a small task to configure a new WildCard SSL for domains on a Debian GNU / Linux Jessie running Apache 2.4.25.

The official documentation on how to install the SSL certificate on Linux given by GoGetSSL (which is by COMODO was obsolete as of time of writting this article and suggested as install instructions:
 

SSLEngine on
SSLCertificateKeyFile /etc/ssl/ssl.key/server.key
SSLCertificateFile /etc/ssl/ssl.crt/yourDomainName.crt
SSLCertificateChainFile /etc/ssl/ssl.crt/yourDomainName.ca-bundle


Adding such configuration to domain Vhost and testing with apache2ctl spits an error like:


root@webserver:~# apache2ctl configtest
AH02559: The SSLCertificateChainFile directive (/etc/apache2/sites-enabled/the-domain-name-ssl.conf:17) is deprecated, SSLCertificateFile should be used instead
Syntax OK


To make issued GoGetSSL work with Debian Linux, hence, here is the few things done:

The files issued by Gogetssl.COM were the following:


AddTrust_External_CA_Root.crt
COMODO_RSA_Certification_Authority.crt
the-domain-name.crt


The webserver had already SSL support via mod_ssl Apache module, e.g.:


root@webserver:~# ls -al /etc/apache2/mods-available/*ssl*
-rw-r–r– 1 root root 3112 окт 21  2017 /etc/apache2/mods-available/ssl.conf
-rw-r–r– 1 root root   97 сеп 19  2017 /etc/apache2/mods-available/ssl.load
root@webserver:~# ls -al /etc/apache2/mods-enabled/*ssl*
lrwxrwxrwx 1 root root 26 окт 19  2017 /etc/apache2/mods-enabled/ssl.conf -> ../mods-available/ssl.conf
lrwxrwxrwx 1 root root 26 окт 19  2017 /etc/apache2/mods-enabled/ssl.load -> ../mods-available/ssl.load


For those who doesn't have mod_ssl enabled, to enable it quickly run:


# a2enmod ssl


The VirtualHost used for the domains had Apache config as below:


NameVirtualHost *:443

<VirtualHost *:443>
    ServerAdmin support@the-domain-name.com
    ServerName the-domain-name.com
    ServerAlias *.the-domain-name.com the-domain-name.com

    DocumentRoot /home/the-domain-namecom/www
    SSLEngine On
#    <Directory />
#        Options FollowSymLinks
#        AllowOverride None
#    </Directory>
    <Directory /home/the-domain-namecom/www>
        Options Indexes FollowSymLinks MultiViews
        AllowOverride None
        Include /home/the-domain-namecom/www/htaccess_new.txt
        Order allow,deny
        allow from all
    </Directory>

    ScriptAlias /cgi-bin/ /usr/lib/cgi-bin/
    <Directory "/usr/lib/cgi-bin">
        AllowOverride None
        Options +ExecCGI -MultiViews +SymLinksIfOwnerMatch
        Order allow,deny
        Allow from all
    </Directory>

    ErrorLog ${APACHE_LOG_DIR}/error.log

    # Possible values include: debug, info, notice, warn, error, crit,
    # alert, emerg.
    LogLevel warn

    CustomLog ${APACHE_LOG_DIR}/access.log combined

#    Alias /doc/ "/usr/share/doc/"
#   <Directory "/usr/share/doc/">
#       Options Indexes MultiViews FollowSymLinks
#       AllowOverride None
#       Order deny,allow
#       Deny from all
#       Allow from 127.0.0.0/255.0.0.0 ::1/128
#   </Directory>
SSLCertificateKeyFile /etc/apache2/ssl/the-domain-name.com.key
SSLCertificateFile /etc/apache2/ssl/chain.crt


</VirtualHost>

The config directives enabling and making the SSL actually work are:
 

SSLEngine On
SSLCertificateKeyFile /etc/apache2/ssl/the-domain-name.com.key
SSLCertificateFile /etc/apache2/ssl/chain.crt


The chain.crt file is actually a bundle file containing a bundle of the gogetssl CA_ROOT and RSA_Certification_Authority 3 files, to prepare that file, I've used bundle.sh small script found on serverfault.com here I've made a mirror of bundle.sh on www.pc-freak.net here   the script content is as follows:

To prepare the chain.crt  bundle, I ran:


sh create-ssl-bundle.sh _iq-test_cc.crt chain.crt
sh create-ssl-bundle.sh _iq-test_cc.crt >chain.crt
sh create-ssl-bundle.sh COMODO_RSA_Certification_Authority.crt >> chain.crt
sh create-ssl-bundle.sh bundle.sh AddTrust_External_CA_Root.crt >> chain.crt


Then I copied the file to /etc/apache2/ssl together with the-domain-name.com.key file earlier generated using openssl command earlier explained in my article how to install RapidSSL certificate on Linux

/etc/apache2/ssl was not previously existing (on Debian Linux), so to create it:


root@webserver:~# mkdir /etc/apache2/ssl
root@webserver:~# ls -al /etc/apache2/ssl/chain.crt
-rw-r–r– 1 root root 20641 Nov  2 12:27 /etc/apache2/ssl/chain.crt
root@webserver:~# ls -al /etc/apache2/ssl/the-domain-name.com.key
-rw-r–r– 1 root root 6352 Nov  2 20:35 /etc/apache2/ssl/the-domain-name.com.key


As I needed to add the SSL HTTPS configuration for multiple domains, further on I've wrote and used a tiny shell script add_new_vhost.sh which accepts as argument the domain name I want to add. The script works with a sample Skele (Template) file, which is included in the script itself and can be easily modified for the desired vhost config.
To add my multiple domains, I've used the script as follows:
 

sh add_new_vhost.sh add-new-site-domain.com
sh add_new_vhost.sh add-new-site-domain1.com


etc.

Here is the complete script as well:


#!/bin/sh
# Shell script to add easily new domains for virtual hosting on Debian machines
# arg1 should be a domain name
# This script takes the domain name which you type as arg1 uses it and creates
# Docroot / cgi-bin directory for the domain, create seperate site's apache log directory
# then takes a skele.com file and substitutes a skele.com with your domain name and directories
# This script's aim is to easily enable sysadmin to add new domains in Debian
sites_base_dir=/var/www/jail/home/www-data/sites/;
# the directory where the skele.com file is
skele_dir=/etc/apache2/sites-available;
# base directory where site log dir to be created
cr_sep_log_file_d=/var/log/apache2/sites;
# owner of the directories
username='www-data';
# read arg0 and arg1
arg0=$0;
arg1=$1;
if [[ -z $arg1 ]]; then
echo "Missing domain name";
exit 1;
fi


# skele template
echo "#
#  Example.com (/etc/apache2/sites-available/www.skele.com)
#
<VirtualHost *>
        ServerAdmin admin@design.bg
        ServerName  skele.com
        ServerAlias www.skele.com


        # Indexes + Directory Root.
        DirectoryIndex index.php index.htm index.html index.pl index.cgi index.phtml index.jsp index.py index.asp

        DocumentRoot /var/www/jail/home/www-data/sites/skelecom/www/docs
        ScriptAlias /cgi-bin "/var/www/jail/home/www-data/sites/skelecom/cgi-bin"
        
        # Logfiles
        ErrorLog  /var/log/apache2/sites/skelecom/error.log
        CustomLog /var/log/apache2/sites/skelecom/access.log combined
#       CustomLog /dev/null combined
      <Directory /var/www/jail/home/www-data/sites/skelecom/www/docs/>
                Options FollowSymLinks MultiViews -Includes
                AllowOverride None
                Order allow,deny
                allow from all
                # This directive allows us to have apache2's default start page
                # in /apache2-default/, but still have / go to the right place
#               RedirectMatch ^/$ /apache2-default/
        </Directory>

        <Directory /var/www/jail/home/www-data/sites/skelecom/www/docs/>
                Options FollowSymLinks ExecCGI -Includes
                AllowOverride None
                Order allow,deny
                allow from all
        </Directory>

</VirtualHost>
" > $skele_dir/skele.com;

domain_dir=$(echo $arg1 | sed -e 's/\.//g');
new_site_dir=$sites_base_dir/$domain_dir/www/docs;
echo "Creating $new_site_dir";
mkdir -p $new_site_dir;
mkdir -p $sites_base_dir/cgi-bin;
echo "Creating sites's Docroot and CGI directory";
chown -R $username:$username $new_site_dir;
chown -R $username:$username $sites_base_dir/cgi-bin;
echo "Creating site's Log files Directory";
mkdir -p $cr_sep_log_file_d/$domain_dir;
echo "Creating sites's VirtualHost file and adding it for startup";
sed -e "s#skele.com#$arg1#g" -e "s#skelecom#$domain_dir#g" $skele_dir/skele.com >> $skele_dir/$arg1;
ln -sf $skele_dir/$arg1 /etc/apache2/sites-enabled/;
echo "All Completed please restart apache /etc/init.d/apache restart to Load the new virtual domain";

# Date Fri Jan 11 16:27:38 EET 2008


Using the script saves a lot of time to manually, copy vhost file and then edit it to change ServerName directive, for vhosts whose configuration is identical and only the ServerName listener has to change, it is perfect to create all necessery domains, I've created a simple text file with each of the domains and run it in a loop:
 

while :; do sh add_new_vhost.sh $i; done < domain_list.txt


Display Content of SSL certificate .pem file with openssl command

Thursday, October 11th, 2018

display-content-of-pem-der-and-scr-file-how-to-view-pem-file-linux

If you have generated a .pem formatted SSL certificate or you have multiple .pem SSL certificates and you're not sure which .pem file is generated for which domain / subdomain it is useful to Display content of SSL Certificate .PEM file with openssl command.

Viewing certificate's content is also very useful if you have hosted multiple websites hosted on a server and you want to check which of the SSLs assigned in the Virtualhosts has Expired (for example if you have domains that expire in short term period (365 days).


1. How to Display Content of SSL certificate .pem file?


root@pcfreak:~# openssl x509 -in cert.pem -text
Certificate:
    Data:
        Version: 3 (0x2)
        Serial Number:
            04:d1:ad:55:91:f3:f9:ef:3e:53:ea:2c:3a:f4:5f:e6:ce:c1
    Signature Algorithm: sha256WithRSAEncryption
        Issuer: C = US, O = Let's Encrypt, CN = Let's Encrypt Authority X3
        Validity
            Not Before: Oct 10 17:49:34 2018 GMT
            Not After : Jan  8 17:49:34 2019 GMT
        Subject: CN = mail.www.pc-freak.net

        Subject Public Key Info:
            Public Key Algorithm: rsaEncryption
                Public-Key: (2048 bit)
                Modulus:
                    00:bb:b0:c9:1c:83:82:61:47:f9:c2:73:60:c0:48:
                    e6:0c:f2:a1:ff:db:ae:f1:84:17:14:5d:fc:a3:b2:
                    e4:00:3a:d1:85:42:90:da:41:a9:e9:a8:af:20:3d:
                    12:ef:8e:ca:61:a1:71:f2:cc:43:bf:40:0d:fa:08:
                    7d:d9:61:2b:ea:5d:30:e0:52:43:db:18:30:92:0c:
                    2c:ce:87:93:84:ea:91:61:b7:70:db:11:7c:b6:a4:
                    33:de:d8:3f:d6:61:47:42:f2:36:12:7f:3d:e3:f7:
                    5b:11:3e:1c:f0:af:96:cd:61:8a:1a:a0:f0:b5:23:
                    65:73:b6:b4:9c:19:a7:09:dd:43:96:37:ac:48:fc:
                    21:07:02:52:67:26:2c:81:24:f4:d7:10:e6:f4:12:
                    69:53:ef:91:2a:15:6a:21:06:22:ea:fe:31:38:82:
                    b4:5a:b5:9b:67:90:16:b8:31:e8:27:38:f2:41:b9:
                    19:02:8f:c7:6e:e1:2c:84:75:19:6d:bb:30:3b:d2:
                    02:f0:65:f1:76:82:15:9c:ce:31:3a:d4:7c:83:ca:
                    d1:f9:e1:b7:76:f6:78:93:47:d2:00:f9:63:aa:94:
                    41:d4:78:d0:ee:bc:e6:e9:14:14:e4:ae:54:31:88:
                    f8:58:8d:7b:3e:9f:87:5c:f2:04:e5:07:e0:4c:9a:
                    81:eb
                Exponent: 65537 (0x10001)
        X509v3 extensions:
            X509v3 Key Usage: critical
                Digital Signature, Key Encipherment
            X509v3 Extended Key Usage:
                TLS Web Server Authentication, TLS Web Client Authentication
            X509v3 Basic Constraints: critical
                CA:FALSE
            X509v3 Subject Key Identifier:
                DB:AB:81:E3:14:5F:6D:BE:B4:78:7B:5E:7D:FB:66:BF:56:37:C5:1D
            X509v3 Authority Key Identifier:
                keyid:A8:4A:6A:63:04:7D:DD:BA:E6:D1:39:B7:A6:45:65:EF:F3:A8:EC:A1


            Authority Information Access:
                OCSP – URI:http://ocsp.int-x3.letsencrypt.org
                CA Issuers – URI:http://cert.int-x3.letsencrypt.org/

            X509v3 Subject Alternative Name:
                DNS:mail.www.pc-freak.net
            X509v3 Certificate Policies:
                Policy: 2.23.140.1.2.1
                Policy: 1.3.6.1.4.1.44947.1.1.1
                  CPS: http://cps.letsencrypt.org
                  User Notice:
                    Explicit Text: This Certificate may only be relied upon by Relying Parties and only in accordance with the Certificate Policy found at https://letsencrypt.org/repository/

            CT Precertificate SCTs:
                Signed Certificate Timestamp:
                    Version   : v1 (0x0)
                    Log ID    : E2:69:4B:AE:26:E8:E9:40:09:E8:86:1B:B6:3B:83:D4:
                                3E:E7:FE:74:88:FB:A4:8F:28:93:01:9D:DD:F1:DB:FE
                    Timestamp : Oct 10 18:49:34.453 2018 GMT
                    Extensions: none
                    Signature : ecdsa-with-SHA256
                                30:46:02:21:00:D6:DE:47:AD:D2:32:BE:BE:DD:B3:EB:
                                EE:84:9E:02:8A:4F:33:E2:63:21:D5:F7:4D:47:82:92:
                                AB:B9:0A:49:62:02:21:00:E8:7D:17:81:32:E3:4F:CF:
                                2D:79:8C:97:46:E1:EF:5E:99:F4:8A:8B:B5:6D:23:5F:
                                05:84:E2:14:6A:56:8E:A0
                Signed Certificate Timestamp:
                    Version   : v1 (0x0)
                    Log ID    : 29:3C:51:96:54:C8:39:65:BA:AA:50:FC:58:07:D4:B7:
                                6F:BF:58:7A:29:72:DC:A4:C3:0C:F4:E5:45:47:F4:78
                    Timestamp : Oct 10 18:49:34.451 2018 GMT
                    Extensions: none
                    Signature : ecdsa-with-SHA256
                                30:44:02:20:6C:8E:E7:E2:70:AD:33:A6:5C:E0:89:84:
                                FB:0B:F6:E1:5C:05:06:0A:A8:DB:8B:1C:7A:D0:52:99:
                                5F:3F:A2:64:02:20:4B:CD:0B:E7:A0:27:04:31:19:18:
                                58:99:51:73:49:6B:77:25:A7:E7:5B:10:8C:BD:ED:54:
                                03:DD:40:E4:2D:31
    Signature Algorithm: sha256WithRSAEncryption
         9c:86:b3:34:64:af:ac:9d:c4:d3:a7:cc:fc:8a:32:18:75:95:
         95:47:9b:9c:3c:0e:3b:61:f9:88:61:38:1a:a6:92:69:3d:14:
         6a:53:13:14:65:e6:ca:fa:b9:8e:48:c9:d4:73:f6:e4:74:8a:
         1f:2b:f2:14:86:f1:18:55:26:1b:a0:97:89:15:0b:62:c6:2b:
         27:81:6f:60:af:55:68:b3:2c:5b:10:56:a2:7d:28:cb:8e:fc:
         f0:21:65:78:9b:3a:52:d3:9d:27:ff:d7:24:95:de:0f:d8:3d:
         a2:43:6e:fc:a5:2d:f2:ad:37:e9:ea:db:b5:75:b8:7c:ad:23:
         45:1d:bd:fe:4e:36:c7:f4:e2:3d:47:c9:06:fc:cb:75:ba:d4:
         0a:90:17:ea:e1:7f:49:e6:68:27:97:8a:70:c7:50:e9:19:4a:
         8a:21:18:26:79:a3:61:ff:1b:26:9e:fe:85:8f:20:ed:c6:4d:
         c1:0e:04:21:a8:05:d4:29:69:99:53:63:81:c7:d5:58:71:df:
         02:b5:94:c9:36:48:c9:35:80:ab:71:78:d9:12:f6:f5:10:25:
         3d:38:c5:40:75:25:b1:95:18:d8:1c:96:f1:c6:1a:d2:c4:99:
         f5:01:2e:f4:e1:4a:1f:10:42:0e:34:ed:92:8e:53:9f:c2:7b:
         11:51:78:6a
—–BEGIN CERTIFICATE—–
MIIGDTCCBPWgAwIBAgISBNGtVZHz+e8+U+osOvRf5s7BMA0GCSqGSIb3DQEBCwUA
MEoxCzAJBgNVBAYTAlVTMRYwFAYDVQQKEw1MZXQncyBFbmNyeXB0MSMwIQYDVQQD
ExpMZXQncyBFbmNyeXB0IEF1dGhvcml0eSBYMzAeFw0xODEwMTAxNzQ5MzRaFw0x
OTAxMDgxNzQ5MzRaMBwxGjAYBgNVBAMTEW1haWwucGMtZnJlYWsubmV0MIIBIjAN
BgkqhkiG9w0BAQEFAAOCAQ8AMIIBCgKCAQEAu7DJHIOCYUf5wnNgwEjmDPKh/9uu
8YQXFF38o7LkADrRhUKQ2kGp6aivID0S747KYaFx8sxDv0AN+gh92WEr6l0w4FJD
2xgwkgwszoeThOqRYbdw2xF8tqQz3tg/1mFHQvI2En894/dbET4c8K+WzWGKGqDw
tSNlc7a0nBmnCd1DljesSPwhBwJSZyYsgST01xDm9BJpU++RKhVqIQYi6v4xOIK0
WrWbZ5AWuDHoJzjyQbkZAo/HbuEshHUZbbswO9IC8GXxdoIVnM4xOtR8g8rR+eG3
dvZ4k0fSAPljqpRB1HjQ7rzm6RQU5K5UMYj4WI17Pp+HXPIE5QfgTJqB6wIDAQAB
o4IDGTCCAxUwDgYDVR0PAQH/BAQDAgWgMB0GA1UdJQQWMBQGCCsGAQUFBwMBBggr
BgEFBQcDAjAMBgNVHRMBAf8EAjAAMB0GA1UdDgQWBBTbq4HjFF9tvrR4e159+2a/
VjfFHTAfBgNVHSMEGDAWgBSoSmpjBH3duubRObemRWXv86jsoTBvBggrBgEFBQcB
AQRjMGEwLgYIKwYBBQUHMAGGImh0dHA6Ly9vY3NwLmludC14My5sZXRzZW5jcnlw
dC5vcmcwLwYIKwYBBQUHMAKGI2h0dHA6Ly9jZXJ0LmludC14My5sZXRzZW5jcnlw
dC5vcmcvMBwGA1UdEQQVMBOCEW1haWwucGMtZnJlYWsubmV0MIH+BgNVHSAEgfYw
gfMwCAYGZ4EMAQIBMIHmBgsrBgEEAYLfEwEBATCB1jAmBggrBgEFBQcCARYaaHR0
cDovL2Nwcy5sZXRzZW5jcnlwdC5vcmcwgasGCCsGAQUFBwICMIGeDIGbVGhpcyBD
ZXJ0aWZpY2F0ZSBtYXkgb25seSBiZSByZWxpZWQgdXBvbiBieSBSZWx5aW5nIFBh
cnRpZXMgYW5kIG9ubHkgaW4gYWNjb3JkYW5jZSB3aXRoIHRoZSBDZXJ0aWZpY2F0
ZSBQb2xpY3kgZm91bmQgYXQgaHR0cHM6Ly9sZXRzZW5jcnlwdC5vcmcvcmVwb3Np
dG9yeS8wggEEBgorBgEEAdZ5AgQCBIH1BIHyAPAAdwDiaUuuJujpQAnohhu2O4PU
Puf+dIj7pI8okwGd3fHb/gAAAWZfUA/1AAAEAwBIMEYCIQDW3ket0jK+vt2z6+6E
ngKKTzPiYyHV901HgpKruQpJYgIhAOh9F4Ey40/PLXmMl0bh716Z9IqLtW0jXwWE
4hRqVo6gAHUAKTxRllTIOWW6qlD8WAfUt2+/WHopctykwwz05UVH9HgAAAFmX1AP
8wAABAMARjBEAiBsjuficK0zplzgiYT7C/bhXAUGCqjbixx60FKZXz+iZAIgS80L
56AnBDEZGFiZUXNJa3clp+dbEIy97VQD3UDkLTEwDQYJKoZIhvcNAQELBQADggEB
AJyGszRkr6ydxNOnzPyKMhh1lZVHm5w8Djth+YhhOBqmkmk9FGpTExRl5sr6uY5I
ydRz9uR0ih8r8hSG8RhVJhugl4kVC2LGKyeBb2CvVWizLFsQVqJ9KMuO/PAhZXib
OlLTnSf/1ySV3g/YPaJDbvylLfKtN+nq27V1uHytI0Udvf5ONsf04j1HyQb8y3W6
1AqQF+rhf0nmaCeXinDHUOkZSoohGCZ5o2H/Gyae/oWPIO3GTcEOBCGoBdQpaZlT
Y4HH1Vhx3wK1lMk2SMk1gKtxeNkS9vUQJT04xUB1JbGVGNgclvHGGtLEmfUBLvTh
Sh8QQg407ZKOU5/CexFReGo=
—–END CERTIFICATE—–


Same way a .der files content / encryption algorithm and domain name could be grasped.
 

root@pcfreak:~# openssl x509 -in cert.der -inform der -text
Certificate:
    Data:
        Version: 3 (0x2)
        Serial Number:
            ad:c2:96:6f:4b:db:31:5c
    Signature Algorithm: sha256WithRSAEncryption
        Issuer: CN = example.com
        Validity
            Not Before: Jun 22 04:00:37 2015 GMT
            Not After : Jul 22 04:00:37 2015 GMT

        Subject: CN = example.com
        Subject Public Key Info:
            Public Key Algorithm: rsaEncryption
                Public-Key: (512 bit)

                Modulus:
                    00:ac:75:73:b4:51:ed:1f:dd:ae:70:52:43:fc:df:
                    c7:5b:d0:2c:75:1b:14:b8:75:01:04:10:e5:1f:03:
                    65:45:dd:df:a7:9f:34:ae:fd:be:e9:05:84:df:47:
                    16:81:d9:89:4b:ce:8e:6d:1c:fa:95:44:e8:af:84:
                    74:4f:ed:c2:e5
                Exponent: 65537 (0x10001)
        X509v3 extensions:
            X509v3 Subject Key Identifier:
                26:CF:C8:ED:4B:D7:94:B2:E4:25:03:58:24:8F:04:C0:74:D5:97:8A
            X509v3 Authority Key Identifier:
                keyid:26:CF:C8:ED:4B:D7:94:B2:E4:25:03:58:24:8F:04:C0:74:D5:97:8A


            X509v3 Basic Constraints:
                CA:TRUE
    Signature Algorithm: sha256WithRSAEncryption
         0c:8b:ff:12:80:9e:4c:90:bc:26:b0:96:20:ab:76:0c:64:71:
         d2:15:48:a5:33:f6:47:e4:03:df:76:5e:0f:cd:e1:1b:5e:d1:
         4d:c2:1f:8d:b8:63:2f:c9:7d:6e:5c:3b:cb:cd:a3:d0:d8:27:
         74:66:a3:76:06:a5:fb:81:3a:b6
—–BEGIN CERTIFICATE—–
MIIBdTCCAR+gAwIBAgIJAK3Clm9L2zFcMA0GCSqGSIb3DQEBCwUAMBYxFDASBgNV
BAMMC2V4YW1wbGUuY29tMB4XDTE1MDYyMjA0MDAzN1oXDTE1MDcyMjA0MDAzN1ow
FjEUMBIGA1UEAwwLZXhhbXBsZS5jb20wXDANBgkqhkiG9w0BAQEFAANLADBIAkEA
rHVztFHtH92ucFJD/N/HW9AsdRsUuHUBBBDlHwNlRd3fp580rv2+6QWE30cWgdmJ
S86ObRz6lUTor4R0T+3C5QIDAQABo1AwTjAdBgNVHQ4EFgQUJs/I7UvXlLLkJQNY
JI8EwHTVl4owHwYDVR0jBBgwFoAUJs/I7UvXlLLkJQNYJI8EwHTVl4owDAYDVR0T
BAUwAwEB/zANBgkqhkiG9w0BAQsFAANBAAyL/xKAnkyQvCawliCrdgxkcdIVSKUz
9kfkA992Xg/N4Rte0U3CH424Yy/JfW5cO8vNo9DYJ3Rmo3YGpfuBOrY=
—–END CERTIFICATE—–


2. How to display content and info about .CSR (Certificate Signing request)


root@pcfreak:~# openssl req -in cert.csr -noout -text
 

Certificate Request:
    Data:
        Version: 1 (0x0)
        Subject: C = BG, ST = BG, L = Dobrich, O = Pc Freak, CN = mail.www.pc-freak.net, emailAddress = hipo@www.pc-freak.net
        Subject Public Key Info:
            Public Key Algorithm: rsaEncryption
                Public-Key: (2048 bit)
                Modulus:
                    00:b1:83:a7:07:62:19:d4:60:95:58:49:de:b3:48:
                    a8:39:31:fa:5a:bd:2b:d6:73:94:50:36:72:74:18:
                    58:b6:27:d3:0b:26:75:15:a8:ba:1b:77:a7:c9:54:
                    96:1f:c7:8d:da:bd:c9:17:91:53:85:9e:0a:f4:71:
                    3c:fb:d6:e4:75:41:c1:95:32:e1:22:fc:7b:1f:36:
                    23:12:00:ca:37:27:d5:f9:9b:29:48:4a:51:95:d1:
                    40:d0:ea:94:51:98:98:6b:d3:d9:79:1d:a1:65:bb:
                    a9:d1:ab:c9:46:6e:03:ee:24:45:e5:f2:73:e5:f4:
                    82:4a:08:57:b1:06:52:c3:cc:42:9a:02:5b:7a:7c:
                    bd:34:d5:5f:d7:ba:ef:27:d5:3d:97:16:69:06:c7:
                    c1:06:5e:d9:07:16:3f:a3:61:50:9d:dd:ea:95:32:
                    f1:ee:93:82:48:df:20:8b:ae:d2:95:89:05:e4:3d:
                    0c:d7:e1:cf:07:ae:55:84:11:06:92:be:34:b4:a2:
                    a1:ce:07:06:bf:21:bc:80:e2:03:d2:85:b4:64:02:
                    8d:cd:d2:86:1c:49:41:52:43:a8:12:f8:ef:2c:f4:
                    be:a0:dc:ac:ea:27:3a:f9:ab:ab:27:da:28:63:1d:
                    10:5a:4f:b8:51:42:40:ae:be:c0:2d:e9:a3:5a:5a:
                    23:7f
                Exponent: 65537 (0x10001)
        Attributes:
            a0:00
    Signature Algorithm: sha256WithRSAEncryption
         47:f0:54:cd:5e:46:6f:2c:cc:48:7e:85:f0:a8:96:10:ca:a3:
         15:98:77:d3:02:95:8c:67:84:e3:55:d2:0c:e8:d5:a7:ba:82:
         95:fb:ce:73:4c:bc:8f:da:85:97:0c:a8:59:32:b3:a4:af:0a:
         80:4c:78:7f:62:cd:1b:00:01:e8:51:27:9c:eb:75:29:80:e9:
         99:24:fc:86:e2:09:28:be:47:5a:1d:bf:b1:b4:c4:29:4e:6e:
         f3:70:b4:58:f8:d9:a6:63:03:8b:a1:ef:ee:6d:1a:35:33:1e:
         b2:32:25:c1:33:37:3d:46:82:37:9b:0d:4c:40:20:ae:ff:e0:
         cc:51:a2:6b:dd:74:26:d6:93:26:89:c7:76:29:13:cf:6e:5a:
         0f:7c:1b:f5:80:be:3b:6a:a3:c0:10:cd:07:1e:a2:31:8b:49:
         94:d7:63:cf:93:8d:80:03:75:4a:76:b4:cd:14:fe:96:62:61:
         6b:96:8f:c0:a5:ef:67:c7:5e:c0:a5:4b:4f:95:57:b6:43:03:
         8b:6d:10:5f:ab:f2:95:54:ba:85:8e:8b:c1:99:ea:fd:3f:5e:
         23:01:d4:27:f3:e9:20:37:c4:05:47:30:67:94:53:f0:87:27:
         48:73:57:55:f2:70:04:b1:e9:29:eb:2e:2c:9a:cc:55:f4:cc:
         a4:71:c2:5a


That's all folks 🙂


Run Apache with SSL Self Signed SSL Certificate

Friday, August 14th, 2009

Recently I had to run apache on Debian 4.0 (Edge) with Self Signed certificate.To make it happen I had to Google around and try out stuff. I've red that Debiancomes with a command (apache2-ssl-certificate) that generates a self signed openssl certificate.However on my Debian systems this cmd wasn't available. So I had to google around about it,and I came along the following website which provided mewith the script itself and some instructions how to use it. I've modified a bit the archive mentionedon the above website to make the install instructions of the website through a script. I've built a newarchive based on the archive apache2-ssl.tar.gz that includes an extra file runme.sh which does the properinstallation for you. The new archive itself could be found here .

In the mean time I recommend you read my article explaining how to quickly and efficiently generate self-signed certificate with openssl command on GNU / Linux and BSD

END—–

Apache Webserver: How to Set up multile SSL certificates on multiple domains running on one IP address with Apache SNI feature

Wednesday, September 13th, 2017

apache-ssl-handshake-how-client-talks-to-server-illustrated

In the recent past it was impossible to add multiple different SSL .crt / .pem bundle certificates on Apache Webserver but each one of it was supposed to run under a separate domain or subdomain, preconfigured with a separate IP address, this has changed with the introduction of Apache SNI (Server Name Indication). What SNI does is it sends, the site visitor initiating connections on encrypted SSL port (443) or whatever configured a certificate that matches, the client requested server name.

Note that SNI is Apache HTTPD supported only and pitily can't be used on other services such as Mail Servers (SMTPS), (POP3S), (IMAPS) etc.
Older browsers did not have support for proper communication with WebServers supporting SNI communication, so for Websites whose aim is interoperatibility and large audience of Web clients still the preferrable way is to set up each VirtualHost under a separate IP, just like the good old days.

However Small and MidSized businesses could save some cash by not having to buy separate IPs for each Virtualhost, but just use SNI.
Besides that the people are relatively rarely using old browsers without SNI, so having clients with browsers not supporting SNI would certiainly be too rare. To recognize where a browser is having support for TLS or not is to check whether the Browser has support for TLS extension.

One requirement in order for SNI to work properly is to have registered domain because SNI works based on the requested ServerName by client.

On Debian GNU / Linux based distributions, you need to have Apache Webserver installed with enabled mod_ssl module:


linux:~# apt-get install –yes apache2

linux:~# a2enmod ssl

linux:~# /etc/init.d/apache2 restart


If you're not planning to get a trusted source certificate, especially if you're just a start-up business which is in process of testing the environment (you still did not ordered certificate via some domain registrar you might want to generate self signed certificate with openssl command and use that temporary:


linux:~# openssl req -x509 -nodes -days 365 -newkey rsa:2048 -keyout /etc/apache2/ssl/your-domain.com/apache.key –out /etc/apache2/ssl/your-domain.com/apache.crt

Here among the prompted questions you need the a Distinguished Name or a DN.
There are quite a few fields but you can leave some blank.
For some fields leave the default value,
If you enter '.', or press enter the field will be left blank.

—–
 

Country Name (2 letter code) [AU]:BG
State or Province Name (full name) [Some-State]: Sofia
Locality Name (eg, city) []:SOF
Organization Name (eg, company) [Internet Widgits Pty Ltd]:Pc-Freak.NET
Organizational Unit Name (eg, section) []:
Common Name (e.g. server FQDN or YOUR name) []:your-domain.com                
Email Address []:webmaster@your-domain.com


(by the way it might be interesting to mention here the list of cheapest domain name registrars on the Internet as of January 2017 – source site here


Below order is given as estimated by price /  quality and provided service approximate


1. BlueHost.com – Domains $6.95

2. NameCheap.Com – Annual fee $10.69

3. GoDaddy.com – Annual fee $8.99 for first year, $14.99$ for each additional year

4. HostGator.com – Annual fee $15.00

5. 1and1.com – Annual fee $0.99 for first year ($14.99 for each additional year)

6. Network Solutions – This was historically one of the first domain registrar companies, but the brand is pricy $34.99

7. Register.com – Not sure

8. Hostway.com – $9.95 (first year and $9.95 renewals)

9. Moniker.com – Annual fee $11.99

10. Netfirms.ca – Annual fee $9.95 first year, Renewal fee is $11.99 per year


Note that domain pricing could value depending on the type of domain name country extension and many of the domain registrars would give you discount if you purchase domain name / SSL for 2 / 3+ years.

sni-illustrated-how-it-works-how-to-configure-multiple-domains-ssl-on-same-ip-apache-webserver

Next step in order to use SNI is to configure the WebServer Virtualhosts file:


linux:~# vim /etc/apache2/sites-available/domain-names.com


# Instruct Apache to listen for connections on port 443
Listen 443
# Listen for virtual host requests on all IP addresses
NameVirtualHost *:443

# Go ahead and accept connections for these vhosts
# from non-SNI clients
SSLStrictSNIVHostCheck off

<VirtualHost *:80>
        ServerAdmin webmaster@your-domain.com
        ServerName your-domain.com
        DocumentRoot /var/www

# More directives comes here

</VirtualHost>


<VirtualHost *:443>

        ServerAdmin webmaster@localhost
        ServerName your-domain.com
        DocumentRoot /var/www

        #   SSL Engine Switch:
        #   Enable/Disable SSL for this virtual host.
        SSLEngine on

        #   A self-signed (snakeoil) certificate can be created by installing
        #   the ssl-cert package. See
        #   /usr/share/doc/apache2.2-common/README.Debian.gz for more info.
        #   If both key and certificate are stored in the same file, only the
        #   SSLCertificateFile directive is needed.
        SSLCertificateFile /etc/apache2/ssl/your-domain.com/apache.crt
        SSLCertificateKeyFile /etc/apache2/ssl/your-domain.com/apache.key

# More Apache directives could be inserted here
</VirtualHost>


<VirtualHost *:443>
  DocumentRoot /var/www/sites/your-domain2
  ServerName www.your-domain2.com

  # Other directives here

</VirtualHost>

Add as many of the SNI enabled VirtualHosts following the example below, or if you prefer seperate the vhosts into separate domains.

I also recommend to check out Apache's official documentation on SNI for NameBasedSSLVhostsWithSNI etc.


Hope this article was not too boring 🙂
Enjoy life


Converting .crt .cer .der to PEM, converting .PEM to .DER and convert .PFX PKCS#12 (.P12) to .PEM file using OpenSSL

Friday, September 1st, 2017

openssl_check_verify_crt_csr_key_certificate_consistency-with-openssl-command-openssl-logo

These commands allow you to convert certificates and keys to different formats to make them compatible with specific types of servers or software. For example, you can convert a normal PEM file that would work with Apache to a PFX (PKCS#12) file and use it with Tomcat or IIS.

  • Convert a DER file (.crt .cer .der) to PEM


    openssl x509 -inform der -in certificate.cer -out certificate.pem
    
  • Convert a PEM file to DER


    openssl x509 -outform der -in certificate.pem -out certificate.der
    
  • Convert a PKCS#12 file (.pfx .p12) containing a private key and certificates to PEM


    openssl pkcs12 -in keyStore.pfx -out keyStore.pem -nodes


    You can add -nocerts to only output the private key or add -nokeys to only output the certificates.

  • Convert a PEM certificate file and a private key to PKCS#12 (.pfx .p12)


    openssl pkcs12 -export -out certificate.pfx -inkey privateKey.key \
    -in certificate.crt -certfile CACert.crt

Auto insert password for a Trusted SSL Certificate / Automatically enter password for an SSL Certificate during Apache startup on Debian Lenny

Friday, March 26th, 2010

Protect-Your-Private-SSL_keys-Apache-howto
I've recently installed a Trusted certificate that I've previously protected with a pass-phrase to an Apache server running on top of Debian in order to have a better security.
Now everytime I restart Apache it's pretty annyoing and non-practical at the same time, to enter the Passphrase assigned to the SSL certificate.
It's also dangerous because if Apache crashes and tries to resurrect itself restartig it might not start-up again.
Another unpleasant possible scenario is if for example some of the php code developers tries to change something minor in some Virtualhost and afterwards restarts Apache for the new configurations to take place, again Apache won't bring up and a chaos would emerge.
So I decided to configurate my Apache that it auto fills in the passphrase each time it's being started or restarted.To do that I consulted some online resources and I end up redirected by a blog post to the mod_ssl ssl_reference web page

There is plenty of stuff on that document however in my case all I needed was one directive in /etc/apache2/mods-avalable/mods-available/ssl.conf :

SSLPassPhraseDialog exec:/etc/apache2/mods-available/passphrase

The above code must replace:

SSLPassPhraseDialog builtin

Now last step is to prepare the /etc/apache2/mods-available/passphrase .
Make sure the file has the following content:

#!/bin/sh
echo "yoursecretpassword"

Change above yoursecretpassword with your configured passphrase.
Also please make sure /etc/apache2/mods-availabe/passphrase has proper set permissions. In my case I've set the following permissions for the file:

debian:~# chown www-data:www-data /etc/apache2/mods-available/passphrase
debian:~# chmod 700 /etc/apache2/mods-available/passphrase

That should be it, Restart Apache and make sure Apache is properly loaded without anySSL passphrase prompts.
However you should have in mind that auto enabling passphrase loading on starting in Apache is much more insecure than typing in the password every time you restart Apache. Storing the passphrase in a file is quite insecure compared to if you type it every time Apache starts.
For instance if a hacker breaks into your server he might be able to steal your SSL certificate as well as the passphrase file.
And surely this is something you don't want. Anyways flexibility has a price and if you decide to go the way described, please note the risk first.


If you haven't already added a password to your private key during certficate generation time,

Of course you can add/remove a passphrase at a later time.

    add one (assuming it was an rsa key, else use dsa)

    openssl rsa -des3 -in your.key -out your.encrypted.key
    mv your.encrypted.key your.key

    the -des3 tells openssl to encrypt the key with DES3.

    remove it

    openssl rsa -in your.key -out your.open.key

    you will be asked for your passphrase one last time
    by omitting the -des3 you tell openssl to not encrypt the output.

    mv your.open.key your.key


How to renew self signed QMAIL toaster and QMAIL rocks expired SSL pem certificate

Friday, September 2nd, 2011

qmail_toaster_logo-fix-qmail-rocks-expired-ssl-pem-certificate

One of the QMAIL server installs, I have installed very long time ago. I've been notified by clients, that the certificate of the mail server has expired and therefore I had to quickly renew the certificate.

This qmail installation, SSL certificates were located in /var/qmail/control under the names servercert.key and cervercert.pem

Renewing the certificates with a new self signed ones is pretty straight forward, to renew them I had to issue the following commands:

1. Generate servercert encoded key with 1024 bit encoding

debian:~# cd /var/qmail/control
debian:/var/qmail/control# openssl genrsa -des3 -out servercert.key.enc 1024
Generating RSA private key, 1024 bit long modulus
...........++++++
.........++++++
e is 65537 (0x10001)
Enter pass phrase for servercert.key.enc:
Verifying - Enter pass phrase for servercert.key.enc:

In the Enter pass phrase for servercert.key.enc I typed twice my encoded key password, any password is good, here though using a stronger one is better.

2. Generate the servercert.key file

debian:/var/qmail/control# openssl rsa -in servercert.key.enc -out servercert.key
Enter pass phrase for servercert.key.enc:
writing RSA key

3. Generate the certificate request

debian:/var/qmail/control# openssl req -new -key servercert.key -out servercert.csr
debian:/var/qmail/control# openssl rsa -in servercert.key.enc -out servercert.key
Enter pass phrase for servercert.key.enc:writing RSA key
root@soccerfame:/var/qmail/control# openssl req -new -key servercert.key -out servercert.csr
You are about to be asked to enter information that will be incorporated
into your certificate request.
What you are about to enter is what is called a Distinguished Name or a DN.
There are quite a few fields but you can leave some blank
For some fields there will be a default value,
If you enter '.', the field will be left blank.
-----
Country Name (2 letter code) [AU]:UK
State or Province Name (full name) [Some-State]:London
Locality Name (eg, city) []:London
Organization Name (eg, company) [Internet Widgits Pty Ltd]:My Company
Organizational Unit Name (eg, section) []:My Org
Common Name (eg, YOUR name) []:
Email Address []:admin@adminmail.com

Please enter the following 'extra' attributes
to be sent with your certificate request
A challenge password []:
An optional company name []:

In the above prompts its necessery to fill in the company name and location, as each of the prompts clearly states.

4. Sign the just generated certificate request

debian:/var/qmail/control# openssl x509 -req -days 9999 -in servercert.csr -signkey servercert.key -out servercert.crt

Notice the option -days 9999 this option instructs the newly generated self signed certificate to be valid for 9999 days which is quite a long time, the reason why the previous generated self signed certificate expired was that it was built for only 365 days

5. Fix the newly generated servercert.pem permissions debian:~# cd /var/qmail/control
debian:/var/qmail/control# chmod 640 servercert.pem
debian:/var/qmail/control# chown vpopmail:vchkpw servercert.pem
debian:/var/qmail/control# cp -f servercert.pem clientcert.pem
debian:/var/qmail/control# chown root:qmail clientcert.pem
debian:/var/qmail/control# chmod 640 clientcert.pem

Finally to load the new certificate, restart of qmail is required:

6. Restart qmail server

debian:/var/qmail/control# qmailctl restart
Restarting qmail:
* Stopping qmail-smtpd.
* Sending qmail-send SIGTERM and restarting.
* Restarting qmail-smtpd.

Test the newly installed certificate

To test the newly installed SSL certificate use the following commands:

debian:~# openssl s_client -crlf -connect localhost:465 -quiet
depth=0 /C=UK/ST=London/L=London/O=My Org/OU=My Company/emailAddress=admin@adminmail.com
verify error:num=18:self signed certificate
verify return:1
...
debian:~# openssl s_client -starttls smtp -crlf -connect localhost:25 -quiet
depth=0 /C=UK/ST=London/L=London/O=My Org/OU=My Company/emailAddress=admin@adminmail.com
verify error:num=18:self signed certificate
verify return:1
250 AUTH LOGIN PLAIN CRAM-MD5
...

If an error is returned like 32943:error:140770FC:SSL routines:SSL23_GET_SERVER_HELLO:unknown protocol:s23_clnt.c:607: this means that SSL variable in the qmail-smtpdssl/run script is set to 0.

To solve this error, change SSL=0 to SSL=1 in /var/qmail/supervise/qmail-smtpdssl/run and do qmailctl restart

The error verify return:1 displayed is perfectly fine and it's more of a warning than an error as it just reports the certificate is self signed.