Recently I blogged How to create dynamic and static SSH tunnels traffic forwarding with Plink.
Another common topic related to SSH tunneling traffic is
How to make the tunnel initialize automatically on Windows PC boot?
E.g. Make just created SSH Tunnel Port forwarding to be active – start up automatically when Windows PC / server starts, is restarted.
There are at least three approaches to make Windows to Linux SSH Tunnel to start with PC Windows boot.
1. Method 1 adding batch script to Windows start up
Probably the fastest and simplest way is to create a batch script launching the tunnel or respawning it if there is none and then Add it to Windows start up by:
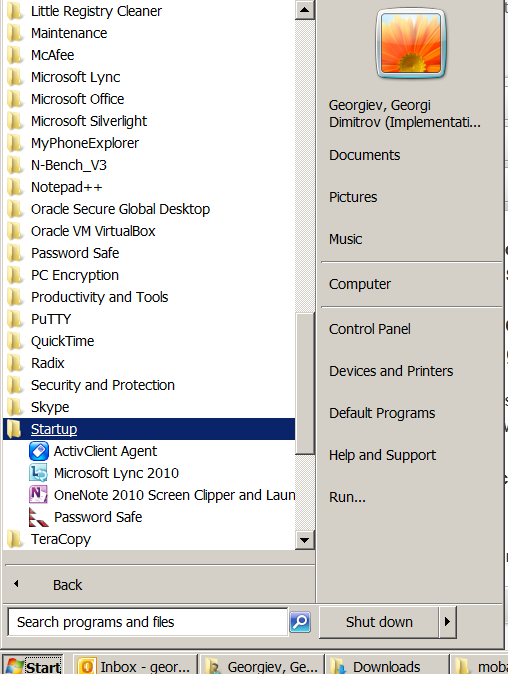
Start -> All programs -> Startup (right click on it)
-> Open -> right click batch file ->
(Press right CTRL + SHIFT) or create shortcut -> drag shortcut to startup folder
2. Method 2 set up Plink SSH Tunnel on start up with (srvany) Windows Resource Kit 2003
An alterantive way to add SSH port forwarding tunnel to start up with PC boot is to use srvany part of Windows Resource Kit 2003.
Microsoft Windows Server 2003 Resource Kit Tools are a set of tools to help administrators streamline management tasks such as troubleshooting operating system issues, managing Active Directory (AD), configuring networking and security features, and automating application deployment. This is a precious package I think every win server sysadmin should install. Just to name few of the many useful tools Windows Resource Kit provides. These are commands like: cleanmem, tail, chklnks, cleanspl, diskuse, dnsdiag, robocopy, lsview, memmonitor, moveuser etc. If you will be installing Win Rerouce Kit, here is list with all extra commands which Windows Resource Kit package provides.
Note! That Windows Resource Kit is originally set of extra commands for Windows Server 2003, Windows XP, however though there is incompitability notice while installing it on WIndows 7, tools work fine o WIn 7.
a) Once Win Resource Kit is installed to set srvany to run as a service in cmd prompt run:
– Whether WIndows is 32-bit (which is not very likely these days)
C:ToolsPutty>instsrv ssh_tunnel "C:Program FilesWindows Resource KitsToolssrvany.exe"
For 64-bit Windows run:
C:ToolsPutty>instsrv ssh_tunnel "c:Program Files (x86)Windows Resource
KitsToolssrvany.exe"
The service was successfuly added!
Make sure that you go into the Control Panel and use
the Services applet to change the Account Name and
Password that this newly installed service will use
for its Security Context.
b) Add to Windows registry ssh_tunnel service
To add it to registry either download add_ssh_tunnel_service_to_registry.reg and double click it to import new registry settings.
You will be prompted with a message that this might harm your system you can safely ignore that.
Here is content of add_ssh_tunnel_service_to_registry.reg file:
[HKEY_LOCAL_MACHINESYSTEMCurrentControlSetServicesssh_tunnelParameters]
"Application"="C:toolsputtyplink.exe"
"AppDirectory"="C:toolsputty"
"AppParameters"="-ssh -2 -L www.pc-freak.net:22:localhost:22 -l remote-username -pw Remote_Password www.pc-freak.net -N"
SECURITY WARNING ! Be careful, storing password in plaintext in Windows registry is a very bad security practice, anyone having access to your registry could see the password stored! It is very bad security practice to make ssh tunnels with root privileges and store pass plain text !
As of time of writting this article, I'm not aware of a way to create SSH tunnel and auto-pass the password which is kept encrypted, if someone know of such please share in comments.
c) Add host keys for putty (plink) for the system user to win registry
On first time access a remote ssh server you should have noticed that you're offered to get and store remote ssh host key.
Putty and respectively Plink as part of Putty installation package stores the host key in Windows registry db.
Therefore running Plink as a Windows service, the host key file should be available to the Windows system user, otherwise, plink will fail to connect to the remote server. The workaround for this is explained here.
Here is the work around:
i) Make sure you have accessed Interactively with Putty / Plink remote server for which you will be setting the tunnel to be initialized as a service.
Simply open SSH session with Putty to remote server or initialize a tunnel with plink:
plink -ssh -2 -L www.pc-freak.net:22:localhost:22 -l hipo -pw my_password www.pc-freak.net -N
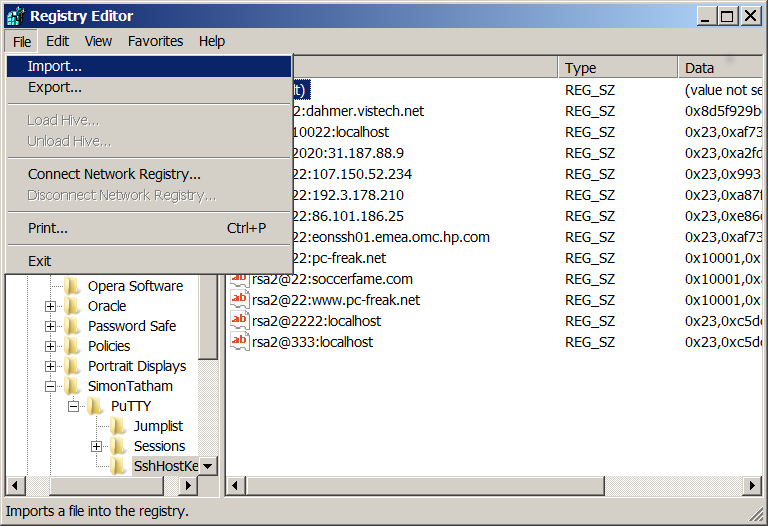
ii) Run regedit command:
And naviagte to registry key:
HKEY_CURRENT_USERSoftwareSimonTathamPuTTYSshHostKeys
And Export:from File -> Export to some file.

You will get something like:
Windows Registry Editor Version 5.00
[HKEY_CURRENT_USERSoftwareSimonTathamPuTTYSshHostKeys]
"rsa2@22:www.pc-freak.net"="0x10001,0xb5e039dc0443c0fb5e49085610c7b2010238370cd2f02e5e4e3c31ee2510aa502ffad7ae66e369654a2e4e5546e53422fec988a92ee4471dc166927ce6553106a1f91d976ec647d76582f04a9fe5aa410caa41775bb0a425cb5be0acbb05fb7d5e8ba1d27fca94498f31452b5ccd4afbb81bda5b15260e114daded35dc5b6813387ca859a787bae5ca31db6a43fa27a1894c7974c7fb0933fed1365469168cc00a8f02320fae0a3b1a3cf2fc38b7cd504ea8d5ebf6aa2ede7744d813431d20ff4f8bf31f4e3647f87fa20e1a95f81ab863eab67f849ff212c36006912e7101580d99175c818f1cfafc2cd38a73bb4288a2e536d16a9226ce09ddbe3304d8209b"
"rsa2@22:soccerfame.com"="0x10001,0xabd9c222b5345fdb485232ed7e8d78968bde74df04b467c807d9136fa42dfeb253c6e590039e81e8918d28bd8db79b985f73390b5c0b4ce0ca0d8d6e54faf308ee94c621cdb2b15eb7142c6f234e18d12235f842d9d6b3ffec34a2896d0b7a132bc6077f3e02d2db509675d47ab82f6ff4a90afe077e27c21c0b638b57a2eab45bb559f008bd7be33a80a7b589d13e0b55ead454dd7273dba32eed5c8825108d119067223244f3fbffeca61c1a56ea931ed9b59e79c8d01e45f08c17b7da7876222c13f33e9b5330bdb84bb96a554bf678f9b7cf25b4817913143314c05608a82f5f8904550489f290327c7eb9a9eb9184db2ee3af9c06a8b705ea5f4c2d3109"
"rsa2@22:86.101.186.25"="0x23,0xe86ebf194b7047bfe97ef345c0165821d4a822b06534c7dd6591381494a6843c8c0e236d826b02977a9c409fc8388a5019178c7c0bd92c5ae45918c352604f6b2a6b6fef9c108af629f05585ef1d806ee807f038455cbb1230164c44b37d2e7673f57ea80127c71a572433746f9ebdc8459739d67bfa95ef7aa2c73fd59827ff"
iii. You need to substitute in this file value of HKEY_CURRENT_USER to HKEY_USERS.DEFAULT
HKEY_CURRENT_USER
to
HKEY_USERS.DEFAULT
After changing the value it should look like:
[HKEY_USERS.DEFAULTSoftwareSimonTathamPuTTYSshHostKeys]
"rsa2@22:www.pc-freak.net"="0x10001,0xb5e039dc0443c0fb5e49085610c7b2010238370cd2f02e5e4e3c31ee2510aa502ffad7ae66e369654a2e4e5546e53422fec988a92ee4471dc166927ce6553106a1f91d976ec647d76582f04a9fe5aa410caa41775bb0a425cb5be0acbb05fb7d5e8ba1d27fca94498f31452b5ccd4afbb81bda5b15260e114daded35dc5b6813387ca859a787bae5ca31db6a43fa27a1894c7974c7fb0933fed1365469168cc00a8f02320fae0a3b1a3cf2fc38b7cd504ea8d5ebf6aa2ede7744d813431d20ff4f8bf31f4e3647f87fa20e1a95f81ab863eab67f849ff212c36006912e7101580d99175c818f1cfafc2cd38a73bb4288a2e536d16a9226ce09ddbe3304d8209b"
"rsa2@22:soccerfame.com"="0x10001,0xabd9c222b5345fdb485232ed7e8d78968bde74df04b467c807d9136fa42dfeb253c6e590039e81e8918d28bd8db79b985f73390b5c0b4ce0ca0d8d6e54faf308ee94c621cdb2b15eb7142c6f234e18d12235f842d9d6b3ffec34a2896d0b7a132bc6077f3e02d2db509675d47ab82f6ff4a90afe077e27c21c0b638b57a2eab45bb559f008bd7be33a80a7b589d13e0b55ead454dd7273dba32eed5c8825108d119067223244f3fbffeca61c1a56ea931ed9b59e79c8d01e45f08c17b7da7876222c13f33e9b5330bdb84bb96a554bf678f9b7cf25b4817913143314c05608a82f5f8904550489f290327c7eb9a9eb9184db2ee3af9c06a8b705ea5f4c2d3109"
"rsa2@22:86.101.186.25"="0x23,0xe86ebf194b7047bfe97ef345c0165821d4a822b06534c7dd6591381494a6843c8c0e236d826b02977a9c409fc8388a5019178c7c0bd92c5ae45918c352604f6b2a6b6fef9c108af629f05585ef1d806ee807f038455cbb1230164c44b37d2e7673f57ea80127c71a572433746f9ebdc8459739d67bfa95ef7aa2c73fd59827ff"
iv. Import the new file with modified values back to registry
d) Start the newly created ssh_tunnel service
Type in win command prompt (cmd.exe)
net start ssh_tunnel
The ssh_tunnel service is starting.
The ssh_tunnel service was started successfully.
If you want to further stop the ssh_tunnel service later run:
net stop ssh_tunnel
Using the same logic you can use instsrv, a new registry setting and the net command to set services to ran on Windows boot.
3. Method 3 – Use AlwaysUP GUI to run plink as a service
The only pity thing about this method is it depends on a Trial non-free program, so if you want to use it permanently either you will have to crack it or you have to buy full version.
Here is how to set plink through alwaysup
i. Download and Install Coretechnologies AlwaysUP
ii. Start AlwaysUP
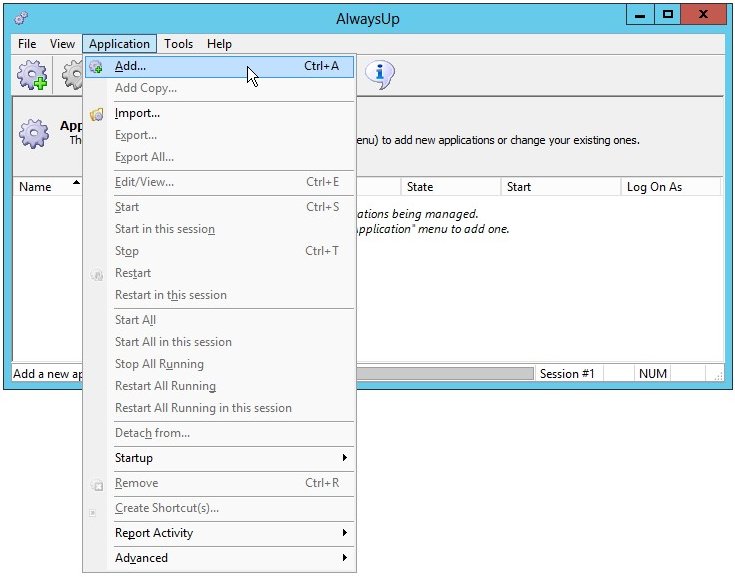
iii. Select Application > Add to open the Add Application window:
iv. In General Tab
In application field enter the full path to PuTTY's command line executable, PLINK.EXE. In my case this is C:ToolsPutty
v. in Arguments field, enter the Plink SSH tunnel creation full command:
plink -ssh -2 -L www.pc-freak.net:22:localhost:22 -l remote-username -pw Remote_Password www.pc-freak.net -N
vi. In the Name field, enter the name that you will call the application in AlwaysUp. We have specified PuTTY but you can specify another name if you like.
vii. Click over to the Logon tab and enter the user name and password of the account with which you will run Plink command, usually the current logged in user.
AlwaysUp will run Plink in this account so that it can find its settings, such as saved ssh host keys, etc.
vii. Click on Startup tab and check if Ensure that the Windows Networking components have started is ticked. This instructs Always, that PuTTY needs network in order to work.
vii. Click the Save button. PuTTY will show up in few secs within AlwaysUp window, however yet not running.
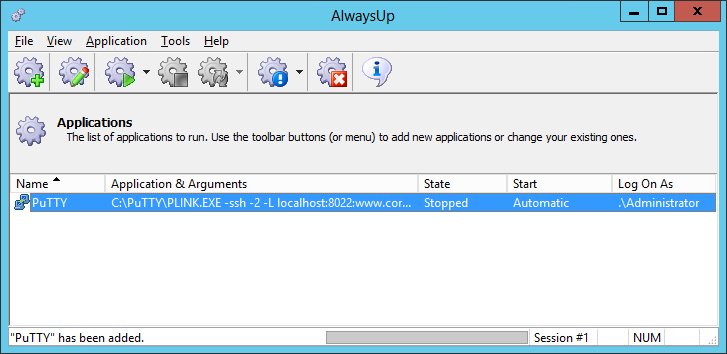
viii. To Start PuTTY as a service:
Click on Application > Start "PuTTY".

State will change to Running after a few secs and tunnel will be established.
After a PC restart on next boot, SSH tunnel will come up immediately (even if there is no logged in WIndows user). To test all works as expected give the PC a restart and try tunnel connection.


 I
I