Posts Tagged ‘port scanner’

How to mask rpcbind on CentOS to prevent rpcbind service from auto start new local server port listener triggered by Security audit port scanner software

Wednesday, December 1st, 2021

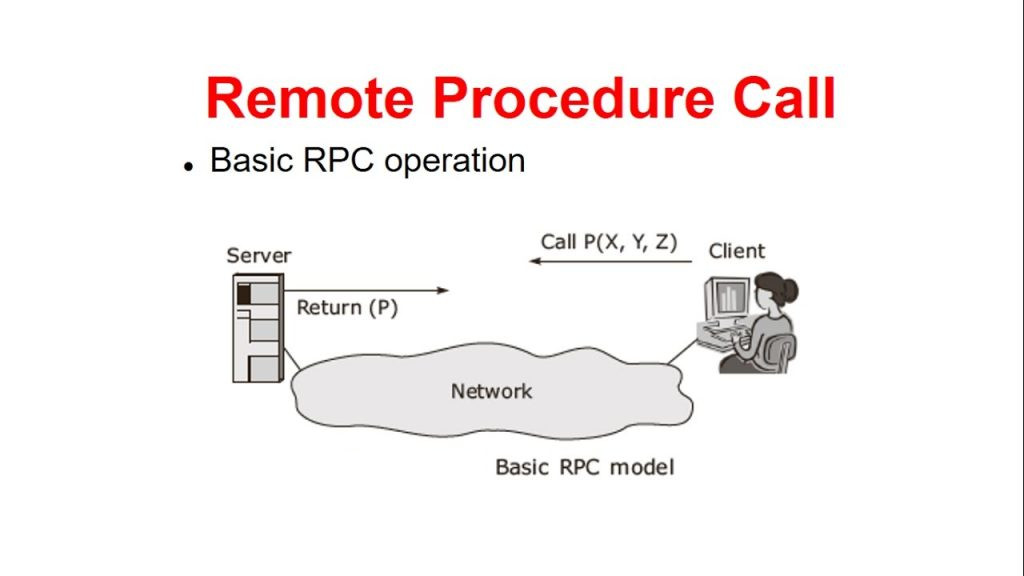
how to mute rpcbind on CentOS to prevent rpcbind service from auto start new local server port rpc-remote-procedure-call-picture


Introduction to  THE PROBLEM :
rpcbind TCP/UDP port 111 automatically starting itself out of nothing on CentOS 7 Linux

For server environments that are being monitored regularly for CVI security breaches based on opened TCP / UDP ports with like Qualys (a proprietary business software that helps automate the full spectrum of auditing, compliance and protection of your IT systems and web applications.), perhaps the closest ex-open source equivallent was Nessus Security Scanner or the more modern security audit Linux tools – Intruder (An Effortless Vulnerability Scanner), OpenVAS (Open Vulnerability Assessment Scanner) or even a simple nmap command port scan on TCP IP / UDP protocol for SunRPC default predefined machine port 111.


[root@centos~]# cat /etc/redhat-release
CentOS Linux release 7.9.2009 (Core)


[root@centos~]# grep -i rpcbind /etc/services
sunrpc          111/tcp         portmapper rpcbind      # RPC 4.0 portmapper TCP
sunrpc          111/udp         portmapper rpcbind      # RPC 4.0 portmapper UDP


Note! For those who don't know it or newer to Linux 
/etc/services file
used to be a file with predefiend well known services and their ports in Linux as well as other UNIXes for years now.

So once this scan is triggered you might end up in a very strange situation that the amount of processes on the CentOS Linux server misterously change with +1 as even though disabled systemctl rpcbind.service process will appear running again.
 

[root@centos~]# ps -ef|grep -i rpcbind
rpc        100     1  0 Nov11 ?        00:00:02 /sbin/rpcbind -w
root     29099 22060  0 13:07 pts/0    00:00:00 grep –color=auto -i rpcbind
[root@centos ~]#

By the wayit took us a while to me and my colleagues to identify what was the mysterious reason for triggering rpcbind process on a  gets triggered and rpcbind process appears in process list even though the machine is in a very secured DMZ Lan and there is no cron jobs or any software that does any kind of scheduling that might lead rpcbind to start up like it does.

[root@centos ~]# systemctl list-unit-files|grep -i rpcbind
rpcbind.service                               disabled
rpcbind.socket                                disabled
rpcbind.target                                static


There is absoultely no logic in that a service whose stopped on TCP / UDP 111 on a machine that is lacking no firewall rules such as iptables CHAINs or whatever.

[root@centos~]# systemctl status rpcbind
● rpcbind.service – RPC bind service
   Loaded: loaded (/usr/lib/systemd/system/rpcbind.service; disabled; vendor preset: enabled)
   Active: inactive (dead)


A you can see the service after all seems to have been disabled originally but after some time this output auto-magically was turning to rpcbind.socket enabled:

root@centos ~]# systemctl list-unit-files|grep -i rpcbind
rpcbind.service                               disabled
rpcbind.socket                                enabled
rpcbind.target                                static

Hence to prevent the rpcbind.socket to automatically respawn itself and lead to resurrection of the dead and disabled /sbin/rpcbind


1. Disable listener in  /usr/lib/systemd/system/rpcbind.socket file


And comment all Listen* rows there

[root@centos ~]# vi /usr/lib/systemd/system/rpcbind.socket

[Unit]

Description=RPCbind Server Activation Socket


[Socket]

ListenStream=/var/run/rpcbind.sock


# RPC netconfig can't handle ipv6/ipv4 dual sockets

BindIPv6Only=ipv6-only

#ListenStream=0.0.0.0:111

#ListenDatagram=0.0.0.0:111

#ListenStream=[::]:111

#ListenDatagram=[::]:111


[Install]

WantedBy=sockets.target

2. Mask rpcbind.socket and, sure /etc/systemd/system/rpcbind.socket links to /dev/null

Mute completely rpcbind.socket (this is systemd option "feature" to link service to /dev/null)

[root@centos ~]# systemctl mask rpcbind.socket


Hence, the link from /etc/systemd/system/rpcbind.socket must be linked to /dev/null

[root@centos ~]# ls -l /etc/systemd/system/rpcbind.socket
lrwxrwxrwx 1 root root 9 Jan 27  2020 /etc/systemd/system/rpcbind.socket -> /dev/null


Voila ! That should be it rpcbind should not hang around anymore among other processes.

Find all running hosts, used IPs and ports on your local wireless / ethernet network or how to do a basic network security audit with nmap

Monday, September 4th, 2017

Find all running hosts / used IPs on your local wireless or ethernet network

nmap-scn-local-network-find-all-running-hosts-used-IPs-on-your-wireless-ethernet-network

If you're using a Free Software OS such as GNU / Linux or some other proprietary OS such as Mac OS X or Windows and you need a quick way to check all running IPs hosts / nodes locally on your current connected Ethernet or Wireless network, here is how to do it with nmap (Network exploration and security tool port scanner).

So why would you do scan that? 

Well just for fun, out of curiousity or just because you want to inspect your local network whether someone unexpected cracker did not break and is not using your Wi-Fi or Ethernet local network and badly snoring your network listening for passwords.

Before you start you should have installed NMAP network scanner on your GNU / Linux, to do so on 

Redhat Based Linux (Fedora / CentOS / Redhat Enterprise RHEL):


yum -y install nmap


On Deb based GNU / Linux-es such as Ubuntu / Mint / Debian etc.


apt-get install –yes nmap


To install nmap on FreeBSD / NetBSD / OpenBSD OS issue from console or terminal:


cd /usr/ports/security/nmap
make install clean 


or if you prefer to install it from latest binary instead of compiling


pkg_add -vr nmap


On a proprietary Mac OS X (I don't recommend you to use this obnoxious OS which is designed as a proprpietary software to steal your freedom and control you, but anyways for Mac OS victims), you can do it to with Macs equivalent tool of apt-get / yum called homebrew:

Open Mac OS X terminal and to install homebrew run:


ruby -e "$(curl -fsSL https://raw.githubusercontent.com/Homebrew/install/master/install)"
brew install nmap
brew search nmap
brew info nmap


If you want to do it system wide become root (super user) from Mac terminal with


su root


and run above commands as administrator user.

Windows users might take a look at Nmap for Windows or use the M$ Windows native portqry command line port scanner

Test whether nmap is properly installed and ready to use with command:


nmap –help
Nmap 6.00 ( http://nmap.org )
Usage: nmap [Scan Type(s)] [Options] {target specification}
TARGET SPECIFICATION:
  Can pass hostnames, IP addresses, networks, etc.
  Ex: scanme.nmap.org, microsoft.com/24, 192.168.0.1; 10.0.0-255.1-254
  -iL <inputfilename>: Input from list of hosts/networks
  -iR <num hosts>: Choose random targets
  –exclude <host1[,host2][,host3],…>: Exclude hosts/networks
  –excludefile <exclude_file>: Exclude list from file
HOST DISCOVERY:
  -sL: List Scan – simply list targets to scan
  -sn: Ping Scan – disable port scan
  -Pn: Treat all hosts as online — skip host discovery
  -PS/PA/PU/PY[portlist]: TCP SYN/ACK, UDP or SCTP discovery to given ports
  -PE/PP/PM: ICMP echo, timestamp, and netmask request discovery probes
  -PO[protocol list]: IP Protocol Ping
  -n/-R: Never do DNS resolution/Always resolve [default: sometimes]
  –dns-servers <serv1[,serv2],…>: Specify custom DNS servers
  –system-dns: Use OS's DNS resolver
  –traceroute: Trace hop path to each host
SCAN TECHNIQUES:
  -sS/sT/sA/sW/sM: TCP SYN/Connect()/ACK/Window/Maimon scans
  -sU: UDP Scan
  -sN/sF/sX: TCP Null, FIN, and Xmas scans
  –scanflags <flags>: Customize TCP scan flags
  -sI <zombie host[:probeport]>: Idle scan
  -sY/sZ: SCTP INIT/COOKIE-ECHO scans
  -sO: IP protocol scan
  -b <FTP relay host>: FTP bounce scan
PORT SPECIFICATION AND SCAN ORDER:
  -p <port ranges>: Only scan specified ports
    Ex: -p22; -p1-65535; -p U:53,111,137,T:21-25,80,139,8080,S:9
  -F: Fast mode – Scan fewer ports than the default scan
  -r: Scan ports consecutively – don't randomize
  –top-ports <number>: Scan <number> most common ports
  –port-ratio <ratio>: Scan ports more common than <ratio>
SERVICE/VERSION DETECTION:
  -sV: Probe open ports to determine service/version info
  –version-intensity <level>: Set from 0 (light) to 9 (try all probes)
  –version-light: Limit to most likely probes (intensity 2)
  –version-all: Try every single probe (intensity 9)
  –version-trace: Show detailed version scan activity (for debugging)
SCRIPT SCAN:
  -sC: equivalent to –script=default
  –script=<Lua scripts>: <Lua scripts> is a comma separated list of 
           directories, script-files or script-categories
  –script-args=<n1=v1,[n2=v2,…]>: provide arguments to scripts
  –script-args-file=filename: provide NSE script args in a file
  –script-trace: Show all data sent and received
  –script-updatedb: Update the script database.
  –script-help=<Lua scripts>: Show help about scripts.
           <Lua scripts> is a comma separted list of script-files or
           script-categories.
OS DETECTION:
  -O: Enable OS detection
  –osscan-limit: Limit OS detection to promising targets
  –osscan-guess: Guess OS more aggressively
TIMING AND PERFORMANCE:
  Options which take <time> are in seconds, or append 'ms' (milliseconds),
  's' (seconds), 'm' (minutes), or 'h' (hours) to the value (e.g. 30m).
  -T<0-5>: Set timing template (higher is faster)
  –min-hostgroup/max-hostgroup <size>: Parallel host scan group sizes
  –min-parallelism/max-parallelism <numprobes>: Probe parallelization
  –min-rtt-timeout/max-rtt-timeout/initial-rtt-timeout <time>: Specifies
      probe round trip time.
  –max-retries <tries>: Caps number of port scan probe retransmissions.
  –host-timeout <time>: Give up on target after this long
  –scan-delay/–max-scan-delay <time>: Adjust delay between probes
  –min-rate <number>: Send packets no slower than <number> per second
  –max-rate <number>: Send packets no faster than <number> per second
FIREWALL/IDS EVASION AND SPOOFING:
  -f; –mtu <val>: fragment packets (optionally w/given MTU)
  -D <decoy1,decoy2[,ME],…>: Cloak a scan with decoys
  -S <IP_Address>: Spoof source address
  -e <iface>: Use specified interface
  -g/–source-port <portnum>: Use given port number
  –data-length <num>: Append random data to sent packets
  –ip-options <options>: Send packets with specified ip options
  –ttl <val>: Set IP time-to-live field
  –spoof-mac <mac address/prefix/vendor name>: Spoof your MAC address
  –badsum: Send packets with a bogus TCP/UDP/SCTP checksum
OUTPUT:
  -oN/-oX/-oS/-oG <file>: Output scan in normal, XML, s|<rIpt kIddi3,
     and Grepable format, respectively, to the given filename.
  -oA <basename>: Output in the three major formats at once
  -v: Increase verbosity level (use -vv or more for greater effect)
  -d: Increase debugging level (use -dd or more for greater effect)
  –reason: Display the reason a port is in a particular state
  –open: Only show open (or possibly open) ports
  –packet-trace: Show all packets sent and received
  –iflist: Print host interfaces and routes (for debugging)
  –log-errors: Log errors/warnings to the normal-format output file
  –append-output: Append to rather than clobber specified output files
  –resume <filename>: Resume an aborted scan
  –stylesheet <path/URL>: XSL stylesheet to transform XML output to HTML
  –webxml: Reference stylesheet from Nmap.Org for more portable XML
  –no-stylesheet: Prevent associating of XSL stylesheet w/XML output
MISC:
  -6: Enable IPv6 scanning
  -A: Enable OS detection, version detection, script scanning, and traceroute
  –datadir <dirname>: Specify custom Nmap data file location
  –send-eth/–send-ip: Send using raw ethernet frames or IP packets
  –privileged: Assume that the user is fully privileged
  –unprivileged: Assume the user lacks raw socket privileges
  -V: Print version number
  -h: Print this help summary page.
EXAMPLES:
  nmap -v -A scanme.nmap.org
  nmap -v -sn 192.168.0.0/16 10.0.0.0/8
  nmap -v -iR 10000 -Pn -p 80
SEE THE MAN PAGE (http://nmap.org/book/man.html) FOR MORE OPTIONS AND EXAMPLES


Most local router local networks are running under an IP range of 192.168.0.1/24 (192.168.0.1.254) or 192.168.1.1/24 or at some weird occasions depending on how the router is configured it might be something like 192.168.10.0/24 to be sure on what kind of network your computer is configured, you can check with ifconfig command, what kind of network IP has the router assigned to your computer, here is output from my Debian GNU / Linux /sbin/ifconfig


 hipo@noah:~$ /sbin/ifconfig 
lo        Link encap:Local Loopback  
          inet addr:127.0.0.1  Mask:255.0.0.0
          inet6 addr: ::1/128 Scope:Host
          UP LOOPBACK RUNNING  MTU:16436  Metric:1
          RX packets:336 errors:0 dropped:0 overruns:0 frame:0
          TX packets:336 errors:0 dropped:0 overruns:0 carrier:0
          collisions:0 txqueuelen:0 
          RX bytes:26656 (26.0 KiB)  TX bytes:26656 (26.0 KiB)


wlan0     Link encap:Ethernet  HWaddr 00:1c:bf:bd:27:59  
          inet addr:192.168.0.103  Bcast:192.168.0.255  Mask:255.255.255.0
          inet6 addr: fe80::21c:bfff:ffbd:2759/64 Scope:Link
          UP BROADCAST RUNNING MULTICAST  MTU:1500  Metric:1
          RX packets:112836 errors:0 dropped:0 overruns:0 frame:0
          TX packets:55363 errors:0 dropped:0 overruns:0 carrier:0
          collisions:0 txqueuelen:1000 
          RX bytes:141318655 (134.7 MiB)  TX bytes:7391330 (7.0 MiB)


As evident from above output my router assigns IPs via DHCP once authenticated into the Wi-Fi router under standard IP range of 192.168.0.0/24

So under this IP range case, to inspect my small local networkconnected computer I had to run from gnome-terminal or under a /dev/ttyX virtual console:


hipo@noah:~$ nmap -sn 192.168.0.0/24

Starting Nmap 6.00 ( http://nmap.org ) at 2017-09-04 12:45 EEST
Nmap scan report for pcfreak (192.168.0.1)
Host is up (0.011s latency).
Nmap scan report for 192.168.0.103
Host is up (0.00011s latency).
Nmap done: 256 IP addresses (2 hosts up) scanned in 2.53 seconds


-sn argument instructs nmap to do the so called ping scan, e.g. not to do a port s
can after host discovery but just print available hosts that are responding

Some bigger corporate networks are configured to run a couple of local networks simultaneously such as 192.168.168.0.0/24, 192.168.1.0/24, 192.168.2.0/24 etc.

So if that's the case you can add more virtual IPs to your ifconfig after becoming root super user with:


hipo@noah:~$ su root 
Password: 
root@noah:/home/hipo# 


And then run:


/sbin/ifconfig wlan0:0 192.168.1.110 netmask 255.255.255.0
/sbin/ifconfig wlan0:1 192.168.2.110 netmask 255.255.255.0


etc.

Note that here I purposefully choose .110 IP because often the 192.168.1.1 is an IP assigned to the router and that might cause some IP conflicts and trigger alarms in the router security which I want to avoid.

To check just added extra Virtual IPs on wlan0 wireless interface (note that depending on your Wi-Fi card and your driver this interface might come under a different name on your computer):


root@noah# /sbin/ifconfig |grep -i wlan0 -A 1
wlan0     Link encap:Ethernet  HWaddr 00:1c:bf:bd:25:59  
          inet addr:192.168.0.103  Bcast:192.168.0.255  Mask:255.255.255.0

wlan0:0   Link encap:Ethernet  HWaddr 00:1c:bf:bd:25:59  
          inet addr:192.168.1.110  Bcast:192.168.1.255  Mask:255.255.255.0

wlan0:1   Link encap:Ethernet  HWaddr 00:1c:bf:bd:27:59  
          inet addr:192.168.2.110  Bcast:192.168.2.255  Mask:255.255.255.0


If you're scanning not on your own network but on a public connected network you might prefer to not use the ping scan as this might identify you in router's firewall as possible intruder and could cause you headaches, besides that some network connected nodes are connected to not respond on a ping scan (some networks purposefully disable pings at all) to avoid possibility of the so called ping flood that might overload a router buffer or bring down hosts on the network beinf flooded.

If you have doubts that a network has ping disabled and it shows no result you can give a try to the so called SYN / FIN Stealth packet scan with added requirement to scan for UDP open ports (-sS) argument


root@noah:/~# nmap -sS -sU -sT 192.168.0.1-255

Starting Nmap 6.00 ( http://nmap.org ) at 2017-09-04 13:31 EEST
Nmap scan report for pcfreak (192.168.0.1)
Host is up (0.012s latency).
Not shown: 998 closed ports
PORT     STATE SERVICE
80/tcp   open  http
1900/tcp open  upnp
MAC Address: 10:FE:ED:43:CF:0E (Unknown)

Nmap scan report for 192.168.0.100
Host is up (0.0036s latency).
Not shown: 998 closed ports
PORT      STATE SERVICE
625/tcp   open  apple-xsrvr-admin
49153/tcp open  unknown
MAC Address: 84:38:35:5F:28:75 (Unknown)

Nmap scan report for 192.168.0.103
Host is up (0.000012s latency).
Not shown: 999 closed ports
PORT   STATE SERVICE
22/tcp open  ssh


You might also like to add some verbosy (that would generate a lot of output so be careful):

In case if above scan fails due to firewalls and you have a ping scan disabled on the network too you might also try out the so called nmap connect TCP connect scan (-sT), that would avoid the SYN scan. The -sT is useful also if you're not possessing root superprivileges on nmap running host.


nmap -sS -sU 192.168.0.1-255


Note that connect scan could take ages as nmap tries to connect every port from default port scanned ranged on remote found hosts that are reporting as up and running.

If the shown results lead you find some unknown computer / tablet / mobile / phone device connected to your network, then connect to your router and thoroughfully inspect the traffic flowing through it, if you find intruder cut him off and change immediately your router passwords and monitor your network periodically to make sure the unwanted guest did not go back in future.

There is much more you can do with nmap so if you have some extra time and interest into penetration testing I recommend you check out Nmap Book (The Official Nmap project guide to Network Discovery and Security Scanning)
PortQRY Native Windows command line Nmap like port scanner – Check status of remote host ports on Windows

Monday, June 30th, 2014

Windows_command_line_and_gui_port-scanner-portqry-like-nmap-check-status-of-remote-host-service-windows-xp-7-2000-2003-2008-server
Linux users know pretty well Nmap (network mapper) tool which is precious in making a quick server host security evaluation.
Nmap binary port is available for Windows too, however as nmap is port for its normal operation you have to install WinPcap (Packet Capture Library).
And more importantly it is good to mention if you need to do some remote port scanning from Windows host, there is Microsoft produced native tool called PortQry (Port Query).

PortQRY is a must have tool for the Windows Admin as it can help you troubleshoot multiple network issues.

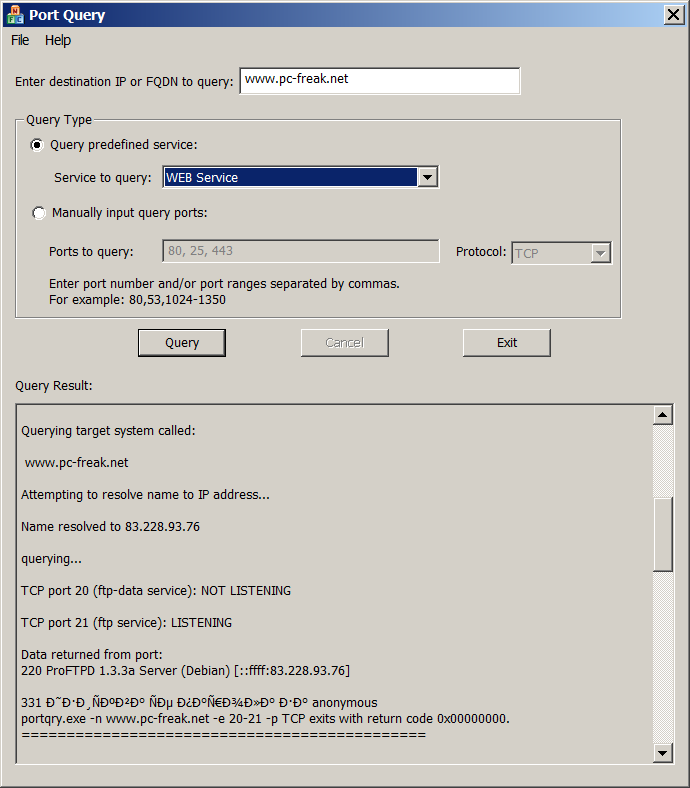
windows-nmap-native-alternative-portqry-gui-ui-web-service-port-scan-screenshot
As of time of writting this post PortQRY is at version 2, PortQRY tool has also a GUI (UI) Version for those lazy to type in command line.

Port Query UI tool (portqueryui.exe) is a tool to query open ports on a machine. This tool makes use of command line version port query tool (portqry.exe). The UI provides the following functionalities:

   1. Following "Enter destination IP or FQDN to query:”, an edit box needs the user to specify the IP address or FDQN name of the destination to query port status.

   2. The end user is able to choose Query type:

        – Predefined services type. It groups ports into service, so that you can query multiple ports for a service by a single click. Service includes "Domains and Trusts", "DNS Queries", "NetBIOS     communication", "IPSEC", "Networking", "SQL Service", "WEB Service", "Exchange Server",          "Netmeeting", and other services.

You can check detail port and protocol info for each service category by opening Help -> Predefined Services…

PORTQRY is part of Windows Server 2003 Support Tools and can be added to any NT based Windows (XP, 2003, Vista, 7, 8)
 You can download portqry command line tool here or my mirrored portqry version command line port scanner here and PortQRY UI here.

PortQRY comes in PortQryV2.exe package which when run extracts 3 files: PortQry.exe program, EULA and readme file. Quickest way to make portqry globally accessible from win command prompt is to copy it to %SystemRoot% (The environment variable holding default location for Windows Installation directory).
It is good idea to add PortQRY to default PATH folder to make it accessible from command line globally.

PorQry has 3 modes of operation:

Command Line Mode, Interactive Mode and Local Mode

portqry-windows-native-security-port-network-scanner-nmap-equivalent-help-screenshot
 

Command Line Mode – is when it is invoked with parameters.

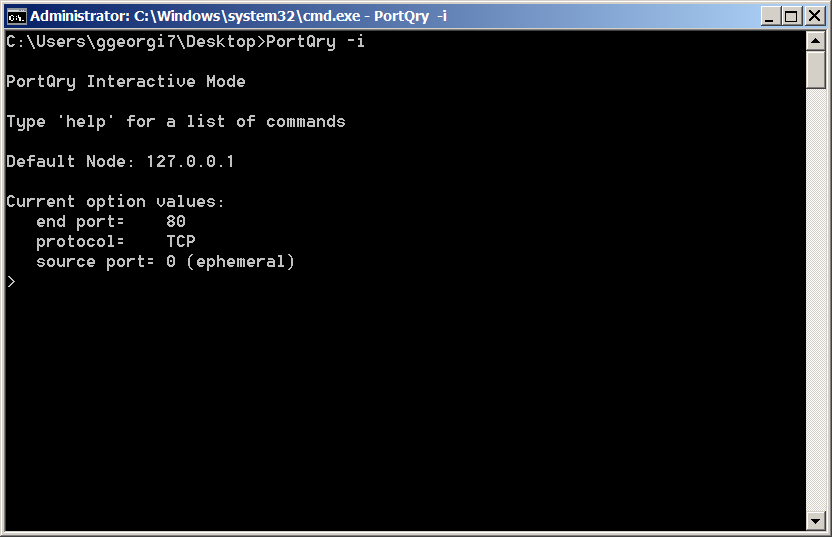
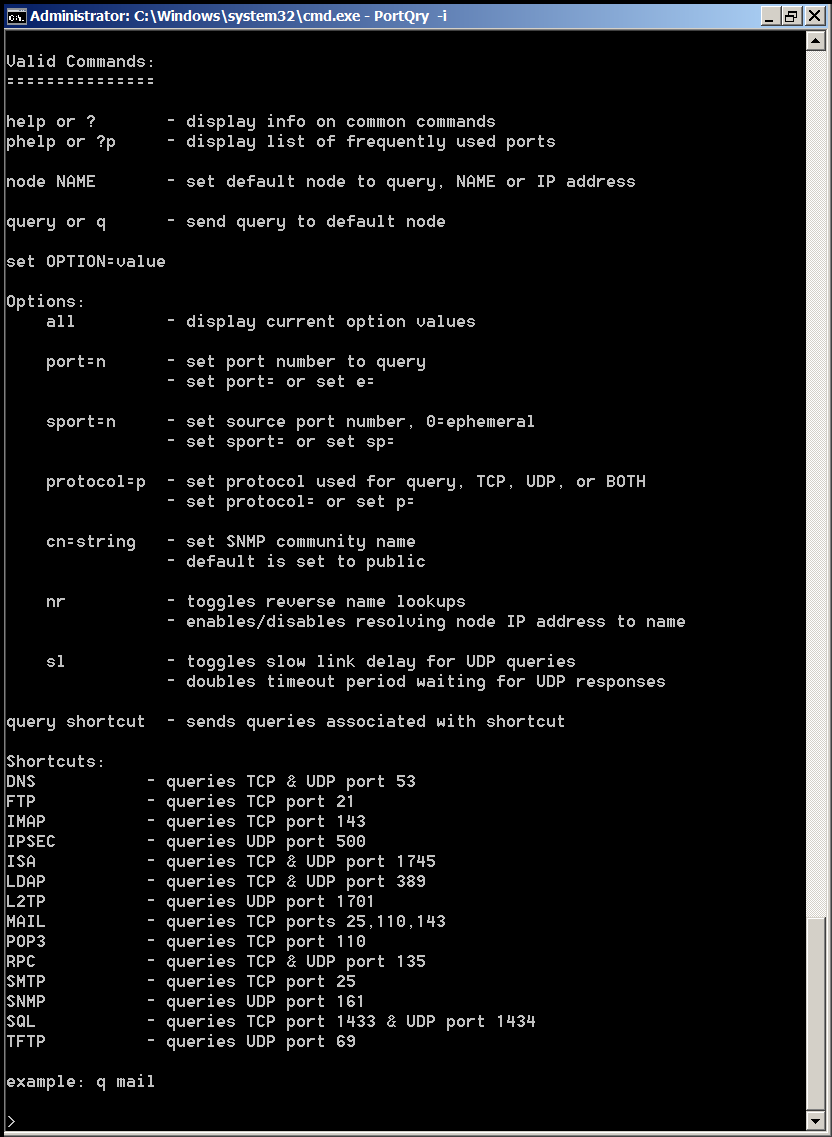
Interactive Mode is when it runs in interactive CLI console

portqry-windows-native-security-port-network-scanner-nmap-equivalent-interactive-mode-screenshot

portqry-windows-native-security-port-network-scanner-nmap-equivalent-interactive-mode-help-screenshot
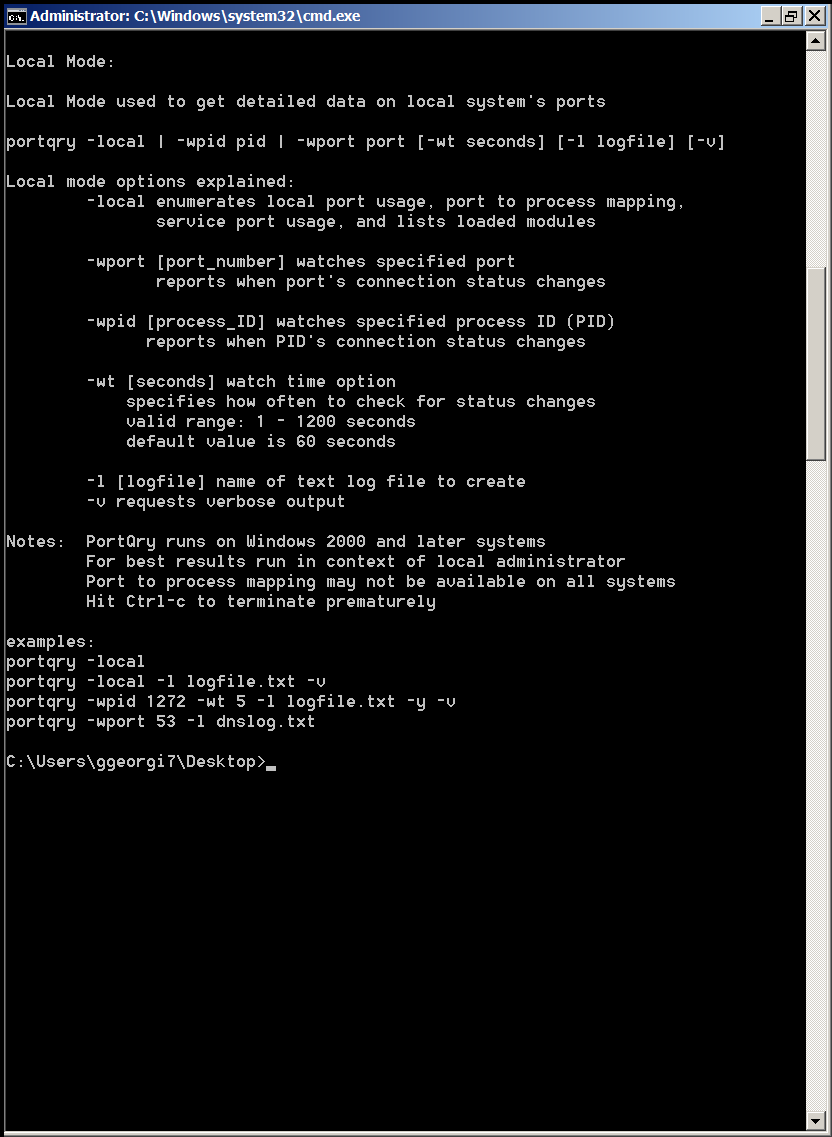
and Local Mode is used whether information on local system ports is required.

portqry-windows-native-security-port-network-scanner-nmap-equivalent-local-mode-screenshot


Here are some examples on basic usage of portqry:
 

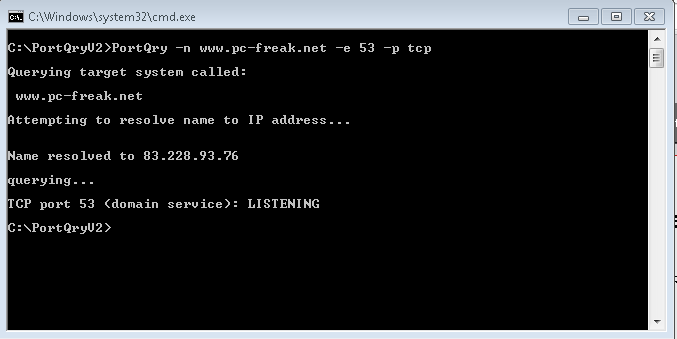
1. Check if remote server is running webserver is listening on (HTTPS protocol) TCP port 80

portqry -n servername -e 80
 

Querying target system called:

 www.pc-freak.net

Attempting to resolve name to IP address…


Name resolved to 83.228.93.76

querying…

TCP port 80 (http service): FILTERED

2. Check whether some common Samba sharing and DNS UDP ports are listening

portqry -n servername -p UDP -o 37,53,88,135
 

Querying target system called:

servername

Attempting to resolve name to IP address…


Name resolved to 74.125.21.100

querying…

UDP port 37 (time service): NOT LISTENING

UDP port 53 (domain service): NOT LISTENING

UDP port 88 (kerberos service): NOT LISTENING

UDP port 135 (epmap service): NOT LISTENING

3. Scan open ports in a port range – Check common services port range (port 1-1024)

portqry -n 192.168.1.20 -r 1:1024 | find ": LISTENING"

4. Logging network scan output to file

Portqry –n localhost –e 135 -l port135.txt
 

Querying target system called:

 localhost

Attempting to resolve name to IP address…


Name resolved to 127.0.0.1

querying…

TCP port 135 (epmap service): LISTENING

Using ephemeral source port
Querying Endpoint Mapper Database…
Server's response:

UUID: d95afe70-a6d5-4259-822e-2c84da1ddb0d
ncacn_ip_tcp:localhost[49152]

UUID: 2f5f6521-cb55-1059-b446-00df0bce31db Unimodem LRPC Endpoint
ncacn_np:localhost[PIPEwkssvc]

Total endpoints found: 38


5. Scanning UDP and TCP protocols port

PortQry -n www.pc-freak.net -e 25 -p both


Querying target system called:

 www.pc-freak.net

Attempting to resolve name to IP address…


Name resolved to 83.228.93.76

querying…

TCP port 53 (domain service): LISTENING

UDP port 53 (domain service): LISTENING or FILTERED

Sending DNS query to UDP port 53…


6. Checking remote server whether LDAP ports are listening

Portqry -remotehost.com -p tcp -e 389
Portqry -n remotehost.com -p tcp -e 636
Portqry -n remotehost.com -p both -e 3268
Portqry -n remotehost.com -p tcp -e 3269


7. Making SNMP community name requests

portqry -n host2 -cn !my community name! -e 161 -p udp


8. Initiating scan from pre-selected source port

A network socket request initiation is useful from certain port because, some remote services expect connection from certain ports, lets say you're connecting to mail server, you might want to set as a source port – port 25, to make remote server another SMTP is connecting.

portqry -n www.pc-freak.net -e 25 -sp 25


9. Scanning whether server ports required by Active Directories are opened

Common ports used in Windows hosts to communicate between each other to sustain Active Directory are:

88 (Kerberos)
135 (RPC)
389 (LDAP)
445 (CIFS)
3268 (Global Catalog)

portqry -n remote-host.com -o 88,135,389,445,3268 -p both

portqry has also a silent mode with the "-q" switch if you want to get only whether a port is LISTENING (opened).

On port scan it returns three major return codes (very useful for scripting purposes);

  • returncode 0 – if port / service is listening
  • returncode 1 – if service is not listening
  • returncode 2 – if service is listening or filtered

PortQry is very simple port scanner for win sysadms and is precious tool for basic network debugging (services)  on Windows farms, however it doesn't have the powerful cracker functionality, application / OS versioning etc. like Nmap.


Anmap network port scanner – Nmap security scanner for your Android Mobile and Tablet

Tuesday, June 24th, 2014

Nmap-for-Android-Anmap-port-security-penetriation-and-network-hacking-from-your-mobile

Those who have to deal with network security or do periodic UNIX / Windows server security audits know  well Nmap (Network Mapper).
NMAP is the swiss army knife tool of choice of both crackers and security exports and it is a must have exploration tool.
For those who just heard of Nmap or want  to learn more on Nmap basics, I recommend my previos articles how to check Windows / Linux host port security (by examples)  and test a local network for open Windows shares.

Nmap is one of the most improtant tools for every cracker (white, grey black hat "hacker"). Nmap is a legendary hack tool and probably the prevelent networt security port scanner tool over the last 10 years on all major Operating Systems. Nmap's high portability is thanks to being open source, being ported so far for:

Window – Zen, Mac OS and Linux, FreeBSD, OpenBSD, NetBSD and even obscure proprietary operating systems like Hewlett Packard's UNIX – HP-UX, Sun Microsystems's UNIX variant Solaris. It is in an interesting fact to mention probably not much known Sun Solaris's core code base is based on Berkley's BSD 4.4 whose fork nowadays give birth to FreeBSD and rest of *BSD family OSes. 
Nmap evolved a lot through the last 7 years from only having a command line interface for hardcode console geeks like me to having a nice shiny GUI frontendinterface ZenMap.
Nmap is popular for being one of the hack tools in the famous move The Matrix (II) – Reloaded.

As hacking and security penetration is quickly moving from PC Desktops and Notebooks to more mobile and stealth variants with recent boom of smartphones – it is no strange that Nmap got ported to the most wide-spread (and very Linux compatible) – Android OS under the name ANmap (Android Map).

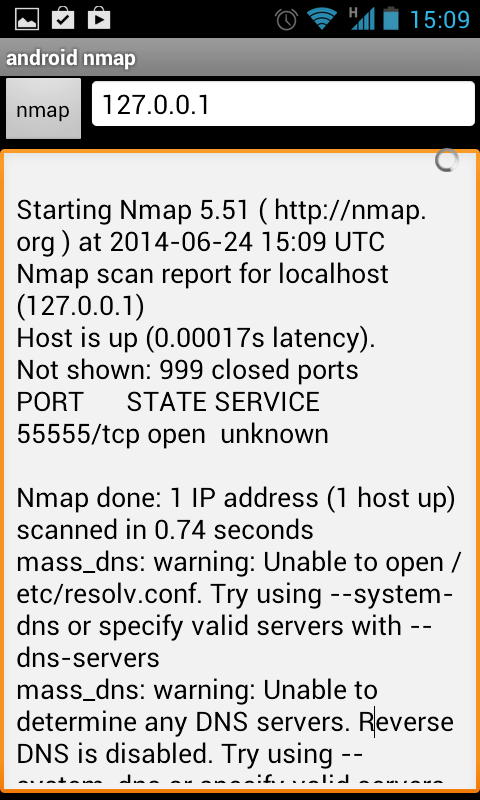
nmap-android-mobile-phone-tablet-screenshot-anmap-port-scanner-screenshot

ANMap source code and apk – (Android Package file) is on GoogleCode here.

By the way using your android device to scan your own Android device on localhost (just like on above screenshot), could be quite helpful and often could reveal some unwated services, run by malware or viruses application.

To get full use of ANmap's full functionality (Stealth Scan, Full version and port scan etc.)  just like on other operating systems ANmap has to run with super user privileges .

To be able to run applications with Super user access on Android you need to have ROOTED ANDROID  (Tablet / Phone) device – rooting android is just a simply hack that makes Android OS to run certain applciations with root (administrator privileges). Usually Rooting a device breaks ups vendor (reseller) guarantees, so if you root your device to run ANmap on it be very careful to which application you give access to run as super user!
As Anmap page reads: There are some little bugs, as domain names resolving and unroot scanning.

If you want to use Anmap only command line interface (without gui).
Download compiled nmap with data files in this tar ball or this zip archive and keep it in one folder.

Than connect to localhost via ConnectBot, untar and start scanning:

$ tar -xvf nmap-5.51-1.tar
$ su
# ./nmap 127.0.0.1

Happy scanning 🙂