Posts Tagged ‘possibility’
Monday, August 1st, 2011 
It seems DjbDNS on Debian Squeeze has been not included as a Debian package. There is still possibility to install djbdns from an older deb package or install it from source. I however decided to install it from source as finding the old Debian package for Lenny and Etch takes time, plus I'm running an amd64 version of Debian and this might even more complicate the situation.
Installing it from source is not really a Debian way but at least it works.
In this article I assume that daemontools and ucspi-tcp are preliminary installed, if not one needs to install them with:
debian:~# apt-get install ucspi-tcp daemontools daemontools-run

...
The above two ones are required as DJBDNS is originally made to run through djb's daemontools.
Here is the exact step I took to have it installed as local caching DNS server on a Debian Squeeze server:
1. Download and untar DjbDNS
debian:~# wget -q http://cr.yp.to/djbdns/djbdns-1.05.tar.gz
debian:~# tar -zxvvf djbdns-1.05.tar.gz

...
2. Add DjbDNS users to /etc/passwd
Creating the below two users is not arbitrary but it's recommendable.
echo 'dnscache:*:54321:54321:dnscache:/dev/null:/dev/null' >> /etc/passwd

echo 'dnslog:*:54322:54322:dnslog:/dev/null:/dev/null' >> /etc/passwd
3. Compile DJBDNS nameserver
First it's necessery to use the below echo command to work around a common Linux bug:
debian:~# cd djbdns-1.05

debian:/root/djbdns-1.05# echo gcc -O2 -include /usr/include/errno.h > conf-cc
Next let's make it:
debian:/root/djbdns-1.05# make
4. Install the compiled djbdns binaries
debian:/root/djbdns-1.05# make setup check

# here comes some long install related output
If no errors are produced by make setup check this means that the djbdns should have installed itself fine.
As installation is compileted it's a good idea to report about the newly installed DjbDNS server if running a mail server. This info is used by Dan Bernstein to gather statistical data about the number of installations of djbdns servers throughout the world.
5. Do some general configurations to the newly installed DJBDNS
Now let's copy the list of the IP addresses of the global DNS root servers in /etc/.
debian:/root/djbdns-1.05# cp -rpf dnsroots.global /etc/
debian:/root/djbdns-1.05# ./dnscache-conf dnscache dnslog /etc/dnscache 0.0.0.0
dnscache-conf will generate some default configuration files for djbdns in /etc/dnscache
Next allow the networks which should be able to use the just installed djbdns server as a caching server:
debian:/root/djbdns-1.05# cd /etc/dnscache/root/ip

debian:/etc/dnscache/root# touch 192.168.1

debian:/root/djbdns-1.05# touch 123.123
First command will allow all ips in range 192.168.1.* to be able to access the DNS server and the second command will allow all ips from 123.123.1-255.1-255 to be able to query the server.
Some further fine tunning can be done from the files:
/etc/dnscache/env/CACHESIZE and /etc/dnscache/env/DATALIMIT
As a last step, before it's running, we have to link the /etc/dnscache to daemontools like so:
debian:/root/djbdns-1.05# ln -sf /etc/dnscache /etc/service/dnscache
If the daemontools is not linked to be accessible via /etc/service it's also a good to link it there:
debian:~# ln -sf /etc/service /
Now the DJBDNS should be running fine, to test if it's running without errors through daemontools I used:
debian:~# ps ax|grep -i readproc

5358 pts/18 R+ 0:00 grep -i readproc

11824 ? S 0:00 readproctitle service errors: ...........
If no errors are displayed it's configured and running to also test if it's capable of resolving I used the host command:
debian:~# host www.pc-freak.net localhost

Using domain server:

Name: localhost

Address: 127.0.0.1#53

Aliases:
www.pc-freak.net has address 83.228.93.76
www.pc-freak.net mail is handled by 0 mail.www.pc-freak.net.
Now the DJBDNS is properly installed and if you test it for a while with time host somehost.com localhost , you will see how quick it is in resolving.
The advantage of running DJBDNS is it does not require almost no maintance, its rock solid and great just like all other Dan Bernstein's written software.
Enjoy 😉
Tags: binaries, Cachening, Cachening Localhost Proxy, Compile, configure, configured, cr, daemontools, dan bern, dan bernstein, deb package, debian cd, debian package, djb, djbdns, DNS, dns server, echo command, efficiency, errno, etc passwd, etch, host, How to, Install, installation, Linux, linux bug, mail server, necessery, package, passwdecho, possibility, root, running, squeeze, statistical data, tar gz, tcp, time, Touch, untar, wget, yp, zxvvf
Posted in Linux, Performance Tuning, System Administration, Web and CMS | 4 Comments »
Thursday, May 15th, 2014 
If you're working in a middle or big sized IT company or corporation like IBM or HP, you're already sucked into the Outlook "mail whirlwind of corporate world" and daily flooded with tons of corporate spam emails with fuzzy business random terms like taken from Corporate Bullshit Generator
Many corporations, because probably of historic reasons still provide employees with small sized mailboxes half a gigabyte, a gigabyte or even in those with bigger user Mailboxes like in Hewlett Packard, this is usually no more than 2 Gigabytes.
This creates a lot of issues in the long term because usually mail communication in Inbox, Sent Items, Drafts Conversation History, Junk Email and Outbox grows up quickly and for a year or a year and a half, available Mail space fills up and you stop receiving email communication from customers. This is usually not too big problem if your Mailbox gets filled when you're in the Office (in office hours). However it is quite unpleasent and makes very bad impression to customers when you're in a few weeks Summar Holiday with no access to your mailbox and your Mailbox free space depletes, then you don't get any mail from the customer and all the time the customer starts receiving emails disrupting your personal or company image with bouncing messages saying the "INBOX" is full.
To prevent this worst case scenario it is always a good idea to archive old mail communication (Items) to free up space in Outlook 2010 mailbox.
Old Outlook Archived mail is (Saved) exported in .PST outlook data file format. Later exported Mail Content and Contacts could be easily (attached) from those .pst file to Outlook Express, leaving you possibility to still have access to your old archived mail keeping the content on your hard drive instead on the Outlook Exchange Mailserver (freeing up space from your Inbox).
Here is how to archive your Outlook mail Calendar and contacts:
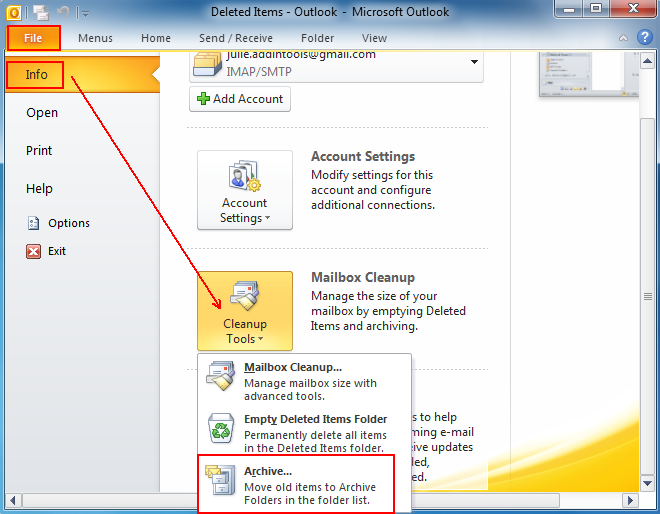
1. Click on the "File" tab on the top horizontal bar.Select "Cleanup Tools" from the options.
2. Click "Cleanup Tools" from the options.
3. Click on the "Archive this folder and all subfolders" option.
4. Select what to archive (e.g. Inbox, Drafts, Sent Items, Calendar whatever …)
5. Choose archive items older than (this is quite self-explanatory)
6. Select the location of your archive file (make sure you palce the .PST file into directory you will not forget later)
That's all now you have old mails freed up from Outlook Exchange server. Now make sure you create regular backups ot old-archived-mail.pst file you just created, it is a very good idea to upload this folder to encrypted file system on USB stick or use something like TrueCrypt to encrypt the file and store it to external hard drive, if you already don't have a complete backup corporate solution backuping up all your Laptop content.
Later Attaching or detaching exported .PST file in Outlook is done from:
File -> Open -> Open Outlook Data File
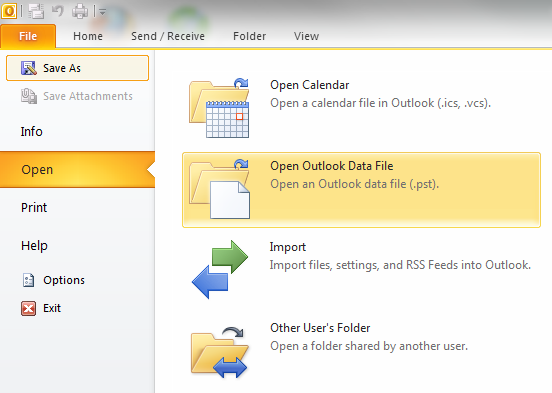
Once .PST file is opened and attached in Left Inbox pane you will have the Archived old mail folder appear.
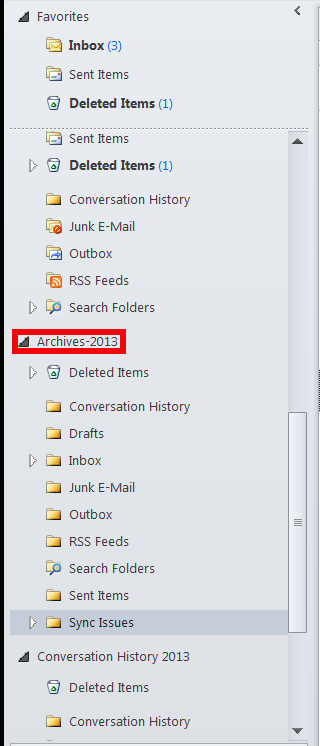
You can change Archived name (like I did to some meaningful name) like I've change it to Archives-2013 by right clicking on it (Data File properties -> Advanced)
Tags: archive, Archive Outlook, Click Cleanup Tools, data, Drafts Conversation History, drive, external hard drive, file, file format, free space, good, hard drive, hp, ibm, idea, IT, location, mail, mailboxes, middle, possibility, PST, Select Cleanup Tools, Sent Items, system, USB, working, year
Posted in Everyday Life, Outlook, Various, Windows | 1 Comment »
Tuesday, May 22nd, 2012 
To continue with my lately ASCII centered articles I found hasciicam
hasciicam is a program to stream ASCII video over the network on Linux and probably can be easily made working on FreeBSDtoo.
The project concept is interesting in a matter of fun (play) point of view, however not too usable as we all know ASCII character looking faces doesn't look too pretty.
Below is the Debian (Squeeze) package description:
noah:~# apt-cache show hasciicam|grep -i description -A 7

Description: (h)ascii for the masses: live video as text

Hasciicam makes it possible to have live ASCII video on the web. It

captures video from a tv card and renders it into ascii, formatting the

output into an html page with a refresh tag or in a live ASCII window or

in a simple text file as well, giving the possibility to anybody that has a

bttv card, a Linux box and a cheap modem line to show a live ASCII video

feed that can be browsable without any need for plugin, java etc.

Homepage: http://ascii.dyne.org/
On hasciicam Project webpage is it is stated as a hardware you need to have:
"As hardware you need to have a webcam or a videocard supported by "video 4 linux", most of the gear you can buy around should work well."
To install and test it I run:
noah:~# apt-get --yes install hasciicam
Though it is stated on the project website supposed to work display video fine with most 'linux ready' webcams, it didn't with this very standard one.
Here is the exact WebCamera model as identified to the kernel:
noah:~# dmesg|grep -i camera

[ 1.433661] usb 2-2: Product: USB2.0 Camera

[ 10.107840] uvcvideo: Found UVC 1.00 device USB2.0 Camera (1e4e:0102)

[ 10.110660] input: USB2.0 Camera as /devices/pci0000:00/0000:00:1d.7/usb2/2-2/2-2:1.0/input/input11
By the way, I use the very same CAM daily on for Skype video calls as well as the Camera is working with no problems to save video or pictures inside Cheese
Here is the exact WebCamera model as identified to the kernel:
noah:~# dmesg|grep -i camera

[ 1.433661] usb 2-2: Product: USB2.0 Camera

[ 10.107840] uvcvideo: Found UVC 1.00 device USB2.0 Camera (1e4e:0102)

[ 10.110660] input: USB2.0 Camera as /devices/pci0000:00/0000:00:1d.7/usb2/2-2/2-2:1.0/input/input11
The just installed deb has one binary file only /usr/bin/hasciicam. To test it with the camera I issued:
noah:~# hasciicam -d /dev/video0

HasciiCam 1.0 - (h)ascii 4 the masses! - http://ascii.dyne.org

(c)2000-2006 Denis Roio < jaromil @ dyne.org >

watch out for the (h)ASCII ROOTS
Device detected is /dev/video0
USB2.0 Camera
1 channels detected
max size w[640] h[480] - min size w[48] h[32]
Video capabilities:
VID_TYPE_CAPTURE can capture to memory
!! error in ioctl VIDIOCGMBUF: : Invalid argument
Unfortunately as you see from the output, it failed to detect the web camera model.
The exact camera besides its kernel detection naminf is a cheap external USB 2.0 (fake brand / nonanem) "universal" Web PC Camera (SUPER .3mega pixel)
For those who have a further interest in building and installing hasciicam on other Linux platforms than Debian and Ubuntu or whoever wants to look in the code check check Project webpage is. For those who are less of programmers (like me) the project is written in C programming language and uses aa-lib in order to render the video to ASCII.
On the site you will notice two totally schizophrenic looking pictures of presumably the project head developer …

As I read in man hasciicam manual page it's said to be able to generate ascii plain text and html files as well as directly to write the output to console, which later probably can be streamed via the network.
Pitily as it didn't detect my camera I couldn't make some testing of its network capabilities.
A Streaming of ASCII couuld be done through pushing the .html output to a webserver and setting a php or javascript to loop through and refresh the browser over the uploaded files every sec or so.
Also I assume the ASCII video output saved in plain console could be streamed via netcat or some tiny scripted perl or bash script and directly observed via a telnet or ssh connection.
One playful way I can think of checking a stored video without the use of FTP is to login via ssh and do:
$ ssh someuser@somehost

$ watch -n 1 "cat video-ascii.html"
🙂
Well something disturbing about hasciicam from a (purely Christian point of view) is it was developed by some kind of non profit organization called RastaSoft on the project website, some of its authors has written JAH BLESS.
As I didn't succeeded seeing it working, I'll be interested to hear if someone who red this article and give it a try can report the web camera model used.
Tags: ascii character, Auto, card, description, dmesg, doesn, Draft, dyne, file, formatting, fun, fun play, gnu linux, HasciiCAM, html page, kernel, linux box, modem line, noah, package, package description, page, pci, plugin java, possibility, Product, project webpage, quot, refresh, show, squeeze, ssh, tag, text, tv card, video, video feed, video on the web, videocard
Posted in Entertainment, System Administration, Various | No Comments »
Monday, February 22nd, 2010 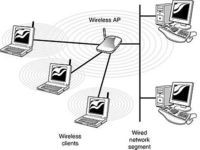
Below are some valuable advices on Wireless Access Point initial install and configuration to better off your Wireless connection.It’s worthy to note that the 2.4 GHz
Wi-Fi signal range is divided into a number of smaller bands or “channels,” similar to television channels. I decided to run my wireless on channel 12 since this there was no other wireless routers operating on that frequency, though most routers are preconfigured to spread it’s signal on channel 6.
There is a difference in channels available for setup for 802.11b and 802.11g wireless networks in the United States and the European Union. In the USA the wireless channels available are from (1 to 11) whether in the EU it’s in the range of (1-13). Each of the Wireless channels run on a different frequency.
The lower the number of the channel is the lowest the radiating frequence band on which data is transmitted .Subsequently, increasing the channel increases the frequency slightly. Therefore the higher the channel you select on your AP the lesser the overlap with other devices running on the same channel and thus the lesser the possibility to overlap and interference.
It’s quite likely that you experience problems, if you use the default wireless channel which is 6.
If that’s the case it’s recommended to use either channel 1 or channel 11. In case of interference, i.e. overlap with other wireless networks, cellphones etc., there are 2 possible ways to approach the situation. In case of smaller interference, any change in channel on which there is no wireless device running could fix it up. The second way is to choose a wireless channel for your router in between 1,6 or 11 in (The USA) or 1,7,13 in Europe.
Up to 3 networks can run on the same space with minimum interference, therefore it would be a wise idea to check the list of wireless routers in your and check if there are others running on the same frequency.
As I mentioned in the beginning of the post I initially started running my wireless on channel 12, however after I discovered it is recommended to run your wireless router either on channel 1 7 or 13 in Europe I switched my D-Link DI-524 wireless router to transmit it’s signal on Channel 13.
I should testify that after changing the wireless channel, there was quite an improvement in my wireless connection.For instance before I change to Channel 13 (when my wireless internet was still streamed on channel 12) my wireless had constantly issues with disconnects because of low wireless signal.
Back then My wireless located physically in like 35 meters away set in another room, I can see my wireless router hardly connected on like 35%, changing to channel 13 enhanced my connection to the current 60% wireless router availability.
It’s also an interesting fact that Opened Wireless networks had better network thoroughput, so if you’re living in a house with a neighbors a bit distant from your place then you might consider it as a good idea to completely wipe out Wireless Router security encryption and abandon the use of WEP or WPA network encryption.
In case if all of the above is not working for you, you might consider take a close look at your Wireless Wireless LAN pc card and see if there are no any kind of bumps there. Another really interesting fact to know is that many people here in Bulgaria tend to configure there Wireless Access Points on channels either 1,6 or 11 which is quite inadequate considering that we’re in the EU and we should use a wireless channel between 1, 7 or 13 as prescribed for EU citizens.
Another thing not to forget is to place your wireless in a good way and prevent it from interferences with other computer equipment. For example keep the router at least few meters away from PC equipment, printers, scanners, cellphones, microwaves. Also try to put your wireless router on some kind of central place in your home, if you want to have the wireless signal all around your place.
At my place I have a microwave in the Kitchen which is sometimes an obstacle for the Wireless signal to flow properly to my notebook, fortunately this kind of interference happens rare (only when the Microwove is used to warm-up food etc.).Upgrading 802.11b wireless card / router to a better one as 802.11g is a wise idea too. 802.11g are said to be like 5 times faster than 802.11b.
You can expect 802.11b wireless network to transfer maximum between 2-5 Mbp/s whether 802.11g is claimed to transfer at approximately (12 to 23 Mbp/s). If even though the above prescriptions there is no wireless signal at some remote place at your home, you might consider adding a wireless repeater or change the AP router antenna.
By default wireless Routers are designed to be omni-directional (in other terms they broadcast the wireless signal all around the place. Thus is quite unhandy if you intend to use your Wireless net only in certain room or location at your place. If that’s the case for you, you might consider upgrading to a hi-gain antenna that will focus the wireless signal to an exact direction. Let me close this article with a small diagram taken from the net which illustrates a good router placement that will enable you to have a wwireless connection all over your place.
Tags: advices, band, bit, card, change, channel 1, channel 11, channel 12, channel 6, Choosing, connection, default, DI, difference, encryption, equipment, european union, fi channel, frequence, house, instance, minimum interference, network performance, number, place, Point, possibility, quot, router, routers, signal range, television channels, Union, wireless access point, wireless channels, wireless networks, wireless routers, wise idea
Posted in Everyday Life, System Administration | 4 Comments »
Thursday, March 29th, 2012

After a long time of inavailability, finally TeamViewer 7 for GNU / Linux is out!
Here is the short TeamViewer 7 Linux release note :
In our TeamViewer download area you will now find TeamViewer 7 for Linux.
The final version includes a selection of new features for Linux, e. g. an integrated screenshot feature and the possibility of saving individual connection settings per computer.
You can now establish cross platform connections with other computers running version 7 and hold online meetings and presentations with up to 25 participants.
We wish you best continued success with TeamViewer!
Well, guys it was about time, even later than that… Until now I've so many times experienced troubles with Windows machines which I had to administrate remotely and they only had a TeamViewer 7 installed (a real, real pain in the ass).
The issue comes cause TeamViewer 6 is incompatible with 7 and just until very recently only TV 6 for Linux was available, so trying to access a 7 install directly from Linux was impossible.
Hence to access TeamViewer 7 Windows install, I had to use either a fresh Windows copy with TeamViewer 7 installed or a Virtual Machine like (Qemu, VirtualBox) with Windows version installed in it.
Often back then, when I had to fix remotely a Windows machine behind a firewall, I had to instruct the machine owners to replace the TeamViewer 7 with TeamViewer 6 in order to be able to easily access the remote host from my Debian Linux.
I still remember, it was quite a stuggle to find a link to a Windows .exe install file for TeamViewer 6.
Now thanksfully, TeamViewer guys are starting to make it easier for the user who would for some reason want to stick to older TV version.
I've noticed on TeamViewer's website there is already a new TeamViewer download page offering for download all the old teamviewer version – 1.x, 2.x, 3.x, 4.x, 5.x, 6.x
One example, where old teamviewer release is useful is if you want to run teamviewer on older hardware or old OS (MS Windows 98 or old Linux distro).
I've made a mirror of teamviewer 6 for Debian / Ubuntu amd 32 and 64 bit versions along with all the OS available TeamViewer version 6 and 7, for the sake of preserving it if one day link to old versions of Teamviewer disappear from their website.
Here are the TeamViewer mirrored files:
Below you see a screenshot of teamviewer 7 running on my Debian Squeeze 🙂
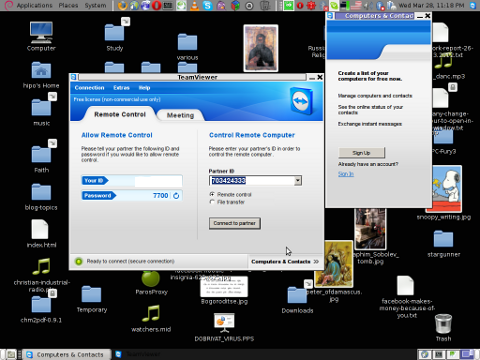
It is great teamviewer produced a Linux working application, however if you run it you realize just like the previous releases TeamViewer is not natively supposed (compiled) to run on GNU / Linux OS but uses wine (windows emulator) to launch through…
Instead of porting the application to be natively for the Linux distros once again with this new release, teamviewer developers just "hacked" it to run on top of windows emulation. Though this is working its performance, is probably a bit degraded and it depends on having install on the Linux host a bunch of useless packages which wine depends on.
Besides that even if it "works" on Linux , TeamViewer has still non-free software essense. I still use it because unfortunately, I don't know of a better remote access program capable to connect to servers behind NAT / machines located behind a tight firewalled routers.
If only (I knew of?) a TeamViewer free software / open source equivalent …
I will be glad to hear if someone know a (free software / open source) TeamViewer like program able to access remote hosts with no a real (public inet) IP address?P.S.: By similar TV program I don't mean VNC, UltraVNC and this kind of other VNC derivative programs but mean close TeamViewer alternative.
Tags: Auto, connection, connection settings, copy, cross platform, debian linux, download, download area, Draft, exa, feature, firewall, gnu linux, host, inavailability, new features, online meetings, page, pain in the ass, platform, possibility, qemu, reason, screenshot, software, stuggle, TeamViewer, time, tv 6, tv version, Ubuntu, Virtual, virtual machine, VirtualBox, windows copy, windows machine, windows machines, windows version, wine, xOne
Posted in Linux and FreeBSD Desktop, News, System Administration | No Comments »
Friday, February 24th, 2012 There two main reasons which cause incorrect clock settings on Slackware Linux.
One common reason for incorrectly set time is improper clock and timezone settings during Slackware install.
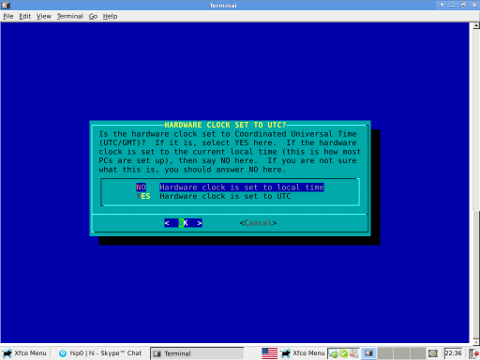
On install, one of the ncruses install menus asks an ambigious dialog question reading
HARDWARE CLOCK SET TO UTC?

Is the hardware clock set to Coordinated Universal Time (UTC/GMT)?
Some newbie Slackware users make the mistake to choose YES here, resulting in incorrectly set clock.
Second possibility for improper time is incorrect time on BIOS level. This is not so common among laptop and modern desktop PCs. However in the past impoper system BIOS hardware clock was usual.
In any case it is a good practice to check the system PC BIOS clock settings.
To check BIOS battery hardware clock from command line use:
bash-4.1# hwclock --show

Fri 24 Feb 2012 01:24:18 AM EET -0.469279 seconds
The system clock on Slackware is set via a script called timeconfig. To fix slack's incorrect host time run:
bash-4.1# timeconfig
Running timeconfig once should configure a proper timezone to be set on next system reboot, however the system time will probably still be not ok.
To manually set time to right time, use date command. To set manually the system wide time to 12:00:00 with date:
bash-4.1# date -s "12:00:00"
Anyways for time accuracy the ntpdate should be used to feth time from NTP internet time server:
bash-4.1# ntpdate time.nist.gov

...
Finally to make the new set right time permanent also for the BIOS battery clock issue:
bash-4.1# hwclock --systohc
By the way its curious fact Slackware Linux is the oldest still existent GNU / Linux based distribution. Its up and running since the very day GNU and Linux came to merge at one Free OS 😉
Tags: ambigious, Auto, bios clock, clock settings, configure, Coordinated, coordinated universal time, curious fact, Desktop, distribution, Draft, EET, feth, free os, Fri, gnu linux, hardware, hardware clock, host, host time, hwclock, improper time, incorrect time, internet time server, laptop, level, Linux, ntpdate, possibility, quot, reading, reason, script, show, slack, slackware linux, slackware users, system bios, system clock, systohc, time, time accuracy, time run, timezone, timezone settings, Universal, UTC, YES
Posted in Linux, System Administration | 6 Comments »
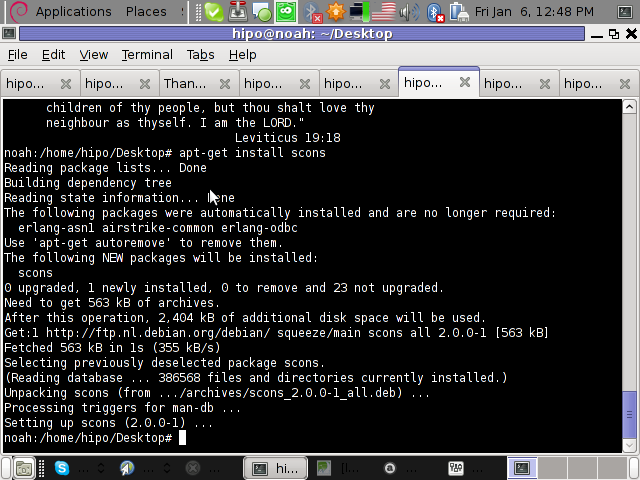
Friday, January 6th, 2012 I'm testing some old school arcade games, available from Debian's package repositories and quitting one of the games ended me up with a GNOME Screen Resolution of 640×480 pixels.
I wanted to revert back to the Classics resolution, so what I would normally do to do that is use >GNOME menus:
System -> Preferences -> Monitors
In that huge screen resolution on my 14 inch lenovo notebook screen, however the System menu cannot fit in 640×480 resolution. You can see the non-screen fitting System on the screenshot below:
Having this situation, I needed a way to change back to my normal daily used 1024x768px screen resolution to continue my daily work by some other way.
One possible solution I thought of was Logging Off Gnome and logging again. Loggig off and log on again would usually restart the initiated GNOME session and therefore will reset the screen resolution to my default 1024×768 / 32 bit color.
Having the unobservable System gnome panel menu on my screen however made using the usual Log off procedure via System -> Log Out myusername impossible…
Another possible way to actually restart my screen and hence revert back to my original resolution is achiavable using the classical restart X server key switch CTRL + ALT + backspace (bckspc) . Though this was a possible approach to the situation, I had a bunch of programs already running on my desktop and I did not wanted to interrupt my desktop session, what I was looking for is simply change the screen resolution size .
With all said I had to look up for alternative way (preferably easy) way, to revert back my screen resolution to my desired 1024×768.
As a console guy, I was interested if there is some kind of possibility to change my GNOME resolution directly using xterm or gnome-terminal , after a bit of check up online, I've found few threads started by people who were looking just like me for a way to change GNOME / KDE screen resolution size on various distributions Linux desktops as well on Free/Net/Open/BSDs. The answer to the question on few places was the command xrandr which I had used some few years ago to initiate remote X server connections via SSH
xrandr is actually a great tool part of the x11-xserver-utils
Actually xrandr is capable of doing a few things besides setting the screen resolution size, just to name a few it supports change the screen orientation, reflection of the output of the screen, adjust brightness, set color gamma etc. etc.
It is good to mention that xrandr changes the resolution not on a GNOME level but on Xorg server level.
Using xrandr to change the screen resolution appeared to be very easy.
1. First I issued xrandr to check all the supported xrandr resolutions by my X server
hipo@noah:~/Desktop$ xrandr Screen 0: minimum 320 x 200, current 1024 x 768, maximum 8192 x 8192VGA1 disconnected (normal left inverted right x axis y axis)LVDS1 connected 1024x768+0+0 (normal left inverted right x axis y axis) 304mm x 228mm 1024x768 60.0*+ 50.0 800x600 60.3 56.2 640x480 60.0 59.9 TV1 disconnected (normal left inverted right x axis y axis)hipo@noah:~/Desktop$
From the output you can see I have 3 basic resolutions configured in my Xorg, I can switch between.
2. To switch to my previous default screen resolution
hipo@noah:~/Desktop$ xrandr -s 1024x768
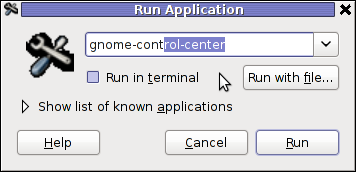
After using xrandr command to revert back to my default screen size, I realized there is two other (partially command line partially gui) way to change to 1024×768 pixels.3. Through launching gnome Control Center and searching for Monitors menu.
If one prefers this way he can;
i) press ALT+F2 to invoke Gnome's Run Application dialog
ii) issue gnome-control-center command:
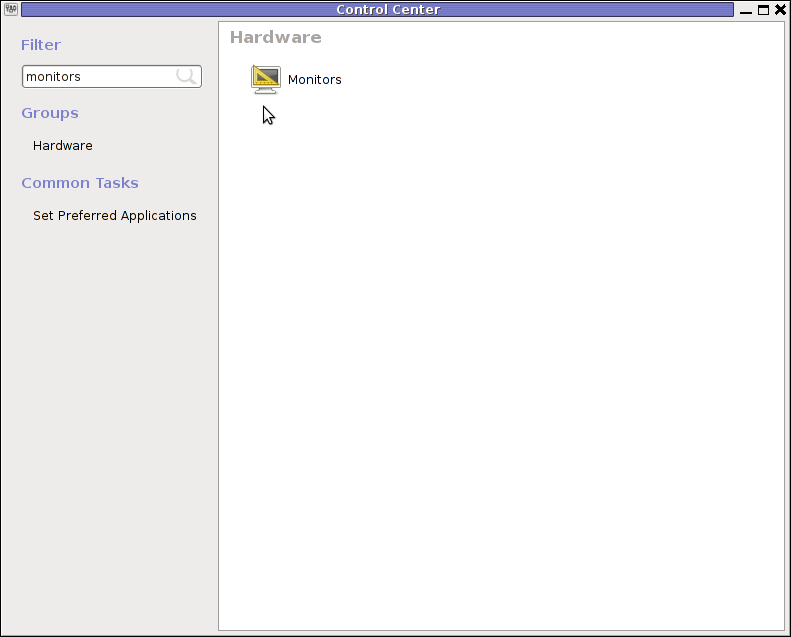
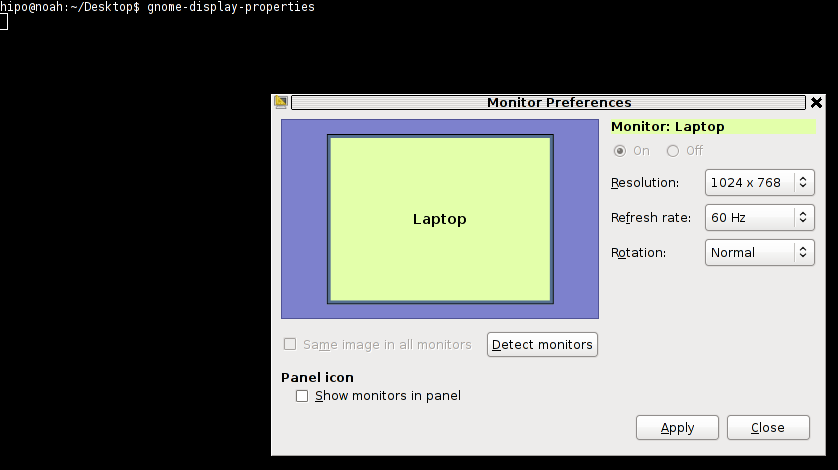
4. By invoking gnome's Control Panel -> Monitors settings window by a command
hipo@noah:~/Desktop$ gnome-display-properties
Tags: Alt, arcade games, Auto, bckspc, change, debian gnu, Desktop, Draft, freebsd, Gnome, gnome panel, gnome resolution, gnu linux, hipo, key switch, level, Linux, menu, menus, Monitors, noah, notebook, old school, package, panel menu, possibility, possible solution, repositories, resolution size, right, screen, screenshot, size, system menu, terminal, threads, work, x server, Xorg, xterm
Posted in FreeBSD, Linux and FreeBSD Desktop | 2 Comments »
Monday, April 18th, 2011 I really hate this new Debian theme SpaceFun / MoreBlue Orbit – (cosmic stars theme). I find it too childish and the combination of the blue color and the stars is so dis-tasteful.
If you’re not using a Debian GNU/Linux 6.0 or Debian Testing/Unstable you have probably not encountered this ugliness, you see on below’s picture.

I do understand the theme design guys wanted to have something which ties to Christmas (at the time of creating it), but come on Christmas has gone long time ago and it’s about Easter and the bad Christmas looking theme is still there …
The possibility that this theme might stay as a default one for the GRUB boot manager and for Gnome Display Manager during the whole Debian Squeeze 6.0 release cycle (about 2 years time) is quite sad.
My dislike for the more blue orbit theme has pushed me into a desire to change this theme into something which is more likeable for the eye.
The idea behind this post was to express my thoughts on the bad graphic design policy Debian has recently embraced, along with the few lines concerning the gdm theme change setup.
This ugly new theme picture has even appeared on the official website of Debian ( debian.org ).
We all know that Linux is not notable with a great Design, as most good graphic designers are Windows users, but still the old simplistic Debian ideas about themes made more sense to me.
Now after I’ve expressed my personal thoughts and feelings on Debian’s new graphic design policy I’ll skip further and will explain how to change the gdm theme: in few seconds:
1. Open gnome-terminal and become root and launch gdmsetup:
GDMSetup requires root privileges as it changes the theme of Gnome Display Manager for the whole system:
hipo@debian:~$ su root

debian:~# gdmsetup
2. You will see the gnome display manager setup program to appear on the screen :
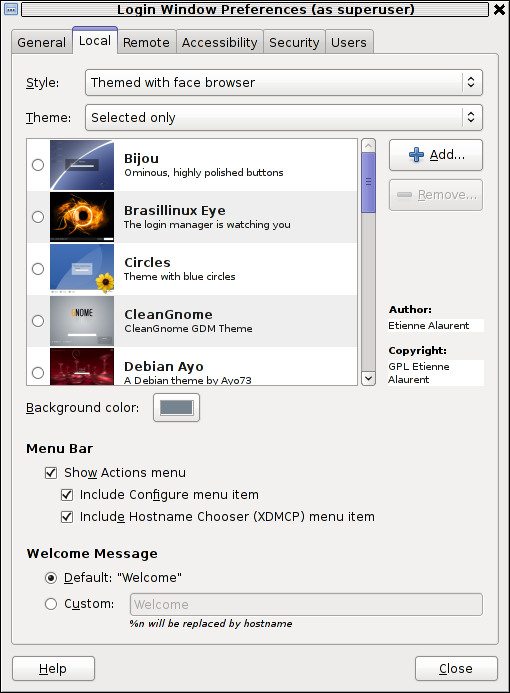
3. As you see in the screenshot you need to go to the menu:
Local and scroll down to see the complete list of system installed themes.
Installing new themes is also a piece of cake, all you have to do is download a selected GDM from art.gnome.org or gnome-look.org and use the Add button you see on the screenshot to include the theme from the list of themes you can further use.
There are number of options in gdmsetup which can change the way gdmsetup authenticates users in Gnome, it also allows useful things like for example:
- Remote Login (located in Remote menu, for example remote gdm logins through Xserver)
- Accessibility (see Accessibility menu) – options (for blind and deaf people’s login)
- Automatic user login (Logging in Gnome without a password)
- Enabling the root (administrator) user login
- Disable certain system user’s ability to login via gdm
etc.
The default Welcome screen text “Welcome” could also easily be changed from the menus:
Local -> Custom
Just type in your custom text you want to appear on Gnome’s user login screen in the Custom field, and restart gdm:
debian:~# killall -HUP gdm
Next gdm login will prompt you with your new selected theme and text.
I personally liked LiNsta (LiNsta is Not Vista GDM theme with Gnome Logo) the most and I recommend it to everybody who wants to switch from the old Debian MoreBlue Orbit ugly theme.
Concerning the Debian themes bad design, I hope truly that this will change soon.
I’m quite interested if other people share my opinion about the new themes implemented in Debian.
Looking forward to hear for your opinions!
Tags: Blue, boot manager, change, christmas, custom, cycle, debian gnu, desire, dislike, Display, display manager, eye, Gnome, gnu linux, graphic design, graphic designers, grub, Linux, login, long time, manager, menu, Open, orbit, personal thoughts, possibility, Remote, root, root privileges, rootdebian, scre, screen, screenshot, scroll, something, SpaceFun, text, thoughts and feelings, time, ugliness, windows users
Posted in Everyday Life, Linux, Linux and FreeBSD Desktop | 2 Comments »


