Posts Tagged ‘program’
Wednesday, May 14th, 2014 
If you're a using GNU / Linux for Desktop and you're already tired of creating backups by your own hacks using terminal and you want to make your life a little bit more easier and easily automate your important files back up through GUI program take a look at luckyBackup.
Luckibackup is a GUI frontend to the infamous rsync command line backup tool. Luckibackup is available as a package in almost all modern Linux distributions its very easy to setup and can save you a lot of time especially if you have to manage a number of your Workplace Desktop Office Linux based computers.
Luckibackup is an absolute must have program for Linux Desktop start-up users. If you're migrating from Microsoft Windows realm and you're used to BackupPC, Luckibackup is probably the defacto Linux BackupPC substitute.
The sad news for Linux GNOME Desktop users is luckibackup is written in QT and it using it will load up a bit your notebook.
It is not installed by default so once a new Linux Desktop is installed you will have to install it manually on Debian and Ubuntu based Linux-es to install Luckibackup apt-get it.
debian:~# apt-get install --yes luckibackup

...
On Fedora and CentOS Linux install LuckiBackup via yum rpm package manager
[root@centos :~]# yum -y install luckibackup

.
Luckibackup is also ported for OpenSuSE Slackware, Gentoo, Mandriva and ArchLinux. In 2009 Luckibackup won the prize of Sourceforge Community Choice Awards for "best new project".
luckyBackup copies over only the changes you've made to the source directory and nothing more.
You will be surprised when your huge source is backed up in seconds (after the first backup).
Whatever changes you make to the source including adding, moving, deleting, modifying files / directories etc, will have the same effect to the destination.
Owner, group, time stamps, links and permissions of files are preserved (unless stated otherwise).
Luckibackup creates different multiple backup "snapshots".Each snapshot is an image of the source data that refers to a specific date-time.
Easy rollback to any of the snapshots is possible. Besides that luckibackup support Sync (just like rsync) od any directories keeping the files that were most recently modified on both of them.
Useful if you modify files on more than one PCs (using a flash-drive and don't want to bother remembering what did you use last. Luckibackup is capable of excluding certain files or directories from backups – Exclude any file, folder or pattern from backup transfer.
After each operation a logfile is created in your home folder. You can have a look at it any time you want.
luckyBackup can run in command line if you wish not to use the gui, but you have to first create the profile that is going to be executed.
Type "luckybackup –help" at a terminal to see usage and supported options.
There is also TrayNotification – Visual feedback at the tray area informs you about what is going on.
Tags: ArchLinux, area, backups, bit, command, Debian, Easy, file, GUI, line, linux desktop, little bit, look, make, manager, package, program, project, rpm, rsync, snapshots, terminal, time, tool, transfer, Ubuntu, use, Workplace Desktop Office Linux, yum
Posted in Computer Security, Everyday Life, Linux and FreeBSD Desktop, System Administration | No Comments »
Friday, May 23rd, 2014 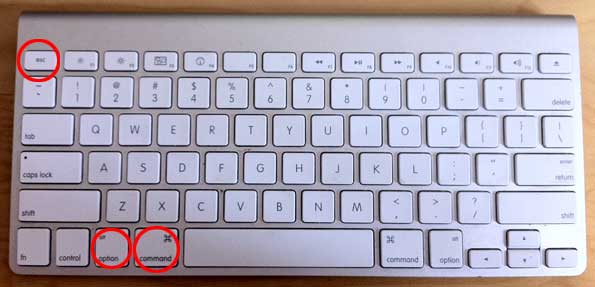
If you happen to have the rare case of having a hung MAC OS X application and you're coming from a Linux / Windows background you will be certainly wonderhing how to kill Mac OS X hung application.
In Mac OS the 3 golden buttons to kill crashed application are:
COMMAND + OPTION + ESCAPE
Command + Option + Escape
while pressed simultaneously is the Mac Computer equivalent of Windows CTRL + ALT + DEL
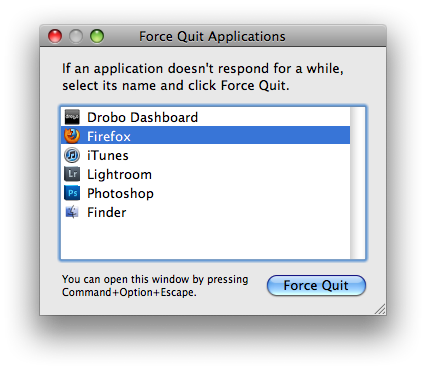
Holding together COMMAND + OPTION + ESCAPE on MAC OS brings up the Force Quit Window showing and letting you choose between the list of open applications. To close freezed MAC application, choose it and Press the Force Quit Button this will kill immediately that application.
To directly end application without invoking the choose Force Quit Window menu, to force a hanging app quit right click on its icon in Dock (CTRL + Click) and choose "Force Quit” from context menu.
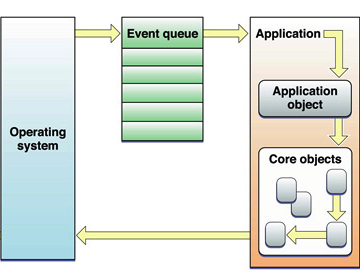
A little bit more on why applications hung in MAC OS. Each application in MAC OS has its event queue. Event queue is created on initial application launch, event queue is buffer that accepts input from system (could be user input from kbd or mouse, messages passed from other programs etc.). Program is hanging when system detects queued events are not being used.
Other reasons for Mac OS hanging program is whether you're attaching detaching new hardware peripherals (i.e. problems caused by improper mount / unmounts), same hang issues are often observed on BSD and Linux. Sometimes just re-connecting (mouse, external hdd etc.) resolves it.
Program hungs due to buggy software are much rarer in Macs just like in IPhones and Ipads due to fact mac applications are very well tested until published in appstore.
Issues with program hungs in Mac sometimes happen after "sleep mode" during "system wake" function – closing, opening macbook. If a crashed program is of critical importance and you don't want to "Force Quit" with COMMAND + OPTION + ESC. Try send PC to sleep mode for a minute or 2 by pressing together OPTION + COMMAND + EJECT.
An alternative approach to solve hanging app issue is to Force-quit Finder and Dock to try that, launch Terminal
And type there:
# killall Dock
Other useful to know Mac OS keyboard combination is COMMAND + OPTION + POWER – Hold together Command and Option and after a while press Power – This is a shortcut to instruct your Mac PC to reboot.
Tags: application, BSD, case, close, event, external hdd, Force Quit, Force Quit Window, kill, Linux, linux windows, MAC, Mac Computer, new hardware, Press, program, queue, rare case, Restart, sleep, system
Posted in Curious Facts, Everyday Life, Mac OS X, System Administration, Various | 1 Comment »
Wednesday, January 7th, 2015 
I've been to home of my wife's parents and for this Christmas, they have received second hand Acer Aspire notebook as a Christmas gift. So far they were using internet using their Windows XP PC which is getting internet here in Belarus via UTP network cable using ByFly ZTE ADSL router modem. As ADSL modem lacked wifh WI-FI Antenna (support) and there was already the Acer notebook which had to access the internet preferrably via Wireless connection, the option was to get a WI-FI router and connect it to the ADSL modem but as this would cost (20 EUR at minimum) and there was alreay Wireless (Receiver) adapter TP-LINK TL-WN722N unused, I decided to try make the TP-LINK Receiver and Windows XP PC to act as a small Home Made Wireless (software) router.
Until I succeeded I've tried multiple softwares which all failed to turn the Windows PC to Wi-Fi Hotspot.
Here is list of few of the softwares I tried that didn't worked for some reason:
1. Wifi HotSpot Creator
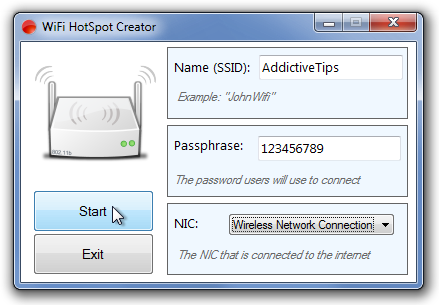
Turn your PC into a Wi-Fi Router for Free!
Instantly share your internet connection with your friends and peers over Wi-Fi. Turns your PC into a Wi-Fi Router! And its Free! Wifi HotSpot Creator is said to be able to convert any Mac OS X and Windows PC to hotspot here is Wifi HotSpot Creator download website
Wifi HotSpot Creator is said to work with Windows Vista / XP / 7 / 8, however as I said it doesn't work for me on Windows XP.
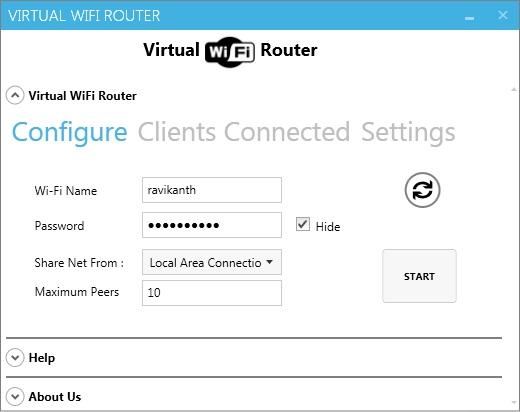
2. Virtual Wifi router
Here is
With Virtual WiFi Router you can create a WiFi hotspot for WiFi Reverse Tethering on Windows 7 and for wifi supported mobiles and other wifi enabled computer to create a network and to share internet. Virtual Wifi Router in a minute converts your PC into a WiFi hot spot for free.
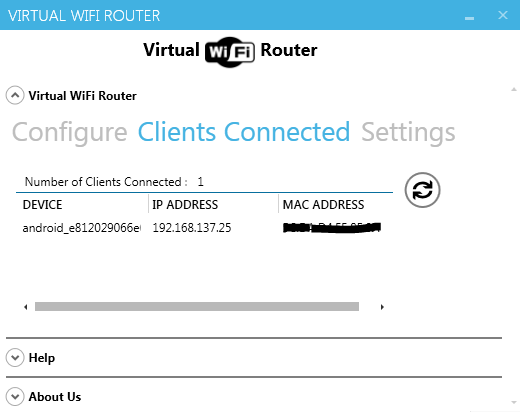
To make the program working it depends on .NET 4.5. Though the program looked like a superb it unfortunately was crashing on Windows XP. Below are few screenshots from program working on Windows 7.
3. My Wifi Router 3.0
Finally I've come across My Wifi Router 3.0 which is just another program that makes necessery Windows configuration to TP-Link TL-WN722N Wireless receiver Adapter to turn it into a homemade Wi-Fi router.
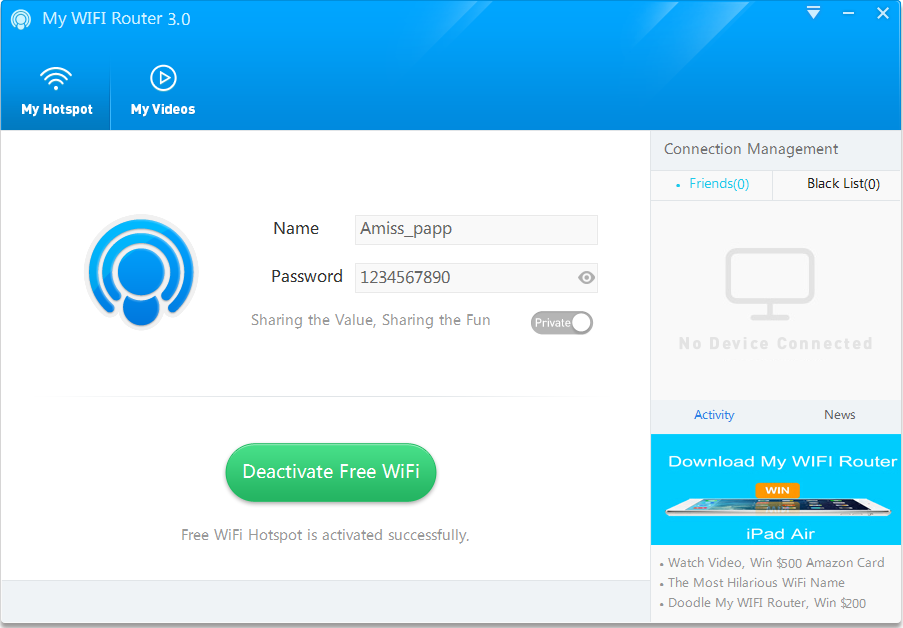
By default Amiss_papp Wifi is configured, this can be changed, however in my case when I tried changing it there were some issues, so finally I've had to re-install My Wifi Router to make it working again.
Once configured My Wifi Router there is the green button (Activate / Deactivate Free Wifi) as seen from screenshot.
As you can see My Wifi Router also allows to Share Videos over WiFi. Once I've tested the program and confirmed it as working, I had to configure it to automatically start on Windows PC boot.
This is done from Settings (located on backward triangle button, next to minimize function).
I had to set check in to Auto Start and Software Conflict Detection.

Once connected to the TP-Link TL-WN722N (USB) Wi-Fi (High Gain) Receiver adapter in Windows Tray a new indicator will popup that a device has been connected. I've tested My Wifi Router and it seem to be working fine with 3 remote connected Wi-Fi devices (1 Notebook and 2 Nokia Lumia mobile phones). The speed of internet was fast and if I didn't know the connection is done in a software way via such an improvised Windows XP Wi-Fi network router I would think it is just a regular Wi-Fi network router.
One more thing I had to do to make the internet working I had to share the the LAN Network (ethernet card) Interface's internet from
Control Panel -> Networking -> Local Area Connection (Properties) -> Advanced
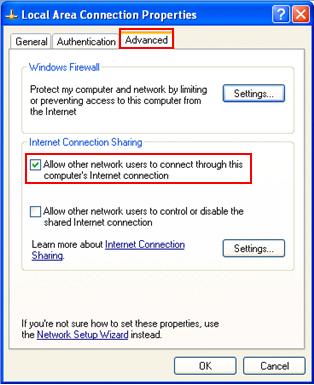
A downside of My Wifi Router is I couldn't find a way to save password while connection to the newly created WiFi router with it, so each time I had to login I had to manually type in the password (default my wifi router password is 123567890). Re-typing password on each login is annoying but if you have to do it once per day in the morning when you turn on your notebook it is not such a big deal.
Once connected to My Wifi Router in Connection Management in Friends (tab) you will see a list with connected devices.
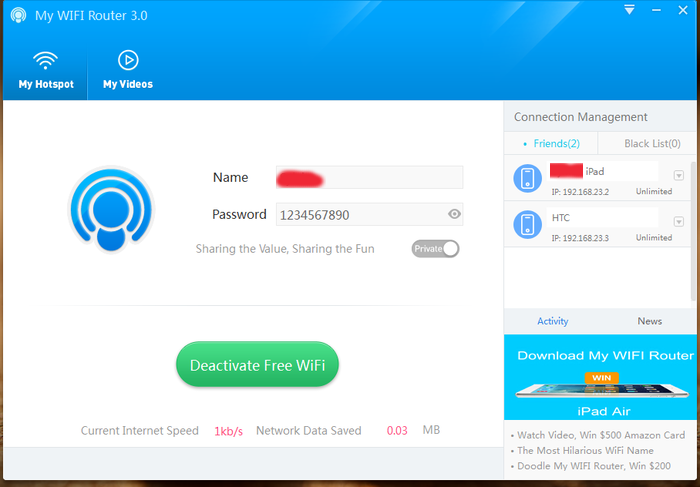
As visible from above screenshot default IPs which will be assigned to new connected clients to My Wifi Router will be in local network IP range 192.168.23.2 – 192.168.23.254.
Now all left is to Enjoy your new Software Wi-Fi router 🙂
Tags: function, make, multiple, password, Pc, program, screenshot, turn, Windows Tray, working
Posted in Entertainment, System Administration, Various, Windows | 3 Comments »
Tuesday, November 2nd, 2010 You will need png2ico
First you will have to download the png2ico source
Now you will have to download compile and install the program by issuing:
debian:~# wget http://www.winterdrache.de/freeware/png2ico/data/png2ico-src-2002-12-08.tar.gz

debian:~# tar -zxvf png2ico-src-2002-12-08.tar.gz...

debian:~# cd png2ico/

debian:/root/png2ico# make

debian:/root/png2ico# cp -rpf png2ico /usr/local/bin/
Convertion is pretty easy and it comes to executing simply:
debian:/home/hipo$ png2ico favicon.ico png_picture_to_convert.png
Note that your png_picture_to_convert.png has to be in a graphic dimensions of 16×16
That’s all now you should have your favicon.ico on your Linux created.
Tags: Convert, Convert png files to ico on Linux, data, debian cd, download, gz, Linux, make, png, program, root, src, tar, zxvf
Posted in Linux | 2 Comments »
Monday, December 2nd, 2013 
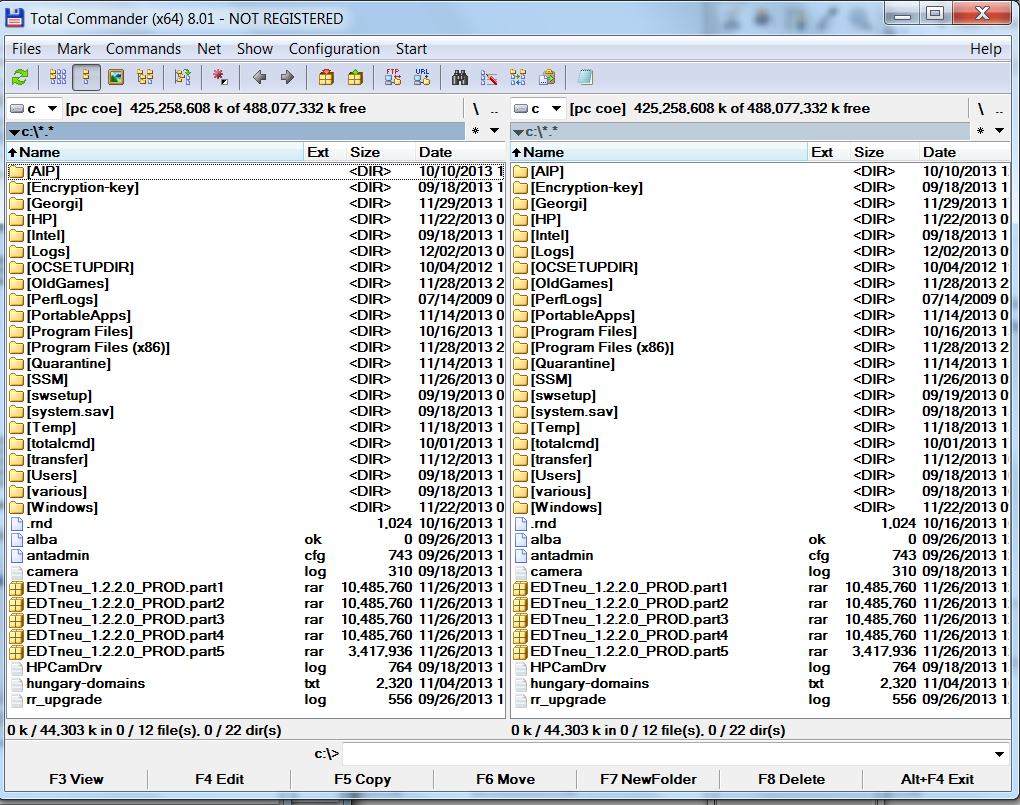
Whether coming from Linux background and you're forced to work with MS Windows or even if you're born as a Windows user and you hold a strong dislike for Windows File Explorer. You will certainly appreacite some Windows Explorer alternative like Total Commander.
1. Total Commander – Windows Advanced File Manager
Total Commander was widely spread and still is mostly used by advanced Windows users since the distant 1996 when it came to exist.
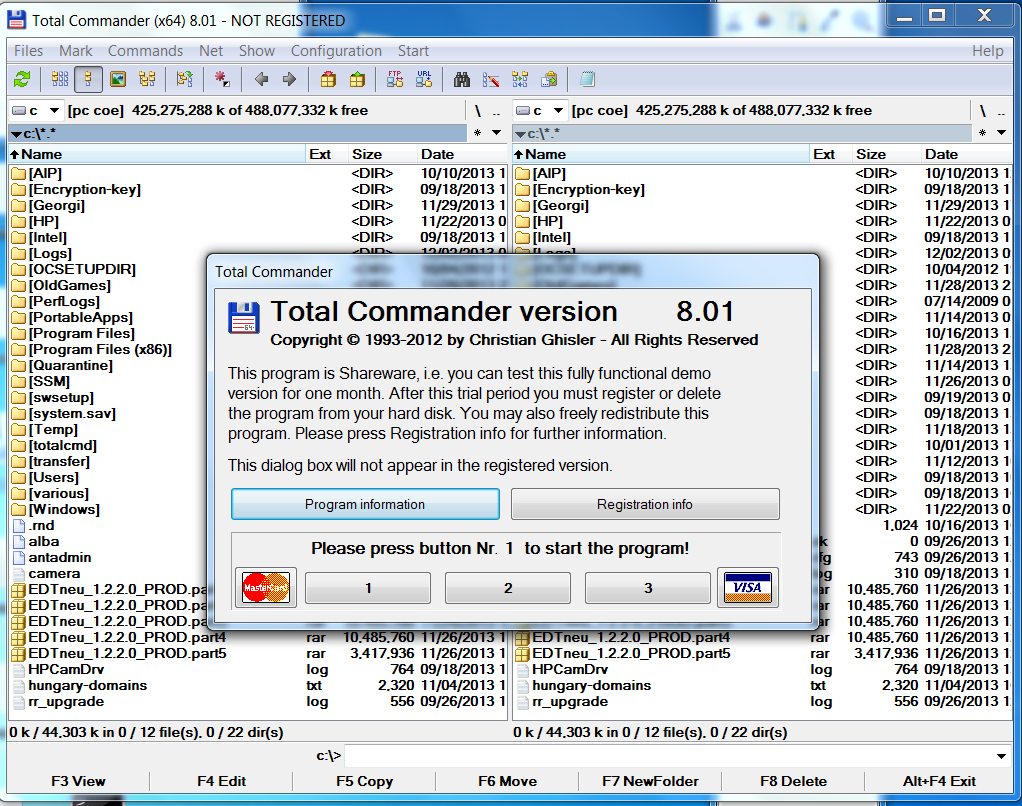
Total Commander is highly spread among programmers and computer professionals. It is well known in Russia and the ex-Soviet Union block countries Total Commander is strongly preferred over Windows Explorer by anyone who ever had to work in Old command line MS-DOS, Unix consoles / Midnight Commander etc. Total Commander has just one downside it is not free as in freedom but shareware, so you either have to find a crack for it or everytime you run it press a number before you can proceed with it, this however is not such a big issue as usually you work with computer whole day and even if you should press a number once to continue run as Shareware, you have to do it just once or twice a day.
So why use Total Commander or Free Commander preferred choice over Windows Explorer and why it is better for one to use it:
1. Security
Big part of viruses have hidden attribute. Of course we can’t see it’s presence in Windows Explorer, this is so common with USB Drive Viruses. While MS Explorer has limited capability in showing system file, Total Commander is different, once it is specified to show hidden files, all kind of hidden files are to be shown.
2. Support for multiple upload protocols like FTP and SFTP
Through Total Commander plugins you can enjoy simplified way to do every operation from one interface. Once plugin for SFTP / Webdav … plugins you will not have to install separate clients like WinSCP / CarotWebDav etc.
3. Play multimedia mp3 / Zip / Unzip, watch pictures
You can play your mp3s with no need for WinAmp, Unzip or IrfanView. As this is done internally in Total Commander through plugins. So using Total Commander saves you from multiple applications also gives you unified interface something which saves time and annoyance of separate applications pop-up windows.
4. Better file copying internal program
Total Commander's copier is much better than Windows Explorer default one. Lets say you have a power outage during copying a large file. What Windows Explorer will offer is overwrite the file loosing you time, whether Total Commander will continue copying from file byte size it stopped due to outage. Another advantage is it will be able to copy damaged files much better than Windows default copier program. TT's internal copy is not so quick as TerraCopy but faster than Windows Explorer default one..
5. More powerful search than Explorer's
TT has capabilities to search inside archives, set search encoding type. Search only by directories or files, set a range of dates from which files has to be found, search only hidden directories, search by directory file attribute, file size, look for duplicate files etc. etc.

Here is a complete list of Basic features embedded in Total Commander latest version which of time of writting is 8.01;
- Two file windows side by side
- Multiple language and Unicode support
- Enhanced search function
- Compare files (now with editor) / synchronize directories
- Quick View panel with bitmap display
- ZIP, ARJ, LZH, RAR, UC2, TAR, GZ, CAB, ACE archive handling + plugins
- Built-in FTP client with FXP (server to server) and HTTP proxy support
- Parallel port link, multi-rename tool
- Tabbed interface, regular expressions, history+favorites buttons
- Thumbnails view, custom columns, enhanced search
- Compare editor, cursor in lister, separate trees, logging, enhanced overwrite dialog etc.
- Unicode names almost everywhere, long names (>259 characters), password manager for ftp and plugins, synchronize empty dirs, 64 bit context menu, quick file filter (Ctrl+S)
- USB port connection via special, many improvements to ftp, synchronizing and other functions
Total Commander has a portable version for those who travel a lot and like to use it on multiple computers from a USB Stick.
2. Free Commander – A Total Commander Free for personal use Alternative

Free Commander is not open source but it is free to use for non-commercial use and not Shareware, so it is perfect alternative for those who like Total Commander but dislike fact you have to press a number on each TT start up and you have to see in Total Commander Title (NOT REGISTERED)
List of basic supported functions by Free Commander are;
- Dual-panel technology – horizontal and vertical
- Tabbed interface
- Optional tree view for each panel
- Built in file viewer to view files in hex, binary, text or image format
- File viewer inside archives too
- Built in archive handling: ZIP (read, write), CAB (read, write), RAR (read)
- Nested archive handling
- Built in FTP client
- Easy access to system folders, control panel, desktop and start menu
- Copy, move, delete, rename files and folders
- Multi rename tool
- Wipe files
- Create and verify MD5 checksums
- File splitting
- File properties and context menu
- Calculation of folder size
- Folder comparison / synchronization
- Modification of file date and attributes
- Folder / program favorites
- File searching (inside archive too)
- File filters for display
- User defined columns for detailed view
- DOS command line
- Multiple language support
Just like Total Command, Free Commander has a portable version for those who want run it on Windows machines with no admin permissions to install.
Tags: choice, copying, explorer, file, Free Commander, Ftp, Linux, multiple, program, programmers, protocols, Shareware, Total Commander, TT, Unicode, upload, view, Windows, windows explorer, Windows File Explorer, work
Posted in System Administration, Various, Windows | 3 Comments »
Sunday, July 29th, 2012 A friend of mine (Dido) who is learning C programming, has written a tiny chat server / client (peer to peer) program in C. His program is a very good learning curve for anyone desiring to learn basic C socket programming.
The program is writen in a way so it can be easily modified to work over UDP protocol with code:
struct sockaddr_in a;
a_sin_family=AF_INET;
a_sin_socktype=SOCK_DGRAM;
Here are links to the code of the Chat server/client progs:
Tiny C Chat Server Client source code
Tiny C Chat Client source code
To Use the client/server compile on the server host tiny-chat-serer-client.c with:
$ cc -o tiny-chat-server tiny-chat-server.c
Then on the client host compile the client;
$ cc -o tiny-chat-client tiny-chat-client.c
On the server host tiny-chat-server should be ran with port as argument, e.g. ;
$ ./tiny-chat-server 8888
To chat with the person running tiny-chat-server the compiled server should be invoked with:
$ ./tiny-chat-client 123.123.123.123 8888
123.123.123.123 is the IP address of the host, where tiny-chat-server is executed.
The chat/server C programs are actually a primitive very raw version of talk.
The programs are in a very basic stage, there are no condition checks for incorrectly passed arguments and with wrongly passed arguments it segfaults. Still for C beginners its useful …
Tags: Auto, c programming, c programs, c socket programming, chat client, chat server, checks, client, client host, client server, client source code, codeTo, cThen, curve, dido, Draft, family, ip address, learning c, learning curve, mine, minimalistic, peer to peer program, person, port, program, programming, Protocol, raw version, server c, server client, server host, sockaddr, Socket, socktype, stage, struct, struct sockaddr, Tiny, tiny c, UDP, version, way, writen
Posted in Programming | No Comments »
Monday, March 19th, 2012 
One of the company Debian Lenny 5.0 Webservers, where I'm working as sys admin sometimes stops to properly server HTTP requests.
Whenever this oddity happens, the Apache server seems to be running okay but it is not failing to return requested content
I can see the webserver listens on port 80 and establishing connections to remote hosts – the apache processes show normally as I can see in netstat …:
apache:~# netstat -enp 80

Active Internet connections (w/o servers)

Proto Recv-Q Send-Q Local Address Foreign Address State User Inode PID/Program name

tcp 0 0 xxx.xxx.xxx.xx:80 46.253.9.36:5665 SYN_RECV 0 0 -

tcp 0 0 xxx.xxx.xxx.xx:80 78.157.26.24:5933 SYN_RECV 0 0 -

...
Also the apache forked child processes show normally in process list:
apache:~# ps axuwwf|grep -i apache

root 46748 0.0 0.0 112300 872 pts/1 S+ 18:07 0:00 \_ grep -i apache

root 42530 0.0 0.1 217392 6636 ? Ss Mar14 0:39 /usr/sbin/apache2 -k start

www-data 42535 0.0 0.0 147876 1488 ? S Mar14 0:01 \_ /usr/sbin/apache2 -k start

root 28747 0.0 0.1 218180 4792 ? Sl Mar14 0:00 \_ /usr/sbin/apache2 -k start

www-data 31787 0.0 0.1 219156 5832 ? S Mar14 0:00 | \_ /usr/sbin/apache2 -k start
In spite of that, in any client browser to any of the Apache (Virtual hosts) websites, there is no HTML content returned…
This weird problem continues until the Apache webserver is retarted.
Once webserver is restarted everything is back to normal.
I use Apache Check Apache shell script set on few remote hosts to regularly check with nmap if port 80 (www) of my server is open and responding, anyways this script just checks if the open and reachable and thus using it was unable to detect Apache wasn't able to return back HTML content.
To work around the malfunctions I wrote tiny script – retart_apache_if_empty_content_is_returned.sh
The scripts idea is very simple;
A request is made a remote defined host with lynx text browser, then the output of lines is counted, if the output returned by lynx -dump http://someurl.com is less than the number returned whether normally invoked, then the script triggers an apache init script restart.
I've set the script to periodically run in a cron job, every 5 minutes each hour.
# check if apache returns empty content with lynx and if yes restart and log it

*/5 * * * * /usr/sbin/restart_apache_if_empty_content.sh >/dev/null 2>&1
This is not perfect as sometimes still, there will be few minutes downtime, but at least the downside will not be few hours until I am informed ssh to the server and restart Apache manually …
A quick way to download and set from cron execution my script every 5 minutes use:
apache:~# cd /usr/sbin

apache:/usr/sbin# wget -q https://www.pc-freak.net/bscscr/restart_apache_if_empty_content.sh

apache:/usr/sbin# chmod +x restart_apache_if_empty_content.sh

apache:/usr/sbin# crontab -l > /tmp/file; echo '*/5 * * * *' /usr/sbin/restart_apache_if_empty_content.sh 2>&1 >/dev/null
Tags: address state, apache processes, apache server, apache webserver, apache2, apacheroot, Auto, checks, child processes, client, client browser, content, cron, Draft, enp, everything, grep, HTML, HTTP, internet connections, lenny, Lynx, nmap, oddity, program, proto, Restart, restart apache, root, script, scripts, Shell, shell script, show, spite, ss, SYN, User, Virtual, virtual hosts, webservers, weird problem
Posted in System Administration, Web and CMS | 7 Comments »
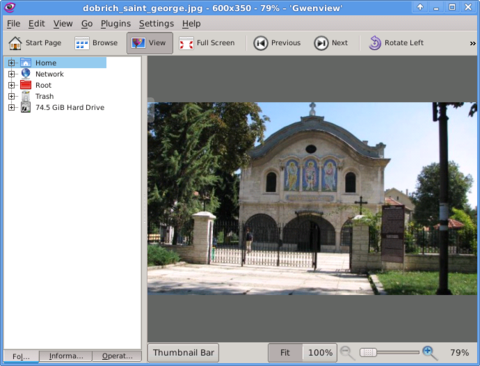
Saturday, March 17th, 2012 Default XFce picture viewer on Slackware Linux is GIMP (GNU Image Manipulation Program). Though GIMP is great for picture editting, it is rather strange why Patrick Volkerding compiled XFCE to use GIMP as a default picture viewer? The downsides of GIMP being default picture viewing program for Slackware's XFCE are the same like Xubuntu's XFCE risterroro, you can't switch easily pictures back and forward with some keyboard keys (left, right arrow keys, backspace or space etc.). Besides that another disadvantage of using GIMP are;
a) picture opening time in GIMP loading is significantly higher if compared to a simple picture viewer program like Gnome's default, eye of the gnome – eog.
b) GIMP is more CPU intensive and puts high load on each picture opening
A default Slackware install comes with two good picture viewing programs substitute for GIMP:
- Gwenview
-
- Geeqie
-
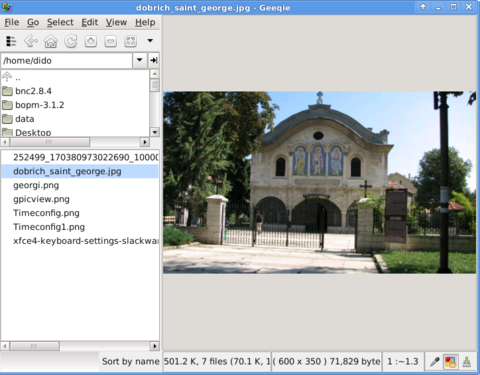
Both of the programs support picture changing, so if you open a picture you can switch to the other ones in the same directory as the first opened one.
I personally liked more Gwenview because it has more intutive picture switching controls. With it you can switch with keyboard keys space and backspace
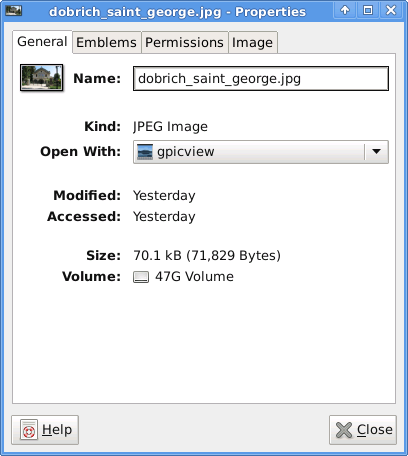
To change GIMP's default PNG, JPEG opening I had with mouse right button over a pic and in properties change, Open With: program.
If you're curious about the picture on on all screenshots, this is Church – Saint George (situated in the city center of Dobrich, Bulgaria).
St. Georgi / St. George Church is built in 1842 and is the oldest Orthodox Church in Dobrich.
In the Crimean War (1853-1856) the church was burned down and was restored to its present form in 1864.
gpicview is another cool picture viewing program, I like. Unfortunately on Slackware, there is no prebuild package and the only option is either to convert it with alien from deb package or to download source and compile as usual with ./configure && make && make install .
Downloading and compiling from source went just fine on Slackware Linux 13.37gpicview has more modern looking interface, than gwenview and geeqie. and is great for people who want to be in pace with desktop fashion 🙂
Tags: arrow, arrow keys, Auto, backspace, Button, center, change, city, configure, crimean war 1853, deb package, Desktop, desktop environment, dobrich bulgaria, download, Draft, eye, georgi, GIMP, Gnome, gnu image manipulation, gnu image manipulation program, image manipulation program, keyboard keys, manipulation, nbsp, Open, opening time, option, orthodox church, other ones, package, picture editting, png, program, Risterroro, st george church, substitute, time, XFCE, Xubuntu
Posted in Linux and FreeBSD Desktop, System Administration | No Comments »
Tuesday, March 13th, 2012 The default picture viewer on Xubuntu's XFCE is risterroro. Risterroro is quite lightweight, but anyways is lacking even basic functionality with reading a number of pictures in a directory and showing, them one by one lacks any picture automated slider. The lack of picture back/forward functionality makes picture viewing very inconvenient on those Linux distro.

Thanksfully this kind of unconfortable default behaviour on Xubuntu can easily be changed to use a handy picture viewer program called gpicview
xubuntu-linux:~# apt-get install --yes gpicview
Gpicview is a good minimalistic program which has all the functionality of the default GNOME picture viewer program eog – (eye of the Gnome). If you're aaccustomed to GNOME's eog you can always install and use eog instead 🙂
Tags: Auto, behaviour, default, default behaviour, directory, distro, Draft, eog, functionality, Gnome, gpicview, gpicviewGpicview, kind, Lack, Linux, linux distro, minimalistic, number, picture, program, Risterroro, slider, Thanksfully, viewer, XFCE, Xubuntu
Posted in Linux, Linux and FreeBSD Desktop, System Administration | No Comments »
Tuesday, February 28th, 2012  These days, I'm playing with The GIMP. I've been a GNU / Linux, FreeBSD user for already 11 years now but as I'm doing mostly system administration and I don't have much expertise in Panting or Computer Graphical Design, I've never put much time to learn more in the interesting area of graphical design. Hence until just recently, Just until now, I've never spend time with the GIMP (GNU Image Manipulation Program) and never realized how powerful this great program is. The more I learn about GIMP functionalities and how it works the more it makes me determined to learn some basic web design 🙂
The functionality which The GIMP offers in a basic install is quite rich, however by default on most Debian and Ubuntu installations many of the great plugins which easifies the way to edit pictures is missing.
Example for a very valuable functionality which is not present with standard gimp package installed on Debian and Ubuntu are:
…
Here I will mention here few words on:
- GIMP FX-Foundry Collection
GIMP FX-Foundry is a thoroughful collection of GIMP scripts (addon plugins), that automates many of the operations which requires a professional web design skills and gives an easy intuitive interface through which very robust "high level" graphic design can be accomplished. This additional GIMP extensions helps to create very unique design in just few simple steps, as well as gives multiple tools for the sake of easy pro design creation. For anyone looking for quick edit of images with GIMP FX-Foundry is a must have GIMP plugins extension. The script pack is located on http://gimpfx-foundry.sourceforge.net/
To install FX-Foundry scripts collection on Debian / Ubuntu / Linux Mint and other based Linux distributions:
debian:~# apt-get install --yes gimp-plugin-registry

...
gimp-plugin-registry package name is based on GIMP Plugin registry's website
. Gimp plugin registry contains many helpful design goodies 🙂
Once installed you will notice GIMP with a new menu on the main menus bar reading FX-Foundry :
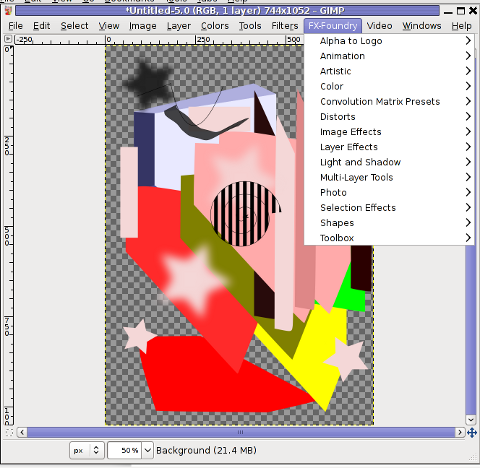
GIMP FX Foundry extensionos package contains 124 scripts for additional graphics manipulation. The collection contains less scripts than the ones provided by gimp-plugin-registry. package has 156 scripts inside.
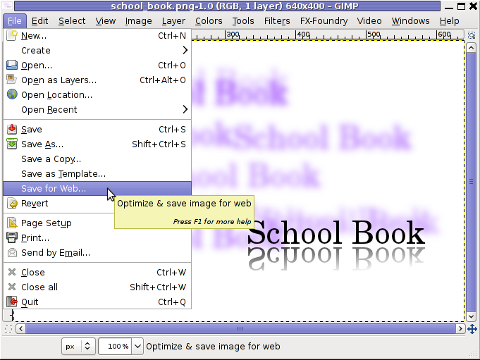
One of the most helpful GIMP addition from the package is the inclusion of Save for Web button under:
File -> Save for Web
Another very helpful .deb package which adds up to GIMP's design possibilities is gimp-data-extras .
gimp-data-extras adds 111 new GIMP Fill in Patterns , which can be used through the Blend Tool to Fill selected areas with color gradients.
To install gimp-data-extras on Debian:
debian:~# apt-get install --yes gimp-data-extras

...
Generally once installed this package will add to GIMP – an extra set of brushes, palettes, and gradients for The GIMP as you can read in the package description.
I was also quite stunned to find out the good old GIMP is capable of basic Video editting!!
On Debian and Ubuntu there is a package called gimp-gap which once installed adds an extra Video menu.

I've not tested the GIMP video editting capabilities yet, however I intend to learn something about it immediately when I have some free time left. You see the enormous list of Video editting possibilities GIMP obtaines with gimp-gap which btw stands for (The GIMP Animation Package).
To install gimp-gap:
debian:~# apt-get install --yes gimp-gap
I've noticed also the following list of others useful GIMP additions (mainly helpful in Web, Brochure and Logo Graphic Design) to install them:
debian:~# apt-get --yes install gimp-gmic gimp-ufraw gtkam-gimp gimp-gluas \gimp-dimage-color gimp-dds gimp-dcraw gimp-cbmplugs flegita-gimp gimp-texturize \gimp-resynthesizer gimp-lensfun gimp-gutenprint gtkam-gimp mrwtoppm-gimp
Here is the package description of the packages above command will install:
- gimp-cbmplugs – plugins for The GIMP to import/export Commodore 64 files
- gimp-data-extras – An extra set of brushes, palettes, and gradients for The GIMP
- gimp-dcraw – GIMP plug-in for loading RAW digital photos
- gimp-dds – DDS (DirectDraw Surface) plugin for the gimp
- gimp-dimage-color – GIMP plugin to convert Minolta DiMAGE pictures to sRGB colour space
- gimp-gap – The GIMP Animation Package
- gimp-gluas – Lua environment plug-in for GIMP
- gimp-gmic – GIMP plugin for GREYC's Magic Image Converter
- gimp-gutenprint – print plugin for the GIMP
- gimp-lensfun – Gimp plugin to correct lens distortion using the lensfun library
- gimp-normalmap – Normal map plugin for GIMP
- gimp-plugin-registry – repository of optional extensions for GIMP
- gimp-resynthesizer – Gimp plugin for texture synthesis
- gimp-texturize – generates large textures from a small sample
- gimp-ufraw – gimp importer for raw camera images
- flegita-gimp – Gnome Gimp scan plugin.
- gtkam-gimp – gtkam gimp plugin to open digital camera pictures
- mrwtoppm-gimp – GIMP-plugin to support Minolta DiMAGE 5/7/7i RAW images
Now after installing all this plugins and seeing all GIMP's power, I'm starting to wonder why are still people ranting Adobe PhotoShop is feature rich.
That's all, enjoy the great new GIMP features. Happy picture editting 😉
Tags: addon, Auto, basic web design, collection etc, Computer, copyright text, Design, design creation, Draft, existence, few words, foundry, freebsd user, functionalities, FX-Foundry, gnu image manipulation, gnu image manipulation program, graphical design, image manipulation program, intuitive interface, level, Linux, linux distributions, linux freebsd, manipulation, menu, Pack, package, photo, photo effects, plugin, plugin registry, professional web design, program, reading, SaveForWeb, script, script pack, simple steps, system, time, Ubuntu, ubuntu linux, unique design, web design skills
Posted in Linux, Linux and FreeBSD Desktop, System Administration, Various, Web and CMS | No Comments »


