Posts Tagged ‘Redhat’

CentOS 8 / Redhat 8 insert additional guests additions to VM to enable Fullscreen, Copy / Paste and Shared Folder from host OS

Monday, January 10th, 2022

virtualbox-guest-additions-install-on-centos-8.3-linux-oracle-logo

My experience with enabling virtualbox additions guest tools on many of the separate Linux distributions throughout time is pretty bad as it always is a pain in the ass to enable fully functional full screen and copy paste for Virtualbox…
 
For those who installed it for a first time vbox guest addition tools for Virtualbox are additional software components added so the Emulated Operating system
could allow better screen resolution and better mouse integration support.

So far I've installed virtualbox additions tools to CentOS 7 and Debian Linux various releases and faced complications there as well.
Few days ago my colleague Georgi Stoyanov have installed CentOS 8.3 with current version of VirtualBox 6.1 (vesrsion from beginning of 2022) and he has also shared had issues with enabling the CentOS 8.3 Linux to work with guestadditions but eventually found a resolution.

Thus he has shared with me the solution and I share it with you, so hopefully someone else could enable Guesttools on his CentOS 8.3 with less digging online.
The error received is:

# ./VBoxLinuxAdditions.run

Trying to install Guest Additions in RHEL 8.3.

VirtualBox Guest Additions: Starting.
VirtualBox Guest Additions: Building the VirtualBox Guest Additions kernel
modules. This may take a while.
VirtualBox Guest Additions: To build modules for other installed kernels, run
VirtualBox Guest Additions: /sbin/rcvboxadd quicksetup
VirtualBox Guest Additions: or
VirtualBox Guest Additions: /sbin/rcvboxadd quicksetup all
VirtualBox Guest Additions: Building the modules for kernel
4.18.0-193.el8.x86_64.

VirtualBox Guest Additions: Look at /var/log/vboxadd-setup.log to find out what
went wrong
ValueError: File context for /opt/VBoxGuestAdditions-6.0.20/other/mount.vboxsf already defined
VirtualBox Guest Additions: Running kernel modules will not be replaced until
the system is restarted
Press Return to close this window…

No idea what to do next. Been trying for sometime.


To enable guestaddtions in CentOS 8.3, e.g. get arount the error you have to:


1. Install all necessery dependncies RPMs required by GuestAddition tools


# dnf install tar bzip2 kernel-devel-$(uname -r) kernel-headers perl gcc make elfutils-libelf-devel

# dnf -y install gcc automake make kernel-headers dkms bzip2 libxcrypt-compat kernel-devel perl

2.  Run below semanage and restorecon commands


# semanage fcontext -d /opt/VBoxGuestAdditions-/other/mount.vboxsf
# restorecon /opt/VBoxGuestAdditions-/other/mount.vboxsf


3.  Insert Virtualbox guest additions ISO and Run it


centos-insert-guest-additions-linux-virtualbox-screenshot
 

Devices -> Insert Guest Additions CD Image


Click Run button to exec Vbox_GAs_6.0.18 script or run it manually

Run-Guest-Additions-screenshot-virtualbox-centos-8

or mount it manually with mount command and execute the VBoxLinuxAdditions.run to do so:


$ cd /run/media/`whoami`/VB*
$ su
# ./VBoxLinuxAdditions.run
Installing additional modules …
VirtualBox Guest Additions: Building the VirtualBox Guest Additions kernel modules.  This may take a while.
VirtualBox Guest Additions: Running kernel modules will not be replaced until the system is restarted
VirtualBox Guest Additions: Starting.


4. Reboot the VM
 

# reboot

5. Check and Confirm Virtualbox guest additions are properly installed and running
 

# lsmod | grep vbox


6. Enable Copy / Paste from to Virttual Machine e.g. Shared Clipboard / Shared Folder etc.


Share-Clipboard-in-Virtualbox-screenshot-centos-8


The three options most useful besides the support for FullScreen OS emulation by Virtualbox to enable right after
guesttools is on are:


1. Devices -> Shared Clipboard -> Bidirectional
2. Devices -> Drag and Drop -> Bidirectional
3. Devices -> Shared Folders -> Shared Folder Settings


KVM Virtual Machine RHEL 8.3 Linux install on Redhat 8.3 Linux Hypervisor with custom tailored kickstart.cfg

Friday, January 22nd, 2021

kvm_virtualization-logo-redhat-8.3-install-howto-with-kickstart

If you don't have tried it yet Redhat and CentOS and other RPM based Linux operationg systems that use anaconda installer is generating a kickstart file after being installed under /root/{anaconda-ks.cfg,initial-setup- ks.cfg,original-ks.cfg} immediately after the OS installation completes. Using this Kickstart file template you can automate installation of Redhat installation with exactly the same configuration as many times as you like by directly loading your /root/original-ks.cfg file in RHEL installer.

Here is the official description of Kickstart files from Redhat:

"The Red Hat Enterprise Linux installation process automatically writes a Kickstart file that contains the settings for the installed system. This file is always saved as /root/anaconda-ks.cfg. You may use this file to repeat the installation with identical settings, or modify copies to specify settings for other systems."


Kickstart files contain answers to all questions normally asked by the text / graphical installation program, such as what time zone you want the system to use, how the drives should be partitioned, or which packages should be installed. Providing a prepared Kickstart file when the installation begins therefore allows you to perform the installation automatically, without need for any intervention from the user. This is especially useful when deploying Redhat based distro (RHEL / CentOS / Fedora …) on a large number of systems at once and in general pretty useful if you're into the field of so called "DevOps" system administration and you need to provision a certain set of OS to a multitude of physical servers or create or recreate easily virtual machines with a certain set of configuration.
 

1. Create /vmprivate storage directory where Virtual machines will reside

First step on the Hypervisor host which will hold the future created virtual machines is to create location where it will be created:

[root@redhat ~]#  lvcreate –size 140G –name vmprivate vg00
[root@redhat ~]#  mkfs.ext4 -j -b 4096 /dev/mapper/vg00-vmprivate
[root@redhat ~]# mount /dev/mapper/vg00-vmprivate /vmprivate

To view what is the situation with Logical Volumes and  VG group names:

[root@redhat ~]# vgdisplay -v|grep -i vmprivate -A7 -B7
  Segments               1
  Allocation             inherit
  Read ahead sectors     auto
  – currently set to     8192
  Block device           253:0


  — Logical volume —
  LV Path                /dev/vg00/vmprivate
  LV Name                vmprivate
  VG Name                vg00
  LV UUID                VVUgsf-FXq2-TsMJ-QPLw-7lGb-Dq5m-3J9XJJ
  LV Write Access        read/write
  LV Creation host, time main.hostname.com, 2021-01-20 17:26:11 +0100
  LV Status              available
  # open                 1
  LV Size                150.00 GiB


Note that you'll need to have the size physically available on a SAS / SSD Hard Drive physically connected to Hypervisor Host.

To make the changes Virtual Machines storage location directory permanently mounted add to /etc/fstab

/dev/mapper/vg00-vmprivate  /vmprivate              ext4    defaults,nodev,nosuid 1 2

[root@redhat ~]# echo '/dev/mapper/vg00-vmprivate  /vmprivate              ext4    defaults,nodev,nosuid 1 2' >> /etc/fstab


2. Second we need to install the following set of RPM packages on the Hypervisor Hardware host

[root@redhat ~]# yum install qemu-kvm qemu-img libvirt virt-install libvirt-client virt-manager libguestfs-tools virt-install virt-top -y

3. Enable libvirtd on the host

[root@redhat ~]#  lsmod | grep -i kvm
[root@redhat ~]#  systemctl enable libvirtd

4. Configure network bridging br0 interface on Hypervisor


In /etc/sysconfig/network-scripts/ifcfg-eth0 you need to include:

NM_CONTROLED=NO

Next use nmcli redhat configurator to create the bridge (you can use ip command instead) but since the tool is the redhat way to do it lets do it their way ..

[root@redhat ~]# nmcli connection delete eno3
[root@redhat ~]# nmcli connection add type bridge autoconnect yes con-name br0 ifname br0
[root@redhat ~]# nmcli connection modify br0 ipv4.addresses 10.80.51.16/26 ipv4.method manual
[root@redhat ~]# nmcli connection modify br0 ipv4.gateway 10.80.51.1
[root@redhat ~]# nmcli connection modify br0 ipv4.dns 172.20.88.2
[root@redhat ~]# nmcli connection add type bridge-slave autoconnect yes con-name eno3 ifname eno3 master br0
[root@redhat ~]# nmcli connection up br0

5. Prepare a working kickstart.cfg file for VM


Below is a sample kickstart file I've used to build a working fully functional Virtual Machine with Red Hat Enterprise Linux 8.3 (Ootpa) .

#version=RHEL8
#install
# Run the Setup Agent on first boot
firstboot --enable
ignoredisk --only-use=vda
# Use network installation
#url --url=http://hostname.com/rhel/8/BaseOS
##url --url=http://171.23.8.65/rhel/8/os/BaseOS
# Use text mode install
text
#graphical
# System language
#lang en_US.UTF-8
keyboard --vckeymap=us --xlayouts='us'
# Keyboard layouts
##keyboard us
lang en_US.UTF-8
# Root password
rootpw $6$gTiUCif4$YdKxeewgwYCLS4uRc/XOeKSitvDJNHFycxWVHi.RYGkgKctTMCAiY2TErua5Yh7flw2lUijooOClQQhlbstZ81 --iscrypted
# network-stuff
# place ip=your_VM_IP, netmask, gateway, nameserver hostname 
network --bootproto=static --ip=10.80.21.19 --netmask=255.255.255.192 --gateway=10.80.21.1 --nameserver=172.30.85.2 --device=eth0 --noipv6 --hostname=FQDN.VMhost.com --onboot=yes
# if you need just localhost initially configured uncomment and comment above
##network В --device=lo --hostname=localhost.localdomain
# System authorization information
authconfig --enableshadow --passalgo=sha512 --enablefingerprint
# skipx
skipx
# Firewall configuration
firewall --disabled
# System timezone
timezone Europe/Berlin
# Clear the Master Boot Record
##zerombr
# Repositories
## Add RPM repositories from KS file if necessery
#repo --name=appstream --baseurl=http://hostname.com/rhel/8/AppStream
#repo --name=baseos --baseurl=http://hostname.com/rhel/8/BaseOS
#repo --name=inst.stage2 --baseurl=http://hostname.com ff=/dev/vg0/vmprivate
##repo --name=rhsm-baseos В  В --baseurl=http://172.54.8.65/rhel/8/rhsm/x86_64/BaseOS/
##repo --name=rhsm-appstream --baseurl=http://172.54.8.65/rhel/8/rhsm/x86_64/AppStream/
##repo --name=os-baseos В  В  В --baseurl=http://172.54.9.65/rhel/8/os/BaseOS/
##repo --name=os-appstream В  --baseurl=http://172.54.8.65/rhel/8/os/AppStream/
#repo --name=inst.stage2 --baseurl=http://172.54.8.65/rhel/8/BaseOS
# Disk partitioning information set proper disk sizing
##bootloader --location=mbr --boot-drive=vda
bootloader --append=" crashkernel=auto tsc=reliable divider=10 plymouth.enable=0 console=ttyS0 " --location=mbr --boot-drive=vda
# partition plan
zerombr
clearpart --all --drives=vda --initlabel
part /boot --size=1024 --fstype=ext4 --asprimary
part swap --size=1024
part pv.01 --size=30000 --grow --ondisk=vda
##part pv.0 --size=80000 --fstype=lvmpv
#part pv.0 --size=61440 --fstype=lvmpv
volgroup s pv.01
logvol / --vgname=s --size=15360 --name=root --fstype=ext4
logvol /var/cache/ --vgname=s --size=5120 --name=cache --fstype=ext4 --fsoptions="defaults,nodev,nosuid"
logvol /var/log --vgname=s --size=7680 --name=log --fstype=ext4 --fsoptions="defaults,nodev,noexec,nosuid"
logvol /tmp --vgname=s --size=5120 --name=tmp --fstype=ext4 --fsoptions="defaults,nodev,nosuid"
logvol /home --vgname=s --size=5120 --name=home --fstype=ext4 --fsoptions="defaults,nodev,nosuid"
logvol /opt --vgname=s --size=2048 --name=opt --fstype=ext4 --fsoptions="defaults,nodev,nosuid"
logvol /var/log/audit --vgname=s --size=3072 --name=audit --fstype=ext4 --fsoptions="defaults,nodev,nosuid"
logvol /var/spool --vgname=s --size=2048 --name=spool --fstype=ext4 --fsoptions="defaults,nodev,nosuid"
logvol /var --vgname=s --size=7680 --name=var --fstype=ext4 --fsoptions="defaults,nodev,nosuid"
# SELinux configuration
selinux --disabled
# Installation logging level
logging --level=debug
# reboot automatically
reboot
###
%packages
@standard
python3
pam_ssh_agent_auth
-nmap-ncat
#-plymouth
#-bpftool
-cockpit
#-cryptsetup
-usbutils
#-kmod-kvdo
#-ledmon
#-libstoragemgmt
#-lvm2
#-mdadm
-rsync
#-smartmontools
-sos
-subscription-manager-cockpit
# Tune Linux vm.dirty_background_bytes (IMAGE-439)
# The following tuning causes dirty data to begin to be background flushed at
# 100 Mbytes, so that it writes earlier and more often to avoid a large build
# up and improving overall throughput.
echo "vm.dirty_background_bytes=100000000" >> /etc/sysctl.conf
# Disable kdump
systemctl disable kdump.service
%end

Important note to make here is the MD5 set root password string in (rootpw) line this string can be generated with openssl or mkpasswd commands :

Method 1: use openssl cmd to generate (md5, sha256, sha512) encrypted pass string

[root@redhat ~]# openssl passwd -6 -salt xyz test
$6$xyz$rjarwc/BNZWcH6B31aAXWo1942.i7rCX5AT/oxALL5gCznYVGKh6nycQVZiHDVbnbu0BsQyPfBgqYveKcCgOE0

Note: passing -1 will generate an MD5 password, -5 a SHA256 encryption and -6 SHA512 encrypted string (logically recommended for better security)

Method 2: (md5, sha256, sha512)

[root@redhat ~]# mkpasswd –method=SHA-512 –stdin

The option –method accepts md5, sha-256 and sha-512
Theoretically there is also a kickstart file generator web interface on Redhat's site here however I never used it myself but instead use above kickstart.cfg
 

6. Install the new VM with virt-install cmd


Roll the new preconfigured VM based on above ks template file use some kind of one liner command line  like below:
 

[root@redhat ~]# virt-install -n RHEL8_3-VirtualMachine –description "CentOS 8.3 Virtual Machine" –os-type=Linux –os-variant=rhel8.3 –ram=8192 –vcpus=8 –location=/vmprivate/rhel-server-8.3-x86_64-dvd.iso –disk path=/vmprivate/RHEL8_3-VirtualMachine.img,bus=virtio,size=70 –graphics none –initrd-inject=/root/kickstart.cfg –extra-args "console=ttyS0 ks=file:/kickstart.cfg"

7. Use a tiny shell script to automate VM creation


For some clarity and better automation in case you plan to repeat VM creation you can prepare a tiny bash shell script:
 

#!/bin/sh
KS_FILE='kickstart.cfg';
VM_NAME='RHEL8_3-VirtualMachine';
VM_DESCR='CentOS 8.3 Virtual Machine';
RAM='8192';
CPUS='8';
# size is in Gigabytes
VM_IMG_SIZE='140';
ISO_LOCATION='/vmprivate/rhel-server-8.3-x86_64-dvd.iso';
VM_IMG_FILE_LOC='/vmprivate/RHEL8_3-VirtualMachine.img';

virt-install -n "$VMNAME" –description "$VM_DESCR" –os-type=Linux –os-variant=rhel8.3 –ram=8192 –vcpus=8 –location="$ISO_LOCATION" –disk path=$VM_IMG_FILE,bus=virtio,size=$IMG_VM_SIZE –graphics none –initrd-inject=/root/$KS_FILE –extra-args "console=ttyS0 ks=file:/$KS_FILE"


A copy of virt-install.sh script can be downloaded here

Wait for the installation to finish it should be visualized and if all installation is smooth you should get a login prompt use the password generated with openssl tool and test to login, then disconnect from the machine by pressing CTRL + ] and try to login via TTY with

[root@redhat ~]# virst list –all
 Id   Name        State
—————————
 2    
RHEL8_3-VirtualMachine   running

[root@redhat ~]#  virsh console RHEL8_3-VirtualMachine


redhat8-login-prompt

One last thing I recommend you check the official documentation on Kickstart2 from CentOS official website

In case if you later need to destroy the VM and the respective created Image file you can do it with:
 

[root@redhat ~]#  virsh destroy RHEL8_3-VirtualMachine
[root@redhat ~]#  virsh undefine RHEL8_3-VirtualMachine

Don't forget to celebreate the success and give this nice article a credit by sharing this nice tutorial with a friend or by placing a link to it from your blog 🙂


Enjoy !

Install and enable Sysstats IO / DIsk / CPU / Network monitoring console suite on Redhat 8.3, Few sar useful command examples

Tuesday, September 28th, 2021

linux-sysstat-monitoring-logo


Why to monitoring CPU, Memory, Hard Disk, Network usage etc. with sysstats tools?
 

Using system monitoring tools such as Zabbix, Nagios Monit is a good approach, however sometimes due to zabbix server interruptions you might not be able to track certain aspects of system performance on time. Thus it is always a good idea to 
Gain more insights on system peroformance from command line. Of course there is cmd tools such as iostat and top, free, vnstat that provides plenty of useful info on system performance issues or bottlenecks. However from my experience to have a better historical data that is systimized and all the time accessible from console it is a great thing to have sysstat package at place. Since many years mostly on every server I administer, I've been using sysstats to monitor what is going on servers over a short time frames and I'm quite happy with it. In current company we're using Redhats and CentOS-es and I had to install sysstats on Redhat 8.3. I've earlier done it multiple times on Debian / Ubuntu Linux and while I've faced on some .deb distributions complications of making sysstat collect statistics I've come with an article on Howto fix sysstat Cannot open /var/log/sysstat/sa no such file or directory” on Debian / Ubuntu Linux
 

Sysstat contains the following tools related to collecting I/O and CPU statistics:
iostat
Displays an overview of CPU utilization, along with I/O statistics for one or more disk drives.
mpstat
Displays more in-depth CPU statistics.
Sysstat also contains tools that collect system resource utilization data and create daily reports based on that data. These tools are:
sadc
Known as the system activity data collector, sadc collects system resource utilization information and writes it to a file.
sar
Producing reports from the files created by sadc, sar reports can be generated interactively or written to a file for more intensive analysis.

My experience with CentOS 7 and Fedora to install sysstat it was pretty straight forward, I just had to install it via yum install sysstat wait for some time and use sar (System Activity Reporter) tool to report collected system activity info stats over time.
Unfortunately it seems on RedHat 8.3 as well as on CentOS 8.XX instaling sysstats does not work out of the box.

To complete a successful installation of it on RHEL 8.3, I had to:

[root@server ~]# yum install -y sysstat


To make sysstat enabled on the system and make it run, I've enabled it in sysstat

[root@server ~]# systemctl enable sysstat


Running immediately sar command, I've faced the shitty error:


Cannot open /var/log/sysstat/sa18:
No such file or directory. Please check if data collecting is enabled”


Once installed I've waited for about 5 minutes hoping, that somehow automatically sysstat would manage it but it didn't.

To solve it, I've had to create additionally file /etc/cron.d/sysstat (weirdly RPM's post install instructions does not tell it to automatically create it)

[root@server ~]# vim /etc/cron.d/sysstat

# run system activity accounting tool every 10 minutes
0 * * * * root /usr/lib64/sa/sa1 60 59 &
# generate a daily summary of process accounting at 23:53
53 23 * * * root /usr/lib64/sa/sa2 -A &


  • /usr/local/lib/sa1 is a shell script that we can use for scheduling cron which will create daily binary log file.
  • /usr/local/lib/sa2 is a shell script will change binary log file to human-readable form.


[root@server ~]# chmod 600 /etc/cron.d/sysstat

[root@server ~]# systemctl restart sysstat


In a while if sysstat is working correctly you should get produced its data history logs inside /var/log/sa

[root@server ~]# ls -al /var/log/sa 


Note that the standard sysstat history files on Debian and other modern .deb based distros such as Debian 10 (in  y.2021) is stored under /var/log/sysstat

Here is few useful uses of sysstat cmds


1. Check with sysstat machine history SWAP and RAM Memory use


To lets say check last 10 minutes SWAP memory use:

[hipo@server yum.repos.d] $ sar -W  |last -n 10
 

Linux 4.18.0-240.el8.x86_64 (server)       09/28/2021      _x86_64_        (8 CPU)

12:00:00 AM  pswpin/s pswpout/s
12:00:01 AM      0.00      0.00
12:01:01 AM      0.00      0.00
12:02:01 AM      0.00      0.00
12:03:01 AM      0.00      0.00
12:04:01 AM      0.00      0.00
12:05:01 AM      0.00      0.00
12:06:01 AM      0.00      0.00

[root@ccnrlb01 ~]# sar -r | tail -n 10
14:00:01        93008   1788832     95.06         0   1357700    725740      9.02    795168    683484        32
14:10:01        78756   1803084     95.81         0   1358780    725740      9.02    827660    652248        16
14:20:01        92844   1788996     95.07         0   1344332    725740      9.02    813912    651620        28
14:30:01        92408   1789432     95.09         0   1344612    725740      9.02    816392    649544        24
14:40:01        91740   1790100     95.12         0   1344876    725740      9.02    816948    649436        36
14:50:01        91688   1790152     95.13         0   1345144    725740      9.02    817136    649448        36
15:00:02        91544   1790296     95.14         0   1345448    725740      9.02    817472    649448        36
15:10:01        91108   1790732     95.16         0   1345724    725740      9.02    817732    649340        36
15:20:01        90844   1790996     95.17         0   1346000    725740      9.02    818016    649332        28
Average:        93473   1788367     95.03         0   1369583    725074      9.02    800965    671266        29


2. Check system load? Are my processes waiting too long to run on the CPU?

[root@server ~ ]# sar -q |head -n 10
Linux 4.18.0-240.el8.x86_64 (server)       09/28/2021      _x86_64_        (8 CPU)

12:00:00 AM   runq-sz  plist-sz   ldavg-1   ldavg-5  ldavg-15   blocked
12:00:01 AM         0       272      0.00      0.02      0.00         0
12:01:01 AM         1       271      0.00      0.02      0.00         0
12:02:01 AM         0       268      0.00      0.01      0.00         0
12:03:01 AM         0       268      0.00      0.00      0.00         0
12:04:01 AM         1       271      0.00      0.00      0.00         0
12:05:01 AM         1       271      0.00      0.00      0.00         0
12:06:01 AM         1       265      0.00      0.00      0.00         0


3. Show various CPU statistics per CPU use
 

On a multiprocessor, multi core server sometimes for scripting it is useful to fetch processor per use historic data, 
this can be attained with:


[hipo@server ~ ] $ mpstat -P ALL
Linux 4.18.0-240.el8.x86_64 (server)       09/28/2021      _x86_64_        (8 CPU)

06:08:38 PM  CPU    %usr   %nice    %sys %iowait    %irq   %soft  %steal  %guest  %gnice   %idle
06:08:38 PM  all    0.17    0.02    0.25    0.00    0.05    0.02    0.00    0.00    0.00   99.49
06:08:38 PM    0    0.22    0.02    0.28    0.00    0.06    0.03    0.00    0.00    0.00   99.39
06:08:38 PM    1    0.28    0.02    0.36    0.00    0.08    0.02    0.00    0.00    0.00   99.23
06:08:38 PM    2    0.27    0.02    0.31    0.00    0.06    0.01    0.00    0.00    0.00   99.33
06:08:38 PM    3    0.15    0.02    0.22    0.00    0.03    0.01    0.00    0.00    0.00   99.57
06:08:38 PM    4    0.13    0.02    0.20    0.01    0.03    0.01    0.00    0.00    0.00   99.60
06:08:38 PM    5    0.14    0.02    0.27    0.00    0.04    0.06    0.01    0.00    0.00   99.47
06:08:38 PM    6    0.10    0.02    0.17    0.00    0.04    0.02    0.00    0.00    0.00   99.65
06:08:38 PM    7    0.09    0.02    0.15    0.00    0.02    0.01    0.00    0.00    0.00   99.70


sar-sysstat-cpu-statistics-screenshot

Monitor processes and threads currently being managed by the Linux kernel.

[hipo@server ~ ] $ pidstat

pidstat-various-random-process-statistics

[hipo@server ~ ] $ pidstat -d 2


pidstat-show-processes-with-most-io-activities-linux-screenshot

This report tells us that there is few processes with heave I/O use Filesystem system journalling daemon jbd2, apache, mysqld and supervise, in 3rd column you see their respective PID IDs.

To show threads used inside a process (like if you press SHIFT + H) inside Linux top command:

[hipo@server ~ ] $ pidstat -t -p 10765 1 3

Linux 4.19.0-14-amd64 (server)     28.09.2021     _x86_64_    (10 CPU)

21:41:22      UID      TGID       TID    %usr %system  %guest   %wait    %CPU   CPU  Command
21:41:23      108     10765         –    1,98    0,99    0,00    0,00    2,97     1  mysqld
21:41:23      108         –     10765    0,00    0,00    0,00    0,00    0,00     1  |__mysqld
21:41:23      108         –     10768    0,00    0,00    0,00    0,00    0,00     0  |__mysqld
21:41:23      108         –     10771    0,00    0,00    0,00    0,00    0,00     5  |__mysqld
21:41:23      108         –     10784    0,00    0,00    0,00    0,00    0,00     7  |__mysqld
21:41:23      108         –     10785    0,00    0,00    0,00    0,00    0,00     6  |__mysqld
21:41:23      108         –     10786    0,00    0,00    0,00    0,00    0,00     2  |__mysqld

10765 – is the Process ID whose threads you would like to list

With pidstat, you can further monitor processes for memory leaks with:

[hipo@server ~ ] $ pidstat -r 2


4. Report paging statistics for some old period


[root@server ~ ]# sar -B -f /var/log/sa/sa27 |head -n 10
Linux 4.18.0-240.el8.x86_64 (server)       09/27/2021      _x86_64_        (8 CPU)

15:42:26     LINUX RESTART      (8 CPU)

15:55:30     LINUX RESTART      (8 CPU)

04:00:01 PM  pgpgin/s pgpgout/s   fault/s  majflt/s  pgfree/s pgscank/s pgscand/s pgsteal/s    %vmeff
04:01:01 PM      0.00     14.47    629.17      0.00    502.53      0.00      0.00      0.00      0.00
04:02:01 PM      0.00     13.07    553.75      0.00    419.98      0.00      0.00      0.00      0.00
04:03:01 PM      0.00     11.67    548.13      0.00    411.80      0.00      0.00      0.00      0.00


5.  Monitor Received RX and Transmitted TX network traffic perl Network interface real time
 

To print out Received and Send traffic per network interface 4 times in a raw

sar-sysstats-network-traffic-statistics-screenshot
 

[hipo@server ~ ] $ sar -n DEV 1 4


To continusly monitor all network interfaces I/O traffic

[hipo@server ~ ] $ sar -n DEV 1


To only monitor a certain network interface lets say loopback interface (127.0.0.1) received / transmitted bytes

[hipo@server yum.repos.d] $  sar -n DEV 1 2|grep -i lo
06:29:53 PM        lo      0.00      0.00      0.00      0.00      0.00      0.00      0.00      0.00
06:29:54 PM        lo      0.00      0.00      0.00      0.00      0.00      0.00      0.00      0.00
Average:           lo      0.00      0.00      0.00      0.00      0.00      0.00      0.00      0.00


6. Monitor block devices use
 

To check block devices use 3 times in a raw
 

[hipo@server yum.repos.d] $ sar -d 1 3


sar-sysstats-blockdevice-statistics-screenshot
 

7. Output server monitoring data in CSV database structured format


For preparing a nice graphs with Excel from CSV strucuted file format, you can dump the collected data as so:

 [root@server yum.repos.d]# sadf -d /var/log/sa/sa27 — -n DEV | grep -v lo|head -n 10
server-name-fqdn;-1;2021-09-27 13:42:26 UTC;LINUX-RESTART    (8 CPU)
# hostname;interval;timestamp;IFACE;rxpck/s;txpck/s;rxkB/s;txkB/s;rxcmp/s;txcmp/s;rxmcst/s;%ifutil
server-name-fqdn;-1;2021-09-27 13:55:30 UTC;LINUX-RESTART    (8 CPU)
# hostname;interval;timestamp;IFACE;rxpck/s;txpck/s;rxkB/s;txkB/s;rxcmp/s;txcmp/s;rxmcst/s;%ifutil
server-name-fqdn;60;2021-09-27 14:01:01 UTC;eth1;19.42;16.12;1.94;1.68;0.00;0.00;0.00;0.00
server-name-fqdn;60;2021-09-27 14:01:01 UTC;eth0;7.18;9.65;0.55;0.78;0.00;0.00;0.00;0.00
server-name-fqdn;60;2021-09-27 14:01:01 UTC;eth2;5.65;5.13;0.42;0.39;0.00;0.00;0.00;0.00
server-name-fqdn;60;2021-09-27 14:02:01 UTC;eth1;18.90;15.55;1.89;1.60;0.00;0.00;0.00;0.00
server-name-fqdn;60;2021-09-27 14:02:01 UTC;eth0;7.15;9.63;0.55;0.74;0.00;0.00;0.00;0.00
server-name-fqdn;60;2021-09-27 14:02:01 UTC;eth2;5.67;5.15;0.42;0.39;0.00;0.00;0.00;0.00

To graph the output data you can use Excel / LibreOffice's Excel equivalent Calc or if you need to dump a CSV sar output and generate it on the fly from a script  use gnuplot 


What we've learned?


How to install and enable on cron sysstats on Redhat and CentOS 8 Linux ? 
How to continuously monitor CPU / Disk and Network, block devices, paging use and processes and threads used by the kernel per process ?  
As well as how to export previously collected data to CSV to import to database or for later use inrder to generate graphic presentation of data.
Cheers ! 🙂


How to configure static DNS and Search domain for Redhat / CentOS and Redhat Linux

Wednesday, February 3rd, 2021

Fedora-Red-Hat-and-CentOS-fix-DNS-resolv-conf-automatically-deleted-records
In latest Redhat based OS-es Fedora / CentOS / Redhat etc. just like on many other Linux distributions, we have /etc/resolv.conf being overwritten by NetworkManager and / or systemd configurations setup which since some time has been introduced to be a "more sophisticated" (default)  so the file is being written by Network Manager / dhcp or systemd config. Though the idea is good, having other programs modify /etc/resolv.conf is a real pain in the ass especially as you end up with an empty file because some service has overwritten what you have placed in the file and the DNS records and Search Domain is deleted forever. If you're not aware of this "new cool" linux feature you might first think that it was a bug that has ovewritten /etc/resolv.conf but ok guys as Bill Gates loved to say "this is not a bug it is a feature", so any attemps you make to manually change /etc/resolv.conf will be soon gone 🙂

This is pretty annoying for old school sysadmins which like to just set the necessery Domain name server resolving

search Subdomain.SearchDomain.Com
nameserver xxx.xxx.xxx.xxx
nameserver yyy.yyy.yyy.yyy


However as said Nowdays if you just place the desired config with in /etc/resolv.conf on next Server reboot or Network restart (or next fetch of DHCP if the ethernet interface IPs are being obtained via DHCP protocol) you will end up in a situation with an empty /etc/resolv.conf  with one commented line reading:

[root@redhat ~]# cat /etc/resolv.conf
# Generated by NetworkManager

To make the DNS and Search Domain be always presented on any network restart or reboot on the server hence you will need to define  DNS1 DNS2 DNS3 etc. and SEARCH variable inside the network configuration files for Bridge or Network interfaces located in /etc/sysconfig/network-scripts/ifcfg-br0 /etc/sysconfig/network-scripts/ifcfg-eno1np0 etc.  that will automatically append above search / nameserver fields in /etc/resolv.conf on any NetworkManager or system restart.
Below is example with the variables added to a Network bridge configuration on Redhat 8.3 (Ootpa):

[root@redhat ~]# cat /etc/sysconfig/network-scripts/ifcfg-br0
STP=yes
BRIDGING_OPTS=priority=32768
TYPE=Bridge
PROXY_METHOD=none
BROWSER_ONLY=no
BOOTPROTO=none
DEFROUTE=yes
IPV4_FAILURE_FATAL=no
IPV6INIT=yes
IPV6_AUTOCONF=yes
IPV6_DEFROUTE=yes
IPV6_FAILURE_FATAL=no
IPV6_ADDR_GEN_MODE=stable-privacy
NAME=br0
UUID=f87e54a8-0fc4-4197-8ccc-0d8a671f30d0
DEVICE=br0
ONBOOT=yes
IPADDR=10.10.51.16
PREFIX=26
GATEWAY=10.10.51.1

DNS1="172.80.11.2"
DNS2="172.80.11.3"
DNS3="172.80.11.4"
SEARCH="sub.search-domain.com"


To test the configuration does append proper records into /etc/resolv.conf on Network restart  or /sbin/reboot reload the network.

[root@redhat ~]# systemctl restart NetworkManager


The result is you should have a good looking resolv.conf as so

[root@redhat ~]#  cat /etc/resolv.conf
# Generated by NetworkManager
search sub.search-domain.com
nameserver 172.20.88.2
nameserver 172.20.88.3
nameserver 172.20.88.4


Enable printing from Windows and Macs remotely through Linux Print server – Share Brother Printer DCP-1610W with Linux CUPS and Samba Windows Share

Thursday, March 23rd, 2017

Brother-Printer-model-DCP-1610W-printer-scanner-and-copier-in-one-picture
I've recently bought a new Printer model Brother DCP 1610W and as in my home I have already a small Linux router and a web server where this blog and a couple of other websites runs and I need multiple PC / notebook / mobile phone enabled people to print on the Printer easily pretty much like a Printing server for a Small Office environment.

To do that of course I needed it configured to be accessible remotely for print via LAN and Wireless network. The task is not a complex one and printing remotely over the network is a standard thing many company organizations / universities and univerities does for quite some time and hence nowadays most printers are network connect ready so you just have to place them inside your home or corporate network and use the time to configure them via their web configuration interface or even some have their own embedded wifi adapter, as well as many printers nowdays can even be ready to print directly by just connecting the Printer to the Wi-Fi network and installing its drivers on a Win host.

Anyhow the most common way for both home printer configurations and corporate I'm aware of still is to Share the printer via Windows Server or Win Server Domain so anyone connected to the Network to be able to Add the printer via Winblows.

In the case i'm going to describe below my home the Wi-Fi router is connected to an 5 Port Network Switch (HUB) which on its hand is connected to the Linux router which serves multiple things (a Linux router, a hosting server (web server and a database server hosted, a mail server, traffic proxy server, a firewall and a NAT router), I decided to Share the printer to Wi-Fi connected and LAN clients directly switched via an UTP cable to the switch by using the good old Linux Samba Sharing server.

I did not actually do that for a really long time hence before I started I did some quick research to get an idea on the general steps to partake to succeed in Sharing the Printer over the network of this Debian's Wiki SystemPrinting Guide was mostly helpful.


1. Downloading and Installing necessery Brother Printer deb packages
 

A small remark to make here is my Linux server is running Debian GNU / Linux and hence this article is giving details on how Printer can be Shared on Debian though a minor adaptation of the article should make it possible to install also on any RHEL / CentOS / SuSE etc. Redhat based RPM Linux distribution.)

First step to do is to download Brother printer vendor provided drivers as of moment of writting this article they're here

To download the drivers get the proper links and use wget or curl to download all the necessery .deb archives in lets say in /root/brother-printer-drivers e.g. before that create the folder with:
 

root@linux:/root# mkdir /root/brother-printer-drivers

Also it might be helpful for those who need some other Brother Printer Linux driver complete list of Brother Printer all Linux drivers as of time of writting this post is found on this URL here

Next you need to install following Brother printer driver deb packages brscan-skey brscan4 dcp1610wcupswrapper dcp1610wlpr

root@linux:/root# cd brother-printer-drivers
root@linux:/root/brother-printer-drivers# dpkg -i –force-all brscan-skey-0.2.4-1.amd64.deb

root@linux:/root# dpkg -i –force-all brscan4-0.4.4-1.amd64.deb

root@linux:/root# dpkg -i –force-all dcp1610wcupswrapper-3.0.1-1.i386.deb

root@linux:/root# dpkg -i –force-all dcp1610wlpr-3.0.1-1.i386.deb

root@linux/root# cd  ../


Once installed dpkg -l should show like so:
 

root@linux:/root# dpkg -l |grep -i brother
ii  brscan-skey                                0.2.4-1                      Brother Linux scanner S-KEY tool
ii  brscan4                                    0.4.4-1                      Brother Scanner Driver
ii  dcp1610wcupswrapper                        3.0.1-1                      Brother DCP-1610W CUPS wrapper driver
ii  dcp1610wlpr                                3.0.1-1                      Brother DCP-1610W LPR driver

Brother's vendor provided packages will install drivers under /opt/brother
 

root@linux:/root# ls -al /opt/brother/
общо 16
drwxr-xr-x 4 root root 4096 яну 26 13:58 ./
drwxr-xr-x 3 root root 4096 яну 26 13:55 ../
drwxr-xr-x 3 root root 4096 яну 26 13:58 Printers/
drwxr-xr-x 4 root root 4096 яну 26 13:58 scanner/


2. Installing CUPS Printing Service and related Filters and Postscript packages necessery for PDF processing on CUPS server side


root@linux:/root#  apt-get install –yes cups cups-client cups-common cups-pdf cups-ppdc foomatic-db foomatic-db-engine foomatic-filters foomatic-filters-ppds openprinting-ppds lpr hp-ppd hpijs cups-pdf ghostscript-cups

Your printing should work normally without cups-pdf and ghostscript-cups packages installed but I install them just in case if PDF processing is problematic you can skip that.

It is also useful to install sane and sane-utils packages if you're going to use the brother's scanner capabilities.

root@linux:/root# apt-get install –yes sane sane-utils

Note that considering that all packages installed fine and the CUPS service is running, this should have set a proper printer into /etc/printcap a short database used to describe printers. printcap file is being used by UNIX's spooling system and allows you to dynamic addition and deletion of printers, for Linux / *Nix hosts which have more than one printer connected and added in CUPs records for the various printer goes there.
With a single Brother DCP-1610W Printer like my case is you should have records similar to these:

root@linux:~/brother-printer-drivers# cat /etc/printcap
DCP1610W:\
        :mx=0:\
        :sd=/var/spool/lpd/DCP1610W:\
        :sh:\
        :lp=/dev/usb/lp0:\
        :if=/opt/brother/Printers/DCP1610W/lpd/filter_DCP1610W:


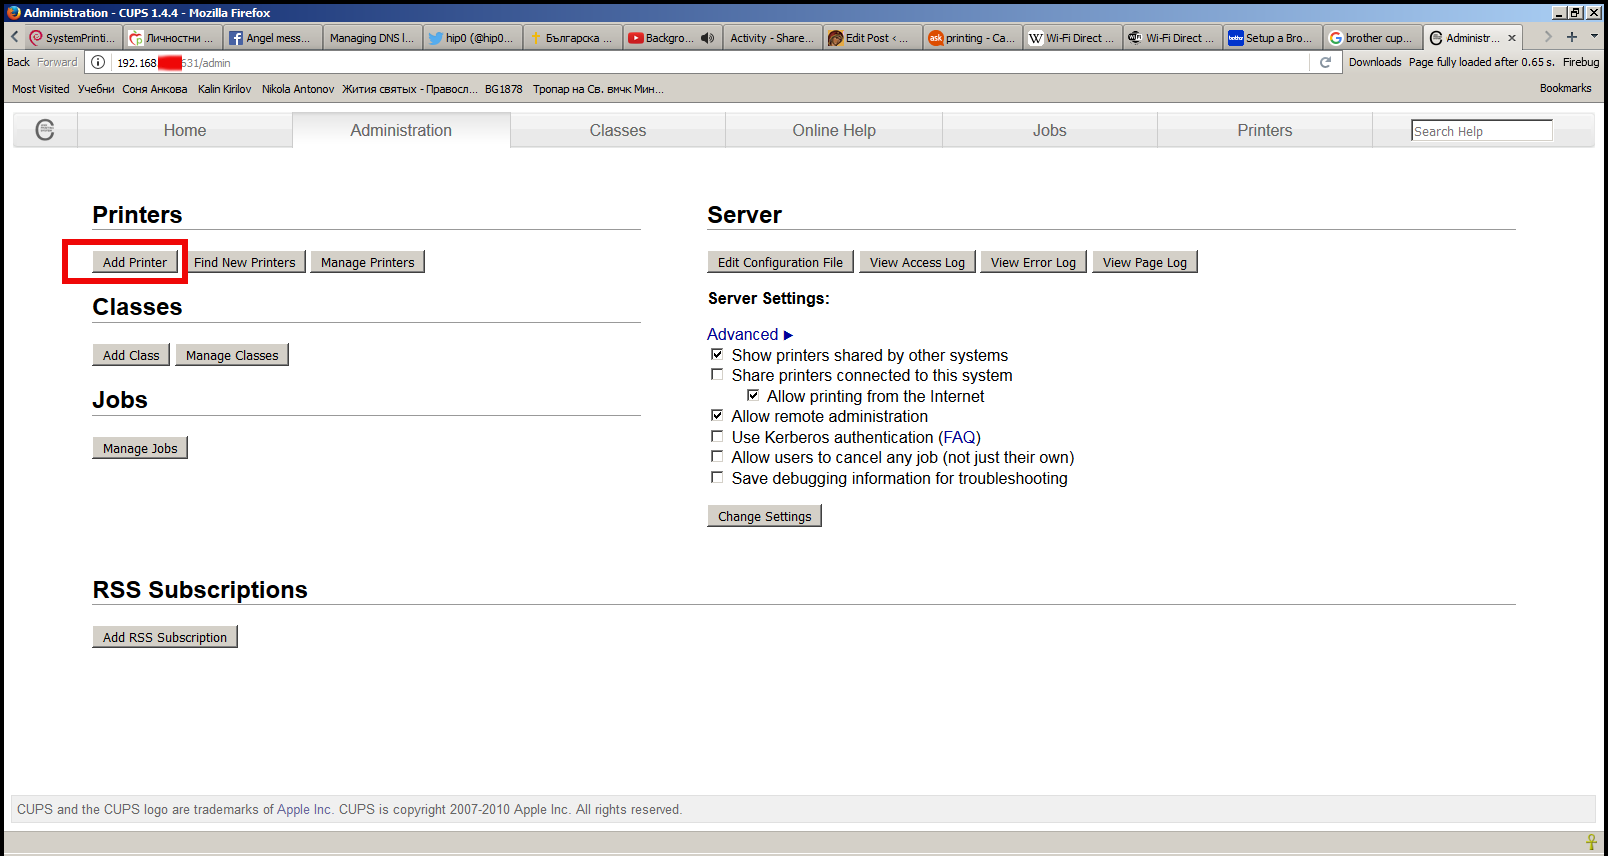
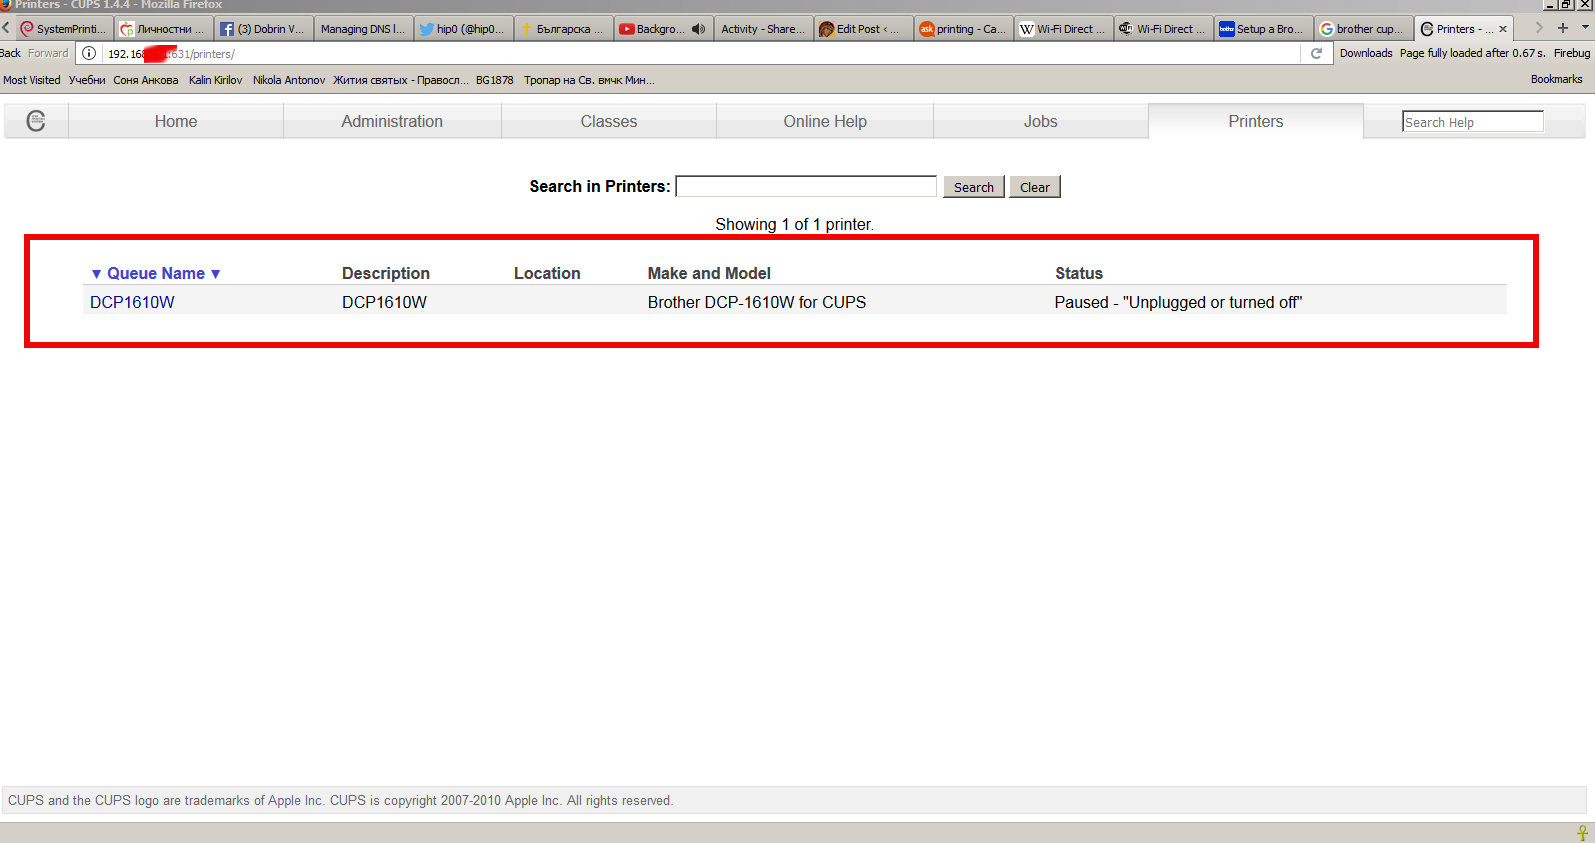
3. Adding a Printer in CUPS the easy way through CUPS Printing System Web Interface


CUPS has a nice web interface for setting up and administering printers and print queues.

Below is a selfexplanatory screenshot of Add Printer screen 

add-a-new-printer-cups-web-admin-interface-screenshot-in-a-firefox-browser  .


Use your favourite browser (Firefox, Opera, Chromium, lynx, elinks – yes the great news is console / terminal browsers are also supported well by cups web iface) to display interface and add a printer via the Administration screen. If you are asked for a username and password see here.

cups-web-admin-interface-accessed-in-browser-listing-brother-dcp1610w-printer-screenshot

There are three sections. The first is for local printers; that is, printers which are usually attached to the machine you are using. These are very often printers using a USB connection but can be parallel or serial port printers.

Adding a USB printer is a common occurance and one should automatically be detected as a local printer and a URI (Unified Resource Indicator) for its connection displayed on the next page.
 

The Other Network Printers section requires you to specify the destination for the remote print queue/printer, which could be on the local network or many kilometres away. AppSocket is almost always available on a network printer and other devices and requires only the IP address of the printer and a port number. An Internet Printing Protocol (IPP) URI is the preferrred choice for connecting to another CUPS server because it is CUPS' native protocol. ipp14 is the ipp backend from CUPS 1.4 and Debian-specific. It is provided because some devices do not work with the current ipp backend, which has a stricter adherence to the IPP standard. A Line Printer Daemon (LPD) URI could be considered if the remote printing service does not support IPP satisfactorily or at all. As before, when a remote print queue is doing the filtering choose RAW as the Make/Manufacturer.


4. Printer Status and Control testing whether CUPS printing is up and running


Once cups is installed and hopefully up and running you should see the cups process up and running to check it do:

root@linux:/root# /etc/init.d/cups status; ps axuwwf|grep -i cups|grep -v grep
Status of Common Unix Printing System: cupsd is running.
root      2815  0.0  0.0  75364  2912 ?        Ss   Mar17   0:00 /usr/sbin/cupsd -C /etc/cups/cupsd.conf

To get some further testing you can also use lpstat command and should get ouput similar to belows:
 

root@linux:/root# lpstat -t
scheduler is running
no system default destination
device for DCP1610W: usb://Brother/DCP-1610W%20series
DCP1610W accepting requests since Fri Mar 17 23:03:37 2017
printer DCP1610W disabled since Fri Mar 17 23:03:37 2017 –
        Unplugged or turned off

At the moment of issuing above command it shows printer is disabled because of moment of execution the printer was turned off for a while cause I was not needing it you should get usually an output of enabled and ready to print.

lpstat is also about to report whether a queue is accepting jobs and what is yet to be printed you can do


5. Install and Configure Samba Sharing Server on the Linux server


You can setup CUPS to allow Windows machines to print to a CUPS server using an http address.

First, install the samba package. When you are asked to use WINS, say yes.

root@linux:/root#  apt-get install samba

Next you might want to set setup your /etc/cups/cupsd.conf file by default CUPS would listen to LPD's port 631 if you don't have a strong firewall isolating you from the Internet on port 631 you might want to change that port to another one lets say to Port 49651.


I personally prefer keep the default port 631 and do use a robust firewall. If you want to change it modify config to something like:

# Our private connection we listen to Listen *:49651 # Allow machines on local network to use printers <Location /printers> Order allow,deny Allow 192.168.0.* Allow 192.168.1.* </Location>

If you like to filter access to CUPs daemon to receive Printing requests to be originating only from the local network place in smb.conf also something with your private network ranges:

# Allow machines on local network to use printers

<Location /printers>
Order allow,deny
Allow 192.168.0.*
Allow 192.168.1.*
Allow 192.168.2.*
</Location>
<Location />
  # Allow remote administration…
  Order allow,deny
##  Allow all
Allow 192.168.0.*
Allow 192.168.1.*
Allow 192.168.2.*
</Location>
<Location />
  # Allow remote administration…
  Order allow,deny
##  Allow all
Allow 192.168.0.*
Allow 192.168.1.*
Allow 192.168.2.*
</Location>
<Location /admin>
  # Allow remote administration…
  Order allow,deny
##  Allow all
Allow 192.168.0.*
Allow 192.168.1.*
Allow 192.168.2.*
</Location>


This will listen on port 49651 from any network. You may use some other port number besides 631. Note that the dynamic and/or private ports as specified by the IANA are in the range 49152 through 65535. Also, this will only allow computers from the local network to print to the CUPS printers.
 

6. Use CUPS Printing server to print over the network directly


Next you need to restart the CUPS daemon once again as it will be used for samba printing


# service cups restart


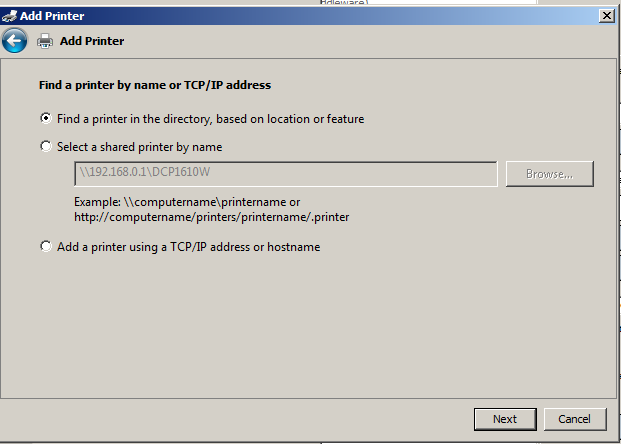
Now on each Windows machine, Choose that you want to install a network printer and that you want to install a printer on the Internet or home/office network. The URL you will use should be smth like:


http://<cups_server_hostname>:49651/printers/DCP1610W


Lastly, select the Brother downloaded from Internet or the one that's available on the Install CD, for any other vendor printer if it is lets say HP Printer or Canon to install use the respective provided driver or as a last resort use the Generic section driver labeled MS Publisher Color Printer.


7. Configure Samba to Share CUPS network enabled printer


I've done a minor changes in default installed /etc/samba/smb.conf to make the printer accessible from The Samba server here is the main things to consider changing:
 

# Change this to the workgroup/NT-domain name your Samba server will part of
   workgroup = WORKGROUP

#   security = user
security = share

[printers]
   comment = PC Freak Printer
   browseable = yes
   path = /var/spool/samba
   printable = yes
   guest ok = yes
   read only = yes
   create mask = 0700

# Windows clients look for this share name as a source of downloadable
# printer drivers
[print$]
   comment = Printer Drivers
   path = /var/lib/samba/printers
   browseable = yes
   read only = yes
   guest ok = yes


Next restart Samba server to make the new setting take affect:
 

root@linux:/# /etc/init.d/samba restart
Stopping Samba daemons: nmbd smbd.
Starting Samba daemons: nmbd smbd.
root@linux:/# ps axu|grep -E "smb|nmb"
root     21887  0.0  0.0 169588  1904 ?        Ss   16:53   0:00 /usr/sbin/nmbd -D
root     21892  0.0  0.0 197560  3272 ?        Ss   16:53   0:00 /usr/sbin/smbd -D
root     21894  0.0  0.0 197560  1564 ?        S    16:53   0:00 /usr/sbin/smbd -D
root     21899  0.0  0.0 112368   840 pts/6    S+   16:53   0:00 grep -E smb|nmb

root@linux:/#

Complete current smb.conf configuration I use to make the Brother Printer DCP 1610W accesible via network share is here

This section needs updating as you can setup print server via samba print sharing just by uploading drivers.

When printing to windows printers in an NT domain using SMB the Device URI should use similar to:


smb://username:password@domain/server/printername


This allows Samba to authenticate against a domain controller for acces to the printer queue.

In my case as you can see in below smb.conf configuration I've configured Samba security = share which will allow anyone to access the samba server without authentication so you can omit  username:password@ part

One good way to determine the printername  (in case you are not sure of) is to use smbclient command line tool. computername refers to the name of the machine that shares the printer:


smbclient -L copmputername


computername is the name of the samba server machine or its IP address


E.g.
 

hipo@linux:~$ smbclient -L //192.168.0.1/
Enter Attitude's password:
Domain=[WORKGROUP] OS=[Unix] Server=[Samba 3.5.6]

        Sharename       Type      Comment
        ———       —-      ——-
        print$          Disk      Printer Drivers
        IPC$            IPC       IPC Service (pcfreak server)
        DCP1610W        Printer   DCP1610W
Domain=[WORKGROUP] OS=[Unix] Server=[Samba 3.5.6]

        Server               Comment
        ———            ——-
        PCFREAK              pcfreak server

        Workgroup            Master
        ———            ——-
        WORKGROUP            WORKGROUP


Check the ouput for entries of Type "Printer":


The resulting (Linux / Mac OS) Samba Share access URL from the output above would be

smb://192.168.0.1/DCP1610W


8. Adding Printer to your Windows machines to enable actual Remote Samba Sharing printing

Assuming you already know the Printer share name, here is what I needed to do to have the Printer Added on each of Windows Desktop PCs and Notebooks


Control Panel -> Devices and Printers -> Add a printer -> (Add a Network wireless or bluetooth printer)

Then instead of Searching the printer to click on:

The printer that I wasn't listed

add-samba-network-share-brother-dcp-1610w-printer-to-windows-7-machine-no-printer-found-from-add-printer

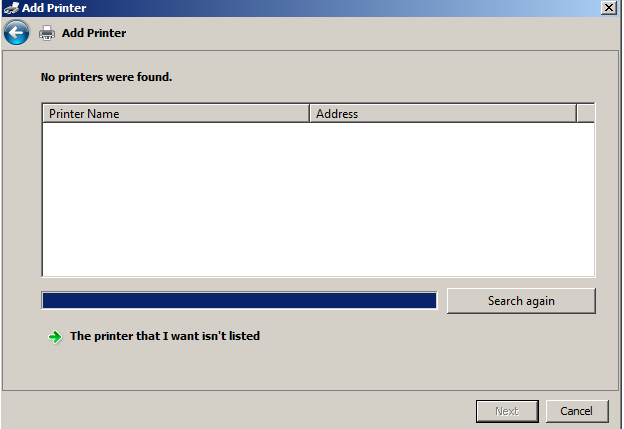
Then type in the URL or IP (as in my case) leading to the printer as you see in below screenshot:


9. Printer Samba Sharing Using Macintosh notebook as the Client and Debian as the Server


1. Assuming you have cups to set up the printer on Debian as described above.

2. On the Mac (OS X 10.4+) start Print and Fax from System Preferences. Use the + button to add a printer.

3. Look first in the "Default" tab. If the automagic printer-sharing has worked, and your Mac is connected to the local network properly, then the Debian-based printer should already be visible in the list.

Just select it and use the recommended print driver. If you face problems you can try to play with
Gutenprint Printer drivers to make it printing.

4. If your printer is not visible in the Default tab, then try adding it on the "IP" tab.

Pick IPP as the protocol, give the plain IP address of the server in the address box (in my case that's 192.168.0.1, and in the Queue box put
"printers/DCP1610W

Put whatever helps you identify the printer in the Name and Location boxes (fields), and choose a printer driver than matches Brother DCP1610W or with another printer installed whatever you used to set up the printer on Debian .
Finally Pray that God help you to make it work and press the Add button. If you prayed honestly and repenting for your sins perhaps you will have mercy and it will work, of course if not try to research online on how to fix it further by God's grace.

Note that making printing work on Mac is a little bit of tricky and it might cause you some extra effort / nerves to complete.


10. Some other Useful maintanance commands you might need in future CUPS Printer queue jobs maintance


For displaying or setting print queue options and defaults:

lpoptions -p <print_queue_name> -l

Stopping and starting print queues. Acceptance and rejection of jobs sent to a destination:
 

cupsdisable <print_queue_name>
cupsenable <print_queue_name>
cupsaccept <print_queue_name>
cupsreject <print_queue_name>


To Cancel all jobs on a destination and additionally delete job data files:

cancel -a <print_queue_name>
cancel -a -x <print_queue_name>

That's all folks, Thanks God the printer should be working. Enjoy!

Installing Virtualbox Guest Additions Vboxadditions on CentOS 7, Fedora 19 / 20 and RHEL 6.5 / 5.10 on Windows host

Thursday, July 17th, 2014

Virtualbox_guest_additions-on-centos-7-howto-virtualbox-logo
If you decided to use Redhat based Linux distribution inside Virtualbox Virtual Machine on Windows 7 / 8, first thing to do right after installing the Linux guest OS is to install Virtualbox Guest Additions. Earlier I've blogged How to enable virtualbox VM Windows XP fullscreen mode on Virtualbox running on Ubuntu now I need it vice versa a Linux OS living inside Virtual Machine running on top of Windows 7 Enterprise. need to enable Full-screen mode. Another reason why Vboxadditions should be installed right after Linux install is complete is for performance reasons and better integration between host OS and guest OS. Virtualbox Guest Additions enables mouse's copy / paste functions to work between Win and Virtualized Linux as well as enables arbitrary screen resolutions (resizing VM guest window) etc. On Windows versions of Virtualbox to install Vbox Guest Additions it is no longer necessery to download and mount a separate vbox-guest-additions ISO file, this is handled by Virtualbox itself.

The steps described here for installation of VirtualBox Guest Additions are tested and prooved as working on current latest CentOS 6.5, however they should be working (with or without minor modifications) in rest of RPM based Linux distributions

Fedora 20, 19, 18, 17, 16, 15, 14, 13, 12, CentOS 6.5, 6.4, 6.3, 6.2, 6.1, 6.0, 5.10 and Redhat Enterprise Linux (RHEL) 6.5, 6.4, 6.3, 6.2, 6.1, 6, 5.10 VirtualBox version installed on Windows 7 host is 4.3.14 build.


Devices -> Drag'n'Drop (Bidirectional)

Devices -> Share Clipboard (Bidirectional)


1. Installing VirtualBox GuestAdditions on CentOS 7, Redhat, Fedora

a) become superuser

su root
[root@centos~:]#

b) Mount Virtualbox provided Guest additions into virtual cdrom /dev/cdrom

From VirtualBox click on
 

Devices -> Install Guest Additions

centos7-install-guest-additions-cd-screenshot-microsoft-windows-virtualbox

mkdir /media/VirtualBoxGuestAdditions
mount -r /dev/cdrom /media/VirtualBoxGuestAdditions

c) Update to the latest Linux kernel with yum

yum -y update kernel*

Then to boot up into the updated kernel – restart the system

shutdown -r now


d) Install Kernel headers bzip dkms bzip2

yum install -y gcc kernel-devel kernel-headers dkms make bzip2 perl

If you're installing VirtualBox Guest Additions on CentOS 6 or RHEL 5, you will have to install also below 2 rpms:
 

## CentOS 6 and Red Hat (RHEL) 5 ##
rpm -Uvh http://dl.fedoraproject.org/pub/epel/6/i386/epel-release-6-8.noarch.rpm
 
## CentOS 5 and Red Hat (RHEL) 5 ##
rpm -Uvh http://dl.fedoraproject.org/pub/epel/5/i386/epel-release-5-4.noarch.rpm


e) export KERN_DIR to just installed kernel source


For CentOS 7 export following KERN_DIR


## Current running kernel on Fedora, CentOS 7 and Red Hat (RHEL) 7 ##
KERN_DIR=/usr/src/kernels/`uname -r`
export KERN_DIR

For older CentOS and RHEL 5 export
## Current running kernel on CentOS 5 and Red Hat (RHEL) 5 ##

KERN_DIR=/usr/src/kernels/`uname -r`-`uname -m`
export KERN_DIR

f) Download VBoxAdditions 4.3.14 iso from Virtualbox website

I've made mirror of VBoxGuestAdditions_4.3.14.iso for download here:
 

mkdir /usr/share/virtualbox
cd /usr/share/virtualbox

wget http://dlc.sun.com.edgesuite.net/virtualbox/4.3.14/VBoxGuestAdditions_4.3.14.iso

g) Mount the iso
 

mount -t iso9660 VBoxGuestAdditions_4.3.14.iso /media/VirtualBoxGuestAdditions/


h) Compile and Install Virtualbox GuestAdditions kernel modules
For both 32-bit and 64-bit systems run one and the same shell script:

cd /media/VirtualBoxGuestAdditions
./VBoxLinuxAdditions.run

Verifying archive integrity… All good.
Uncompressing VirtualBox 4.3.14_RC1 Guest Additions for Linux…………
VirtualBox Guest Additions installer
Removing installed version 4.3.14_RC1 of VirtualBox Guest Additions…
Copying additional installer modules …
Installing additional modules …
Removing existing VirtualBox non-DKMS kernel modules       [  OK  ]
Building the VirtualBox Guest Additions kernel modules
Building the main Guest Additions module                   [  OK  ]
Building the shared folder support module                  [  OK  ]
Building the OpenGL support module                         [  OK  ]
Doing non-kernel setup of the Guest Additions              [  OK  ]
You should restart your guest to make sure the new modules are actually used

Installing the Window System drivers
Installing X.Org Server 1.15 modules                       [  OK  ]
Setting up the Window System to use the Guest Additions    [  OK  ]
You may need to restart the hal service and the Window System (or just restart
the guest system) to enable the Guest Additions.

Installing graphics libraries and desktop services componen[  OK  ]

l) Restart the CentOS Virtual Machine
 

reboot

Now get a beer and celebrate the full-screen / USB / Webcamera enabled support ! 🙂

This article is possible thanks to earlier article called Virtualbox guest additions on Fedora CentOS and Redhat.

http://www.if-not-true-then-false.com/2010/install-virtualbox-guest-additions-on-fedora-centos-red-hat-rhel/


How to disable IPv6 on Debian / Ubuntu / CentOS and RHEL Linux

Friday, December 9th, 2011

I have few servers, which have automatically enabled IPv6 protocols (IPv6 gets automatically enabled on Debian), as well as on most latest Linux distribituions nowdays.

Disabling IPv6 network protocol on Linux if not used has 2 reasons:

1. Security (It’s well known security practice to disable anything not used on a server)
Besides that IPv6 has been known for few criticil security vulnerabilities, which has historically affected the Linux kernel.
2. Performance (Sometimes disabling IPv6 could have positive impact on IPv4 especially on heavy traffic network servers).
I’ve red people claiming disabling IPv6 improves the DNS performance, however since this is not rumors and did not check it personally I cannot positively confirm this.

Disabling IPv6 on all GNU / Linuces can be achieved by changing the kernel sysctl settings net.ipv6.conf.all.disable_ipv6 by default net.ipv6.conf.all.disable_ipv6 equals 1 which means IPv6 is enabled, hence to disable IPv6 I issued:

server:~# sysctl net.ipv6.conf.all.disable_ipv6=0

To set it permanently on system boot I put the setting also in /etc/sysctl.conf :

server:~# echo 'net.ipv6.conf.all.disable = 1 >> /etc/sysctl.conf

The aforedescribed methods should be working on most Linux kernels version > 2.6.27 in that number it should work 100% on recent versions of Fedora, CentOS, Debian and Ubuntu.

To disable IPv6 protocol on Debian Lenny its necessery to blackist the ipv6 module in /etc/modprobe.d/blacklist by issuing:

echo 'blacklist ipv6' >> /etc/modprobe.d/blacklist

On Fedora / CentOS there is a another universal “Redhat” way disable IPv6.

On them disabling IPv6 is done by editting /etc/sysconfig/network and adding:

NETWORKING_IPV6=no
IPV6INIT=no

I would be happy to hear how people achieved disabling the IPv6, since on earlier and (various by distro) Linuxes the way to disable the IPv6 is probably different.
 

Alto to stop Iptables IPV6 on CentOS / Fedora and RHEL issue:

# service ip6tables stop

# service ip6tables off

Secure delete files irreverseble on Debian and Fedora GNU / Linux

Thursday, February 21st, 2013

I just read an article in Linux-Magazine on Advanced File Management named – "Beyond the Basics". Most of what the article says is pretty trivial and known by any Linux enthusiast average user and administrator. There was one command mentioned shred which is probably not so well known among Free Software users shred allows the user to "secure delete files" / from the hard disk irreversible.

The tool is part of coreutils package and available across mostly all Linux distributions including Debian / Ubuntu debian derivatives and the RedHat based distros CentOS, Fedora, RHEL etc.

Just for info for those who don't know how to check, to which package a command belongs with rpm and dpkg, here is how;

[hipo@centos ~]$ rpm -qf /usr/bin/shred
coreutils-5.97-23.el5_4.2

hipo@debian:~$ dpkg -S /usr/bin/shred
coreutils: /usr/bin/shred

Here is how to delete a sample file ovewritting 3 times (-n2 – means 3 because in comuters we know we countr from 0 – 0 1 2 3), the z option fills up with zeros after overwritting the file ( just like seen on paste), -v option shows verbose what shred is doing and -u option truncates removes file after overwritting

noah:/var/tmp# shred -n2 -zvu crash20121113021508.txt
shred: crash20121113021508.txt: pass 1/3 (random)…
shred: crash20121113021508.txt: pass 2/3 (random)…
shred: crash20121113021508.txt: pass 3/3 (000000)…
shred: crash20121113021508.txt: removing
shred: crash20121113021508.txt: renamed to 00000000000000000000000
shred: 00000000000000000000000: renamed to 0000000000000000000000
shred: 0000000000000000000000: renamed to 000000000000000000000
shred: 000000000000000000000: renamed to 00000000000000000000
shred: 00000000000000000000: renamed to 0000000000000000000
shred: 0000000000000000000: renamed to 000000000000000000
shred: 000000000000000000: renamed to 00000000000000000
shred: 00000000000000000: renamed to 0000000000000000
shred: 0000000000000000: renamed to 000000000000000
shred: 000000000000000: renamed to 00000000000000
shred: 00000000000000: renamed to 0000000000000
shred: 0000000000000: renamed to 000000000000
shred: 000000000000: renamed to 00000000000
shred: 00000000000: renamed to 0000000000
shred: 0000000000: renamed to 000000000
shred: 000000000: renamed to 00000000
shred: 00000000: renamed to 0000000
shred: 0000000: renamed to 000000
shred: 000000: renamed to 00000
shred: 00000: renamed to 0000
shred: 0000: renamed to 000
shred: 000: renamed to 00
shred: 00: renamed to 0
shred: crash20121113021508.txt: removed
 

One common use of shred is by sysadmins who has to prepare old server containing lets say client data (SQL) – mail boxes or just file data and then sell it to third parties making sure data will be un-restorable for the new owner. Also shred is used a lot by crackers who set up "time bombs" activated on user activity or inactivity to destroy evidences in case of crackers PC is being captured by police. Though shred cannot guarantee 100% that deleted data can't be recoved within a special data recovery lab in most of cases it is enough to assure data with it will be almost impossible to recover.

Editting binary files in console and GUI on FreeBSD and Linux

Thursday, April 26th, 2012

I’ve recently wanted to edit one binary file because there was compiled in the binary a text string with a word I didn’t liked and therefore I wanted to delete. I know I can dig in the source of the proggie with grep and directly substitute my “unwatned text” there but I wanted to experiment, and see what kind of hex binary text editors are for Free OSes.
All those who lived the DOS OS computer era should certainly remember the DOS hex editors was very enjoyable. It was not rare case, where in this good old days, one could simply use the hex editor to “hack” the game and add extra player lives or modify some vital game parameter like put himself first in the top scores list. I even remember some DOS programs and games was possible to be cracked with a text editor … Well it was times, now back to current situation as a Free Software user for the last 12 years it was interesting to see what is the DOS hexeditor like alternatives for FreeBSD and Linux and hence in this article I will present my findings:

A quick search in FreeBSD ports tree and Debian installable packages list, I’ve found a number of programs allowing one to edit in console and GUI binary files.

Here is a list of the hex editors I will in short review in this article:

  • hexedit
  • dhex
  • chexedit
  • hte
  • hexer
  • hexcurse
  • ghex
  • shed
  • okteta
  • bless
  • lfhex

1. hexedit on Linux and BSD – basic hex editor

I’ve used hexedit already on Linux so I’ve used it some long time ago.

My previou experience in using hexedit is not too pinky, I found it difficult to use on Redhat and Debian Linux back in the day. hexedit is definitely not a choice of people who are not “initiated” with hex editting.
Anyways if you want to give it a try you can install it on FreeBSD with:

freebsd# cd /usr/ports/editors/hexedit
freebsd# make install clean

On Debian the hexedit, install package is named the same so installation is with apt:

debian:~# apt-get –yes install hexedit

hexedit screenshot Debian Linux Squeeze

2. Hex editting with chexedit

I’ve installed chexedit the usual way from ports:

freebsd# cd /usr/ports/editors/chexedit
freebsd# make install clean

chexedit is using the ncurses text console library, so the interface is very similar to midnight commander (mc) as you see from below’s screenshot:

Chexeditor FreeBSD 7.2 OS Screenshot

Editting the binary compiled in string was an easy task with chexedit as most of the commands are clearly visible, anyways changing a certain text string contained within the binary file with some other is not easy with chexedit as you need to know the corresponding binary binary value representing each text string character.
I’m not a low level programmer, so I don’t know the binary values of each keyboard character and hence my competence came to the point where I can substitute the text string I wanted with some unreadable characters by simply filling all my text string with AA AA AA AA values…

chexedit on Debian is packaged under a deb ncurses-hexedit. Hence to install it on Deb run:

debian:~# apt-get –yes install ncurses-hexedit

Further on the binary to run chexedit on binary contained within ncurses-hexedit is:

debian:~# hexeeditor

3. Hex Editting on BSD and Linux with hte

Just after trying out chexedit, I’ve found about the existence of one even more sophisticated hexeditor console program available across both FreeBSD and Linux.
The program is called hte (sounds to me a bit like the Indian word for Elephant “Hatti” :))

hte is installable on Debian with cmd:

debian:~# apt-get install ht

On FreeBSD the port name is identical, so to install it I execed:

freebsd# cd /usr/ports/editors/hte
freebsd# make install clean

hte is started on Debian Linux (and presumably other Linux distros) with:

$ hte

On FreeBSD you need to run it with ht command:

freebsd# ht

You see how hte looks like in below screenshot:

ht has the look & feel like midnight commander and I found it easier to use than chexedit and hexeditor
4. hexer VI like interface for Linux

As I was looking through the available packages ready to install, I’ve tried hexer

debian:~# apt-get install –yes hexer

hexer does follow the same standard commands like VIM, e.g. i for insert, a for append etc.

Hexer Debian Linux vim like binary editor screenshot

It was interesting to find out hexer was written by a Bulgarian fellow Petar Penchev 🙂
(Proud to be Bulgarian)

http://people.freebsd.org/~roam/ – Petar Penchev has his own page on FreeBSD.org

As a vim user I really liked the idea, the only thing I didn’t liked is there is no easy way to just substitute a string within the binary with another string.

5. hexcurse another ncurses library based hex editor

On Deb install and run via:

debian:~# apt-get –yes install hexcurse
debian:~# hexcurse /usr/bin/mc

Hexcurse Debian Linux text binary editor screenshot

hexcurse is also available on FreeBSD to install it use cmd:

freebsd# cd /usr/ports/editors/hexcurse
freebsd# make install clean
….

To access the editor functions press CTRL+the first letter of the word in the bottom menu, CTRL+H, CTRL+S etc.
Something I disliked about it is the program search is always in hex, so I cannot look for a text string within the binaries with it.

6. ghex – Editting binary files in graphical environment

If you’re running a graphical environment, take a look at ghex. ghex is a gnome (graphical hex) editor.Installing ghex on Debian is with:

debian:~# apt-get –yes install ghex
….

To run ghex from terminal type:

debian:~# ghex2

GHex2 GNOME hex binary editor screenshot

To install ghex on FreeBSD (and I assume other BSDs), install via port:

freebsd# cd /usr/ports/editors/ghex
freebsd# make install clean

Gnome hex editor have plenty of tools, useful for developers to debug binary files.

Some nice tools one can find are under the the menus:

Windows -> Character Table

This will show a complete list of each keyboard sent character in ASCII, Hex, Decimal, Octal and Binary

Screenshot ghex Character table Debian Linux

Another useful embedded tool in ghex is:

Windows -> Type Convertion Dialog

Ghex type convertion dialog screenshot

Note that if you want to use the Type Convertion Dialog tool to find the representing binary values of a text string you will have to type in the letters one by one and save the output within a text file and later you can go and use the same editor to edit the text string within the binary file you like.

I’m not a programmer but surely for programmers or people who want to learn some binary counting, this 2 ghex edmebbed tools are surely valuable.

To conclude even though there are plenty of softwares for hex editting in Linux and BSD, none of them is not so easy to use as the old DOS hexdedit tool, maybe it will be a nice idea if someone actually rewrites the DOS tool and they package it for various free operating systems, I’m sure many people will find it helpful to have a 1:1 equivalent to the DOS tool.

7. Shed pico like interfaced hex editor

For people, who use pico / nano as a default text editor in Linux shed will probably be the editor of choice as it follows the command shortcuts of picoOn Deb based distros to install it run:

debian:~# apt-get install –yes shed

shed pico like hex binary editor Linux

Shed has no BSD port as of time of writting.8. Okteta a KDE GUI hex editor

For KDE users, I found a program called okteta. It is available for Deb based Linuxes as deb to install it:

debian:~# apt-get –yes install okteta

Screenshot Okteta Debian GNU / Linux Squeeze

As of time of writting this article there is no okteta port for BSDs.
Okteta has plenty of functions and even has more of a functions than ghexedit. Something distinctive for it is it supports opening multiple files in tabs.

9. lfhex a large file text editor

lfhex is said to be a large (binary) file text editor, I have not tested it myself but just run it to see how it looks like. I don’t have a need to edit large binary files too, but I guess there are people with such requirements too 🙂

lfhex - Linux The Large file hex editor

To install lfhex on Debian:

debian:~# apt-get install –yes lfhex

lfhex has also a FreeBSD port installable via:

freebsd# cd /usr/ports/editors/lfhex
freebsd# make install clean

10. Bless a GUI tool for editting large hex (binary) files

Here is the description directly taken from the BSD port /usr/ports/editors/bless

Bless is a binary (hex) editor, a program that enables you to edit files asa sequence of bytes. It is written in C# and uses the Gtk# bindings for theGTK+ toolkit.

To install and use ot on deb based Linuxes:

debian:~# apt-get install –yes bless
….

On BSD installation is again from port:

freebsd# cd /usr/ports/editors/bless
freebsd# make install clean
….

Something that makes bless, maybe more desirable choice for GUI users than ghex is its availability of tabs. Opening multiple binaries in tabs will be useful only to few heavy debuggers.

Bless GUI hex editor Debian Linux tabs opened screenshot

11. Ghextris – an ultra hard hacker tetris game 🙂

For absolute, hacker / (geeks), there is a tetris game called ghextris. The game is the hardest tetris game I ever played in my life. It requires more than regular IQ and a lot of practice if you want to become really good in this game.

To enjoy it:

debian:~# apt-get –yes install ghextris

Ultra hrad hardcore hackers game ghextris screenshot

Unfortunately there is no native port of ghextris for BSD (yet). Anyhow, it can be probably run using the Linux emulation or even compiled from source.
Well that’s all I found for hexedit-ing, I’ll be happy to hear if someone can give me some feedback on his favourite editor.