Posts Tagged ‘resolv’

Nginx increase security by putting websites into Linux jails howto

Monday, August 27th, 2018

linux-jail-nginx-webserver-increase-security-by-putting-it-and-its-data-into-jail-environment

If you're sysadmining a large numbers of shared hosted websites which use Nginx Webserver to interpret PHP scripts and serve HTML, Javascript, CSS … whatever data.

You realize the high amount of risk that comes with a possible successful security breach / hack into a server by a malicious cracker. Compromising Nginx Webserver by an intruder automatically would mean that not only all users web data will get compromised, but the attacker would get an immediate access to other data such as Email or SQL (if the server is running multiple services).

Nowadays it is not so common thing to have a multiple shared websites on the same server together with other services, but historically there are many legacy servers / webservers left which host some 50 or 100+ websites.

Of course the best thing to do is to isolate each and every website into a separate Virtual Container however as this is a lot of work and small and mid-sized companies refuse to spend money on mostly anything this might be not an option for you.

Considering that this might be your case and you're running Nginx either as a Load Balancing, Reverse Proxy server etc. , even though Nginx is considered to be among the most secure webservers out there, there is absolutely no gurantee it would not get hacked and the server wouldn't get rooted by a script kiddie freak that just got in darknet some 0day exploit.

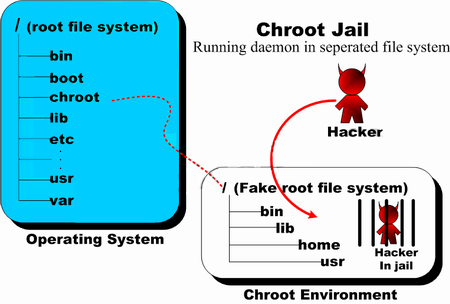
To minimize the impact of a possible Webserver hack it is a good idea to place all websites into Linux Jails.

linux-jail-simple-explained-diagram-chroot-jail

For those who hear about Linux Jail for a first time,
chroot() jail is a way to isolate a process / processes and its forked children from the rest of the *nix system. It should / could be used only for UNIX processes that aren't running as root (administrator user), because of the fact the superuser could break out (escape) the jail pretty easily.

Jailing processes is a concept that is pretty old that was first time introduced in UNIX version 7 back in the distant year 1979, and it was first implemented into BSD Operating System ver. 4.2 by Bill Joy (a notorious computer scientist and co-founder of Sun Microsystems). Its original use for the creation of so called HoneyPot – a computer security mechanism set to detect, deflect, or, in some manner, counteract attempts at unauthorized use of information systems that appears completely legimit service or part of website whose only goal is to track, isolate, and monitor intruders, a very similar to police string operations (baiting) of the suspect. It is pretty much like а bait set to collect the fish (which in this  case is the possible cracker).

linux-chroot-jail-environment-explained-jailing-hackers-and-intruders-unix

BSD Jails nowadays became very popular as iPhones environment where applications are deployed are inside a customly created chroot jail, the principle is exactly the same as in Linux.

But anyways enough talk, let's create a new jail and deploy set of system binaries for our Nginx installation, here is the things you will need:

1. You need to have set a directory where a copy of /bin/ls /bin/bash /bin/,  /bin/cat … /usr/bin binaries /lib and other base system Linux system binaries copy will reside.


server:~# mkdir -p /usr/local/chroot/nginx


2. You need to create the isolated environment backbone structure /etc/ , /dev, /var/, /usr/, /lib64/ (in case if deploying on 64 bit architecture Operating System).


server:~# export DIR_N=/usr/local/chroot/nginx;
server:~# mkdir -p $DIR_N/etc
server:~# mkdir -p $DIR_N/dev
server:~# mkdir -p $DIR_N/var
server:~# mkdir -p $DIR_N/usr
server:~# mkdir -p $DIR_N/usr/local/nginx
server:~# mkdir -p $DIR_N/tmp
server:~# chmod 1777 $DIR_N/tmp
server:~# mkdir -p $DIR_N/var/tmp
server:~# chmod 1777 $DIR_N/var/tmp
server:~# mkdir -p $DIR_N/lib64
server:~# mkdir -p $DIR_N/usr/local/


3. Create required device files for the new chroot environment


server:~# /bin/mknod -m 0666 $D/dev/null c 1 3
server:~# /bin/mknod -m 0666 $D/dev/random c 1 8
server:~# /bin/mknod -m 0444 $D/dev/urandom c 1 9


mknod COMMAND is used instead of the usual /bin/touch command to create block or character special files.

Once create the permissions of /usr/local/chroot/nginx/{dev/null, dev/random, dev/urandom} have to be look like so:


server:~# ls -l /usr/local/chroot/nginx/dev/{null,random,urandom}
crw-rw-rw- 1 root root 1, 3 Aug 17 09:13 /dev/null
crw-rw-rw- 1 root root 1, 8 Aug 17 09:13 /dev/random
crw-rw-rw- 1 root root 1, 9 Aug 17 09:13 /dev/urandom


4. Install nginx files into the chroot directory (copy all files of current nginx installation into the jail)
 

If your NGINX webserver installation was installed from source to keep it latest
and is installed in lets say, directory location /usr/local/nginx you have to copy /usr/local/nginx to /usr/local/chroot/nginx/usr/local/nginx, i.e:


server:~# /bin/cp -varf /usr/local/nginx/* /usr/local/chroot/nginx/usr/local/nginx


5. Copy necessery Linux system libraries to newly created jail
 

NGINX webserver is compiled to depend on various libraries from Linux system root e.g. /lib/* and /lib64/* therefore in order to the server work inside the chroot-ed environment you need to transfer this libraries to the jail folder /usr/local/chroot/nginx

If you are curious to find out which libraries exactly is nginx binary dependent on run:

server:~# ldd /usr/local/nginx/usr/local/nginx/sbin/nginx

        linux-vdso.so.1 (0x00007ffe3e952000)
        libpthread.so.0 => /lib/x86_64-linux-gnu/libpthread.so.0 (0x00007f2b4762c000)
        libcrypt.so.1 => /lib/x86_64-linux-gnu/libcrypt.so.1 (0x00007f2b473f4000)
        libpcre.so.3 => /lib/x86_64-linux-gnu/libpcre.so.3 (0x00007f2b47181000)
        libcrypto.so.0.9.8 => /usr/local/lib/libcrypto.so.0.9.8 (0x00007f2b46ddf000)
        libz.so.1 => /lib/x86_64-linux-gnu/libz.so.1 (0x00007f2b46bc5000)
        libc.so.6 => /lib/x86_64-linux-gnu/libc.so.6 (0x00007f2b46826000)
        /lib64/ld-linux-x86-64.so.2 (0x00007f2b47849000)
        libdl.so.2 => /lib/x86_64-linux-gnu/libdl.so.2 (0x00007f2b46622000)


The best way is to copy only the libraries in the list from ldd command for best security, like so:


server: ~# cp -rpf /lib/x86_64-linux-gnu/libthread.so.0 /usr/local/chroot/nginx/lib/*
server: ~# cp -rpf library chroot_location

etc.


However if you're in a hurry (not a recommended practice) and you don't care for maximum security anyways (you don't worry the jail could be exploited from some of the many lib files not used by nginx and you don't  about HDD space), you can also copy whole /lib into the jail, like so:


server: ~# cp -rpf /lib/ /usr/local/chroot/nginx/usr/local/nginx/lib


NOTE! Once again copy whole /lib directory is a very bad practice but for a time pushing activities sometimes you can do it …


6. Copy /etc/ some base files and ld.so.conf.d , prelink.conf.d directories to jail environment


server:~# cp -rfv /etc/{group,prelink.cache,services,adjtime,shells,gshadow,shadow,hosts.deny,localtime,nsswitch.conf,nscd.conf,prelink.conf,protocols,hosts,passwd,ld.so.cache,ld.so.conf,resolv.conf,host.conf}  \
/usr/local/chroot/nginx/usr/local/nginx/etc


server:~# cp -avr /etc/{ld.so.conf.d,prelink.conf.d} /usr/local/chroot/nginx/nginx/etc


7. Copy HTML, CSS, Javascript websites data from the root directory to the chrooted nginx environment


server:~# nice -n 10 cp -rpf /usr/local/websites/ /usr/local/chroot/nginx/usr/local/


This could be really long if the websites are multiple gigabytes and million of files, but anyways the nice command should reduce a little bit the load on the server it is best practice to set some kind of temporary server maintenance page to show on the websites index in order to prevent the accessing server clients to not have interrupts (that's especially the case on older 7200 / 7400 RPM non-SSD HDDs.)


8. Stop old Nginx server outside of Chroot environment and start the new one inside the jail


a) Stop old nginx server

Either stop the old nginx using it start / stop / restart script inside /etc/init.d/nginx (if you have such installed) or directly kill the running webserver with:


server:~# killall -9 nginx


b) Test the chrooted nginx installation is correct and ready to run inside the chroot environment


server:~# /usr/sbin/chroot /usr/local/chroot/nginx /usr/local/nginx/nginx/sbin/nginx -t
server:~# /usr/sbin/chroot /usr/local/chroot/nginx /usr/local/nginx/nginx/sbin/nginx


c) Restart the chrooted nginx webserver – when necessery later


server:~# /usr/sbin/chroot /nginx /usr/local/chroot/nginx/sbin/nginx -s reload


d) Edit the chrooted nginx conf

If you need to edit nginx configuration, be aware that the chrooted NGINX will read its configuration from /usr/local/chroot/nginx/nginx/etc/conf/nginx.conf (i'm saying that if you by mistake forget and try to edit the old config that is usually under /usr/local/nginx/conf/nginx.conf


How to configure manually static IP address on Debian GNU/Linux / How to fix eth0 interface not brought up with error (networking restart is deprecated)

Friday, July 29th, 2011

I’ve recently had to manually assign a static IP address on one of the servers I manage, here is how I did it:             

debian:~# vim /etc/network/interfaces

Inside the file I placed:

# The primary network interface
allow-hotplug eth0
auto eth0
iface eth0 inet static address 192.168.0.2 netmask 255.255.255.0 broadcast 192.168.0.0 gateway 192.168.0.1 dns-nameservers 8.8.8.8 8.8.4.4 208.67.222.222 208.67.220.220

The broadcast and gateway configuration lines are not obligitory.
dns-nameservers would re-create /etc/resolv.conf file with the nameserver values specified which in these case are Google Public DNS servers and OpenDNS servers.

Very important variable is allow-hotplug eth0
If these variable with eth0 lan interface is omitted or missing (due to some some weird reason), the result would be the output you see from the command below:

debian:~# /etc/init.d/networking restart
Running /etc/init.d/networking restart is deprecated because it may not enable again some interfaces ... (warning).
Reconfiguring network interfaces...

Besides the /etc/init.d/networking restart is deprecated because it may not enable again some interfaces … (warning). , if the allow-hotplug eth0 variable is omitted the eth0 interface would not be brough up on next server boot or via the networking start/stop/restart init script.

My first reaction when I saw the message was that probably I’ll have to use invoke-rc.d, e.g.:
debian:~# invoke-rc.d networking restart
Running invoke-rc.d networking restart is deprecated because it may not enable again some interfaces ... (warning).

However as you see from above’s command output, running invoke-rc.d helped neither.

I was quite surprised with the inability to bring my network up for a while with the networking init script.
Interestingly using the command:

debian:~# ifup eth0

was able to succesfully bring up the network interface, whether still invoke-rc.d networking start failed.

After some wondering I finally figured out that the eth0 was not brought up by networking init script, because auto eth0 or allow-hotplug eth0 (which by the way are completely interchangable variables) were missing.

I added allow-hotplug eth0 and afterwards the networking script worked like a charm 😉

How to configure static IP address on Lan card eth0 on Ubuntu and Debian Linux

Wednesday, April 27th, 2011

Does your provider provides you with a connection to the internet via a static IP address? Are you an Ubuntu or Debian user like me? Are you looking for a way to configure your eth0 Linux network card with the static ISP provided IP address? That was the scenario with me and in this article I will explain, how you can configure your Home internet access with your Ubuntu/Debian based Linux.

Both Ubuntu and Debian does have a graphic tools, which also can be used to set a static IP address to your network interface, however I find it easier to do it straight from the command line.

To configure your internet static IP via a command line, what you will need to modify is the file:

/etc/network/interfaces

In order to configure a static IP address, your provider should have equipped you with few IP addresses like let’s say the example values below:

Host IP Address: 192.168.0.5
Netmask Address: 255.255.255.0
Gateway: 192.168.0.1
Primary DNS Server: 192.168.0.1
Secondary DNS Server: 192.168.0.2

Now edit with vim, nano or mcedit /etc/network/interfaces e.g.:

root@ubuntu:~# mcedit /etc/network/interfaces

A plain /etc/network/interfaces file should contain something similar to:

auto lo
iface lo inet loopback

In order to be able to set your static IP address, Netmask, Gateway and DNS servers you will have to append in the interfaces file, the settings:

iface eth0 inet static
address 192.168.0.1
netmask 255.255.255.0
network 192.168.0.0
gateway 192.168.0.1

The eth0 sets the lan card on which the values will be assigned, address variable is the IP address assigned by your ISP, netmask is logically the netmask, network should always be configured same as the value set for address but the last ip block should be always .0 , gateway as you already know is the gateway (the ISP router).

One more thing you need to do is to configure your DNS servers by including the DNS ip addresses to /etc/resolv.conf , just issue something like:

root@ubuntu:~# echo 'nameserver 192.168.0.1' >> /etc/resolv.conf
root@ubuntu:~# echo 'nameserver 192.168.0.2' >> /etc/resolv.conf

To test that your new Linux static ip configuration is correct exec:

root@ubuntu:~# /etc/init.d/networking restart

Next use ping or (if ping is disabled by ISP), use matt’s traceroute (mtr) or a browser to test if the Linux is connected to the net.

ubuntu:~# ping google.com
...
ubuntu:~# mtr google.com

If none of the two are not able to show either ping requests flowing around, or routes to google, then something is either wrong with your internet configuration or you forgot to pay your internet bill 😉

Speed up your DNS resolve if your Internet Service Provider DNS servers fail or resolve slowly / Privacy concerns of public DNS services use

Wednesday, March 30th, 2011

In my experience with many network Internet Service Providers by so far I’ve encountered a lot of DNS oddities and therefore surfing (web) and mail slowness.

It’s sometimes very irritating especially in cases, when I use my internet over Wireless public or university wireless networks.
In principle many of the Wireless routers which distribute the internet especially in organizations are badly configured and the slowness with DNS resolvings is an absolute classic.
If you haven’t encountered that slowness in opening web pages when connected from your University’s canteen, whether it’s fill with people for the lunch break, then I should say you’re really lucky!

My personal experience with this bad configured devices DNS services has been quite negative and every now and then I use to set and use public DNS servers like OpenDNS and Google DNS

Very often when I connect to a wireless network with my notebook running Debian Linux and the internet is too slow in opening pages I automatically set the Google or OpenDNS servers as a default DNS IP resolving servers.

1. DNS IP addresses of Google Public DNS are:

8.8.8.7
and
8.8.8.8

2. OpenDNS Public DNS servers has the IP addresses of:

208.67.222.222
208.67.222.220

I do set up and use the upper public DNS services addresses via the commands:

3. Set and use Google Public DNS services on my Linux debian:~# cp -rpf /etc/resolv.conf /etc/resolv.conf.orig
debian:~# echo "nameserver 8.8.8.7n nameserver 8.8.8.8 n" > /etc/resolv.conf;

I first create backu pof my resolv.conf under the name resolv.conf.orig just to make sure I can revert back to my old DNSes if I need them at some point.

If you prefer to use the OpenDNS services for some let’s say privacy reasons, you do it in the same manner as in the above commands, you only change the IP addresses. 4. Configure and use the OpenDNS public DNS services

debian:~# cp -rpf /etc/resolv.conf /etc/resolv.conf.orig
debian:~# echo "nameserver 208.67.222.222n nameserver 208.67.222.220 n" > /etc/resolv.conf;

Of course using Public DNS services has it’s disadvantages over the domain resolving speed up advantage.
One major issue is that Public DNS services are running on a top of a cloud and if you have red my previous article Cloud Computing a possible threat to users privacy and system administrator employment you might be agaist the idea of using a services which are powered by cloud.

The other primary concern is related to your SECURITY and a PRIVACY by using Public DNS networks, you risk that your Public DNS provider might use some DNS spoof techniques to mislead you and resolve you common domain names which usually resolve to let’s say 1.1.1.1 to let’s say 1.5.5.10

Even though this kind of practices on a side of a public DNS provider is not a likely scenario the possible implications of Public DNS providers using DNS forgery to fool you about domain names locations is a very serious issue.

As public DNS providers does contain again the good old philosophy of cloud computing embedded in themselves and they strive to become some kind of a standard which people might vote to adopt and use, the future implications of a wide adoption of Public DNS servers might be a terrible thing on internet users privacy!!!

Just think about a future scenario where we users of the Internet are forced to use a number of public DNS servers in order to use the Internet!
Usually a very huge companies are possessing the Public DNS services and do pay for the tech equipment required for building up the cluster clouds which provide the DNS services and therefore, if in the short future public DNS becomes a fashion and (God forbid!) a standard which shifts up the regular ISP DNS servers to resolve domains to IPs then it will be terrible.

The corporations which does own the Public DNS service/s might have a direct control over filtering and censoling information posted on any website on the internet.
Even worser if the world decides to adopt public DNS services somewhere in the future this means that large corporations owning the open dns cluster or clusters will be able to check each and every resolving made by any user on the net.
If you think closely such an information possessed by a company is not the best thing we want.

So let me close up this article, I’m not a fan and an evangelist who preaches the use of Public DNS services. Right on Contrary I do honestly hate the idea behind public DNS.
Nevertheless apart from my personal opinion I’m a practical person and using the public DNS servers every now and then when this will accelerate my access to the internet is still an option I do enjoy.

Maybe it’s time for a free software project (a tor like), which will provide users with an OpenDNS alternative which will run on hobbyist computers around the globe (just like with tor).

What’s rather funny is that the loud name OpenDNS is a big lie in reality OpenDNS is not opened it’s a company owned closed source service 😉