Posts Tagged ‘scratch’

Into great depression – What is like to live in the Balkans?

Wednesday, May 18th, 2011

I'm so depressed these days that I'm trying to write something decent here but everytime I try I do stop and delete all I have written and start from scratch again.
It's terrible, I believe everyone have this days and they're so dark that even the smallest ray of light is gone somewhere…

The causes for depression are multiple, I know we're entering into the season period and that could be a factor, but truly for a long time I haven't felt that bad and I really cannot find the true cause. It's like hunting the unexplained.
Being a citizen of a countries on the balkans brings a lot of questions which cannot get answered. Why we the Balkan and more specificly most of the Orthodox Christian countries are suffering so badly and economically in constant crisis and recession?
From a material perspective Bulgaria is one of the worst countries one can live in, we the people on the balkans are chronically depressed and it really seems like a downward spiral
We've been gone through so far, when I was a child we were teached in the spirit of communism and a believe in a hard material realities.

Communism has taught us we're all fleshly brothers and we should live in groups and stick to the group, now as the democracy come it's on the contraty, we're being constantly re-taught that we should leave behind the group kind of thinking and all built from communism destroy it all and build the new society… We're told by individualist nations like USA and Western europe that the only thing for the good of a person is to (get an absolute individualistic life and only exist for the greater goodness of each ones self as individuals..

As with everything the Balkans are notable for being a very unordered place. Living here is like living in chaos…
The social security policies here are not working, the jurisdiction is working on behalf of the rich, the police force is seriously disfunctional and easily bribable. Put next to all this shit a high levels of unemployment and a lot of unhappy depressed people crawling around the streets and you get the picture …
As a normal consequence most of the young people have entered a dark ways of alcoholism and hard-core nihillism.
There are high level of people who are oriented into the new dark realities of Metal or underground music.
Each philosophy that is being put in from the west is being adopted here and being multiplied million times and mostly the bad things are being adopted and less rarely the good ones…
It's so mixed up that nobody can explain why it is happening as it is here.
I really am trying hard to convince myself for a years now that it is worthy to live here but the more I live here in Bulgaria the more I see all is getting worser than getting for good.

I wonder for how long it will go this pointless way, we the balkan people are living in ruins literally.

The only light we still have is the Church, but very sadly most people has left behind the faith and prefer to follow the fake American dream than to obey to our old ways and traditions.

Globalisation has entered in the Balkans in a full-force and is destroying our ancient culture and traditions and building the fakeness of the coca-cola culture that most of the people prefer to adore nowdays …

Bulgaria's population is mostly based of old people and we're a dying nation, if a miracle doesn't happen then we definitely will be gone.

Fixing Compaq Presario CQ71-330ED can’t connect to wireless on 64-bit Windows 7

Thursday, January 10th, 2013

Fixing Windows 7 Wireless Compaq Presario CQ71 330ED notebook / What makes it not to connect to wi-fi

I had to fix one Notebook Compaq CQ71-330ED which was failing connecting to a home Wireless Router. The notebook was running 64 Bit Windows 7 installed from scratch just few weeks ago. The PC could connect normally via a LAN cable to the Internet, but can't connect to the Wireless Router. I thought the issue might be due to the Wireless Router, thus checked with my laptop if I can connect to the WPA2 network with the pass key. Being able to connect from my own PC make it clear the problem is somewhere in Windows 7 (most likely the drivers). I checked in

Control Panel -> Device Manager


to make sure the Wireless drivers were appearing as properly installed, there all seemed fine, Wireless was detected as:

Intel (R) Centrino Wireless-N 1000

I tried playing with Wireless settings from
 

Control Panel -> Network and Internet

stopped Wireless Power Saving, as I know with some wireless devices it creates problems. Also tried settings the default wireless network support from A B G N to A B G. I tried playing with changing the Workgroup name to WORKGROUP., Disabling / Enabling the Wireless Network, checking if settings for IP obtain for IPv4 are not messed up etc., but all seemed okay and still the PC weirdly was unable to connect to Wi-fi network.

I suspected, the drivers though reporting as properly installed and working with the Wi-Fi card are the point of failure. So removed driver for Wireless card and tried re-installing.

As the model of laptop was COMPAQ Presario CQ71-330ED, I looked for this model driver, but again strangely CQ71-330ED was not among the Presario models on www.hp.com drivers section.

I improvised and dfecided to download 64 bit Wi-Fi drivers for the model which seemed to be closest to CQ71-330ED – Compaq Presario CQ71-120ED.

Install the Intel 64-bit Wireless Driver for notebook CQ71-120ED solved the Wi-Fi Router connection issues. Re-connecting once again to the WPA network just worked 🙂

A mirror of Wireless driver that worked for me . After installing the driver the Wireless was detected as:
 

Intel (R) Wifi Link BGN


How to run your Own / Personal Domain Web WHOIS service in a minute with SpeedyWHOIS

Thursday, April 5th, 2012

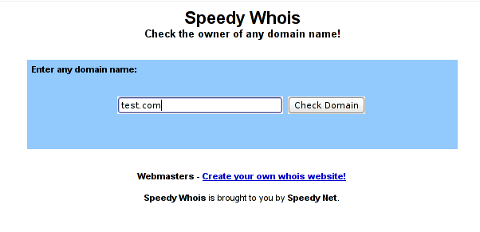
Running your own personal WHOIS service speedy whois in browser screenshot

I've been planning to run my own domain WHOIS service, for quite sime time and I always postpone or forgot to do it.
If you wonder, why would I need a (personal) web whois service, well it is way easier to use and remember for future use reference if you run it on your own URL, than wasting time in search for a whois service in google and then using some other's service to get just a simple DOMAIN WHOIS info.

So back to my post topic, I postpopned and postponed to run my own web whois, just until  yesterday, whether I have remembered about my idea to have my own whois up and running and proceeded wtih it.

To achieve my goal I checked if there is free software or (open source) software that easily does this.
I know I can write one for me from scratch, but since it would have cost me some at least a week of programming and testing and I didn't wanted to go this way.

To check if someone had already made an easy to install web whois service, I looked through in the "ultimate source for free software" sourceforge.net

Looking for the "whois web service" keywords, displayed few projects on top. But unfortunately many of the projects sources was not available anymore from http://sf.net and the project developers pages..
Thanksfully in a while, I found a project called SpeedyWhois, which PHP source was available for download.

With all prior said about project missing sources, Just in case if SpeedyWhois source  disappears in the future (like it probably) happened with, some of the other WHOIS web service projects, I've made SpeedyWhois  mirror for download here

 
Contrary to my idea that installing the web whois service might be a "pain in the ass", (like is the case  with so many free software php scripts and apps) – the installation went quite smoothly.
 
To install it I took the following 4 steps:
 
1. Download the source (zip archive) with wget 
 
# cd /var/www/whois-service;
/var/www/whois-service# wget -q https://www.pc-freak.net/files/speedywhois-0.1.4.zip
 
2. Unarchive it with unzip command 
 
 
/var/www/whois-service# unzip speedywhois-0.1.4.zip
3. Set the proper DNS records

My NS are using Godaddy, so I set my desired subdomain record from their domain name manager.
 

4. Edit Apache httpd.conf to create VirtualHost
 
This step is not mandatory, but I thought it is nice if I put the whois service under a subdomain, so add a VirtualHost to my httpd.conf
 
The Virtualhost Apache directives, I used are:
 
<VirtualHost *:80>
        ServerAdmin hipo_aT_www.pc-freak.net
        DocumentRoot /var/www/whois-service
        ServerName whois.www.pc-freak.net
        &lt;Directory /var/www/whois-service
        AllowOverride All
        Order Allow,Deny
        Allow from All
        </Directory>
</VirtualHost>
 
Onwards to take effect of new Webserver configs, I did Apache restart
 
# /usr/local/etc/rc.d/apache2 restart
 
Further on You can test whois a domain using my new installed SpeedyWHOISWeb WHOIS service  on http://whois.www.pc-freak.net
Whenever I have some free time, maybe I will work on the code, to try to add support for logging of previous whois requests and posting links pointing to the previous whois done via the web WHOIS service on the main whois page.
 
One thing that I disliked about how SpeedyWHOIS is written is, if there is no WHOIS information returned for a domain request (e.g.) a:
 
# whois domainname.com
 
returns an empty information, the script doesn't warn with a message there is no WHOIS data available for this domain or something.
 
 
This is not so important as this kind of behaviour of 'error' handling can easily be changed with minimum changes in the php code.
If you wonder, why do I need the web whois service, the answer is it is way easier to use.
I don't have more time to research a bit further on the alternative open source web whois services, so I would be glad to hear from anyone who tested other web whois service that is free comes under a FOSS license.
In the mean time, I'm sure people with a small internet websites like mine who are looking to run their OWN (personal) whois service SpeedyWHOIS does a great job.

FreeBSD Jumbo Frames network configuration short how to

Wednesday, March 14th, 2012

FreeBSD Jumbo Frames Howto configure FreeBSD

Recently I wrote a post on how to enable Jumbo Frames on GNU / Linux , therefore I thought it will be useful to write how Jumbo Frames network boost can be achieved on FreeBSD too.

I will skip the details of what is Jumbo Frames, as in the previous article I have thoroughfully explained. Just in short to remind you what is Jumbo Frames and why you might need it? – it is a way to increase network MTU transfer frames from the MTU 1500 to MTU of 9000 bytes

It is interesting to mention that according to specifications, the maximum Jumbo Frames MTU possible for assignment are of MTU=16128
Just like on Linux to be able to take advantage of the bigger Jumbo Frames increase in network thoroughput, you need to have a gigabyt NIC card/s on the router / server.

1. Increasing MTU to 9000 to enable Jumbo Frames "manually"

Just like on Linux, the network tool to use is ifconfig. For those who don't know ifconfig on Linux is part of the net-tools package and rewritten from scratch especially for GNU / Linux OS, whether BSD's ifconfig is based on source code taken from 4.2BSD UNIX

As you know, network interface naming on FreeBSD is different, as there is no strict naming like on Linux (eth0, eth1, eth2), rather the interfaces are named after the name of the NIC card vendor for instance (Intel(R) PRO/1000 NIC is em0), RealTek is rl0 etc.

To set Jumbro Frames Maximum Transmission Units of 9000 on FreeBSD host with a Realtek and Intel gigabyt ethernet cards use: freebsd# /sbin/ifconfig em0 192.168.1.2 mtu 9000
freebsd# /sbin/ifconfig rl0 192.168.2.2 mtu 9000

!! Be very cautious here, as if you're connected to the system remotely over ssh you might loose connection to it because of broken routing.

To prevent routing loss problems, if you're executing the above two commands remotely, you better run them in GNU screen session:

freebsd# screen
freebsd# /sbin/ifconfig em0 192.168.1.2 mtu 9000; /sbin/ifconfig rl0 192.168.1.2 mtu 9000; \
/etc/rc.d/netif restart; /etc/rc.d/routed restart

2. Check MTU settings are set to 9000

If everything is fine the commands will return empty output, to check further the MTU is properly set to 9000 issue:

freebsd# /sbin/ifconfig -a|grep -i em0em0: flags=8843<UP,BROADCAST,RUNNING,SIMPLEX,MULTICAST> metric 0 mtu 9000freebsd# /sbin/ifconfig -a|grep -i rl0
rl0: flags=8843<UP,BROADCAST,RUNNING,SIMPLEX,MULTICAST> metric 0 mtu 9000

3. Reset routing for default gateway

If you have some kind of routing assigned for em0 and rl0, network interfaces they will be affected by the MTU change and the routing will be gone. To reset the routing to the previously properly assigned routing, you have to restart the BSD init script taking care for assigning routing on system boot time:

freebsd# /etc/rc.d/routing restart
default 192.168.1.1 done
add net default: gateway 192.168.1.1
Additional routing options: IP gateway=YES.

4. Change MTU settings for NIC card with route command

There is also a way to assign higher MTU without "breaking" the working routing, e.g. avoiding network downtime with bsd route command:

freebsd# grep -i defaultrouter /etc/rc.conf
defaultrouter="192.168.1.1"
freebsd# /sbin/route change 192.168.1.1 -mtu 9000
change host 192.168.1.1

5. Finding the new MTU NIC settings on the FreeBSD host

freebsd# /sbin/route -n get 192.168.1.1
route to: 192.168.1.1
destination: 192.168.1.1
interface: em0
flags: <UP,HOST,DONE,LLINFO,WASCLONED>
recvpipe sendpipe ssthresh rtt,msec rttvar hopcount mtu expire
0 0 0 0 0 0 9000 1009

6. Set Jumbo Frames to load automatically on system load

To make the increased MTU to 9000 for Jumbo Frames support permanent on a FreeBSD system the /etc/rc.conf file is used:

The variable for em0 and rl0 NICs are ifconfig_em0 and ifconfig_rl0.
The lines to place in /etc/rc.conf should be similar to:

ifconfig_em0="inet 192.168.1.1 netmask 255.255.255.0 media 1000baseTX mediaopt half-duplex mtu 9000"

Change in the above lines the gateway address 192.168.1.1 and the netmask 255.255.255.0 to yours corresponding gw and netmask.
Also in the above example you see the half-duplex ifconfig option is set insetad of full-duplex in order to prevent some duplex mismatches. A full-duplex could be used instead, if you're completely sure on the other side of the host is configured to support full-duplex connections. Otherwise if you try to set full-duplex with other side set to half-duplex or auto-duplex a duplex mismatch will occur. If this happens insetad of taking the advantage of the Increase Jumbo Frames MTU the network connection could become slower than originally with standard ethernet MTU of 1500. One other bad side if you end up with duplex-mismatch could be a high number of loss packets and degraded thoroughout …

7. Setting Jumbo Frames for interfaces assigning dynamic IP via DHCP

If you need to assign an MTU of 9000 for a gigabyt network interfaces, which are receiving its TCP/IP network configuration over DHCP server.
First, tell em0 and rl0 network interfaces to dynamically assign IP addresses via DHCP proto by adding in /etc/rc.conf:

ifconfig_em0="DHCP"
ifconfig_rl0="DHCP"

Secondly make two files /etc/start_if.em0 and /etc/start_if.rl0 and include in each file:

ifconfig em0 media 1000baseTX mediaopt full-duplex mtu 9000
ifconfig rl0 media 1000baseTX mediaopt full-duplex mtu 9000

Copy / paste in root console:

echo 'ifconfig em0 media 1000baseTX mediaopt full-duplex mtu 9000' >> /etc/start_if.em0
echo 'ifconfig rl0 media 1000baseTX mediaopt full-duplex mtu 9000' >> /etc/start_if.rl0

Finally, to load the new MTU for both interfaces, reload the IPs with the increased MTUs:

freebsd# /etc/rc.d/routing restart
default 192.168.1.1 done
add net default: gateway 192.168.1.1

8. Testing if Jumbo Frames is working correctly

To test if an MTU packs are transferred correctly through the network you can use ping or tcpdumpa.) Testing Jumbo Frames enabled packet transfers with tcpdump

freebsd# tcpdump -vvn | grep -i 'length 9000'

You should get output like:

16:40:07.432370 IP (tos 0x0, ttl 50, id 63903, offset 0, flags [DF], proto TCP (6), length 9000) 192.168.1.2.80 > 192.168.1.1.60213: . 85825:87285(1460) ack 668 win 14343
16:40:07.432588 IP (tos 0x0, ttl 50, id 63904, offset 0, flags [DF], proto TCP (6), length 9000) 192.168.1.2.80 > 192.168.1.1.60213: . 87285:88745(1460) ack 668 win 14343
16:40:07.433091 IP (tos 0x0, ttl 50, id 63905, offset 0, flags [DF], proto TCP (6), length 9000) 192.168.1.2.80 > 192.168.1.1.60213: . 23153:24613(1460) ack 668 win 14343
16:40:07.568388 IP (tos 0x0, ttl 50, id 63907, offset 0, flags [DF], proto TCP (6), length 9000) 192.168.1.2.80 > 192.168.1.1.60213: . 88745:90205(1460) ack 668 win 14343
16:40:07.568636 IP (tos 0x0, ttl 50, id 63908, offset 0, flags [DF], proto TCP (6), length 9000) 192.168.1.2.80 > 192.168.1.1.60213: . 90205:91665(1460) ack 668 win 14343
16:40:07.569012 IP (tos 0x0, ttl 50, id 63909, offset 0, flags [DF], proto TCP (6), length 9000) 192.168.1.2.80 > 192.168.1.1.60213: . 91665:93125(1460) ack 668 win 14343
16:40:07.569888 IP (tos 0x0, ttl 50, id 63910, offset 0, flags [DF], proto TCP (6), length 9000) 192.168.1.2.80 > 192.168.1.1.60213: . 93125:94585(1460) ack 668 win 14343

b.) Testing if Jumbo Frames are enabled with ping

Testing Jumbo Frames with ping command on Linux

linux:~# ping 192.168.1.1 -M do -s 8972
PING 192.168.1.1 (192.168.1.1) 8972(9000) bytes of data.
9000 bytes from 192.168.1.1: icmp_req=1 ttl=52 time=43.7 ms
9000 bytes from 192.168.1.1: icmp_req=2 ttl=52 time=43.3 ms
9000 bytes from 192.168.1.1: icmp_req=3 ttl=52 time=43.5 ms
9000 bytes from 192.168.1.1: icmp_req=4 ttl=52 time=44.6 ms
--- 192.168.0.1 ping statistics ---
4 packets transmitted, 4 received, 0% packet loss, time 3003ms
rtt min/avg/max/mdev = 2.397/2.841/4.066/0.708 ms

If you get insetad an an output like:

From 192.168.1.2 icmp_seq=1 Frag needed and DF set (mtu = 1500)

--- 192.168.1.1 ping statistics ---
0 packets transmitted, 0 received, +4 errors

This means a packets with maximum MTU of 1500 could be transmitted and hence something is not okay with the Jumbo Frames config.
Another helpful command in debugging MTU and showing which host in a hop queue support jumbo frames is Linux's traceroute

To debug a path between host and target, you can use:

linux:~# traceroute --mtu www.google.com
...

If you want to test the Jumbo Frames configuration from a Windows host use ms-windows ping command like so:

C:\>ping 192.168.1.2 -f -l 8972
Pinging 192.168.1.2 with 8972 bytes of data:
Reply from 192.168.1.2: bytes=8972 time=2ms TTL=255
Ping statistics for 192.168.1.2:
Packets: Sent = 4, Received = 4, Lost = 0 (0% loss),
Approximate round trip times in milli-seconds:
Minimum = 2ms, Maximum = 2ms, Average = 2ms

Here -l 8972 value is actually equal to 9000. 8972 = 9000 – 20 (20 byte IP header) – 8 (ICMP header)

My PHP/ MySQL Restaurant Reservation Form

Tuesday, December 14th, 2010

Two months ago, I’ve developed a contact reservation form in PHP. The form is really easily customizable and is straight forward to integrate.
I’ve developed the form for a small restaurant which was missing the feature on it’s joomla based website in order to be able for restaurant clients to reserve tables.

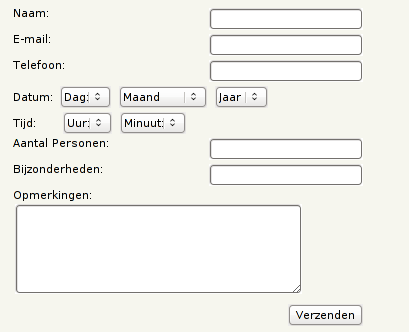
Here is how my restaurant reservation form looks like:

hip0's plain php restaurant reservation form

Later on I found there are plenty of possibilities to easily make a reservation form in Joomla but at that time I had no idea that custom contact forms can be prepared with Joomla, so I developed my own one from scratch in plain PHP and MySQL.

The form’s fields are in Dutch, because the form I’ve developed for a Dutch restaurant.
However changing the form text is really easy,to do so open the php file and modify it, according to your needs.
I decided to share here the reservation form in hope that it might be helpful to somebody out there.
The Reservation form is licensed under GPLv2 so you’re very welcome to distribute and modify it freely.

The form installation is described in the README file you will find bundled with the reservation form archive.

You can d Download my PHP restaurant reservation form here

Feedback on the form is very welcome!
 

Fix vnstat error “eth0: Not enough data available yet.” on Debian GNU / Linux

Monday, November 21st, 2011

Vnstat GNU Linux console terminal traffic statistics logo

After installing vnstat to keep an eye on server IN and OUT traffic on a Debian Squeeze server. I used the usual:

debian:~# vnstat -u -i eth0

In order to generate the initial database for the ethernet interface used by vnstat to generate its statistics.

However even though /var/lib/vnstat/eth0 got generated with above command statistics were not further generated and trying to check them with command:

debian:~# vnstat --days

Returned the error message:

eth0: Not enough data available yet.

To solve the eth0: Not enough data available yet. message I tried completely removing vnstat package by purging the package e.g.:

debian:~# apt-get --yes remove vnstat
...
debian:~# dpkg --purge vnstat
...

Even though dpkg –purge was invoked /var/lib/vnstat/ refused to be removed since it contained vnstat’s db file eth0

Therefore I deleted by hand before installing again vnstat:

debian:~# rm -rf /var/lib/vnstat/

Tried installing once again vnstat “from scratch”:

debian:~# apt-get install vnstat
...

After that I tried regenerating the vnstat db file eth0 once again with vnstat -u -i eth0 , hoping this should fix the error but it was no go and after that the error:

debian:~# vnstat --hours
eth0: Not enough data available yet.

persisted.

I checked in Debian bugs mailing lists and I found, some people complaining about the same issue with some suggsetions on how the error can be work arouned, anyways none of the suggestions worked for me.

Being irritated I further removed / purged once again vnstat and decided to give it a try by installing vnstat from source
As of time of writting this article, the latest stable vnstat version is 1.11 .
Therefore to install vnstat from source I issued:

debian:~# cd /usr/local/src
debian:/usr/local/src# wget http://humdi.net/vnstat/vnstat-1.11.tar.gz
...
debian:/usr/local/src# tar -zxvvf vnstat-1.11.tar.gz
debian:/usr/local/src# cd vnstat-1.11
debian:/usr/local/src/vnstat-1.11# make & make all & make install
debian:/usr/local/src/vnstat-1.11# cp examples/vnstat.cron /etc/cron.d/vnstat
debian:/usr/local/src/vnstat-1.11# vnstat -u -i eth0
Error: Unable to read database "/var/lib/vnstat/eth0".
Info: -> A new database has been created.

As a last step I put on root crontab to execute:

debian:~# crontab -u root -e

*/5 * * * * /usr/bin/vnstat -u >/dev/null 2>&1

This line updated vnstat db eth0 database, every 5 minutes. After the manual source install vnstat works, just fine 😉