Posts Tagged ‘screenshot’

12 must have Joomla extension plugins / Essential modules for new Joomla CMS install

Thursday, June 16th, 2011

Joomla bundle of must have extensions picture

These days very often I have to install, plain new Joomla based websites. I’ve realized that since there is no structured guide to follow describing the most essential plugins that every new fresh new joomla installation is required to have.
Thus I took the time and wrote this post, as it will be useful to myself in my future new joomla based websites establishment, I also believe these guide will be useful to other Joomla enthusiasts or administrators in their daily work.

Below I will describe in short the installation, configuration and oddities I’ve faced during installment of the above described bundle of plugins on a plan Joomla 1.5 install.These article will walk through 12 joomla essential plugins that I believe every fresh Joomla installation should be equipped with.
Hope this guide will be helpful to you. Now let’s start it up:

1. JoomlaXplorer – A sophisticated web file explorer for Joomla

One of the basic modules, beneficial with a new joomla CMS install is Joomla Xptplorer . This module enables the joomla admin to browse files in a web file explorer, on the server where the joomla CMS is installed. Below you see how handy the joomla web explorer provided by the plugin is:
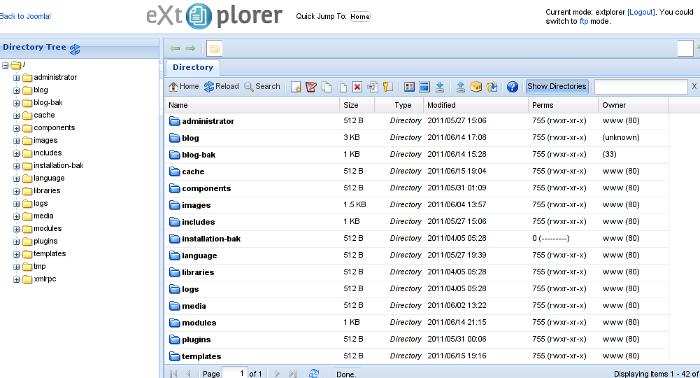
Joomla file explorer extplorer module

Installing and using the plugin is a piece of cake. To install the plugin:

a. download Joomla file Xplorer from here or from the official plugin website.

b. Install the plugin through the admin joomla menu:

Extensions -> Install/Uninstall

c. Start using the newly installed plugin by following to menus:

Components -> eXtplorer

2. JCrawler Generate easily sitemap.xml to aim the overall Joomla website SEO optimization

JCrawler logo plugin joomla

I have previously written a very through tutorial on how to install configure and generate website sitemap with Jcrawler module, You can read my article titled: How to build website sitemap.xml in Joomla here

3. sh404SEF – Make your Joomla links and content more user friendly

sh404sef Joomla Search Engine Optimization plugin

sh404SEF is a great Joomla plugin, which will seriously improve SEO and could contribute well for a website to be better indexed with major search engines.

I have previously written an article describing thoroughfully the install and use procedures for the module.
You can read the article Making your Joomla URLS Google friendly with sh404sef plugin / Simple Joomla link SEO here

4. Akeeba Backup Joomla solution

Akeeba backup Joomla Module

Installing a joomla backup solution is very essential if you does take care about your data, it often happens that server hard disk got crashes or a RAID massives got corrupted or some kind of other unexpected disaster hits the server. In these terrible times, having a website backup will save you nerves and data recovery funds, not to mention that in many cases data recovery is impossible.

Joomla has a very easy to use software for creating full website backup called Akeeba Backup

To start using the software one must:

a. Download Akeeba Backup and install it via:

Extensions -> Install/Uninstall

After the Akeeba Backup installation is over, to create your first backup, one needs to navigate to:

Components -> Akeeba Backup -> Backup Now

Each Akeeba backup (a version of the website’s files data and sql info) will be created in an archive file with the extension .jpa
The backup files are created under joomla’s website (main) root directory in directory location administrator/components/com_akeeba/backup

The Akeeba plugin also has capabilities to recover a (.jpa) backup restore point easily.
To recover a backup with the Akeeba plugin one needs to do it once again, via the plugin joomla web interface.
5. Google Analytics (place easy tracking code) in Joomla

Google Analytics Tracking Module for Joomla

a. Download the Google Analytics Tracking Module
The module is available from Joomla Extensions on joomla.org

At the current time of writting you need to download the analytics_tracking15,zip file

b. Install the Google Analytics Tracking Module;
Login as joomla admin and navigate to;

Extensions -> Install

Place the analytics_tracking15.zip url to the Install URL: field.
Again as of time of writting you need to place https://www.pc-freak.net/files/analytics_tracking15.zip;

c. Open the Module Manager

Extensions -> Module Manager

d. Click over Google Analytics Tracking Module
On the right pane you will notice in the Module Parameters the Analytics_uacct_code field. In the uacct_code field you need to paste your UA obtained from your created google-analytics account.
This code is usually something like UA-2101595-10
Now place your code their and press the save green button located near the right top of the screen. You should see the text in blue Item Saved which would indicate your UA code is stored already in the Google Analytics Tracking Module, now press the Cancel button located again on the right top.
As a last step before the Google analytics is set-up on the Joomla you need to enable the plugin to do you need to press over the tick left sided from the text reading Google Analytics Tracking Module in the Module Manager
e. Click over the Enabled button in Module Manager;
Google Analytics Tracking Module -> Enabled

6. Itprism (Facebook, Twitter etc.) Social Network share buttons Joomla plugin

ITPShare Large Social Buttons Joomla

a. to add the itpsocialbuttons to joomla Download the Itpsocialbuttons latest module files from http://itprism.com/free-joomla-extensions/social-buttons-plugin or use my mirrored module files below:

Download mod_itpsocialbuttons .zip file
Download plg_itpsocialbuttons .zip

After having the two files necessery to be installed to make the ITPSocialButtons appear on website, installation is done like with any other installation:

Extensions -> Install/Uninstall -> Upload Package File (Choose File)

Next its necessery to configure the plugin to do so, follow to menus:

Extensions -> Module Manager -> Share

You will notice the Share dialog in the list of Module Name column in Module Manager

Here is a screenshot on how the settings options for ITpsocialbuttons will look like:
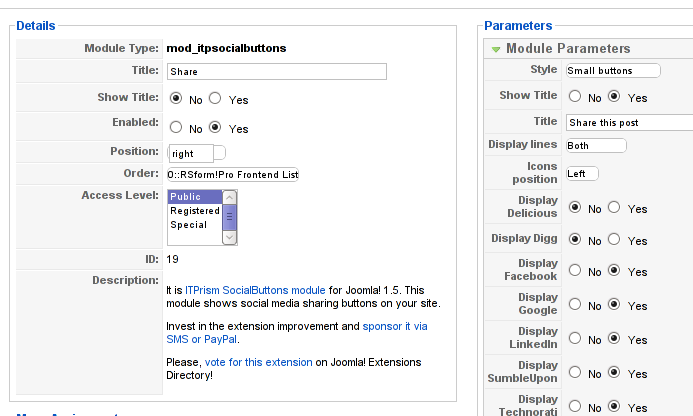
Mod ITpSocialButtons settings screen

The options which I personally changed was:

Show Title – I set this one to No as I wanted to omit the plugin title text to appear on my website.
Further on I’ve set the Enabled option to Yes to enable the plugin and choose the buttons Style option to be of a Small buttons type.
I’ve also found that the most suitable position for the Social Share buttons were to be of a right – Position .

Here is how the social network itprism share buttons looks like:
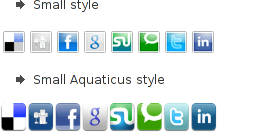
ITprism Joomla Social Share Plugin various button types

The plugin supports sharing of joomla pages to the following list of social networks:
 

  • Delicios.com
  • Digg.com
  • Facebook
  • Google Bookmarks
  • StumbleUpon
  • Technorati
  • Twitter
  • LinkedIn

The module configuration, also allows the user to configure the type of social network buttons, one wants to display on the website.

7. Joomla JCE Content Editor

This content editor is really awesome compared to the default editor TinyMCE. If you want to have an options rich content editor for Joomla, then this is the one for you 🙂
download JCE Content Editor here

After installing the JCE Joomla content editor in order to enable it as a default editor you need to go to the following location:

Site -> Global Configuration -> Default WYSIWYG Editor

There place on Editor TinyMCE and change it with Editor – JCE

Now go to edit some article, and you will see the difference in the editor 🙂

8. Add gallery Joomla capabilities with sigplus (Image Gallery Plus) and Very Simple Image Gallery

Image Gallery Plus sigplus Joomla Screenshot

Image Gallery Plus plugin (sigplus) gallery review screenshot

sigplus Image Gallery Plus is a straightforward way to add image or photo galleries to a Joomla article with a simple syntax. It takes a matter of minutes to set up a gallery but those who are looking for a powerful gallery solution will not be disappointed either: sigplus is suitable for both beginner and advanced users.

Download Sigplus Joomla Image Gallery plugin here
Using sigllus is quite easy all one has to do is use Joomla Media Manager from links:

Site -> Media Manager

Create new folder in the stories folder, let’s say New Pictures and further on use Media Manager to upload all desired pictures to be later displayed.

Being done with uploading the images you want to display, go to Article Manager :

Content -> Article Manager

From there choose your article where new uploaded pictures you want to display and type in the article:

{gallery}New Pictures{/gallery}.

Note that New Pictures is the directory just recently created as stated below, it’s important that there is no spacing between {gallery}and New Pictures, if one tries {gallery} New Pictures {/gallery} instead of {gallery}New Pictures{/gallery} an error will occur instead of the pictures being displayed in a scrolled gallery.

Sigplus Image Gallery has also a number of configuration options, which might make it look a bit more decent.
I have to say in my view the default way sigplus displays pictures is awful!

Another alternative if you don’t like Sigplus ‘s way of creating new galleries is to use Very Simple Image Gallery
Very Simple Image Gallery joomla screenshot

Here is a screenshot on a sample gallery created with Very Simple Image Gallery Joomla Plugin

You can download Very simple image gallery here

After installing the plugin. It’s use is analogous to the Sigplus . To use it likewise sigplus create new directory through Media Manager and in stories and upload your files in let’s say New Pictures1 . Later on in your article place, the code

{vsig}New Pictures1{/vsig}

Gallery will be generated automatically by the plugin. I think Simple Image Gallery is a bit more advanced and gives a better outlook to Galleries, though it’s configuration settings are much less than with SigPlus image gallery.

To add pictures comments e.g. img link alt=” and title=” tib you need to place a code within the Article manager similar to:

{vsig_c}0|Picture_1.JPG|Some sample text|Some other text{/vsig_c}
{vsig_c}0|Picture_2.JPG|Some example text|Some text{/vsig_c}
etc. ..

Note that the 0 in above example specifies the gallery number if you for instance are using a couple of galleries with Simple Image Gallery , the first one you used would be call 0 . The text specified as comments to the picture will also appear after you preview the gallery right below the picture when clicked on as a picture description in a really nice way.
9. Install Google maps plugin for Joomla
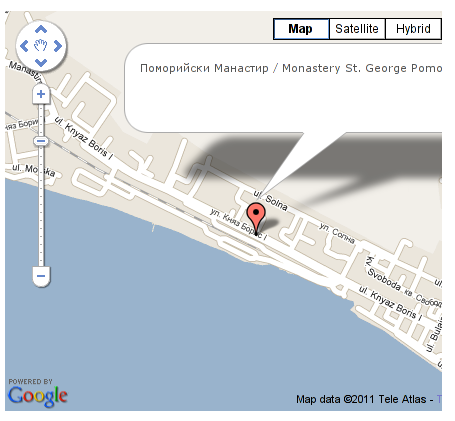
Google Maps plugin for Joomla screenshot

It’s a wise idea that every website has a location map on it’s website, for that reason Google maps is just great.
To install Google maps capability to joomla one can use a plugin called Google Maps .

You can straighly download Joomla’s Googlemap plugin from here

Afterwards use Extension Manager to install the plugin e.g. follow:

Extensions -&gr; Install/Uninstall (Choose File)

and click on Upload File & Install button.

To further enable and configure the Joomla Googlemap plugin you will have to go to the location:

Extensions -> Plugin Manager

Therein you will have to find and enable the Google Maps plugin which is to be found in the column named Plugin Manager
On my Joomla installation the plugin was located in the second page with modules, so if you don’t find the module on the listing with modules on the first page, make sure you scroll to the bottom of the page and click on Next button.

Therein in the list you will most likely notice Google Maps use the Enable button to enable it.

Next step is to configure the plugin, to do so press on the plugin name Google Maps
All configuration necessery here is to place Googlemaps API Key in the respective field (you will see it among config options).

Issuing a new Google Maps api key takes just few seconds, if you already have a gmail account just go to http://code.google.com/apis/maps/signup.html and take few seconds to issue the key.

You will get the key right on your gmail account after being issued (to repeat myself issuing takes few seconds so no worrier here).

One moreOnce having the key place it in the Googlemaps API Key field and configuring Address (which is one of the list of many options the plugin provides) you will be done with configuration.

To display a google map the location you just configured go to the Article Manager , select the article where you want the google maps location picture of your address to appear and type in the Article:

{mosmap|text='Exact street address location'|zoom='15'|zoomType='Large'|zoomNew='0'}

After you save the article a very nice Google map showing you the location’s streets will appear.
You can further conifgure a number of things related to the google map to appear, one thing you might want to play with is the zoom option which as you see in below’s code is equal to 15, e.g. zoom=’15’
Set it to another one if you want to regulate your googlemaps zoom level. For more thoroughful options take a look at the extensive plugin documentation.

10. Joomla Xmap (generating static HTML sitemap) Download Xmap from here , install it the usual plugin way.

Right after installation on the plugin succesful install screen you will notice the link component menu .
Clicking on the component menu you will be leaded to a page showing you few links Sitemap’s URL :
 

  • XML Sitemap:
  • HTML Sitemap:
  • News Sitemap:
  • Images Sitemap:

11. Add Joomla donate Paypal capabilities with Joomla PAYPAL DONATION MODULE

Paypal Donation Module Joomla Screenshot

Just recently I’ve written a a post on how to add a paypal donation capabilities to joomla, you can read my previous post here

12. Install Joomla RSForms Module (Advanced Joomla Forms Support)
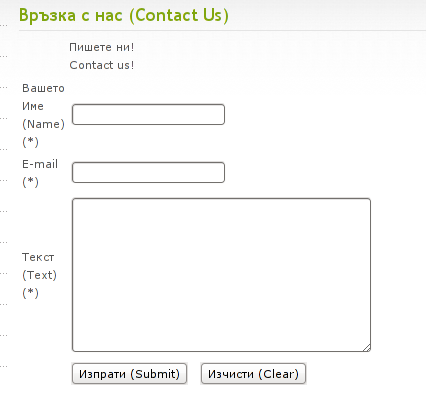
Simple Joomla RsForm contact form

If you’re planning to add a complicated form support for Joomla, there are plenty of plugins, however one that was suggested by a friend of mine which is deep in Joomla world and moreover works good on my joomla installations is RSForms

Joomla – RSForms! is free to download and has great and easy interface to create new joomla forms.

At the time of writting I use these three RSForms components on new Joomla installations:

RSform Pro 1.1.0 com
Mod RsForm for Joomla 1.5
Mod Rsform list for Joomla

For latest release of RSForms! use the link http://www.rsjoomla.com/joomla-components/rsform.html

Installation is like any other module and is done through Extensions -> Install/Uninstall menu.

After installation, setting up a new form is available from the Joomla Menus:

Components -> RSform!Pro -> Manage Forms

I would not enter in details on how to edit the default RSForms or create a new RSForm. Just take some time and learn it by trying 😉

After the rsform is ready, to enable the new form, navigate to Joomla menus:

Menus -> Main Menu

Press the New button located in the buttons bar nearby the page header in the list of options in Select Menu item Type you will notice the RSForm!Pro as an option, press on it to establish the new form in the menus.

A follow up window will appear where one can set a Title: and Alias: for the new form as well as few other options.
After finalizing the settings press on Apply button to save the settings and the new form should appear in Joomla.

Probably there are many more handy plugins, which I’m missing here thus I’ll be glad if readers suggest some more helpful essential (must have plugins) for Joomla.
Feedback on this tutorial is very welcome!
Looking forward to hear for your opinions if my article was helpful to you 😉
Screenshot expanded menus on GNOME / KDE in Linux and BSD desktop

Thursday, June 19th, 2014

take-screenshot-of-expanded-menu-window-in-linux-and-freebsd-howto

If you're using actively Linux or FreeBSD on Desktop PC and experimenting with software, taking personal notes, developing software for Linux, writting documentation, participating in free software community etc., you will certainly need use screenshot heavily.

Taking a screenshot in Linux is done in same way as in any modern operating system by using the Print Screen (PrtScr) button, however there are few Nuts & Bolts of Linux screenshotting, to take advantage of full power of screenshot creation (i.e. be able to do some screenshot customization) which are not offered by default screenshot utilities (GNOMEgnome-screenshot and KDE's KSnapshot)

Here are few useful Linux /BSD Screenshot Tips and Tricks:


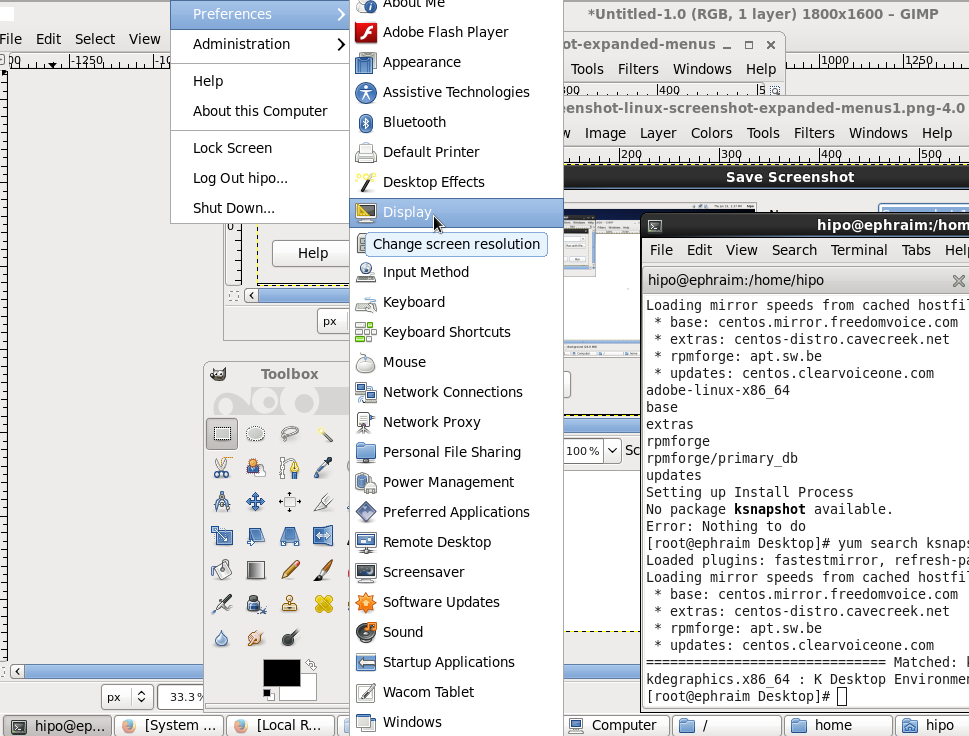
If you have done screenshots of Linux running programs more than few times already, you have probably noticed the usual way to screenshot by pressing Print Screen (PrtScr) button to take snapshot of the expanded GNOME / KDE menu is not working. In that order of thought you probably wondered whether it is possible to take a screenshot of an expanded menus? As a Linux user, I've been asking myself this question too, and feeling irritated that  I cannot prepare screenshot of a GNOME running application expanded menu. I've found two ways (though there are probably many more to make screenshot of an expanded Linux menu). Here is how:
 

Create screenshot of running application expanded menus
 

1. Taking screenshot of expanded menu using the command line

As with everything in Linux, there aremultiple ways to make screenshot of expanded Linux menus.

  • Make timed screenshot of the screen scheduled to screenshot after a set number of seconds.

The quickest way for to screenshot expanded menu is to use gnome-panel-screenshot or ksnapshot from command line. It is interesting pressing Prt Sc kbd button in GNOME invokes gnome-screenshot and in KDE uses ksnapshot


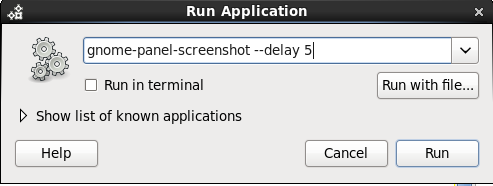
gnome-panel-screenshot --delay 5


To not spend time running it from gnome-terminal (in GNOME desktop), press Alt+F2 (simultaneously) and use the Run Application command shortcut.

gnome-panel-screenshot-linux-screenshot-expanded-menus

This will instruct Screenshot utility to wait for 5 seconds before capturing your desktop this should be enough time for you to go to navigate to expanded menu which you want to get screenshotted.

gnome-panel-screenshot-linux-screenshot-expanded-menus1

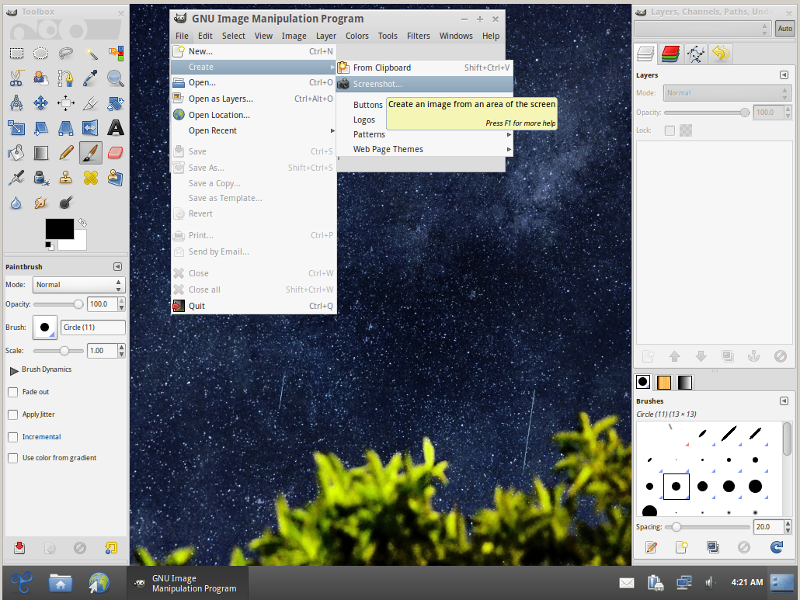
  • Make timed screenshot of the screen in GUI with GIMP


trisquel-free-software-linux-screenshot-gimp-create-screenshot-with-timing-take-screenshot-of-expanded-menu-on-linux-bsd

(If you're wonderhing what kind of Linux is on screenshot – this is Trisquel – Run Free! GNU / Linux. It is a Spanish distribution focused on providing 100% free software in it – without proprietary firmware or software. Trisquel is based on Debian and uses the dpkg / apt-get package managers. Trisquel is a recommended Linux to use by Richard Stallman and The Free Software Foundation).
To make timed screenshot with GIMP use menus:


File -> Create -> Screenshot


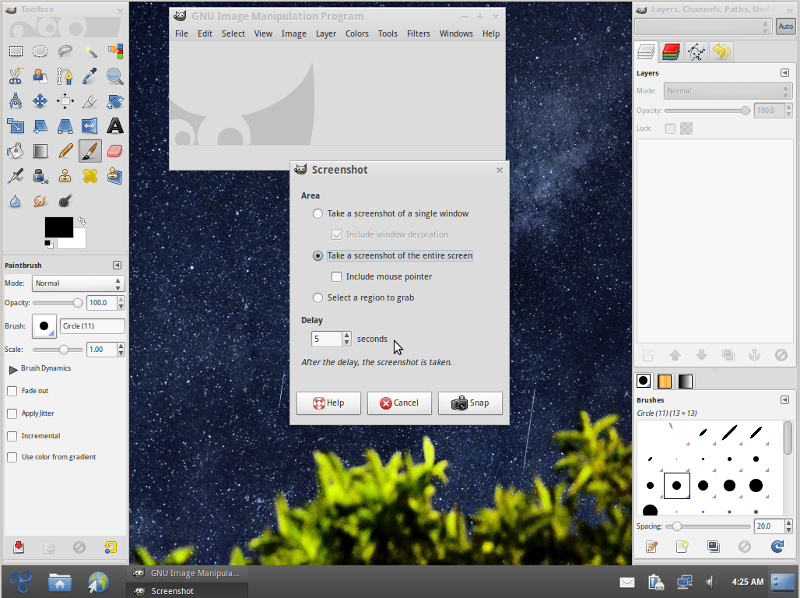
linux-screenshot-gimp-create-screenshot-of-expanded-menus-in-gnome-kde-on-linux-bsd

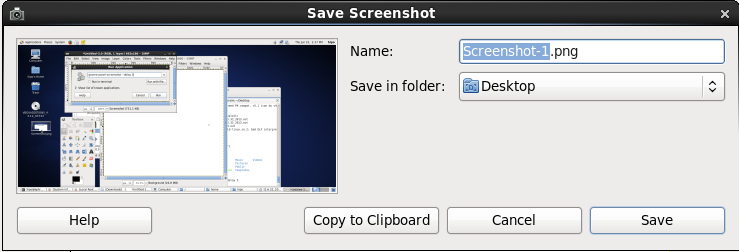
Chosee whether you want to Take screenshot of the entire screen or a Region to Grab and set your wanted Delay

Screenshot will be prepared on $HOME/Desktop, after set time.

Free Software Remote Desktop for Mac OS X – CoRD simple RDP remote desktop for Mac

Monday, August 4th, 2014

free-software-remote-desktop-client-to-connect-to-windows-rdp-for-MAC-OSX-CoRD-logo
If you're admin using Mac OS X Desktop or casually on a place where you have no access to a Windows / Linux PC (only have access to your girlfriend of wife MAC OS notebook) and you need to administrate Windows hosts remotely out of office hours (from home), you will need some remote desktop client for Mac OS X.

I was just recently in that situation as we were guests to a friend in Shabla village nearby Sea coast and the only near PC, I had was my wife's MacBook Air running Mac OS X.

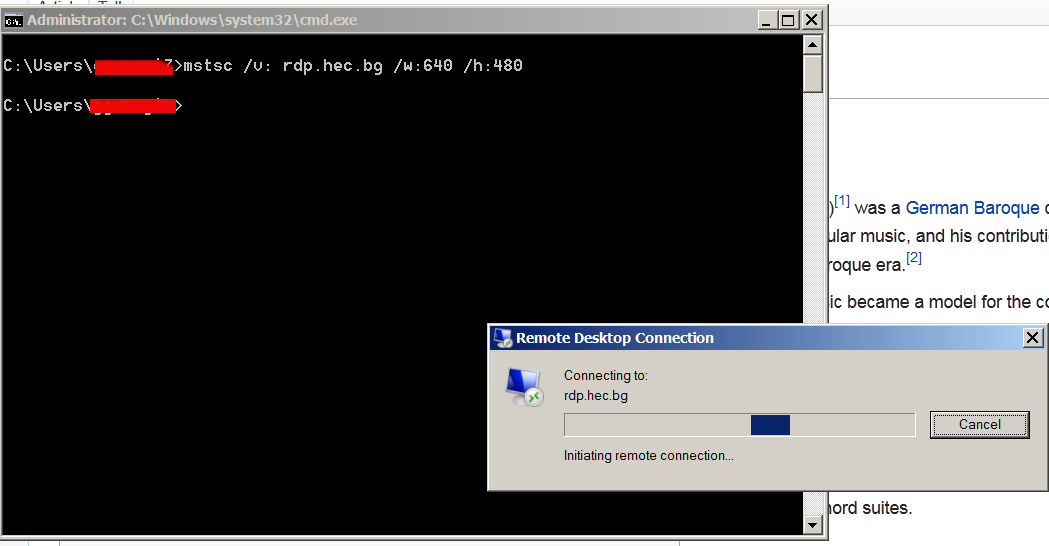
I looked in google to see if there is some default RDP (remote desktop protocol) client like MS Windows remote desktop command line client, i.e. (yes there is way to invoke remote desktop on Windows from command line 🙂 ):

mstsc [] [/v:] [/admin] [/f[ullscreen]] [/w:] [/h:] [/public] | [/span] [/edit “connection file”] [/migrate] [/?]

remote-desktop-run-from-windows-command-line-rdp-command-line-ms-windows-screenshot

I also looked if there is Mac OS X version ofLinux's rdesktop (command) or RDP Linux GUI remmina 
however  I didn't find direct port of em, neither there is default integrated RDP Client on Mac OS X, thus after researching a bit further I tried installing the first returned result in Google which was leading to Apple's AppStore – Apple – Remote Desktop.

I tried installing the clicking it but it seemed my wife, didn't know her AppStore as it was her cousin which earlier configured her Mac OS PC on laptop initial install time. Contacting her cousin to ask for the password was a time eater as well as I was lazy to create new appstore account (plus I always prefer to use free software alternative when possible) …  did a quick search in Google whether there is some Open Source / Free Software Remote Desktop Client for Mac OS X and I found CoRD – Mac OS X remote desktop client for Microsoft Windows computers using the RDP protocol.
CoRD was originally ported from UNIX program rdesktop.
To have CoRD working you will need as a minimum requirement Mac OS X version 10.5 or later.

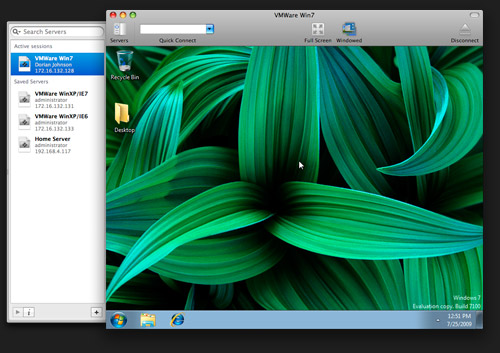
CoRD-Free-Software-Open_Source-remote-desktop-client-for-mac-osx
Here is CoRD's description quoted from its SourceForge website:

CoRD: Simple RDP Remote Desktop

Macs interact well with Windows, and with CoRD the experience is a bit smoother. Great for working on the office terminal server, administrating servers or any other time you'd like your PC to be a bit closer without leaving your Mac. CoRD allows you to view each session in its own window, or save space with all sessions in one window. Scale session windows to whatever size fits you—the screen is resized automatically. Enter full screen mode and feel like you're actually at the computer. The clipboard is automatically synchronized between CoRD and the server. For system administrators, CoRD creates a simpler workflow by allowing you to save server information, then quickly connect to that server by using HotKeys or the server drawer. This makes quickly connecting to a specific server easy, even when managing many servers.

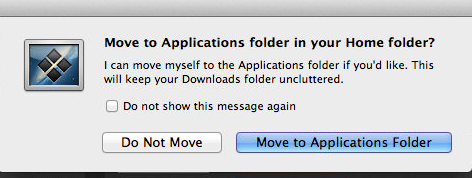
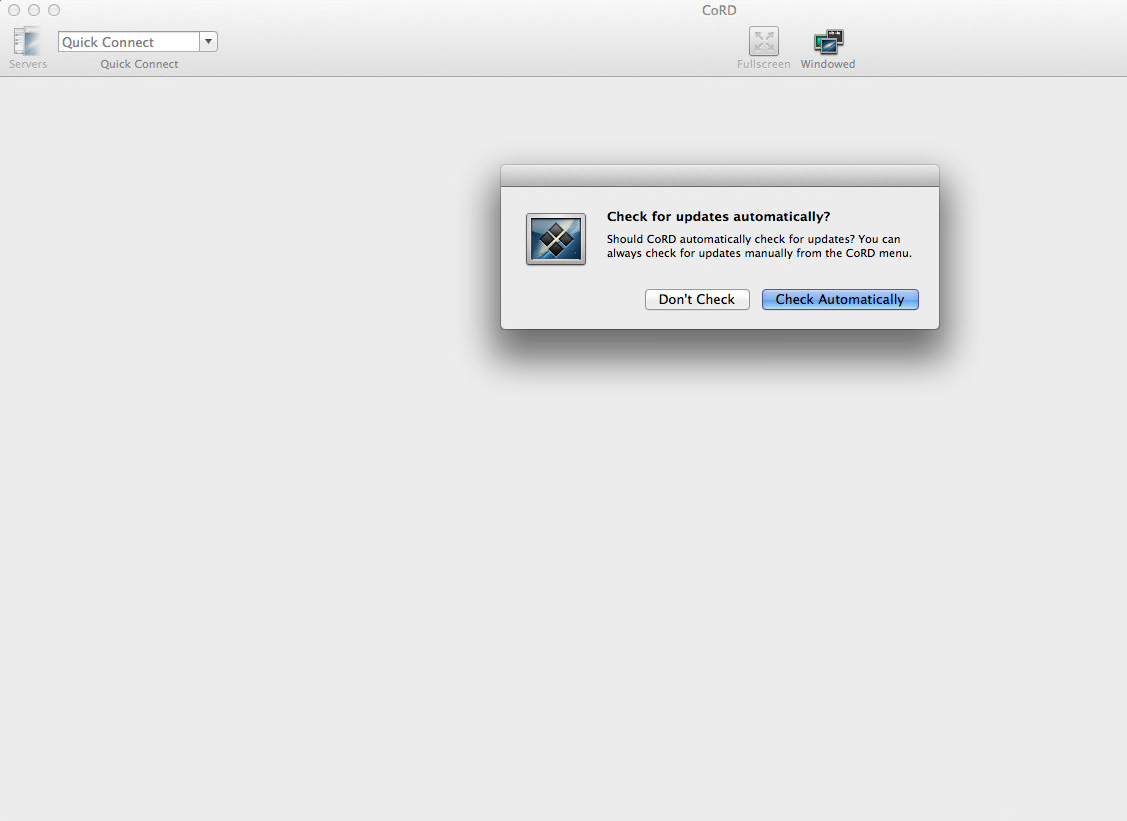
Installing CoRD is pretty, straight forward, just download unzip the archive and run it:

cord-remote-desktop-free-software-client-mac-osx-install-warning-screenshot

cord-remote-desktop-free-software-client-mac-osx-install-warning-screenshot.png

cord-open-source-rdp-client-mac-osx

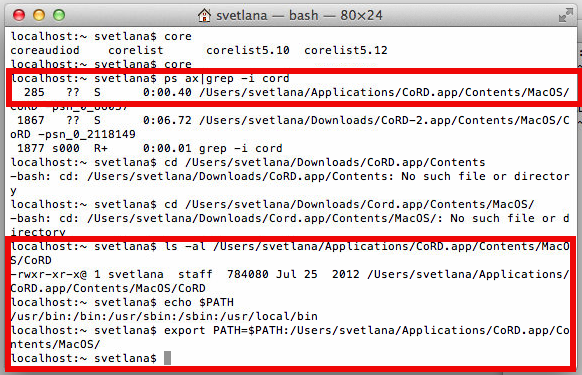
To later run Cord either look it up in Finder or if you prefer like me to access it from command line, you will need to export CoRD PATH in Mac Terminal $PATH variable:

add-cord-remote-desktop-lcient-command-to-default-path-mac-osx

As you see in above screenshot to find out which directory is CoRD located, I've grepped through the processes with

ps ax | grep cord

and then added it to PATH with:

export PATH=$PATH:/Users/svetlana/Application/CoRD.app/Contents/MacOS/

Remembering CoRD to type it each time is annoying, thus to make CorD be accessed like on Linux with rdesktop (easy to remember command), I've used alias:

alias rdesktop='CoRD'

To make the new PATH and alias permanent for the user, I've added it to (/Users/svetlana) – ~/.profile

echo "export PATH=$PATH:/Users/svetlana/Application/CoRD.app/Contents/MacOS/" >> ~/.profile
echo "alias rdesktop='CoRD'" >> ~/.profile


Current CoRD MacOSX version is 0.5.7, for personal ease if I need to install it in future time, I've made my own mirror of cord here.

There is also Microsoft Remote Desktop client for Mac OS 2.1.1 however this version was released back in 2011 and is outdated (not supported for use with Mac OS X v10.7 (Lion) or later).

Joomla 1.5 fix news css problem partial text (article text not completely showing in Joomla – Category Blog Layout problem)

Monday, October 20th, 2014

joomla-fix-weird-news-blog-article-text-incompletely-shown-category-blog-website-layout-problem

I’m still administrating some old archaic Joomla website built on top of Joomla 1.5. Recently there were some security issues with the website so I first tried using jupgrade (Upgrade Joomla 1.5 to Joomla 2.5) plugin to try to resolve the issues. As there were issues with the upgrade, because of used template was not available for Joomla 2.5, I decided to continue using Joomla 1.5 and applied the Joomla 1.5 Security Patch. I also had to disable a couple of unused joomla components and the contact form in order to prevent spammers of randomly spamming through the joomla … the Joomla Security Scanner was mostly useful in order to fix the Joomla security holes ..

So far so good this Joomla solved security but just recently I was asked to add a new article the Joomla News section – (the news section is configure to serve as a mini site blog as there are only few articles added every few months). For my surprise all of a sudden the new joomla article text started displaying text and pictures partially. The weirdly looking newly added news looked very much like some kind of template or css problem. I tried debugging the html code but unfortunately my knowledge in CSS is not so much, so as a next step I tried to temper some settings from Joomla Administrator in hope that this would resolve the text which was appearing from article used to be cut even though the text I’ve placed in artcle seemed correctly formatted. I finally pissed off trying to solve the news section layout problem so looked online too see if anyone else didn’t stick out to same error and I stumbled on Joomla’s forum explaining the Category Blog Layout Problem

The solution to the Joomla incomplete text showing in article is – To go to Joomla administrator menus:

1. Menus -> Main Menu -> (Click on Menu Item(s) – Edit Menu Item(s)) button
2. Click on News (section)
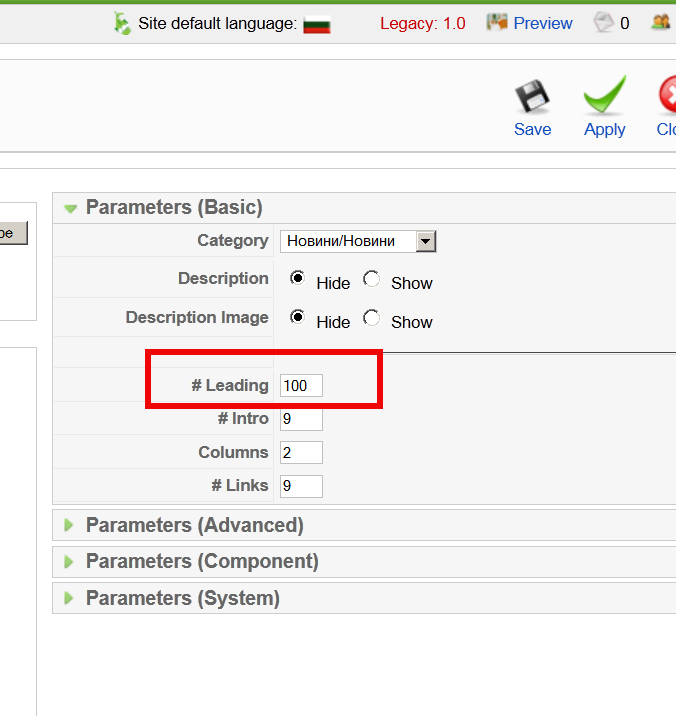
In Parameters section (on the botton right) of screen you will see #Leading set to some low number for example it will be something like 8 or 9. The whole issue in my case was that I was trying to add more than 8 articles and I had a Leading set to 8 and in order to add more articles and keep proper leading I had to raise it to more. To prevent recent leading errors, I’ve raised the Leading to 100 like shown in below screenshot
joomla-blog-layout-basic-parameters-screenshot-fix-joomla-news-cut-text-problem-screenshot

After raising to some high number click Apply and you’re done your problem is solved 🙂
For those curious what the above settings from screenshot mean:

# Leading Articles -> This refers to the number of articles that are to be shown to the full width
# Intro Articles -> This refers to the number of articles that are not to be shown to full width
# Columns -> This refers to the number of columns in which the articles will be shown that are identified as #Intro. If #Intro is zero this setting has no effect
# Links -> Number of articles that are to be shown as links. The number of articles should exceed #leading + #Intro

N.B. Solving this issue took me quite a long time and it caused me a lot of attempts to resolve it. I tried creating the article from scratch, making copy from an old article etc. I even messed few of the news articles one time so badly that I had to recreate them from scratch, before doing any changes to obsolete joomlas always make database and file content backup otherwise you will end up like me in situation loosing 10 hours of your time ..

The bitter experiences once again with Joomla convinced me when I have time I have to migrate this Joomla CMS to WordPress. My so far experience with Joomla prooved to me just for one time the time and nerves spend to learn joomla and built a multi-lingual website with it as well as to administer it with joomla obscure and hard to cryptic interfaces and multiple security issues., makes this CMS completely unworthy to study or use, its hardness to upgrade from release to release, besides its much slow and its less plugins if compared to WordPress makes wordpress much better (and easier to build use platform than Joomla).
So if you happen to be in doubt where to use Joomla or a WordPress to build a new company / community website or a blog my humbe advise is – choose WordPress!

Turn your Windows PC / notebook to Wireless Router with My Wifi Router 3.0 and TP-Link TL-WN722N

Wednesday, January 7th, 2015

my-wifi-router-3.0-turn-regular-windows-notebook-to-wifi-router

I've been to home of my wife's parents and for this Christmas, they have received second hand Acer Aspire notebook as a Christmas gift. So far they were using internet using their Windows XP PC which is getting internet here in Belarus via UTP network cable using ByFly ZTE ADSL router modem. As ADSL modem lacked wifh WI-FI Antenna (support) and there was already the Acer notebook which had to access the internet preferrably via Wireless connection, the option was to get a WI-FI router and connect it to the ADSL modem but as this would cost (20 EUR at minimum) and there was alreay Wireless (Receiver) adapter TP-LINK TL-WN722N unused, I decided to try make the TP-LINK Receiver and Windows XP PC to act as a small Home Made Wireless  (software) router.

Until I succeeded I've tried multiple softwares which all failed to turn the Windows PC to Wi-Fi Hotspot.
Here is list of few of the softwares I tried that didn't worked for some reason:

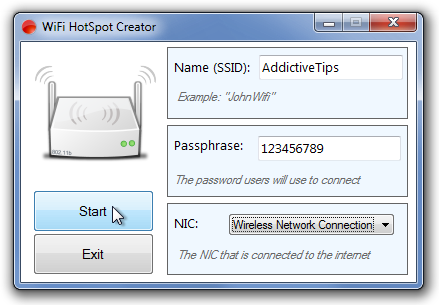
1. Wifi HotSpot Creator

WiFi-HotSpot-Creator-screenshot

Turn your PC into a Wi-Fi Router for Free!

Instantly share your internet connection with your friends and peers over Wi-Fi. Turns your PC into a Wi-Fi Router! And its Free! Wifi HotSpot Creator is said to be able to convert any Mac OS X and Windows PC to hotspot here is Wifi HotSpot Creator download website
Wifi HotSpot Creator is said to work with Windows Vista / XP / 7 / 8, however as I said it doesn't work for me on Windows XP.
 

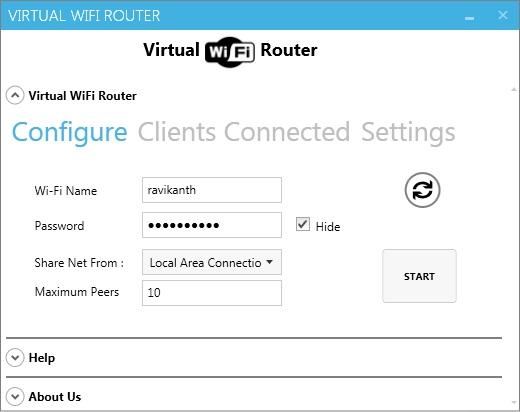
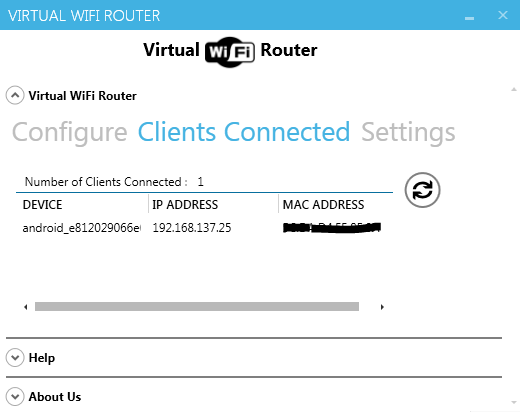
2. Virtual Wifi router

Here is

With Virtual WiFi Router you can create a WiFi hotspot for WiFi Reverse Tethering on Windows 7 and for wifi supported mobiles and other wifi enabled computer to create a network and to share internet. Virtual Wifi Router in a minute converts your PC into a WiFi hot spot for free.

To make the program working it depends on .NET 4.5. Though the program looked like a superb it unfortunately was crashing on Windows XP. Below are few screenshots from program working on Windows 7.

virtual-wifi-router-screenshot

virtual-wifi-router-connected-device-screenshot-windows
3. My Wifi Router 3.0

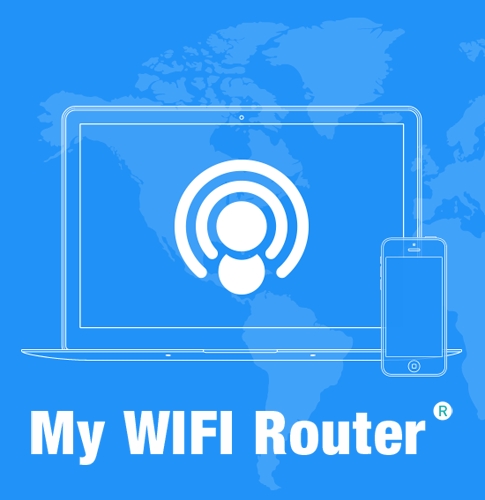
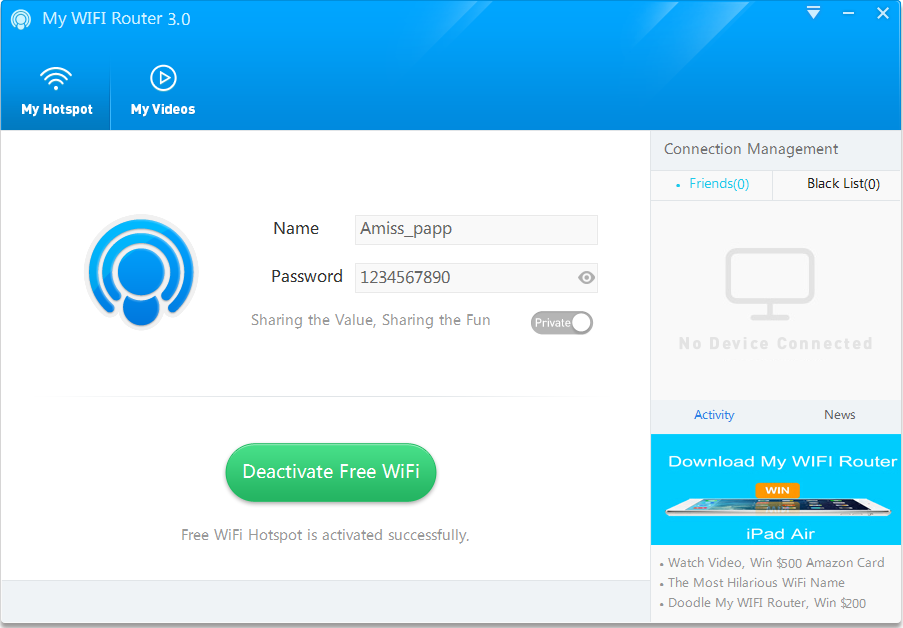
Finally I've come across My Wifi Router 3.0 which is just another program that makes necessery Windows configuration to TP-Link TL-WN722N Wireless receiver Adapter to turn it into a homemade Wi-Fi router.
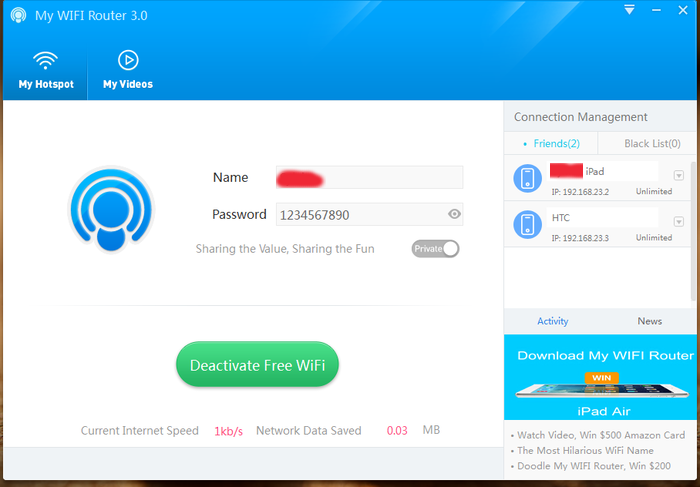
my-wifi-router-on-windows-xp-desktop-pc-noteboko-creenshot

By default Amiss_papp Wifi is configured, this can be changed, however in my case when I tried changing it there were some issues, so finally I've had to re-install My Wifi Router to make it working again.
Once configured My Wifi Router there is the green button (Activate / Deactivate Free Wifi) as seen from screenshot.

As you can see My Wifi Router also allows to Share Videos over WiFi. Once I've tested the program and confirmed it as working, I had to configure it to automatically start on Windows PC boot.

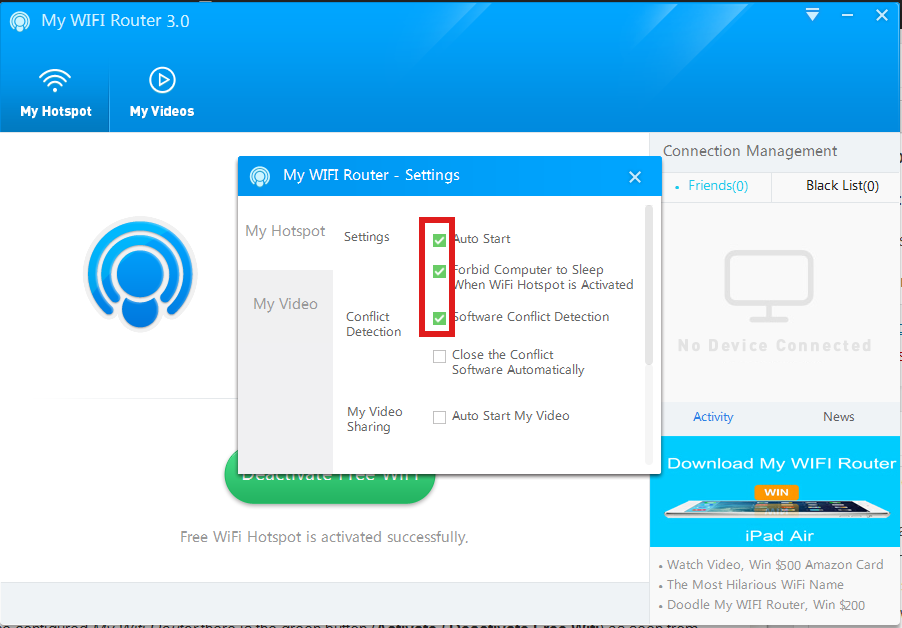
This is done from Settings (located on backward triangle button, next to minimize function).
I had to set check in to  Auto Start and Software Conflict Detection.

make-windows-pc-with-wireless-wifi-router-my-wifi-router-settings-screenshot

Once connected to the TP-Link TL-WN722N (USB) Wi-Fi (High Gain) Receiver adapter in Windows Tray a new indicator will popup that a device has been connected. I've tested My Wifi Router and it seem to be working fine with 3 remote connected Wi-Fi devices (1 Notebook and 2 Nokia Lumia mobile phones). The speed of internet was fast and if I didn't know the connection is done in a software way via such an improvised Windows XP Wi-Fi network router I would think it is just a regular Wi-Fi network router.

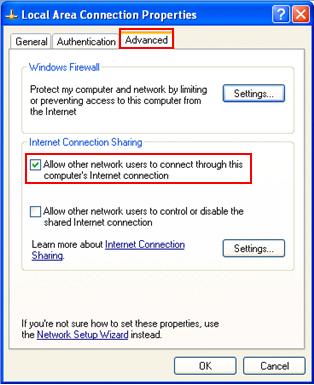
One more thing I had to do to make the internet working I had to share the the LAN Network (ethernet card) Interface's internet from
 

Control Panel -> Networking -> Local Area Connection (Properties) -> Advanced

https://www.pc-freak.net/images/windows-xp-internet-connection-sharing-how-to-networking-screenshot-make-network-address-translation-windows-xp.jpg

A downside of My Wifi Router is I couldn't find a way to save password while connection to the newly created WiFi router with it, so each time I had to login I had to manually type in the password (default my wifi router password is 123567890). Re-typing password on each login is annoying but if you have to do it once per day in the morning when you turn on your notebook it is not such a big deal.

Once connected to My Wifi Router in Connection Management in Friends (tab) you will see a list with connected devices.

my-wifi-router-on-windows-xp-with-htc-and-ipad-iphone-connected
As visible from above screenshot default IPs which will be assigned to new connected clients to My Wifi Router will be in local network IP range 192.168.23.2 – 192.168.23.254.

Now all left is to Enjoy  your new Software Wi-Fi router 🙂

Fixing Active Desktop Recovery Windows XP problem

Thursday, April 11th, 2013

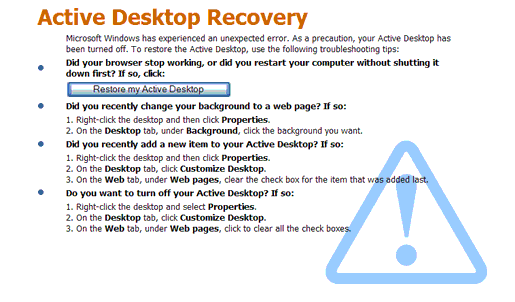
Windows XP active desktop recovery screenshot picture

I had to repair Windows XP PC which got the annoying Active Desktop Recovery screen. I remember seeing this screen back in the days when I was still using Microsoft Windows 98. It was quite shocking for me to find out this stupid pointless Windows bug appears on NT based Windows as well…

As you can see on the screenshot there is a button Restore My Active Desktop but pressing this button doesn't change anything

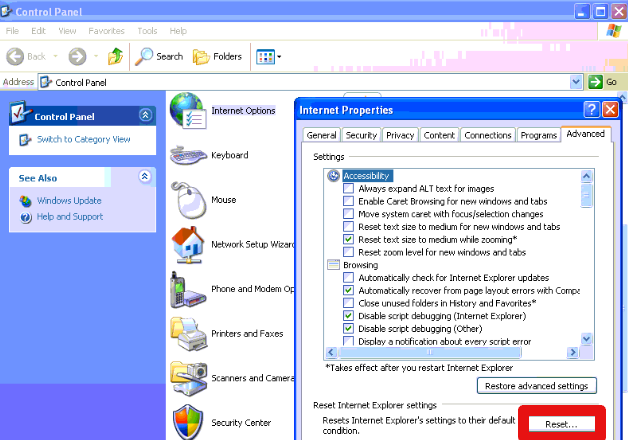
People around the net recommend two ways to fix that one is through:

Control Panel -> Internet Options -> Advanced (Reset)

Windows XP Control Panel Internet Options Advanced Reset tab screenshot

After this I tried the usual Computer Restart but unfortunately this not solved the problem.

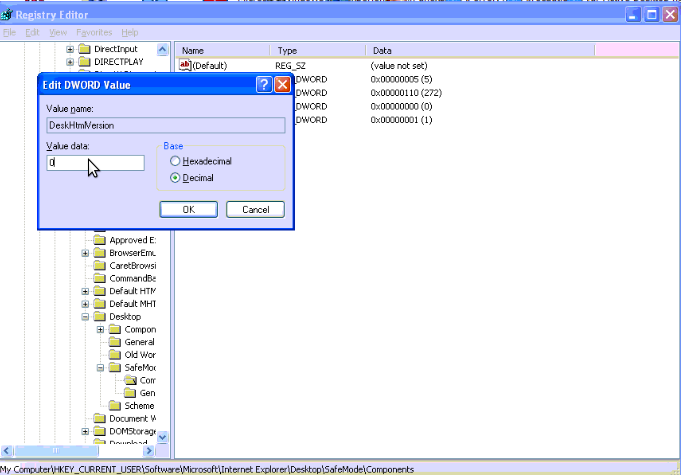
Second suggested method was through a change in Windows registry from

C:\> regedit

HKEY_CURRENT_USER\\Software\Microsoft\\Internet Explorer\\Desktop\\SafeMode\\Components

Change the key value – DeskHtmlVersion REG_DWORD 0x00000110(272) to decimal zero.

Windows XP fix Active Desktop Recovery - change the key value - DeskHtmlVersion REG_DWORD 0x00000110(272) to decimal zero

Improve your night sleep when using PC with Windows XP late at night with F.lux

Tuesday, February 26th, 2013

f.lux auto detect timezone geographic location after install screenshot microsoft windows XP

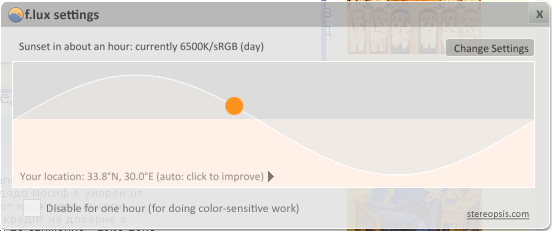
After testing F.lux on Mac OS X, I decided to install it and test it on a friend's Windows XP OS. Up is a screenshot from the program right after installed.

Just like on MAC OS X F.lux auto set the Geographic Location and started changing the Gamma of the screen to reddish at night. As you can see the change of Screen Color gamma can be set in various intervals with default of auto changing monitor backlid gamma every 20 secs.

On early day, when usually outside you see the day light because Sun Light shines on our planet, the color gamma is auto-configured to the normal light one.
I think in short future all computer vendors should think of embedding F.lux or some similar application to every Desktop PC, laptop, Phone and Tablet.


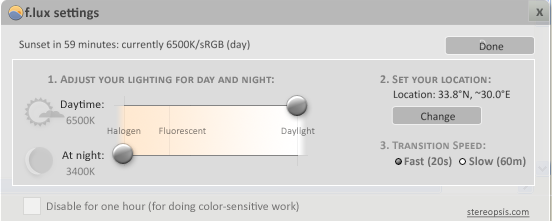
f.lux settings improve night sleep auto set monitor gamma ms windows xp

When F.lux is active a tiny icon with the F.Lux logo is visible on Taskbar like in below screenshot. From there you can view f.lux settings, see in what Color gamma mode the program works at present or to manually set custom color gamma. Enjoy

Fun: Development of Windows OS graphic interface 1995 – 2008, Computer design is repeating itself

Sunday, January 27th, 2013

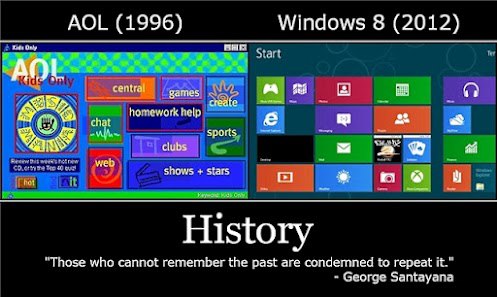
history from aol to windows mobile phones OS history of IT is repeating itself or where Windows OS stole their interface from :)

Do you remember the old days, when AOL (America on Line) was part of Windows 95 / 98 progam components / menus? Most brand new Windows 95 and Win 98 installations had AOL by default. Though AOL was standard internet ISP in America, I think they never took the lead in Europe in my home country it was impossible to use AOL, so Win installs back in the day just had desktop shortcut which had to be deleted. However in America AOL was well known company providing Internet access via dial up in the yearly days of Internet years 1995 – 2000.  In above picture you see screenshot of the order of buttons, design and coloring of AOL Windows 95 / 98 application compared compared to modern (Mobile) Windows powered 8 / Windows phones, the likeness is striking! Doesn't seem too much like incident or innovative design, does it? 🙂 The difference between 1995 and now in functionality is not significant too the main difference is in 95 the Net was slow, there are some improved graphics and mobility which is so common today, the res is just redesign and re-inventing the steel. Probably if one takes the time to compare other old computer interfaces with newer one find many similarities. This is also true for Macintosh / Apple products.
Big thanks to my dear friend Nomen for handing me in the pic 🙂
 

Fixing (NULL unable to write in comments box) error. / Solving unable to write more than 2 nested (threaded) comments in WordPress blog

Thursday, December 20th, 2012


Earlier I've blogged how to fix NULL error appearing in comments box, when someone tries to comment in WordPress (Comments) section. As you can read from my previous post the whole issue, was caused by wordpress-threaded-comments plugin which as of time of writing this post is incompatible with modern WordPress versions.

Recently one of my blog readers Jem, reported the same NULL comments issue happens again in my WordPress (thanks for that Jem).

 Over the last 2-3 months I didn't added or removed plugins from my wp blog, so I excluded the possibility that the error, might be due to Enabling new plugins.
Since I only blogged in those 2-3 months it was completely, incomprehensible for me why this NULL comments err happens again?

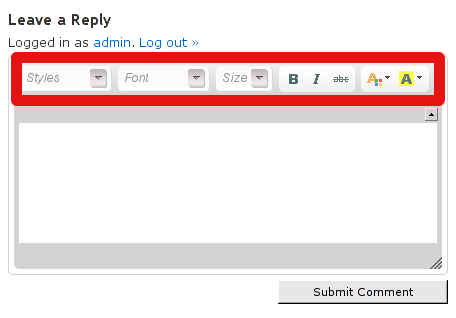
I've remembered, that few months ago along with the last changes I made to my blog, was enabling FCKEditor, for comments to aid Comments with possibility to change easily, font size, add color or make bold and italic their comments, ie. – for those who didn't tried yet FCKEditor yet I warmly recommend you this plugin, below is a screenshot of FCKEditor from 1 of my comments:

fckeditor comments bold italic set style and font wordpress comments

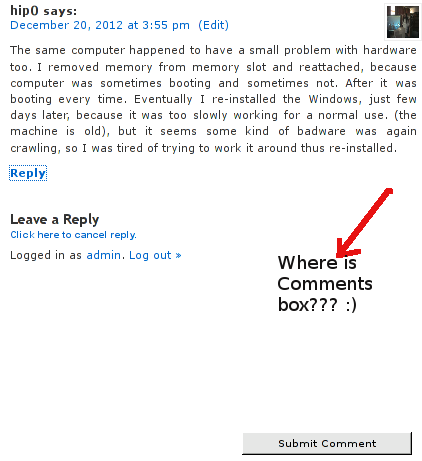
As I supposed, the problem might be caused by FCKEditor (advanced comment editor) wp plugin. I tried disabling the plugin, to see if this will solve the issue. Contrary to my expectations, the same NULL error kept hanging in the comment. However as the html form for default WordPress Comments is simplistic instead of displaying the NULL in comments box, Comments form was blank, with no ability for the user to type in anything. Here is the screenshot of it:

wordpress nested threaded comments showing blank message box null wp error


I pushed forward, to look for what is causing, the strange occurance since it is not directly caused by some conflict with my installed FCKEditor (latest stable version). Checked if I can find something on the internet, but for my amazement the first result I found in Google was actually, my own previous article on Fixing NULL Comments box error 🙂 The rest of the threads, I've saw were not so helpful. So finally I've got the idea to check in the Source Code (CTRL + U) of the returned page with the empty form box. Guess what I found there, a reference to TinyMCE Advanced WordPress editor. I've remembered some, very long time ago. When I started experimenting with WordPress plugins and still was new to wordpress, I've used TinyMCE instead of FCKEDitor which later started using as a substitute for TinyMCE, cause finding it to be more advanced and hence more useful.
Back in the time when I was still using TinyMCE, I found a little TinyMCE addon plugin  called TinyMCEComments, the function of TinyMCEComments, was to add the TinyMCEComments originally available inside snf only to wordpress logged in Administrator user to the non-registered subscribed users (e.g. beautify user comments box with allowing them to easily make comments text bold and Italic etc.).
It seems, even though I switched on to FCKEditor at some point in time and hence switched off TinyMCE plugin from Administrator's

Dashboard -> Plugins -> TinyMCE Editor

Forgot to disable the little extension plugin TinyMCEComments addon to TinyMCE editor!!

Therefore, the NULL box problem occurs cause of conflict between TimeMCEComments Javascript with WordPress default comment engine.


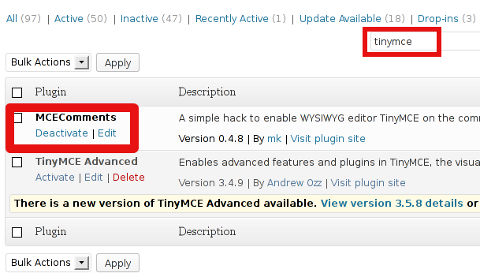
Henceforth, the NULL fix is to Deactivate MCEComments.

mcecomments disabled activate screenshot

Fixing QMAIL mail server SMTP auto-configure issues in Thunderbird and other mail IMAP / POP3 mobile clients

Friday, July 13th, 2012

One of the QMAIL mail servers, setup-uped on a Debian host has been creating some auto configuration issues. Every-time a new mail user tries to use the embedded Thunderbird client auto configuration, the auto config fails leaving the client unable to use his Mailbox through POP3 or IMAP protocols.

Since about 2 years Thunderbird and many other modern pop3 and imap mail desktop and mobile clients are by default using the auto configuration and hence it was unthinkable to manually change settings for new clients with the QMAIl install; Besides that most of the Office users are always confused, whether they have to manually change SMTP or POP3 host for a server.

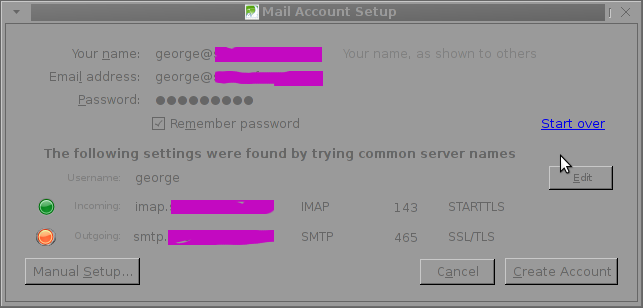
Below is a screenshot displaying the warning during email auto-configuration:

Thunderbird new Mail account setup auto config warning SMTP not OKThe orange color in the button for the newly auto-detected smtp.mail-domain.com indicates, something is not right with the SMTP host.
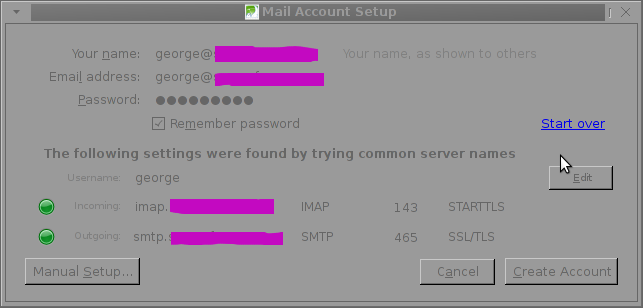
Obviously, something was wrong with smtp.mail-domain.com, hence I checked where smtp.mail.domain.com resolves with host command. What I found was actually smtp.mail-domain.com Active ( A ) DNS records was pointing to an IP address, our company previously used for the mail server. At present time the correct mail server host name is mx.mail-domain.com and the QMAIL installation on mx.soccerfame.com is configured to be the actual SMTP server.

By default Thunderbird and many other POP3, IMAP mail clients, however automatically assume the default SMTP host for a mail server is to be configured under a host name smtp.mail-domain.com. This is really strange, especially when the primary MX record for mail-domain.com domain is pointing to mx.mail-domain.com, e.g.:

qmail:~# host -t MX mail-domain.com
soccerfame.com mail is handled by 10 mx.mail-domain.com.
soccerfame.com mail is handled by 20 mail.mail-domain.com.
soccerfame.com mail is handled by 30 mail-domain.com.

The whole warning was caused due to the fact mx.mail-domain.com was resolving to an IP like xxx.xxx.xxx.xxx, whether smtp.mail-domain.com was resolving to yyy.yyy.yyy.yyy

Both xxx.xxx.xxx.xxx and yyy.yyy.yyy.yyy hosts were configured to have a different qmail SMTP host i.e.:

The server under IP xxx.xxx.xxx.xxx – (mx.mail-domain.com) was configured in /var/qmail/control/me to be mx.mail-domain.com and the other old one yyy.yyy.yyy.yyy – (mail.mail-domain.com) had (mail.mail-domain.com) in /var/qmail/control/me

As smtp.mail-domain.com was actually being still resolved to mail.mail-domain.com, the EMAILs were improperly trying to be sent with a configured DNS hostname of smtp.mail-domain.com, where the actual one on the server was mail.mail-domain

It took, me about an hour of pondering what is causing the oddities until I got the here explained issue. As the DNS recors for the domain the sample mail-domain.com were handled by Godaddy, to fix the mess, I logged in to Godaddy and;

a) deleted – DNS record for smtp.mail-domain.com.
b) Created new CNAME record for smtp.mail-domain.com to be a domain alias for mx.soccerfame.com

A few minutes, afterwards I tried configuring once again the same email account in Thunderbird and this time both imap.mail-domain.com and smtp.mail-domain.com turned green; indicating everything is configured fine.

To be 100% sure all is working fine I first fetched, all email via the IMAP protocol without hassles and onwards sent a test email to my Gmail account; thanksfully the sent email was delivered to Gmail indicating both Get Mail and Send Mail functions worked now fine.

Thunderbird icedove new mail account setup auto config Okay