Posts Tagged ‘sda’

How to create SD Card DATA dump image to .ISO with dd and mount it with imdisk from command line on Windows CygWin with MobaXterm

Saturday, September 18th, 2021

dd-command-logo
I'm forced to use Windows every now and then and do some ordinary things which I do usually on Linux such as dumping the content of my Android phone SD Card SanDisk, Kingston etc. to .ISO image etc.

On Linux creating and mounting a data copy of a whole SD Card is a relatively simple thing and there are plenty of ways to do it such as using the dd ( command-line utility for Unix and Unix-like operating systems whose primary purpose is to convert and copy files as said in the command manual .- e.g. ''man dd'. ). On Microsoft Windows environment perhaps one of easiest ways is to use WinCDEmu (which is relatively free under LGPL License).
WinCDEmu is capable of doing plenty of things such as:
 

  • One-click mounting of ISO, CUE, NRG, MDS/MDF, CCD, IMG images.

  • Supports unlimited amount of virtual drives.

  • Runs on 32-bit and 64-bit Windows versions from XP to Windows 10.

  • Allows creating ISO images through a context menu in Explorer.

  • Small installer size – less than 2MB!

  • Have a portable version

WinCDEmu is a nice piece of software that perhaps every Win poweruser can enjoy, plus it has a nice Graphical frontend:
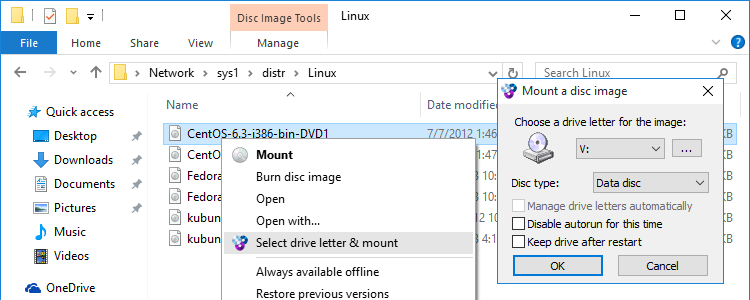
wincdemu-graphical-create-iso-and-mount-so-ms-windows-software

But what if you're a console geek, like me and you end up forced to be using Windows on your Work PC and you still need to create .iso dump of your Mobile SD Card or external attached Hard Drive, without the graphical mambo jumbo in the old fashioned way with dd?

Luckily Windows advanced command lined users could massively benefit from Cygwin + Mobaxterm (if you don't know or used MobaXterm and you still use things like Putty / SuperPutty or SecureCRT – perhaps you can reconsider and make your sysadmin life easier with MobaXerm gnome-terminal like SSH tabbed Windows alternative.

Once having mobaxterm + cygwin you have dd installed on the Windows host as it is part of the busybox minimal environment and you can use it in the same manner as your used in Linux environment.
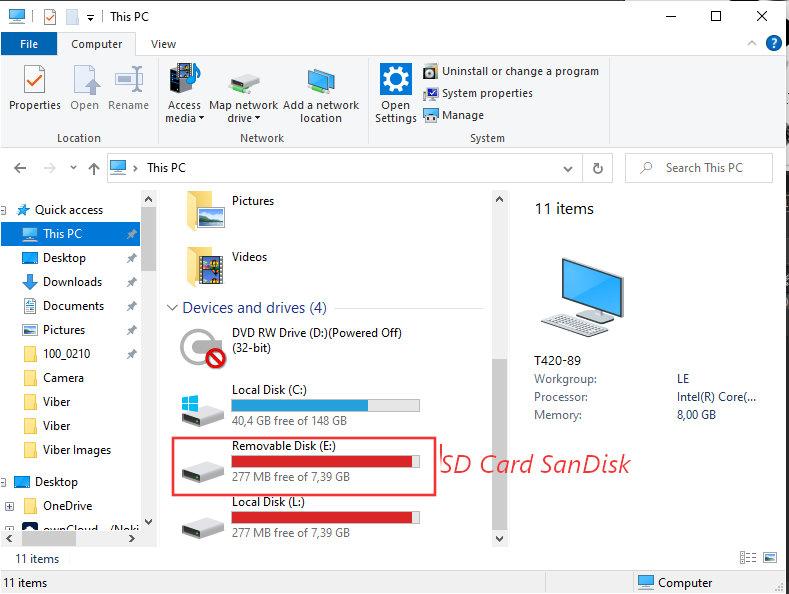
sdcard-sandisk-drive-my-computer-windows-screenshot
 

1. Using dd to copy files on Linux / UNIX OS with a dialog status bar

To use dd the usual syntax on Linux / BSD / Unix is:
 

dd if=/dev/dev-name_ID of=/path/to/directory/dump/location.iso bs=2048


As 2048 BS (Bytes) per second is quite a low value usually on Modern operating systems, this bytesize is usually increased to some MBs  ( Megabytes).

For example if the reading from carrier  is Solid State Drive Disk (SSD) supporting 100 MBs per second and the output SD Card is a 32 Bit Kingston Plus+ drive with whose write speed is up to 50 ~ 100 MBs, you can use cmd as:

dd if=/dev/dev-name_ID of=/path/to/directory/dump/location.iso bs=100M


If you need to have a progress on the dd copy (in case if you copy some large SD Card 128 GB or 256GB or a full copy of a hard drive partition that is really big lets say 8 Terabytes of data, dialog and pv comes quite handy.

To use them install them first:

# apt-get install –yes pv dialog


Next to have a beautiful ncurses dialog box with the status (very useful if you're shell scripting), use:
 

(pv -n /dev/sda | dd of=/dev/sdb bs=128M conv=notrunc,noerror) 2>&1 | dialog –gauge "Running dd command (cloning), please wait…" 10 70 0
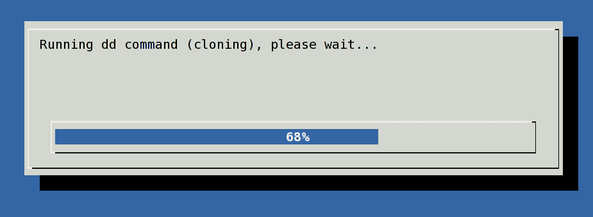
pv-dialog-dd-command-ncurses-status-screenshot-gnu-linux
 

2. Listing the avaialble copy drives /dev/sda /dev/sdb1 … etc. disk locations on Windows 7 / 10 / 11 OS

[User.T420-89] ➤ for F in /dev/s* ; do echo "$F    $(cygpath -w $F)" ; done

check-drives-loop-on-cygwin-to-be-used-later-with-dd-copy-iso-creating-imageCheck drives device naming on WIndows PC – Screenshot extract from Mobaxterm

As you can see the drive location we've seen in Windows Explorer is located at drive E: above bash for loop reveals us this is located and readable from CygWin / MobaxTerm at /dev/sdb1


3. Create .iso image file on WIndows OS with dd command
 

To create a full data copy dump of to .iso (image file) with dd on Windows , I had to run:

[User.T420-89] ➤ dd if=/dev/sdb1 of=sdcard-blu-r1-hd-sdcard-backup_10092021a.img bs=100M

75+1 records in
75+1 records out
7944011776 bytes (7.4GB) copied, 391.794316 seconds, 19.3MB/s


dd-copy-drive-data-screenshot-100mb-bitesize-windows-mobaxterm


4. Mount the newly create dd Image with imdisk

In order to test the image is properly created, you can attempt to mount it from command line on Linux, mounting it is quite easy and is up to mounting the just created .img file as a loopback (loop) device, like so: 

# mount -o loop file.iso /mnt/dir

Unfortunately cygwin and mobaxterm's embedded mount command on Win OS does not support the loopback device so to have it you have to install and use some additional program  such as the upmentioned WinCDEmu or if you prefer to do it fully from command line and further on automate the process of creating a dump of images of attached drives out of a multiple computers (lets say belonging to a Windows Active Directory domain). You might install and use something like:


imdisk 
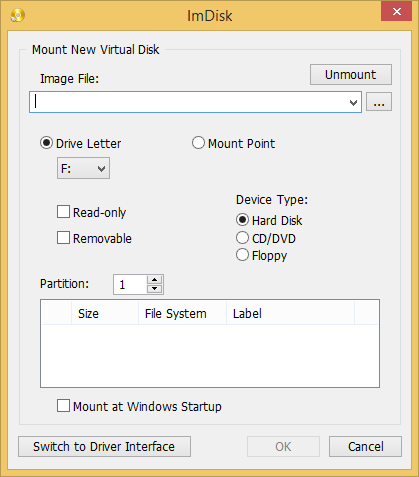
imdisk-gui-interface-ms-windows-screenshot

imdisk handy tool is  created by Olof Lagerkvist. It is free and open-source software, which  will let you mount image files of hard drive, cd-rom or floppy, and create one or several ramdisks with various parameters either from a command line or via its Graphical interface.

To use imdisk download it from its home page on sourceforge extract and install it, pretty much as any other software it has both 32 bit version as a legacy for old computers as well as 64 bit exe installer.
The general command line use of it follows a cmd syntax like:

  • Mounting .iso image files from command line on WIndows host with imdisk


[User.T420-89] ➤ ImDisk.exe -a -f "sdcard-blu-r1-hd-sdcard-backup_10092021.img" -m #:

Where:
 

  • #: – is the actual drive you would like to mount to.
     
  • -a option stands for attach to, it will configure and attach a virtual disk with the parameters specified and attach it to the system.
     
  • -f – is self explanatory, provides the iso image file naming 

If you want to attach the newly created image to lets say  L:\ windows new mapped drive

ImDisk.exe -a -f "sdcard-blu-r1-hd-sdcard-backup_10092021.img" -m l:

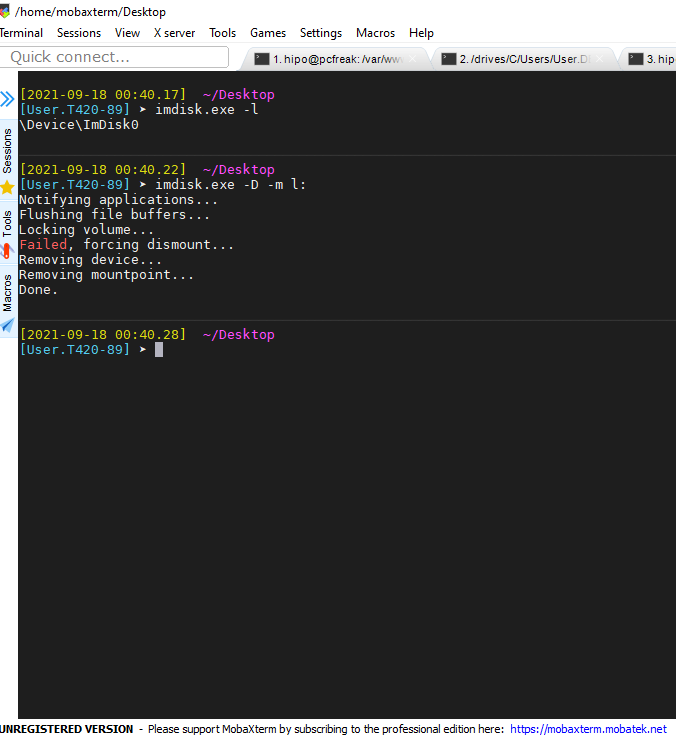
  • Unmount mounted .img image with imdisk from cmd line

[User.T420-89] ➤ imdisk.exe -l
\Device\ImDisk0
                                                                                                                              ✘

[User.T420-89] ➤ imdisk.exe -D -m l:
Notifying applications…
Flushing file buffers…
Locking volume…
Failed, forcing dismount…
Removing device…
Removing mountpoint…
Done.

imdisk-detach-attached-drive-mobaxterm-windows-screenshot


What we learned ?

What we have learned in this article is how to use Mobaxterm embedded dd Data Convert and Copy command to prepare full image backups of SD card or external drives on Windows OS. Also few alternative ways were entions such as using WinCDEmu free  open source alternative to DaemonTools program to create / mount or convert the image for the GUI lovers. Also for hard core sysadmins as me was shown how to list drives devices attached to the Win PC {/dev/sda,/dev/sdb} etc. and how to copy partition data with dd just like one would do on Linux OS. Finally to test the created image, I've shown you how to use the imdisk free software tool to attach and detach image to a mapped local Windows drive.

Hope this article learned you something new.

How rescue unbootable Windows PC, Windows files through files Network copy to remote server shared Folder using Hirens Boot CD

Saturday, November 12th, 2011

hirens-boot-cd-logo-how-to-rescue-unbootable-pc-with-hirens-bootcd
I'm rescuing some files from one unbootable Windows XP using a livecd with Hirens Boot CD 13

In order to rescue the three NTFS Windows partitions files, I mounted them after booting a Mini Linux from Hirens Boot CD.

Mounting NTFS using Hirens BootCD went quite smoothly to mount the 3 partitions I used cmds:

# mount /dev/sda1 /mnt/sda1
# mount /dev/sda2 /mnt/sda2
# mount /dev/sdb1 /mnt/sdb1

After the three NTFS file partitions are mounted I used smbclient to list all the available Network Shares on the remote Network Samba Shares Server which by the way possessed the NETBIOS name of SERVER 😉

# smbclient -L //SERVER/
Enter root's password:
Domain=[SERVER] OS=[Windows 7 Ultimate 7600] Server=[Windows 7 Ultimate 6.1]

Sharename Type Comment
——— —- ——-
!!!MUSIC Disk
ADMIN$ Disk Remote Admin
C$ Disk Default share
Canon Inkjet S9000 (Copy 2) Printer Canon Inkjet S9000 (Copy 2)
D$ Disk Default share
Domain=[SERVER] OS=[Windows 7 Ultimate 7600] Server=[Windows 7 Ultimate 6.1]
Server Comment
——— ——-
Workgroup Master
——— ——-

Further on to mount the //SERVER/D network samba drive – (the location where I wanted to transfer the files from the above 3 mounted partitions):

# mkdir /mnt/D
# mount //192.168.0.100/D /mnt/D
#

Where the IP 192.168.0.100 is actually the local network IP address of the //SERVER win smb machine.

Afterwards I used mc to copy all the files I needed to rescue from all the 3 above mentioned win partitions to the mounted //SERVER/D
 

How to detect failing storage LUN on Linux – multipath

Wednesday, April 16th, 2014

detect-failing-lun-on-linux-failing-scsi-detection

If you login to server and after running dmesg – show kernel log command you get tons of messages like:

# dmesg


end_request: I/O error, dev sdc, sector 0
sd 0:0:0:1: SCSI error: return code = 0x00010000
end_request: I/O error, dev sdb, sector 0
sd 0:0:0:0: SCSI error: return code = 0x00010000
end_request: I/O error, dev sda, sector 0
sd 0:0:0:2: SCSI error: return code = 0x00010000
end_request: I/O error, dev sdc, sector 0
sd 0:0:0:1: SCSI error: return code = 0x00010000
end_request: I/O error, dev sdb, sector 0
sd 0:0:0:0: SCSI error: return code = 0x00010000
end_request: I/O error, dev sda, sector 0
sd 0:0:0:2: SCSI error: return code = 0x00010000
end_request: I/O error, dev sdc, sector 0
sd 0:0:0:1: SCSI error: return code = 0x00010000
end_request: I/O error, dev sdb, sector 0
sd 0:0:0:0: SCSI error: return code = 0x00010000
end_request: I/O error, dev sda, sector 0


In /var/log/messages there are also log messages present like:

# cat /var/log/messages
...


Apr 13 09:45:49 sl02785 kernel: end_request: I/O error, dev sda, sector 0
Apr 13 09:45:49 sl02785 kernel: klogd 1.4.1, ———- state change ———-
Apr 13 09:45:50 sl02785 kernel: sd 0:0:0:1: SCSI error: return code = 0x00010000
Apr 13 09:45:50 sl02785 kernel: end_request: I/O error, dev sdb, sector 0
Apr 13 09:45:55 sl02785 kernel: sd 0:0:0:2: SCSI error: return code = 0x00010000
Apr 13 09:45:55 sl02785 kernel: end_request: I/O error, dev sdc, sector 0


This is a sure sign something is wrong with SCSI hard drives or SCSI controller, to further debug the situation you can use the multipath command, i.e.:


multipath -ll | grep -i failed
_ 0:0:0:2 sdc 8:32 [failed][faulty]
_ 0:0:0:1 sdb 8:16 [failed][faulty]
_ 0:0:0:0 sda 8:0 [failed][faulty]


As you can see all 3 drives merged (sdc, sdb and sda) to show up on 1 physical drive via the remote network connectedLUN to the server is showing as faulty. This is a clear sign something is either wrong with 3 hard drive members of LUN – (Logical Unit Number) (which is less probable)  or most likely there is problem with the LUN network  SCSI controller. It is common error that LUN SCSI controller optics cable gets dirty and needs a physical clean up to solve it.

In case you don't know what is storage LUN? – In computer storage, a logical unit number, or LUN, is a number used to identify a logical unit, which is a device addressed by the SCSI protocol or protocols which encapsulate SCSI, such as Fibre Channel or iSCSI. A LUN may be used with any device which supports read/write operations, such as a tape drive, but is most often used to refer to a logical disk as created on a SAN. Though not technically correct, the term "LUN" is often also used to refer to the logical disk itself.

What LUN's does is very similar to Linux's Software LVM (Logical Volume Manager).

Tracking I/O hard disk server bottlenecks with iostat on GNU / Linux and FreeBSD

Tuesday, March 27th, 2012

Hard disk overhead tracking on Linux and FreeBSD with iostat

I've earlier wrote an article How to find which processes are causing hard disk i/o overhead on Linux there I explained very rawly few tools which can be used to benchmark hard disk read / write operations. My prior article accent was on iotop and dstat and it just mentioned of iostat. Therefore I've wrote this short article in attempt to explain a bit more thoroughfully on how iostat can be used to track problems with excessive server I/O read/writes.

Here is the command man page description;
iostatReport Central Processing Unit (CPU) statistics and input/output statistics for devices, partitions and network filesystems

I will further proceed with few words on how iostat can be installed on various Linux distros, then point at few most common scenarious of use and a short explanation on the meaning of each of the command outputs.

1. Installing iostat on Linux

iostat is a swiss army knife of finding a server hard disk bottlenecks. Though it is a must have tool in the admin outfut, most of Linux distributions will not have iostat installed by default.
To have it on your server, you will need to install sysstat package:

a) On Debian / Ubuntu and other Debian GNU / Linux derivatives to install sysstat:

debian:~# apt-get --yes install sysstat

b) On Fedora, CentOS, RHEL etc. install is with yum:

[root@centos ~]# yum -y install sysstat

c) On Slackware Linux sysstat package which contains iostat is installed by default. 

d) In FreeBSD, there is no need for installation of any external package as iostat is part of the BSD world (bundle commands).
I should mention bsd iostat and Linux's iostat commands are not the same and hence there use to track down hard disk bottlenecks differs a bit, however the general logic of use is very similar as with most tools in BSD and Linux.

2. Checking a server hard disk for i/o disk bottlenecks on G* / Linux

Once having the sysstat installed on G* / Linux systems, the iostat command will be added in /usr/bin/iostat
a) To check what is the hard disk read writes per second (in megabytes) use:

debian:~# /usr/bin/iostat -m
Linux 2.6.32-5-amd64 (debian) 03/27/2012 _x86_64_ (8 CPU)
avg-cpu: %user %nice %system %iowait %steal %idle
15.34 0.36 2.76 2.66 0.00 78.88
Device: tps MB_read/s MB_wrtn/s MB_read MB_wrtn
sda 63.89 0.48 8.20 6730223 115541235
sdb 64.12 0.44 8.23 6244683 116039483
md0 2118.70 0.22 8.19 3041643 115528074

In the above output the server, where I issue the command is using sda and sdb configured in software RAID 1 array visible in the output as (md0)

The output of iostat should already be easily to read, for anyone who didn't used the tool here is a few lines explanation of the columns:

The %user 15.34 meaning is that 15.34 out of 100% possible i/o load is generad by system level read/write operations.
%nice – >Show the percentage of CPU utilization that occurred while executing at the user level with nice priority.
%iowait – just like the top command idle it shows the idle time when the system didn't have an outstanding disk I/O requests.
%steal – show percentage in time spent in time wait of CPU or virtual CPUs to service another virtual processor (high numbers of disk is sure sign for i/o problem).
%idle – almost the same as meaning to %iowait
tps – HDD transactions per second
MB_read/s (column) – shows the actual Disk reads in Mbytes at the time of issuing iostat
MB_wrtn/s – displays the writes p/s at the time of iostat invocation
MB_read – shows the hard disk read operations in megabytes, since the server boot 'till moment of invocation of iostat
MB_wrtn – gives the number of Megabytes written on HDD since the last server boot filesystem mount

The reason why the Read / Write values for sda and sdb are similar in this example output is because my disks are configured in software RAID1 (mirror)

The above iostat output reveals in my specific case the server is experiencing mostly Disk writes (observable in the high MB_wrtn/s 8.19 md0 in the above sample output).

It also reveals, the I/O reads experienced on that server hard disk are mostly generated as a system (user level load) – see (%user 15.34 and md0 2118.70).

For all those not familiar with system also called user / level load, this is all kind of load which is generated by running programs on the server – (any kind of load not generated by the Linux kernel or loaded kernel modules).

b) To periodically keep an eye on HDD i/o operations with iostat, there are two ways:

– Use watch in conjunction with iostat;

[root@centos ~]# watch "/usr/bin/iostat -m"
Every 2.0s: iostat -m Tue Mar 27 11:00:30 2012
Linux 2.6.32-5-amd64 (centos) 03/27/2012 _x86_64_ (8 CPU)
avg-cpu: %user %nice %system %iowait %steal %idle
15.34 0.36 2.76 2.66 0.00 78.88
Device: tps MB_read/s MB_wrtn/s MB_read MB_wrtn
sda 63.89 0.48 8.20 6730255 115574152
sdb 64.12 0.44 8.23 6244718 116072400
md0 2118.94 0.22 8.20 3041710 115560990
Device: tps MB_read/s MB_wrtn/s MB_read MB_wrtn
sda 55.00 0.01 25.75 0 51
sdb 52.50 0.00 24.75 0 49
md0 34661.00 0.01 135.38 0 270

Even though watch use and -d might appear like identical, they're not watch does refresh the screen, executing instruction similar to the clear command which clears screen on every 2 seconds, so the output looks like the top command refresh, while passing the -d 2 will output the iostat command output on every 2 secs in a row so all the data is visualized on the screen. Hence -d 2 in cases, where more thorough debug is necessery is better. However for a quick routine view watch + iostat is great too.

c) Outputting extra information for HDD input/output operations;

root@debian:~# iostat -x
Linux 2.6.32-5-amd64 (debian) 03/27/2012 _x86_64_ (8 CPU)
avg-cpu: %user %nice %system %iowait %steal %idle
15.34 0.36 2.76 2.66 0.00 78.88
Device: rrqm/s wrqm/s r/s w/s rsec/s wsec/s avgrq-sz avgqu-sz await svctm %util
sda 4.22 2047.33 12.01 51.88 977.44 16785.96 278.03 0.28 4.35 3.87 24.72
sdb 3.80 2047.61 11.97 52.15 906.93 16858.32 277.05 0.03 5.25 3.87 24.84
md0 0.00 0.00 20.72 2098.28 441.75 16784.05 8.13 0.00 0.00 0.00 0.00

This command will output extended useful Hard Disk info like;
r/s – number of read requests issued per second
w/s – number of write requests issued per second
rsec/s – numbers of sector reads per second
b>wsec/s – number of sectors wrote per second
etc. etc.

Most of ppl will never need to use this, but it is good to know it exists.

3. Tracking read / write (i/o) hard disk bottlenecks on FreeBSD

BSD's iostat is a bit different in terms of output and arguments.

a) Here is most basic use:

freebsd# /usr/sbin/iostat
tty ad0 cpu
tin tout KB/t tps MB/s us ni sy in id
1 561 45.18 44 1.95 14 0 5 0 82

b) Periodic watch of hdd i/o operations;

freebsd# iostat -c 10
tty ad0 cpu
tin tout KB/t tps MB/s us ni sy in id
1 562 45.19 44 1.95 14 0 5 0 82
0 307 51.96 113 5.73 44 0 24 0 32
0 234 58.12 98 5.56 16 0 7 0 77
0 43 0.00 0 0.00 1 0 0 0 99
0 485 0.00 0 0.00 2 0 0 0 98
0 43 0.00 0 0.00 0 0 1 0 99
0 43 0.00 0 0.00 0 0 0 0 100
...

As you see in the output, there is information like in the columns tty, tin, tout which is a bit hard to comprehend.
Thanksfully the tool has an option to print out only more essential i/o information:

freebsd# iostat -d -c 10
ad0
KB/t tps MB/s
45.19 44 1.95
58.12 97 5.52
54.81 108 5.78
0.00 0 0.00
0.00 0 0.00
0.00 0 0.00
20.48 25 0.50

The output info is quite self-explanatory.

Displaying a number of iostat values for hard disk reads can be also achieved by omitting -c option with:

freebsd# iostat -d 1 10
...

Tracking a specific hard disk partiotion with iostat is done with:

freebsd# iostat -n /dev/ad0s1a
tty cpu
tin tout us ni sy in id
1 577 14 0 5 0 81
c) Getting Hard disk read/write information with gstat

gstat is a FreeBSD tool to print statistics for GEOM disks. Its default behaviour is to refresh the screen in a similar fashion like top command, so its great for people who would like to periodically check all attached system hard disk and storage devices:

freebsd# gstat
dT: 1.002s w: 1.000s
L(q) ops/s r/s kBps ms/r w/s kBps ms/w %busy Name
0 10 0 0 0.0 10 260 2.6 15.6| ad0
0 10 0 0 0.0 10 260 2.6 11.4| ad0s1
0 10 0 0 0.0 10 260 2.8 12.5| ad0s1a
0 0 0 0 0.0 0 0 0.0 20.0| ad0s1b
0 0 0 0 0.0 0 0 0.0 0.0| ad0s1c
0 0 0 0 0.0 0 0 0.0 0.0| ad0s1d
0 0 0 0 0.0 0 0 0.0 0.0| ad0s1e
0 0 0 0 0.0 0 0 0.0 0.0| acd0

It even has colors if your tty supports colors 🙂

Another useful tool in debugging the culprit of excessive hdd I/O operations is procstat command:

Here is a sample procstat run to track (httpd) one of my processes imposing i/o hdd load:

freebsd# procstat -f 50404
PID COMM FD T V FLAGS REF OFFSET PRO NAME
50404 httpd cwd v d -------- - - - /
50404 httpd root v d -------- - - - /
50404 httpd 0 v c r------- 56 0 - -
50404 httpd 1 v c -w------ 56 0 - -
50404 httpd 2 v r -wa----- 56 75581 - /var/log/httpd-error.log
50404 httpd 3 s - rw------ 105 0 TCP ::.80 ::.0
50404 httpd 4 p - rw---n-- 56 0 - -
50404 httpd 5 p - rw------ 56 0 - -
50404 httpd 6 v r -wa----- 56 25161132 - /var/log/httpd-access.log
50404 httpd 7 v r rw------ 56 0 - /tmp/apr8QUOUW
50404 httpd 8 v r -w------ 56 0 - /var/run/accept.lock.49588
50404 httpd 9 v r -w------ 1 0 - /var/run/accept.lock.49588
50404 httpd 10 v r -w------ 1 0 - /tmp/apr8QUOUW
50404 httpd 11 ? - -------- 2 0 - -

Btw fstat is sometimes helpful in identifying the number of open files and trying to estimate which ones are putting the hdd load.
Hope this info helps someone. If you know better ways to track hdd excessive loads on Linux / BSD pls share 'em pls.
 

diskinfo Linux hdparm FreeBSD equivalent command for disk info and benchmarking

Thursday, March 8th, 2012

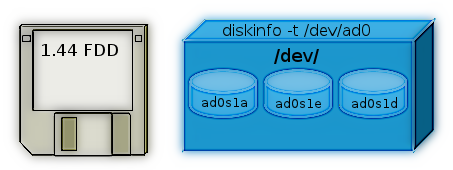
FreeBSD Linux hdparm equivalent is diskinfo artistic logo

On Linux there is the hdparm tool for various hard disk benchmarking and extraction of hard disk operations info.
As the Linux manual states hdparmget/set SATA/IDE device parameters

Most Linux users should already know it and might wonder if there is hdparm port or equivalent for FreeBSD, the aim of this short post is to shed some light on that.

The typical use of hdparm is like this:

linux:~# hdparm -t /dev/sda8

/dev/sda8:
Timing buffered disk reads: 76 MB in 3.03 seconds = 25.12 MB/sec
linux:~# hdparm -T /dev/sda8
/dev/sda8:
Timing cached reads: 1618 MB in 2.00 seconds = 809.49 MB/sec

The above output here is from my notebook Lenovo R61i.
If you're looking for alternative command to hdparm you should know in FreeBSD / OpenBSD / NetBSD, there is no exact hdparm equivalent command.
The somehow similar hdparm equivallent command for BSDs (FreeBSD etc.) is:
diskinfo

diskinfo is not so feature rich as linux's hdparm. It is just a simple command to show basic information for hard disk operations without no possibility to tune any hdd I/O and seek operations.
All diskinfo does is to show statistics for a hard drive seek times I/O overheads. The command takes only 3 arguments.

The most basic and classical use of the command is:

freebsd# diskinfo -t /dev/ad0s1a
/dev/ad0s1a
512 # sectorsize
20971520000 # mediasize in bytes (20G)
40960000 # mediasize in sectors
40634 # Cylinders according to firmware.
16 # Heads according to firmware.
63 # Sectors according to firmware.
ad:4JV48BXJs0s0 # Disk ident.

Seek times:
Full stroke: 250 iter in 3.272735 sec = 13.091 msec
Half stroke: 250 iter in 3.507849 sec = 14.031 msec
Quarter stroke: 500 iter in 9.705555 sec = 19.411 msec
Short forward: 400 iter in 2.605652 sec = 6.514 msec
Short backward: 400 iter in 4.333490 sec = 10.834 msec
Seq outer: 2048 iter in 1.150611 sec = 0.562 msec
Seq inner: 2048 iter in 0.215104 sec = 0.105 msec

Transfer rates:
outside: 102400 kbytes in 3.056943 sec = 33498 kbytes/sec
middle: 102400 kbytes in 2.696326 sec = 37978 kbytes/sec
inside: 102400 kbytes in 3.178711 sec = 32214 kbytes/sec

Another common use of diskinfo is to measure hdd I/O command overheads with -c argument:

freebsd# diskinfo -c /dev/ad0s1e
/dev/ad0s1e
512 # sectorsize
39112312320 # mediasize in bytes (36G)
76391235 # mediasize in sectors
75784 # Cylinders according to firmware.
16 # Heads according to firmware.
63 # Sectors according to firmware.
ad:4JV48BXJs0s4 # Disk ident.

I/O command overhead:
time to read 10MB block 1.828021 sec = 0.089 msec/sector
time to read 20480 sectors 4.435214 sec = 0.217 msec/sector
calculated command overhead = 0.127 msec/sector

Above diskinfo output is from my FreeBSD home router.

As you can see, the time to read 10MB block on my hard drive is 1.828021 (which is very high number),
this is a sign the hard disk experience too many read/writes and therefore needs to be shortly replaced with newer faster one.
diskinfo is part of the basis bsd install (bsd world). So it can be used without installing any bsd ports or binary packages.

For the purpose of stress testing hdd, or just some more detailed benchmarking on FreeBSD there are plenty of other tools as well.
Just to name a few:
 

  • rawio – obsolete in FreeBSD 7.x version branch (not available in BSD 7.2 and higher)
  • iozone, iozone21 – Tools to test the speed of sequential I/O to files
  • bonnie++ – benchmark tool capable of performing number of simple fs tests
  • bonnie – predecessor filesystem benchmark tool to bonnie++
  • raidtest – test performance of storage devices
  • mdtest – Software to test metadata performance on filsystems
  • filebench – tool for micro-benchmarking storage subsystems

Linux hdparm allows also changing / setting various hdd ATA and SATA settings. Similarly, to set and change ATA / SATA settings on FreeBSD there is the:

  • ataidle

tool.

As of time of writting ataidle is in port path /usr/ports/sysutils/ataidle/

To check it out install it as usual from the port location:

FreeBSD also has also the spindown port – a small program for handling automated spinning down ofSCSI harddrive
spindown is useful in setting values to SATA drives which has problems with properly controlling HDD power management.

To keep constant track on hard disk operations and preliminary warning in case of failing hard disks on FreeBSD there is also smartd service, just like in Linux.
smartd enables you to to control and monitor storage systems using the Self-Monitoring, Analysisand Reporting Technology System (S.M.A.R.T.) built into most modern ATA and SCSI hard disks.
smartd and smartctl are installable via the port /usr/ports/sysutils/smartmontools.

To install and use smartd, ataidle and spindown run:

freebsd# cd /usr/ports/sysutils/smartmontools
freebsd# make && make install clean
freebsd# cd /usr/ports/sysutils/ataidle/
freebsd# make && make install clean
freebsd# cd /usr/ports/sysutils/spindown/
freebsd# make && make install clean

Check each one's manual for more info.

Installing Linux on old hardware PC. Few thoughs on Puppy and Xubuntu Linux

Tuesday, January 24th, 2012

I needed a G/Linux distribution that will work fine on an old PC with hardware configuration:

guest@xubuntu-desktop:~$ grep -i cpu /proc/cpuinfo; free -m; df -h
cpu family : 6
cpu MHz : 797.613cpuid level : 2
total used free shared buffers cachedMem: 497 470 26 0 35 259-/+ buffers/cache: 176 321Swap: 1454 10 1444File System Size Used Free % Mounted on
/dev/sda1 37G 4,3G 31G 13% /

I've read a lot on the internet and come to the conclusion I have basicly two popular Linux distros as option to install on archaic x86 hardware:

1. Puppy Linux
2. Xubuntu Linux

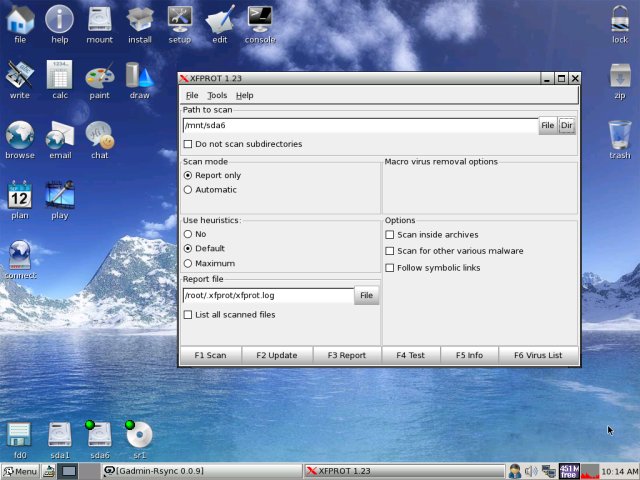
I first give Puppy Linux a try. It worked quite nice, but the interface was too old school and the desktop felt like a bit out-dated.
Besides that many of the Puppy Linux shipped programs were not a mainstream programs available across most of the other Linux distributions.

Many of the programs shipped with Puppy are great, but more suitable for a computer geek than for a Windows accustomed GUI user.
Puppy Linux Screenshot

My opinion on Puppy (from what I've seen) is that its great distro for old school hardcore Linux users.
Anyways its not suitable for absolutely "uniniated" users who encounter Linux for a first time.

Secondly I installed Xubuntu. Most of the archaic hardware on the PC was detected during install time (a pleasently surprise).
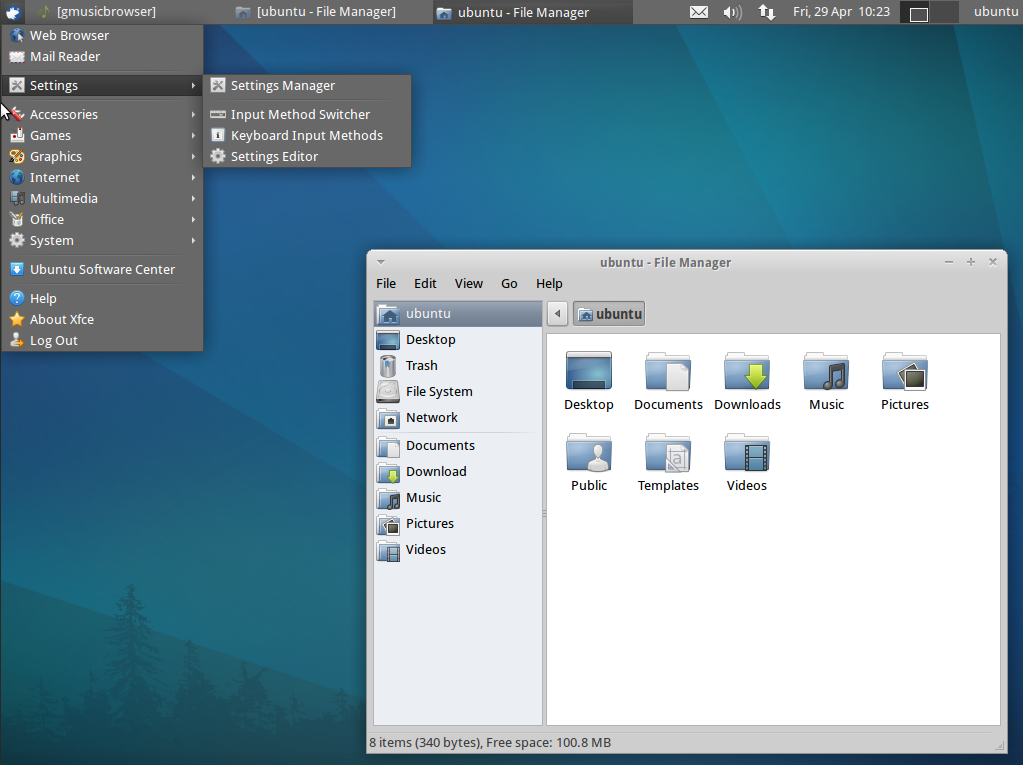
Xubunto works fast and Xfce menus opens "light fast" as on the old 800Mhz pc with 512 mem of ram. Generally the GUI worked quick and responsive.
To conclude I liked Xubuntu a lot and I strongly recommend it to anyone who want to quickly roll on Linux on an old PC.
Xubuntu GNU / Linux theme

What impressed me most is the minimalistic look & feel and simplicity.

I'm sure Debian will be working great on old hardware as well, however configuring it will be hell a lot of work. Thus I think Xubuntu is a good choice for people who want save some time in obscure configurations and easily have a neat Linux ready for desktop use.

How to check /dev/ partition disk labeling in Debian GNU / Linux

Thursday, December 8th, 2011

The usual way that one is supposed to check a certain partition let’s say /dev/sda1 disk UUID (Universal Unique Identifier) label is through a command:
vol_id /dev/sda1

For reason however Debian does not include vol_id command. To check the UUID assigned disk labels on Debian one should use another command called blkid (part of util-linux deb package).

blkid will list all block device attributes so it doesn’t specifically, passing any partition as argument.
Here is an example output of blkid :

server:/root# blkid
/dev/sda1: UUID="cdb1836e-b7a2-4cc7-b666-8d2aa31b2da4" SEC_TYPE="ext2" TYPE="ext3"
/dev/sda5: UUID="c67d6d43-a48f-43ff-9d65-7c707a57dfe6" TYPE="swap"
/dev/sdb1: UUID="e324ec28-cf04-4e2e-8953-b6a8e6482425" TYPE="ext2"
/dev/sdb5: UUID="1DWe0F-Of9d-Sl1J-8pXW-PLpy-Wf9s-SsyZfQ" TYPE="LVM2_member"
/dev/mapper/computer-root: UUID="fbdfc19e-6ec8-4000-af8a-cde62926e395" TYPE="ext3"
/dev/mapper/computer-swap_1: UUID="e69100ab-9ef4-45df-a6aa-886a981e5f26" TYPE="swap"
/dev/mapper/computer-home: UUID="2fe446da-242d-4cca-8b2c-d23c76fa27ec" TYPE="ext3"


How to check any filesystem for bad blocks using GNU / Linux or FreeBSD with dd

Monday, November 28th, 2011

Check any filesystem partition for BAD BLOCKS with DD on GNU Linux and FreeBSD

Have you looked for a universal physical check up tool to check up any filesystem type existing on your hard drive partitions?
I did! and was more than happy to just recently find out that the small UNIX program dd is capable to check any file system which is red by the Linux or *BSD kernel.

I’ll give an example, I have few partitions on my laptop computer with linux ext3 filesystem and NTFS partition.
My partitions looks like so:

noah:/home/hipo# fdisk -l
Disk /dev/sda: 160.0 GB, 160041885696 bytes
255 heads, 63 sectors/track, 19457 cylinders
Units = cylinders of 16065 * 512 = 8225280 bytes
Sector size (logical/physical): 512 bytes / 512 bytes
I/O size (minimum/optimal): 512 bytes / 512 bytes
Disk identifier: 0x2d92834c
Device Boot Start End Blocks Id System
/dev/sda1 1 721 5786624 27 Unknown
Partition 1 does not end on cylinder boundary.
/dev/sda2 * 721 9839 73237024 7 HPFS/NTFS
/dev/sda3 9839 19457 77263200 5 Extended
/dev/sda5 9839 12474 21167968+ 83 Linux
/dev/sda6 12474 16407 31593208+ 83 Linux
/dev/sda7 16407 16650 1950448+ 82 Linux swap / Solaris
/dev/sda8 16650 19457 22551448+ 83 Linux

For all those unfamiliar with dddd – convert and copy a file this tiny program is capable of copying data from (if) input file to an output file as in UNIX , the basic philosophy is that everything is a file partitions themselves are also files.
The most common use of dd is to make image copies of a partition with any type of filesystem on it and move it to another system
Looking from a Windows user perspective dd is the command line Norton Ghost equivalent for Linux and BSD systems.
The classic way dd is used to copy let’s say my /dev/sda1 partition to another hard drive /dev/hdc1 is by cmds:

noah:/home/hipo# dd if=/dev/sda1 of=/dev/hdc1 bs=16065b

Even though the basic use of dd is to copy files, its flexibility allows a “trick” through which dd can be used to check any partition readable by the operating system kernel for bad blocks

In order to check any of the partitions listed, let’s say the one listed with filesystem HPFS/NTFS on /dev/sda2 using dd

noah:/home/hipo# dd if=/dev/sda2 of=/dev/null bs=1M

As you can see the of (output file) for dd is set to /dev/null in order to prevent dd to write out any output red by /dev/sda2 partition. bs=1M instructs dd to read from /dev/sda2 by chunks of 1 Megabyte in order to accelerate the speed of checking the whole drive.
Decreasing the bs=1M to less will take more time but will make the bad block checking be more precise.
Anyhow in most cases bs of 1 Megabyte will be a good value.

After some minutes (depending on the partition size), dd if, of operations outputs a statistics informing on how dd operations went.
Hence ff some of the blocks on the partition failed to be red by dd this will be shown in the final stats on its operation completion.
The drive, I’m checking does not have any bad blocks and dd statistics for my checked partition does not show any hard drive bad block problems:

71520+1 records in
71520+1 records out
74994712576 bytes (75 GB) copied, 1964.75 s, 38.2 MB/s

The statistics is quite self explanatory my partition of s size 75 GB was scanned for 1964 seconds roughly 32 minutes 46 seconds. The number of records red and written are 71520+1 e.g. (records in / records out). This means that all the records were properly red and wrote to /dev/null and therefore no BAD blocks on my NTFS partition 😉

How to reboot remotely Linux server if reboot, shutdown and init commands are not working (/sbin/reboot: Input/output error) – Reboot Linux in emergency using MagicSysRQ kernel sysctl variable

Saturday, July 23rd, 2011

SysRQ an alternative way to restart unrestartable Linux server

I’ve been in a situation today, where one Linux server’s hard drive SCSI driver or the physical drive is starting to break off where in dmesg kernel log, I can see a lot of errors like:

[178071.998440] sd 0:0:0:0: [sda] Result: hostbyte=DID_BAD_TARGET driverbyte=DRIVER_OK,SUGGEST_OK
[178071.998440] end_request: I/O error, dev sda, sector 89615868

I tried a number of things to remount the hdd which was throwing out errors in read only mode, but almost all commands I typed on the server were either shown as missng or returning an error:
Input/output error

Just ot give you an idea what I mean, here is a paste from the shell:

linux-server:/# vim /etc/fstab
-bash: vim: command not found
linux-server:/# vi /etc/fstab
-bash: vi: command not found
linux-server:/# mcedit /etc/fstab
-bash: /usr/bin/mcedit: Input/output error
linux-server:/# fdisk -l
-bash: /sbin/fdisk: Input/output error

After I’ve tried all kind of things to try to diagnose the server and all seemed failing, I thought next a reboot might help as on server boot the filesystems will get checked with fsck and fsck might be able to fix (at least temporary) the mess.

I went on and tried to restart the system, and guess what? I got:

/sbin/reboot init Input/output error

I hoped that at least /sbin/shutdown or /sbin/init commands might work out and since I couldn’t use the reboot command I tried this two as well just to get once again:

linux-server:/# shutdown -r now
bash: /sbin/shutdown: Input/output error
linux-server:/# init 6
bash: /sbin/init: Input/output error

You see now the situation was not pinky, it seemed there was no way to reboot the system …
Moreover the server is located in remote Data Center and I the tech support there is conducting assigned task with the speed of a turtle.
The server had no remote reboot, web front end or anything and thefore I needed desperately a way to be able to restart the machine.

A bit of research on the issue has led me to other people who experienced the /sbin/reboot init Input/output error error mostly caused by servers with failing hard drives as well as due to HDD control driver bugs in the Linux kernel.

As I was looking for another alternative way to reboot my Linux machine in hope this would help. I came across a blog post Rebooting the Magic Wayhttp://www.linuxjournal.com/content/rebooting-magic-way

As it was suggested in Cory’s blog a nice alternative way to restart a Linux machine without using reboot, shutdown or init cmds is through a reboot with the Magic SysRQ key combination

The only condition for the Magic SysRQ key to work is to have enabled the SysRQ – CONFIG_MAGIC_SYSRQ in Kernel compile time.
As of today luckily SysRQ Magic key is compiled and enabled by default in almost all modern day Linux distributions in this numbers Debian, Fedora and their derivative distributions.

To use the sysrq kernel capabilities as a mean to restart the server, it’s necessery first to activate the sysrq through sysctl, like so:

linux-server:~# sysctl -w kernel.sysrq=1
kernel.sysrq = 1

I found enabling the kernel.sysrq = 1 permanently in the kernel is also quite a good idea, to achieve that I used:

echo 'kernel.sysrq = 1' >> /etc/sysctl.conf

Next it’s wise to use the sync command to sync any opened files on the server as well stopping as much of the server active running services (MySQL, Apache etc.).

linux-server:~# sync

Now to reboot the Linux server, I used the /proc Linux virtual filesystem by issuing:

linux-server:~# echo b > /proc/sysrq-trigger

Using the echo b > /proc/sysrq-trigger simulates a keyboard key press which does invoke the Magic SysRQ kernel capabilities and hence instructs the kernel to immediately reboot the system.
However one should be careful with using the sysrq-trigger because it’s not a complete substitute for /sbin/reboot or /sbin/shutdown -r commands.
One major difference between the standard way to reboot via /sbin/reboot is that reboot kills all the running processes on the Linux machine and attempts to unmount all filesystems, before it proceeds to sending the kernel reboot instruction.

Using echo b > /proc/sysrq-trigger, however neither tries to umount mounted filesystems nor tries to kill all processes and sync the filesystem, so on a heavy loaded (SQL data critical) server, its use might create enormous problems and lead to severe data loss!

SO BEWARE be sure you know what you’re doing before you proceed using /proc/sysrq-trigger as a way to reboot ;).

Way to get around mdadm: /dev/md2 assembled from 1 drive – not enough to start the array.

Wednesday, July 13th, 2011

One server with a broken Raid array was having troubles with it’s software raid.
I tried to scan the raid array via a rescue cd like so:
server:~# mdadm --assemble --scan /dev/md1

just to be suprised by the message:
mdadm: /dev/md1 assembled from 2 drives – not enough to start the array.

In /proc/mdstat respectively the raid was showing inactive, e.g.:

server:~# cat /proc/mdstat
Personalities : [raid10] [raid1]
md1 : inactive sda2[0] sdc2[2] sdb2[1]
12024384 blocks

Respectively trying to activate the software Linux raid array with:
server:~# mdadm -A -s

Couldn’t be completed because of the same annoying error:
/dev/md1 assembled from 2 drives – not enough to start the array.

Thanksfully finally thanks to some Russian, who posted having same issues reported to be able to active his software RAID with mdadm’s –force option.

Thus enabling the problematic RAID 5 array was possible with:
server:~# mdadm -A -s --force

This solution of course is temporary and will have to further check what’s wrong with the array, however at least now I can chroot to the server’s / directory. 😉