Posts Tagged ‘server host’

How to get rid of “PHP Warning: PHP Startup: Unable to load dynamic library ‘/usr/lib/php5/20090626/suhosin.so'” on Debian GNU / Linux

Tuesday, October 25th, 2011

PHP-warning-how-to-fix-warnings-and-errors-php-logo

After a recent new Debian Squeeze Apache+PHP server install and moving a website from another server host running on CentOS 5.7 Linux server, some of the PHP scripts running via crontab started displaying the following annoying PHP Warnings :

debian:~# php /home/website/www/cron/update.php

PHP Warning: PHP Startup: Unable to load dynamic library '/usr/lib/php5/20090626/suhosin.so' – /usr/lib/php5/20090626/suhosin.so: cannot open shared object file: No such file or directory in Unknown on line 0

Obviously the error revealed that PHP cli is not happy that, I've previously removes the suhosin php5-suhosin module from the system.
I wouldn't have removed php5-suhosin if sometimes it doesn't produced some odd experiences with the Apache webserver.
To fix the PHP Warning, I used first grep to see, where exactly the suhosin module gets included in debian's php.ini config files. debian:~# cd /etc/php5
debian:/etc/php5# grep -rli suhosin *
apache2/conf.d/suhosin.ini
cgi/conf.d/suhosin.ini
cli/conf.d/suhosin.ini
conf.d/suhosin.ini

Yeah that's right Debian has three php.ini php config files. One for the php cli/usr/bin/php, another for the Apache webserver loaded php library/usr/lib/apache2/modules/libphp5.so and one for Apache's cgi module/usr/lib/apache2/modules/mod_fcgid.so .

I was too lazy to edit all the above found declarations trying to include the suhosin module in PHP, hence I remembered that probably all this obsolete suhosin module declaration are still present because probably the php5-suhosin package is still not purged from the system.

A quick check with dpkg , further strenthened my assumption as the php5-suhosin module was still hanging around as an (rc – remove candidate);

debian:~# dpkg -l |grep -i suhosin
rc php5-suhosin 0.9.32.1-1 advanced protection module for php5

Hence to remove the obsolete package config and directories completely out of the system and hence solve the PHP Warning I used dpkg –purge, like so:

debian:~# dpkg --purge php5-suhosin
(Reading database ... 76048 files and directories currently installed.)
Removing php5-suhosin ...
Purging configuration files for php5-suhosin ...
Processing triggers for libapache2-mod-php5 ...
Reloading web server config: apache2.

Further on to make sure the PHP Warning is solved I did the cron php script another go and it produced no longer errors:

debian:~# php /home/website/www/cron/update.php
debian:~#

PortQRY Native Windows command line Nmap like port scanner – Check status of remote host ports on Windows

Monday, June 30th, 2014

Windows_command_line_and_gui_port-scanner-portqry-like-nmap-check-status-of-remote-host-service-windows-xp-7-2000-2003-2008-server
Linux users know pretty well Nmap (network mapper) tool which is precious in making a quick server host security evaluation.
Nmap binary port is available for Windows too, however as nmap is port for its normal operation you have to install WinPcap (Packet Capture Library).
And more importantly it is good to mention if you need to do some remote port scanning from Windows host, there is Microsoft produced native tool called PortQry (Port Query).

PortQRY is a must have tool for the Windows Admin as it can help you troubleshoot multiple network issues.

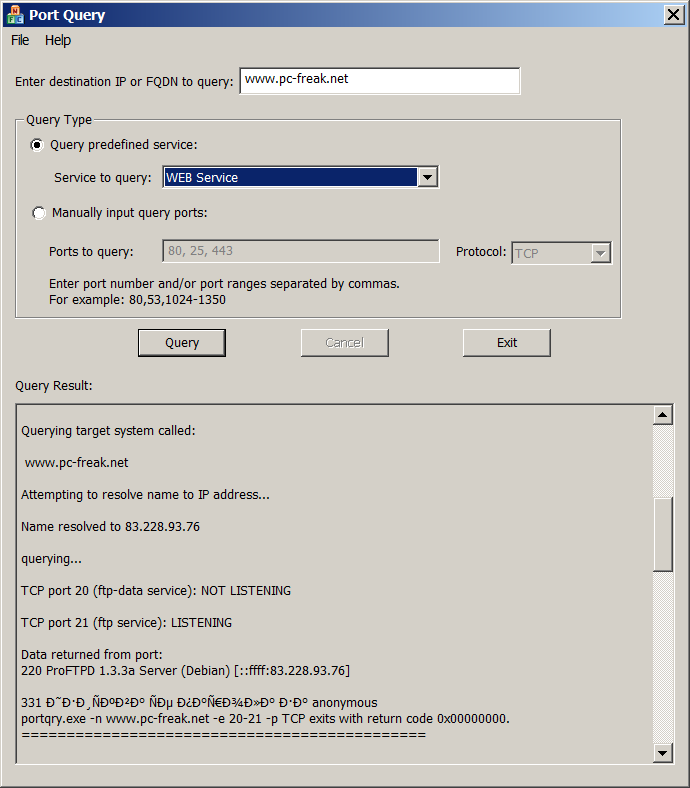
windows-nmap-native-alternative-portqry-gui-ui-web-service-port-scan-screenshot
As of time of writting this post PortQRY is at version 2, PortQRY tool has also a GUI (UI) Version for those lazy to type in command line.

Port Query UI tool (portqueryui.exe) is a tool to query open ports on a machine. This tool makes use of command line version port query tool (portqry.exe). The UI provides the following functionalities:

   1. Following "Enter destination IP or FQDN to query:”, an edit box needs the user to specify the IP address or FDQN name of the destination to query port status.

   2. The end user is able to choose Query type:

        – Predefined services type. It groups ports into service, so that you can query multiple ports for a service by a single click. Service includes "Domains and Trusts", "DNS Queries", "NetBIOS     communication", "IPSEC", "Networking", "SQL Service", "WEB Service", "Exchange Server",          "Netmeeting", and other services.

You can check detail port and protocol info for each service category by opening Help -> Predefined Services…

PORTQRY is part of Windows Server 2003 Support Tools and can be added to any NT based Windows (XP, 2003, Vista, 7, 8)
 You can download portqry command line tool here or my mirrored portqry version command line port scanner here and PortQRY UI here.

PortQRY comes in PortQryV2.exe package which when run extracts 3 files: PortQry.exe program, EULA and readme file. Quickest way to make portqry globally accessible from win command prompt is to copy it to %SystemRoot% (The environment variable holding default location for Windows Installation directory).
It is good idea to add PortQRY to default PATH folder to make it accessible from command line globally.

PorQry has 3 modes of operation:

Command Line Mode, Interactive Mode and Local Mode

portqry-windows-native-security-port-network-scanner-nmap-equivalent-help-screenshot
 

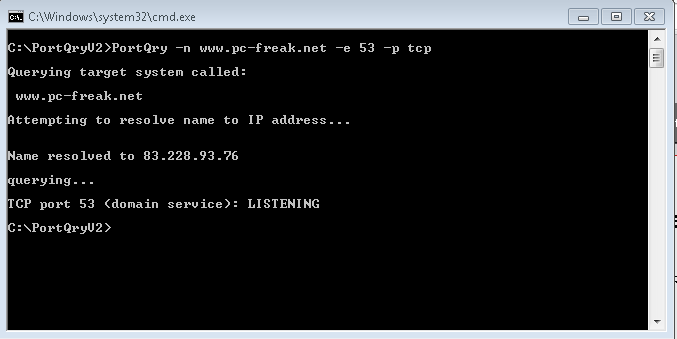
Command Line Mode – is when it is invoked with parameters.

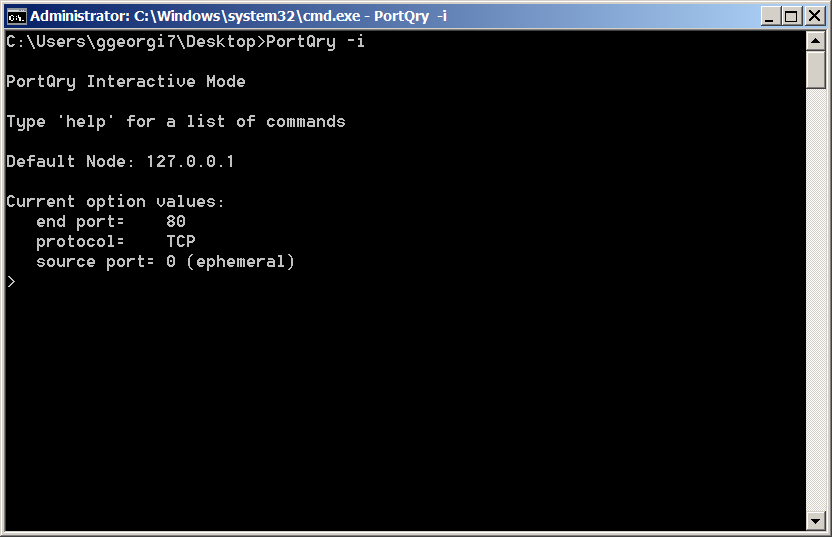
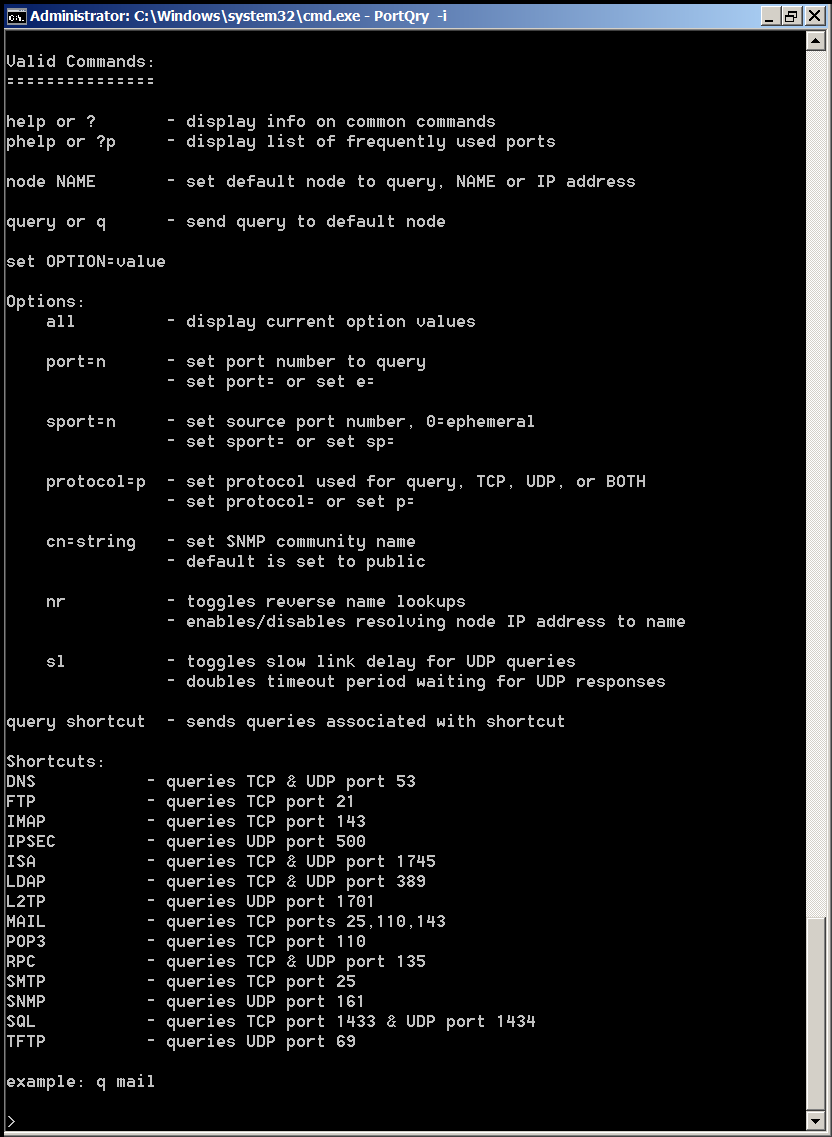
Interactive Mode is when it runs in interactive CLI console

portqry-windows-native-security-port-network-scanner-nmap-equivalent-interactive-mode-screenshot

portqry-windows-native-security-port-network-scanner-nmap-equivalent-interactive-mode-help-screenshot
and Local Mode is used whether information on local system ports is required.

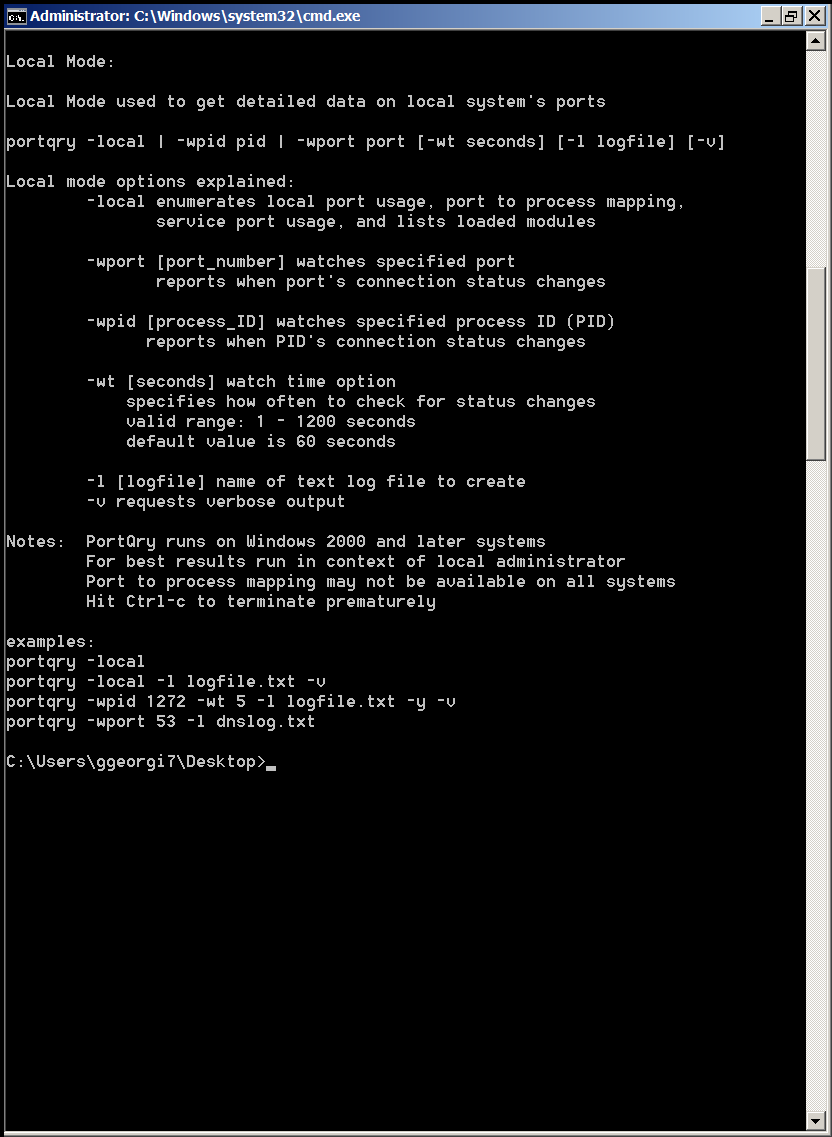
portqry-windows-native-security-port-network-scanner-nmap-equivalent-local-mode-screenshot


Here are some examples on basic usage of portqry:
 

1. Check if remote server is running webserver is listening on (HTTPS protocol) TCP port 80

portqry -n servername -e 80
 

Querying target system called:

 www.pc-freak.net

Attempting to resolve name to IP address…


Name resolved to 83.228.93.76

querying…

TCP port 80 (http service): FILTERED

2. Check whether some common Samba sharing and DNS UDP ports are listening

portqry -n servername -p UDP -o 37,53,88,135
 

Querying target system called:

servername

Attempting to resolve name to IP address…


Name resolved to 74.125.21.100

querying…

UDP port 37 (time service): NOT LISTENING

UDP port 53 (domain service): NOT LISTENING

UDP port 88 (kerberos service): NOT LISTENING

UDP port 135 (epmap service): NOT LISTENING

3. Scan open ports in a port range – Check common services port range (port 1-1024)

portqry -n 192.168.1.20 -r 1:1024 | find ": LISTENING"

4. Logging network scan output to file

Portqry –n localhost –e 135 -l port135.txt
 

Querying target system called:

 localhost

Attempting to resolve name to IP address…


Name resolved to 127.0.0.1

querying…

TCP port 135 (epmap service): LISTENING

Using ephemeral source port
Querying Endpoint Mapper Database…
Server's response:

UUID: d95afe70-a6d5-4259-822e-2c84da1ddb0d
ncacn_ip_tcp:localhost[49152]

UUID: 2f5f6521-cb55-1059-b446-00df0bce31db Unimodem LRPC Endpoint
ncacn_np:localhost[PIPEwkssvc]

Total endpoints found: 38


5. Scanning UDP and TCP protocols port

PortQry -n www.pc-freak.net -e 25 -p both


Querying target system called:

 www.pc-freak.net

Attempting to resolve name to IP address…


Name resolved to 83.228.93.76

querying…

TCP port 53 (domain service): LISTENING

UDP port 53 (domain service): LISTENING or FILTERED

Sending DNS query to UDP port 53…


6. Checking remote server whether LDAP ports are listening

Portqry -remotehost.com -p tcp -e 389
Portqry -n remotehost.com -p tcp -e 636
Portqry -n remotehost.com -p both -e 3268
Portqry -n remotehost.com -p tcp -e 3269


7. Making SNMP community name requests

portqry -n host2 -cn !my community name! -e 161 -p udp


8. Initiating scan from pre-selected source port

A network socket request initiation is useful from certain port because, some remote services expect connection from certain ports, lets say you're connecting to mail server, you might want to set as a source port – port 25, to make remote server another SMTP is connecting.

portqry -n www.pc-freak.net -e 25 -sp 25


9. Scanning whether server ports required by Active Directories are opened

Common ports used in Windows hosts to communicate between each other to sustain Active Directory are:

88 (Kerberos)
135 (RPC)
389 (LDAP)
445 (CIFS)
3268 (Global Catalog)

portqry -n remote-host.com -o 88,135,389,445,3268 -p both

portqry has also a silent mode with the "-q" switch if you want to get only whether a port is LISTENING (opened).

On port scan it returns three major return codes (very useful for scripting purposes);

  • returncode 0 – if port / service is listening
  • returncode 1 – if service is not listening
  • returncode 2 – if service is listening or filtered

PortQry is very simple port scanner for win sysadms and is precious tool for basic network debugging (services)  on Windows farms, however it doesn't have the powerful cracker functionality, application / OS versioning etc. like Nmap.


Fix FTP client error 425 Unable to build data connection: No route to host (Cause and Solution)

Monday, July 8th, 2013

ftp fix client 425 unable to-build data connection no route to host Linux
I just configured new dedicated server. One of requirement was dedicated server to support connections via FTP transfer protocol and few users to have access via it.
I added users with required permissions to directory structure and went on to test it with Linux ftp command, i.e.:


hipo@pcfreak:~$ ftp remote-host-name

Connected to remote-host-name.com
220 ProFTPD 1.3.3a Server (Matusala) [xx.xxx.xxx.xxx.xx]
Name (Matusala:hipo): testing-user
331 Password required for testing-user
Password:
230 User testing-user logged in

Remote system type is UNIX.
Using binary mode to transfer files.


ftp> ls


200 PORT command successful
425 Unable to build data connection: No route to host

ftp> exit


221 Goodbye.


As you see from above FTP paste even simple commands like "ls" failed to work with error:

425 Unable to build data connection: No route to host

I thought somehow I have configured on server some paranoid firewall, so tested same connection with iptables rules flushed, e.g.: matusala:~# iptables -F
matusala:~# iptables -t nat -F

Even after flushing firewall message persisted, so I googled around to see the what causes the error. The same error was hit by many users, and as I read, understand what causes is FTP server host is located behind some DMZ or firewall (as it was not my firewall I suppose, the dedicated provider has some firewall rules which are blocking FTP traffic on standard FTP TCP / UDP ports, port 20 and 21 ).
Fix is to enable in Linux kernel ip_nat_ftp or in newer Linux kernels module nf_nat_ftp:

matusala:~# modprobe ip_nat_ftp
matusala:~# modprobe nf_nat_ftp

or
To make ip_nat_ftp load permanently on Debian and Ubuntu servers:

matusala:~# echo 'ip_nat_ftp' >> /etc/modules
matusala:~# echo 'nf_nat_ftp' >> /etc/modules

One important note to make here is if you're testing the connection between two Linux servers it is possible the server from which you're running the client to have missing nf_nat_ftp loaded, so if error persist and you're testing remote FTP server from local ftp client on linux load same modules on localhost and you're done 🙂

Create Email Forwarding with Qmail Vpopmail using .qmail file

Tuesday, June 11th, 2013

how to do forwarding on qmail with vpopmail qmail e mailbox screenshot logo

Even though Qmail is considered as obsolete email server lately and it lacks good systematical official documentation and requires a lot of "hacking" to make work. It is surely still the fastest and maybe securest mail server out there (if properly configured).
My Qmail uses Vpopmail (for Virtual Email hosting). Every now and them some client requires to add a new e-mail forwarding from E-mail mail@host.com to Email to mail1@host2.com. Though many like to use Web interface as QmailAdmin for adding the forward I still prefer do it via old fashioned way, by SSH-ing to qmail server host and manually creating .qmail file.

Location (of my Vpopmail) install is (/var/vpopmail), so (to add e-mail forwarding for sample mail – mail@host.com)  .qmail file needs to be created in dir /var/vpopmail/domains/host.com/mail/ with content:

/var/vpopmail/domains/host.com/mail/Maildir/
&mail@host1.com

qmail:~# echo '/var/vpopmail/domains/host.com/mail/Maildir/' > /var/vpopmail/domains/host.com/mail/.qmail

qmail:~# echo '&mail@host1.com' >> /var/vpopmail/domains/host.com/mail/.qmail

First file instructs, where to store a copy of received e-mail (copy is stored in Maildir of receipt e-mail).

In Second line is mail to which to forward. For forwarding to group of e-mails all e-mails has to be listed in .qmail, i.e.:

/var/vpopmail/domains/host.com/mail/Maildir/
&mail@host1.com
&mail1@host2.com
&mail3@host3.com

Finally to make just created .qmail file work peroperly user group permissions has to be fixed:

# chown -R vpopmail:vchkpw /var/vpopmail/domains/host.com/mail/Maildir/.qmail

How to change hostname permanently on Debian and Ubuntu Linux

Thursday, March 14th, 2013

Change hostname on Debian and Ubuntu Linux terminal hostname screenshot

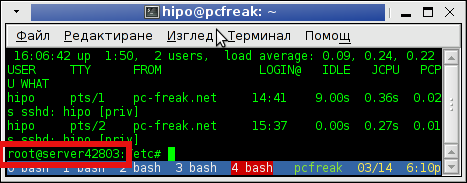
I had to configure a newly purchased dedicated server from UK2. New servers cames shipped with some random assigned node hostname  like server42803. This is pretty annoying, and has to be changed especially if your company has a naming server policy in some format like; company-s1#, company-s2#, company-sN#.

Changing hostname via hosts definition file /etc/hosts to assign the IP address of the host to the hostname is not enough for changing the hostname shown in shell via SSH user login.

To display full hostname on Debian and Ubuntu, had to type:

server42803:~# hostname
server42803.uk2net.com

To change permanently server host to lets say company-s5;

server42803:~# cat /etc/hostname | \
sed -e 's#server42803.uk2net.com#company-s5#' > /etc/hostname

To change for current logged in SSH session:

server42803:~# hostname company-s5
company-s5:~#

Finally because already old hostname is red by sshd, you have to also restart sshd for new hostname to be visible on user ssh:

company-s5:~# /etc/init.d/ssh restart
...

As well as run script:

company-s5:~# /etc/init.d/hostname.sh

Mission change host accomplished, Enjoy 🙂

Fixing MySQL server start up “ERROR 1045 (28000): Access denied for user ‘debian-sys-maint’@’localhost’ (using password: YES)”

Friday, September 7th, 2012

I'm still busy configuring the new Lenovo (Le-novo) 🙂 ThinkCenter server necessery for migration of old machines. I've done a lot yesterday but really moving all this stuff takes time …

I moved the SQL databases from the old MySQL server host to the new Debian Linux host.

In order to move databsaes, I did the usual SQL dump from current working host with:

mysql:~# mysqldump --opt --allow-keywords --add-drop-table --all-databases -u root > dump.sql

After that did the standard move of dump.sql to the new host with sftp

mysql-new:~# sftp root@mysql-host
Connected to mysql-host.
sftp> get dump.sql
....
sftp> exit

and imported dump:

mysql-new:~# mysql -u root -p < dump.sql
Enter password:

Databases dump grow really a lot (7GB)!, so I had to wait for dump.sql to import about 20 minutes – (the host configuration is Dual core 6Ghz 3MB Cache CPU, 4GB DDR3 RAM, 7200 500 GB Hitachi ExcelStor Techno V32O HDD).

The dumps migration was between identical release Debian Linux – (Squeeze 6.0.5) servers running identical versions of MySQL.

mysql-new:~# mysql --version
mysql Ver 14.14 Distrib 5.1.63, for debian-linux-gnu (i486) using readline 6.1

Because of that the whole db import worked like a charm.

Once moved the SQL started re-started normally but there was an on screen warning:

ERROR 1045 (28000): Access denied for user
'debian-sys-maint'@'localhost' (using password: YES)"

The cause of this warning error is because of way /etc/init.d/mysql script is written and in particular the custom MySQL (Debian specific start-up philosophy).

/etc/init.d/mysql is written in a way that on every restart a check of Database consistency is done. There in the script the user debian-sys-maint (a user with mysql administrator root privileges) is used to do the quick consistency check. The debian-sys-maint password which is used on start-up is stored in /etc/mysql/debian.cnf:

mysql-new:~# less /etc/mysql/debian.cnf
# Automatically generated for Debian scripts. DO NOT TOUCH!
[client]
host = localhost
user = debian-sys-maint
password = pQFM9RetOHFjewwn
socket = /var/run/mysqld/mysqld.sock
[mysql_upgrade]
host = localhost
user = debian-sys-maint
password = pQFM9RetOHFjewwn
socket = /var/run/mysqld/mysqld.sock
basedir = /usr

The whole problem is that during, the old SQL import the password set for user debian-sys-maint is different and once SQL starts the init script reads this pass and fails to login to SQL server.

The warning (error):

ERROR 1045 (28000): Access denied for user
'debian-sys-maint'@'localhost' (using password: YES)
hence appears on every SQL start (including on every system boot). The err is generally harmless and SQL seems to work fine with or without it. However since the consistency check is not done at start up, if there are some CORRUPT tables not initiating the start up check is not a good idea.

There are two options to get rid of the warning one and better one is to check in /etc/mysql/debian.cnf for password string and change the pwd with mysql cli e.g.:

new-mysql:~# grep -i pass /etc/mysql/debian.cnf | uniq
password = pQFM9RetOHFjewwn

GRANT SELECT on `mysql`.`user` to 'debian-sys-maint'@'localhost' identified by 'pQFM9RetOHFjewwn';
Query OK, 1 row affected (0.01 sec)
GRANT SELECT ON mysql.user TO 'debian-sys-main'@'localhost';Query OK, 0 rows affected (0.00 sec)
mysql> flush privileges;
Query OK, 0 rows affected (0.00 sec)

Second option (not recommended in terms of security) is to set user/pass to root values in /etc/mysql/debian.cnf.

That's all. N-joy 🙂

A tiny minimalistic CHAT Client Program writen in C

Sunday, July 29th, 2012

A friend of mine (Dido) who is learning C programming, has written a tiny chat server / client (peer to peer) program in C. His program is a very good learning curve for anyone desiring to learn basic C socket programming.
The program is writen in a way so it can be easily modified to work over UDP protocol with code:

struct sockaddr_in a;
a_sin_family=AF_INET;
a_sin_socktype=SOCK_DGRAM;

Here are links to the code of the Chat server/client progs:

Tiny C Chat Server Client source code

Tiny C Chat Client source code

To Use the client/server compile on the server host tiny-chat-serer-client.c with:

$ cc -o tiny-chat-server tiny-chat-server.c

Then on the client host compile the client;

$ cc -o tiny-chat-client tiny-chat-client.c

On the server host tiny-chat-server should be ran with port as argument, e.g. ;

$ ./tiny-chat-server 8888

To chat with the person running tiny-chat-server the compiled server should be invoked with:

$ ./tiny-chat-client 123.123.123.123 8888

123.123.123.123 is the IP address of the host, where tiny-chat-server is executed.
The chat/server C programs are actually a primitive very raw version of talk.

The programs are in a very basic stage, there are no condition checks for incorrectly passed arguments and with wrongly passed arguments it segfaults. Still for C beginners its useful …

Use rsync to copy from files from destination host to source host (rsync reverse copy) / few words on rsync

Monday, January 9th, 2012

I've recently had to set up a backup system to synchronize backup archive files between two remote servers and as I do usually with this situation I just set up a crontab job to periodically execute rsync to copy data from source server to the destination server . Copying SRC to DEST is the default behaviour rsync uses, however in this case I had to copy from the destination server to the source server host (in other words sync files the reversely.

The usual way to copy with rsync via SSH (from SRC to DEST) is using a cmd line like:

debian:~$ /usr/bin/rsync -avz -e ssh backup-user@xxx.xxx.xxx.xxx:/home/backup-user/my-directory .

Where the xxx.xxx.xxx.xxx is my remote server IP with which files are synched.
According to rsync manual, the proposed docs SYNOPSIS is in the format;
Local: rsync [OPTION…] SRC… [DEST

Obviusly the default way to use rsync is to copy source to destination which I used until now, but in this case I had to the other way around and copy files from a destination host to the source server. It was logical that swapping the SRC and DEST would complete my required task. Anyways I consulted with some rsync gurus in irc.freenode.net , just to make sure it is proper to just swap the SRC, DEST arguments.
I was told this is possible, so I swapped args;

debian:~$ /usr/bin/rsync -avz -e ssh . backup-user@xxx.xxx.xxx.xxx:/home/backup-user/my-directory
...

Surprisingly this worked 😉 Anyways I was adviced by by a good guy nick named scheel , that putting -e ssh to command line is generally unnecessery except if there is no some uncommon used SSH port over which the data is transferred. An example case in which -e 'ssh is necessery would be if transferring via lets say SSH port 1234;

rsync -avz -e 'ssh -p1234' /source user@host:/dest

In all other cases omitting '-e ssh' is better as '-e ssh' is rsync default. Therefore my final swapped line I put in cron to copy from a destinatio to source host with rsync looked like so:

05 03 2 * * /usr/bin/ionice -c 3 /usr/bin/rsync -avz my-directory backup-user@xxx.xxx.xxx.xxx:/home/backup-user/ >/dev/null 2>&1
 

How to configure ssh to automatically connect to non standard ssh port numbers (!port 22)

Tuesday, August 2nd, 2011

SSH Artistic Logo, don't give away your password

Today I’ve learned from a admin colleague, a handy tip.
I’m administrating some Linux servers which are configured on purpose not to run on the default ssh port number (22) and therefore each time I connect to a host I have to invoke the ssh command with -p PORT_NUMBER option.

This is not such a problem, however when one has to administrate a dozen of servers each of which is configured to listen for ssh connections on various port numbers, every now and then I had to check in my notes which was the correct ssh port number I’m supposed to connect to.

To get around this silly annoyance the ssh client has a feature, whether a number of ssh server hosts can be preconfigured from the ~/.ssh/config in order to later automatically recognize the port number to which the corresponding host will be connecting (whenever) using the ssh user@somehost without any -p argument specified.

In order to make the “auto detection” of the ssh port number, the ~/.ssh/config file should look something similar to:

hipo@noah:~$ cat ~/.ssh/config
Host home.*.www.pc-freak.net
User root
Port 2020
Host www.remotesystemadministration.com
User root
Port 1212
Host sub.www.pc-freak.net
User root
Port 2222
Host www.example-server-host.com
User root
Port 1234

The *.www.pc-freak.net specifies that all ssh-able subdomains belonging to my domain www.pc-freak.net should be by default sshed to port 2020

Now I can simply use:

hipo@noah:~$ ssh root@myhosts.com

And I can connect without bothering to remember port numbers or dig into an old notes.
Hope this ssh tip is helpful.