Posts Tagged ‘sftp’
Monday, December 3rd, 2018 
Adding user SFTP access to a Linux system is often required and therefore a must for multi users or web hosting environments it is an absolute requirement to have SFTP user space separation ( isolation ) out of the basic Linux system environment this is done using a fake CHROOT Jail.
Purpose of this article is to show how to create SFTP Chroot JAIL in few easy configurations.
By isolating each user into his own space you will protect the users to not eventually steal or mistakenly leak information such as user credentials / passwords etc.
Besides that it is useful to restrict the User to his own File / Web Space to have granted only access to Secure FTP (SFTP) only and not SSH login access and togheter with the chroot jail environment to protect your server from being attempted to be hacked (rooted / exploited) through some (0day) zero-day kernel 1337 vulnerability.
1. Setup Chrooted file system and do the bind mount in /etc/fstab
# chown root:root /mnt/data/share
# chmod 755 /mnt/data/share
# mkdir -p /sftp/home
# mount -o bind /mnt/data/share /sftp/home
Next add to /etc/fstab (e.g. vim /etc/fstab) and add following line:
/mnt/data/share /sftp/home none bind 0 0
To mount it next:
# mount -a
/mnt/data/share is a mounted HDD in my case but could be any external attached storage
2. Create User and sftpgroup group and add your new SFTP Jailed user accounts to it
To achieve SFTP only CHROOT Jail environment you need some UNIX accounts new group created such as sftpgroup and use it to assign proper ownership / permissions to newly added SFTP restricted accounts.
# groupadd sftpgroup
Once the group exists, next step is to create the desired username / usernames with useradd command and assign it to sftpgroup:
# adduser sftp-account1 -s /sbin/nologin -d /sftp/home
# passwd sftp-account1
# usermod -G sftpgroup sftp-account1
Above both commands could be also done in one line with adduser
# adduser sftp-account1 -g sftpgroup -s /sbin/nologin -d /sftp/home
Note the /sbin/nologin which is set to prevent SSH logins but still allow access via sftp / scp data transfer clients Once the user exists it is a good idea to prepare the jailed environment under a separate directory under root File system system lets say in /sftp/home/
3. Set proper permissions to User chrooted /home folder
# mkdir -p /sftp/home
# mkdir /sftp/home/sftp-account1
# chown root:root /sftp/
# chown sftp-account1:sftpgroup /sftp/home/sftp-account1
For each new created uesr (in this case sftp-account1) make sure the permissions are properly set to make the files readable only by the respective user.
# chmod 700 -R /sftp/home/sftp-account1
For every next created user don't forget to do the same 3. Modify SSHD configuration file to add Chroot match rules Edit /etc/ssh/sshd_config file and to the end of it add below configuration:
# vim /etc/ssh/sshd_config
Subsystem sftp internal-sftp
Match Group sftpgroup
ChrootDirectory /sftp/home
ForceCommand internal-sftp
X11Forwarding no
AllowTcpForwarding no
Restart sshd to make the new settings take effect, to make sure you don't ed up with no access (if it is a remote server) run the sshd daemon on a secondary port like so:
# /usr/sbin/sshd -p 2208 &
Then restart sshd – if it is old Linux with Init V support
# /etc/init.d/sshd restart
– For systemd Linux systems
# systemctl restart sshd
4. Verify Username (sftp-account1) could login only via SFTP and his environment is chrooted
ssh sftp-account1@www.pc-freak.net
This service allows sftp connections only.
Connection to 83.228.93.76 closed.
sftp sftp-account1@www.pc-freak.net Connected to 83.228.93.76. sftp>
5. Closure
The quick summary of What we have achieved with below is:
restrict Linux users from having no /bin/shell access but still have Secure FTP copy in few steps to summarize them
a. create new user and group for SFTP chrooted restricted access only
b. set proper permissions to make folder accessible only by user itself
c. added necessery sshd config and restarted sshd to make it working d. tested configuration
This short guide was based on documentation on Arch Linux's wiki SFTP chroot you can check it here.
Tags: chroot, create, data, jail, sftp, User
Posted in Computer Security, Linux | 1 Comment »
Wednesday, April 27th, 2011 
I have updated Ubuntu version 9.04 (Jaunty) to 9.10 and followed the my previous post update ubuntu from 9.04 to Latest Ubuntu
I expected that a step by step upgrade from a release to release will work like a charm and though it does on many notebooks it doesn't on Toshiba Satellite L40
The update itself went fine, whether I used the update-manager -d and followed the above pointed tutorial, however after a system restart the PC failed to boot the X server properly, a completely blank screen with blinking cursor appeared and that was all.
I restarted the system into the 2.6.35-28-generic kernel rescue-mode recovery kernel in order to be able to enter into physical console.
Logically the first thing I did is to check /var/log/messages and /var/log/Xorg.0.log but I couldn't find nothing unusual or wrong there.
I suspected something might be wrong with /etc/X11/xorg.conf so I deleted it:
ubuntu:~# rm -f /etc/X11/xorg.conf
and attempted to re-create the xorg.conf X configuration with command:
ubuntu:~# dpkg-reconfigure xserver-xorg
This command was reported to be the usual way to reconfigure the X server settings from console, but in my case (for unknown reasons) it did nothing.
Next the command which was able to re-generate the xorg.conf file was:
ubuntu:~# X -configure
The command generates a xorg.conf sample file in /root/xorg.conf.* so I used the conf to put it in /etc/X11/xorg.conf X's default location and restarted in hope that this would fix the non-booting issue.
Very sadly again the black screen of death appeared on the notebook toshiba screen.
I further thought of completely wipe out the xorg.conf in hope that at least it might boot without the conf file but this worked out neither.
I attempted to run the Xserver with a xorg.conf configured to work with vesa as it's well known vesa X server driver is supposed to work on 99% of the video cards, as almost all of them nowdays are compatible with the vesa standard, but guess what in my case vesa worked not!
The only version of X I can boot in was the failsafe X screen mode which is available through the grub's boot menu recovery mode.
Further on I decided to try few xorg.conf which I found online and were reported to work fine with Intel GM965 internal video , and yes this was also unsucessful.
Some of my other futile attempts were: to re-install the xorg server with apt-get, reinstall the xserver-xorg-video-intel driver e.g.:
ubuntu:~# apt-get install --reinstall xserver-xorg xserver-xorg-video-intel
As nothing worked out I was completely pissed off and decided to take an alternative approach which will take a lot of time but at least will probably be succesful, I decided to completely re-install the Ubuntu from a CD after backing up the /home directory and making a list of available packages on the system, so I can further easily run a tiny bash one-liner script to install all the packages which were previously existing on the laptop before the re-install:
Here is how I did it:
First I archived the /home directory:
ubuntu:/# tar -czvf home.tar.gz home/

....
For 12GB of data with some few thousands of files archiving it took about 40 minutes.
The tar spit archive became like 9GB and I hence used sftp to upload it to a remote FTP server as I was missing a flash drive or an external HDD where I can place the just archived data.
Uploading with sftp can be achieved with a command similar to:
sftp user@yourhost.com

Password:

Connected to yourhost.com.

sftp> put home.tar.gz
As a next step to backup in a file the list of all current installed packages, before I can further proceed to boot-up with the Ubuntu Maverich 10.10 CD and prooceed with the fresh install I used command:
for i in $(dpkg -l| awk '{ print $2 }'); do

echo $i; done >> my_current_ubuntu_packages.txt
Once again I used sftp as in above example to upload my_current_update_packages.txt file to my FTP host.
After backing up all the stuff necessery, I restarted the system and booted from the CD-rom with Ubuntu.
The Ubuntu installation as usual is more than a piece of cake and even if you don't have a brain you can succeed with it, so I wouldn't comment on it 😉
Right after the installation I used the sftp client once again to fetch the home.tar.gz and my_current_ubuntu_packages.txt
I placed the home.tar.gz in /home/ and untarred it inside the fresh /home dir:
ubuntu:/home# tar -zxvf home.tar.gz
Eventually the old home directory was located in /home/home so thereon I used Midnight Commander ( the good old mc text file explorer and manager ) to restore the important user files to their respective places.
As a last step I used the my_current_ubuntu_packages.txt in combination with a tiny shell script to install all the listed packages inside the file with command:
ubuntu:~# for i in $(cat my_current_ubuntu_packagespackages.txt); do

apt-get install --yes $i; sleep 1;

done
You will have to stay in front of the computer and manually answer a ncurses interface questions concerning some packages configuration and to be honest this is really annoying and time consuming.
Summing up the overall time I spend with this stupid Toshiba Satellite L40 with the shitty Intel GM965 was 4 days, where each day I tried numerous ways to fix up the X and did my best to get through the blank screen xserver non-bootable issue, without a complete re-install of the old Ubuntu system.
This is a lesson for me that if I stumble such a shitty issues I will straight proceed to the re-install option and not loose my time with non-sense fixes which would never work.
Hope the article might be helpful to somebody else who experience some problems with Linux similar to mine.
After all at least the Ubuntu Maverick 10.10 is really good looking in general from a design perspective.
What really striked me was the placement of the close, minimize and maximize window buttons , it seems in newer Ubuntus the ubuntu guys decided to place the buttons on the left, here is a screenshot:

I believe the solution I explain, though very radical and slow is a solution that would always work and hence worthy 😉
Let me hear from you if the article was helpful.
Tags: blank screen, blinking cursor, com, configured, configureThe, cursor, default location, file, generic kernel, installation, intel, location, log, log messages, Logically, notebook toshiba, notebooks, personal data, rescue mode, root, Satellite, screen, script, server settings, sftp, something, system, toshiba, toshiba satellite, toshiba satellite l40, tutorial, Ubuntu, upgrade, vesa, video, video cards, x server, Xorg, yourhost
Posted in Linux, Linux and FreeBSD Desktop, Linux Audio & Video, Linux on Laptops, System Administration | No Comments »
Thursday, April 23rd, 2015 
I've recentely have a task to transfer some huge Application server long time stored data (about 70GB) of data after being archived between an old Linux host server and a new one to where the new Tomcat Application (Linux) server will be installed to fit the increased sites accessibility (server hardware overload).
The two systems are into a a paranoid DMZ network and does not have access between each other via SSH / FTP / FTPs and even no Web Access on port (80 or SSL – 443) between the two hosts, so in order to move the data I had to use a third HOP station Windows (server) which have a huge SAN network attached storage of 150 TB (as a Mapped drive I:/).
On the Windows HOP station which is giving me access via Citrix Receiver to the DMZ-ed network I'm using mobaxterm so I have the basic UNIX commands such as sftp / scp already existing on the Windows system via it.
Thus to transfer the Chronos Tomcat application stored files .tar.gz archived I've sftp-ed into the Linux host and used get command to retrieve it, e.g.:
sftp UserName@Linux-server.net
Password:
Connected to Linux-server.
sftp> get Chronos_Application_23_04_2015.tar.gz
….
The Secured DMZ Network seemed to have a network shaper limiting my get / Secured SCP download to be at 2.5MBytes / sec, thus the overall file transfer seemed to require a lot of time about 08:30 hours to complete. As it was the middle of day about 13:00 and my work day ends at 18:00 (this meant I would be able to keep the file retrieval session for a maximum of 5 hrs) and thus file transfer would cancel when I logout of the HOP station (after 18:00). However I've already left the file transfer to continue for 2hrs and thus about 23% of file were retrieved, thus I wondered whether SCP / SFTP Protocol file downloads could be resumed. I've checked thoroughfully all the options within sftp (interactive SCP client) and the scp command manual itself however none of it doesn't have a way to do a resume option. Then I thought for a while what I can use to continue the interrupted download and I remembered good old rsync (versatile remote and local file copying tool) which I often use to create customer backup stragies has the ability to resume partially downloaded files I wondered whether this partially downloaded file resume could be done only if file transfer was only initiated through rsync itself and luckily rsync is able to continue interrupted file transfers no matter what kind of HTTP / HTTPS / SCP / FTP program was used to start file retrieval. rsync is able to continue cancelled / failed transfer due to network problems or user interaction activity), that turned even pretty easy to continue failed file transfer download from where it was interrupted I had to change to directory where file is located:
cd /path/to/interrupted_file/
and issue command:
rsync -av –partial username@Linux-server.net:/path/to/file .
the –partial option is the one that does the file resume trick, -a option stands for –archive and turns on the archive mode; equals -rlptgoD (no -H,-A,-X) arguments and -v option shows a file transfer percantage status line and an avarage estimated time for transfer to complete, an easier to remember rsync resume is like so:
rsync -avP username@Linux-server.net:/path/to/file .
Password:
receiving incremental file list
chronos_application_23_04_2015.tar.gz
4364009472 8% 2.41MB/s 5:37:34
To continue a failed file upload with rsync (e.g. if you used sftp put command and the upload transfer failed or have been cancalled:
rsync -avP chronos_application_23_04_2015.tar.gz username@Linux-server.net:/path/where_to/upload
Of course for the rsync resume to work remote Linux system had installed rsync (package), if rsync was not available on remote system this would have not work, so before using this method make sure remote Linux / Windows server has rsync installed. There is an rsync port also for Windows so to resume large Giga or Terabyte file archive downloads easily between two Windows hosts use cwRsync.
Tags: archive, command, Connected, day, downloads, gz, long time, network, rsync, scp, server hardware, sftp, tar, use
Posted in Everyday Life, Linux, Linux Backup tools, System Administration, Various, Web and CMS | 2 Comments »
Friday, October 21st, 2011 
I needed to migrate vpopmail/domains multiple directories stored on 2 servers to a single vpopmail install.
Merging the two vpopmails user Maildir/ stored accounts actually actually was quite simple, though it needed a bit of tweaks.
Here is how I migrated the two vpopmail installations to reside on the one vpopmail mail storage.
1. I used tar to archive the two vpopmail installations on the two different
First I logged in with root over ssh on the first node, e.g.:
qmail-server1:~# cd /home/vpopmail/

qmail-server1:/home/vpopmail# ionice -c 3 tar -czvf vpopmail1_$(date +%Y%m%d).tar.gz domains/

...
Then logged in on the second machine:
qmail-server2:~# cd /home/vpopmail

qmail-server2:/home/vpopmail# ionice -c 3 tar -czvf vpopmail2_$(date +%Y%m%d).tar.gz domains/
I used ionice -c 3 which instructs the tar archive of vpopmail directory to be created using idle (sparing the hard disk) from I/O overheads.
Sometimes not using ionice especially the case where hundreds of mail domains exist in domains/ could overload the server and stop the qmail and even sometimes ssh from properly responding for a very long periods as well as delaying the work of the mail server and failure to accept some user connections to pop3 or smtp protocols.I found out about the exisnte of ionice command just recently, reading some blog online. The command is absolute "must use", always when have to archive directories with tens of thousands of files and subdirectories. It's also nice in general, also on some copy or move operations on GNU / Linux, ionice is truly great.
Anyways after a while I had my both archives on both servers existing, so I used sftp (one can use scp as well) to transfer the archives to the newly configured qmail + vpopmail installation.
2. Use sftp or scp to copy the archives to the new configured vpopmail server
Again on both servers I had to execute, sftp I prefer sftp as I love being interactive on the shell 😉
qmail-server1:/home/vpopmail# sftp root@my-vpopmail-server-host.com

Password:

Connected to my-vpopmail-server-host.com.

sftp> cd /home/vpopmail

sftp> put vpopmail1_$(date +%Y%m%d).tar.gz

...

sftp> exit
Once again the same commands has to be issued on the second vpomail server, where the second domains/ mail accounts archive was just made:
qmail-server2:/home/vpopmail# sftp root@my-vpopmail-server-host.com

Password:

Connected to my-vpopmail-server-host.com.

sftp> cd /home/vpopmail

sftp> put vpopmail2_$(date +%Y%m%d).tar.gz

...

sftp> exit
Now as both of the archives are uploaded, next step is to login to the root@my-vpopmail-server-host.com server, where the two archives were just uploaded:
qmail-server1:/var/domains# ssh root@my-vpopmail-server-host.com

my-vpopmal-server-host:~# cd /home/vpopmailmy-vpopmail-server-host:/home/vpopmail# tar -zxvf vpopmail1_$(date +%Y%m%d).tar.gz domains/

...
Next on, the second vpopmail2_$(date +%Y%m%d).tar.gz is untarred:
3. Unarchive the uploaded vpopmail*.tar.gz archives
my-vpopmail-server-host:/home/vpopmail# tar -zxvf vpopmail2_$(date +%Y%m%d).tar.gz domains/

...
Now, if the two archives are properly tarred and no errors are returned (that was my case thx God).
4. Use a shell script to generate a script, to later change all user emails passwords on the my-vpopmail-server-host.com
The next thing which has to be done is that all email accounts with passwords are recreated with vpopmail's /home/vpopmail/bin/vpasswd command. Even though the domains are existing with the respective vpasswd and vpasswd.cdb in each mailbox on the new server my-vpopmail-server-host still the mailboxes were not visible by vpopmail. To make all the mailboxes with the correct passwords be responding on the new vpopmail connections via IMAP and POP3 mail fetch protocols, I wrote a small script which does change the passwords of all mailboxes just transferred from the two servers to my-vpopmail-server-host
The script is very simple and actually is not too automated, but at least it works. I've called my script to dump all the user passwords for all the vpopmail filesystem existing mail domains dump_vpopmail_mail_passwords.sh
To use the script its necessery that the script is downloaded on both the vpopmail mail servers from which domains/ directory is migrated, e.g.:
qmail-server1:/home/vpopmail# wget https://www.pc-freak.net/bshscr/dump_vpopmail_mail_passwords.sh

...

qmail-server1:/home/vpopmail# sh dump_vpopmail_mail_passwords.sh >> change_mail_account_pwds.sh
Same procedure goes on the second vpopmail server qmail-server2:
qmail-server2:/home/vpopmail# wget https://www.pc-freak.net/bshscr/dump_vpopmail_mail_passwords.sh

...

qmail-server2:/home/vpopmail# sh dump_vpopmail_mail_passwords.sh >> change_mail_account_pwds.sh
5. Upload the change_mail_accounts_pwds.sh shell script created on the two qmail mail servers to dump_vpopmail_mail_passwords.sh
Again I used sftp to upload the two change_mail_account_pwds.sh bash scripts:
qmail-server1:/home/vpopmail# sftp root@my-vpopmail-server-host.com

Password:

Connected to my-vpopmail-server-host.com.

sftp> put change_mail_account_pwds.sh change_mail_account_pwds1.sh

...

sftp> exit
sftp>
qmail-serve2:/home/vpopmail# sftp root@my-vpopmail-server-host.com

Password:

Connected to my-vpopmail-server-host.com.

sftp> put change_mail_account_pwds.sh change_mail_account_pwds2.sh

...

sftp> exit
6. Execute change_mail_account_pwds1.sh and change_mail_account_pwds2.sh on my-vpopmail-server-host.com
On the 3rd server where the two vpopmail domains are migrated my-vpopmail-server-host.com , from /home/vpopmail invoke the above two scripts:
root@my-vpopmail-server-host.com:/home/vpopmail# sh change_mail_account_pwds1.sh

root@my-vpopmail-server-host.com:/home/vpopmail# sh change_mail_account_pwds2.sh
The two scripts will contain list with all the two migrated vpopmail user mail addresses in a format similar to:
vpasswd mail_account@mail-domain.com password1

vpasswd mail_account1@mail-domain.com some_password

vpasswd mail_accountX@mail-domain.com other_password

etc..
After following this steps, all the mail accounts (or most of them ;)) should be merged from the two servers on the new configured vpopmail on my-vpopmail-server-host.com host.
The up-described procedure could be literally followed with migratingm any number of vpopmail /home/vpopmail/domains user email accounts.
If it has to be mass deployed based, its coparatively easy even to write an automated script to do the various aforementioned steps without any user interaction.
I've seen also some other explanations on how to migrate qmail.jsm1.net , but honestly was too lazy to read them, so I just came up with the ways described here.
One important note to make here is always to make backups, this steps worked for me but I can't guarantee this migration tutorial will work at all. I hope this helps somebody out there. Cheers 😉
Tags: archive directories, cd home, change, com, command, comPassword, configured, copy, czvf, Disk, email accounts, failure, gnu linux, gz, hard disk, How to, installation, login, long periods, mail accounts, mail domains, mail server, mail storage, move, node, pop, protocols, quot, root, scp, script, servers, sftp, Shell, smtp, ssh, tar archive, tar gz, tens of thousands, thx, tweaks, vpomail, vpopmail, wget, work
Posted in Linux, Qmail, System Administration, Various | 1 Comment »
Wednesday, November 13th, 2013 
Last 10+ years I worked on GNU / Linux as Desktop. Last 7 years most of my SSH connections were managed from GNOME and I'm quite used to gnome-terminal ssh tabbing. In my new Employee Hewlett Packard. I'm forced to work on Microsoft Windows 7 and thus I used for a month or so Putty and Kitty fork from version 0.63 of PuTTY advertising itself as the best telnet / SSH client in the world. Both of the two lack tabbing and have interface which is pretty unfamiliar to me. As I'm so used to using native UNIX terminal. Fortunately a colleague of mine Ivelin was using an SSH client called MobaXTerm which very much did emulation similar to my favourite gnome-terminal. MobaXterm is not free software / open source app but this doesn't matter so much to me as anyways I'm running a non-free Win OS on my desktop. What makes MobaXterm so attractive is its rich functionality (cosmic years infront of Putty).
Here is website description of MobaXterm quoted from its website:
MobaXterm is an enhanced terminal for Windows with an X11 server, a tabbed SSH client and several other network tools for remote computing (VNC, RDP, telnet, rlogin). MobaXterm brings all the essential Unix commands to Windows desktop, in a single portable exe file which works out of the box.
Overall list of features MobaXterm offers are;
-
multitab terminal with embedded Unix commands (ls, cd, cat, sed, grep, awk, rsync, wget, …)
-
embedded X11 server for easily exporting your Unix/Linux display
-
a session manager with several network utilities: SSH, RDP, VNC, Telnet, Rlogin, FTP, SFTP and XDMCP
-
passwords management for SSH, RDP, VNC, SFTP (on demand password saving)
-
easy graphical file transfer using drag and drop during SSH sessions
-
advanced SSH tunnels creation tool (graphical port forwarding builder)
-
tasks automation using scripts or macros
Mobaxterm is portable just like Putty so its useful to use on HOP stations to servers like used in big companies like HP. Featured embedded Unix commands (e.g., ls, cd, cat, sed, grep, awk, rsync, wget) gives a feeling like you're working on pure Linux console making people addicted to Linux / BSD quite confortable. Some other very useful terminal emulator functions are support for anti-aliasing session manager (save / remember passwords for ssh sessions in Crypted format so much missing in Putty) and it even supports basic macros.
Basic UNIX commands embedded in MobaXterm are taken and ported from Cygwin project – Linux-like environment for Windows making it possible to port software running on POSIX systems (such as Linux, BSD, and Unix systems) to Windows. A very cool think is also MobaXterm gives you a Linux like feel of console navigation in between basic files installed from Cygwin. Some downside I found is program menus which look at first glimpse a bit confusing especially for people used to simplicity of gnome-terminal. Once logged in to remote host via ssh command the program offers you to log you in also via SFTP protocol listing in parallel small window with possibility to navigate / copy / move etc. between server files in SFTP session which at times is pretty useful as it saves you time to use some external SFTP connector tools like WinSCP.
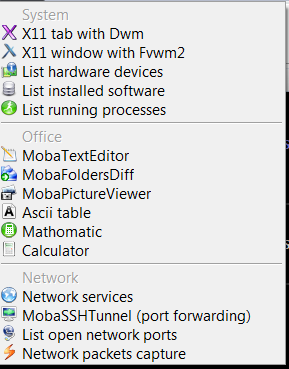
From Tools configuration menu, there are few precious tools as well;
– embedded text editor MobaTextEditor
– MobaFoldersDiff (Able to show diffeernces between directories)
– AsciiTable (Complete List of Ascii table with respective codes and characters)
– Embedded simple Calculator
– List open network ports – GUI Tool to list all open ports on Windows localhost
– Network packets capture – A Gui tool showing basic info like from UNIX's tcpdump!
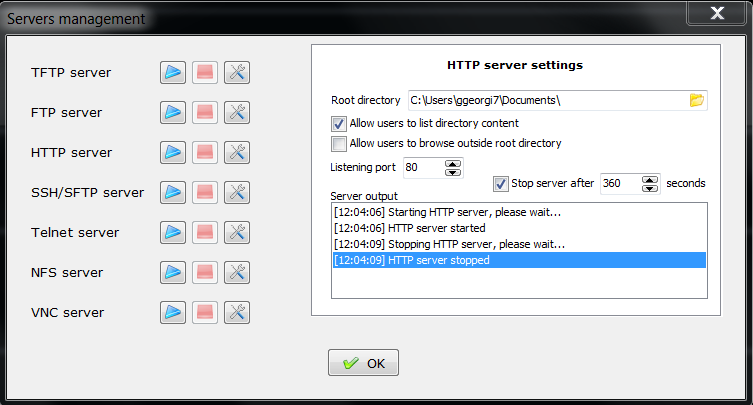
– Ability to start quickly on local machine (TFTP, FTP, SFTP / SSH server, Telnet server, NFS server, VNC Server and even simple implementation of HTTP server)
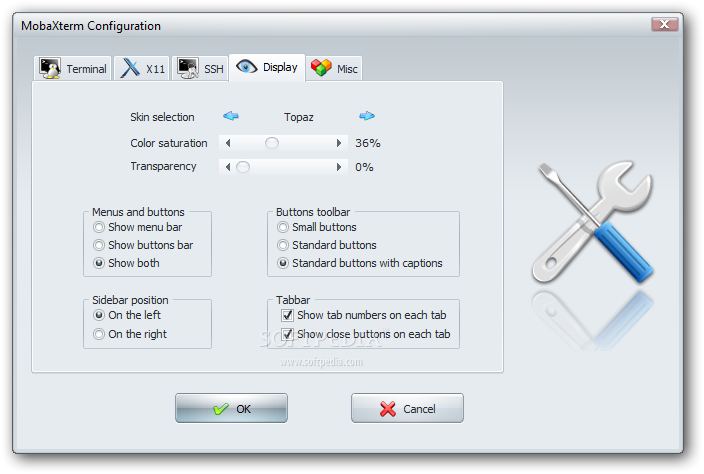
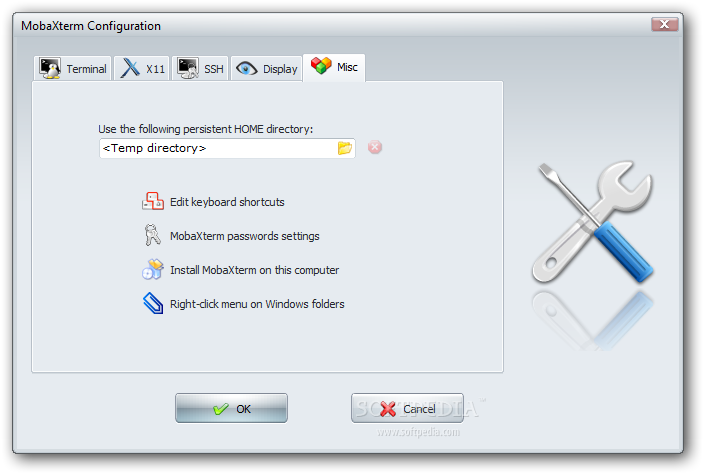
Below are few screenshots to get you also idea about what kind of configuration MobaXterm supports
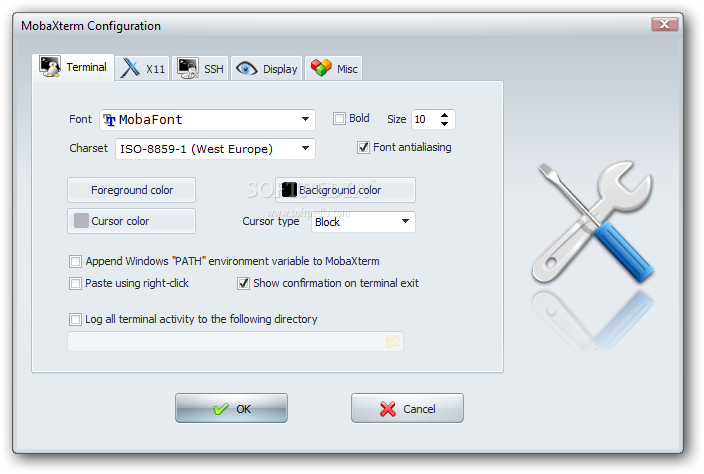
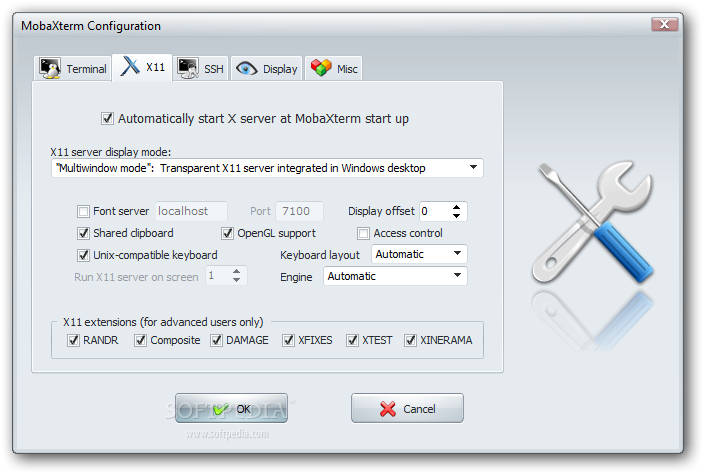

To configure and use Telnet, RSH, RDP, VNC, FTP etc. Sessions use the Sessions tab on top menu.
One very handy thing is MobaXterm supports export of remote UNIX display with no requirement to install special Xserver like already a bit obsolete Xming – X server for Windows.
The X Display Manager Control Protocol (XCMCP) is a key feature of the X11 architecture. Together with XDMCP, the X network protocol allows distributed operation of the X server and X display manager. The requesting X server runs on the client (usually as an X terminal), thus providing a login service, that why the X server ported to MobaXterm from Cygwin also supports XDMCP. If, for example, you want to start a VNC session with a remote VNC server, all you have to do is enter the remote VNC server’s IP address in the VNC area; the default VNC port is already registered.
Accessing the remote Windows server via RDP (Remote Desktop Protocol) is also a piece of cake. Once you establish a session to RDP or other Proto it is possible to save this session so later you just choose between session to access. The infamous (X11 Port Forwarding) or creation of SSH encrypted tunnels between hosts to transfer data securily or hide your hostname is also there.
MobaXterm is undoubtedly a very useful and versatile tool. Functionally, the software is well mannered, and Windows users who want to sniff a little Linux/Unix air can get a good idea of how Linux works. A closer look reveals that anything you can do with MobaXterm can be achieved directly with freely available tools (Cygwin) and Unix tools ported from Cygwin. However, although Cygwin provides a non-Posix environment for Windows, it doesn’t offer a decent terminal, which is one thing Moba-Xterm has going for it.
Admittedly, in pure vanilla Cygwin, you can start an X server automatically and then use xterm, but xterm lacks good-quality fonts, whereas MobaXterm conveniently lets you integrate a font server.
Tags: awk, cat, drag, drop, exe, file, Ftp, grep, infront, manager, microsoft windows, network, open source, password, Putty, RDP, session, session manager, sftp, software open source, ssh, Telnet, terminal, VNC, wget, Windows
Posted in System Administration, Various, Windows | 15 Comments »
Thursday, March 7th, 2013 If amount of Unique users on website has increased dramatically and Apache + PHP server starts to get user load higher than 50% in times of most users site activity then it is time to move to think of migrating data on more powerful Server hardware.
Moving few thousands of Gigabytes of PHP, JS, PNG, JPG images and plain text files data from a productive host to another puts an extra burden on hard disk Input / Output (I/O) operations, thus risking to put extraordinary server load and make websites on server inaccessible. The normal way I copy data on less busy servers is create .tar.gz archive of data from one server and transfer with sftp or scp. In this situation, doing so however puts too much load on server and thus is risking to stone the server and make it inaccessible to users. A solution to problem is to use rsync instead, synchronizing data between the servers by instructing it to transfer data from one hard disk to another via network using a maximum read/write bandwidth.
rsync command argument specifying a maximum bandwidth is
--bwlimit=KBPS
To transfer data between two servers specifyinga maximum transfer bandwidth of 10MB per second you have to pass 2MBytes as it is in megabytes (2*1024Kb) = 2048.
Hence to make the transfer while logged to current productive server via SSH to host server with IP XXX.XXX.XXX.XXX I used:
 w:~# cd /home/sites

w:/home/sites# /usr/bin/rsync --bwlimit=2048 -avz -e ssh . root@XXX.XXX.XXX.XXX:/home/sites/
The arguments to above rsync command are clear enough (-e ssh) – tells to use ssh as data transfer protocol, (root@) – specifies to connect to second server with root user and (:/home/sites/) – tells rsync to transfer to remote server to same directory (/home/sites/) like from which copying.
Bear in mind that, in order this method to work, rsync has to be installed both on the server from which data is transferred and to second one to where data is transferred.
Since rsync is available in Linux as well as has port in FreeBSD / NetBSD / OpenBSD ports tree, same way to transfer "web data" while upgrading BSD OS host to another is possible.
Tags: command argument, disk input, gigabytes, maximum bandwidth, maximum transfer, php server, root user, server hardware, server load, servers, sftp, synchronizing data, tar gz, transfer protocol
Posted in System Administration, Various, Web and CMS | No Comments »
Saturday, May 12th, 2012 After migrating databases data from FreeBSD MySQL 5.0.83 server to a Debian Squeeze Linux MySQL version 5.1.61, below is a mysql –version issued on both the FreeBSD and the Debian servers
freebsd# mysql --version

mysql Ver 14.12 Distrib 5.0.83, for portbld-freebsd7.2 (i386) using 5.2
debian:~# mysql --version

mysql Ver 14.14 Distrib 5.1.61, for debian-linux-gnu (i486) using readline 6.1
The data SQL dump from the FreeBSD server was dumped with following command arguments:
freebsd# mysqldump --opt --allow-keywords --add-drop-table --all-databases -u root -p > complete_db_dump.sql
Then I used sftp to transfer complete_db_dump.sql dump to the a brand new installed latest Debian Squeeze 6.0.2. The Debian server was installed using a "clean Debian install" without graphical environment with CD downloaded from debian.org's site.
On the Debian machine I imported the dump with command:
debian:~# mysq -u root -p < complete_db_dump.sql
Right After the dump was imported I re-started SQL server which was previously installed with:
debian:~# apt-get install mysql-server
The error I got after restarting the mysql server:
debian:~# #/etc/init.d/mysql restart
was:
 ERROR 1577 (HY000) at line 1: Cannot proceed because system tables used by Event Scheduler were found damaged at server start

ERROR 1547 (HY000) at line 1: Column count of mysql.proc is wrong. Expected 20, found 16. The table is probably corrupted
This error cost me a lot of nerves and searching in google to solve. It took me like half an hour of serious googling ,until I finally found the FIX!!!:
 debian:~# mysql_upgrade -u root -h localhost -p --verbose --force

Enter password:

Looking for 'mysql' as: mysql

Looking for 'mysqlcheck' as: mysqlcheck

Running 'mysqlcheck' with connection arguments: '--port=3306' '--socket=/var/run/mysqld/mysqld.sock' '--host=localhost'

Running 'mysqlcheck' with connection arguments: '--port=3306' '--socket=/var/run/mysqld/mysqld.sock' '--host=localhost'

bible.holy_bible OK

bible.holybible OK

bible.quotes_meta OK
Afterwards finally I had to restart the mysql server once again in order to finally get rid of the shitty:
ERROR 1547 (HY000) at line 1: Column count of mysql.proc is wrong. Expected 20, found 16. The table is probably corrupted error!
 debian:~# /etc/init.d/mysql restart

Stopping MySQL database server: mysqld.

Starting MySQL database server: mysqld.

Checking for corrupt, not cleanly closed and upgrade needing tables..
This solved the insane Column count of mysql.proc is wrong. Expected 20, found 16 once and for all!
Before I came with this fix I tried all kind of forum suggested fixes like:
 debian:~# mysql_upgrade -u root -p

Looking for 'mysql' as: mysql

Looking for 'mysqlcheck' as: mysqlcheck

This installation of MySQL is already upgraded to 5.1.61, use --force if you still need to run mysql_upgrade
 debian:~# mysql_upgrade -p

Looking for 'mysql' as: mysql

Looking for 'mysqlcheck' as: mysqlcheck

This installation of MySQL is already upgraded to 5.1.61, use --force if you still need to run mysql_upgrade
And few more, none of them worked the only one that worked was:
debian:~# #mysql_upgrade -u root -h localhost -p --verbose --force
I have to say big thanks to Mats Lindth wonderful blog post which provided me with the solution.
It seems, since Oracle bought the Community edition of MySQL thinks with this database server are getting more and more messy and backwards incompatible day by day.
Lately, I'm experiencing too much hassles with MySQL version incompitabilities. Maybe I should think for migrating permanently to Postgre …
By the way the ERROR 1547 (HY000) at line 1: Column count of mysql.proc is wrong. is most probably caused of some kind of password hashing incompitability between the password hashing between the BSD and Debian SQL versions, as mysql -u root -p < dump.sql, does override default stored user passwords in the mysql database tables… Such password, hashing issues were common in prior MySQL 4 to MySQL 5 migrations I've done, however since MySQL 5+ is already storing its password strings encrypted with md5 encryption I wonder why on earth this mess happens ….
Tags: Auto, COLUMN, column count, command arguments, connection, cost, count, debian linux, debian server, Draft, event, event scheduler, fix, freebsd server, google, googling, graphical environment, half an hour, host, host localhost, init, installation, line 1, linux gnu, localhost, machine, mysq, mysql server, mysqlcheck, mysqld, nerves, password, port 3306, quot, root, server start, sftp, Socket, SQL, squeeze, system tables, TABLE, verbose
Posted in Everyday Life, MySQL, System Administration, Web and CMS | 2 Comments »
Friday, April 13th, 2012 1. Dump all installed server packages from Debian Linux server1
First it is necessery to dump a list of all installed packages on the server from which the intalled deb packages 'selection' will be replicated.
debian-server1:~# dpkg --get-selections \* > packages.txt
The format of the produced packages.txt file will have only two columns, in column1 there will be the package (name) installed and in column 2, the status of the package e.g.: install or deinstall
Note that you can only use the –get-selections as root superuser, trying to run it with non-privileged user I got:
hipo@server1:~$ dpkg --set-selections > packages.txt

dpkg: operation requires read/write access to dpkg status area
2. Copy packages.txt file containing the installed deb packages from server1 to server2
There is many way to copy the packages.txt package description file, one can use ftp, sftp, scp, rsync … lftp or even copy it via wget if placed in some Apache directory on server1.
A quick and convenient way to copy the file from Debian server1 to server2 is with scp as it can also be used easily for an automated script to do the packages.txt file copying (if for instance you have to implement package cloning on multiple Debian Linux servers).
 root@debian-server1:~# scp ./packages.txt hipo@server-hostname2:~/packages.txt

The authenticity of host '83.170.97.153 (83.170.97.153)' can't be established. RSA key fingerprint is 38:da:2a:79:ad:38:5b:64:9e:8b:b4:81:09:cd:94:d4. Are you sure you want to continue connecting (yes/no)? yes Warning: Permanently added '83.170.97.153' (RSA) to the list of known hosts. hipo@83.170.97.153's password:

packages.txt
As this is the first time I make connection to server2 from server1, I'm prompted to accept the host RSA unique fingerprint.
3. Install the copied selection from server1 on server2 with apt-get or dselect
debian-server2:/home/hipo# apt-get update

...

debian-server2:/home/hipo# apt-get upgrade

Reading package lists... Done

Building dependency tree

Reading state information... Done

debian-server2:/home/hipo# dpkg --set-selections < packages.txt

debian-server2:/home/hipo# apt-get -u dselect-upgrade --yes
The first apt-get update command assures the server will have the latest version of the packages currently installed, this will save you from running an outdated versions of the installed packages on debian-server2
Bear in mind that using apt-get sometimes, might create dependency issues. This is depending on the exact package names, being replicated in between the servers
Therefore it is better to use another approach with bash for loop to "replicate" installed packages between two servers, like so:
debian-server2:/home/hipo# for i in $(cat packages.txt |awk '{ print $1 }'); do aptitude install $i; done
If you want to automate the questioning about aptitude operations pass on the -y
debian-server2:/home/hipo# for i in $(cat packages.txt |awk '{ print $1 }'); do aptitude -y install $i; done
Be cautious if the -y is passed as sometimes some packages might be removed from the server to resolve dependency issues, if you need this packages you will have to again install them manually.
4. Mirroring package selection from server1 to server2 using one liner
A quick one liner, that does replicate a set of preselected packages from server1 to server2 is also possible with either a combination of apt, ssh, awk and dpkg or with ssh + dpkg + dselect :
a) One-liner code with apt-get unifying the installed packages between 2 or more servers
debian-server2:~# apt-get --yes install `ssh root@debian-server1 "dpkg -l | grep -E ^ii" | awk '{print $2}'`

...
If it is necessery to install on more than just debian-server2, copy paste the above code to all servers you want to have identical installed packages as with debian-server1 or use a shor for loop to run the commands for each and every host of multiple servers group.
In some cases it might be better to use dselect instead as in some situations using apt-get might not correctly solve the package dependencies, if encountering problems with dependencies better run:
debian-server2:/home/hipo# ssh root@debian-server1 'dpkg --get-selections' | dpkg --set-selections && dselect install
As you can see using this second dselect installed "package" mirroring is also way easier to read and understand than the prior "cryptic" method with apt-get, hence I personally think using dselect method is a better.
Well that's basically it. If you need to synchronize also configurations, either an rsync/scp shell script, should be used with all defined server1 config files or in case if a cloning of packages between identical server machines is necessery dd or some other tool like Norton Ghost could be used.
Hope this helps, someone.
Tags: apache, aptitude, authenticity, b4, clone, cloning, copying, deb packages, debian linux, deinstall, dependency, description, dpkg, dump, file, fingerprint, hosts, instance, lftp, Linux, linux servers, Mirroring, necessery, operation, package, package description, Permanently, privileged user, quot, root, rsync, scp, server packages, server1, server2, sftp, ssh, wget
Posted in Linux, System Administration | No Comments »
Monday, April 2nd, 2007 I need harmony. I’m overwhelmed with work and thoughts about existence, you know it’s a terrible thing to think about the human existence all the time. The time passes slowly. Today I went throught a lot of stress. It seems that I did a mistake when modifying the server firewall in Friday when we moved pozvanete and connections about the aids were not possible thanksfully Vladi said it will be fixed. Bobb reported that efficiencylaboratory system does not send emails when I take a look I saw the qmail queue was broken ( something I see for a first time ). qmail-qstat reported empty queue while qmail-qread reported empty. I found this about fixing messed queues http://pyropus.ca/software/queue-repair/. After running it over the queue and restarting the mail server few times it seemed to work at the end. I experience terrible problem when trying to run jailkit on one Debian Sarge machine, I’m trying to figure out what is the reason few days ago with no luck a terrible thing even stracing the jk_socket does not provide with anything that could lead to a solution when I’m logging into the machine with the jailed user the auth.log indicates that login is successful and sftp-server is spawned while the sftp client closes the connection. I’ll be looking at this later again I really ran out of ideas aboud a possible solution.I’m very tired I need rest. Too often I despair sometimes I want to cry, there is so much unrightfulness in the world. On Saturday night me and Nomen decided to do a pretty Ñ€eckless thing we catched the train for Botevo and spend the night in a forest around a fire. This time we was equiped at least we had a torch. We baked bread and potatoes on the fire and made a sort of sandwiches with a salt and cucumbers. At least this time we went to the other forest and there were trees all around so it wasn’t necessary to search for them in the darkness. All the forecast said it would rain. But Praise the Lord it didn’t. (We even prayed a little to God not to rain cause we had not the proper equipment ). Thanksfully again God heard our prayers. The only bad side of our great adventure was that after 1:00 o’clock in the morning the temperature started falling and it was extremely cold. I was able to sleep just for 40 minutes or so. In the morning after 6:00 the birds started to awaken and sing, so beautiful voices all around, even flickers :]. In went to the Botevo’s railway station and in 8:40 take the train back to Dobrich. I went home and took a shower then went to bed. I was woken by a telephone call and it was the missionary which call me two days ago wanted to see me and speak about the faith, he call me to remind me of our meeting ( from the way he speaks I undestood he is a Mormon ). So I decided to rewrite the Orthodox Creed of Faith and show him and explain them what I believe. When we met they were very kind to me and after some time they supposed to go to their church to explain us about their faith. I went their and they started talking strange things they wanted to pray together ( I rejected ofcourse ). How can we pray a prayer I have no idea about.After a lot of discussion about the Gospel and the truth Church they got angry and chased me out of their sect/”church” ;]They tried to lie they tried to claim they’re orthodox Christians in the first cause I told them I’m orthodox. One of the Moroms tried to convince me he knows more about orthodox Christianity more than me. Other of the two cited me a some Writting in the Book of Jeremiah trying to convince me I have existed before my birth, I told him this is occult (this was my opinion ofcourse God knows best).END—–
Tags: Bobb, bread, ca software, cause, client, connection, cucumbers, despair, efficiencylaboratory, empty queue, existence, fire this time, harmony, human existence, jailkit, login, mail server, possible solution, potatoes, pozvanete, pray, queue, queues, quot, reason, sandwiches, saturday night, server firewall, sftp, sftp client, sftp server, Socket, software queue, something, terrible thing, time, torch, train, work
Posted in Everyday Life | No Comments »
Monday, November 21st, 2011 
Many of us have already taken advantage of the powerful Rsync proggie, however I'm quite sure there are still people who never used rsync to transfer files between servers.. That's why I came with this small post to possibly introduce rsync to my blog readers.
Why Rsync and not Scp or SFTP? Well Rsync is designed from the start for large files transfer and optimized to do the file copying job really efficient. Some tests with scp against rsync will clearly show rsync's superiority.
Rsync is also handy to contiue copying of half copied files or backups and thus in many cases saves bandwidth and machine hdd i/o operations.
The most simple way to use rsync is:
server:~# rsync -avz -e ssh remoteuser@remotehost:/remote/directory /local/directory/
Where remoteuser@remotehost — is the the username and hostname of remote server to copy files to.
/remote/directory — is the directory where the rsync copied files should be stored
/local/directory — is the local directory from which files will be copied to remote directory
If not a preliminary passwordless ssh key (RSA / DSA) authentication is configured on remote server, the above command will prompt for a password otherwise the rsync will start doing the transfer.
If one needs to have a RSA or DSA (public / private key) passwordless SSH key authentication , a RSA key first should be generated and copied over to the remote server, like so:
server:~# ssh-keygen -t dsa

...

server:~# ssh-copy-id -i ~/.ssh/id_dsa.pub root@remotehost

...
That's all folks, enjoy rsyncing 😉
Tags: authentication, backups, bandwidth, blog, bsd unix, command, copying, directoryIf, DSA, file, half, hostname, job, Linux, local directory, password, passwordless ssh, private key, proggie, remote server, remotehost, remoteuser, root, rsa key, rsync, scp, sftp, ssh, ssh copy, superiority, transfer, unix, unix servers, username, way
Posted in Everyday Life, Linux, System Administration, Various, Web and CMS | No Comments »


