Posts Tagged ‘share’

Free Software in Balkans 2010 (A free software conference on the Balkanies is approaching)

Tuesday, August 24th, 2010

Richard Stallman on a Free Software Conference

Today when I was reviewing my daily visited websites I come across an interesting news.
This kind of meeting is quite a news because it is the first in line where Free software users and developmers fromall around the balkanies will meet to discuss,test,share and continue the free software code and ideals.
The first Free Software conference in the Balkanies is about to be hosted in Vlora University Albania .

The conference Free Software in Balkans (FreeSB2010) is an annual meeting of the free software users, developpers and supporters in the Balkan countries. It will travel from country to country, year to year to different locations. The Conference will gather professionals, academics and enthusiasts who share the vision that software should be free and open for the community to develop and customize to its needs, and that knowledge is a communal property and free and open to everyone.

This kind of event will build up the social network between free software fans and developers and will further help in the general spread of free software on the balkanies.
This kind of meeting are already for a long time a tradition in many states in America, so having it in the balkanies is quite a development.

You can read a bit more about the exact focus of Free Software in Balkans 2010 conference here

Pitily right now there is no published scheduled list of presentations which are about to be given in the conference, but I guess the conference schedule would be out in a few days time.
I’m not yet sure if I’ll have the time and opportunity to attend the conference, however I do hope that somebody of my balkan readers will got interested into the “fabulous” Free Software event and will support the event’s initiative by visiting it 🙂

Quick way to access remotely your GNU / Linux Desktop – Access Linux Desktop from Mac and Windows 7

Tuesday, August 5th, 2014

how-to-access-linux-host-from-microsoft-windows-or-mac-client-xrdp-tightvnc-native-way-logo
For M$ Windows users its always handy to have remote access to your home PC or notebook via Remote Desktop (RDP) protocol.

However in GNU / Linux, there is no native implementation of RDP protocol. So if you're using Linux as your Desktop like me you will probably want to be able to access the Linux system remotely not only via terminal with SSH using (Putty) or MobaXTerm all in one tabbed Windows terminal program but also be able to use your Linux GNOME / KDE Graphical environment from anywhere on the Internet.

This will make you ponder – Is it possible to access Linux Desktop via proprietary RDP protocol and if not how you can achieve remote GUI access to Linux?

1. Using Linux Xorg and Xming Xserver for Windows

Most people should already know of Linux ability to start multiple Xserver sessions remotely which is the native way to access between two Linux hosts or access remotely Linux from other Linux UNIX like OS. It is also possible to use xinit / startx / xhost commands to establish remotely connection to new or running Linux (Xorg) Xserver by using them in combination with XMing – XServer for Windows running on the Windows host and Debian package (x11-xserver-utils) – providing xhost cmd, however this method is a bit complicated and not so convenient.

I used to be using this method XMing (whose mirror is here), earlier in my university years to use remotely my Debian Linux from  Windows 98 and this works perfectly fine.

2. Using RDP emulation with XRDP server

in order to be able to access your desk from any friend or computer club in the world using standard available in MS Windows Remote Desktop client (mstsc.exe).
There is also another alternative way by using Windows Desktop sharing RDP experimental server xrdp:
 

apt-cache show xrdp |grep -i descr -A 3
Description: Remote Desktop Protocol (RDP) server
 Based on research work by the rdesktop project, xrdp uses the Remote
 Desktop Protocol to present a graphical login to a remote client.
 xrdp can connect to a VNC server or another RDP server.

To make your Linux host accessible via RDP:

On Debian / Ubuntu etc. deb based Linux:


apt-get update
apt-get install xrdp

 
$ /etc/init.d/xrdp status
Checking status of Remote Desktop Protocol server xrdp                                             [ OK ]
Checking status of RDP Session Manager sesman

/etc/init.d/xrdp start

On  Fedora Linux:
 

yum -y install xrdp
systemctl enable xrdp.service
systemctl start xrdp.service
systemctl enable xrdp-sesman.service
systemctl start xrdp-sesman.service


It is possible to access remote Linux host using xrdp RDP server, but this will only work in older releases of mstsc.exe (Windows XP / Vista / 2003) and will not work on Windows 7 / 8, because in MS Windows 7 and onwards RDP proto version has changed and the client no longer has compatability with older mstsc releases. There is a work around for this for anyone who stubbornly want to use RDP protocol to access Linux host. If you want to connect to xrdp from Windows 7 you have to copy the old RDP client (mstsc.exe and mstscax.dll) from a WinXP install to the Windows 7 box and run it independently, from the default installed ones, anyways this method is time consuming and not really worthy …

3. Using the VNC withTightVNC server / client


Taking above in consideration, for me personally best way to access Linux host from Windows and Mac is to use simply the good old VNC protocol with TightVNC.

TightVNC is cross-platform free and open source remote Desktop client it uses RFB protocol to control another computer screen remotely.

To use tightvnc to access remote Debian / Ubuntu – deb based Linux screen, tightvncserver package has to be installed:

apt-cache show tightvncserver|grep -i desc -A 7
Description-en: virtual network computing server software
 VNC stands for Virtual Network Computing. It is, in essence, a remote
 display system which allows you to view a computing `desktop' environment
 not only on the machine where it is running, but from anywhere on the
 Internet and from a wide variety of machine architectures.

 .
 This package provides a server to which X clients can connect and the
 server generates a display that can be viewed with a vncviewer.


apt-get –yes install tightvncserver


TightVNCserver package is also available in default repositories of Fedora / CentOS / RHEL and most other RPM based distros, to install there:
 

yum -y install tightvnc-server


Once it is installed to make tightvncserver running you have to start it (preferrably with non-root user), usually this is the user with which you're using the system:

tightvncserver

You will require a password to access your desktops.

Password:
Verify:   
Would you like to enter a view-only password (y/n)? n

New 'X' desktop is rublev:4

Creating default startup script /home/hipo/.vnc/xstartup
Starting applications specified in /home/hipo/.vnc/xstartup
Log file is /home/hipo/.vnc/rublev:4.log
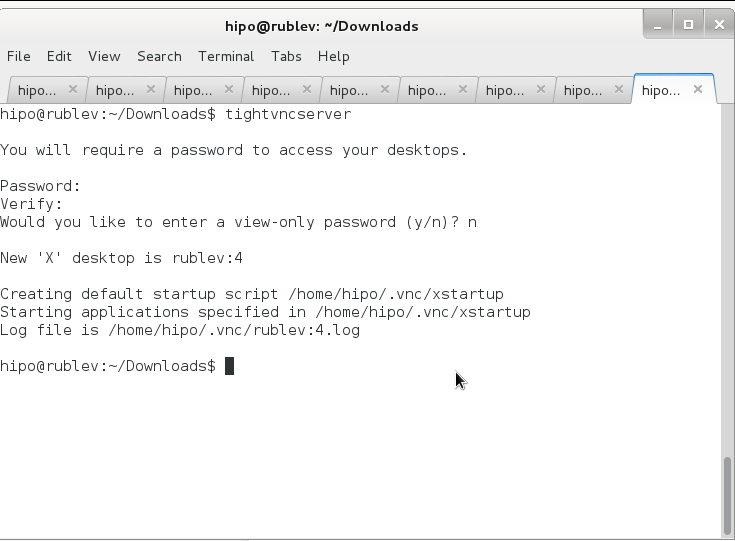
 

tightvncserver-running-in-gnome-terminal-debian-gnu-linux-wheezy-screenshot

To access now TightVncserver on the Linux host Download and Install TightVNC Viewer client

note that you need to download TightVNC Java Viewer JAR in ZIP archive – don't install 32 / 64 bit installer for Windows, as this will install and setup TightVNCServer on your Windows – and you probably don't want that (and – yes you will need to have Oracle Java VM installed) …
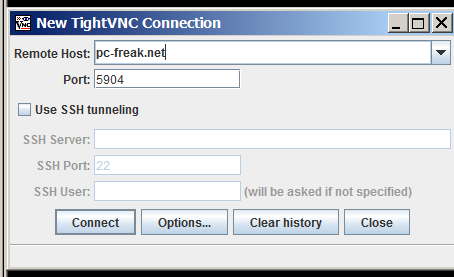
 

tightvnc-viewer-java-client-running-on-microsoft-windows-7-screenshot

Once unzipped run tightvnc-jviewer.jar and type in the IP address of remote Linux host and screen, where TightVNC is listening, as you can see in prior screenshot my screen is :4, because I run tightvnc to listen for connections in multiple X sessions. once you're connected you will be prompted for password, asker earlier when you run  tightvncserver cmd on Linux host.

If you happen to be on a Windows PC without Java installed or Java use is prohibited you can use TightVNC Viewer Portable Binary (mirrored here)
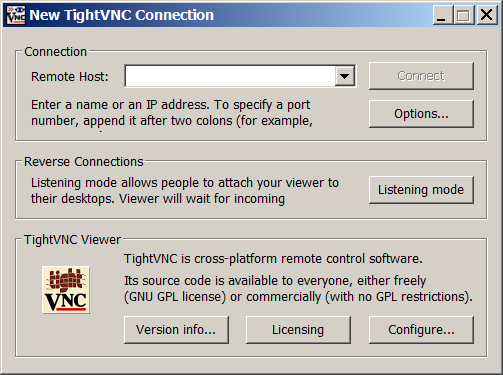
/images/tightvnc-viewer-portable-windows-7-desktop-screenshot

If you have troubles with connection, on Linux host check the exact port on which TightVncServer is running:
 

ps ax |grep -i Tightvnc

 8630 pts/8    S      0:02 Xtightvnc :4 -desktop X -auth /var/run/gdm3/auth-for-hipo-7dpscj/database -geometry 1024×768 -depth 24 -rfbwait 120000 -rfbauth /home/hipo/.vnc/passwd -rfbport 5904 -fp /usr/share/fonts/X11/misc/,/usr/share/fonts/X11/Type1/,/usr/share/fonts/X11/75dpi/,/usr/share/fonts/X11/100dpi/ -co /etc/X11/rgb

Then to check, whether the machine you're trying to connect from doesn't have firewall rules preventing the connection use (telnet) – if installed on the Windows host:
 

telnet www.pc-ferak.net 5904
Trying 192.168.56.101…
Connected to 192.168.56.101.
Escape character is '^]'.
RFB 003.008

telnet> quit
Connection closed.
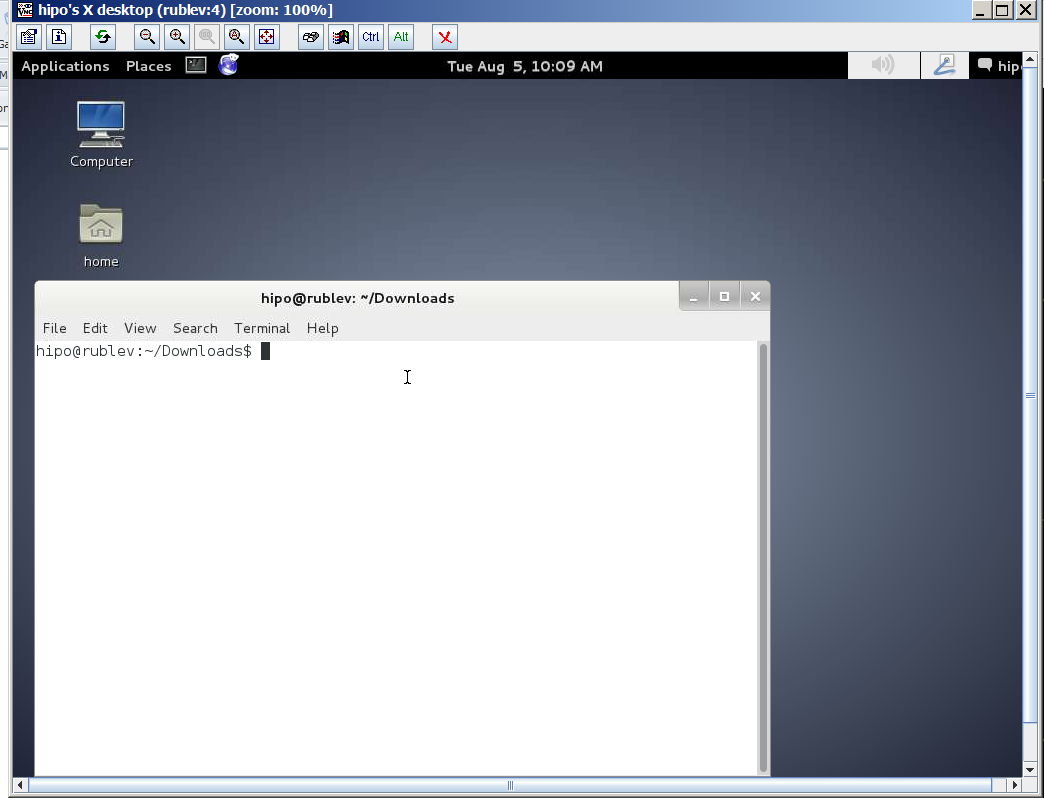
remote-connection-via-tightvnc-to-linux-host-from-windows-7-using-tightvnc-java-client-screenshot
 

Linux: Virtualbox shared folder – how to share files from host to guest OS in Virtualbox

Monday, June 9th, 2014

add-shared-folder-in-virtualbox-linux-virtual-machine-on-top-of-windows-howto

If you just installed Debian / Ubuntu / CentOS Linux on top of Windows inside Virtualbox Virtual Machine and you're wondering how to Share files between Windows Host Operating System and Guest Operating System (Linux), here is how:

1. First make sure Virtualbox guest additions are installed

Besides installing Virtualbox guest additions which will enable you to resize VBox Window / enable copy paste between guest and host OS it is useful to have also Virtualbox extension packs which allows your Virtual Machine to be accessed remote via Remote Desktop Protocol (RDP) – the so called VRDP

2. From Virtualbox VM select folder on Windows hsot which will be shared

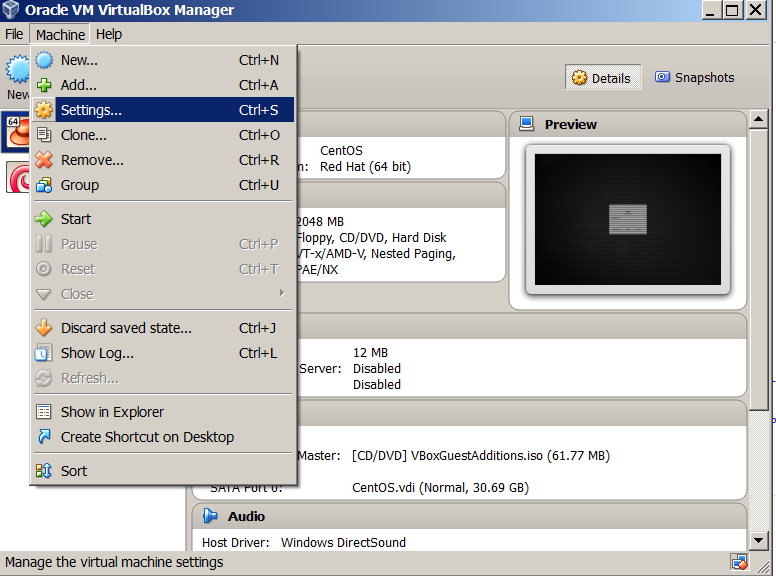
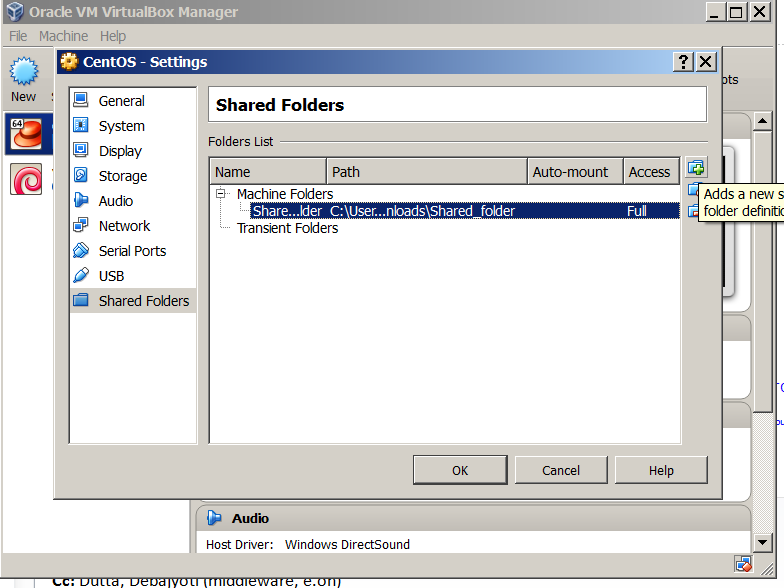
Selection of which Win folder to mount in Vbox is done via Virtualbox menus:
 

Machine -> Settings -> Shared Folder

virtualbox-windows-linux-guest-OS-how-to-shared_folder-screenshot2

virtualbox-windows-linux-guest-OS-how-to-shared_folder-screenshot

3. Launch Linux Virtual Machine and use mount command to mount shared folder

I like the practice of creating a new folder inside c:UsersgeorgiDownloadsShared_folder

Then fire up gnome-terminal / xterm whatever terminal you like and to mount shared folder inside emulated Linux issue:

mount -t vboxsf -o rw Shared_folder /mnt/Shared_folder/


This will mount Shared_folder in rw (read / write) mode, if you prefer to only mount Virtualbox Shared_folder for reading:

mount -t vboxsf -o ro Shared_folder /mnt/Shared_folder/

4. Configure Virtualbox Shared Folder to auto mount in Linux via fstab

As we all know automating mounts in Linux is done by adding line in /etc/fstab to automate Vbox Shared_Folder mount add new line to fstab like:
 

Shared_folder         /mnt/Shared_folder         vboxsf  defaults,rw    0 0

This will auto-mount in vbox shared folder read / write mode, to auto-mount it in read only mode:

Shared_folder         /mnt/Shared_folder         vboxsf  defaults,ro    0 0

  If you added it to /etc/fstab (and you didn't mount Shared Folder manually before), run

mount -a

to make Linux system re-read auto-mounts defined in fstab
 

The new mounted folder will appear in whenever said to be mounted. Enjoy 🙂


Create video from linux console / terminal – Record ssh terminal session as video with asciinema, showterm, termrecord

Thursday, August 21st, 2014

/var/www/images/asciinema-create-and-upload-ascii-terminal-console-videos-debian-gnu-linux-screenshot
You probably already know of existence of two Linux commands available by default across all Linux distributions scriptwhich makes a text based save of all commands executed on console and scriptreplay – which playbacks saved script command typescripts. Using this two you can save terminal sessions without problem, but in order to play them you need to have a Linux / UNIX computer at hand.
However If you want to make a short video record displaying what you have done on Linux console / terminal, you have few other options with which you can share your Linux terminal sessions on the web. In this short article I will go through 3 popular tools to do that – asciinema, showterm and termrecord.

1. Asciinema Current most popular tool to create video from Linux terminal

Here is how ASCIINEMA's website describes it:

"Asciinema is a free and open source solution for recording the terminal sessions and sharing them on the web."

apt-get –yes install python-pip

To install it with pip python package installer

pip install asciinema

Or if the machine is in DMZ secured zone and have access to the internet over a Proxy:

pip install –proxy=http://internet-proxy-host.com:8080 asciinema

It will get installed in /usr/local/bin/asciinema to make a terminal screen video capture just launch it (nomatter if it is privileged or non-privileged user):

asciinema

To finalize and upload the recorded terminal session, just type exit (to exit the shell), hopefully it will get you an upload link.

exit

You can claim authorship on video you issue:

asciinema auth

Use can then embed the new Linux terminal session video to your website.
 

2. ShowTerm – "It's showtime in a terminal near you!"

ShowTerm have same features as AsciiNema. Just like AsciiNema, what it does is it creates a record of your terminal session and then uploads it to showterm.io website, providing you a link over which you can share your terminal lesson / ascii art video / whatever with your friends. ShowTerm is written in, the world famous Ruby on Railsruby web development framework, so you will need to have ruby programming language installed before use. As showterm uses the Internet to upload video, so it is not really an option to create videos from remote terminal session on servers which are in DMZ with no access to the internet, I will explain in a little while how to create video of your terminal / console for private purpose on local server and then share it online on your own site.

a) To install ShowTerm:

– First be sure to have ruby installed:

On Debian / Ubuntu and derives deb Linux, as supersuser:

apt-get install –yes ruby curl

On CentOS / RHEL / Fedora Linux

yum -y install ruby curl

NB! curl is real requirement but as showterm.io website recommends downloading the script with it and later same curl tool is used to upload the created showterm file to http://showterm.io .

– Then to finalize install, download showterm script and make it executable

curl showterm.io/showterm > ~/bin/showterm

% Total    % Received % Xferd  Average Speed   Time    Time     Time  Current
                                       Dload  Upload   Total   Spent    Left  Speed
100  2007  100  2007    0     0   2908      0 –:–:– –:–:– –:–:–  8468

mkdir ~/bin
chmod +x ~/bin/showterm

This will save the script into your home folder ~/bin/showterm

b) Using showterm

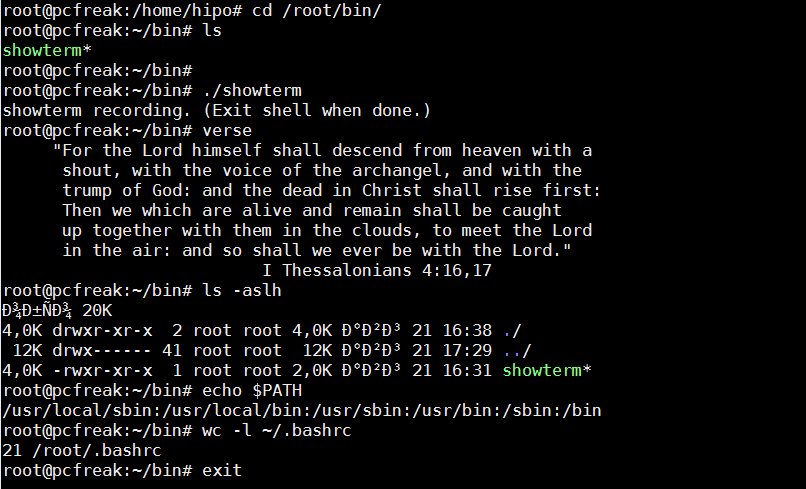
To run it to create video from your terminal simply start it and do whatver you will in terminal.

~/bin/showterm

After you're done with the video you like type exit

exit

create-video-from-your-linux-console-terminal-with-showterm-screenshot

Note that if your server is behind a proxy curl will not understand proxy set inside Linux shell variable with http_proxy var, to upload the file if you're behind a proxy you will have to pass to curl –proxy setting, once you get the curl line invoked after failure to upload use something like:

curl –proxy $(echo $http_proxy)  https://showterm.herokuapp.com/scripts –data-urlencode cols=80 –data-urlencode lines=24 –data-urlencode scriptfile@/tmp/yCudk.script –data-urlencode timingfile@/tmp/lkiXP.timing

Where assuming proxy is defined already inside http_proxy shell variable.


3. Creating video from your terminal / console on Linux for local (private) use with TermRecord

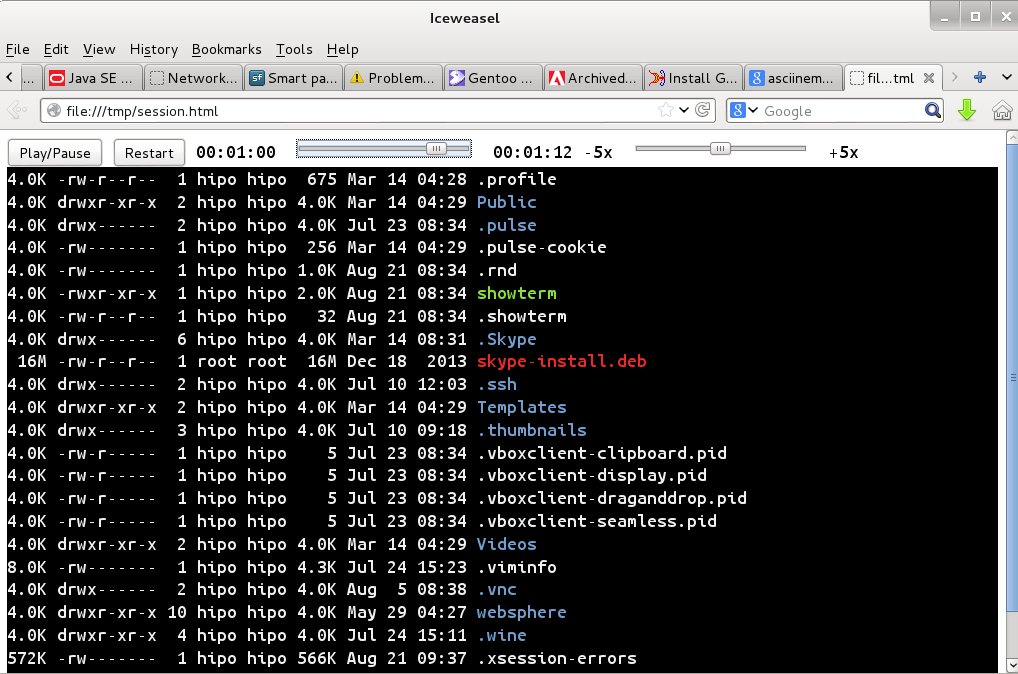
In my humble view TermRecord is the most awesome of all the 3, as it allows you to make records with an own generated Javascript based video player and allows you to keep the videos on your own side, guaranteeing you independence of external services. Its
 

pip install TermRecord

TermRecord -o /tmp/session.html


You can further access the video in a local browser in Firefox / Chrome / Epiphany type in URL address bar:

/tmp/session.html to play the video

create-video-from-terminal-console-on-gnu-linux-howto-screenshot-with-termrecord

TermRecord uses term.js javascript to create the video web player and play the video which is directly encoded inside session.html.
If you want to share the video online, place it on your webserver and you're done 🙂
Check out my TermRecord generated video terminal sample session here.
 

How to share your Windows local drives via Remote Desktop (RDP) – Safe file copy with RDP protocol

Tuesday, October 14th, 2014

remote-desktop-connection-options-button-screenshot

Just had a task to install Tomcat 7, Java JRE 1.7 and .NET Framework 3.5 and MS Visual C++ x86 on a Windows 2008 RC2 system situated behind a firewalled network NAT. To do the installation I had to use a special jump host (which was also a MS Windows system). The end system where installation had to occur did not have access to the Internet was in special DMZ-ed network so to install above 3 software packages I had to transfer them from my notebook to install host.
To depic what had to happen, I had to:

Transfer files from (host A – my notebook) -> via host (B – jump host) to host (C – the end install host).

Default Windows RDP Client command (mstsc.exe) supports transferring files between host A and RDP-ed host B via standard file copy / paste, so I tried transferring files between my work Windows PC to (jump host B), by copy pasting the files, but as the DotNetFx35Client.exe file was 261 Megabytes and the network between host A and B has some shapings and network firewalls the file transfer timed out. Copy / Paste method via RDP Protocol by default, doesn’t support Transfer Resume thus in order to transfer the 261 MB file, I tried Sharing C:Temp Folder and transfer that way, but unfortunately I didn’t have the permissions in that Windows Domain to create sharings (even though on the remote system I was already logged in with admin accounts). I’ve consulted a colleague on advise on how to transfer the files and I was told about a Win RDP client option to share drives.

Here is how to share your PC drive letters C: D: E: etc. via Remote Desktop Protocol


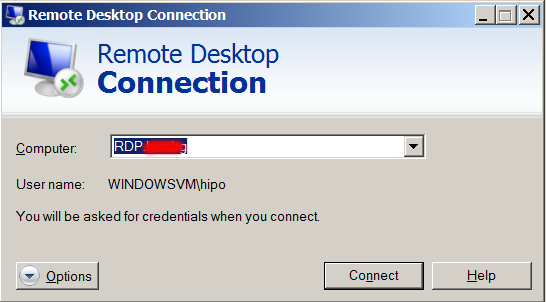
1. Run mstsc.exe

2. Click the Options button

remote-desktop-connection-options-button-screenshot

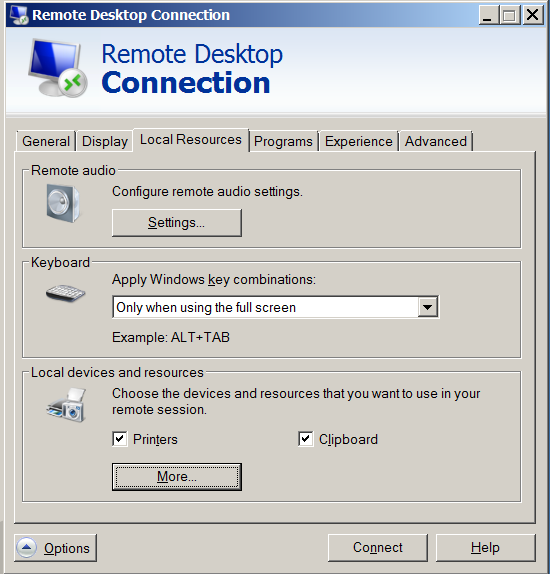
3. Click Local Resources tab

4. Click More button

remote-desktop-connection-more-options-button-screenshot

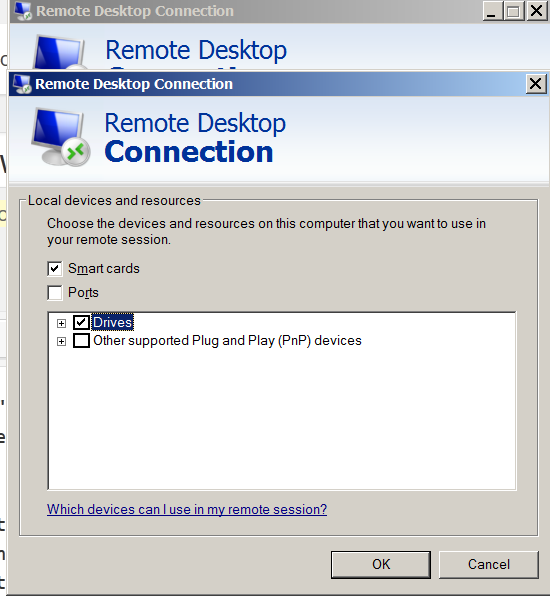
5. Click on Drives

remote-desktop-connection-share-windows-disk-drives-option-screenshot

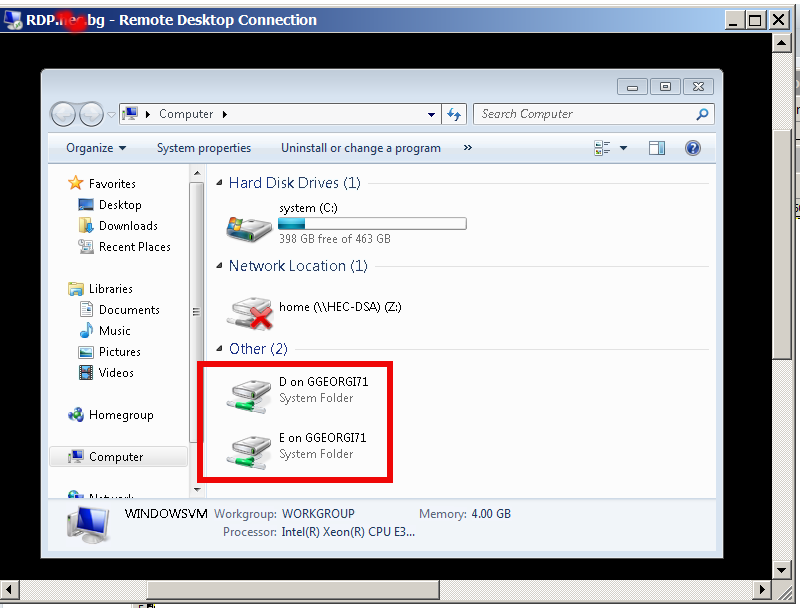
Then after connecting to the Remote RDP host, all your local PC drive partitions C: D: E: will be visible as (attached) ones in mounted in My Computer / MS Explorer with assigned new drive letters

Once, I transferred the .NET Framework 3.5 while using the installer I was notified that .NET Framework 3.5 is by default included in Windows 8 and I need only to enable it.

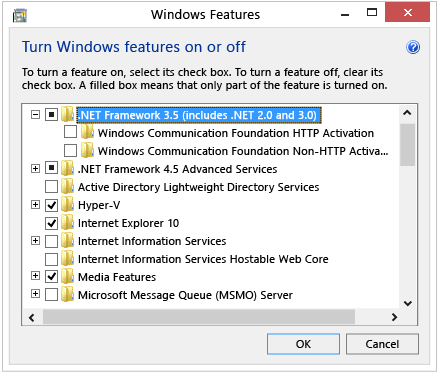
To enable .NET Framework 3.5 in Windows 8 from Control Panel

Choose Programs, and then choose Turn Windows features on or off.

Select the .NET Framework 3.5 (includes .NET 2.0 and 3.0) check box.
enable-dot-net-framework-windows-8-windows-8.1-add-feature-screenshot

Tracking graphically MySQL, Apache and Network performance in web with Munin on Debian Linux

Saturday, March 19th, 2011

munin_monitor_cpu_network_hard_drive_apache_mysql_performance-in-web-on-linux_logo

Munin is great software for surveillance software for your MySQL, Apache, Qmail, Postfix and many other of the classical daemon services which most of the Linux, BSD servers online are running on.

1. Munin on Debian Linux is really easy to be installed and comes to executing:

debian:~# apt-get install munin munin-node munin-plugins-extra

2. Link /var/www/munin/ to some VirtualHost or ServerHost
For instance if your munin is to be placed on the domain www.pc-freak.net.net which has the DocumentRoot of /var/www

debian:~# cd /var/www
debian:/var/www# ln -sf /var/www/munin munin

3. Add some extra MySQL related plugins

To check whole list of pmunin plugins you can enable check in /etc/munin/plugins directory

Lets say our Munin will be providing statistics mainly for MySQL, enable this bunch of plugins:

cd /etc/munin/plugins
ln -s /usr/share/munin/plugins/mysql_ mysql_
ln -s /usr/share/munin/plugins/mysql_bytes mysql_bytes
ln -s /usr/share/munin/plugins/mysql_innodb mysql_innodb
ln -s /usr/share/munin/plugins/mysql_isam_space_ mysql_isam_space_
ln -s /usr/share/munin/plugins/mysql_queries mysql_queries
ln -s /usr/share/munin/plugins/mysql_slowqueries mysql_slowqueries
ln -s /usr/share/munin/plugins/mysql_threads mysql_threads


Though above command would enable mysql monitoring it will be not working out of the box. You will find in munin logs error like:

Missing dependency Cache::Cache at /usr/share/munin/plugins/mysql_ line 716."

To fix this install libcache-perl and libcache-cache-perl

apt-get install --yes libcache-perl libcache-cache-perl
 

Then regenerate munin plugin configuration issue cmd:

munin-node-configure --suggest --shell | sh

and restart Munin-node server

service munin-node restart
 

Munin Node should be able login to the MySQL server using the Debian System Maintenance user however if you should need to create a custom user you can add the following configuration to:
 

/etc/munin/plugin-conf.d/munin-node


[mysql*]
    user root
    env.mysqluser muninmonitor
    env.mysqlpassword Your-Secret-Password

4. Edit Munin config

Make sure you have at least the following variables enabled in /etc/munin/munin.conf
 

 dbdir  /var/lib/munin
 htmldir /var/cache/munin/www
 logdir /var/log/munin
 rundir  /var/run/munin

 tmpldir    /etc/munin/templates

includedir /etc/munin/munin-conf.d

[localhost.localdomain]
    address 127.0.0.1
    use_node_name yes


5. Add Munin Alias or Virtualhost

To make Munin Accessible from Webserver you need to at least add an alias create a file
/etc/apache2/conf.d/munin with following content:

vim /etc/apache2/conf.d/munin

Alias /munin /var/cache/munin/www

<Directory /var/cache/munin/www>
        Order allow,deny
        #Allow from localhost 127.0.0.0/8 ::1
        Allow from all
        Options None
        php_value engine off

    <IfModule mod_expires.c>
        ExpiresActive On
        ExpiresDefault M310
    </IfModule>

</Directory>


If you want to access Munin from Apache subdomain create it lets say you want to access it via stats.www.pc-freak.net, use following config file:

vi /etc/apache2/sites-enabled/stats.www.pc-freak.net
 

<VirtualHost *>
   ServerAdmin hipo@www.pc-freak.net
   ServerName stats.www.pc-freak.net
   DocumentRoot /var/cache/munin/www
   <Directory />
       Options FollowSymLinks
       #AllowOverride All
       php_value engine off
   </Directory>
   LogLevel debug
   CustomLog /var/log/apache2/munin/access.log combined
   ErrorLog /var/log/apache2/munin/error.log
   ServerSignature On
<Directory /var/cache/munin/www>
        Order allow,deny
        #Allow from localhost 127.0.0.0/8 ::1
        Allow from all
        Options FollowSymlinks
        #AllowOverride All
        php_value engine off

</Directory>

</VirtualHost>


6. Restart Apache;

debian:~# /etc/init.d/apache2 restart

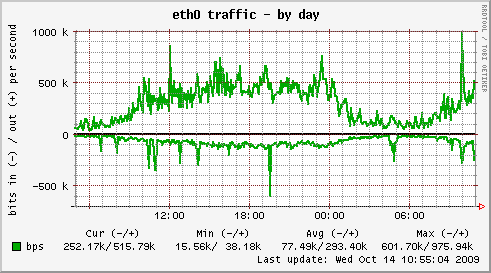
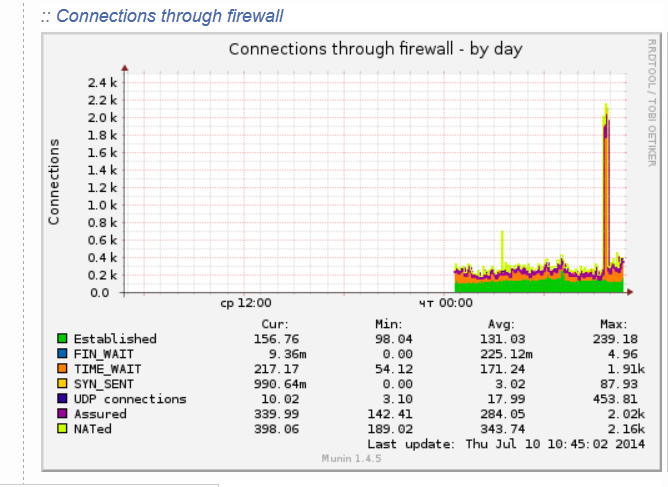
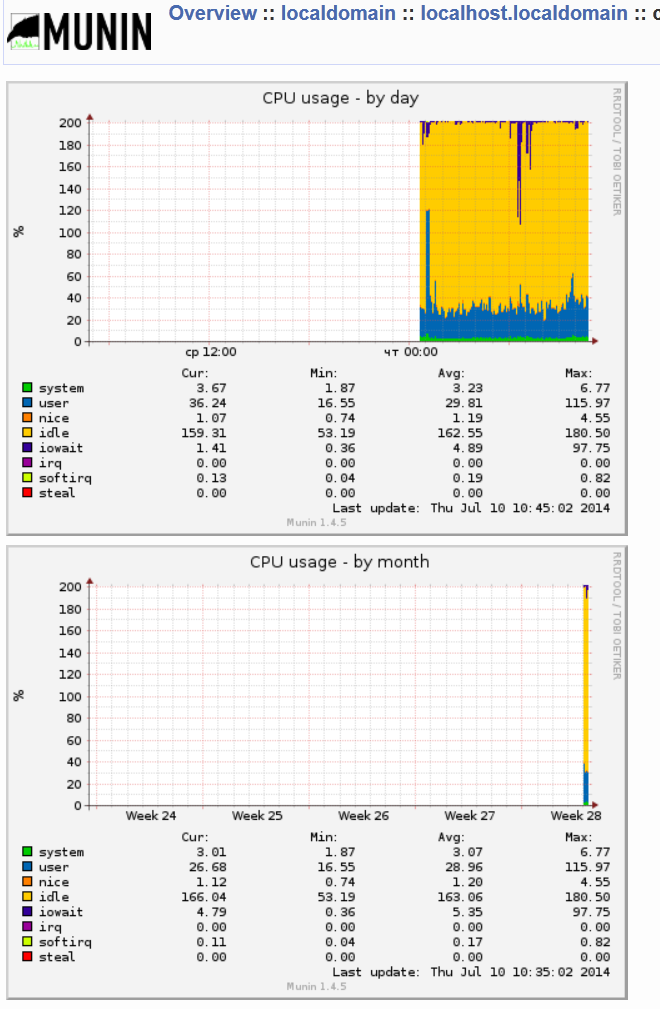
Now to access the newly installed munin point your favorite browser to (either the subdirectory configured for access or the Virtualhost subdomain):

https://www.pc-freak.net/munin/
or
http://munin.www.pc-freak.net

eth0-network-traffic-munin-server-statistics

connections_through_firewall-statistics-munin-debian-linux
7. Protecting Munin with a password

As it could be a security leak to expose statistics regarding your server (Disk I/O, Memory, Load Avarage, Apache, MySQL Postfix) operations it is good security practice to protect munin with a password.

I've earlied blogged on how to protect your server munin web-statistics wtih an htaccess password (read it here)


munin-cup-statistics-by-day-and-by-month-screenshot

Happy Monitoring

How to Share virtual terminal SSH between mutliple logged in users with screen / Create multi user sessions with GNU screen

Friday, November 2nd, 2012

How to share bash shell between multiple users with gnu screen - share virtual terminal via ssh through multiple users screen

GNU Screen is great utility with a number of helpful features. Maybe there is no UNIX / (GNU / Linux),  admin which doesn't use screen or some similar terminal emulator prog. daily basis.

Little might know however abut a kewl functionality allowing, a few logged in users via ssh to share one terminal.

Sharing a virtual terminal with another person, is very helpful if you want to teach someone a bit of Linux / UNIX basics, showing him how certain commands works on a system etc. etc.

Shared terminal session is very helpful in case of need for remote system administration or support, whether instead of explaining someone over the phone for 20 minutes or an hour a bunch of commands he has to run to achieve something,  you can login share terminal with screen and do whatever necessary  in front of his eyes.

Shared screen session, can actually in theory allow unlimited people to watch what a certain one is doing in a his virtual terminal. This is very helpful for example in Computer Laboratories for Teachers to teach students FreeBSD, Linux, bash, csh shell scripting, perl or whatever programming language taught.

Allowing two or more logged in users with same user credentialsto use screen can be done pretty easy, one primary user (creating the initial screen terminal session), should just launch GNU screen:

test@noah:~$ screen

The second, third, 4th, 5th and the rest of users should login via SSH session with same user, lets say test and launch screen -x

test@noah:~$ screen -list
There is a screen on:
    20147.pts-5.noah    ( 1.11.2012 18,27,50)    (Attached)
1 Socket in /var/run/screen/S-hipo.


test@noah:~$ screen -x

I'm not sure if screen has some kind of limitation on how many users maximum can connect to a screen session, but I guess it should be high enough for dozen of people –  at least 512 or 1024 people to connect and share one shell simultaneously.

In some Linux distributions (versions) RHEL, CentOS it is possible screen -x not to work out of the box, because screen binary is not set to be SUID.
On latest Debian versions and deb derivatives thanksfully, screen bin is by default installed as SUID so screen -x works fine.

hipo@noah:~$ ls -al /usr/bin/screen
-rwxr-sr-x 1 root utmp 364088 29 юли  2009 /usr/bin/screen

Enabling mutiuser screen login via a running screen session is possible by pressing:

CTRL + a + : and typing in prompt  multiuser on

In case you want to have a system user which by default allows a multiple logged in users to share shell you can use a little 'hack' just change in /etc/passwd the field recordfor user shell (/bin/bash) with (/usr/bin/screen)

Lets say you want to allow the user test support multiple logged in users share one shell the record for test in /etc/passwd should look smth. like:

test:x:1003:1004:,,,:/home/test:/bin/bash

Change it with your favourite text editor to:

test:x:1003:1004:,,,:/home/test:/usr/bin/screen

If you have some problems running screen, check permissions and eventually exec as superuser:

chmod u+s /usr/bin/screen


How to mount Windows share from command line (cmd.exe) on Microsoft Windows XP / Vista / 7

Wednesday, October 24th, 2012

MS Windows net command mount map attach command how to windows xp 7 and vista, mount share name with net cmd
I’m rarely using computer from a Windows host, but sometimes I need to as well. I’m not a big fan of M$ Windows, Microsoft and their products. Though to be truthful lately their OS has improved significantly. BTW from purely “it works” perspective Windows 7 is quite succesfully made OS. Windows 7 is hard to infect with Viruses, looks to me it works much more stable compared to XP and so on. Well anyways back to my topic. I write this post just to shortly show how one can mount a share in Windows Command Line (cmd.exe)

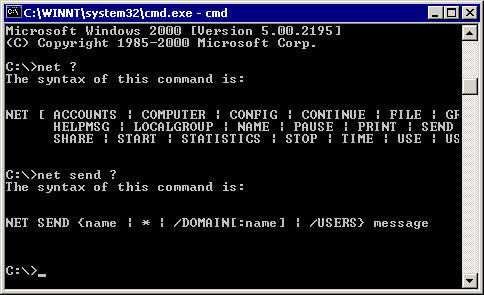
In all Windows NT based Windows OSes (except maybe some Home releases), the way to attach / mount a Windows Network Share (Samba share / SMB share – as we Linux users call it) is done with command:

  • net

The net command has many options, but most important ones in most cases are:

net view – Using to list a share content
and
net


C:\> net view \\NetworkShare.Domain-name.com\ /All
Shared resources at \\NetworkShare.Domain-name.com\
Share name Type Used as Comment
---------------------------------------------------
ADMIN$ Disk Remote Admin
C$ Disk Default share
IPC$ IPC Remote IPC
NETLOGON Disk Logon server share
SYSVOL Disk Logon server share
The command completed successfully.

As you see in above output, net view \\IP_ADDRESS\ /All or net view \\Whateveer-Host-Name.com\ lists every Shared folder on a host.
Once you have the list choose of possible mount points, you can easily map / mount share by opening Windows command line, cmd.exe (Quickest way I know of is press simultaneously Windows button + R (key) and typing in command prompt:


C:\> net use h: \\NetworkShare.Domain-name.com\Share-Name\
Shared resources at \\NetworkShare.Domain-name.com\

BTW sometimes administrators forget to set password to Administrator account, it is generally good rule of thumb if you’re in position to check your Windows Sharing server security by trying intruding with adminsitrator user:


C:\> net user administrator admin
....

Hopefully if you set a password for your Administrator you will get:


C:\> net user adminsitrator admin
System error 5 has occcured.
Access is denied.

If you need to login to a ShareName from command line on Winblows with certain username use:


net use d:\ \\server-share-name\share /USER:UserName

Just change Username with whatever username you need …

If the “Domain name” is created so it contains few words without a space you will need to Connect the Windows Share putting windomain name in “” :


C:\> net use k: "\\share name with spaces name"\Users

.....

Removing mapped Share is done with:


C:\> net use f: \\share-name\public /delete
....

Another useful net variation is to once for all map a Share, just like you have option from Windows Control Panel -> Network and Sharing Center


c:\> net use k: "\\whatever share name"\Users
C:\> net use /persistent:yes

Then whilst restart-ing Windows PC on next boot K:\ Drive will be mapped to “whatever share name”\Users

net command is among the swiss army knife tools of Windows crackers, hence I think any person interested in Windows Security or supposed to write .VBS logon scripts for Windows DomainController should check it (if not already) 🙂

net supports also to send a password directly from command line (very bad idea from security perspective):


C:> net use * \\remotepc\share /u:domainname\username password

The meaning of * character above is to map the network drive in the last free one drive letter on the system. Lets say that last Drive Letter mounted on the Win host is W:/, then net use * will automatically assign the new drive a letter corresponding to consequential letter Z:\

Here is complete syntax as pointed from Microsoft resources net cmd documentation:

Syntax
net use [{DeviceName | *}] [\\ComputerName\ShareName[\volume]] [{Password | *}]] [/user:[DomainName\]UserName] [/user:[DottedDomainName\]UserName] [/user: [UserName@DottedDomainName] [/savecred] [/smartcard] [{/delete | /persistent:{yes | no}}]

net use [DeviceName [/home[{Password | *}] [/delete:{yes | no}]]

net use [/persistent:{yes | no}]

net command is one of the most important commands for the Windows SysAdmin. It gives one access to add / delete / modify existing users and many, many more. If you want to learn a bit more on Windows Command Line or interested in Windows Scripting, I suggest you check out net docs thouroughfully
That’s all hope this post helps someone.

Wine in The Central Park

Friday, January 11th, 2008

I and Alex Drunk Asenovgrad’s Mavrut in the central park it was very cold, but at least an experience. Right now I’m a little hot (cause of the wine). I’m urinating too often recently and it drives me mad. Also I’m a kind of lost I told Sasho about Torsion fields and stuff but he make a fun of that no matter I think that’s a serious matter here is an interview with Nikolay Palushev that may be of an interest to the reader
http://www.spiralata.net/kratko/articles.php?lng=bg&pg=128 .

Today I had English in the college pretty boring haven’t had a lot of work I had to fix few binary permissions part of a postfix also delete some old backups and create a new samba share some mail server problems for few minutes I think that’s all … I hate this world so much everything is so useless and awful. I hope to meet God soon …

How to fix clamd “ERROR: LOCAL: Socket file /tmp/clamd.socket is in use by another process.”

Monday, May 23rd, 2011

One of the Qmail server installations I’m taking care of’s clamd antivirus process started loading the system heavily.
After a bit of log reading and investigation I’ve found the following error in my /var/log/clamd/current

@400000004dda1e1815cf03f4 ERROR: LOCAL: Socket file /tmp/clamd.socket is in use by another process.

I’ve noticed in my process list that actually I do have two processes clamd :

11608 ? Sl 0:05 /usr/local/sbin/clamd
11632 ? S 0:00 /usr/bin/multilog t /var/log/clamd
16013 ? Sl 0:06 /usr/local/sbin/clamd

It appeared that for some weird reason one of the clamd process was failing to connect constantly to the clam server socket /tmp/clamd.socket and each time it tried to connect and failed to connect to the socket the system gets about 5% of extra load …

Resolving the issues was a piece of cake, all I had to do is stop the clamd server delete the /tmp/clamd.socket and relaunch the clamd server.

Here is exactly the commands I issued:

debian:~# cd /service/
debian:/service# svc -a clamd
debian:/service# svc -h clamd
debian:/service# svc -d clamd
debian:/service# rm -f /tmp/clamd.socket
debian:/service# svc -u clamd

Afterwards the clamd extra load went out and in /var/log/clamd/current I can see clamd loads fine without errors, e.g.:

Listening daemon: PID: 16013
MaxQueue set to: 150
No stats for Database check - forcing reload
Reading databases from /usr/local/share/clamav
Database correctly reloaded (966822 signatures)
SelfCheck: Database status OK.
...