I’ve noticed an ex-colleague as well as a friend of mine’s recently started company who does provide just Wonderful Web Development, SQL database and data processing System Administration services.The new company is named dreamupweb . The whole project looks quitepromising. The already completeled projects do testify the good quality work of the company.END—–
Posts Tagged ‘SQL’
Web Development & System Administration Company DreamupWeb
Tuesday, September 8th, 2009How to completely disable Replication in MySQL server 5.1.61 on Debian GNU / Linux
Monday, July 16th, 2012 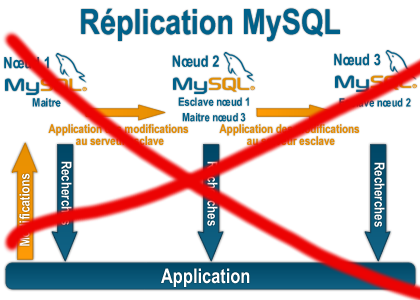
Some time ago on one of the Database MySQL servers, I've configured replication as it was required to test somethings. Eventually it turned out replication will be not used (for some reason) it was too slow and not fitting our company needs hence we needed to disable it.
It seemed logical to me that, simply removing any replication related directives from my.cnf and a restart of the SQL server will be enough to turn replication off on the Debian Linux host. Therefore I proceeded removed all replication configs from /etc/my/my.cnf and issued MySQL restart i. e.:
sql-server:~# /etc/init.d/mysql restart

....
This however didn't turned off replication,as I thought and in phpmyadminweb frontend interface, replication was still appearing to be active in the replication tab.
Something was still making the SQL server still act as an Replication Slave Host, so after a bit of pondering and trying to remember, the exact steps I took to make the replication work on the host I remembered that actually I issued:
mysql> START SLAVE;
Onwards I run:
mysql> SHOW SLAVE STATUS;

....
and found in the database the server was still running in Slave Replication mode
Hence to turn off the db host run as a Slave, I had to issue in mysql cli:
mysql> STOP SLAVE;

Query OK, 0 rows affected, 1 warning (0.01 sec)

mysql> RESET SLAVE;

Query OK, 0 rows affected, 1 warning (0.01 sec)
Then after a reload of SQL server in memory, the host finally stopped working as a Slave Replication host, e.g.
sql-server:~# /etc/init.d/mysql restart

....
After the restart, to re-assure myself the SQL server is no more set to run as MySQL replication Slave host:
mysql> SHOW SLAVE STATUS;

Empty set (0.00 sec)
Cheers 😉
‘host-name’ is blocked because of many connection errors; unblock with ‘mysqladmin flush-hosts’
Sunday, May 20th, 2012 ![]()
My home run machine MySQL server was suddenly down as I tried to check my blog and other sites today, the error I saw while trying to open, this blog as well as other hosted sites using the MySQL was:
Error establishing a database connection
The topology, where this error occured is simple, I have two hosts:
1. Apache version 2.0.64 compiled support externally PHP scripts interpretation via libphp – the host runs on (FreeBSD)
2. A Debian GNU / Linux squeeze running MySQL server version 5.1.61
The Apache host is assigned a local IP address 192.168.0.1 and the SQL server is running on a host with IP 192.168.0.2
To diagnose the error I've logged in to 192.168.0.2 and weirdly the mysql-server was appearing to run just fine:
debian:~# ps ax |grep -i mysql
31781 pts/0 S 0:00 /bin/sh /usr/bin/mysqld_safe
31940 pts/0 Sl 12:08 /usr/sbin/mysqld –basedir=/usr –datadir=/var/lib/mysql –user=mysql –pid-file=/var/run/mysqld/mysqld.pid –socket=/var/run/mysqld/mysqld.sock –port=3306
31941 pts/0 S 0:00 logger -t mysqld -p daemon.error
32292 pts/0 S+ 0:00 grep -i mysql
Moreover I could connect to the localhost SQL server with mysql -u root -p and it seemed to run fine. The error Error establishing a database connection meant that either something is messed up with the database or 192.168.0.2 Mysql port 3306 is not properly accessible.
My first guess was something is wrong due to some firewall rules, so I tried to connect from 192.168.0.1 to 192.168.0.2 with telnet:
freebsd# telnet 192.168.0.2 3306
Trying 192.168.0.2…
Connected to jericho.
Escape character is '^]'.
Host 'webserver' is blocked because of many connection errors; unblock with 'mysqladmin flush-hosts'
Connection closed by foreign host.
Right after the telnet was initiated as I show in the above output the connection was immediately closed with the error:
Host 'webserver' is blocked because of many connection errors; unblock with 'mysqladmin flush-hosts'Connection closed by foreign host.
In the error 'webserver' is my Apache machine set hostname. The error clearly states the problems with the 'webserver' apache host unable to connect to the SQL database are due to 'many connection errors' and a fix i suggested with mysqladmin flush-hosts
To temporary solve the error and restore my normal connectivity between the Apache and the SQL servers I logged I had to issue on the SQL host:
mysqladmin -u root -p flush-hostsEnter password:
Thogh this temporar fix restored accessibility to the databases and hence the websites errors were resolved, this doesn't guarantee that in the future I wouldn't end up in the same situation and therefore I looked for a permanent fix to the issues once and for all.
The permanent fix consists in changing the default value set for max_connect_error in /etc/mysql/my.cnf, which by default is not too high. Therefore to raise up the variable value, added in my.cnf in conf section [mysqld]:
debian:~# vim /etc/mysql/my.cnf

...

max_connect_errors=4294967295
and afterwards restarted MYSQL:
debian:~# /etc/init.d/mysql restart

Stopping MySQL database server: mysqld.

Starting MySQL database server: mysqld.

Checking for corrupt, not cleanly closed and upgrade needing tables..
To make sure the assigned max_connect_errors=4294967295 is never reached due to Apache to SQL connection errors, I've also added as a cronjob.
debian:~# crontab -u root -e

00 03 * * * mysqladmin flush-hosts
In the cron I have omitted the mysqladmin -u root -p (user/pass) input options because for convenience I have already stored the mysql root password in /root/.my.cnf
Here is how /root/.my.cnf looks like:
debian:~# cat /root/.my.cnf

[client]

user=root

password=a_secret_sql_password
Now hopefully, this would permanently solve SQL's 'failure to accept connections' due to too many connection errors for future.
Creating multi-part zip archives in Linux with 7zip command to transfer large zip files data in parts
Monday, December 1st, 2014 
Recently, I've blogged on how to move large files from source to destination server in parts on a slow / restricted networks or whenever the media is limtied in size. This is not a common scenario but it happens so if you're admin sooner or later you will need that. I give example with UNIX's split and unrar. However strip's file naming can get you insane (in case if you don't want to use cstrip command – split a file into sections determined by context lines instead) plus normal split Linux / *nix command doesn't support compression and encryption. On the other side on many Company internal Networks with Windows server hosts running – Winblows (2003, 2008, 1012) for security purposes it might be that WinRar is not installed, thus you might need to transfer the file parted between the GNU / Linux server and Windows server in standard OS supported by Windows ZIP format. Assuming that you have root (admin) access to the Linux host you can then archive your file in parts using ZIP encryption algorithm with 7zip.
1. Installing 7zip on CentOS / Fedora / RHEL and other Redhat based Linuces
If the Linux server is running:
Fedora / CentOS / RHEL and you don't have 7zip installed yet install it with:
yum -y install p7zip
According to distros version it might be the name could be a bit different if p7zip is different to find the one you need search with:
yum search p7zip
and install whatever you need
2. Installing 7zip on Debian / Ubuntu and other Debian based servers
apt-get install –yes p7zip-full
Depending on Deb based distro just like with fedora if p7zip-full pack is not installable, check 7zip's package distro version:
apt-cache search p7zip
3. Archiving ZIP file in multiple (sized) parts on GNU / Linux
7z a -v512m Large-file-separated-in-multi-parts.zip Large-Many-Gigabytes-File.SQL
This would output multiple files:
Large-file-separated-in-multi-parts.zip.001, Large-file-separated-in-multi-parts.zip.002, Large-file-separated-in-multi-parts.zip.003, Large-file-separated-in-multi-parts.004 etc.
If you want to add security to the transferred file to protect newly created ZIP archive with password use following command:
7z a -v512m Large-file-separated-in-multi-parts.zip Large-Many-Gigabytes-File.SQL
7-Zip [64] 9.20 Copyright (c) 1999-2010 Igor Pavlov 2010-11-18
p7zip Version 9.20 (locale=bg_BG.UTF-8,Utf16=on,HugeFiles=on,2 CPUs)
ScanningCreating archive Large-file-separated-in-multi-parts.zip
Enter password (will not be echoed) :
…
Once you have transferred all the many parts via (SSH/ FTPS or not preferrably HTTP / HTTPS / FTP) place them in the same folder and use Windows standard ZIP to unarchive.
If the archived 7zip files are to be unarchived on another Linux host (in case if multi part zip transfer is between Linux -> Linux hosts) to unarchive, parted files:
7z x Large-file-separated-in-multi-parts.zip.* …
WordPress blog MySQL data maintainance valuable plugin WP-OPTIMIZE
Tuesday, April 12th, 2011The more my blog is growing the slower it becomes, this is a tendency I’ve noticed since a couple of weeks.
Very fortunately while reading some random articles online I’ve came across a super valuable wordpress plugin called WP-OPTIMIZE
I think it’s best if I present instead of taking the time to explain what the WP-optimize does for a wordpress powered blog:
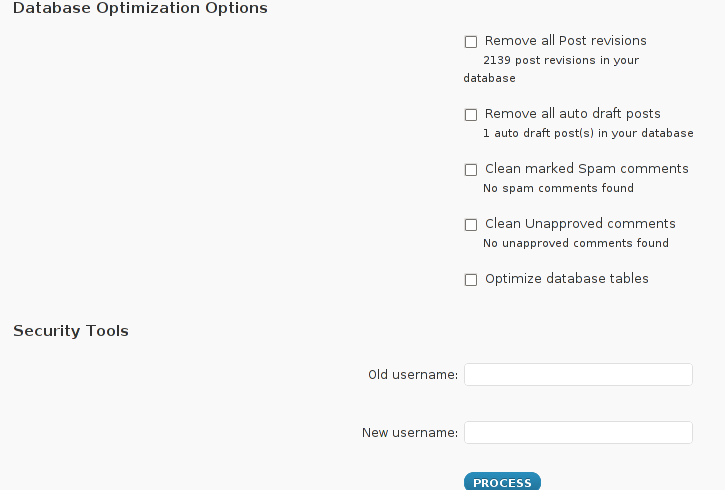
WP-Optimize is a WordPress 2.9++ database cleanup and optimization tool. It doesn’t require PhpMyAdmin to optimize your database tables. It allows you to remove post revisions, comments in the spam queue, un-approved comments within few clicks.
Additionally you can rename any username to another username too.
For example: If you want to rename default ‘admin’ username to ‘someothername’; just put ‘admin’ (without quotes) to the Old username field and the new username to the New username field, then click “PROCESS”)
Now in short to rephrase above text, during MySQL database requests a lot of database starts needing the so called MySQL optimization , this operation becomes necessery especially for databases which are very actively used and is related to the basic design of the mysql server.
Very often many tables starts having a lot of garbage (repetitive) data and therefore read and writes from the SQL server gets slower and slower day by day.
Thus the MySQL server has it’s famous OPTIMIZE TABLE command which does wipe out all the garbage unnecessery data stored in a tables/s and hence seriously impacts the later read/write table operations.
Now to go back to wordpress the same optimization issues, very often are a cause for a performance bottleneck and some smart guy has came with the great idea to create a specific wordpress plugin to fix such an optimize table issues
The WP-Optimize plugin has 5 major options which somehow could have a positive impact on blog’s performance, these are:
- Remove all Post revisions
- Remove all auto draft posts
- Clean marked Spam comments
- lean Unapproved comments
-
Optimize database tables
Apart from the nice performance boost applicaiton the wp-optimize plugin has one super valuable function, it could change the default wordpress blog administrator user admin to some other desired username, for example rename the default blog administrator username “admin” user to “john”.
From a security perspective this is another must have feature in every wordpress blog as it can kill many of the possible brute force attacks with some web brute force softwares like Hydra
Installing and using wp-optimize is a real piece of cake, here is a very quick few command lines to install it:
host:~# cd /var/www/blog/wp-content/plugins/

host:/var/www/blog/wp-content/plugins:# wget https://www.pc-freak.net/files/wp-optimize.0.9.2.zip

host:/var/www/blog/wp-content/plugins:# unzip wp-optimize.0.9.2.zip

...
To launch WP-OPTIMIZE and fix many speed bottlenecks caused by unoptimized tables, or just hanging around in database old spam comments, go and login with your adminsitrator to wordpress.
In the left pane menu starting up with Dashboard somewhere near the end of the vertical menu you will notice a button reading WP-Optimize .
Click over the Wp-Optimize button and a screen like the one in below’s screenshot will appear in your browser screen:
I have personally decided to use just 2 of all the 5 available primary plugin options, I decided to select only:
- Clean marked Spam comments
- Optimize database tables
Scrolling below the PROCEED button I could also notice a number of tables which were missing optimization and hence required an optimize table to be executed on each one of them.
Further on I pressed the PROCESS button and after a couple of minutes (2, 3 minutes) of waiting the wp-optimize plugin was done it’s selected tasks:
In the screenshot below, you see all my blog tables which were optimized by the plugin:

It’s interesting to say few words about the Remove All Posts revisions plugin option, as many might be wondering what this plugin option really means.
When writting posts, wordpress has an option to restore to a certain point of the write out and makes a sort of different versions in time of each of it’s written posts.
Therefore later restoration if something gots deleted by mistake is facilitated, this is actually the all meaning of Remove All Posts revisions
With time and the increase wp posts the amount of Posts Revisions is growing on and on and just taking space and possibly making the access to the database entries slower, thus it might be a good idea to also remove them as, it’s absolutely rare to use the wp post restoration function.
However I’ve personally decided to not wipe out the old posts revisions as someday i might need it and I’m a bit scared that it might cause me some database issues.
I’ll be glad if somebody has tried the Posts Revisions wp-Optimize funciton and is happy with the results.
How to check MASTER / SLAVE MySQL nodes status – Check MySQL Replication Status
Thursday, April 19th, 2012I'm doing replication for one server. Its not the first time I do configure replication between two MySQL database nodes, however since I haven't done it for a few years, my "know how" has mostly vanished so I had some troubles in setting it up. Once I followed some steps to configure replication I had to check if the two MASTER / Slave MySQL db nodes communicate properly. Hence I decided to drop a short post on that just in case if someone has to do the same or if I myself forget how I did it so I can check later on:
1. Check if MASTER MySQL server node is configured properly
The standard way to check a MySQL master node status info is with:
mysql> show master status;
+——————+———-+———————————————————+——————+
| File | Position | Binlog_Do_DB | Binlog_Ignore_DB |
+——————+———-+———————————————————+——————+
| mysql-bin.000007 | 106 | database1,database2,database3 | |
+——————+———-+———————————————————+——————+
1 row in set (0.00 sec)
By putting \G some extra status info is provided:
mysql> show master status\G;
*************************** 1. row ***************************
File: mysql-bin.000007
Position: 106
Binlog_Do_DB: database1,database2,database3
Binlog_Ignore_DB:
1 row in set (0.00 sec)ERROR:
No query specified
2. Check if Slave MySQL node is configured properly
To check status of the slave the cmd is:
mysql> show slave status;
The command returns an output like:
mysql> show slave status;+———————————-+————-+————-+————-+—————+——————+———————+————————-+—————+———————–+——————+——————-+——————————————————-+———————+——————–+————————+————————-+—————————–+————+————+————–+———————+—————–+—————–+—————-+—————+——————–+——————–+——————–+—————–+——————-+—————-+———————–+——————————-+—————+—————+—————-+—————-+| Slave_IO_State | Master_Host | Master_User | Master_Port | Connect_Retry | Master_Log_File | Read_Master_Log_Pos | Relay_Log_File | Relay_Log_Pos | Relay_Master_Log_File | Slave_IO_Running | Slave_SQL_Running | Replicate_Do_DB | Replicate_Ignore_DB | Replicate_Do_Table | Replicate_Ignore_Table | Replicate_Wild_Do_Table | Replicate_Wild_Ignore_Table | Last_Errno | Last_Error | Skip_Counter | Exec_Master_Log_Pos | Relay_Log_Space | Until_Condition | Until_Log_File | Until_Log_Pos | Master_SSL_Allowed | Master_SSL_CA_File | Master_SSL_CA_Path | Master_SSL_Cert | Master_SSL_Cipher | Master_SSL_Key | Seconds_Behind_Master | Master_SSL_Verify_Server_Cert | Last_IO_Errno | Last_IO_Error | Last_SQL_Errno | Last_SQL_Error |+———————————-+————-+————-+————-+—————+——————+———————+————————-+—————+———————–+——————+——————-+——————————————————-+———————+——————–+————————+————————-+—————————–+————+————+————–+———————+—————–+—————–+—————-+—————+——————–+——————–+——————–+—————–+——————-+—————-+———————–+——————————-+—————+—————+—————-+—————-+| Waiting for master to send event | HOST_NAME.COM | slave_user | 3306 | 10 | mysql-bin.000007 | 106 | mysqld-relay-bin.000002 | 251 | mysql-bin.000007 | Yes | Yes | database1,database2,database3 | | | | | | 0 | | 0 | 106 | 407 | None | | 0 | No | | | | | | 0 | No | 0 | | 0 | |+———————————-+————-+————-+————-+—————+——————+———————+————————-+—————+———————–+——————+——————-+——————————————————-+———————+——————–+————————+————————-+—————————–+————+————+————–+———————+—————–+—————–+—————-+—————+——————–+——————–+——————–+—————–+——————-+—————-+———————–+——————————-+—————+—————+—————-+—————-+
As you can see the output is not too readable, as there are too many columns and data to be displayed and this doesn't fit neither a text console nor a graphical terminal emulator.
To get more readable (more verbose) status for the SQL SLAVE, its better to use command:
mysql> show slave status\G;
Here is a sample returned output:
mysql> show slave status\G;*************************** 1. row *************************** Slave_IO_State: Waiting for master to send event Master_Host: HOST_NAME.COM Master_User: slave_user Master_Port: 3306 Connect_Retry: 10 Master_Log_File: mysql-bin.000007 Read_Master_Log_Pos: 106 Relay_Log_File: mysqld-relay-bin.000002 Relay_Log_Pos: 251 Relay_Master_Log_File: mysql-bin.000007 Slave_IO_Running: Yes Slave_SQL_Running: Yes Replicate_Do_DB: database1,database2,database3 Replicate_Ignore_DB: Replicate_Do_Table: Replicate_Ignore_Table: Replicate_Wild_Do_Table: Replicate_Wild_Ignore_Table: Last_Errno: 0 Last_Error: Skip_Counter: 0 Exec_Master_Log_Pos: 106 Relay_Log_Space: 407 Until_Condition: None Until_Log_File: Until_Log_Pos: 0 Master_SSL_Allowed: No Master_SSL_CA_File: Master_SSL_CA_Path: Master_SSL_Cert: Master_SSL_Cipher: Master_SSL_Key: Seconds_Behind_Master: 0Master_SSL_Verify_Server_Cert: No Last_IO_Errno: 0 Last_IO_Error: Last_SQL_Errno: 0 Last_SQL_Error: 1 row in set (0.00 sec)ERROR: No query specified
If show master status or shwo slave status commands didn't reveal replication issue, one needs to stare at the mysql log for more info.
How to fix “ERROR 1577 (HY000) at line 1: Cannot proceed because system tables used by Event Scheduler were found damaged at server start”
Saturday, May 12th, 2012After migrating databases data from FreeBSD MySQL 5.0.83 server to a Debian Squeeze Linux MySQL version 5.1.61, below is a mysql –version issued on both the FreeBSD and the Debian servers
freebsd# mysql --version

mysql Ver 14.12 Distrib 5.0.83, for portbld-freebsd7.2 (i386) using 5.2
debian:~# mysql --version

mysql Ver 14.14 Distrib 5.1.61, for debian-linux-gnu (i486) using readline 6.1
The data SQL dump from the FreeBSD server was dumped with following command arguments:
freebsd# mysqldump --opt --allow-keywords --add-drop-table --all-databases -u root -p > complete_db_dump.sql
Then I used sftp to transfer complete_db_dump.sql dump to the a brand new installed latest Debian Squeeze 6.0.2. The Debian server was installed using a "clean Debian install" without graphical environment with CD downloaded from debian.org's site.
On the Debian machine I imported the dump with command:
debian:~# mysq -u root -p < complete_db_dump.sql
Right After the dump was imported I re-started SQL server which was previously installed with:
debian:~# apt-get install mysql-server
The error I got after restarting the mysql server:
debian:~# #/etc/init.d/mysql restart
was:
 ERROR 1577 (HY000) at line 1: Cannot proceed because system tables used by Event Scheduler were found damaged at server start

ERROR 1547 (HY000) at line 1: Column count of mysql.proc is wrong. Expected 20, found 16. The table is probably corrupted
This error cost me a lot of nerves and searching in google to solve. It took me like half an hour of serious googling ,until I finally found the FIX!!!:
 debian:~# mysql_upgrade -u root -h localhost -p --verbose --force

Enter password:

Looking for 'mysql' as: mysql

Looking for 'mysqlcheck' as: mysqlcheck

Running 'mysqlcheck' with connection arguments: '--port=3306' '--socket=/var/run/mysqld/mysqld.sock' '--host=localhost'

Running 'mysqlcheck' with connection arguments: '--port=3306' '--socket=/var/run/mysqld/mysqld.sock' '--host=localhost'

bible.holy_bible OK

bible.holybible OK

bible.quotes_meta OK
Afterwards finally I had to restart the mysql server once again in order to finally get rid of the shitty:
ERROR 1547 (HY000) at line 1: Column count of mysql.proc is wrong. Expected 20, found 16. The table is probably corrupted error!
 debian:~# /etc/init.d/mysql restart

Stopping MySQL database server: mysqld.

Starting MySQL database server: mysqld.

Checking for corrupt, not cleanly closed and upgrade needing tables..
This solved the insane Column count of mysql.proc is wrong. Expected 20, found 16 once and for all!
Before I came with this fix I tried all kind of forum suggested fixes like:
 debian:~# mysql_upgrade -u root -p

Looking for 'mysql' as: mysql

Looking for 'mysqlcheck' as: mysqlcheck

This installation of MySQL is already upgraded to 5.1.61, use --force if you still need to run mysql_upgrade
 debian:~# mysql_upgrade -p

Looking for 'mysql' as: mysql

Looking for 'mysqlcheck' as: mysqlcheck

This installation of MySQL is already upgraded to 5.1.61, use --force if you still need to run mysql_upgrade
And few more, none of them worked the only one that worked was:
debian:~# #mysql_upgrade -u root -h localhost -p --verbose --force
I have to say big thanks to Mats Lindth wonderful blog post which provided me with the solution.
It seems, since Oracle bought the Community edition of MySQL thinks with this database server are getting more and more messy and backwards incompatible day by day.
Lately, I'm experiencing too much hassles with MySQL version incompitabilities. Maybe I should think for migrating permanently to Postgre …
By the way the ERROR 1547 (HY000) at line 1: Column count of mysql.proc is wrong. is most probably caused of some kind of password hashing incompitability between the password hashing between the BSD and Debian SQL versions, as mysql -u root -p < dump.sql, does override default stored user passwords in the mysql database tables… Such password, hashing issues were common in prior MySQL 4 to MySQL 5 migrations I've done, however since MySQL 5+ is already storing its password strings encrypted with md5 encryption I wonder why on earth this mess happens ….


Manually deleting spam comments from WordPress blogs and websites to free disk space and optimize MySQL
Monday, November 24th, 2014If you're a web-hosting company or a web-development using WordPress to build multitudes of customer blogs or just an independent blogger or sys-admin with a task to optimize a server's MySQL allocated storage / performance on triads of WordPress-es a a good tip that would help is to removing wp_comments marked as spam.
Even though sites might be protected of thousands of spam message daily caught by WP anti-spam plugin Akismet, spam caught messages aer forwarder by Akismet to WP's Spam filter and kept wp_comments table with comments_approved column record 'spam'.
Therefore you will certainly gain of freeing disk space uselessly allocated by spam messages into current MySQL server storage dir (/var/lib/mysql /usr/local/mysql/data – the directory where my.cnf tells the server to keep its binary data .MYI, .MYD, .frm files) as well as save a lot of disk space by excluding the useless spam messages from SQL daily backup archives.
Here is how to remove manually spam comments from a WordPress blog under database (wp_blog1);
The most common and quick way useful for scripting (whether you have to do it for multiple blogs with separate dbs) is to delete all comments being filled as 'Spam'.
To delete all messages which were filled by Akismet's spam filter with high probabily being a spam issue from mysql cli interface:
For Unread (Unapproved) messages the value of comment_approved field are 0 or 1, 0 if the comment is Red and Approved and 1 if still it is to be marked as read (and not spam).
If a wordpress gets heavily hammered with mainly spam and the probability that unapproved message is different from spam is low and you want to delete any message waiting for approvel as not being spam from wordpress use following SQL query:
Another not very common you might want to do is delete only all apprved comments:
For old installed long time unmaintained blogs (with garbish content), it is very likely that 99% of the messages might be spam and in case if there are already >= 100 000 spam messages and you don't have the time to inspect 100 000 spam comments to get only some 1000 legitimate and you want to delete completely all wordpress comments for a blog in one SQL query use:
Another scenario if you know a blog has been maintained until certain date and comments were inspected and then it was left unmaintained for few years without any spam detect and clear plugin like Akismet, its worthy to delete all comments starting from the date wordpress site stopped to be maintained:
Tags: binary data, blogs, command delete coments wordpress, common, disk space, interface, manually delete spam comments, multiple, server, spam messages, SQL, use, Wordpress, wordpress delete comments query, wp
Posted in MySQL, System Administration, Various, Web and CMS, Wordpress | No Comments »