Posts Tagged ‘ssh session’

How to Copy large data directories between 2 Linux / Unix servers without direct ssh / ftp access between server1 and server2 other by using SSH, TAR and Unix pipes

Monday, April 27th, 2015

how-to-copy-large-data-directories-between-2-linux-unix-servers-without-direct-ssh-ftp-access-btween-each-other

In a Web application data migration project, I've come across a situation where I have to copy / transfer 500 Gigabytes of data from Linux server 1 (host A) to Linux server 2 (host B). However the two machines doesn't have direct access to each other (via port 22) for security reasons and hence I cannot use sshfs to mount remotely host dir via ssh and copy files like local ones.

As this is a data migration project its however necessery to migrate the data finding a way … Normal way companies do it is to copy the data to External Hard disk storage and send it via some Country Post services or some employee being send in Data center to attach the SAN to new server where data is being migrated However in my case this was not possible so I had to do it different.

I have access to both servers as they're situated in the same Corporate DMZ network and I can thus access both UNIX machines via SSH.

Thanksfully there is a small SSH protocol + TAR archiver and default UNIX pipe's capabilities hack that makes possible to transfer easy multiple (large) files and directories. The only requirement to use this nice trick is to have SSH client installed on the middle host from which you can access via SSH protocol Server1 (from where data is migrated) and Server2 (where data will be migrated).

If the hopping / jump server from which you're allowed to have access to Linux  servers Server1 and Server2 is not Linux and you're missing the SSH client and don't have access on Win host to install anything on it just use portable mobaxterm (as it have Cygwin SSH client embedded )

Here is how:
 

jump-host:~$ ssh server1 "tar czf – /somedir/" | pv | ssh server2 "cd /somedir/; tar xf


As you can see from above command line example an SSH is made to server1  a tar is used to archive the directory / directories containing my hundred of gigabytes and then this is passed to another opened ssh session to server 2  via UNIX Pipe mechanism and then TAR archiver is used second time to unarchive previously passed archived content. pv command which is in the middle is not obligitory though it is a nice way to monitor status about data transfer like below:
 

500GB 0:00:01 [10,5MB/s] [===================================================>] 27%


P.S. If you don't have PV installed install it either with apt-get on Debian:


debian:~# apt-get install –yes pv


Or on CentOS / Fedora / RHEL etc.


[root@centos ~]# yum -y install pv


Below is a small chunk of PV manual to give you better idea of what it does:

NAME
       pv – monitor the progress of data through a pipe

SYNOPSIS
       pv [OPTION] [FILE]…
       pv [-h|-V]

DESCRIPTION
       pv  allows  a  user to see the progress of data through a pipeline, by giving information such as time elapsed, percentage
       completed (with progress bar), current throughput rate, total data transferred, and ETA.

       To use it, insert it in a pipeline between two processes, with the appropriate options.  Its standard input will be passed
       through to its standard output and progress will be shown on standard error.

       pv  will  copy  each  supplied FILE in turn to standard output (- means standard input), or if no FILEs are specified just
       standard input is copied. This is the same behaviour as cat(1).

       A simple example to watch how quickly a file is transferred using nc(1):

              pv file | nc -w 1 somewhere.com 3000

       A similar example, transferring a file from another process and passing the expected size to pv:

              cat file | pv -s 12345 | nc -w 1 somewhere.com 3000


Note that with too big file transfers using PV will delay data transfer because everything will have to pass through another 2 pipes, however for file transfers up to few gigabytes its really nice to include it.

If you only need to transfer huge .tar.gz archive and you don't bother about traffic security (i.e. don't care whether transferred traffic is going through encrypted SSH tunnel and don't want to put an overhead to both systems for encrypting the data and you have some unfiltered ports between host 1 and host 2 you can run netcat on host 2 to listen for connections and forward .tar.gz content via netcat's port like so:
 

linux2:~$ nc -l -p 12345 > /path/destinationfile
linux2:~$ cat /path/sourcfile | nc desti.nation.ip.address 12345


Another way to transfer large data without having connection with server1 and server2 but having connection to a third host PC is to use rsync and good old SSH Tunneling, like so:
 

jump-host:~$ ssh -R 2200:Linux-server1:22 root@Linux-server2 "rsync -e 'ssh -p 2200' –stats –progress -vaz /directory/to/copy root@localhost:/copy/destination/dir"
Secure your work PC internet traffic using SSH Dynamic Tunnel as Proxy to get around Corporate Spy Proxy and Site Filtering

Friday, March 20th, 2015

use-ssh-dynamic-tunnel-as-socks5-proxy-to-get-around-corporate-website-filtering-restrictions

If you work for some huge corporations such as IBM / Sony / Toshiba / Concentrix / HP etc. and you're using a Windows Work Computer (notebook), pre-installed with a custom Company software which is by default configured to use a Proxy Server for all your Browsing activities and at a certain point you start being filtered some of the websites you love to visit so much because of some Corporate policies (limitations) at some filtered sites you will start getting empty pages or some   nasty filtering messages.

Even if you don't get a filtering message but you know all your Company Internal Network traffic is proxified for the sake of keeping your personal (privacy) high stop browsing using company's default proxy, because all your access requests (passwords) and queries to the internet are probably logged for later (review) in case if you enter the company's paragraph of "non-compliant employee".
If you fail on time to get around the default set "Corporate Proxy", sooner or later you will start getting filtering messages to some of the regular websites you use daily, as I did today while trying to open my personal blog (to check if there are new user comments):

Your request was denied because of its content categorization: "Hacking;Malicious Sources/Malnets;Religion"
For assistance, contact your network support team.

Screenshot of above message from today here

You see this guys or automated Proxy filter became so prudent that my site was filtered because it contains some Proof of Concept (PoC) security tools and content related to Christian (Faith) Religion. I guess its the time to think seriously is there a censorship in large corporations and how far could censorship go and if such censorship so easily adopted in large companies wouldn't same happen also on a backbone ISP level in short future??
If today my site is being filtered out to be unable to open from a corporation network because it contains "Religious" contain I would not be surprised if tomorrow, I've been prohibited to confess publicly my faith in salvation power of the Cross of our Lord Jesus Christ or even already in a blacklist because I'm trying to be a dedicated Orthodox Christian …
The fact that Religion is already perceived in same light as Hacking and Malicious Source or Malnet bots is also very eloquent and shows how very big part of people nowdays (including the person that added my site to this proxy filtering rules) think of religion and in what bad state our society and understanding of freedom and respect for others went.

Obviously it is time to react to this censorship and stop the evil corporation from spying on your traffic and logging all that matches there "kilometer long" prohibited sites filter lists. There are few ways to do that and the most straight forward is to set-up and use a Own Proxy server such as Privoxy / Polipo or Squid Proxy, however the proxy method requires that your company local network doesn't have too strick (restrictive) firewall rules (e.g. you need some port opened to the Internet such as 8080, 3128, 8118, 1080 standard port for (socks) etc.

As many companies are too restrictive in their outbound firewall rules and you might be in situation like with me where Browsers such as Internet Explorer / Opera / Firefox and Chrome are configured to use by default company proxy host (autocache.proxy-ur-company.hp.com:80) (with a custom Proxy PAC file filtering out a whole ranges of useful domains and IPs) and only allowed firewall access outside of local corporate network in on port 22 (for outside ssh session purposes) only.

Then your best way to get across such restrictive network configuration is to run your own home Linux / BSD / Windows server with opensshd installed and use OpenSSH protocol Dynamic Tunneling (Proxy socks5 like) capabilities to tunnel all your favourite Web Browser Traffic (lets say Firefox's) through your remote-home-host.com:22.


In short once you have installed plink.exe on your PC run manually from command line (cmd.exe)


plink.exe -ssh UserName@remote-home-host.com -P 22 -pw Secret_Password -D 127.0.0.1:8080 -N


For people who use MobaXTerm it is even easier as there is an integrated SSH tunneling input interface which can be used to create the SSH tunnel.

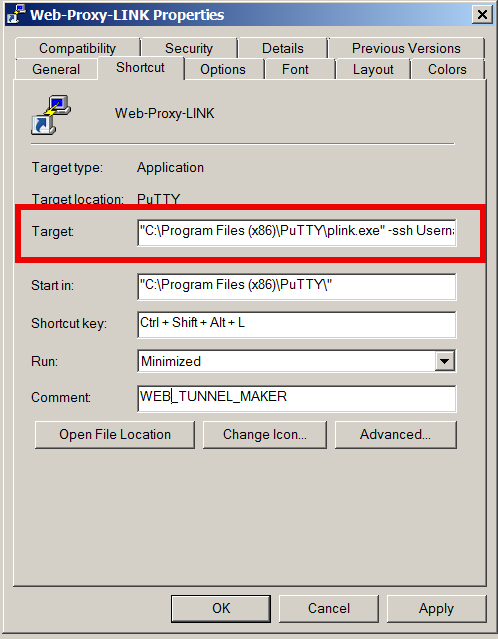
To have a quick way to Enable SSH Dynamic Tunnel button on your Desktop make a SymLink to Plink with Target below command line:

web-tunnel-maker-with-plink-win-ssh-connection-tool-screenshot-on-ms-windows-7

  • If from Linux / *BSD / Mac OS host to create Dynamic SSH Tunnel to your remote home SSH server host run in a Terminal
     

ssh -D 8080 Username@remote-home-host.com


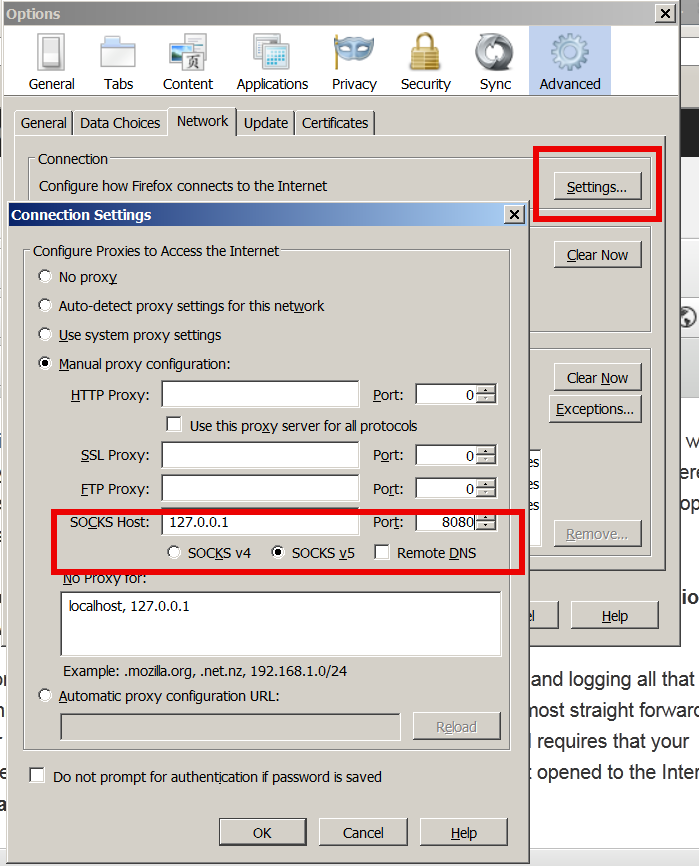
To start tunneling all your Web traffic via just created Dynamic SSH Tunnel to host remote-home-host.com, just set in browser's proxy options to use as proxy socks5 – localhost:8080

Secure-your-work-PC-notebook-internet-traffic-using-SSH-Dynamic-Tunnel-as-Proxy

To test whether your traffic is going to the Internet from remote-home-host.com open in just set proxy browser www.myip.ru .
You should see your home SSH server IP as IP which made the request to www.myip.ru.

How to create ssh tunnels / ssh tunneling on Linux and FreeBSD with openssh

Saturday, November 26th, 2011

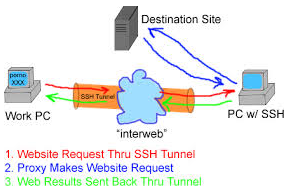
ssh-tunnels-port-forwarding-windows-linux-bypassing-firewall-diagram
SSH tunneling
allows to send and receive traffic using a dedicated port. Using an ssh traffic can have many reasons one most common usage reason is to protect the traffic from a host to a remote server or to access port numbers which are by other means blocked by firewall, e.g.: (get around firewall filtering)
SSH tunneling works only with TCP traffic. The way to make ssh tunnel is with cmds:

host:/root# ssh -L localhost:deshost:destport username@remote-server.net
host:/root# ssh -R restport:desthost:localport username@remote-server.net
host:/root# ssh -X username@remote-server.net

This command will make ssh to bind a port on localhost of the host host:/root# machine to the host desthost:destport (destination host : destinationport). Important to say deshost is the host destination visible from the remote-server.net therefore if the connection is originating from remote-server.net this means desthost will be localhost.
Mutiple ssh tunnels to multiple ports using the above example commands is possible. Here is one example of ssh tunneling
Let’s say its necessery to access an FTP port (21) and an http port (80), listening on remote-server.net In that case desthost will be localhost , we can use locally the port (8080) insetad of 80, so it will be no necessery to make the ssh tunnel with root (admin privileges). After the ssh session gets opened both services will be accessible on the local ports.

host:/home/user$ ssh -L 21:localhost:21 -L 8080:localhost:80 user@remote-server.net

That’s all enjoy 😉

Resolving messed up console / terminal on GNU Linux / A tiny old school hack ;)

Thursday, September 26th, 2013

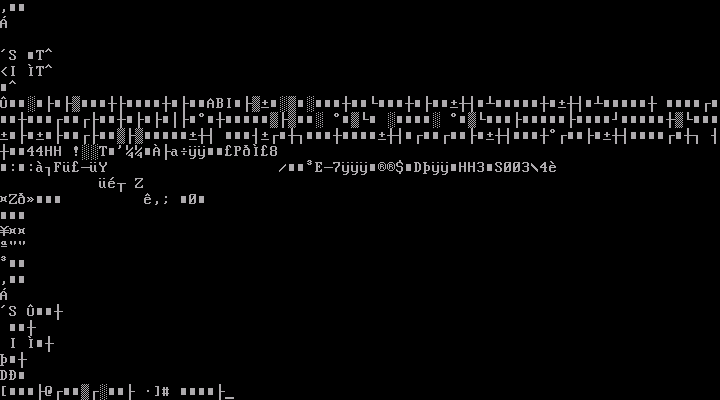
Resolve fix messed up unreadable gnu linux console terminal screenshot

Its probably not so common problem among new-comer Linux users / admins but sooner or later even those who haven't will cat by mistake (or on purpose) some binary file end result will be physical console / terminal / SSH Client (lets say PuTTY) will display some non-sense characters and whether typing you will type in some "alien language" characters this continues until you close up console and re-login. Of course its not such a big problem to re-login or (kill active SSH session).

fix terminal after showing displaying binary file by mistake catting wrong file incident

But there is no sense to do that and loose time and most importantly loose your logged in session (especially if you have hopped to 4 ssh sessions and you forgot to run GNU / screen). Thus its handy to know about
 

# reset

command. Once issued in most cases TTY messed up characters gets fixed up. However if even reset doesn't fix it, there is another "hack" to resolve it with no need for relogin. This is an old hack from my old Linux days and not so popular among admins, here is how:

Type

cat

press Enter

and then press

Ctrl + O (Ctrl ^ O)


then press Enter

and then again press

Ctrl + D (Ctrl ^ D)

Nice hack isn't it ? 🙂

How to start a process in background and keep it running after the console / terminal is closed on Linux and FreeBSD

Tuesday, November 29th, 2011

The classical way to keep a process running in background after log out of a shell is using screen
Anyways using screen is not the only way to detach a running process , GNU / Linux and BSDs (Free, Open, Net BSDs) had a command nohup which aim is to run a command immune to hangups, with output to a non-tty

Let’s say one wants to keep track (log) constantly ICMP traffic to a certain host with ping command on a UNIX server / desktop which doesn’t have the screen manager … terminal emulation program installed. Achieving this task is possible with nohup cmd by backgrounding the ping process, like so:

guoi@host:~$ nohup ping google.com >ping.log &[1] 45931hipo@host:~$ nohup: ignoring input and redirecting stderr to stdout

Afterwards even after closing up the opened ssh session or console (tty) / terminal (pts) on which the ping process is background nohup prevents the ping to be sent kill SIGNAL so the process continues running in the background.

Later on to check in real time the statistics of the continuous ICMP ping requests tail, less, or cat can be used for example watching the tail:

hipo@host:~$ tail -f ping.log
64 bytes from fx-in-f106.1e100.net (74.125.39.106): icmp_req=562 ttl=51 time=44.0 ms
64 bytes from fx-in-f106.1e100.net (74.125.39.106): icmp_req=563 ttl=51 time=43.8 ms
64 bytes from fx-in-f106.1e100.net (74.125.39.106): icmp_req=564 ttl=51 time=43.3 ms
64 bytes from fx-in-f106.1e100.net (74.125.39.106): icmp_req=565 ttl=51 time=43.1 ms
64 bytes from fx-in-f106.1e100.net (74.125.39.106): icmp_req=566 ttl=51 time=43.4 ms
64 bytes from fx-in-f106.1e100.net (74.125.39.106): icmp_req=567 ttl=51 time=43.6 ms

I’m using Linux / BSD for quite a lot of time and never before put in use the nohup cmd I guess there are more ppl who never heard of this handy UNIX basic command. Hope I’m not the only one who never heard about it and its useful knowledge to someone out. Cheers 😉