Posts Tagged ‘storage’

How to View and Delete NetApp Storage qtree, Get statistics about Filer Volume Read / Writes operations and delete and show mounted volumes

Friday, August 2nd, 2019

how-to-delete-volume-qtree-snapmirror-view-netapp-volume-qtree-and-and-view-netapp-cluster-device-statistics-NetAppLogo

I've had recently the trivial decomissioning task to delete some NetApp Storage qtrees on some of the SAP Hana Enterprise Cloud NetApp filers.
If it is first time you heard of NetApp is a hybrid cloud data services and data management (ranked in the Fortune 500 companies).

Netapps are hybrid cloud data services for management of applications and data across cloud and on-premises environments and are a de-facto standard for Data storage on many of the existing Internet Clouds and Large Corporatons that Stores many Pentabytes of Data.

The Netapp storage devices are a kinda of proprietary Clustered version of the Small business NAS storage Solution FreeNAS (which of itself is a Free FreeBSD based Data Storage OS – The #1 Storage OS).
NetApps allow plenty of things to do such as Data Mirroring (Data Backups), Data Syncing, SpapMirroring, SnapVault and many, many more custom Data revolutionary solutions such as StorageGrid.

NetApp supports integration with Kubernetes, Docker, Oracle / SAP DB, Citrix, Xen, KVM as well as multiple cloud environments such as AWS, Azure, OpenStack and has even integration with some CI/CD DevOps data provisioning – i.e. Jenkins.

In this small article, I'll show you how a Volume / Qtree on a NetApp filer could be viewed, mounted, unmounted, deleted. I'll also show you how to get statistics, while logged in remotely to the NetApp console and finally how to view and delete a NetApp configured snapmirror.


View NetApp Qtree


Here is how to view the Storage Qtree:

netapp> qtree show -vserver netapp01fv018 -volume VOL_OS_MIG -qtree bck_01v046485_20190108

To view the file content existing on the Storage server from the Linux bost next step to do is mount it with regular mount:

linux-host:~# mount netappfiler01fv018:/VOL_OS_MIG/ bck_01v035527_20190108 /mnt/test


Delete the Qtree from NetApp (Storage) Filer

Become administrator on the device

Once assured the content could go on to delete the qtree, it is necessery to become superuser (root) on the NetApp device, to do so, I hed to type:


netapp> set -privilege advanced


Then to delete the unneded volume previously used for transferring system update files, when logged in via SSH to the NetApp device – ONTAP Proprietary Operating system :


netapp> qtree delete -vserver netapp01fv018 -volume VOL_OS_MIG -force -qtree bck_01v035527_20190108


Note that this command will return back a job ID
assigned until operation is completed, to check the status of completion of generated JOB that is backgrounded, I've used command:

netapp> job show 53412

If all is okay you should get a Status of Success otherwise, if you get failed status you have to debug further what's causing it.
 

How to view existing export polcities and remove them


If you don't want to delete the qtree or volume but want to prevent a certain Linux server / application to not have access to it, it is useful to view existing export policy for a qtree.
 

netappfc001::> qtree show -exports -volume vol1_vmspace_netapp01v000885 -qtree q_01v002131
                                                   Is Export
Vserver    Volume        Qtree        Policy Name  Policy Inherited
———- ————- ———— ———— —————–
netapp01fv001 vol1_vmspace_netapp01v000885
                         q_01v002131
                                      vol1_vmspace_netapp01v000885.exports
                                                   true


To remove then export policy (to not exist at all), this is how:


netapp> volume qtree modify -vserver hec01fv018 -qtree-path /vol/volume_name/qtree_name -export-policy ""


I've also found the following volume qtree commands NetApp ONTAP documentation page helpful to read and recommend to anyone that wants to learn more.
 

How to delete a NetApp Volume if it is not used anymore

To delete unsed netapp volume, you have to do 3 things.
1. Unmount the volume
2. Put it offline
3. Delete it

to do so run below 3 cmds:


netapp> volume unmount -vserver vserver_name -volume volume_name
netapp> volume offline -vserver vserver_name volume_name
netapp> volume delete -vserver vserver_name volume_name


Show mounted Volume junctions (Get Extra Storage Volume information)


netapp> volume show -vserver netapp01fv004 -junction
netapp> volume show -vserver netapp01fv004 -volume MUFCF01_BACKUP


How to delete a Configured SnapMirror

What is a snapmirror?


Recovery-Scenario-Restore-Changes-To-Recovery-site-snapmirror-diagram

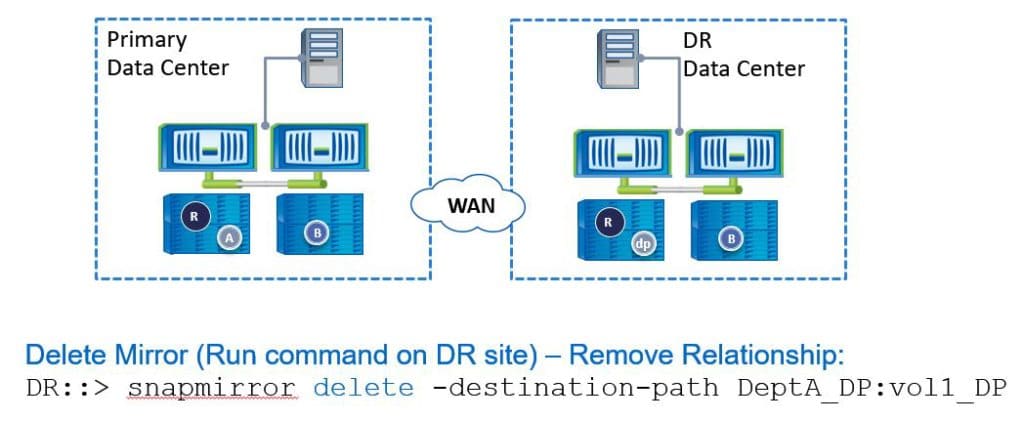
SnapMirror is a feature of Data ONTAP that enables you to replicate data. SnapMirror enables you to replicate data from specified source volumes or qtrees to specified destination volumes or qtrees, respectively. You need a separate license to use SnapMirror.

You can use SnapMirror to replicate data within the same storage system or with different storage systems.

After the data is replicated to the destination storage system, you can access the data on the destination to perform the following actions:

  • You can provide users immediate access to mirrored data in case the source goes down.
  • You can restore the data to the source to recover from disaster, data corruption (qtrees only), or user error.
  • You can archive the data to tape.
  • You can balance resource loads.
  • You can back up or distribute the data to remote sites.


netapp> snapmirror show -destination-path netapp02fv001:vol1_MUF_PS1_DR


netapp> snapmirror delete -destination-path netapp02fv001:vol1_MUF_PS1_DR -force
Operation succeeded: snapmirror delete for the relationship with destination "hec02fv001:vol1_MUF_PS1_DR".
 

If the snapmirror deletion gets scheduled you can use snapmirror status command to check status:
 

netapp> snapmirror status MUF_PS1_PRD
Snapmirror is on.


How to telnet from NetApp Storage to another one / check status of configured SMTPs for NetApp Cluster (filer)


You can use the autosupport and options autosupport commands to change or view AutoSupport configuration, display information about past AutoSupport messages, and send or resend an AutoSupport message.

For example if NetApp Filers have configured SMTP or SMTPs servers or other Proxy Configurations to pass on traffic from DMZ-ed network to external Internet resources or Relay servers this command will provide information on the Connection status of this remote services.


rows 0
set diag
node show

autosupport check show
systemshell -node netapp01f0018 -c telnet
autosupport show -fields proxy-url
systemshell -node netappf0018 -c telnet  147.204.148.38 80

netapp09fc001::*> systemshell -node  netapp08f0013 -c telnet  8080
  (system node systemshell)
Trying 100.127.20.4


node show – will provide information about configured nodes
rows 0 – will set the output print rows how they will be displayed
set – diag sets the device in diagnostic state

As you can see you can use the systemshell netapp command to try out telnet connections from the Configured NetApp logged in Source to any remote destination to make sure the set Proxy or SMTP is properly reachable.

How to get Statistics about NetApp existing volume Read / Write operations


On Netapp side issue:

netapp> statistics volume show -interval 5 -iterations 1 -max 25 -vserver netapp01fv004 -volume MUFCF01_BACKUP

For people starting up with NetApps, it is very useful to get a in-depth read on quick and dirty –  Netapp Commandline CheatSheet (for simplicity I've stored it in netapp-commands-cheatsheat.txt formatted file here ).

Conclusion

NetApp storages are used in many Governments and Large Corporations and for critical applications with SLAs forfeits for million bucks, mostly for applications and Database storage that are of a very large scale and too critical to be handled by the conventional storage computing of simple RAIDS 1,2,3,5,6 etc. / LVM and so on. ONTAP and NetApp Filers and Filer Clusters, are easy to maintain but due to its high number of features, not many NetApp Storage / Backup system administrators have the knowledge how to take a good advantage of this beasts. Thus finally, my even small experience with them shows that even simple things as critical errors are not handled properly at least that was my experience as a SAP consultant with SAP Hana Enterprise Cloud (HEC) and their HANA Converged Cloud where, main storage. 
This article's goal was pretty simple to guide the user on a minimum set of commands for simple qtree / volume / snapmirror view and removal decomissioning tasks. NetApps Clusters are a whole ocean of stuff and knowledge so before doing anything complex, if you're not sure what you're doing always consult a NetApp storage sysadmin as some of this animals features looks easy for the common general sysadmin but not are not so.
 

Best Windows tools to Test (Benchmark) Hard Drives, SSD Drives and RAID Storage Controllers

Wednesday, April 23rd, 2014

atto-windows-hard-disk-benchmark-freeware-tool-screenshot-check-hard-disk-speed-windows
Disk Benchmarking is very useful for people involved in Graphic Design, 3D modelling, system admins  and anyone willing to squeeze maximum of his PC hardware.

If you want to do some benchmarking on newly built Windows server targetting Hard Disk performance, just bought a new hard SSD (Solid State Drives) and you want to test how well Hard Drive I/O operations behave or you want to see a regular HDD benchmarking of group of MS Windows PCs and plan hardware optiomization, check out ATTO Disk Benchmark.

So why exactly ATTO Benchmark? – Cause it is one of the best Windows Free Benchmark tools on the internet.

ATTO is a widely-accepted Disk Benchmark freeware utility to help measure storage system performance. ATTO though being freeware is among top tools utilized in industry. It is very useful in comparing different Hard Disk vendors speed, measure Windows storage systems performance with various transfer sizes and test lengths for reads and writes.

ATTO Disk Benchmark is used by manufacturers of Hardware RAID controllers, its precious tool to test Windows storage controllers, host bus adapters (HBAs).

Here is ATTO Benchmark tool specifications (quote from their webstie):
 

  • Transfer sizes from 512KB to 8MB
  • Transfer lengths from 64KB to 2GB
  • Support for overlapped I/O
  • Supports a variety of queue depths
  • I/O comparisons with various test patterns
  • Timed mode allows continuous testing
  • Non-destructive performance measurement on formatted drives
  • Transfer sizes from 512KB to 8MB
  • Transfer lengths from 64KB to 2GB
  • Support for overlapped I/O
  • Supports a variety of queue depths
  • I/O comparisons with various test patterns
  • Timed mode allows continuous testing
  • Non-destructive performance measurement on formatted drives
  • – See more at: http://www.attotech.com/disk-benchmark/#sthash.rRlgSTOE.dpuf

Here is mirrored latest version of ATTO Disk for Download. Once you get your HDD statistics you will probably want to compare to other people results. On  TomsHardware's world famous Hardware geek site there are plenty of Hard Drives performance Charts

Of course there are other GUI alternatives to ATTO Benchmark one historically famous is NBench

NBench

nbench_benchmark_windows_hard-drive-cpu-and-memory

Nbench is nice little benchmarking program for Windows NT. Nbench reports the following components of performance:

CPU speed: integer and floating operations/sec
L1 and L2 cache speeds: MB/sec
main memory speed: MB/sec
disk read and write speeds: MB/sec

SMP systems and multi-tasking OS efficiency can be tested using up to 20 separate threads of execution.

For Console Geeks or Windows server admins there are also some ports of famous *NIX Hard Disk Benchmarking tools:

NTiogen

NTiogen benchmark was written by Symbios Logic, It's Windows NT port of their popular UNIX benchmark IOGEN. NTIOGEN is the parent processes that spawns the specified number of IOGEN processes that actually do the I/O.
The program will display as output the number of processes, the average response time, the number of I/O operations per second, and the number of KBytes per second. You can download mirror copy of Ntiogen here


There are plenty of other GUI and Console HDD Benchmarking Win Tools, i.e.:

IOMeter (ex-developed by Intel and now abandoned available as open source available on SourceForge)

iometer-benchmark-disk-storage-speed-windows
 

Bench32 – Comprehensive benchmark that measures overall system performance under Windows NT or Windows 95, now obsolete not developed anymore abandoned by producer company.

ThreadMark32 – capable of bench (ex developed and supported by ADAPTEC) but also already unsupported

IOZone – filesystem benchmark tool. The benchmark generates and measures a variety of file operations. Iozone has been ported to many machines and runs under many operating systems.
 

N! B! Important note to make here is above suggested tools will provide you more realistic results than the proprietary vendor tools shipped by your hardware vendor. Using proprietary software produced by a single vendor makes it impossible to analyze and compare different hardwares, above HDD benchmarking tools are for "open systems", e.g. nomatter what the hardware producer is produced results can be checked against each other.
Another thing to consider is even though if you use any of above tools to test and compare two storage devices still results will be partially imaginary, its always best to conduct tests in Real Working Application Environments. If you're planning to launch a new services structure always test it first and don't rely on preliminary returned soft benchmarks.

if you know some other useful benchmarking software i'm missing please share.

What is Vertical scaling and Horizontal scaling – Vertical and Horizontal hardware / services scaling

Friday, June 13th, 2014

horizontal-vs-vertical-scaling-vertical-and-horizontal-scaling-explained-diagram

If you're coming from a small or middle-sized company to a corporations like HP or IBM probably you will not a clear defined idea on the 2 types (2 dimensions) of system Scaling (Horizontal and Vertical scaling). I know from my pesronal experience that in small companies – all needed is to guarantee a model for as less probels as possible without too much of defining things and with much less planning. Other thing is being a sysadmin in middle-sized companies, often doesn't give you opportunity to discuss issues to solve with other admins but you have to deal as "one man (machine) for all" and thus often to solve office server and services tasks you do some custom solution.
hence for novice system administrators probably it will be probably unclear what is the difference between Horizontal and Vertical Scaling?

horizontal-vertical-scaling-scale-up-and-scale-out-server-infrastructure-diagram


Vertical Scaling (scale vertically or scale up) :- adding more resources(CPU/RAM/DISK) to your server (database or application server is still remains one).
Vertical Scaling is much more used in small and middle-sized companies and in applications and products of middle-range. Very common example for Virtual Scaling nowdays is to buy an expensive hardware and use it as a Virtual Machine hypervisor (VMWare ESX). Where a database is involved using Vertical Scaling without use of multiple virtual machines might be not the best solution, as even though hardware might suffice (creation of database locks might impose problems). Reasons to scale vertically include increasing IOPS (Input / Ouput Operations), increasing CPU/RAM capacity, and increasing disk capacity.
Because Vertical Scaling usually means upgrade of server hardware – whenever an improved performance is targeted, even though if Virtualization is used, the risk for downtimes with it is much higher than whenever horizontal scaling.

Horizontal Scaling (scale horizontally or scale out):- adding more processing units (phyiscal machine) to your server (infrastructure be it application web/server or database).
Horizontal scaling, means increasing  the number of nodes in the cluster, reduces the responsibilities of each member node by spreading the keyspace wider and providing additional end-points for client connections. The capacity of each individual node does not change, but its load is decreased (because load is distributed between separate server nodes). Reasons to scale horizontally include increasing I/O concurrency, reducing the load on existing nodes, and increasing disk capacity.
Horizontal Scaling has been historically much more used for high level of computing and for application and services. The Internet and particular web services gave a boom of Horizontal Scaling use, most companies nowadays that provide well known web services like Google (Gmail, Youtube), Yahoo, Facebook, Ebay, Amazon etc. are using heavily horizontal scaling. Horizontal Scaling is a must use technology – whenever a high availability of (server) services are required.

Install postfix on Debian Wheezy Linux / Postfix mail server with Dovecot and MySQL user storage on Debian Wheezy 7 Linux

Monday, August 5th, 2013

postfix Debian GNU Linux logo picture install and configure postfix with dovecot on Wheezy debian 7 Linux

I have recently installed Postfix on a server following WorkAround.org ISPMail Tutorial on Debian Wheezy Linux 7. Officially as you can see on their website there is no official guide still for Debian Wheezy yet. Therefore my only option was to follow ISPMail tutorial using Postfix 2.7 (Debian Squeeze).

It was quite a struggle to adapt tutorial for Squeeze deb to Wheezy and it took me an  overall time of about of week (each day spending few hours trying to make various components of tutorial) work. But finally I managed to install it. This is how this article got born in hope that in future it will help others have a decent Postfix install on Wheezy.. 

For those unfamiliar with Workaround.org's ISPMail Postfix Tutorial it is pretty much standard step-by-step installation guide for dummies similar to QmailRocks.org or Thibs QmailRocks Updated Installation Guide.

In Other words Workaround.org  is probably the best Postfix full featured install tutorial currently online as of time of writting this post. Workaround.org is great for people who want to run full featured; 

Postfix SMTP configured to support;


  • Postfix to support Mail Virtual Domains (store E-mails in MySQL database)
  • Dovecot Secure IMAP / IMAPS / POP3 / POP3s server to offer Pop3 and Imap remote access
  • Support Properly Generated SSL Certificates for POP3s and IMAPs
  • Anti Spam – SMTPD restrictions, SPF,  RBL,  Greylisting
  • Install web frontend to support Web E-mail Domaim / Accounts easy administrations for users stored in MySQL db
  • Amavisd-New (to protect Mail server from Spam)
  • Postfix WebMail frontend with Roundcube or Squirrelmail

Here is the big picture as it gives good idea on how all above components correspond to each other:

how postfix dovecot amavis clamav and spamassassin work postfix the bigpicture

So here we go:
 

1. Install Postfix necessary  debian packages


a) Install Postfix / MySQL / phpmyadmin and Postfix support for MySQL mail storage deb packs


apt-get update

apt-get upgrade

apt-get install –yes ssh
apt-get install –yes postfix postfix-mysql
apt-get –purge remove 'exim4*'
apt-get install –yes mysql-client mysql-server dovecot-common dovecot-imapd dovecot-pop3d postfix libsasl2-2 libsasl2-modules libsasl2-modules-sql sasl2-bin libpam-mysql openssl telnet mailutils
apt-get install –yes mysql-server phpmyadmin


b) Install deb packages for Dovecot and Imap Support as well as Roundcube and / or Squirrelmail for Webmail support


squirrelmail
apt-get install –yes dovecot-pop3d dovecot-imapd dovecot-lmtpd

c) Install packages deb packages for Anti-spam greylisting (tumgreyspf)


apt-get install –yes tumgreyspf

2. Create necessary MySQL database structures


Next step is toconnect to MySQL as root via MySQL CLI or PhpMyadmin and  CREATE new user "mailuser" and new database "mailserver", then create basic structure for "mailserver" database – i.e. sql tables ("virtual_domains", virtual_users", virtual_aliases")
These user and database is used laters by Dovecot server  to connect and  fetch emails from MySQL on user request via POP3 or IMAP. I've taken all the SQL requests and from Workaround.org's site and placed them in one SQL file:
create-postfix-mysql-user-database.sql.

Below is mysql cli query to import it. If you prefer more user friendliness do it via PhpMyAdmin with a copy / paste from file or with PhpMyAdmin import


 wget -q https://www.pc-freak.net/files/postfix/create-postfix-mysql-user-database.sql
mysql -u root -p < create-postfix-mysql-user-database.sql

Link to create-postfix-mysql-user-database.sql is here
 

3. Setting up Dovecot required users and directories

Next its necessary configure some users and create directories where Dovecot will store its configuration files. Dovecot requires to create its custom files for each existing users in MySQL database. Therefore whenever user receives or sends e-mail or is simply created Dovecot also creates a user directory structure in /var/vmail/, for exmpl.:


# ls -al /var/vmail/mail-domain.org/test/mail/
total 20
drwx—— 4 vmail vmail 4096 jul 29 09:15 .
drwx—— 3 vmail vmail 4096 jul 29 07:20 ..
drwx—— 3 vmail vmail 4096 jul 29 09:15 .imap
drwx—— 2 vmail vmail 4096 jul 29 09:15 INBOX
-rw——- 1 vmail vmail   24 jul 29 09:15 .subscriptions

The functions of Dovecot server again are:

  • Get emails from Postfix (MySQL database) and save them to disk
  • Allow mail users to fetch emails using POP3 or IMAP protocol with Outlook / Thunderbird whatever pop3 client

    groupadd -g 5000 vmail
    useradd -g vmail -u 5000 vmail -d /var/vmail -m
    chown -R vmail:vmail /var/vmail
    chmod u+w /var/vmail
    chgrp vmail /etc/dovecot/dovecot.conf
    chmod g+r /etc/dovecot/dovecot.conf
    chown root:root /etc/dovecot/dovecot-sql.conf
    chmod go= /etc/dovecot/dovecot-sql.conf


4. Create self-signed SSL certificate for Postfix mail and Dovecot pop3 server


openssl req -new -x509 -days 3650 -nodes -out /etc/ssl/certs/dovecot.pem -keyout /etc/ssl/private/dovecot.pem
chmod o= /etc/ssl/private/dovecot.pem
/etc/init.d/dovecot restart
openssl req -new -x509 -days 3650 -nodes -out /etc/ssl/certs/postfix.pem -keyout /etc/ssl/private/postfix.pem
chmod o= /etc/ssl/private/postfix.pem


5. Configuring Amavis (Anti Virus frontend) with Clamav AV

To reduce viruses it is a must nowadays to install Antivirus in Qmail I used qmail-scanner (perl script) frontend to Clamav Antivirus to check for Viruses and some messed up e-mails. In Postfix just like in Sendmail, tool that does the same is amavisd-new.  There are some configuration files to do, but as its time consuming to do changes one by one I prefer moving old /etc/amavis/ to /etc/amavis-bak/ and download and untar archive with already set  proper configs


apt-get install –yes amavisd-new
useradd clamav -g amavis
mv /etc/amavis /etc/amavis-old
cd /etc/
wget https://www.pc-freak.net/files/postfix/
amavis-config-debian-wheezy-7.tar.gz
tar -zxvvf amavis-config-debian-wheezy-7.tar.gz

…..
/etc/init.d/amavis start
Starting amavisd: amavisd-new.

Amavisd is meant to communicate in two port numbers with Postfix. Postfix passes Input in one (10024) and Output – Scanned File Status in (10025). Thus for normal amavis operation this two ports has to be showing as listening on localhost, e.g.:


netstat -nap | grep -E '10024|10025'
tcp        0      0 127.0.0.1:10024         0.0.0.0:*               LISTEN      13957/amavisd-new (
tcp        0      0 127.0.0.1:10025         0.0.0.0:*               LISTEN      9007/master     


6. Placing Dovecot working (properly configured) config files for Debian Wheezy

On Workaround.org there are plenty of configurations to copy paste inside files and how it is explained is a bit complicated thus played a lot mainly with /etc/postfix/master.cf and /etc/postfix/main.cf configurations until I finally had a working version of (SMTP) configured not to be an open relay and receive / sent email OK …
Here are configurations that worked for me:


mv /etc/postfix /etc/postfix-old
cd /etc/
wget -q https://www.pc-freak.net/files/postfix/postfix-configs-debian-wheezy.tar.gz
tar -zxvvf postfix-configs-debian-wheezy.tar.gz
… …..

[ ok ] Stopping Postfix Mail Transport Agent: postfix.

[ ok ] Starting Postfix Mail Transport Agent: postfix.


To download my good postfixs-debian-wheezy.tar.gz look here

Afterwards only setting you have to change in /etc/postfix/main.cf is:


myhostname = example-mail.org

to your Fully Qualified Domain Name (FQDN), lets say www.pc-freak.net
 

myhostname = www.pc-freak.net

I find it also useful to remove from SMTP after connect banner reporting that Postfix is running on Debian in main.cf change:
 

smtpd_banner = $myhostname ESMTP $mail_name (Debian/GNU)

 to

smtpd_banner = $myhostname ESMTP $mail_name


7. Placing Dovecot working config files in /etc/

Configuring Dovecot is not an easy task in Debian Linux Squeeze and Lenny, on Postfix ISPMail guide there is a special tutorial for each as there is none yet for Debian Wheezy. It took me long to figure it out how to translate from old config settings for Wheezy's Dovecot 2.1.7-7. Configuration files places has changed for some clarity in Dovecot 2.1.7-7. So many of the Workaround.rog's Squeeze Tutorial suggested changes in /etc/dovecot/dovecot.conf are to be made in files under /etc/dovecot/conf.d

Therefore quickest way to have working Dovecot is to move default config dir /etc/dovecot to /etc/dovecot-old and place tuned configs:
 

cd /etc/
wget -q https://www.pc-freak.net/files/postfix/dovecot-configs-debian-wheezy.tar.gz
tar -zxvvf dovecot-configs-debian-wheezy.tar.gz

….

chown -R vmail:dovecot /etc/dovecot
/etc/init.d/dovecot restart

[ ok ] Restarting IMAP/POP3 mail server: dovecot.
 

To download dovecot-configs-debian-wheezy.tar.gz click here

8.Install Web Interface User / Domain edit Mail Frontend – Mail Admin Tool – Matv1.1

There are 4 web mail admin interfaces suggested by ISPMail tutorial:


  • Matv.1.1 – Mail Admin Tool
  • ISPWebadmin
  • Mailadm
  • VEA

I tried with ISPWebadmin and VEA, but only one that worked for me is MATv1.1. Actually I liked a lot Mail Admin tool it is simple and does support; create new mail domains, create new users in domains and add user aliases.

Mail admin tool login screen screenshot Debian / Ubuntu GNU Linux

mail admin tool matv1 postfix web mail admin tool debian gnu linux wheezy

Here is how to install

cd /var/www;
wget -q http://mat.ssdata.dk/files/MATv1.1.tar.gz
tar -zxvvf MATv1.1.tar.gz
mv "MAT v1.1" mailadmin
cd mailadmin
cd includes
wget -q https://www.pc-freak.net/files/postfix/postfix-webadmin/config.php.txt
mv config.php.txt config.php
cd /var/www/mailadmin
wget -q https://www.pc-freak.net/files/postfix/postfix-webadmin/index-matv1.php.txt
mv index-matv1.php.txt index.php
chown -R www-data:www-data /var/www/mailadmin

Now point your browser to:


http://localhost/mailadmin/

or

http://xxx.xxx.xxx.xxx/mailadmin/

(where xxx.xxx.xxx.xxx is your local or Internet IP address) and you should see Matt mailadmin popup. I hope my little tutorial will be of use to many. Comments and problems with install steps will be much appreciated and might lead hopefully to improvements of this little Postfix Install Wheezy tutorial Enjoy 🙂
 

9. Configuring Web mail access to Mail server Mailboxes with Squirrelmail and Roundcube

a) Configuring Squirrelmail to work with Postfix


apt-get install –yes squirrelmail
ln -s /etc/squirrelmail/apache.conf /etc/apache2/conf.d/squirrelmail.conf
squirrelmail-configure


Squirrelmail config options default folder config none postfix debian wheezy linux

(Select option 3) – Folder Defaults

Choose Option 1 – Press 1
and set (Default Folder Prefix) to 'none'.

You can take few minutes to browse to other options too to select for example some meaningful title for your Squirrel Webmail – i.e. organization name or whatever…

That's all now to access Squirrel open in Firefox:

http://mail-domain.org/squirrelmail/

To test squirrel is configured correctly try to login with user john@example.org with pass summersun

b)Configure Roundcube + Postfix + Dovecot

Edit /etc/roundcube/apache.conf and uncomment:
 

#Alias /roundcube /var/lib/roundcube

to

Alias /roundcube /var/lib/roundcube
Then restart Apache:


/etc/init.d/apache2 restart
 …

 10. Testing if everything works fine together

a) Testing if mail server defined domain has properly configured DNS – PTR, MX and TXT records

First I assume here that mailserver has proper configured PTR record and it is defined properly in DNS to be MX (Mail Exchange server). You will have to contact your ISP (Internet Service Provider) and ask them to create new PTR record corresponding to hostname of mail server defined in myhostname var in /etc/postfix/main.cf
To test whether you have PTR record run:

host 83.228.93.76
www.pc-freak.net has address 83.228.93.76
www.pc-freak.net mail is handled by 0 mail.www.pc-freak.net.
root@websrv:/etc/dovecot# host 83.228.93.76
76.93.228.83.in-addr.arpa domain name pointer www.pc-freak.net.

In above example you see my domain www.pc-freak.net has proper defined PTR record. To test you have defined in domain DNS server (zone files) proper MX record issue:
 

host -t MX www.pc-freak.net
www.pc-freak.net mail is handled by 0 mail.www.pc-freak.net.

Again for sake of testing you see www.pc-freak.net has defined MX with priority of 0 (which in those case is highest), since there are no other defined MX domains and priorities.

It is good practice that domain name has also proper SPF record this is done with DNS server zone record of type TXT. 
Once again here is SPF record defined for www.pc-freak.net.
 

host -t TXT www.pc-freak.net
www.pc-freak.net descriptive text "google-site-verification=j9d4Bt5c_1ukGf4WBng0i4esOqJtbxSFVkG144dFqv4"
www.pc-freak.net descriptive text "spf1 a mx ptr ip4:83.228.93.76 -all"

You see 2nd line is the actual SPF record
www.pc-freak.net descriptive text "spf1 a mx ptr ip4:83.228.93.76 -all"

First line command returns is actually Domain DKIM key. I tried configuring DKIM keys following ISPMail tutorial unsuccesfully so by installing Postfix by my tutorial you will not have to have  DKIM keys (soft) installed or TXT records for Domain Keys defined.
 

b) Testing if mail server is able to send (deliver) mails to other MTA's correctly Next to test whether postfix is sending mails properly use:
 

mail -s "This is a simple test mail, no need to reply" systemexec@gmail.com
Heya,

Do you get this mail
?
Hope so 🙂
.
Cc:

Note that after writing the email you have to press "." and then Enter to send the mail.

To check everything is fine with sending the mail check in /var/log/mail.log, there should be something like;

Aug 2 08:29:56 websrv postfix/smtpd[16228]: connect from localhost[127.0.0.1]
Aug 2 08:29:57 websrv postfix/smtpd[16228]: 0D323662499: client=localhost[127.0.0.1]
 Aug 2 08:29:57 websrv postfix/cleanup[16224]: 0D323662499: message-id=<20130802132956.3C4A766249B@www.pc-freak.net>
 Aug 2 08:29:57 websrv postfix/qmgr[14241]: 0D323662499: from=<root@www.pc-freak.net>, size=749, nrcpt=1 (queue active)
 Aug 2 08:29:57 websrv amavis[13958]: (13958-01) Passed CLEAN {RelayedOpenRelay}, <root@www.pc-freak.net> -> <systemexec@gmail.com>, Message-ID: <20130802132956.3C4A766249B@www.pc-freak.net>, mail_id: 1oIcE-Zc9MND, Hits: -, size: 369, queued_as: 0D323662499, 828 ms
Aug 2 08:29:57 websrv postfix/smtp[16226]: 3C4A766249B: to=<systemexec@gmail.com>, relay=127.0.0.1[127.0.0.1]:10024, delay=1, delays=0.2/0.01/0.01/0.83, dsn=2.0.0, status=sent (250 2.0.0 from MTA(smtp:[127.0.0.1]:10025): 250 2.0.0 Ok: queued as 0D323662499)
Aug 2 08:29:57 websrv postfix/qmgr[14241]: 3C4A766249B: removed
Aug 2 08:29:57 websrv postfix/smtp[16235]: connect to gmail-smtp-in.l.google.com[2a00:1450:4013:c01::1b]:25: Network is unreachable
Aug 2 08:29:58 websrv postfix/smtp[16235]: 0D323662499: to=<systemexec@gmail.com>, relay=gmail-smtp-in.l.google.com[74.125.136.27]:25, delay=1.2, delays=0.08/0.01/0.65/0.49, dsn=2.0.0, status=sent (250 2.0.0 OK 1375450198 a48si4827663eep.113 – gsmtp)
Aug 2 08:29:58 websrv postfix/qmgr[14241]: 0D323662499: removed

As you see from above output gmail server returned status of  "Success" – 250 2.0.0 Ok: quequed as 0D323662499 – this means email is delivered OK and if the mail server IP from which you're sending is not listed in some Mailserver IPs Blacklist mail should arrive in a sec.

c) Testing if Dovecot POP3 and IMAP protocol are accessible by SQL kept mail accounts

Last thing to test is Dovecot (for Qmail users for sake of comparison – Dovecot is like Couirier IMAP and Courier POP3 mail server):

To test IMAP and POP3 easiest way is to use simple telnet connections. I've earlier written a small article on How to test if IMAP and POP3 mail service is working with telnet connections, so if you never done this take 2 mins to read it. By default ISPMail adds an email with username john@example.org with password summersun


telnet localhost pop3
Trying ::1…
Connected to localhost.
Escape character is '^]'.
+OK Dovecot ready.
USER john@example.org
+OK
PASS summersun
+OK Logged in.
quit
+OK Logging out.
Connection closed by foreign host.

To test IMAP protocol login

telnet localhost imap
Trying ::1…
Connected to localhost.
Escape character is '^]'.
* OK [CAPABILITY IMAP4rev1 LITERAL+ SASL-IR LOGIN-REFERRALS ID ENABLE IDLE STARTTLS AUTH=PLAIN AUTH=LOGIN] Dovecot ready.
01 login john@example.org summersun
01 OK [CAPABILITY IMAP4rev1 LITERAL+ SASL-IR LOGIN-REFERRALS ID ENABLE IDLE SORT SORT=DISPLAY THREAD=REFERENCES THREAD=REFS MULTIAPPEND UNSELECT CHILDREN NAMESPACE UIDPLUS LIST-EXTENDED I18NLEVEL=1 CONDSTORE QRESYNC ESEARCH ESORT SEARCHRES WITHIN CONTEXT=SEARCH LIST-STATUS SPECIAL-USE QUOTA] Logged in
^]
telnet> quit
Connection closed.

Well this is the end my friend 🙂 You should now have a properly running Postfix + Dovecot + Virtual Domains in SQL. Please drop me a thank you comment if it worked for you. If it doesn't drop a comment so I can integrate it and improve this tutorial. Happy Hacking 😉