Posts Tagged ‘substitute’
Saturday, March 3rd, 2012 I've recently had to make a copy of one /usr/local/nginx directory under /usr/local/nginx-bak, in order to have a working copy of nginx, just in case if during my nginx update to new version from source mess ups.
I did not check the size of /usr/local/nginx , so just run the usual:
nginx:~#  cp -rpf /usr/local/nginx /usr/local/nginx-bak

...
Execution took more than 20 seconds, so I check the size and figured out /usr/local/nginx/logs has grown to 120 gigabytes.
I didn't wanted to extra load the production server with copying thousands of gigabytes so I asked myself if this is possible with normal Linux copy (cp) command?. I checked cp manual e.g. man cp, but there is no argument like –exclude or something.
Even though the cp command exclude feature is not implemented by default there are a couple of ways to copy a directory with exclusion of subdirectories of files on G / Linux.
Here are the 3 major ones:
1. Copy directory recursively and exclude sub-directories or files with GNU tar
Maybe the quickest way to copy and exclude directories is through a littke 'hack' with GNU tar
nginx:~# mkdir /usr/local/nginx-new;

nginx:~# cd /usr/local/nginx#

nginx:/usr/local/nginx# tar cvf - \. --exclude=/usr/local/nginx/logs/* \

| (cd /usr/local/nginx-new; tar -xvf - )
Copying that way however is slow, in my case it fits me perfectly but for copying large chunks of data it is better not to use pipe and instead use regular tar operation + mv
# cd /source_directory

# tar cvf test.tar --exclude=dir_to_exclude/*\--exclude=dir_to_exclude1/* . \

# mv test.tar /destination_directory

# cd /destination# tar xvf test.tar
2. Copy folder recursively excluding some directories with rsync
P>eople who has experience with rsync , already know how invaluable this tool is. Rsync can completely be used as for substitute=de.a# rsync -av –exclude='path1/to/exclude' –exclude='path2/to/exclude' source destination
This example, can also be used as a solution to my copy nginx and exclude logs directory casus like so:
nginx:~# rsync -av --exclude='/usr/local/nginx/logs/' /usr/local/nginx/ /usr/local/nginx-new
As you can see for yourself, this is a way more readable for the tar, however it will not work on servers, where rsync is not installed and it is unusable if you have to do operations as a regular users on such for that case surely the GNU tar hack is more 'portable' across systems.
rsync has also Windows version and therefore, the same methodology should be working on MS Windows and good for batch scripting.
I've not tested it myself, yet as I've never used rsync on Windows, if someone has tried and it works pls drop me a short msg in comments.
3. Copy directory and exclude sub directories and files with find
Find in collaboration with cp can also be used to exclude certain directories while copying. Actually this method is better than the GNU tar hack and surely more efficient. For machines, where rsync is not installed it is just a perfect way to copy files from location to location, while excluding some directories, here is an example use of find and cp, for the above nginx case:
nginx:~# cd /usr/local/nginx

nginx:~# mkdir /usr/local/nginx

nginx:/usr/local/nginx# find . -type d \( ! -name logs \) -print -exec cp -rpf '{}' /usr/local/nginx-bak \;
This will find all directories inside /usr/local/nginx with find command print them on the screen, then execute recursive copy over each found directory and copy to /usr/local/nginx-bak
This example will work fine in the nginx case because /usr/local/nginx does not contain any files but only sub-directories. In other occwhere the directory does contain some files besides sub-directories the files had to also be copied e.g.:
# for i in $(ls -l | egrep -v '^d'); do\

cp -rpf $i /destination/directory
This will copy the files from source directory (for instance /usr/local/nginx/my_file.txt, /usr/local/nginx/my_file1.txt etc.), which doesn't belong to a subdirectory.
The cmd expression:
# ls -l | egrep -v '^d'
Lists only the files while excluding all the directories and in a for loop each of the files is copied to /destination/directory
If someone has better ideas, please share with me 🙂
Tags: argument, Auto, copy, copy cp, copy directory, copy folder, copying, destination directory, directory cd, Draft, eople, exclusion, feature, file, g man, gigabytes, gnu linux, gnu tar, linux linux, littke, location, man cp, mess, mess ups, msg, operation, p eople, production, production server, recursively, rpf, rsync, someone, something, source directory, subdirectories, substitute, tar cvf, tar xvf, test, tool, ups, xvf
Posted in Linux, Linux and FreeBSD Desktop, System Administration | 2 Comments »
Saturday, January 14th, 2012 Mounting ISO files in Linux is easy with mount cmd, however remembering the exact command one has to issue is a hard task because mounting ISO files is not a common task.
Mounting ISO files directly by clicking on the ISO file is very nice, especially for lazy people uninitiated with the command line 😉
Besides that I'm sure many Windows users are curious if there is an equivallent program to DaemonTools for Linux / BSD*?
The answer to this question is YES!
There are two major programs which can be used as a DaemonTools substitute on Linux:
These are FuriousISOMount and AcetoneISO
AcetoneISO is more known and I've used it some long time ago and if I'm correct it used to be one of the first ISO Mount GUI programs for Linux. There is a project called GMount-ISO / (GMountISO) which of the time of writting this article seems to be dead (at least I couldn't find the source code).
Luckily FuriousISOMount and AcetoneISO are pretty easy to install and either one of the two is nowdays existing in most Linux distributions.
Probably the programs can also be easily run on BSD platform also quite easily using bsd linux emulation.
If someone has tried something to mount GUIs in Free/Net/OpenBSD, I'll be interesting to hear how?
1. Mount ISO files GUI in GNOME with Furius ISO Mount
FuriousISOMount is a simple Gtk+ interface to mount -t iso9660 -o loop command.
To start using the program on Debian / Ubuntu install with apt;
debian:~# apt-get install furiusisomount

The following extra packages will be installed:

fuseiso fuseiso9660 libumlib0

The following NEW packages will be installed:

furiusisomount fuseiso fuseiso9660 libumlib0
…
To access the program in GNOME after install use;
Applications -> Accessories -> Furious ISO Mount
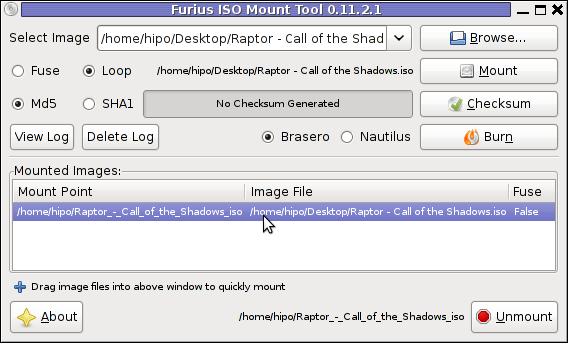
When mounting it is important to choose Loop option to mount the iso instead of Fuse
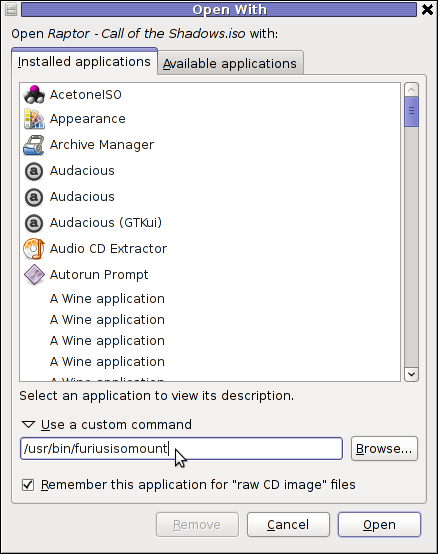
After the program is installed to associate the (.iso) ISO files, to permanently be opened with furiusisomount roll over the .iso file and choose Open With -> Other Application -> (Use a custom command) -> furiusisomount
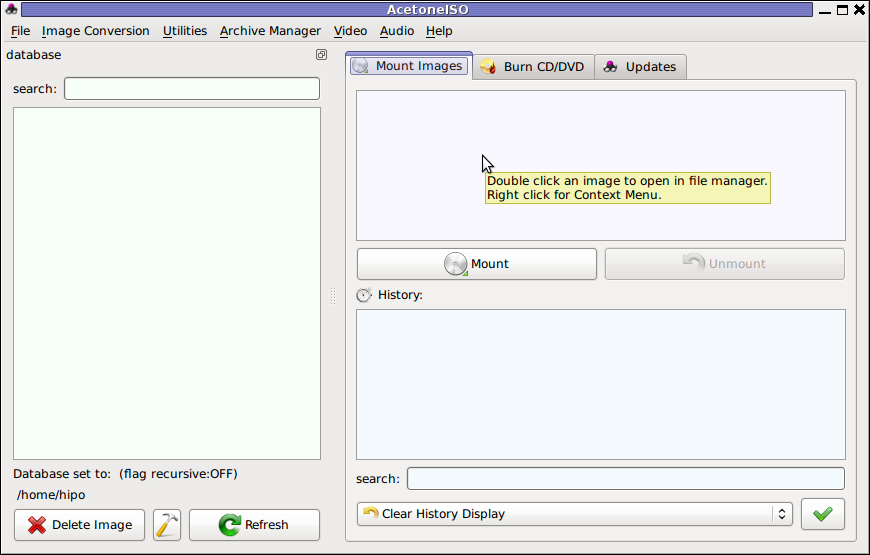
2. Mount ISO Files in KDE Graphical Environment with AcetoneISO
AcetoneISO is build on top of KDE's QT library and isway more feature rich than furiousisomount.
Installing AcetoneISO Ubuntu and Debian is done with:
debian:~# apt-get install acetoneiso

The following NEW packages will be installed:

acetoneiso gnupg-agent gnupg2 libksba8 pinentry-gtk2 pinentry-qt4

0 upgraded, 6 newly installed, 0 to remove and 35 not upgraded.

Need to get 3,963 kB of archives.

After this operation, 8,974 kB of additional disk space will be used.

...
AcetoneISO supports:
- conversion between different ISO formats
- burn images to disc
- split ISO image volumes
- encrypt images
- extract password protected files
Complete list of the rich functionality AcetoneISO offers is to be found on http://www.acetoneteam.org/viewpage.php?page_id=6
To start the program via the GNOME menus use;
Applications -> Accessories -> Sound & Video -> AcetoneISO
I personally don't like AcetoneISO as I'm not a KDE user and I see the functionality this program offers as to rich and mostly unnecessery for the simple purpose of mounting an ISO.
3. Mount ISO image files using the mount command
If you're a console guy and still prefer mounting ISO with the mount command instead of using fancy gui stuff use:
# mount -t iso9660 -o loop /home/binary/someiso.iso /home/username/Iso_Directory_Name
Tags: AcetoneISO, Auto, BSD, cmd, custom, debian gnu, Draft, emulation, exact command, file, Files, Free, GMount-ISO, Gnome, graphical environment, gtk interface, guis, image files, ISO, iso file, iso files, iso9660, libumlib, long time, loop command, most linux distributions, nbsp, Open, OpenBSD, option, platform, roll, someone, something, source code, substitute, time, Ubuntu, windows users, YES
Posted in Gnome, Linux, Linux and FreeBSD Desktop, Linux Audio & Video | No Comments »
Tuesday, April 12th, 2011 Until recently, I have used a default wordpress theme which historically is a bit old and used to be a default theme to the older versions of wordpress.
Since however, I’ve went to many updates and on the other hand I do like and enjoy the template I have decided to continue use it for my blog until this very day.
However this nice theme’s default behaviour is a bit weird, since by default the Single opened posts are configured in a way that the usual index page sidebar is missing.
As in the sidebar there are plenty of navigation buttons and search in the blog button, at a certain moment I have realized it’s probably not a good idea that the single.php (single blog posts) open up with the right sidebar missing.
Thus I’ve decided to put back the missing sidebar in the single posts, with a hope that this will be helpful to my readers and hence have positive impact on the overall blog user experience.
Doing so prooved to be rather easy, here is how I added back the right sidebar to my wordpress single posts :
1. Edit blog/wp-content/themes/default/single.php
debian:~# vim /var/www/blog/wp-content/themes/default/single.php
2. In the single.php look up for the code:
<div id="content" class="widecolumn">
Substitute this html code with:
<div id="content" class="narrowcolumn">
3. Next find the code:
<?php get_footer(); ?>
Right before the get_footer(); php function add in the function;
<?php get_sidebar(); ?>
Tadam! Refresh a single post in Firefox and you should see your blog index.php sidebar to show up.
Tags: behaviour, blog, Button, code lt, content themes, default behaviour, default theme, div, div id, Firefox, footer, function, gt 3, hand, idea, impact, index page, moment, navigation buttons, older versions, page, php, Search, Single, substitute, Tadam, use, user experience, var, vim, way, wordpress blog, www
Posted in Web and CMS, Wordpress | 2 Comments »
Wednesday, January 11th, 2012 Since I've blogged about my recent skype issues. I've played a lot with pulseaudio, alsa, alsa-oss to experimented a lot until I figured out why Skype was failing to properly delivery sound and record via my embedded laptop mic.
Anyways, while researching on the cause of my Thinkpad r61 mic issues, I've red a bunch of blog posts by people experiencing microphone oddities with Lenovo Thinkpads
Throughout the search I come across one very good article, which explained that in many cases the Thinkpad sound problems are caused by the snd-hda-intel alsa kernel module. snd-hda-intel fails to automatically set proper sb model type argument during Linux install when the soundcard is initialized with some argument like options snd-hda-intel model=auto
Hence, the suggested fix which should resolve this on many Thinkpad notebooks is up to passing the right module argument:
To fix its neceessery to edit /etc/modprobe.d/alsa-base.conf .
debian:~# vim /etc/modprobe.d/alsa-base.conf
Find the line in the file starting with:
options snd-hda-intel model=
and substitute with:
options snd-hda-intel model=thinkpad
Finally a restart of Advaned Linux Sound Architecture (alsa) is required:
debian:~# /etc/init.d/alsa restart

...
At most cases just restarting the alsa via its init script is not enough, since the ssnd-hda-intel kernel module is already in use by some program or something, so its best to do a reboot to make sure the module is loaded with the new model=thinkpad argument.
My exact laptop sound card model is:
debian:~# lspci |grep -i audio

00:1b.0 Audio device: Intel Corporation 82801H (ICH8 Family) HD Audio Controller (rev 03)
After changing the module and using alsamixer and aumix to make sure mic is unmuted and its volume is high enough, mic sound rec works fine.
Tags: Advaned, alsa, alsamixer, architecture, argument, audio controller, aumix, Auto, blogged, card, card model, cause, confFind, Draft, file, init, init script, intel corporation, kernel module, laptop, microphone, model auto, model type, modprobe, new model, oddities, pulseaudio, Reboot, script, Search, snd, Solve, something, sound architecture, sound card, soundcard, ssnd, substitute, thinkpad notebooks, thinkpad r61, thinkpads, type, type argument, Ubuntu, vim
Posted in Linux, Various | No Comments »
Tuesday, January 10th, 2012 I've experienced plenty of problems with Pulseaudio and Skype output sound hell crappy. This stupid proprietary program Skype is a total crap … Anyways again thanks to ArchLinux's wiki, I've used the two mentioned steps to fix all this Skype in / out problems …
1. Fix problems with Glitches, voice skips and crackling In file /etc/pulse/default.pa its necessery to substitute the line;
load-module module-udev-detect
with
load-module module-udev-detect tsched=0
2. Resolve Choppy sound in (Pulseaudio) -> Skype
In /etc/pulse/daemon.conf two lines has to be also substituted:
; default-sample-rate = 44100
Should become;
default-sample-rate = 48000
3. Change /etc/default/pulseaudio to allow dynamic module loading
It is a good idea to the default settings from DISALLOW_MODULE_LOADING=1 to DISALLOW_MODULE_LOADING=0 .This step is not required and I'm not sure if it has some influence on solving sound in / out problems with Skype but I believe it can be helpful in some cases..
So in /etc/default/pulseaudio Substitute:
DISALLOW_MODULE_LOADING=1
to;
DISALLOW_MODULE_LOADING=0
4. Restart PulseAudio server
After the line is changed and substituted a restart of PulseAudio is required. For PulseAudio server restart a gnome session logout is necessery. Just LogOff logged Gnome user and issue cmd:
debian:~# pkill pulseaudio
This will kill any left pulseaudio server previous instances.
Tags: ArchLinux, Auto, Choppy, choppy sound, conf, crackling, crap, crappy, debian gnu, default settings, Draft, file, Glitches, Gnome, gnome user, hell, idea, influence, instances, issue, line, Linux, loading, logout, Module, nbsp, necessery, pkill, plenty, proprietary program, pulse, resolve, Skype, sound glitches, substitute, udev, voice, wiki
Posted in Linux and FreeBSD Desktop, Linux Audio & Video, Skype on Linux | 18 Comments »
Wednesday, January 4th, 2012 
I have recently blogged how I've installed & configured ejabberd (jabber server) on Debian .
Today I decided to further extend, my previous jabberd installation by installing JWChat a web chat interface frontend to ejabberd (a good substitute for a desktop app like pidgin which allows you to access a jabber server from anywhere)
Anyways for a base of installing JWChat , I used the previously installed debian deb version of ejabberd from the repositories.
I had a lot of troubles until I actually make it work because of some very minor mistakes in following the official described tutorial ejabberd website jwchat install tutorual
The only way I can make jwchat work was by using the install jwchat with ejabberd's HTTP-Bind and file server method
Actually for quite a long time I was not realizing that, there are two ways to install JWChat , so by mistake I was trying to mix up some install instructions from both jwchat HTTP-Bind file server method and JWchat Apache install method …
I've seen many people complaining on the page of Install JWChat using Apache method which seemed to be experiencing a lot of strangle troubles just like the mines when I mixed up the jwchat php scripts install using instructions from both install methods. Therefore my guess is people who had troubles in installing using the Apache method and got the blank page issues while accessing http://jabber.servername.com:5280/http-poll/ as well as various XML Parsing Error: no element found errors on – http://ejabberd.oac.com:5280/http-poll/ is most probably caused by the same install instructions trap I was diluted in.
The steps to make JWChat install using the HTTP-Bind and file server method, if followed should be followed absolutely precisely or otherwise THEY WILL NOT WORK!!!
This are the exact steps I followed to make ejabberd work using the HTTP-Bind file server method :
1. Create directory to store the jwchat Ajax / htmls
debian:~# mkdir /var/lib/ejabberd/www

debian:~# chmod +x /var/lib/ejabberd

debian:~# chmod +x /var/lib/ejabberd/www
2. Modify /etc/ejabberd/ejabberd.cfg and include the following configs
While editting the conf find the section:
{listen,
[
…
Scrolling down you will fine some commented code marked with %% that will read:
 {5269, ejabberd_s2s_in, [

{shaper, s2s_shaper},

{max_stanza_size, 131072}

]},
Right after it leave one new line and place the code:
 {5280, ejabberd_http, [

{request_handlers, [

{["web"], mod_http_fileserver}

]},
http_bind,
http_poll,
web_admin
]}
]}.
Scrolling a bit down the file, there is a section which says:
%%% =======

%%% MODULES
%%
%% Modules enabled in all ejabberd virtual hosts.
%%
The section below the comments will look like so:
{modules, [ {mod_adhoc, []},

{mod_announce, [{access, announce}]}, % requires mod_adhoc

{mod_caps, []},

{mod_configure,[]}, % requires mod_adhoc

{mod_ctlextra, []},

{mod_disco, []},

%%{mod_echo, [{host, "echo.localhost"}]},

{mod_irc, []},

{mod_last, []},
After the {mod_last, … the following lines should be added:
 {mod_http_bind, []},

{mod_http_fileserver, [

{docroot, "/var/lib/ejabberd/www"},

{accesslog, "/var/log/ejabberd/webaccess.log"}

]},
3. Download and extract latest version of jwchat
Of the time of writting the latest version of jwchat is jwchat-1.0 I have mirrored it on pc-freak for convenience:
debian:~# wget https://www.pc-freak.net/files/jwchat-1.0.tar.gz
….
debian:~# cd /var/lib/ejabberd/www

debian:/var/lib/ejabberd/www# tar -xzvf jwchat-1.0.tar.gz

...

debian:/var/lib/ejabberd/www# mv jwchat-1.0 jwchat

debian:/var/lib/ejabberd/www# cd jwchat
4. Choose the language in which you will prefer jwchat web interface to appear
I prefer english as most people would I suppose:
debian:/var/lib/ejabberd/www/jwchat# for a in $(ls *.en); do b=${a%.en}; cp $a $b; done
For other languages change in the small one liner shell script b=${a%.en} (en) to whatever language you will prefer to make primary.After selecting the correct langauge a rm cmd should be issued to get rid of the .js.* and .html.* in other language files which are no longer needed:
debian:/var/lib/ejabberd/www/jwchat# rm *.html.* *.js.*
5. Configure JWChat config.js
Edit /var/lib/ejabberd/www/jwchat/config.js , its necessery to have inside code definitions like:
/* If your Jabber server is jabber.example.org, set this: */

var SITENAME = "jabber.example.org";
/* If HTTP-Bind works correctly, you may want do remove HTTP-Poll here */
var BACKENDS =
[
{
name:"Native Binding",
description:"Ejabberd's native HTTP Binding backend",
httpbase:"/http-bind/",
type:"binding",
servers_allowed:[SITENAME]
}
];
6. Restart EJabberd server to load the new config settings
debian:~# /etc/init.d/ejabberd restart

Restarting jabber server: ejabberd..
7. Test JWChat HTTP-Bind and file server backend
I used elinksand my beloved Epiphany (default gnome browser) which by the way is the browser I use daily to test that the JWChat works fine with the ejabberd.
To test the newly installed HTTP-Bind ejabberd server backend on port 5280 I used URL:
http://jabber.mydomain.com:5280/web/jwchat/I had quite a struggles with 404 not found errors, which I couldn't explain for half an hour. After a thorough examination, I've figured out the reasons for the 404 errors was my stupidity …
The URL http://jabber.mydomain.com:5280/web/jwchat/ was incorrect because I fogrot to move jwchat-1.0 to jwchat e.g. (mv jwchat-1.0 jwchat) earlier explained in that article was a step I missed. Hence to access the web interface of the ejabberd without the 404 error I had to access it via:
http://jabber.mydomain.com:5280/web/jwchat-1.0

Finally it is handy to add a small index.php redirect to redirect to http://jabber.mydomain.com:5280/web/jwchat-1.0/
The php should like so:
<?

php

header( 'Location: http://jabber.mydomain.com:5280/web/jwchat-1.0' ) ;

?>
Tags: ajax, amp, Bind, Binding, config, configure, deb, Desktop, ejabberd, element, exact steps, fil, file, file server, frontend, good, guess, htmls, HTTP, Install, installation, Jabber, jabber server, jwchat, long time, minor mistakes, mistake, mod, nbsp, official, page, php scripts, pidgin, quot, repositories, Scrolling, server method, substitute, time, tutorial, two ways, web chat, work, wwwdebian, xml parsing error
Posted in Linux, Linux and FreeBSD Desktop, System Administration | No Comments »
Wednesday, December 14th, 2011 
While looking over the installable packages in System -> Administration -> Software Center on my my Debian powered notebook, I’ve accidently rolled over a game called Abe’s Amazing Adventure , as a big oldschool arcade game fan, I’ve immediately clicked on Install being impatient to see the overall game atmosphere and gameplay as well as storyline.
Abe’s Amazing Adventure is available under the debian package name abe and can be installed by issuing:
debian:~# apt-get install abe
I was pleasently surprised to find out the gameplay and the overall game feels like the golden classical arcade game Dangerous Dave
For youngsters who never played the amazing absolute killing arcade ! as well as for people who feel nostalgic about Dangerous Dave 2 here is a nice gameplay screenshot:

Here is also a screenshot of Abe’s Amazing Adventure gameplay:

You can see the great resemblense between the two games even by the screenshot; In both games you have to collect keys to open doors and diamonds which gives you points. Of course there are some differences as you can see Abe’s Amazing Adventure ‘s graphics has some additional items like Baloons with which your main character can fly over distances (for a limited time). There is also more diversity in the enemy types you face on the road to unlock the different doors. The game has also a red stars which while taken saves the game so if you quit the game on next game load up starting the game automatically starts you from the last save point.

The ( 6 ) baloons seen in the screenshot on the left upper corner can be used occasionally to fly some distance by pressing Enter .
There are health recovery kits one can take to recover, some health damaged by hitting obstacles on the way.
The game story is short but entertaining, just like the general game feel:
 The game music is relaxing and more or less in the spirit of arcade games, the keyboard interactivety is pretty good as well.One thing I see can be improved to make the game better are the graphics, they’re a bit childish and too cubical, where sometimes some more general characters and obstacles animation will give the game a better look. Anyways for the year 2003 and for a free software arcade the game is not bad. For children and growing kids the game is just perfect, even for big kids like me its good to spend an hour of jump and run fun 😉
Tags: Administration, Amazing, animation, arcade game, atmosphere, baloons, center, character, course, dangerous dave, debian package, distance, fan, freebsd, fun, game, game atmosphere, game fan, game load, game story, gnu linux, gt software, health, health recovery, img, Install, interactivety, jump, left, linux freebsd, name, oldschool, package, quot, red stars, resemblense, road, s graphics, screenshot, software, software center, story, storyline, substitute, system, time, two games, way, year, youngsters
Posted in Entertainment, Games Linux, Linux, Linux and FreeBSD Desktop | 1 Comment »
Wednesday, December 14th, 2011 
UNetbootin is a nice easy to use Free Software Universal mutli OS program that makes creation of Bootable USB Stick Linux, FreeBSD, NetBSD and other free operating systems a piece of cake
UNetbootin support the three major operating system architectures Windows, Mac OS X and GNU / Linux .
In Debian and Ubuntu based distributions Unetbootin is available as a deb binary package:
debian:~$ dpkg -l |grep -i 'usb' |grep -i 'install'

ii unetbootin 471-2

installer of Linux/BSD distributions to a partition or USB drive
To install it with apt:
debian:~# apt-get install unetbootin

...
debian:~# unetbootin
Alternatively for all those who prefer to run it via the GNOME Application menu follow to the menu path:
Applications -> System Tools -> Unetbootin
If the program is launched with non privileged account (like via GNOME Application menu), in order to to properly tamper with any connected USB Flash drive you will be asked about the super user password.
The shipped uniboot version in current Debian stable version Squeeze is 471-2 is a bit outdated. For everyone eager to use the latest version which as of time of writting is 565 check out UnetBootin’s Official Homepage on SourceForge
Installing the distributed binary of unetbootin downloadable from its website is a trivial one. Simply download the file from the Download (for Linux) link and run the binary unetbootin-linux-565:
debian:~$ ./unetbootin-linux-565
There is one annoying thing about the latest downloadable (static compiled) unetbootin version, it was built to run using KDE’s QT library and therefore the interface that poped up while trying it was KDE like, pitily did not take advantage of my native GNOME GTK2 library :
 Though this little note, unetbootin developers has done a truly great job! I tried unetbootin and was more than pleasently surprised that it prepares bootable USB sticks with only 4 mouse clicks!!! 😉
The program worked out of the box without any external or additional hacks like many of the programs I daily use it just worked 😉
UNetbootin has a thoroughful list of Free Software operating system distributions in the distributions list. Many of the offered Open Source & Free Software distributions has even possibility of installing a multiple versions of the respective distro.
Here is a complete list of all the Free & Open Source Operating Systems, unetbootin program can burn and make bootable on USB stick.
- 1. Ubuntu
- 2. Debian
- 3. Fedora
- 4. PCLinuxOS
- 5. Linux Mint
- 6. Sabayon Linux
- 7. Gentoo
- 8. OpenSUSE
- 9. MEPIS
- 10. Zenwalk
- 11. Arch Linux
- 12. Slax
- 13. Dream Linux
- 14. Damn Small Linux
- 15. SliTaz
- 16. Elive
- 17. CentOS
- 18. Puppy Linux
- 19. Mandriva
- 20. FreeBSD
- 21. LinuxConsole
- 22. Frugalware Linux
- 23. NetBSD
- 24. xPUD
- 25. gNewSense
- 26. GeeXboX
- 27. Gujin
- 28. Kaspersky Rescue Disc
- 29. NimbleX
- 30. Sabayon Linux
- 31. Puppy Linux
- 32. Mandriva
- 33. SuperOS
- 34. Xubuntu
- 35. Parted Magic
- 36. Super Grub Disk
- 37. Smart Boot Manager
- 38. 0phcrack
- 40. FreeNAS
- 41. NetBootCD
- 42. FreeDOS
- 43. Dr. Web Antivirus
- 44. CloneZilla
- 45. Kubutun
- 46. BackTrack
To burn and make bootable on the USB flash drive any of the listed distributions, choose the distribution name and version number as well as the Drive: (which usually will be selected by default to the first sticked USB drive let’s say /dev/sdb1).
Afterwards press on the OK button and that’s it, lay down your back and wait until the distribution is downloaded from the Internet, burned into the USB pendrive and made bootable.
I’ve tested Unetbootin with two distributions;
1. Xubuntu 10_04_live and;
2. Fedora 13
Both of the distributions got burned properly to the USB drive usng the CD images and booted fine on a Packard Bell notebook on.
Having an USB drive with LiveCD GNU / Linux or BSD everywhere with you is hand and is a sort of substitute to the old linux boot floopy disk of Tomsrtbt linux distribution, I used to keep everywhere with me . Now I can move to any PC installed with Windows and use my preferred Free Software OS using an USB Stick.
Besides that, there are laptops whose CD-ROM / DVD-ROM drive is broken and therefore if one wants to re-install an improperly working Windows XP / Vista / 7 and substitute with Free operating system this task is only possible using USB Flash Disk or NetBoot Install.
Installing using USB has its advantageous as you don’t depend on the network as well as the installation from USB is in most of the cases few times faster.
There are plenty of other USB Linux installer programs, most of them however are only available with a Windows version.
Here are few prgrams which can be used to burn a number of Linux and *BSD installations using Microsoft Windows to create Linux / BSD liveUSB:
- Universal USB Installer – http://live.learnfree.eu/download
- YUMI – Your Universal Multiboot Installer – http://www.pendrivelinux.com/yumi-multiboot-usb-creator/
- xBOOT – http://sites.google.com/site/shamurxboot/
I was happy to find out ’bout the existence of Universal USB Installer (this proggie written in Python) is made by a Bulgarian mate! Proud to be Bulgarian 😉 Universal USB Installer is actually multiplatform since written in Python and therefore can be used to burn a LiveUSB on GNU / Linux and (possibly on FreeBSD?)I would be glad to get feedback from other people who had experience with programs to prepare LiveUSB bootable sticks on Free Software OSes. Does anybody tried that on who *BSDs? Cheers 😉
Tags: annoying thing, application menu, binary package, BSD, bsd distributions, cake, debian gnu, Disk, distribution, dpkg, drive, drive memory, Free, free operating systems, Gnome, gnome application, gnu linux, liveUSB, mac os x, menu, menu path, nbsp, NetBSD, number, Open, os program, package, package debian, partition, password, piece, privileged account, qt library, software, sourceforge, stable version, substitute, support, system architectures, Ubuntu, UnetbootinIf, uniboot, Universal, usb flash drive
Posted in FreeBSD, Linux, Linux and FreeBSD Desktop, Linux Audio & Video, System Administration, Various | 2 Comments »
Wednesday, December 7th, 2011 
I’ve playing trying to learn InkScape – The Open Source vector graphic editor .By so far I’m quite impressed on how easy this program is learned and how easy graphical manipulation with this nifty program can be done.
The default format in which InkScape saves its files is SVG (Scalable Vectors Graphics). For all those unfamiliar with SVG – SVG is an open (free format) format developed in 1999 which insetad of containing binary data like PNG or JPEG does contain plain XML content. SVG being consisted of plain XML has multiple advantageous, the most important one makes it easy for text and visual data to be displayed among different program svg readers in absolutely identical way. Besides that the format if read with plain text editor like vim or emacs can be altered directly via the source.
Being multi system interoperable makes SVG as a great format for text and visual data storage in HTML5, actually SVG is already a part of the HTML5 html coding standard. And most probably its adoption rate will raise up drastically as soon as HTML5 starts substitute HTML4 and lower web standards.
Anyways I’m slipping away from the aim of this post so I’ll stop blabbering on how great SVG is and let people check it out for themselves (if not already).
Going back to the aim of my article to show How to convert SVG to PNG graphical extension on GNU / Linux and FreeBSD
After producing a bunch of files with InkScape I realized the default format in which Inkscape stores its files is SVG , this was okay with me but since I wanted to have my experimental produced content in PNG I needed a way to convert SVG to
My first logical guess was that The Gimp will be able to handle the situation and after opening my SVG file with GIMP and used the gimp File -> Save As option and give the SVGfile an extension of PNG , Gimp succesfully converted the file to PNG.
However I wanted to dig further and check out what is the standard accepted way to convert SVG files using a plain command. This will possibly be handy to me if I had to do something online (let’s say a website) which will accept SVG and will require the SVG files to be converted and also stored in PNG or other Graphic file formats.
After checking online, I’ve found a post which pointed me to librsvg2 which contains RSVG – (Turn SVG files into raster images.)
librsvg is available as a package in most mainstream Linux distributions nowdays, Fedora, Debian etc., as well as contains a port inside the FreeBSD ports system. Since I’m using Debian on my notebook where I installed and tested the command line SVG to PNG convertion the way I did it is:
noah:/home/hipo/Desktop# apt-get --yes install librsvg2-bin

Reading package lists... Done

Building dependency tree

Reading state information... Done

The following NEW packages will be installed:

librsvg2-bin

0 upgraded, 1 newly installed, 0 to remove and 16 not upgraded.

Need to get 72.5 kB of archives.

After this operation, 180 kB of additional disk space will be used.

Get:1 http://ftp.nl.debian.org/debian/ squeeze/main librsvg2-bin amd64 2.26.3-1 [72.5 kB]

Fetched 72.5 kB in 0s (184 kB/s)

Selecting previously deselected package librsvg2-bin.

(Reading database ... 376046 files and directories currently installed.)

Unpacking librsvg2-bin (from .../librsvg2-bin_2.26.3-1_amd64.deb) ...

Processing triggers for man-db ...

Setting up librsvg2-bin (2.26.3-1) ...
Afterwards the exact convertion of my Inscape SVG file drawing.svg to drawing.png using rsvg I’ve done like so:
hipo@noah:~/Desktop$ rsvg drawing.svg drawing.png
The convertion results for me was 100% uniqueness between the file converted and the output PNG. Some people might wonder why I didn’t used Inkscape’s Export to Bitmap function and then use convert command part of ImageMagick in order to convert the produced Inkscape bitmap to PNG.
One other thing worthy to mention is on Debian, librsvg2-bin contains 2 more executable besides rsvg. One is the rsvg-view command which allows one to view SVG files using command line or Graphic enviroment, the other one is rsvg-convert which supports again SVG convertion to PDF and to PNG
Before proceeding with the other described ways to convert SVG to PNG earlier in this article, I give a try to Inkscape’s Export to Bitmap embedded function but the produced bitmap did not resembled the original SVG file so I decided to completely abandon this method
Maybe there is some particular reason of the chaotic way I’ve tested Inkscape to place random images sometimes going out of the field of a paper etc. which influenced the improper generation of Bitmap using Inkscape, despite that it seems InkScape needs some more development until the bugs in Bitmap producing get fixed and it can be freely used to produce Bitmaps.
Maybe there is some particular reason for the failure of Inkscape to produce a good BMP file, like for example the chaotic way I’ve tested Inkscape to place random images sometimes going out of the field of a paper borders etc.This should have influenced the improper generation of Bitmap using Inkscape, anyhow it seems InkScape needs some more development until the bugs in Bitmap creation get fixed.
By the way if you’re wondering how to convert PNG to bitmap BMP after, once having converted SVG to PNG this is easily doable with convert command, like so:
hipo@noah:~/Desktop$ convert drawing.png drawing.bmp
Maybe in future releases it will be a good idea if InkScape developers integrate a convertion to other formats this will make it handy and make surely these nice program more popular among users. Hope this is helpful. Cheers and as RMS likes to say Happy Hacking 😉
Tags: adoption rate, binary data, bitmap, convertion, data storage, default format, Desktop, emacs, export, file, format, function, GIMP, gnu linux, graphic editor, graphic formats, graphical extension, graphical manipulation, Graphics, hipo, HTML, inkscape, interoperable, librsvg, nbsp, nifty program, noah, Open, package, png, Scalable, source vector, substitute, svg file, text, Vectors, vim, xml content
Posted in FreeBSD, Linux, Linux and FreeBSD Desktop, Linux Audio & Video, Various | 2 Comments »
Tuesday, August 30th, 2011 
In this article in short, I’ll explain how I configured Nagios on a Debian GNU/Linux release (Squeeze 6) to monitor a couple of Windows hosts running inside a local network. Now let’s start.
1. Install necessery nagios debian packages
apt-get install nagios-images nagios-nrpe-plugin nagios-nrpe-server nagios-plugins nagios-plugins-basic nagios-plugins-standard

nagios3 nagios3-cgi nagios3-common nagios3-core
2. Edit /etc/nagios-plugins/config/nt.cfg
In the File substitute:
define command { command_name check_nt command_line /usr/lib/nagios/plugins/check_nt -H '$HOSTADDRESS$' -v '$ARG1$' }
With:
define command {

command_name check_nt

command_line /usr/lib/nagios/plugins/check_nt -H '$HOSTADDRESS$' -p 12489 -v $ARG1$ $ARG2$

}
3. Modify nrpe.cfg to put in allowd hoss to connect to the Nagions nrpe server
vim /etc/nagios/nrpe.cfg
Lookup inside for nagios’s configuration directive:
allowed_hosts=127.0.0.1
In order to allow more hosts to report to the nagios nrpe daemon, change the value to let’s say:
allowed_hosts=127.0.0.1,192.168.1.4,192.168.1.5,192.168.1.6
This config allows the three IPs 192.168.1.4-6 to be able to report for nrpe.
For the changes to nrpe server to take effect, it has to be restrarted.
debian:~# /etc/init.d/nagios-nrpe-server restart
Further on some configurations needs to be properly done on the nrpe agent Windows hosts in this case 192.168.1.4,192.168.1.5,192.168.1.6
4. Install the nsclient++ on all Windows hosts which CPU, Disk, Temperature and services has to be monitored
Download the agent from http://sourceforge.net/projects/nscplus and launch the installer, click twice on it and follow the installation screens. Its necessery that during installation the agent has the NRPE protocol enabled. After the installation is complete one needs to modify the NSC.ini
By default many of nsclient++ tracking modules are not enabled in NSC.ini, thus its necessery that the following DLLs get activated in the conf:
FileLogger.dll

CheckSystem.dll

CheckDisk.dll

NSClientListener.dll

SysTray.dll

CheckEventLog.dll

CheckHelpers.dll
Another requirement is to instruct the nsclient++ angent to have access to the Linux installed nagios server again with adding it to the allowed_hosts config variable:
allowed_hosts=192.168.1.1
In my case the Nagios runs on Debian Lenny (Squeeze) 6 and possess the IP address of 192.168.1.1
To test the intalled windows nsclient++ agents are properly installed a simple telnet connection from the Linux host is enough:
5. Create necessery configuration for the nagios Linux server to include all the Windows hosts which will be monitored
There is a window.cfg template file located in /usr/share/doc/nagios3-common/examples/template-object/windows.cfg on Debian.
The file is a good start point for creating a conf file to be understand by nagios and used to periodically refresh information about the status of the Windows hosts.
Thus it’s a good idea to copy the file to nagios3 config directory:
debian:~# mkdir /etc/nagios3/objects

debian:~# cp -rpf /usr/share/doc/nagios3-common/examples/template-object/windows.cfg /etc/nagios3/objects/windows.cfg
A sample windows.cfg content, (which works for me fine) and monitor a couple of Windows nodes running MS-SQL service and IIS and makes sure the services are up and running are:
define host{

use windows-server ; Inherit default values from a template

host_name Windows1 ; The name we're giving to this host

alias Iready Server ; A longer name associated with the host

address 192.168.1.4 ; IP address of the host

}

define host{

use windows-server ; Inherit default values from a template

host_name Windows2 ; The name we're giving to this host

alias Iready Server ; A longer name associated with the host

address 192.168.1.4 ; IP address of the host

}

define hostgroup{

hostgroup_name windows-servers ; The name of the hostgroup

alias Windows Servers ; Long name of the group

}

define hostgroup{

hostgroup_name IIS

alias IIS Servers

members Windows1,Windows2

}

define hostgroup{

hostgroup_name MSSQL

alias MSSQL Servers

members Windows1,Windows2

}

define service{

use generic-service

host_name Windows1

service_description NSClient++ Version

check_command check_nt!CLIENTVERSION

}

define service{ use generic-service

host_name Windows1

service_description Uptime

check_command check_nt!UPTIME

}

define service{ use generic-service

host_name Windows1

service_description CPU Load

check_command check_nt!CPULOAD!-l 5,80,90

}

define service{

use generic-service

host_name Windows1

service_description Memory Usage

check_command check_nt!MEMUSE!-w 80 -c 90

define service{

use generic-service

host_name Windows1

service_description C: Drive Space

check_command check_nt!USEDDISKSPACE!-l c -w 80 -c 90

}

define service{

use generic-service

host_name Windows1

service_description W3SVC

check_command check_nt!SERVICESTATE!-d SHOWALL -l W3SVC

}

define service{

use generic-service

host_name Windows1

service_description Explorer

check_command check_nt!PROCSTATE!-d SHOWALL -l Explorer.exe

}

define service{

use generic-service

host_name Windows2

service_description NSClient++ Version

check_command check_nt!CLIENTVERSION

}

define service{ use generic-service

host_name Windows2

service_description Uptime

check_command check_nt!UPTIME

}

define service{ use generic-service

host_name Windows2

service_description CPU Load

check_command check_nt!CPULOAD!-l 5,80,90

}

define service{

use generic-service

host_name Windows2

service_description Memory Usage

check_command check_nt!MEMUSE!-w 80 -c 90

define service{

use generic-service

host_name Windows2

service_description C: Drive Space

check_command check_nt!USEDDISKSPACE!-l c -w 80 -c 90

}

define service{

use generic-service

host_name Windows2

service_description W3SVC

check_command check_nt!SERVICESTATE!-d SHOWALL -l W3SVC

}

define service{

use generic-service

host_name Windows2

service_description Explorer

check_command check_nt!PROCSTATE!-d SHOWALL -l Explorer.exe

}

define service{ use generic-service

host_name Windows1

service_description SQL port Check

check_command check_tcp!1433

}

define service{

use generic-service

host_name Windows2

service_description SQL port Check

check_command check_tcp!1433

}
The above config, can easily be extended for more hosts, or if necessery easily setup to track more services in nagios web frontend.
6. Test if connectivity to the nsclient++ agent port is available from the Linux server
debian:~# telnet 192.168.58.6 12489

Trying 192.168.58.6...

Connected to 192.168.58.6.

Escape character is '^]'.

asd

ERROR: Invalid password.
Another good idea is to launch on the Windows host the NSClient++ (system tray) , e.g.:
Start, All Programs, NSClient++, Start NSClient++ (system tray).
Test Nagios configuration from the Linux host running nagios and nrpe daemons to check if the check_nt, can succesfully authenticate and retrieve data generated from the nsclient++ on the Windows host:
debian:~# /usr/lib/nagios/plugins/check_nt -H 192.168.1.5 -p 12489 -v CPULOAD -w 80 -c 90 -l 5,80,90,10,80,90
If everything is okay and the remote Windows system 192.168.1.5 has properly configured and running NSClient++ the above command should return an output like:
CPU Load 1% (5 min average) 1% (10 min average) | '5 min avg Load'=1%;80;90;0;100 '10 min avg Load'=1%;80;90;0;100
In case of the command returns:
could not fetch information from server
instead this means that probably there is some kind of problem with authentication or handshake of the Linux host’s nagios check_nt to the Windows server’s running on 12489.
This is sometimes caused by misconfigured NSC.ini file, however in other occasions this error is caused by misconfigured Windows Firewall or because the NSClient++ is not running with Administrator user.
By the way important note to make about Windows 2008r2 is that if NSClient++ is running there it’s absolutely required to Login with Windows Administrator and run the NSClient++ /start , if it’s run through the Run As Adminsitrator with an admin privileged user the aforementioned error might appear, so be careful.
I’ve experienced this error myself and it took me about 40 minutes to find that I have to run it directly with Administrator user after logging as Administrator.
7. Create nagios web iface Apache configuration
nagios debian pachage is shipped with a config which is suitable to be set
debian:~# cp -rpf /usr/share/doc/nagios3-common/examples/apache2.conf /etc/apache2/sites-avalable/nagios

debian:~# ln -sf /etc/apache2/sites-available/nagios /etc/apache2/sites-enabled/nagios
The /etc/apache2/sites-available/nagios can easily be configured to work on Virtualhost, to do so the above copied file need to be wrapped inside a VirtualHost directive. For that put in the beginning of the file;
<VirtualHost *:80>
and in the end of the file:
<VirtualHost *:80>
8. Restart nagios server and Apache for the new settings to take effect
debian:~# /etc/init.d/apache2 restart

...

debian:~# /etc/init.d/nagios3 restart
If some custom configuration about tracking the Debian Linux nagios host running services needs to be made, its also helpful for one to check in /etc/nagios3/conf.d
Well that’s mostly what I had to do to make the Nagios3 server to keep track of a small Windows network on Debian GNU/Linux Squeeze 6, hope this small article helps. Cheers 😉
Tags: allowd, cgi, change, config, configuration directive, CPULOAD, debian gnu, debian packages, description, directive, dllCheckEventLog, drive, explorer, file, gnu linux, hoss, host, hostgroup, hosts, IIS, images, Install, installation, Iready, lib, Linux, linux release, Load, local network, memory, nagios plugins, necessery, NSC, nsclient, Protocol, servers, Space, SQL, squeeze, start 1, substitute, template, test, Uptime, value, version, vim
Posted in Linux, System Administration, Various | 2 Comments »


