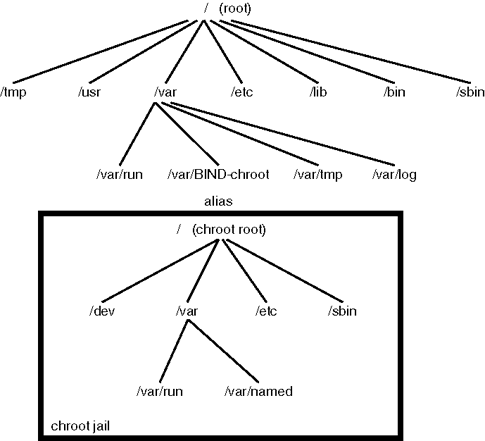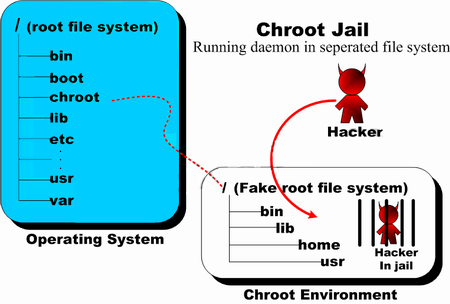
If you're sysadmining a large numbers of shared hosted websites which use Nginx Webserver to interpret PHP scripts and serve HTML, Javascript, CSS … whatever data.
You realize the high amount of risk that comes with a possible successful security breach / hack into a server by a malicious cracker. Compromising Nginx Webserver by an intruder automatically would mean that not only all users web data will get compromised, but the attacker would get an immediate access to other data such as Email or SQL (if the server is running multiple services).
Nowadays it is not so common thing to have a multiple shared websites on the same server together with other services, but historically there are many legacy servers / webservers left which host some 50 or 100+ websites.
Of course the best thing to do is to isolate each and every website into a separate Virtual Container however as this is a lot of work and small and mid-sized companies refuse to spend money on mostly anything this might be not an option for you.
Considering that this might be your case and you're running Nginx either as a Load Balancing, Reverse Proxy server etc. , even though Nginx is considered to be among the most secure webservers out there, there is absolutely no gurantee it would not get hacked and the server wouldn't get rooted by a script kiddie freak that just got in darknet some 0day exploit.
To minimize the impact of a possible Webserver hack it is a good idea to place all websites into Linux Jails.

For those who hear about Linux Jail for a first time,
chroot() jail is a way to isolate a process / processes and its forked children from the rest of the *nix system. It should / could be used only for UNIX processes that aren't running as root (administrator user), because of the fact the superuser could break out (escape) the jail pretty easily.
Jailing processes is a concept that is pretty old that was first time introduced in UNIX version 7 back in the distant year 1979, and it was first implemented into BSD Operating System ver. 4.2 by Bill Joy (a notorious computer scientist and co-founder of Sun Microsystems). Its original use for the creation of so called HoneyPot – a computer security mechanism set to detect, deflect, or, in some manner, counteract attempts at unauthorized use of information systems that appears completely legimit service or part of website whose only goal is to track, isolate, and monitor intruders, a very similar to police string operations (baiting) of the suspect. It is pretty much like а bait set to collect the fish (which in this case is the possible cracker).

BSD Jails nowadays became very popular as iPhones environment where applications are deployed are inside a customly created chroot jail, the principle is exactly the same as in Linux.
But anyways enough talk, let's create a new jail and deploy set of system binaries for our Nginx installation, here is the things you will need:
1. You need to have set a directory where a copy of /bin/ls /bin/bash /bin/, /bin/cat … /usr/bin binaries /lib and other base system Linux system binaries copy will reside.
server:~# mkdir -p /usr/local/chroot/nginx
2. You need to create the isolated environment backbone structure /etc/ , /dev, /var/, /usr/, /lib64/ (in case if deploying on 64 bit architecture Operating System).
server:~# export DIR_N=/usr/local/chroot/nginx;
server:~# mkdir -p $DIR_N/etc
server:~# mkdir -p $DIR_N/dev
server:~# mkdir -p $DIR_N/var
server:~# mkdir -p $DIR_N/usr
server:~# mkdir -p $DIR_N/usr/local/nginx
server:~# mkdir -p $DIR_N/tmp
server:~# chmod 1777 $DIR_N/tmp
server:~# mkdir -p $DIR_N/var/tmp
server:~# chmod 1777 $DIR_N/var/tmp
server:~# mkdir -p $DIR_N/lib64
server:~# mkdir -p $DIR_N/usr/local/
3. Create required device files for the new chroot environment
server:~# /bin/mknod -m 0666 $D/dev/null c 1 3
server:~# /bin/mknod -m 0666 $D/dev/random c 1 8
server:~# /bin/mknod -m 0444 $D/dev/urandom c 1 9
mknod COMMAND is used instead of the usual /bin/touch command to create block or character special files.
Once create the permissions of /usr/local/chroot/nginx/{dev/null, dev/random, dev/urandom} have to be look like so:
server:~# ls -l /usr/local/chroot/nginx/dev/{null,random,urandom}
crw-rw-rw- 1 root root 1, 3 Aug 17 09:13 /dev/null
crw-rw-rw- 1 root root 1, 8 Aug 17 09:13 /dev/random
crw-rw-rw- 1 root root 1, 9 Aug 17 09:13 /dev/urandom
4. Install nginx files into the chroot directory (copy all files of current nginx installation into the jail)
If your NGINX webserver installation was installed from source to keep it latest
and is installed in lets say, directory location /usr/local/nginx you have to copy /usr/local/nginx to /usr/local/chroot/nginx/usr/local/nginx, i.e:
server:~# /bin/cp -varf /usr/local/nginx/* /usr/local/chroot/nginx/usr/local/nginx
5. Copy necessery Linux system libraries to newly created jail
NGINX webserver is compiled to depend on various libraries from Linux system root e.g. /lib/* and /lib64/* therefore in order to the server work inside the chroot-ed environment you need to transfer this libraries to the jail folder /usr/local/chroot/nginx
If you are curious to find out which libraries exactly is nginx binary dependent on run:
server:~# ldd /usr/local/nginx/usr/local/nginx/sbin/nginx
linux-vdso.so.1 (0x00007ffe3e952000)
libpthread.so.0 => /lib/x86_64-linux-gnu/libpthread.so.0 (0x00007f2b4762c000)
libcrypt.so.1 => /lib/x86_64-linux-gnu/libcrypt.so.1 (0x00007f2b473f4000)
libpcre.so.3 => /lib/x86_64-linux-gnu/libpcre.so.3 (0x00007f2b47181000)
libcrypto.so.0.9.8 => /usr/local/lib/libcrypto.so.0.9.8 (0x00007f2b46ddf000)
libz.so.1 => /lib/x86_64-linux-gnu/libz.so.1 (0x00007f2b46bc5000)
libc.so.6 => /lib/x86_64-linux-gnu/libc.so.6 (0x00007f2b46826000)
/lib64/ld-linux-x86-64.so.2 (0x00007f2b47849000)
libdl.so.2 => /lib/x86_64-linux-gnu/libdl.so.2 (0x00007f2b46622000)
The best way is to copy only the libraries in the list from ldd command for best security, like so:
server: ~# cp -rpf /lib/x86_64-linux-gnu/libthread.so.0 /usr/local/chroot/nginx/lib/*
server: ~# cp -rpf library chroot_location
…
etc.
However if you're in a hurry (not a recommended practice) and you don't care for maximum security anyways (you don't worry the jail could be exploited from some of the many lib files not used by nginx and you don't about HDD space), you can also copy whole /lib into the jail, like so:
server: ~# cp -rpf /lib/ /usr/local/chroot/nginx/usr/local/nginx/lib
NOTE! Once again copy whole /lib directory is a very bad practice but for a time pushing activities sometimes you can do it …
6. Copy /etc/ some base files and ld.so.conf.d , prelink.conf.d directories to jail environment
server:~# cp -rfv /etc/{group,prelink.cache,services,adjtime,shells,gshadow,shadow,hosts.deny,localtime,nsswitch.conf,nscd.conf,prelink.conf,protocols,hosts,passwd,ld.so.cache,ld.so.conf,resolv.conf,host.conf} \
/usr/local/chroot/nginx/usr/local/nginx/etc
server:~# cp -avr /etc/{ld.so.conf.d,prelink.conf.d} /usr/local/chroot/nginx/nginx/etc
7. Copy HTML, CSS, Javascript websites data from the root directory to the chrooted nginx environment
server:~# nice -n 10 cp -rpf /usr/local/websites/ /usr/local/chroot/nginx/usr/local/
This could be really long if the websites are multiple gigabytes and million of files, but anyways the nice command should reduce a little bit the load on the server it is best practice to set some kind of temporary server maintenance page to show on the websites index in order to prevent the accessing server clients to not have interrupts (that's especially the case on older 7200 / 7400 RPM non-SSD HDDs.)
8. Stop old Nginx server outside of Chroot environment and start the new one inside the jail
a) Stop old nginx server
Either stop the old nginx using it start / stop / restart script inside /etc/init.d/nginx (if you have such installed) or directly kill the running webserver with:
server:~# killall -9 nginx
b) Test the chrooted nginx installation is correct and ready to run inside the chroot environment
server:~# /usr/sbin/chroot /usr/local/chroot/nginx /usr/local/nginx/nginx/sbin/nginx -t
server:~# /usr/sbin/chroot /usr/local/chroot/nginx /usr/local/nginx/nginx/sbin/nginx
c) Restart the chrooted nginx webserver – when necessery later
server:~# /usr/sbin/chroot /nginx /usr/local/chroot/nginx/sbin/nginx -s reload
d) Edit the chrooted nginx conf
If you need to edit nginx configuration, be aware that the chrooted NGINX will read its configuration from /usr/local/chroot/nginx/nginx/etc/conf/nginx.conf (i'm saying that if you by mistake forget and try to edit the old config that is usually under /usr/local/nginx/conf/nginx.conf


