Posts Tagged ‘testing’

How to test RAM Memory for errors in Linux / UNIX OS servers. Find broken memory RAM banks

Friday, December 3rd, 2021

test-ram-memory-for-errors-linux-unix-find-broken-memory-logo


1. Testing the memory with motherboard integrated tools
 

Memory testing has been integral part of Computers for the last 50 years. In the dawn of computers those older perhaps remember memory testing was part of the computer initialization boot. And this memory testing was delaying the boot with some seconds and the user could see the memory numbers being counted up to the amount of memory. With the increased memory modern computers started to have and the annoyance to wait for a memory check program to check the computer hardware memory on modern computers this check has been mitigated or completely removed on some hardware.
Thus under some circumstances sysadmins or advanced computer users might need to check the memory, especially if there is some suspicion for memory damages or if for example a home PC starts crashing with Blue screens of Death on Windows without reason or simply the PC or some old arcane Linux / UNIX servers gets restarted every now and then for now apparent reason. When such circumstances occur it is an idea to start debugging the hardware issue with a simple memory check.

There are multiple ways to test installed memory banks on a server laptop or local home PC both integrated and using external programs.
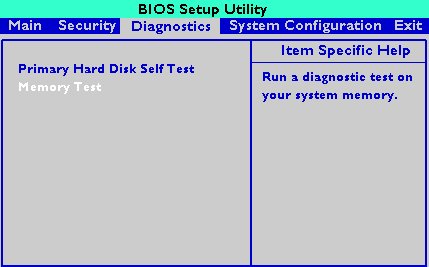
On servers that is usually easily done from ILO or IPMI or IDRAC access (usually web) interface of the vendor, on laptops and home usage from BIOS or UEFI (Unified Extensible Firmware Interface) acces interface on system boot that is possible as well.
memtest-hp
HP BIOS Setup

An old but gold TIP, more younger people might not know is the


Prolonged SHIFT key press which once held with the user instructs the machine to initiate a memory test before the computer starts reading what is written in the boot loader.

So before anything else from below article it might be a good idea to just try HOLD SHIFT for 15-20 seconds after a complete Shut and ON from the POWER button.

If this test does not triggered or it is triggered and you end up with some corrupted memory but you're not sure which exact Memory bank is really crashing and want to know more on what memory Bank and segments are breaking up you might want to do a more thorough testing. In below article I'll try to explain shortly how this can be done.


2. Test the memory using a boot USB Flash Drive / DVD / CD 
 

Say hello to memtest86+. It is a Linux GRUB boot loader bootable utility that tests physical memory by writing various patterns to it and reading them back. Since memtest86+ runs directly off the hardware it does not require any operating system support for execution. Perhaps it is important to mention that memtest86 (is PassMark memtest86)and memtest86+ (An Advanced Memory diagnostic tool) are different tools, the first is freeware and second one is FOSS software.

To use it all you'll need is some version of Linux. If you don't already have some burned in somewhere at your closet, you might want to burn one.
For Linux / Mac users this is as downloading a Linux distribution ISO file and burning it with

# dd if=/path/to/iso of=/dev/sdbX bs=80M status=progress


Windows users can burn a Live USB with whatever Linux distro or download and burn the latest versionof memtest86+ from https://www.memtest.org/  on Windows Desktop with some proggie like lets say UnetBootIn.
 

2.1. Run memtest86+ on Ubuntu

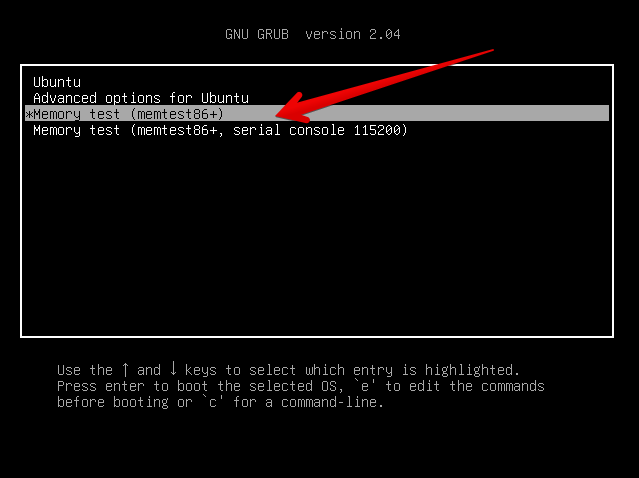
Many Linux distributions such as Ubuntu 20.0 comes together with memtest86+, which can be easily invoked from GRUB / GRUB2 Kernel boot loader.
Ubuntu has a separate menu pointer for a Memtest.
ubuntu-grub-2-04-boot-loader-memtest86-menu-screenshot

Other distributions RPM based distributions such as CentOS, Fedora Linux, Redhat things differ.

2.2. memtest86+ on Fedora


Fedora used to have the memtest86+ menu at the GRUB boot selection prompt, but for some reason removed it and in newest Fedora releases as of time such as Fedora 35 memtest86+ is preinstalled and available but not visible, to start on  already and to start a memtest memory test tool:

  •   Boot a Fedora installation or Rescue CD / USB. At the prompt, type "memtest86".

boot: memtest86

2.3 memtest86+ on RHEL Linux

The memtest86+tool is available as an RPM package from Red Hat Network (RHN) as well as a boot option from the Red Hat Enterprise Linux rescue disk.
And nowadays Red Hat Enterprise Linux ships by default with the tool.

Prior redhat (now legacy) releases such as on RHEL 5.0 it has to be installed and configure it with below 3 commands.

[root@rhel ~]# yum install memtest86+
[root@rhel ~]# memtest-setup
[root@rhel ~]# grub2-mkconfig -o /boot/grub2/grub.cfg


    Again as with CentOS to boot memtest86+ from the rescue disk, you will need to boot your system from CD 1 of the Red Hat Enterprise Linux installation media, and type the following at the boot prompt (before the Linux kernel is started):

boot: memtest86
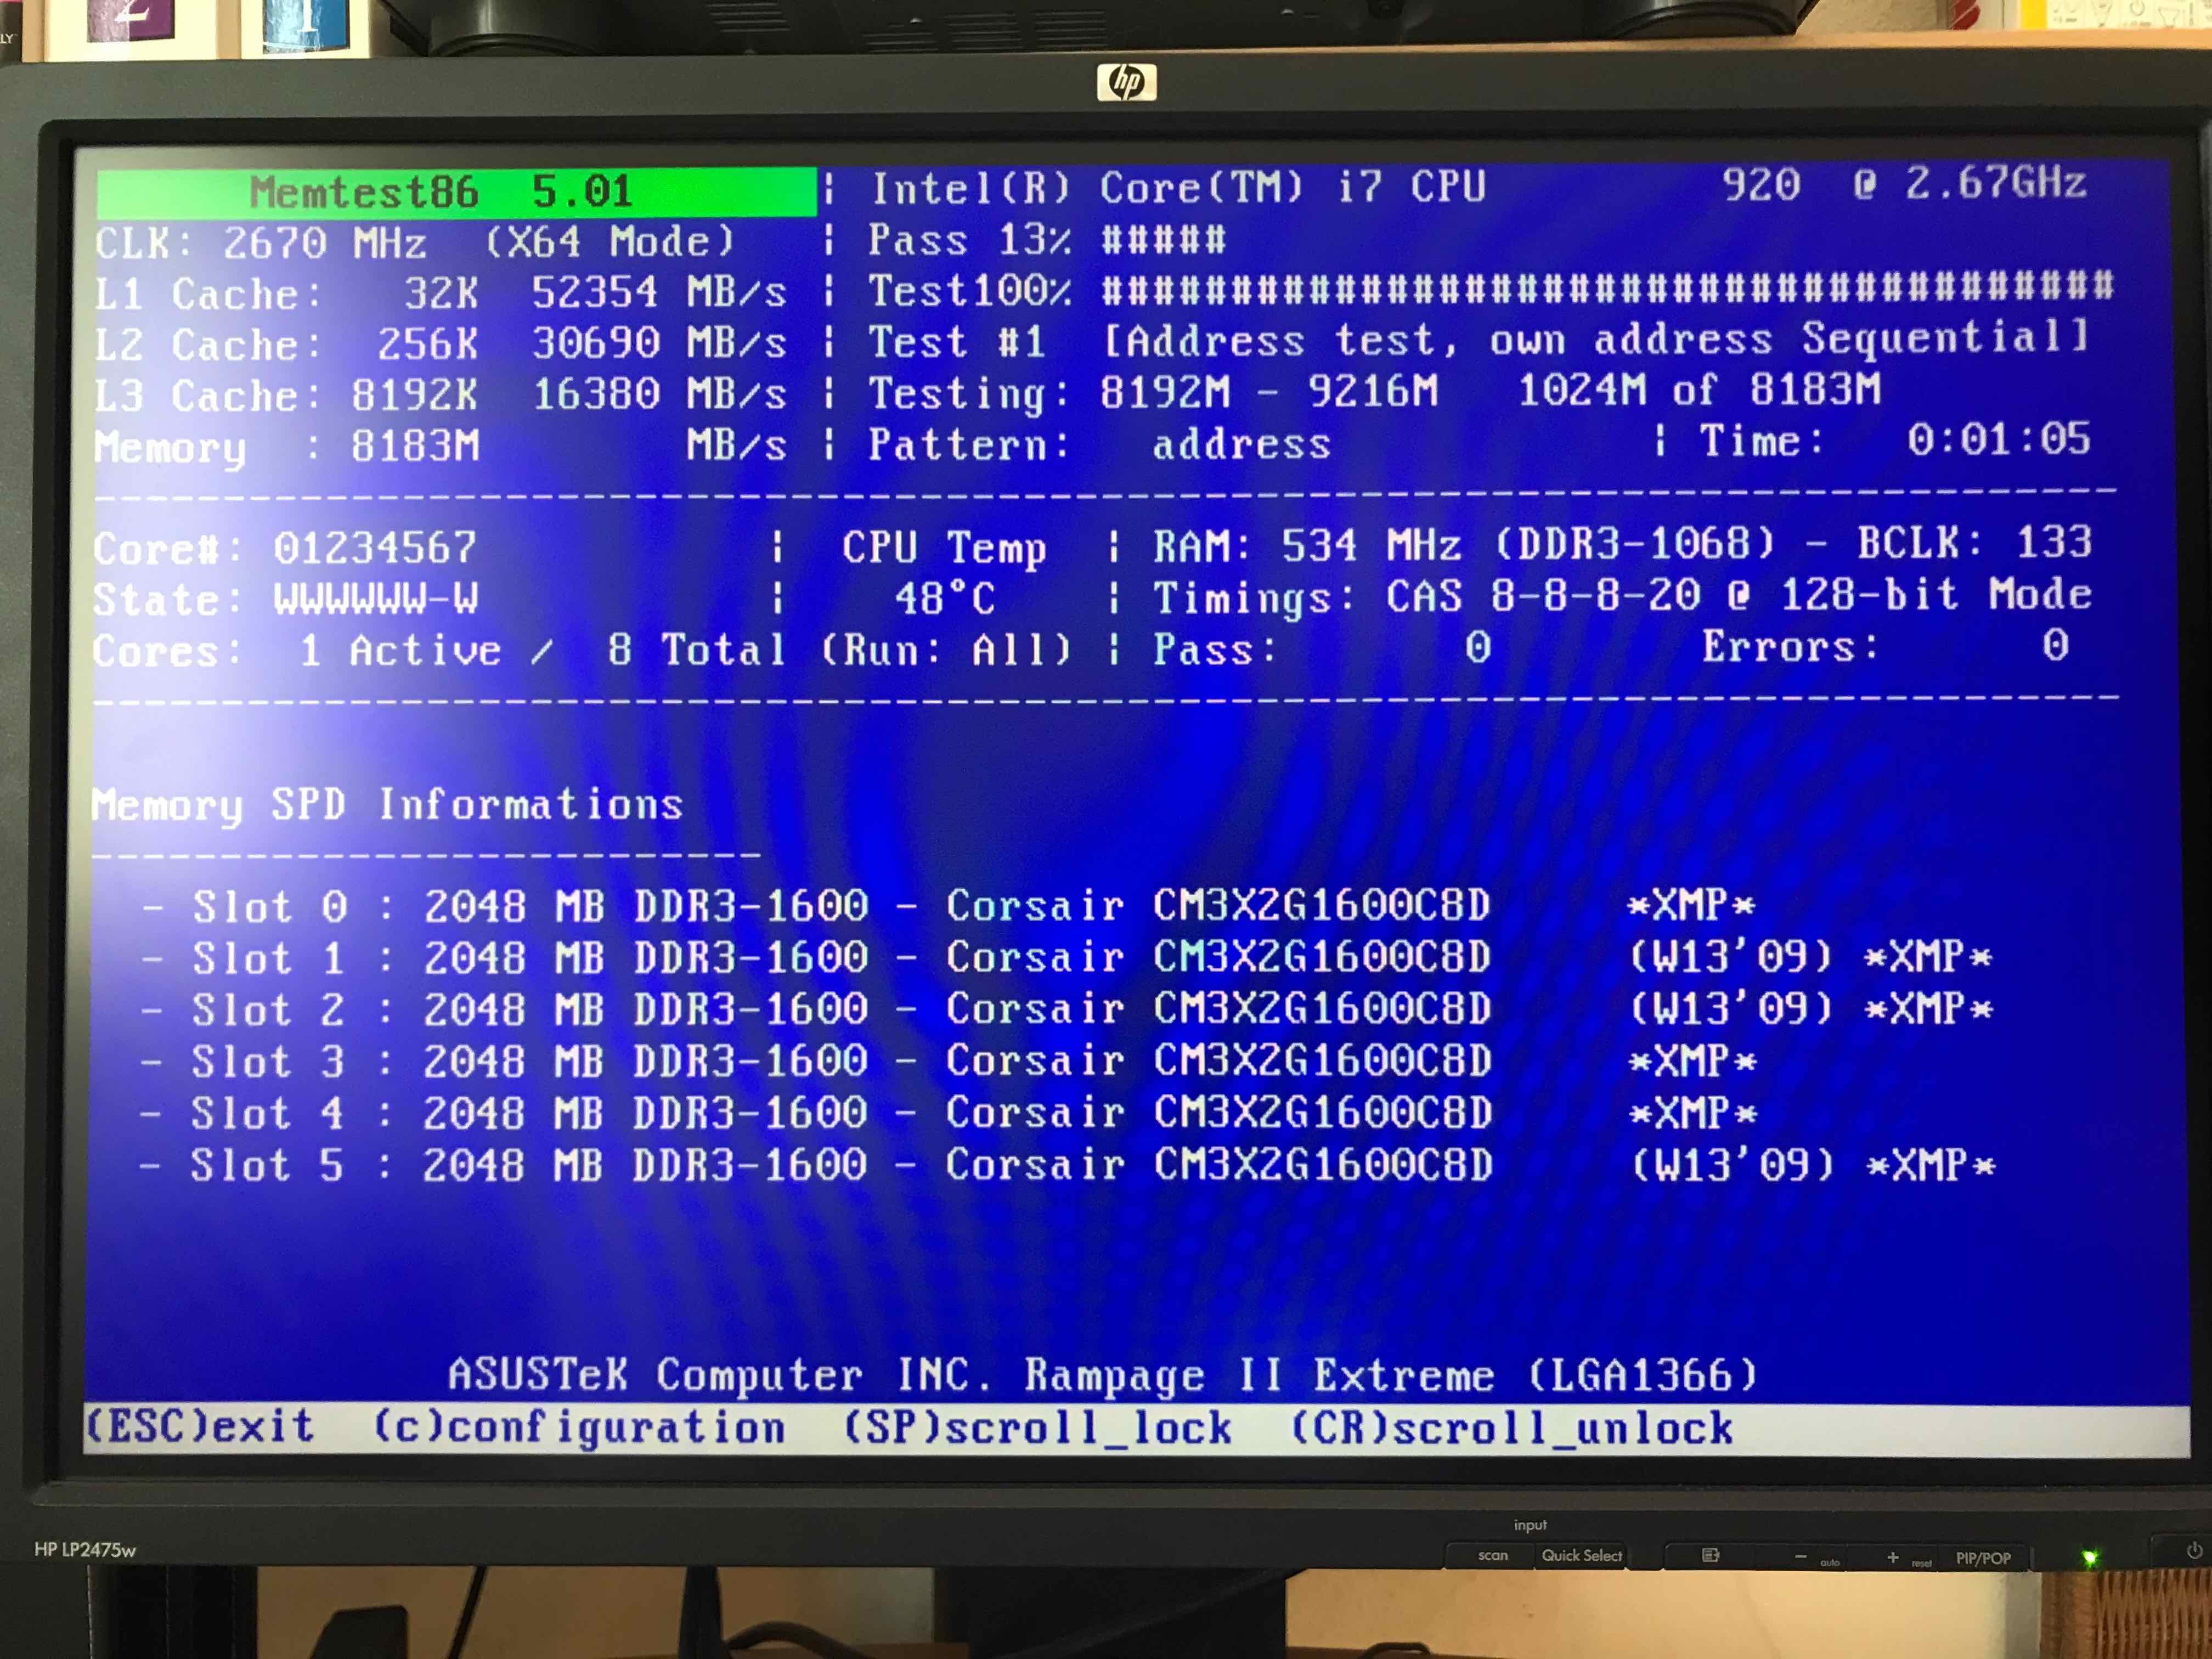
memtestx86-8gigabytes-of-memory-boot-screenshot
memtest86+ testing 5 memory slots

As you see all on above screenshot the Memory banks are listed as Slots. There are a number of Tests to be completed until
it can be said for sure memory does not have any faulty cells. 
The

Pass: 0
Errors: 0 

Indicates no errors, so in the end if memtest86 does not find anything this values should stay at zero.
memtest86+ is also usable to detecting issues with temperature of CPU. Just recently I've tested a PC thinking that some memory has defects but it turned out the issue on the Computer was at the CPU's temperature which was topping up at 80 – 82 Celsius.

If you're unfortunate and happen to get some corrupted memory segments you will get some red fields with the memory addresses found to have corrupted on Read / Write test operations:
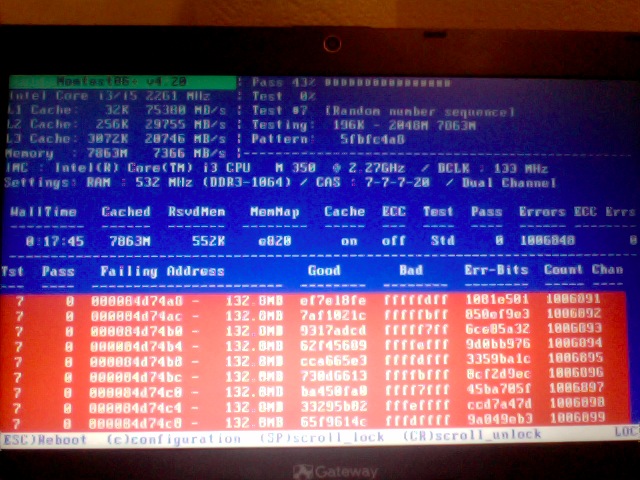
memtest86-returning-memory-address-errors-screenshot


2.4. Install and use memtest and memtest86+ on Debian / Mint Linux

You can install either memtest86+ or just for the fun put both of them and play around with both of them as they have a .deb package provided out of debian non-free /etc/apt/sources.list repositories.


root@jeremiah:/home/hipo# apt-cache show memtest86 memtest86+
Package: memtest86
Version: 4.3.7-3
Installed-Size: 302
Maintainer: Yann Dirson <dirson@debian.org>
Architecture: amd64
Depends: debconf (>= 0.5) | debconf-2.0
Recommends: memtest86+
Suggests: hwtools, memtester, kernel-patch-badram, grub2 (>= 1.96+20090523-1) | grub (>= 0.95+cvs20040624), mtools
Description-en: thorough real-mode memory tester
 Memtest86 scans your RAM for errors.
 .
 This tester runs independently of any OS – it is run at computer
 boot-up, so that it can test *all* of your memory.  You may want to
 look at `memtester', which allows testing your memory within Linux,
 but this one won't be able to test your whole RAM.
 .
 It can output a list of bad RAM regions usable by the BadRAM kernel
 patch, so that you can still use you old RAM with one or two bad bits.
 .
 This is the last DFSG-compliant version of this software, upstream
 has opted for a proprietary development model starting with 5.0.  You
 may want to consider using memtest86+, which has been forked from an
 earlier version of memtest86, and provides a different set of
 features.  It is available in the memtest86+ package.
 .
 A convenience script is also provided to make a grub-legacy-based
 floppy or image.

Description-md5: 0ad381a54d59a7d7f012972f613d7759
Homepage: http://www.memtest86.com/
Section: misc
Priority: optional
Filename: pool/main/m/memtest86/memtest86_4.3.7-3_amd64.deb
Size: 45470
MD5sum: 8dd2a4c52910498d711fbf6b5753bca9
SHA256: 09178eca21f8fd562806ccaa759d0261a2d3bb23190aaebc8cd99071d431aeb6

Package: memtest86+
Version: 5.01-3
Installed-Size: 2391
Maintainer: Yann Dirson <dirson@debian.org>
Architecture: amd64
Depends: debconf (>= 0.5) | debconf-2.0
Suggests: hwtools, memtester, kernel-patch-badram, memtest86, grub-pc | grub-legacy, mtools
Description-en: thorough real-mode memory tester
 Memtest86+ scans your RAM for errors.
 .
 This tester runs independently of any OS – it is run at computer
 boot-up, so that it can test *all* of your memory.  You may want to
 look at `memtester', which allows to test your memory within Linux,
 but this one won't be able to test your whole RAM.
 .
 It can output a list of bad RAM regions usable by the BadRAM kernel
 patch, so that you can still use your old RAM with one or two bad bits.
 .
 Memtest86+ is based on memtest86 3.0, and adds support for recent
 hardware, as well as a number of general-purpose improvements,
 including many patches to memtest86 available from various sources.
 .
 Both memtest86 and memtest86+ are being worked on in parallel.
Description-md5: aa685f84801773ef97fdaba8eb26436a
Homepage: http://www.memtest.org/

Tag: admin::benchmarking, admin::boot, hardware::storage:floppy,
 interface::text-mode, role::program, scope::utility, use::checking
Section: misc
Priority: optional
Filename: pool/main/m/memtest86+/memtest86+_5.01-3_amd64.deb
Size: 75142
MD5sum: 4f06523532ddfca0222ba6c55a80c433
SHA256: ad42816e0b17e882713cc6f699b988e73e580e38876cebe975891f5904828005


root@jeremiah:/home/hipo# apt-get install –yes memtest86+

root@jeremiah:/home/hipo# apt-get install –yes memtest86

Reading package lists… Done
Building dependency tree       
Reading state information… Done
Suggested packages:
  hwtools kernel-patch-badram grub2 | grub
The following NEW packages will be installed:
  memtest86
0 upgraded, 1 newly installed, 0 to remove and 21 not upgraded.
Need to get 45.5 kB of archives.
After this operation, 309 kB of additional disk space will be used.
Get:1 http://ftp.de.debian.org/debian buster/main amd64 memtest86 amd64 4.3.7-3 [45.5 kB]
Fetched 45.5 kB in 0s (181 kB/s)     
Preconfiguring packages …
Selecting previously unselected package memtest86.
(Reading database … 519985 files and directories currently installed.)
Preparing to unpack …/memtest86_4.3.7-3_amd64.deb …
Unpacking memtest86 (4.3.7-3) …
Setting up memtest86 (4.3.7-3) …
Generating grub configuration file …
Found background image: saint-John-of-Rila-grub.jpg
Found linux image: /boot/vmlinuz-4.19.0-18-amd64
Found initrd image: /boot/initrd.img-4.19.0-18-amd64
Found linux image: /boot/vmlinuz-4.19.0-17-amd64
Found initrd image: /boot/initrd.img-4.19.0-17-amd64
Found linux image: /boot/vmlinuz-4.19.0-8-amd64
Found initrd image: /boot/initrd.img-4.19.0-8-amd64
Found linux image: /boot/vmlinuz-4.19.0-6-amd64
Found initrd image: /boot/initrd.img-4.19.0-6-amd64
Found linux image: /boot/vmlinuz-4.19.0-5-amd64
Found initrd image: /boot/initrd.img-4.19.0-5-amd64
Found linux image: /boot/vmlinuz-4.9.0-8-amd64
Found initrd image: /boot/initrd.img-4.9.0-8-amd64
Found memtest86 image: /boot/memtest86.bin
Found memtest86+ image: /boot/memtest86+.bin
Found memtest86+ multiboot image: /boot/memtest86+_multiboot.bin
File descriptor 3 (pipe:[66049]) leaked on lvs invocation. Parent PID 22581: /bin/sh
done
Processing triggers for man-db (2.8.5-2) …


After this both memory testers memtest86+ and memtest86 will appear next to the option of booting a different version kernels and the Advanced recovery kernels, that you usually get in the GRUB boot prompt.

2.5. Use memtest embedded tool on any Linux by adding a kernel variable
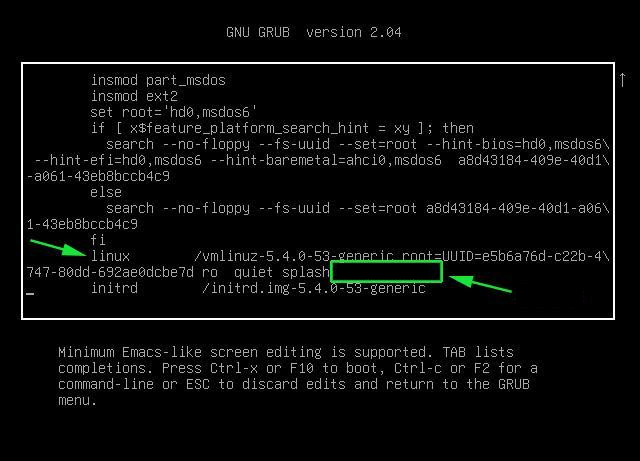
Edit-Grub-Parameters-add-memtest-4-to-kernel-boot

2.4.1. Reboot your computer

# reboot

2.4.2. At the GRUB boot screen (with UEFI, press Esc).

2.4.3 For 4 passes add temporarily the memtest=4 kernel parameter.
 

memtest=        [KNL,X86,ARM,PPC,RISCV] Enable memtest
                Format: <integer>
                default : 0 <disable>
                Specifies the number of memtest passes to be
                performed. Each pass selects another test
                pattern from a given set of patterns. Memtest
                fills the memory with this pattern, validates
                memory contents and reserves bad memory
                regions that are detected.


3. Install and use memtester Linux tool
 

At some condition, memory is the one of the suspcious part, or you just want have a quick test. memtester  is an effective userspace tester for stress-testing the memory subsystem.  It is very effective at finding intermittent and non-deterministic faults.

The advantage of memtester "live system check tool is", you can check your system for errors while it's still running. No need for a restart, just run that application, the downside is that some segments of memory cannot be thoroughfully tested as you already have much preloaded data in it to have the Operating Sytstem running, thus always when possible try to stick to rule to test the memory using memtest86+  from OS Boot Loader, after a clean Machine restart in order to clean up whole memory heap.

Anyhow for a general memory test on a Critical Legacy Server  (if you lets say don't have access to Remote Console Board, or don't trust the ILO / IPMI Hardware reported integrity statistics), running memtester from already booted is still a good idea.


3.1. Install memtester on any Linux distribution from source

wget http://pyropus.ca/software/memtester/old-versions/memtester-4.2.2.tar.gz
# tar zxvf memtester-4.2.2.tar.gz
# cd memtester-4.2.2
# make && make install

3.2 Install on RPM based distros


On Fedora memtester is available from repositories however on many other RPM based distros it is not so you have to install it from source.

[root@fedora ]# yum install -y memtester


3.3. Install memtester on Deb based Linux distributions from source
 

To install it on Debian / Ubuntu / Mint etc. , open a terminal and type:
 

root@linux:/ #  apt install –yes memtester

The general run syntax is:

memtester [-p PHYSADDR] [ITERATIONS]


You can hence use it like so:

hipo@linux:/ $ sudo memtester 1024 5

This should allocate 1024MB of memory, and repeat the test 5 times. The more repeats you run the better, but as a memtester run places a great overall load on the system you either don't increment the runs too much or at least run it with  lowered process importance e.g. by nicing the PID:

hipo@linux:/ $ nice -n 15 sudo memtester 1024 5


  • If you have more RAM like 4GB or 8GB, it is upto you how much memory you want to allocate for testing.
  • As your operating system, current running process might take some amount of RAM, Please check available Free RAM and assign that too memtester.
  • If you are using a 32 Bit System, you cant test more than 4 GB even though you have more RAM( 32 bit systems doesnt support more than 3.5 GB RAM as you all know).
  • If your system is very busy and you still assigned higher than available amount of RAM, then the test might get your system into a deadlock, leads to system to halt, be aware of this.
  • Run the memtester as root user, so that memtester process can malloc the memory, once its gets hold on that memory it will try to apply lock. if specified memory is not available, it will try to reduce required RAM automatically and try to lock it with mlock.
  • if you run it as a regular user, it cant auto reduce the required amount of RAM, so it cant lock it, so it tries to get hold on that specified memory and starts exhausting all system resources.


If you have 8 Gigas of RAM plugged into the PC motherboard you have to multiple 1024*8 this is easily done with bc (An arbitrary precision calculator language) tool:

root@linux:/ # bc -l
bc 1.07.1
Copyright 1991-1994, 1997, 1998, 2000, 2004, 2006, 2008, 2012-2017 Free Software Foundation, Inc.
This is free software with ABSOLUTELY NO WARRANTY.
For details type `warranty'. 
8*1024
8192


 for example you should run:

root@linux:/ # memtester 8192 5

memtester version 4.3.0 (64-bit)
Copyright (C) 2001-2012 Charles Cazabon.
Licensed under the GNU General Public License version 2 (only).

pagesize is 4096
pagesizemask is 0xfffffffffffff000
want 8192MB (2083520512 bytes)
got  8192MB (2083520512 bytes), trying mlock …Loop 1/1:
  Stuck Address       : ok        
  Random Value        : ok
  Compare XOR         : ok
  Compare SUB         : ok
  Compare MUL         : ok
  Compare DIV         : ok
  Compare OR          : ok
  Compare AND         : ok
  Sequential Increment: ok
  Solid Bits          : ok        
  Block Sequential    : ok        
  Checkerboard        : ok        
  Bit Spread          : ok        
  Bit Flip            : ok        
  Walking Ones        : ok        
  Walking Zeroes      : ok        
  8-bit Writes        : ok
  16-bit Writes       : ok

Done.


4. Shell Script to test server memory for corruptions
 

If for some reason the machine you want to run a memory test doesn't have connection to the external network such as the internet and therefore you cannot configure a package repository server and install memtester, the other approach is to use a simple memory test script such as memtestlinux.sh
 

#!/bin/bash
# Downloaded from https://www.srv24x7.com/memtest-linux/
echo "ByteOnSite Memory Test"
cpus=`cat /proc/cpuinfo | grep processor | wc -l`
if [ $cpus -lt 6 ]; then
threads=2
else
threads=$(($cpus / 2))
fi
echo "Detected $cpus CPUs, using $threads threads.."
memory=`free | grep 'Mem:' | awk {'print $2'}`
memoryper=$(($memory / $threads))
echo "Detected ${memory}K of RAM ($memoryper per thread).."
freespace=`df -B1024 . | tail -n1 | awk {'print $4'}`
if [ $freespace -le $memory ]; then
echo You do not have enough free space on the current partition. Minimum: $memory bytes
exit 1
fi
echo "Clearing RAM Cache.."
sync; echo 3 > /proc/sys/vm/drop_cachesfile
echo > dump.memtest.img
echo "Writing to dump file (dump.memtest.img).."
for i in `seq 1 $threads`;
do
# 1044 is used in place of 1024 to ensure full RAM usage (2% over allocation)
dd if=/dev/urandom bs=$memoryper count=1044 >> dump.memtest.img 2>/dev/null &
pids[$i]=$!
echo $i
done
for pid in "${pids[@]}"
do
wait $pid
done

echo "Reading and analyzing dump file…"
echo "Pass 1.."
md51=`md5sum dump.memtest.img | awk {'print $1'}`
echo "Pass 2.."
md52=`md5sum dump.memtest.img | awk {'print $1'}`
echo "Pass 3.."
md53=`md5sum dump.memtest.img | awk {'print $1'}`
if [ “$md51” != “$md52” ]; then
fail=1
elif [ “$md51” != “$md53” ]; then
fail=1
elif [ “$md52” != “$md53” ]; then
fail=1
else
fail=0
fi
if [ $fail -eq 0 ]; then
echo "Memory test PASSED."
else
echo "Memory test FAILED. Bad memory detected."
fi
rm -f dump.memtest.img
exit $fail

Nota Bene !: Again consider the restults might not always be 100% trustable if possible restart the server and test with memtest86+

Consider also its important to make sure prior to script run,  you''ll have enough disk space to produce the dump.memtest.img file – file is created as a test bed for the memory tests and if not scaled properly you might end up with a full ( / ) root directory!


4.1 Other memory test script with dd and md5sum checksum

I found this solution on the well known sysadmin site nixCraft cyberciti.biz, I think it makes sense and quicker.

First find out memory site using free command.
 

# free
             total       used       free     shared    buffers     cached
Mem:      32867436   32574160     293276          0      16652   31194340
-/+ buffers/cache:    1363168   31504268
Swap:            0          0          0


It shows that this server has 32GB memory,
 

# dd if=/dev/urandom bs=32867436 count=1050 of=/home/memtest


free reports by k and use 1050 is to make sure file memtest is bigger than physical memory.  To get better performance, use proper bs size, for example 2048 or 4096, depends on your local disk i/o,  the rule is to make bs * count > 32 GB.
run

# md5sum /home/memtest; md5sum /home/memtest; md5sum /home/memtest


If you see md5sum mismatch in different run, you have faulty memory guaranteed.
The theory is simple, the file /home/memtest will cache data in memory by filling up all available memory during read operation. Using md5sum command you are reading same data from memory.


5. Other ways to test memory / do a machine stress test

Other good tools you might want to check for memory testing is mprime – ftp://mersenne.org/gimps/ 
(https://www.mersenne.org/ftp_root/gimps/)

  •  (mprime can also be used to stress test your CPU)

Alternatively, use the package stress-ng to run all kind of stress tests (including memory test) on your machine.
Perhaps there are other interesting tools for a diagnosis of memory if you know other ones I miss, let me know in the comment section.

Check how webpage looks with Internet Explorer on Linux and FreeBSD with Mozilla Firefox (Netrenderer Firefox plugin)

Thursday, November 1st, 2012

Simulate Internet Explorer in screenshots on GNU / Linux and FreeBSD using Netrenderer in Firefox - Internet Explorer testing tool for web developers on Linux and FreeBSD

I'm not full time web developer. But sometimes, I develop websites too or just had to do some website testing.
I'm using GNU / Linux and BSD as main server and desktop platforms for many years already and hence I don't have regular access to Windows OS and respectively Internet Explorer. In that manner of thoughts it is very useful to have a way to check if a certain website I create displays fine on Internet Explorer 6,7,8 too.

Usually whether I need to test if website displays properly its elements in Internet Explorer I do use the infamous  http://ipinfo.info/netrenderer/index.php – I guess it is almost impossible anyone is developing websites on Linux and don't know it :). Fortunately while I was googling to remind myself about the exact link location to netrenderer, I've stumbled upon Mozilla Firefox add-on extension which does precisely what ipinfo.info/netrenderer/ website does – i.e. renders a website with HTML Web Engine compatible   to most Internet Explorer versions and creating screenshots on how a website would look under Internet Explorer. Of course the plugin is not a panace and since it only makes screenshots whether there are problems with interactivity (Javascript AJAX) of a website on IE will the plugin will be of zero use. However in general it is good to know if at least the website elements are ordered fine.
After the plugin is added in the usual way as any other plugin in FF, you can start using it with keyboard shortcuts:

Ctrl+Shift+F5/F6/F7/F8 – respectively renders the page in IE5.5, IE 6, IE 7 / IE 8 Beta 2

Pressing CTRL + Shift + FX, makes the IE screenshot of site using http://ipinfo.info/netrenderer/

I'm currently running latest Firefox version 16.0.2 and here plugin works, fine I guess on most FF releases not older than few years it should work fine too.

Below is description of the plugin, as taken from plugin website:

IE NetRendered Add-on Description

Adds buttons, tools menu and contextual menu entries to get a screenshot of the current page with IE NetRenderer.

Keyboard shortcuts are also available: Ctrl+Shift+F5/F6/F7/F8 to render the page in IE5.5/6/7/8 Beta 2 (Cmd+Shift+F* on Mac).

Really useful for webmasters which are not using Windows!

You can also access the IE NetRenderer service here: http://ipinfo.info/netrenderer/index.php

Please note that the extension developper is not affiliated with GEOTEK, providing the IE NetRenderer service. You can visit his website here: http://nicopensource.free.fr/


Apache Benchmarking

Monday, January 14th, 2008

They’re few tools out there which are most common in use to do benchmarking and stess test on webservers. One of them “the most common one”is called “ab” or apache benchmark Check it out here another very common tool is called flood Check it here Flood seems to be the newer and most accurate tool to use for stress testing unfortunately it has one weakness. It only works with configuration file which is in xml format. So every time before you start it you have to generate a new xml file to suite your needs. Also a tool recommended to me in the #apache in the irc.freenode.net network is called “jmeter”, it’s located here . I personally didn’t tested it because it uses Java as a back end. While googling around I also have stucked on this interesting project PHPSPEED although I wasn’t able to test it looks like a promising test suite.END—–

Fix “Secure Connection Failed” – An error occured SSL received a record that exceeded the maximum permissible length howto

Monday, September 14th, 2015

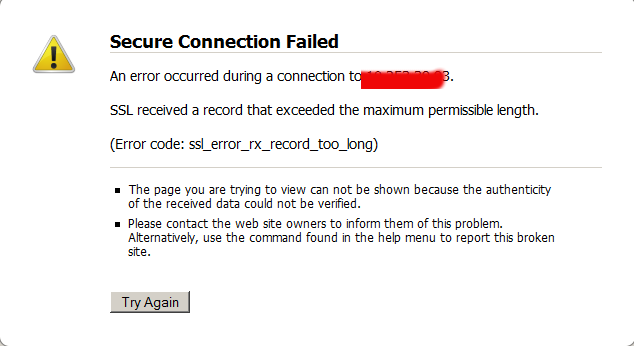
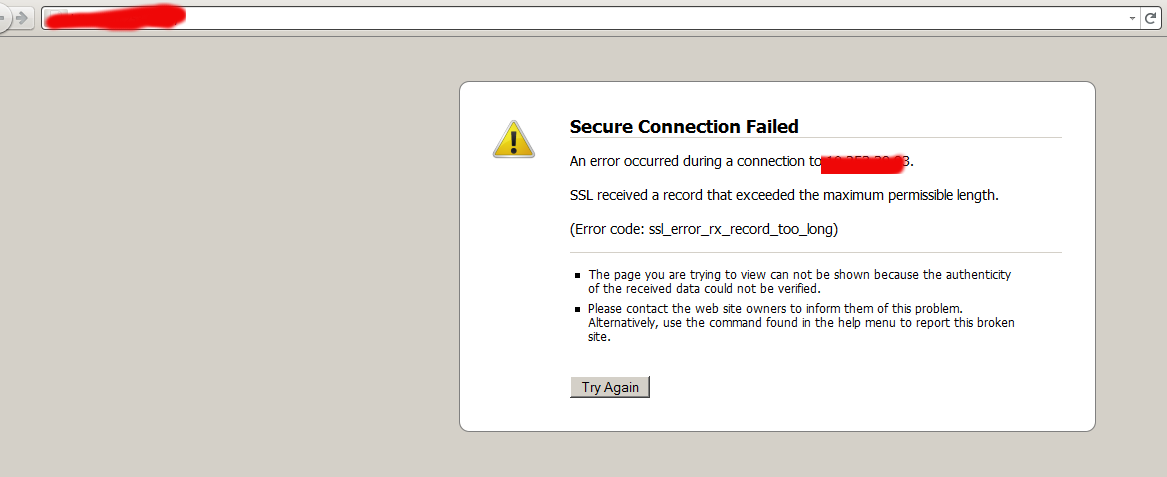
secure-connection-failed-an-error-occured-during-connection-ssl-received-a-record-that-exceeds-the-maximum-permissible-length-fix-howto
When I was trying to establish a new Internal Business SSL certificate on one of the 6 months planned SPLIT projects (e.g. duplicate a range systems environment to another one), I've stumbled a very odd SSL issue. Once I've setup all the virtualhost SSL configurations properly (identical SSL configuration directives and Apache Webserver version to another host and testing in a browser I was getting the following error:
 

Secure Connection Failed

An error occurred during a connection to 10.253.39.93.

SSL received a record that exceeded the maximum permissible length.

(Error code: ssl_error_rx_record_too_long)


Below is a screenshot:

https://www.pc-freak.net/images/secure-connection-failed-an-error-occured-during-connection-ssl-received-a-record-that-exceeds-the-maximum-permissible-length.png

The page you are trying to view can not be shown because the authenticity of the received data could not be verified. Please contact the web site owners to inform them of this problem. Alternatively, use the command found in the help menu to report this broken site.

The first logical thing to do was to check the error.log but there was no any errors there that point me to anything meaningful, besides that the queries I was making to the Domain doesn't show off as requests neither in Apache access.log nor in error.log so this was puzzling.
I thought I might have messed up something during Key file / CSR generation time so I revoked old certificate and reissued it.


$ openssl x509 -text -in test-pegasusgas-eon.intranet.eon-vertrieb.com.crt |less ertificate: Data: Version: 3 (0x2) Serial Number:

Shows that all is fine with certificate Then when trying to test remote certificate with SSL command:


openssl s_client -CApath test-pegasusgas-eon.intranet.eon-vertrieb.com.crt -connect test-pegasusgas-eon.intranet.eon-vertrieb.com:443


: There was an error After plenty of research in Google I come to conclusion something is either wrong with Listen httpd.conf directive or NameVirtualHost is binded to port 80 or some other port different from 443, however surprisingly I did not used the NameVirtualHost at all in my apache config. After a lot of pondering I finally spot it. The whole certificate isseus were caused by:

< – Less than sign

which I missaw and forget to clean up from template during IP paste (obtained from /sbin/ifconfig |grep -i xx.xx.xx.xx). So finally in order to fix the SSL error I had to just delete <, e.g.:
 

<VirtualHost <10.253.39.35:443>

had to become:


<Virtualhost 10.253.39.35:443>

Such a minor thing took me 3 hours of pondering to resolve and thanksfully it is finally fixed! Then of course had to restart Apache to make fixed Vhost settings working:
 

# apachectl stop; sleep 2; apachectl start

So now the SSL works again, thanks God!

How to get rid of Debian and Ubuntu GNU / Linux obsolete configuration files and system directories

Wednesday, October 19th, 2011

debian_ubuntu-linux-get-rid-of-obsolete-files
I've been using Debian GNU / Linux on my Thinkpad laptop for almost 3 years and half. Initially the Debian version which I had installed was a stable Debian Lenny. As I was mostly dissatisfied of the old versions of the programs, I migrated to testing / unstable
Testing / unstables shipped program versions were a bit better but still back in the day I wanted to get advantage of the latest program versions so for a while I switched to unstable .
Later I regretted for this bad idea, after the migration to Unstable, it was too buggy to run on a notebook one uses for everyday work.
Then to revert back to a bit stable I downgraded to testing unstable again.
When Debian launched Debian Squeeze I set in my /etc/apt/sources.list file software repositories to be the one for the stable Debian Squeeze.

As you can see, I've done quite a lot of "experiments" and "excersises". Many packages were installed, then removed, some became obsolete with time others I just temporary installed out of curiosity. Anyways as a result I ended up with many packages uninstalled / removed , which still kept some of their directory structres and configurations on the machine.

Today, I decided to check how many of these obsolete packages are still present in dpkg database and I was shocked to find out 412 debs were still in my package database! To check the number I used cmd:

root@noah:~# dpkg -l | grep -i '^rcs.*$'|wc -l

Considering the tremendous number of packs waiting to be purged, I decided to get rid of this old and already unnecessery files for the sake of clarity, besides that removing the old already uninstalled packages removes old configuration files, readmes, directories and frees some little space and therefore frees some inodes 😉

Before proceeding to remove them, I carefully reviewed and all the package names which I was about to completely purge in order to make sure there is no package with a configuration files I might need in future:

root@noah:~# dpkg -l |grep -i '^rcs.*$'
...
After reviewing all the deb packages possessing the rc – (remove candidate) flag, I used the following bash one liners to remove the obsolete deb packages:

root@noah:~# for i in $(dpkg -l |grep -i '^rcs.*$'|awk '{ print $2 }'); do echo dpkg --purge $i done...
root@noah:~# for i in $(dpkg -l |grep -i '^rcs.*$'|awk '{ print $2 }'); do dpkg --purge $i done

First line will just print out what will be purged with dpkg , so after I checked it out I used the second one to purge all the RC packs.

Best Windows tools to Test (Benchmark) Hard Drives, SSD Drives and RAID Storage Controllers

Wednesday, April 23rd, 2014

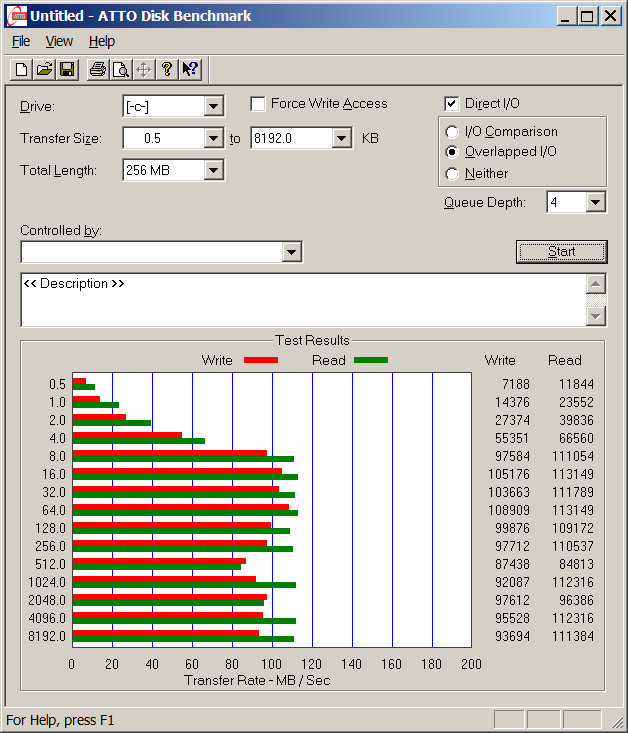
atto-windows-hard-disk-benchmark-freeware-tool-screenshot-check-hard-disk-speed-windows
Disk Benchmarking is very useful for people involved in Graphic Design, 3D modelling, system admins  and anyone willing to squeeze maximum of his PC hardware.

If you want to do some benchmarking on newly built Windows server targetting Hard Disk performance, just bought a new hard SSD (Solid State Drives) and you want to test how well Hard Drive I/O operations behave or you want to see a regular HDD benchmarking of group of MS Windows PCs and plan hardware optiomization, check out ATTO Disk Benchmark.

So why exactly ATTO Benchmark? – Cause it is one of the best Windows Free Benchmark tools on the internet.

ATTO is a widely-accepted Disk Benchmark freeware utility to help measure storage system performance. ATTO though being freeware is among top tools utilized in industry. It is very useful in comparing different Hard Disk vendors speed, measure Windows storage systems performance with various transfer sizes and test lengths for reads and writes.

ATTO Disk Benchmark is used by manufacturers of Hardware RAID controllers, its precious tool to test Windows storage controllers, host bus adapters (HBAs).

Here is ATTO Benchmark tool specifications (quote from their webstie):
 

  • Transfer sizes from 512KB to 8MB
  • Transfer lengths from 64KB to 2GB
  • Support for overlapped I/O
  • Supports a variety of queue depths
  • I/O comparisons with various test patterns
  • Timed mode allows continuous testing
  • Non-destructive performance measurement on formatted drives
  • Transfer sizes from 512KB to 8MB
  • Transfer lengths from 64KB to 2GB
  • Support for overlapped I/O
  • Supports a variety of queue depths
  • I/O comparisons with various test patterns
  • Timed mode allows continuous testing
  • Non-destructive performance measurement on formatted drives
  • – See more at: http://www.attotech.com/disk-benchmark/#sthash.rRlgSTOE.dpuf

Here is mirrored latest version of ATTO Disk for Download. Once you get your HDD statistics you will probably want to compare to other people results. On  TomsHardware's world famous Hardware geek site there are plenty of Hard Drives performance Charts

Of course there are other GUI alternatives to ATTO Benchmark one historically famous is NBench

NBench

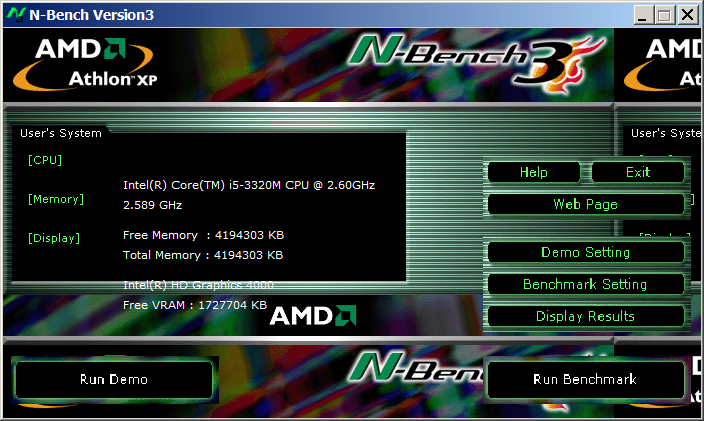
nbench_benchmark_windows_hard-drive-cpu-and-memory

Nbench is nice little benchmarking program for Windows NT. Nbench reports the following components of performance:

CPU speed: integer and floating operations/sec
L1 and L2 cache speeds: MB/sec
main memory speed: MB/sec
disk read and write speeds: MB/sec

SMP systems and multi-tasking OS efficiency can be tested using up to 20 separate threads of execution.

For Console Geeks or Windows server admins there are also some ports of famous *NIX Hard Disk Benchmarking tools:

NTiogen

NTiogen benchmark was written by Symbios Logic, It's Windows NT port of their popular UNIX benchmark IOGEN. NTIOGEN is the parent processes that spawns the specified number of IOGEN processes that actually do the I/O.
The program will display as output the number of processes, the average response time, the number of I/O operations per second, and the number of KBytes per second. You can download mirror copy of Ntiogen here


There are plenty of other GUI and Console HDD Benchmarking Win Tools, i.e.:

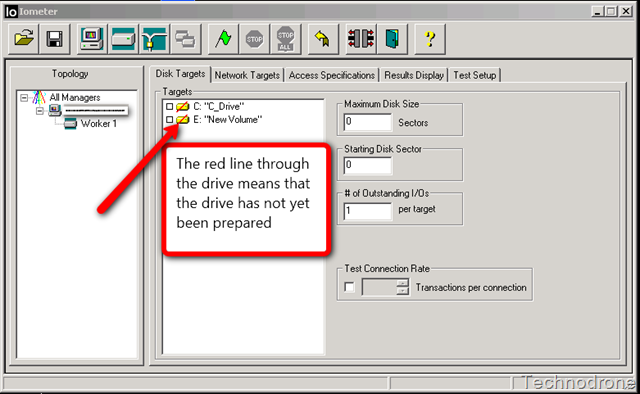
IOMeter (ex-developed by Intel and now abandoned available as open source available on SourceForge)

iometer-benchmark-disk-storage-speed-windows
 

Bench32 – Comprehensive benchmark that measures overall system performance under Windows NT or Windows 95, now obsolete not developed anymore abandoned by producer company.

ThreadMark32 – capable of bench (ex developed and supported by ADAPTEC) but also already unsupported

IOZone – filesystem benchmark tool. The benchmark generates and measures a variety of file operations. Iozone has been ported to many machines and runs under many operating systems.
 

N! B! Important note to make here is above suggested tools will provide you more realistic results than the proprietary vendor tools shipped by your hardware vendor. Using proprietary software produced by a single vendor makes it impossible to analyze and compare different hardwares, above HDD benchmarking tools are for "open systems", e.g. nomatter what the hardware producer is produced results can be checked against each other.
Another thing to consider is even though if you use any of above tools to test and compare two storage devices still results will be partially imaginary, its always best to conduct tests in Real Working Application Environments. If you're planning to launch a new services structure always test it first and don't rely on preliminary returned soft benchmarks.

if you know some other useful benchmarking software i'm missing please share.

Install VMWare tools on Debian and Ubuntu Linux – Enable VMWare Fullscreen and copy paste between OS host and Virtual machine

Wednesday, May 28th, 2014

install-vmware-tools-on-debian-gnu-linux-and-ubuntu-howto

If you need to use Virtual Machine to run some testing on heterogenous Operating Systems and you have chosen VMWare as a Virtual Machine. You will soon notice some of Virtual Machines functionality like copy between host operating system and Virtual Machine, true fullscreen mode and most importantly Copy paste between your host operating system and VMWare is not working. I'm not too much into Virtualization these days so for me it was truely shocking that a proprietary software like VMWare, claimed to be the best and most efficient Virtual Machine nowadays is not supporting copy / paste, fullscreen and copy between host and guest OS.  For those arguing why I'm using VMWare at all as it is proprietary and there is already free software Virtual Machines like QEMU and Oracle's VirtualBox its simply because now I have the chance to install and use VMWare 9 Enterprise on my work place at HP with a free Corporate license – in other words I'm using VMWare just for the sake of educating myself and would always recommend VirtualBox for those looking for good substitute free alternative to VMWare.

Before trying out VMWare, I tried Virtualbox to emulate Linux on my HP work PC running Windows with VirtualBox I was having issues with keyboard not working (because of lack of support of USB, no full screen support and lack of copy / paste between OS-es), I've just recently understood this is not because Virtualbox is bad Virtualization solution but because I forgot to install VirtualBox Oracle VM VirtualBox Extension Pack which allows support for USB, enables copy paste and full screen support. The equivalent to Virtualbox Oracle VM VirtualBox in VMWare world is called VMWare-Tools and once the guest operating system is installed inside VMWare VM, its necessary to install vmware-tools to enable better screen resolution and copy paste.
 

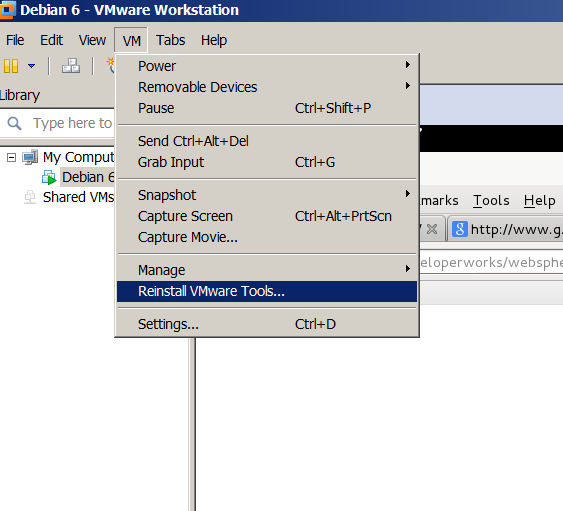
In Windows Virtual Machine installation of vmware-tools is pretty straight forward you go through VMWare's menus


VM -> Install Vmware-tools

install-vmware-tools-on-linux-guest-host-os-debian-redhat-screenshot

follow the instructions and you're done, however as always installing VMWare-tools on Linux is little bit more complicated you need to run few commands from Linux installed inside the Virtual Machine to install vmware-tools. Here is how vmware-tools is installed on Debian / Ubuntu / Linux Mint and rest of Debian based operating systems:

  1. Install Build essentials and gcc You need to have this installed some developer tools as well as GCC compiler in order for the vmware-tools to compile a special Linux kernel module which enables extra support (integration) between the VMWare VM and the installed inside VM Linux distro

apt-get install --yes build-essential gcc
...

2. Install appropriate Linux headers corresponding to current Linux OS installed kernel

apt-get install --yes linux-headers-$(uname -r)
....

3. Mount CD (Virtual) Content to obtain the vmware-tools version for your Linux

Be sure to have first checked from VMWare menus on menus VM -> Intall Vmware Tools
This step is a little bit strange but just do it without too much questioning …


mount /dev/cdrom /mnt/
umount /media/cdrom0/
mount /media/cdrom
mount /dev/sr0 /mnt/cdrom/
mount /dev/sr0 /mnt/


Note that /dev/sr0, might already be mounted and sometimes it might be necessary to unmount it first (don't remember exactly if I unmounted it or not)

4. Copy and Untar VMwareTools-9.2.0-799703.tar.gz

cp -rpf /media/cdrom/VMwareTools-9.2.0-799703.tar.gz /tmp/
cd /tmp/
tar -zxvvf VMwareTools-9.2.0-799703.tar.gz
...

5. Run vmware-tools installer

cd vmware-tools-distrib/
./vmware-install.pl

You will be asked multiple questions you can safely press enter to answer with default settings to all settings, hopefully if all runs okay this will make VMWare Tools installed
 

Creating a new VMware Tools installer database using the tar4 format.
Installing VMware Tools.
In which directory do you want to install the binary files?
[/usr/bin]
What is the directory that contains the init directories (rc0.d/ to rc6.d/)?
[/etc]
What is the directory that contains the init scripts?
[/etc/init.d]
In which directory do you want to install the daemon files?
[/usr/sbin]
In which directory do you want to install the library files?
[/usr/lib/vmware-tools]
The path "/usr/lib/vmware-tools" does not exist currently. This program is
going to create it, including needed parent directories. Is this what you want?
[yes]
In which directory do you want to install the documentation files?
[/usr/share/doc/vmware-tools]
The path "/usr/share/doc/vmware-tools" does not exist currently. This program
is going to create it, including needed parent directories. Is this what you
want? [yes]
The installation of VMware Tools 9.2.0 build-799703 for Linux completed
successfully. You can decide to remove this software from your system at any
time by invoking the following command: "/usr/bin/vmware-uninstall-tools.pl".
Before running VMware Tools for the first time, you need to configure it by
invoking the following command: "/usr/bin/vmware-config-tools.pl". Do you want
this program to invoke the command for you now? [yes]
Initializing…
Making sure services for VMware Tools are stopped.
Stopping VMware Tools services in the virtual machine:
Guest operating system daemon: done
Unmounting HGFS shares: done
Guest filesystem driver: done
[EXPERIMENTAL] The VMware FileSystem Sync Driver (vmsync) is a new feature that creates backups of virtual machines. Please refer to the VMware Knowledge Base for more details on this capability. Do you wish to enable this feature?
[no]
Before you can compile modules, you need to have the following installed…
make
gcc
kernel headers of the running kernel
Searching for GCC…
Detected GCC binary at "/usr/bin/gcc-4.6".
The path "/usr/bin/gcc-4.6" appears to be a valid path to the gcc binary.
Would you like to change it? [no]
Searching for a valid kernel header path…
Detected the kernel headers at "/lib/modules/3.2.0-4-amd64/build/include".
The path "/lib/modules/3.2.0-4-amd64/build/include" appears to be a valid path
to the 3.2.0-4-amd64 kernel headers.
Would you like to change it? [no]
The vmblock enables dragging or copying files between host and guest in a
Fusion or Workstation virtual environment. Do you wish to enable this feature?
[no] yes
make: Leaving directory `/tmp/vmware-root/modules/vmblock-only'

No X install found.
Creating a new initrd boot image for the kernel.
update-initramfs: Generating /boot/initrd.img-3.2.0-4-amd64
Checking acpi hot plug done
Starting VMware Tools services in the virtual machine:
Switching to guest configuration: done
VM communication interface: done
VM communication interface socket family: done
File system sync driver: done
Guest operating system daemon: done
The configuration of VMware Tools 8.6.10 build-913593 for Linux for this
running kernel completed successfully.
You must restart your X session before any mouse or graphics changes take
effect.
You can now run VMware Tools by invoking "/usr/bin/vmware-toolbox-cmd" from the
command line or by invoking "/usr/bin/vmware-toolbox" from the command line
during an X server session.
To enable advanced X features (e.g., guest resolution fit, drag and drop, and
file and text copy/paste), you will need to do one (or more) of the following:
1. Manually start /usr/bin/vmware-user
2. Log out and log back into your desktop session; and,
3. Restart your X session.
Enjoy,
–the VMware team
Found VMware Tools CDROM mounted at /mnt. Ejecting device /dev/sr0 …

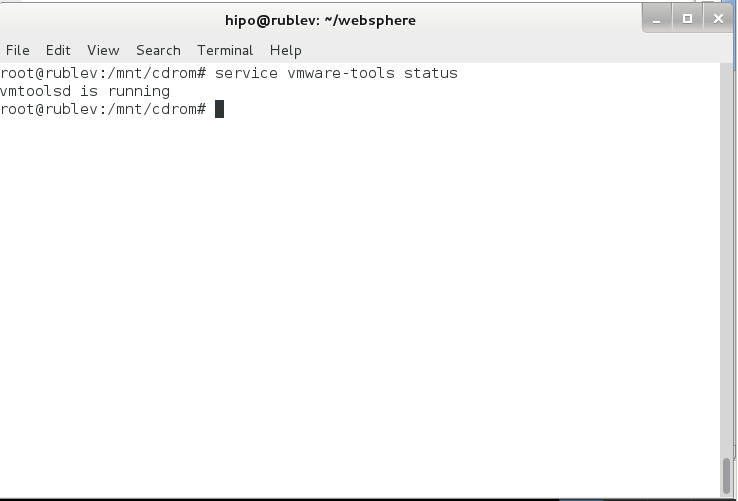
.To make sure vmware-tools compiled modules are loaded into Linux kernel inside VM, restart the Virtual Machine. Once Linux boots again and you login to gnome-terminal to check what is vmware-tools status (e.g. if properly loaded) run:

service vmware-tools status
vmtoolsd is running

install-vmware-tools-on-debian-gnu-linux-and-ubuntu-virtual-machine-screenshot

This method of installing works on Debian 7 (Wheezy) but same steps should work on any Ubuntu and rest of Debian derivatives. For Redhat (RPM) based Linux distributions to install vmware-tools after mounting cdrom drive following above instructions you will have an rpm package instead of .tar.gz archive so all you have to do is install the rpm, e.g. launch smth. like:

rpm -Uhv /mnt/cdrom/VMwareTools-9.2.0-799703.i386.rpm
Cheers 😉

MySQL SSL Configure Howto – How to Make MySQL communication secured

Wednesday, January 15th, 2014

mysql-over-ssl-how-to-configure-logo how to configure ssl on mysql server

Recently I've been asked How to make communication to MySQL database encrypted. The question was raised by a fellow developer who works on developing a Desktop standalone application in Delphi Programming Language with DevArt an (SQL Connection Component capable to connect Delphi applications to multiple databases like MySQL, Oracle, PostgreSQL, Interbase, Firebird etc.

Communicating in Secured form to MySQL database is not common task to do, as MySQL usually communicates to applications hosted on same server or applications to communicate to MySQL are in secured DMZ or administrated via phpMyAdmin web interface.

MySQL supports encrypted connections to itself using Secure Socket Layer (SSL) encryption. Setting up MySQL db to be communicated encrypted is a must for standalone Desktop applications which has to extract / insert data via remote SQL.
Configuring SQL to support communicated queries encrpytion is supported by default and easily configured on most standard Linux version distributions (Debian, RHEL, Fedora) with no need to recompile it.
1. Generate SSL Certificates

$ mkdir /etc/mysql-ssl && cd mysql-ssl

# Create CA certificate
$ openssl genrsa 2048 > ca-key.pem
$ openssl req -new -x509 -nodes -days 3600 \
         -key ca-key.pem -out ca-cert.pem

Create server certificate, remove passphrase, and sign it
server-cert.pem is public key, server-key.pem is private key
$ openssl req -newkey rsa:2048 -days 3600 \
         -nodes -keyout server-key.pem -out server-req.pem

$ openssl rsa -in server-key.pem -out server-key.pem
$ openssl x509 -req -in server-req.pem -days 3600 \
         -CA ca-cert.pem -CAkey ca-key.pem -set_serial 01 -out server-cert.pem

Create client certificate, remove passphrase, and sign it
client-cert.pem is public key and client-key.pem is private key
$ openssl req -newkey rsa:2048 -days 3600 \
         -nodes -keyout client-key.pem -out client-req.pem

$ openssl rsa -in client-key.pem -out client-key.pem
$ openssl x509 -req -in client-req.pem -days 3600 \
         -CA ca-cert.pem -CAkey ca-key.pem -set_serial 01 -out client-cert.pem

After generating the certificates, verify them:

$ openssl verify -CAfile ca-cert.pem server-cert.pem client-cert.pem
 

2. Add SSL support variables to my.cnf

Once SSL key pair files are generated in order to active SSL encryption support in MySQL server, add to (/etc/my.cnf,  /etc/mysql/my.cnf, /usr/local/etc/my.cnf … ) or wherever config is depending on distro

# SSL
ssl-ca=/etc/mysql-ssl/ca-cert.pem
ssl-cert=/etc/mysql-ssl/server-cert.pem
ssl-key=/etc/mysql-ssl/server-key.pem

3. Restart MySQL server

/etc/init.d/mysqld restart
...

4. Create SQL user to require SSL login

Create new user with access to database;

GRANT ALL ON Sql_User_DB.* TO Sql_User@localhost;
FLUSH PRIVILEGES;

To create administrator privileges user:

GRANT ALL PRIVILEGES ON *.* TO ‘ssluser’@'%’ IDENTIFIED BY ‘pass’ REQUIRE SSL;
FLUSH PRIVILEGES;

5. Test SSL Connection with MySQL CLI client or with few lines of PHP

To use mysql cli for testing whether SSL connection works:

$ mysql -u ssluser -p'pass' –ssl-ca /etc/mysql-ssl/client-cert.pem –ssl-cert /etc/mysql-ssl/client-key.pem

Once connected to MySQL to verify SSL connection works fine:

mysql> SHOW STATUS LIKE 'Ssl_Cipher';
 +---------------+--------------------+
| Variable_name | Value              |
 +---------------+--------------------+
| Ssl_cipher    | DHE-RSA-AES256-SHA |
+---------------+--------------------+

If you get this output this means MySQL SSL Connection is working as should.

Alternative way is to use test-mysqli-ssl.php script to test availability to mysql over SSL.

$conn=mysqli_init();
mysqli_ssl_set($conn, '/etc/mysql-ssl/client-key.pem', '/etc/mysql-ssl/client-cert.pem', NULL, NULL, NULL);
if (!mysqli_real_connect($conn, '127.0.0.1', 'ssluser', 'pass')) { die(); }
$res = mysqli_query($conn, 'SHOW STATUS like "Ssl_cipher"');
print_r(mysqli_fetch_row($res));
mysqli_close($conn);

Note: Change username password according to your user / pass before using the script

That's all now you have mysql communicating queries data over SSL


How to fix problem with Skype No Video on MacBook Air with Mac OS X 10.8.6 / Mac OS X Repair OS file permissions with Disk Utility

Monday, December 9th, 2013

mac os x utilities disk utility reset Mac OSX file permissions to default
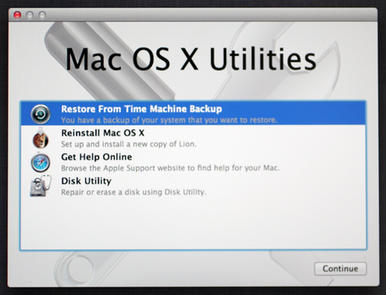
My girlfriend Svetlana has MacBook Air and just recently her skype Video calls stopped working once again after Mac OS X offered her to apply some update. Her notebook as of time of writting this post is running Mac OS X version 10.8.6. About 1 month and a halfago she was facing same Skype No VIdeo on Mac BookAri issues for how I fixed her No Video Skype issues back then check here. Initially I thought again the problem will be identical and to test if Web Camera hardware is detected on a hardware level by OS, I tried to check if it is displaying videoi FaceTime application. Last time there was no Video in Skype on her Mac Book Air  I remember clearly camera was detected on OS level and displaying well in Facetime, however this time even in facetime I couldn't see a capture of myself … As obviously problem was not in Skype Mac OS previous time fix of substituting AppleCamera.plugin with older version would not fix it. After some evaluation on problem and reading large number of posts on Apple support forums, I've came to the conclusion that it is possible the whole issues are faced by improper permissions applied by latest applied Mac OS update. In such cases people were recommending to Repair Mac OS Standard OS Files Permissions using an OS embedded tool called Disk Utility.
Disk Utility is an application that's built into OS X that can perform lots of useful and even scary actions.Sysadmins and advanced users seem to find frequent need of this handy tool but those newer to the Mac OS it is better to only use it after reading the docs and well realizing what exactly doing.

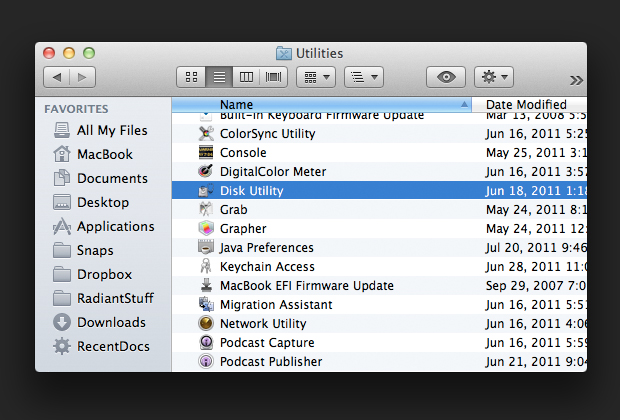
To Find / Open Disk Utility on Mac OS;

Launch Applications folder -> Utilities (folder), click the name of your startup disk, and select Repair Disk Permissions.

mac-oSX-applications-utilitilities-diskutility


Mac OS X 10.8.6 Disk Utility Repair Disk Permissions screenshot
As I can understand from other ports reverting Mac OS File permissions to their default can solve a number of strange issues with Mac OS.
After repairing Mac OS X basis OS file permissions and testing in FaceTime and Skype, Camera god detected and Video was working fine 🙂
Hope this little article helps someone to fix same issues, if so please drop a thank you comment 😉

Testing Qmail installation for problems: Common reasons for unworking qmail / How to debug Qmail mail server failing to delivery or send emails

Friday, November 9th, 2012

Testing qmail installation for problemes finding qmail common component failures

Through my 10 years of experience  in managing and "life with qmail", I've at many times had to deal with suddenly broken or misconducting, qmail installs. With some of them the problems started during new Qmail install configuration time, with others QMAIL worked perfectly for years and then suddenly it stopped working. Nomatter what the situation was, there was a kind of "scenario" and common things to check to debug and find out what is causing the respective qmail installation to not work. In this little, article I will try to share my knowledge in hope that others which configure new QMAIL based mail servers or are in situation to need to recover – "resurrect" a one that suddenly stopped working qmail to its normal operations.

Here are few cases , there are many more, probably hundreds of reasons which might be causing Qmail + Vpopmail  to stop properly delivering e-amails but  as this ones ones are really most likely ones just checking them gives a good clue What is going wrong with  Qmail?.:

  • Something broke up with scheduled daemontools processes;
  • There is no hard disk (the disk is full) and Qmai is unable to writeinside its mail Queue directories (/var/qmail/queue) or Spamassassin or AntiVirus programs fails to write on disk
  • qmail-scanner-queue.pl ( /var/qmail/bin/qmail-scanner-queue.pl ) perl script is messed up or if using simscan to do antivirus check-ups instead simscan is failing somewhere
  • something messed up with /var/qmail/control/rcpthosts
  • something messed up with /var/qmail/control/validrcptto.txt or /var/qmail/control/validrcptto.cdb
  •  incorrect main server host in /var/qmail/control/me or /var/qmail/control/plusdomain
  • Messed up vpopmail (virtual domain) records in /var/qmail/control/virtualdomains file
  • problems with insufficient memory (whether there is a softlimit memory limit for /service/qmail-smtpd/run (qmail daemontools start up and monitoring script) – /usr/local/bin/softlimit is no longer proposed used by newer qmail guides but in older ones it was common to appear in /../qmail-smtpd/run
  • Something is wrong with clamd (/usr/sbin/clamd – for example crashed due to bug) or something is wrong with clamav database ( /var/lib/clamav or wherever set to be stored; on some installs /usr/local/lib/clamav) – there most commonly main.cvd and daily.cld break up during freshclam clamav database update.
  • As freshclam takes care for AntiVirus database updates it is good to check it is properly running, either as a service or via a cronjob
  • Assure there are no mistakes or wrong (unexistent) variables in /etc/tcp.smtp file or / and /etc/tcp.smtp.cdb is not broken
  • Permission issues with; qmail main binaries in /var/qmail/bin/ , queue files – /var/qmail/queue or qmail log files /var/log/qmail/…

As I said there are plenty of other possible, reasons but I listed this here, since they're the most common reasons for problems with sent or receive of messages with Qmail mail server.

Checking all of the above and making sure they're okay, I've checked daemontools readprodctitle process as it often signalize for problems with any part of qmail install, there all seemed normal no warnings and errors, e.g.:

qmail:~# ps ax|grep -i -E 'clam|freshclam|spam|vpopmail'
2241 ? Ssl 3:49 /usr/sbin/clamd
2408 ? Ss 11:54 /usr/bin/freshclam -d --quiet
2853 ? S 0:00 tcpserver -H -R -v -c100 0 110 qmail-popup mail.www.pc-freak.net /home/vpopmail/bin/vchkpw qmail-pop3d Maildir
2856 ? S 0:01 tcpserver -vR -l /var/qmail/control/me -c 30 -u 89 -g 89 -x /etc/tcp.smtp.cdb 0 25 rblsmtpd -t0 -r zen.spamhaus.org -r dnsbl.njabl.org -r dnsbl.sorbs.net -r bl.spamcop.net qmail-smtpd /var/qmail/control/me /home/vpopmail/bin/vchkpw /bin/true
2857 ? S 0:00 sslserver -e -vR -l mail.www.pc-freak.net -c 30 -u 89 -g 89 -x /etc/tcp.smtp.cdb 0 465 qmail-smtpd mail.www.pc-freak.net /home/vpopmail/bin/vchkpw /bin/true

qmail:~# ps ax|grep -i qmail
2840 ? S 0:00 supervise qmail-send
2844 ? S 0:00 supervise qmail-smtpd
2846 ? S 0:00 supervise qmail-pop3d
2848 ? S 0:00 supervise qmail-smtpdssl
2850 ? S 0:05 qmail-send
2852 ? S 0:00 multilog t n1024 s1048576 n20 /var/log/qmail/qmail-smtpdssl
2853 ? S 0:00 tcpserver -H -R -v -c100 0 110 qmail-popup mail.www.pc-freak.net /home/vpopmail/bin/vchkpw qmail-pop3d Maildir
2854 ? S 0:00 multilog t s100000 n20 /var/log/qmail/qmail-pop3d
2855 ? S 0:01 multilog t n1024 s1048576 n20 /var/log/qmail/qmail-smtpd
2856 ? S 0:01 tcpserver -vR -l /var/qmail/control/me -c 30 -u 89 -g 89 -x /etc/tcp.smtp.cdb 0 25 rblsmtpd -t0 -r zen.spamhaus.org -r dnsbl.njabl.org -r dnsbl.sorbs.net -r bl.spamcop.net qmail-smtpd /var/qmail/control/me /home/vpopmail/bin/vchkpw /bin/true
2857 ? S 0:00 sslserver -e -vR -l mail.www.pc-freak.net -c 30 -u 89 -g 89 -x /etc/tcp.smtp.cdb 0 465 qmail-smtpd mail.www.pc-freak.net /home/vpopmail/bin/vchkpw /bin/true
2858 ? S 0:01 multilog t n1024 s1048576 n20 /var/log/qmail/qmail-send
2868 ? S 0:01 qmail-lspawn ./Maildir
2869 ? S 0:00 qmail-rspawn
2870 ? S 0:00 qmail-clean
2871 ? S 0:04 qmail-todo
2872 ? S 0:01 qmail-clean
27742 pts/6 S+ 0:00 grep -i qmail

qmail:~# ps ax |grep -i readproc|grep -v grep
48060 ?        S      0:00 readproctitle service errors: ................................................................................................................................................................................................................................................................................................................................................................................................................
 

As you see  "….." signalize, all is fine with processes scheduled to run over daemontools process. If you instead get warnings or error messages usually the error will point you what is wrong with the qmail install. Common error, I've got over the years here especially on long time functionining qmail installs is insufficient disk space to write in qmail queue and log files.

Also above ps ax|grep -i -E 'clam|freshclam|spam|vpopmail'
shows all 3 clamd, freshclam and vpopmail are up and running so this most likely means all is good with them. Of course sometimes some of those 3 is working and there are problems with the services properly processing emails so it is always a good idea to read qmail log files, in most qmail installations qmail logs are located in /var/log/qmail .

Quickest way is to check all of the qmail related logs in a loop with something like:

qmail:~# for i in $(ls -d /var/log/qmail/*qmail*/); do tail -n 10 $i/current|tai64nlocal; sleep 5; done

Also it is always a good idea to check last 10 lines of clamav, freshclam, qmail-scanner and spamd logs:

qmail:~# tail -n 10 /var/log/qmail/clamav/clamav.log;
Fri Nov 9 06:52:28 2012 -> SelfCheck: Database status OK.
Fri Nov 9 07:52:28 2012 -> SelfCheck: Database status OK.
Fri Nov 9 08:52:28 2012 -> SelfCheck: Database status OK.
Fri Nov 9 09:52:28 2012 -> SelfCheck: Database status OK.
Fri Nov 9 10:52:29 2012 -> SelfCheck: Database status OK.
Fri Nov 9 11:57:29 2012 -> SelfCheck: Database status OK.
Fri Nov 9 12:57:29 2012 -> SelfCheck: Database status OK.
Fri Nov 9 14:14:35 2012 -> SelfCheck: Database status OK.
Fri Nov 9 15:33:46 2012 -> SelfCheck: Database status OK.
Fri Nov 9 16:33:46 2012 -> SelfCheck: Database status OK.

qmail:~# tail -n 10 /var/log/qmail/clamav/freshclam.log
Fri Nov 9 16:20:44 2012 -> --------------------------------------
Fri Nov 9 17:20:44 2012 -> Received signal: wake up
Fri Nov 9 17:20:44 2012 -> ClamAV update process started at Fri Nov 9 17:20:44 2012
Fri Nov 9 17:20:44 2012 -> WARNING: Your ClamAV installation is OUTDATED!
Fri Nov 9 17:20:44 2012 -> WARNING: Local version: 0.97.5 Recommended version: 0.97.6
Fri Nov 9 17:20:44 2012 -> DON'T PANIC! Read http://www.clamav.net/support/faq
Fri Nov 9 17:20:44 2012 -> main.cvd is up to date (version: 54, sigs: 1044387, f-level: 60, builder: sven)
Fri Nov 9 17:20:44 2012 -> daily.cld is up to date (version: 15557, sigs: 284869, f-level: 63, builder: jesler)
Fri Nov 9 17:20:44 2012 -> bytecode.cld is up to date (version: 191, sigs: 37, f-level: 63, builder: neo)
Fri Nov 9 17:20:46 2012 ->
--------------------------------------

qmail:~# tail -n 10 /var/log/qmail/qscan/qmail-queue.log
Fri, 09 Nov 2012 13:14:35 EET:14705:
from='noreply@theitjobboard.eu', subj='Network Developer', via SMTP from oy-ip-034.smwebhost.com
Fri, 09 Nov 2012 13:14:44 EET:14705: ------ Process 14705 finished. Total of 8.846395 secs
Fri, 09 Nov 2012 15:04:27 EET:21979: +++ starting debugging for process 21979 (ppid=21969) by uid=89
Fri, 09 Nov 2012 15:04:27 EET:21979: g_e_h: return-path='hipo@www.pc-freak.net', recips='sandy.richardson@hyperionrecruitment.com'
Fri, 09 Nov 2012 15:04:27 EET:21979: from='"G. Georgiev" ', subj='Re: Network Developer', via SMTP from ip156-108-174-82.adsl2.static.versatel.nl using auth (hipo@www.pc-freak.net@ip156-108-174-82.adsl2.static.versatel.nl)
Fri, 09 Nov 2012 15:04:34 EET:21979: ------ Process 21979 finished. Total of 6.626484 secs
Fri, 09 Nov 2012 15:33:46 EET:23891: +++ starting debugging for process 23891 (ppid=23884) by uid=89
Fri, 09 Nov 2012 15:33:46 EET:23891: g_e_h: return-path='sdy.richardson@hyperionrecruitment.com', recips='hipo@www.pc-freak.net'
Fri, 09 Nov 2012 15:33:46 EET:23891: from='"Sandy Richardson" ', subj='RE: Network Developer', via SMTP from
ostrich.dnsmaster.net

qmail:~# tail -n 10 /var/log/spamd/current |tai64nlocal 2012-11-09 16:25:43.091680500 Nov 9 15:04:27.858 [22049] info: spamd: connection from localhost [127.0.0.1] at port 54494
2012-11-09 16:25:43.091683500 Nov 9 15:04:27.948 [22049] info: spamd: checking message <509CFF4F.9030601@www.pc-freak.net> for qscand:89
2012-11-09 16:25:43.091684500 Nov 9 15:04:33.837 [22049] info: spamd: clean message (0.0/5.0) for qscand:89 in 6.0 seconds, 1104 bytes.
2012-11-09 16:25:43.091690500 Nov 9 15:04:33.838 [22049] info: spamd: result: . 0 - scantime=6.0,size=1104,user=qscand,uid=89,required_score=5.0,rhost=localhost,raddr=127.0.0.1,rport=54494,mid=<509CFF4F.9030601@www.pc-freak.net>,autolearn=ham
2012-11-09 16:25:43.091692500 Nov 9 15:04:34.077 [22043] info: prefork: child states: II
2012-11-09 16:25:43.091692500 Nov 9 15:33:53.626 [22049] info: spamd: connection from localhost [127.0.0.1] at port 54681
2012-11-09 16:25:43.091696500 Nov 9 15:33:53.656 [22049] info: spamd: checking message <05e201cdbe7e$d1c83c90$7558b5b0$@hyperionrecruitment.com> for qscand:89
2012-11-09 16:25:43.091697500 Nov 9 15:33:59.467 [22049] info: spamd: clean message (0.0/5.0) for qscand:89 in 5.8 seconds, 33845 bytes.
2012-11-09 16:25:43.091698500 Nov 9 15:33:59.467 [22049] info: spamd: result: . 0 - scantime=5.8,size=33845,user=qscand,uid=89,required_score=5.0,rhost=localhost,raddr=127.0.0.1,rport=54681,mid=<05e201cdbe7e$d1c83c90$7558b5b0$@hyperionrecruitment.com>,autolearn=ham
2012-11-09 16:25:43.091702500 Nov 9 15:33:59.506 [22043] info: prefork: child states: II

Whether observing, some of above logs reveals problems to delivery e-mail messages because e-mail boxes are not existing in  /var/qmail/control/validrcptto.cdb – this often happens whether new e-mail boxes are created and the new mail somehow did not enter validrcptto.txt / validrcptto.cdb , you will have to re-build validrcptto.cdb. Rebuilding validrcptto.cdb manually is done with cmd:
br />  

qmail:~# /usr/local/bin/mkvalidrcptto > /var/qmail/control/validrcptto.txt qmail:~# cdbmake-12 /var/qmail/control/validrcptto.cdb /var/qmail/control/validrcptto.tmp < /var/qmail/control/validrcptto.txt

Of course, if the qmail was already properly installed with validrcptto support, this should be done automatically with some cron job set to invoke above commands every 5 minutes or so. In Thibs QmailRocks followed install the script is called /usr/sbin/update-validrcptto and is set to exec every 5 mins.
 

If spamassassin is configured to automatically update its set of anti-spam rules, via some cron job or smth. it is always a good idea to check if spamassassin, properly loads up does not fail due to some antispam rule:

qmail:~# spamassassin --lint -D ...
....

You will have to examine carefully, the long returned content for "warning" and "error" keywords. If you don't won't to bother with details you can do, spamassassin –lint

Another good idea whether problems with qmail is of course to rebuild tcpserver cdb file for smtp – this usually solves problems caused by broken /etc/tcp.smtp.cdb.cdb files.

Re-building manually tcp.smtp.cdb is done with:
qmail:~# tcprules /etc/tcp.smtp.cdb /etc/tcp.smtp.tmp < /etc/tcp.smtp
qmail:~# chmod 644 /etc/tcp.smtp.cdb

However, most qmail installation guides recommend or set a qmailctl bash script file, to start / stop / reload / flush qmail queue or simply get status of the qmail installation, so it much easier to rebuild tcp.smtp.cdb through it:
qmail:~# qmailctl cdb
Reloaded /etc/tcp.smtp.

Checking the status of the Qmail Queue state and fixing issues with it can be done using little external tool qmHandle – check my previous article ( Cleaning Qmail filled queue with Spam messages )

To check the basic qmail compontents (qmail-send, qmail-smtpd , qmail-smtpdssl)do:

qmail:~# qmailctl stat
/service/qmail-send: up (pid 2850) 1886193 seconds
/service/qmail-send/log: up (pid 2858) 1886193 seconds
/service/qmail-smtpd: up (pid 2856) 1886193 seconds
/service/qmail-smtpd/log: up (pid 2855) 1886193 seconds
/service/qmail-smtpdssl: up (pid 2857) 1886193 seconds
/service/qmail-smtpdssl/log: up (pid 2852) 1886193 seconds
messages in queue: 2
messages in queue but not yet preprocessed: 0

Another good practice if you have doubts that something is messed with qmail-queue is to check what is waiting to be send in queue:

qmail:~# qmail-qstat
messages in queue: 2
messages in queue but not yet preprocessed: 0

In above paste, from my mail server I have just 2 mails, if you however notice here some large numbers like 5000 or 10000, this might be the cause for asetbacks. If you have plenty of undelivered mails waiting in mail server queue, examine the queue:

qmail:~# qmail-qread ....
.....

Of course it is sometimes, possible to be in situation, where more than one components are creating mail server's sent / receive delivery issues. Anyhow doing a close examination of all possible components usually should (if not reveal what causes the issue) at least give you some pointer to where to search for the problem.

Also for qmail installations based on QmailRocks or Thibs QmailRocks guide, there is a tiny shell script provided, that does evaluation on standard qmail files permissions and binary locations and reports, whether it finds problems with some of them. You can fetch a copy of the qmr_inst_check from here . Although the script is created to check a newly install qmail for problems, it also often helps in determining issues with qmails who mysteriously stopped working.

If you suspect, there are::

Well that's it. Hope this little walk through give you idea where to check on troublesome Qmail install. Please leave a comment if it help you (somehow) solve your issue. Also will be glad to hear if I'm missing somethingi'm sure I am.