Posts Tagged ‘traffic’

Create Haproxy Loadbalancer Access Control Lists and forward incoming frontend traffics based on simple logic

Friday, February 16th, 2024

Create-haproxy-loadbalancer-access-control-list-and-forward-frontend-traffic-based-on-simple-logic-acls-logo

Haproxy Load Balancers could do pretty much to load balance traffic between application servers. The most straight forward way to use is to balance traffic for incoming Frontends towards a Backend configuration with predefined Application machines and ports to send the traffic, where one can be the leading one and others be set as backup or we can alternatively send the traffic towards a number of machines incoming to a Frontend port bind IP listener and number of backend machine.

Besides this the more interesting capabilities of Haproxy comes with using Access Control Lists (ACLs) to forward Incoming Frontend (FT) traffic towards specific backends and ports based on logic, power ACLs gives to Haproxy to do a sophisticated load balancing are enormous. 
In this post I'll give you a very simple example on how you can save some time, if you have already a present Frontend listening to a Range of TCP Ports and it happens you want to redirect some of the traffic towards a spefic predefined Backend.

This is not the best way to it as Access Control Lists will put some extra efforts on the server CPU, but as today machines are quite powerful, it doesn't really matter. By using a simple ACLs as given in below example, one can save much of a time of writting multiple frontends for a complete sequential port range, if lets say only two of the ports in the port range and distinguish and redirect traffic incoming to Haproxy frontend listener in the port range of 61000-61230 towards a certain Ports that are supposed to go to a Common Backends to a separate ones, lets say ports 61115 and 61215.

Here is a short description on the overall screnarios. We have an haproxy with 3 VIP (Virtual Private IPs) with a Single Frontend with 3 binded IPs and 3 Backends, there is a configured ACL rule to redirect traffic for certain ports, the overall Load Balancing config is like so:

Frontend (ft):

ft_PROD:
listen IPs:

192.168.0.77
192.168.0.83
192.168.0.78

On TCP port range: 61000-61299

Backends (bk): 

bk_PROD_ROUNDROBIN
bk_APP1
bk_APP2


Config Access Control Liststo seperate incoming haproxy traffic for CUSTOM_APP1 and CUSTOM_APP2


By default send all incoming FT traffic to: bk_PROD_ROUNDROBIN

With exception for frontend configured ports on:
APP1 port 61115 
APP2 port 61215

If custom APP1 send to bk:
RULE1
If custom APP2 send to bk:
RULE2

Config on frontends traffic send operation: 

bk_PROD_ROUNDROBIN (roundrobin) traffic send to App machines all in parallel
traffic routing mode (roundrobin)
Appl1
Appl2
Appl3
Appl4

bk_APP1 and bk_APP2

traffic routing mode: (balance source)
Appl1 default serving host

If configured check port 61888, 61887 is down, traffic will be resend to configured pre-configured backup hosts: 

Appl2
Appl3
Appl4


/etc/haproxy/haproxy.cfg that does what is described with ACL LB capabilities looks like so:

#———————————————————————
# Global settings
#———————————————————————
global
    log         127.0.0.1 local2

    chroot      /var/lib/haproxy
    pidfile     /var/run/haproxy.pid
    maxconn     4000
    user        haproxy
    group       haproxy
    daemon

    # turn on stats unix socket
    stats socket /var/lib/haproxy/stats

#———————————————————————
# common defaults that all the 'listen' and 'backend' sections will
# use if not designated in their block
#———————————————————————
defaults
    mode                    tcp
    log                     global
    option                  tcplog
    #option                  dontlognull
    #option http-server-close
    #option forwardfor       except 127.0.0.0/8
    option                  redispatch
    retries                 7
    #timeout http-request    10s
    timeout queue           10m
    timeout connect         30s
    timeout client          20m
    timeout server          10m
    #timeout http-keep-alive 10s
    timeout check           30s
    maxconn                 3000


#———————————————————————
# Synchronize server entries in sticky tables
#———————————————————————

peers hapeers
    peer haproxy1-fqdn.com 192.168.0.58:8388
    peer haproxy2-fqdn.com 192.168.0.79:8388


#———————————————————————
# HAProxy Monitoring Config
#———————————————————————
listen stats 192.168.0.77:8080                #Haproxy Monitoring run on port 8080
    mode http
    option httplog
    option http-server-close
    stats enable
    stats show-legends
    stats refresh 5s
    stats uri /stats                            #URL for HAProxy monitoring
    stats realm Haproxy\ Statistics
    stats auth hauser:secretpass4321         #User and Password for login to the monitoring dashboard
    stats admin if TRUE
    #default_backend bk_Prod1         #This is optionally for monitoring backend
#———————————————————————
# HAProxy Monitoring Config
#———————————————————————
#listen stats 192.168.0.83:8080                #Haproxy Monitoring run on port 8080
#    mode http
#    option httplog
#    option http-server-close
#    stats enable
#    stats show-legends
#    stats refresh 5s
#    stats uri /stats                            #URL for HAProxy monitoring
#    stats realm Haproxy\ Statistics
#    stats auth hauser:secretpass321          #User and Password for login to the monitoring dashboard
#    stats admin if TRUE
#    #default_backend bk_Prod1           #This is optionally for monitoring backend

#———————————————————————
# HAProxy Monitoring Config
#———————————————————————
# listen stats 192.168.0.78:8080                #Haproxy Monitoring run on port 8080
#    mode http
#    option httplog
#    option http-server-close
#    stats enable
#    stats show-legends
#    stats refresh 5s
#    stats uri /stats                            #URL for HAProxy monitoring
#    stats realm Haproxy\ Statistics
#    stats auth hauser:secretpass123          #User and Password for login to the monitoring dashboard
#    stats admin if TRUE
#    #default_backend bk_DKV_PROD_WLPFO          #This is optionally for monitoring backend


#———————————————————————
# frontend which proxys to the backends
#———————————————————————
frontend ft_PROD
    mode tcp
    bind 192.168.0.77:61000-61299
        bind 192.168.0.83:51000-51300
        bind 192.168.0.78:51000-62300
    option tcplog
        # (4) Peer Sync: a sticky session is a session maintained by persistence
        stick-table type ip size 1m peers hapeers expire 60m
# Commented for change CHG0292890
#   stick on src
    log-format %ci:%cp\ [%t]\ %ft\ %b/%s\ %Tw/%Tc/%Tt\ %B\ %ts\ %ac/%fc/%bc/%sc/%rc\ %sq/%bq
        acl RULE1 dst_port 61115
        acl RULE2 dst_port 61215
        use_backend APP1 if app1
        use_backend APP2 if app2
    default_backend bk_PROD_ROUNDROBIN


#———————————————————————
# round robin balancing between the various backends
#———————————————————————
backend bk_PROD_ROUNDROBIN
    mode tcp
    # (0) Load Balancing Method.
    balance roundrobin
    # (4) Peer Sync: a sticky session is a session maintained by persistence
    stick-table type ip size 1m peers hapeers expire 60m
    # (5) Server List
    # (5.1) Backend
    server appl1 10.33.0.50 check port 31232
    server appl2 10.33.0.51 check port 31232 
    server appl2 10.45.0.78 check port 31232 
    server appl3 10.45.0.79 check port 31232 

#———————————————————————
# source balancing for the GUI
#———————————————————————
backend bk_APP2
    mode tcp
    # (0) Load Balancing Method.
    balance source
    # (4) Peer Sync: a sticky session is a session maintained by persistence
    stick-table type ip size 1m peers hapeers expire 60m
        stick on src
    # (5) Server List
    # (5.1) Backend
    server appl1 10.33.0.50 check port 55232
    server appl2 10.32.0.51 check port 55232 backup
    server appl3 10.45.0.78 check port 55232 backup
    server appl4 10.45.0.79 check port 55232 backup

#———————————————————————
# source balancing for the OLW
#———————————————————————
backend bk_APP1
    mode tcp
    # (0) Load Balancing Method.
    balance source
    # (4) Peer Sync: a sticky session is a session maintained by persistence
    stick-table type ip size 1m peers hapeers expire 60m
        stick on src
    # (5) Server List
    # (5.1) Backend
    server appl1 10.33.0.50 check port 53119
    server appl2 10.32.0.51 check port 53119 backup
    server appl3 10.45.0.78 check port 53119 backup
    server appl4 10.45.0.79 check port 53119 backup


You can also check and download the haproxy.cfg here.
Enjjoy !

How to filter dhcp traffic between two networks running separate DHCP servers to prevent IP assignment issues and MAC duplicate addresses

Tuesday, February 8th, 2022

how-to-filter-dhcp-traffic-2-networks-running-2-separate-dhcpd-servers-to-prevent-ip-assignment-conflicts-linux
Tracking the Problem of MAC duplicates on Linux routers
 

If you have two networks that see each other and they're not separated in VLANs but see each other sharing a common netmask lets say 255.255.254.0 or 255.255.252.0, it might happend that there are 2 dhcp servers for example (isc-dhcp-server running on 192.168.1.1 and dhcpd running on 192.168.0.1 can broadcast their services to both LANs 192.168.1.0.1/24 (netmask 255.255.255.0) and Local Net LAN 192.168.1.1/24. The result out of this is that some devices might pick up their IP address via DHCP from the wrong dhcp server.

Normally if you have a fully controlled little or middle class home or office network (10 – 15 electronic devices nodes) connecting to the LAN in a mixed moth some are connected via one of the Networks via connected Wifi to 192.168.1.0/22 others are LANned and using static IP adddresses and traffic is routed among two ISPs and each network can see the other network, there is always a possibility of things to go wrong. This is what happened to me so this is how this post was born.

The best practice from my experience so far is to define each and every computer / phone / laptop host joining the network and hence later easily monitor what is going on the network with something like iptraf-ng / nethogs  / iperf – described in prior  how to check internet spepeed from console and in check server internet connectivity speed with speedtest-cliiftop / nload or for more complex stuff wireshark or even a simple tcpdump. No matter the tools network monitoring is only part on solving network issues. A very must have thing in a controlled network infrastructure is defining every machine part of it to easily monitor later with the monitoring tools. Defining each and every host on the Hybrid computer networks makes administering the network much easier task and  tracking irregularities on time is much more likely. 

Since I have such a hybrid network here hosting a couple of XEN virtual machines with Linux, Windows 7 and Windows 10, together with Mac OS X laptops as well as MacBook Air notebooks, I have followed this route and tried to define each and every host based on its MAC address to pick it up from the correct DHCP1 server  192.168.1.1 (that is distributing IPs for Internet Provider 1 (ISP 1), that is mostly few computers attached UTP LAN cables via LiteWave LS105G Gigabit Switch as well from DHCP2 – used only to assigns IPs to servers and a a single Wi-Fi Access point configured to route incoming clients via 192.168.0.1 Linux NAT gateway server.

To filter out the unwanted IPs from the DHCPD not to propagate I've so far used a little trick to  Deny DHCP MAC Address for unwanted clients and not send IP offer for them.

To give you more understanding,  I have to clear it up I don't want to have automatic IP assignments from DHCP2 / LAN2 to DHCP1 / LAN1 because (i don't want machines on DHCP1 to end up with IP like 192.168.0.50 or DHCP2 (to have 192.168.1.80), as such a wrong IP delegation could potentially lead to MAC duplicates IP conflicts. MAC Duplicate IP wrong assignments for those older or who have been part of administrating large ISP network infrastructures  makes the network communication unstable for no apparent reason and nodes partially unreachable at times or full time …

However it seems in the 21-st century which is the century of strangeness / computer madness in the 2022, technology advanced so much that it has massively started to break up some good old well known sysadmin standards well documented in the RFCs I know of my youth, such as that every electronic equipment manufactured Vendor should have a Vendor Assigned Hardware MAC Address binded to it that will never change (after all that was the idea of MAC addresses wasn't it !). 
Many mobile devices nowadays however, in the developers attempts to make more sophisticated software and Increase Anonimity on the Net and Security, use a technique called  MAC Address randomization (mostly used by hackers / script kiddies of the early days of computers) for their Wi-Fi Net Adapter OS / driver controlled interfaces for the sake of increased security (the so called Private WiFi Addresses). If a sysadmin 10-15 years ago has seen that he might probably resign his profession and turn to farming or agriculture plant growing, but in the age of digitalization and "cloud computing", this break up of common developed network standards starts to become the 'new normal' standard.

I did not suspected there might be a MAC address oddities, since I spare very little time on administering the the network. This was so till recently when I accidently checked the arp table with:

Hypervisor:~# arp -an
192.168.1.99     5c:89:b5:f2:e8:d8      (Unknown)
192.168.1.99    00:15:3e:d3:8f:76       (Unknown)

..


and consequently did a network MAC Address ARP Scan with arp-scan (if you never used this little nifty hacker tool I warmly recommend it !!!)
If you don't have it installed it is available in debian based linuces from default repos to install

Hypervisor:~# apt-get install –yes arp-scan


It is also available on CentOS / Fedora / Redhat and other RPM distros via:

Hypervisor:~# yum install -y arp-scan


Hypervisor:~# arp-scan –interface=eth1 192.168.1.0/24

192.168.1.19    00:16:3e:0f:48:05       Xensource, Inc.
192.168.1.22    00:16:3e:04:11:1c       Xensource, Inc.
192.168.1.31    00:15:3e:bb:45:45       Xensource, Inc.
192.168.1.38    00:15:3e:59:96:8e       Xensource, Inc.
192.168.1.34    00:15:3e:d3:8f:77       Xensource, Inc.
192.168.1.60    8c:89:b5:f2:e8:d8       Micro-Star INT'L CO., LTD
192.168.1.99     5c:89:b5:f2:e8:d8      (Unknown)
192.168.1.99    00:15:3e:d3:8f:76       (Unknown)

192.168.x.91     02:a0:xx:xx:d6:64        (Unknown)
192.168.x.91     02:a0:xx:xx:d6:64        (Unknown)  (DUP: 2)

N.B. !. I found it helpful to check all available interfaces on my Linux NAT router host.

As you see the scan revealed, a whole bunch of MAC address mess duplicated MAC hanging around, destroying my network topology every now and then 
So far so good, the MAC duplicates and strangely hanging around MAC addresses issue, was solved relatively easily with enabling below set of systctl kernel variables.
 

1. Fixing Linux ARP common well known Problems through disabling arp_announce / arp_ignore / send_redirects kernel variables disablement


Linux answers ARP requests on wrong and unassociated interfaces per default. This leads to the following two problems:

ARP requests for the loopback alias address are answered on the HW interfaces (even if NOARP on lo0:1 is set). Since loopback aliases are required for DSR (Direct Server Return) setups this problem is very common (but easy to fix fortunately).

If the machine is connected twice to the same switch (e.g. with eth0 and eth1) eth2 may answer ARP requests for the address on eth1 and vice versa in a race condition manner (confusing almost everything).

This can be prevented by specific arp kernel settings. Take a look here for additional information about the nature of the problem (and other solutions): ARP flux.

To fix that generally (and reboot safe) we  include the following lines into


Hypervisor:~# cp -rpf /etc/sysctl.conf /etc/sysctl.conf_bak_07-feb-2022
Hypervisor:~# cat >> /etc/sysctl.conf

# LVS tuning
net.ipv4.conf.lo.arp_ignore=1
net.ipv4.conf.lo.arp_announce=2
net.ipv4.conf.all.arp_ignore=1
net.ipv4.conf.all.arp_announce=2

net.ipv4.conf.all.send_redirects=0
net.ipv4.conf.eth0.send_redirects=0
net.ipv4.conf.eth1.send_redirects=0
net.ipv4.conf.default.send_redirects=0

Press CTRL + D simultaneusly to Write out up-pasted vars.


To read more on Load Balancer using direct routing and on LVS and the arp problem here


2. Digging further the IP conflict / dulicate MAC Problems

Even after this arp tunings (because I do have my Hypervisor 2 LAN interfaces connected to 1 switch) did not resolved the issues and still my Wireless Connected devices via network 192.168.1.1/24 (ISP2) were randomly assigned the wrong range IPs 192.168.0.XXX/24 as well as the wrong gateway 192.168.0.1 (ISP1).
After thinking thoroughfully for hours and checking the network status with various tools and thanks to the fact that my wife has a MacBook Air that was always complaining that the IP it tried to assign from the DHCP was already taken, i"ve realized, something is wrong with DHCP assignment.
Since she owns a IPhone 10 with iOS and this two devices are from the same vendor e.g. Apple Inc. And Apple's products have been having strange DHCP assignment issues from my experience for quite some time, I've thought initially problems are caused by software on Apple's devices.
I turned to be partially right after expecting the logs of DHCP server on the Linux host (ISP1) finding that the phone of my wife takes IP in 192.168.0.XXX, insetad of IP from 192.168.1.1 (which has is a combined Nokia Router with 2.4Ghz and 5Ghz Wi-Fi and LAN router provided by ISP2 in that case Vivacom). That was really puzzling since for me it was completely logical thta the iDevices must check for DHCP address directly on the Network of the router to whom, they're connecting. Guess my suprise when I realized that instead of that the iDevices does listen to the network on a wide network range scan for any DHCPs reachable baesd on the advertised (i assume via broadcast) address traffic and try to connect and take the IP to the IP of the DHCP which responds faster !!!! Of course the Vivacom Chineese produced Nokia router responded DHCP requests and advertised much slower, than my Linux NAT gateway on ISP1 and because of that the Iphone and iOS and even freshest versions of Android devices do take the IP from the DHCP that responds faster, even if that router is not on a C class network (that's invasive isn't it??). What was even more puzzling was the automatic MAC Randomization of Wifi devices trying to connect to my ISP1 configured DHCPD and this of course trespassed any static MAC addresses filtering, I already had established there.

Anyways there was also a good think out of tthat intermixed exercise 🙂 While playing around with the Gigabit network router of vivacom I found a cozy feature SCHEDULEDING TURNING OFF and ON the WIFI ACCESS POINT  – a very useful feature to adopt, to stop wasting extra energy and lower a bit of radiation is to set a swtich off WIFI AP from 12:30 – 06:30 which are the common sleeping hours or something like that.
 

3. What is MAC Randomization and where and how it is configured across different main operating systems as of year 2022?

Depending on the operating system of your device, MAC randomization will be available either by default on most modern mobile OSes or with possibility to have it switched on:

  • Android Q: Enabled by default 
  • Android P: Available as a developer option, disabled by default
  • iOS 14: Available as a user option, disabled by default
  • Windows 10: Available as an option in two ways – random for all networks or random for a specific network

Lately I don't have much time to play around with mobile devices, and I do not my own a luxury mobile phone so, the fact this ne Androids have this MAC randomization was unknown to me just until I ended a small mess, based on my poor configured networks due to my tight time constrains nowadays.

Finding out about the new security feature of MAC Randomization, on all Android based phones (my mother's Nokia smartphone and my dad's phone, disabled the feature ASAP:


4. Disable MAC Wi-Fi Ethernet device Randomization on Android

MAC Randomization creates a random MAC address when joining a Wi-Fi network for the first time or after “forgetting” and rejoining a Wi-Fi network. It Generates a new random MAC address after 24 hours of last connection.

Disabling MAC Randomization on your devices. It is done on a per SSID basis so you can turn off the randomization, but allow it to function for hotspots outside of your home.

  1. Open the Settings app
  2. Select Network and Internet
  3. Select WiFi
  4. Connect to your home wireless network
  5. Tap the gear icon next to the current WiFi connection
  6. Select Advanced
  7. Select Privacy
  8. Select "Use device MAC"
     

5. Disabling MAC Randomization on MAC iOS, iPhone, iPad, iPod

To Disable MAC Randomization on iOS Devices:

Open the Settings on your iPhone, iPad, or iPod, then tap Wi-Fi or WLAN


  1. Tap the information button next to your network
  2. Turn off Private Address
  3. Re-join the network


Of course next I've collected their phone Wi-Fi adapters and made sure the included dhcp MAC deny rules in /etc/dhcp/dhcpd.conf are at place.

The effect of the MAC Randomization for my Network was terrible constant and strange issues with my routings and networks, which I always thought are caused by the openxen hypervisor Virtualization VM bugs etc.

That continued for some months now, and the weird thing was the issues always started when I tried to update my Operating system to the latest packetset, do a reboot to load up the new piece of software / libraries etc. and plus it happened very occasionally and their was no obvious reason for it.


6. How to completely filter dhcp traffic between two network router hosts
IP 192.168.0.1 / 192.168.1.1 to stop 2 or more configured DHCP servers
on separate networks see each other

To prevent IP mess at DHCP2 server side (which btw is ISC DHCP server, taking care for IP assignment only for the Servers on the network running on Debian 11 Linux), further on I had to filter out any DHCP UDP traffic with iptables completely.
To prevent incorrect route assignments assuming that you have 2 networks and 2 routers that are configurred to do Network Address Translation (NAT)-ing Router 1: 192.168.0.1, Router 2: 192.168.1.1.

You have to filter out UDP Protocol data on Port 67 and 68 from the respective source and destination addresses.

In firewall rules configuration files on your Linux you need to have some rules as:

# filter outgoing dhcp traffic from 192.168.1.1 to 192.168.0.1
-A INPUT -p udp -m udp –dport 67:68 -s 192.168.1.1 -d 192.168.0.1 -j DROP
-A OUTPUT -p udp -m udp –dport 67:68 -s 192.168.1.1 -d 192.168.0.1 -j DROP
-A FORWARD -p udp -m udp –dport 67:68 -s 192.168.1.1 -d 192.168.0.1 -j DROP

-A INPUT -p udp -m udp –dport 67:68 -s 192.168.0.1 -d 192.168.1.1 -j DROP
-A OUTPUT -p udp -m udp –dport 67:68 -s 192.168.0.1 -d 192.168.1.1 -j DROP
-A FORWARD -p udp -m udp –dport 67:68 -s 192.168.0.1 -d 192.168.1.1 -j DROP

-A INPUT -p udp -m udp –sport 67:68 -s 192.168.1.1 -d 192.168.0.1 -j DROP
-A OUTPUT -p udp -m udp –sport 67:68 -s 192.168.1.1 -d 192.168.0.1 -j DROP
-A FORWARD -p udp -m udp –sport 67:68 -s 192.168.1.1 -d 192.168.0.1 -j DROP


You can download also filter_dhcp_traffic.sh with above rules from here


Applying this rules, any traffic of DHCP between 2 routers is prohibited and devices from Net: 192.168.1.1-255 will no longer wrongly get assinged IP addresses from Network range: 192.168.0.1-255 as it happened to me.


7. Filter out DHCP traffic based on MAC completely on Linux with arptables

If even after disabling MAC randomization on all devices on the network, and you know physically all the connecting devices on the Network, if you still see some weird MAC addresses, originating from a wrongly configured ISP traffic router host or whatever, then it is time to just filter them out with arptables.

## drop traffic prevent mac duplicates due to vivacom and bergon placed in same network – 255.255.255.252
dchp1-server:~# arptables -A INPUT –source-mac 70:e2:83:12:44:11 -j DROP


To list arptables configured on Linux host

dchp1-server:~# arptables –list -n


If you want to be paranoid sysadmin you can implement a MAC address protection with arptables by only allowing a single set of MAC Addr / IPs and dropping the rest.

dchp1-server:~# arptables -A INPUT –source-mac 70:e2:84:13:45:11 -j ACCEPT
dchp1-server:~# arptables -A INPUT  –source-mac 70:e2:84:13:45:12 -j ACCEPT


dchp1-server:~# arptables -L –line-numbers
Chain INPUT (policy ACCEPT)
1 -j DROP –src-mac 70:e2:84:13:45:11
2 -j DROP –src-mac 70:e2:84:13:45:12

Once MACs you like are accepted you can set the INPUT chain policy to DROP as so:

dchp1-server:~# arptables -P INPUT DROP


If you later need to temporary, clean up the rules inside arptables on any filtered hosts flush all rules inside INPUT chain, like that
 

dchp1-server:~#  arptables -t INPUT -F

SEO: Best day and time to write new articles and tweet to get more blog reads – Social Network Timing

Tuesday, June 17th, 2014

what-is-best-time-to-write-articles-to-increase-your-blog-traffic

I'm trying to regularly blog – as this gives me a roadmap what I'm into and how I spent my time. When have free time,  I blog almost daily except on weekends (as in weekends I'm trying to stay away from computers). So if you want to attract more readers to your blog the interesting question arises
 

What time is best to hit publish on your posts?

writing-in-the-mogning-on-the-internet-timing-morning-is-best-for-your-posts
Now there are different angles from where you can extract conclusions on best timing to blog post.One major thing to consider always when posting is that highest percentage of users read blogs in the morning with their morning coffee. Here are some more facts on when web content is more red:

  • 70% of users say they read blogs in the morning
  • More men read blogs at night than woman
  • Mondays are the highest traffic days for avarage blogs
  • 11 a.m. is normally the highest traffic hour for blogs
  • Usually most comments are put on Saturdays
  • Blogs with more than one post a day has higher chance of inbound links and usually get more unique visitors

As my blog is more technical oriented most of my visitors are men and therefore posting my blogs at night doesn't interfere much with my readers.
However, I've noticed that for me personally posting in time interval from 13:00 to 17:00 influence positively the amount of unique visitors the blog gets.

According to research done by Social Fresh – Thursday is the best day to publish an article if you want to get more Social SharesBest-Day-to-Blog-to-get-more-shares-in-social-networks

As a rule of thumb Thursday wins 10% more shares than all other days. In fact, 31% of the top 100 social share days in 2011 fell on Thursday.
My logical explanation on this phenomenon is that people tend to be more and more bored from their work and try to entertain more and more as the week progresses.

To get more attention on what I'm writting I use a bit of social networking but I prefer using only a micro blogging social networking.  I use Twitter to share what I'm into. When I write a new article on my blog I tweet its title with a link to my article, because this drives people attention to what I have to say.

In overall I am skeptical about social siting like Facebook and MySpace because it has negative impact on how people use their time and especially negative on youngsters Other reason why I don't like Friends Networks is because sharing what you have to say on sites like FB, Google+ or "The Russian Facebook" –  Vkontekte VK.com are not respecting privacy of your data.


You write free fresh content for their website for free and you get nothing!


Moreover by daily posting latest buzz you read / watched on Facebook etc. or simply saying what's happening with you, where you're situated now etc., you slowly get addicted to posting – yes for good or bad people tend to be maniacal).

By placing all of your pesronal or impersonal stuff online, you're making these sites better index their sites into Google / Yahoo / Yandex search engines and therefore making them profitable and high ranked websites on the internet and giving out your personal time for Facebook profit? + you loose control over your data (your data is not physically on your side but situated on some remote server, somewhere on the internet).
 

Best avarage time to post on Tweet Facebook, Google+ and Linkedin

best-time-and-day-to-write-new-articles-schedule-content-at-the-right-time-on-social-media-to-get-high-trafficrank

So What is Best Day timing to Post, Pin or Tweet?

Below is an infographic I fond on this blog (visual data is originalcompiled by SurePayRoll) and showing visualized results from some extensive research on the topic.

best-time-to-post-and-tweet-blog-articles-social-media-infographic


Here is most important facts this infographic reveals:


The avarage best time to post tweet and pin your new articles is about 15:00 h
 

  • Best timing to post on Twitter is on Mondays to Thursdays from 13:00 to 15:00 h
  • Best timing to post on facebook is between 13:00 and 16:00 h
  • For Linkedin it is best to place your publish between Tuesdays to Thursdays


Peak times on Facebook, Twitter and Linkedin

  • Peak times for use of Facebook is on Wednesdays about 15:00 h
  • Peak times for use of Twitter is from Monday to Thursdays from 9:00  to 15:00 h
  • Linkedin Peak time is from 17:00 to 18:00 h
  • Including images to your articles increases traffic, tweets with images increase visits, favorites and leads


Worst time (when users will probably not view your content) on FB, Twitter and Linkedin

  • Weekends before 08:00  and after 20:00 h
  • Everyday after 20:00 and Fridays after 15:00 noon
  • Mondays and Fridays from 22:00 to 06:00 morning

Facts about Google+
 

  • Google+ is the fastest growing demographic social network for people aged 45 to 54
  • Best time to share your posts on Google+ is from 09:00 to 10:00 in the morning
  • Including images to your articles increases traffic, tweets with images increase visits, favorites and leads
     

Images generate more traffic and engagement

  • Including images to your articles increases traffic, tweets with images increase visits, favorites and leads


I'm aware as every research above info on best time to tweet and post is just a generalization and according to field of information posted suggested time could be different from optiomal time for individual writer, however as a general direction, info is very useful and it gives you some idea.
Twitter engagement for brands is 17% higher on weekends according to Dan Zarrella’s research. Tweets posted on Friday, Saturday and Sunday had higher CTR (Click Through Rate) than those posted in the rest of the week.

tweet-on-the-weekends-is-better-for-high-click-through-rate

Other best day to tweet other than weekends is mid-week time Wednesday.
Whether your site or blog is using retweet to generate more traffic to website best time to retweet is said to be around 5 pm. CTR is higher

How to redirect / forward all postfix emails to one external email address?

Thursday, October 29th, 2020

Postfix_mailserver-logo-howto-forward-email-with-regular-expression-or-maildrop

Lets say you're  a sysadmin doing email migration of a Clustered SMTP and due to that you want to capture for a while all incoming email traffic and redirect it (forward it) towards another single mailbox, where you can review the mail traffic that is flowing for a few hours and analyze it more deeper. This aproach is useful if you have a small or middle sized mail servers and won't be so useful on a mail server that handels few  hundreds of mails hourly. In below article I'll show you how.

How to redirect all postfix mail for a specific domain to single external email address?

There are different ways but if you don't want to just intercept the traffic and a create a copy of email traffic using the always_bcc integrated postfix option (as pointed in my previous article postfix copy every email to a central mailbox).  You can do a copy of email flow via some custom written dispatcher script set to be run by the MTA on each mail arriva, or use maildrop filtering functionality below is very simple example with maildrop in case if you want to filter out and deliver to external email address only email targetted to specific domain.

If you use maildrop as local delivery agent to copy email targetted to specifidc domain to another defined email use rule like:

if ( /^From:.*domain\.com/:h ) {
  cc "!someothermail@domain2.com"
}


To use maildrop to just forward email incoming from a specific sender towards local existing email address on the postfix to an external email address  use something like:

if ( /^From: .*linus@mail.example.com.*/ )
{
        dotlock "forward.lock" {
          log "Forward mail"
          to "|/usr/sbin/sendmail linuxbox@collector.example.com"
        }
}

Then to make the filter active assuming the user has a physical unix mailbox, paste above to local user's  $HOME/.mailfilter.

What to do if your mail delivered via your Email-Server.com are sent from a monitoring and alarming scripts that are sending towards many mailboxes that no longer exist after the migration?

To achive capturing all normal attempted to be sent traffic via the mail server, we can forward all served mails towards a single external mail address you can use the nice capability of postfix to understand PCRE perl compatible regular expressions. Regular expressions in postfix of course has its specific I recommend you take a look to the postfix regexp table documentation here, as well as check the Postfix Regex / Tester / Debugger online tool – useful to validate a regexp you want to implement.

How to use postfix regular expression to do a redirect of all sent emails via your postfix mail relayhost towards external mail servers?


In main.cf /etc/postfix/main.cf include this line near bottom or as a last line:

virtual_maps = hash:/etc/postfix/virtual, regexp:/etc/postfix/virtual-regexp

One defines the virtual file which can be used to define any of your virtual domains you want to simulate as present on the local postfix, the regexp: does load the file which is read by postfix where you can type the regular expression applied to every incoming email via SMTP port 25 or encrypted MTA ports 385 / 995 etc.

So how to redirect all postfix mail to one external email address for later analysis?

Create file /etc/postfix/virtual-regexp

/.+@.+/ external-forward-email@gmail.com

Next build the mapfile (this will generate /etc/postfix/virtual-regexp.db )
 

# postmap /etc/postfix/virtual-regexp

This also requires a virtual.db to exist. If it doesn't create an empty file called virtual and run again postmap postfix .db generator

# touch /etc/postfix/virtual && postmap /etc/postfix/virtual


Note in /etc/postfix/virtual you can add your postfix mail domains for which you want the MTA to accept mail as a local mail.

In case you need to view all postfix defined virtual domains configured to accept mail locally on the mail server.
 

$ postconf -n | grep virtual
virtual_alias_domains = mydomain.com myanotherdomain.com
virtual_alias_maps = hash:/etc/postfix/virtual


The regexp /.+@.+/ external-forward-email@gmail.com applied will start forwarding mails immediately after you reload the MTA with:

# systemctl restart postfix


If you want to exclude target mail domains to not be captured by above regexp, in /etc/postfix/virtual-regexp place:

/.+@exclude-domain1.com/ @exclude-domain1.com
/.+@exclude-domain2.com/ @exclude-domain2.com

Time for a test. Send a test email


Next step is to Test it mail forwarding works as expected
 

# echo -e "Tseting body" | mail -s "testing subject" -r "testing@test.com" whatevertest-user@mail-recipient-domain.com

Check server Internet connectivity Speedtest from Linux terminal CLI

Friday, August 7th, 2020

check-server-console-speedtest

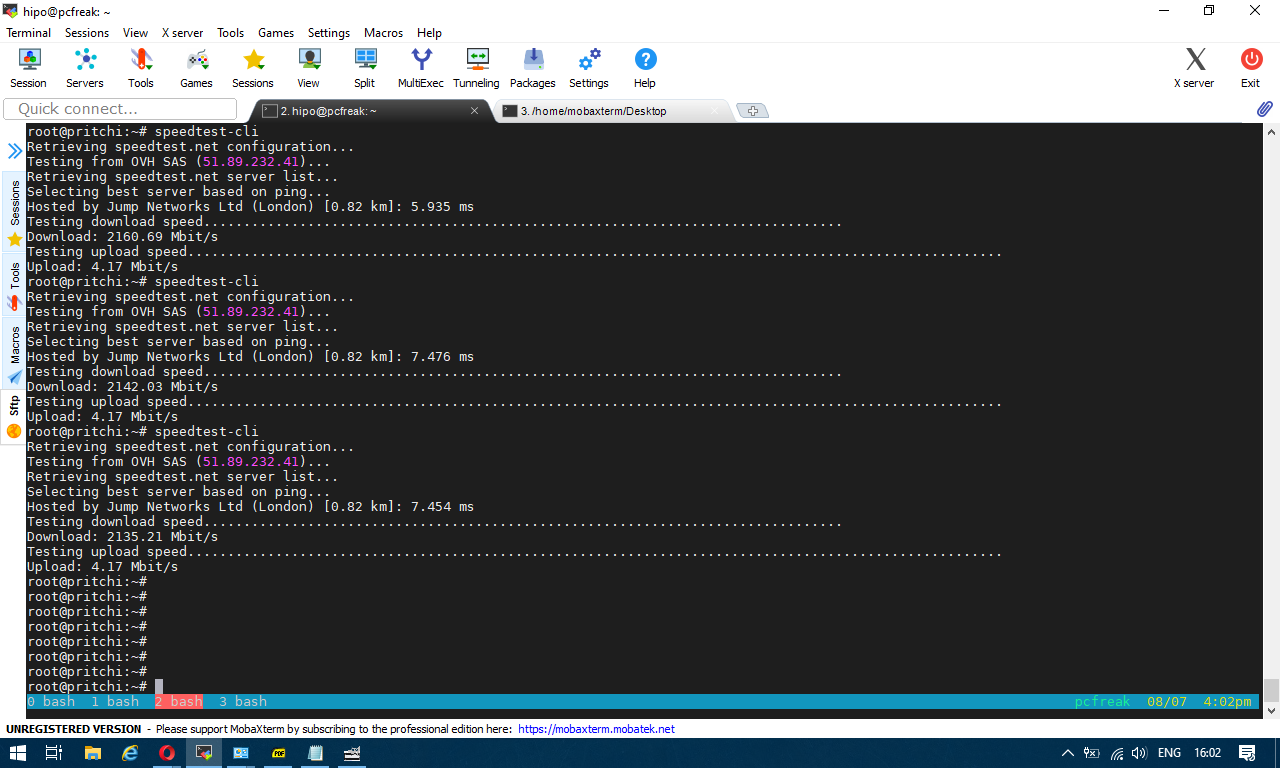
If you are a system administrator of a dedicated server and you have no access to Xserver Graphical GNOME / KDE etc. environment and you wonder how you can track the bandwidth connectivity speed of remote system to the internet and you happen to have a modern Linux distribution, here is few ways to do a speedtest.
 

1. Use speedtest-cli command line tool to test connectivity


speedtest-cli is a tiny tool written in python, to use it hence you need to have python installed on the server.
It is available both for Redhat Linux distros and Debians / Ubuntus etc. in the list of standard installable packages.

a) Install speedtest-cli on Fedora / CentOS / RHEL
 

On CentOS / RHEL / Scientific Linux lower than ver 8:


$ sudo yum install python

On CentOS 8 / RHEL 8 user type the following command to install Python 3 or 2:


$sudo yum install python3
$ sudo yum install python2


On Fedora Linux version 22+


$ sudo dnf install python
$ sudo dnf install pytho3


Once python is at place download speedtest.py or in case if link is not reachable download mirrored version of speedtest.py on www.pc-freak.net here


$ wget -O speedtest-cli https://raw.githubusercontent.com/sivel/speedtest-cli/master/speedtest.py
$ chmod +x speedtest-cli


Then it is time to run script speedtest-screenshot-linux-terminal-console-cli-cmd
To test enabled Bandwidth on the server


$ python speedtest-cli


b) Install speedtest-cli on Debian

On Latest Debian 10 Buster speedtest is available out of the box in regular .deb repositories, so fetch it with apt


# apt install –yes speedtest-cli


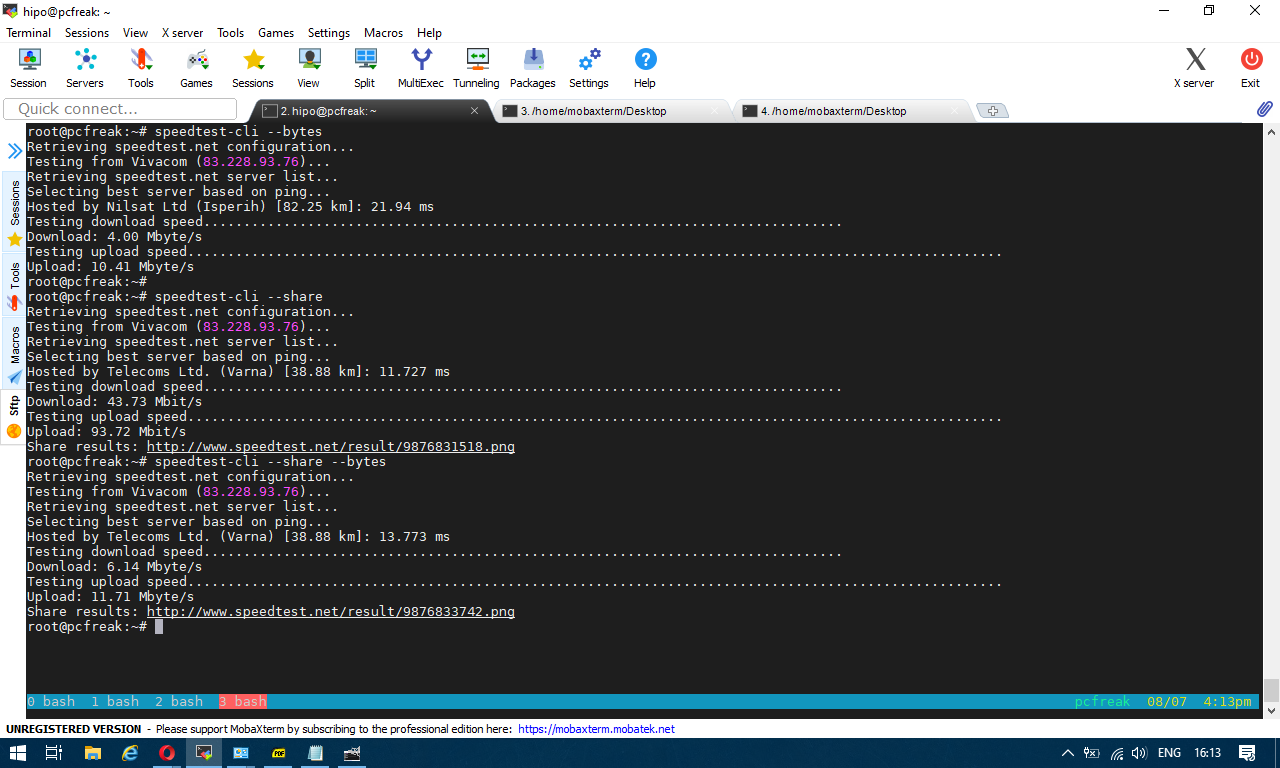
You can give now speedtest-cli a try with –bytes arguments to get speed values in bytes instead of bits or if you want to generate an image with test results in picture just like it will appear if you use speedtest.net inside a gui browser, use the –share option

speedtest-screenshot-linux-terminal-console-cli-cmd-options


2. Getting connectivity results of all defined speedtest test City Locations


Speedtest has a list of servers through which a Upload and Download speed is tested, to run speedtest-cli to test with each and every server and get a better picture on what kind of connectivity to expect from your server towards the closest region capital cities, fetch speedtest-servers.php list and use a small shell loop below is how:


root@pcfreak:~#  wget http://www.speedtest.net/speedtest-servers.php
–2020-08-07 16:31:34–  http://www.speedtest.net/speedtest-servers.php
Преобразувам www.speedtest.net (www.speedtest.net)… 151.101.2.219, 151.101.66.219, 151.101.130.219, …
Connecting to www.speedtest.net (www.speedtest.net)|151.101.2.219|:80… успешно свързване.
HTTP изпратено искане, чакам отговор… 301 Moved Permanently
Адрес: https://www.speedtest.net/speedtest-servers.php [следва]
–2020-08-07 16:31:34–  https://www.speedtest.net/speedtest-servers.php
Connecting to www.speedtest.net (www.speedtest.net)|151.101.2.219|:443… успешно свързване.
HTTP изпратено искане, чакам отговор… 307 Temporary Redirect
Адрес: https://c.speedtest.net/speedtest-servers-static.php [следва]
–2020-08-07 16:31:35–  https://c.speedtest.net/speedtest-servers-static.php
Преобразувам c.speedtest.net (c.speedtest.net)… 151.101.242.219
Connecting to c.speedtest.net (c.speedtest.net)|151.101.242.219|:443… успешно свързване.
HTTP изпратено искане, чакам отговор… 200 OK
Дължина: 211695 (207K) [text/xml]
Saving to: ‘speedtest-servers.php’
speedtest-servers.php                  100%[==========================================================================>] 206,73K  –.-KB/s    in 0,1s
2020-08-07 16:31:35 (1,75 MB/s) – ‘speedtest-servers.php’ saved [211695/211695]

Once file is there with below loop we extract all file defined servers id="" 's 
 

root@pcfreak:~# for i in $(cat speedtest-servers.php | egrep -Eo 'id="[0-9]{4}"' |sed -e 's#id="##' -e 's#"##g'); do speedtest-cli  –server $i; done
Retrieving speedtest.net configuration…
Testing from Vivacom (83.228.93.76)…
Retrieving speedtest.net server list…
Retrieving information for the selected server…
Hosted by Telecoms Ltd. (Varna) [38.88 km]: 25.947 ms
Testing download speed……………………………………………………………………..
Download: 57.71 Mbit/s
Testing upload speed…………………………………………………………………………………………
Upload: 93.85 Mbit/s
Retrieving speedtest.net configuration…
Testing from Vivacom (83.228.93.76)…
Retrieving speedtest.net server list…
Retrieving information for the selected server…
Hosted by GMB Computers (Constanta) [94.03 km]: 80.247 ms
Testing download speed……………………………………………………………………..
Download: 35.86 Mbit/s
Testing upload speed…………………………………………………………………………………………
Upload: 80.15 Mbit/s
Retrieving speedtest.net configuration…
Testing from Vivacom (83.228.93.76)…

…..


etc.

For better readability you might want to add the ouput to a file or even put it to run periodically on a cron if you have some suspcion that your server Internet dedicated lines dies out to some general locations sometimes.
 

3. Testing UPlink speed with Download some big file from source location


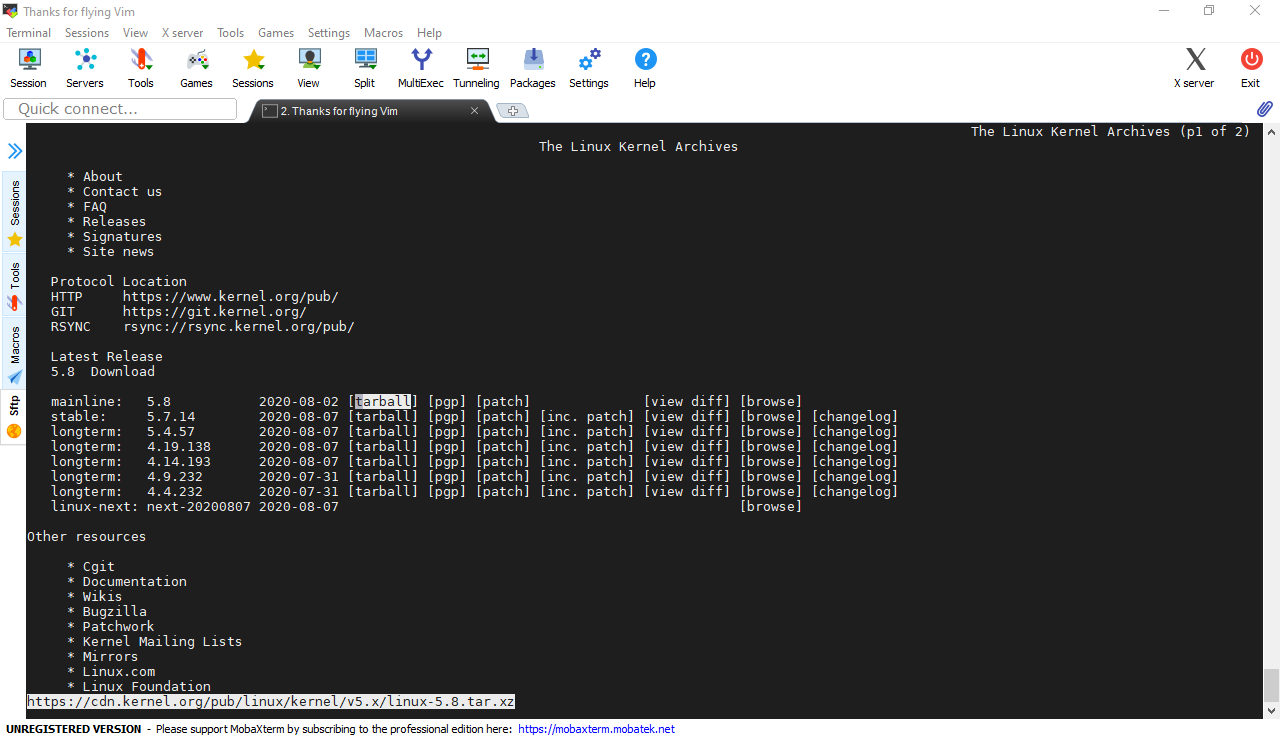
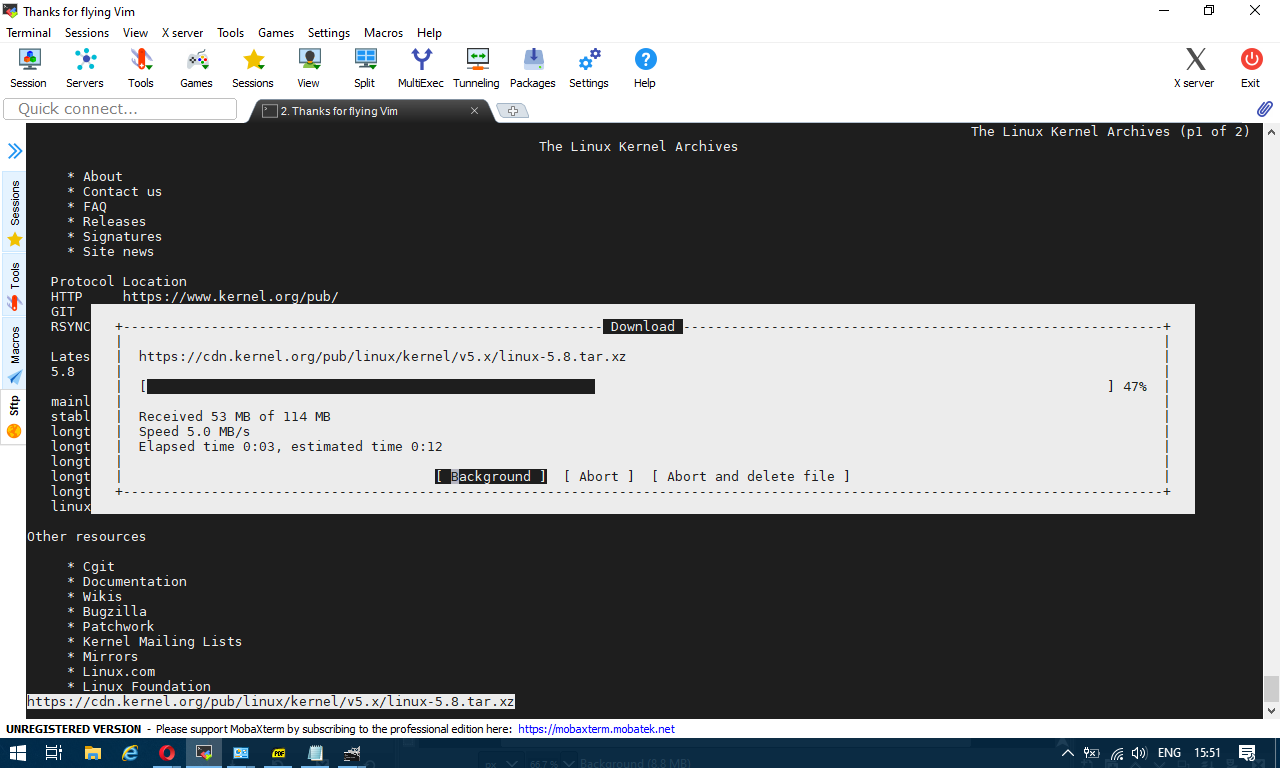
In the past a classical way to test the bandwidth connectivity of your Internet Service Provider was to fetch some big file, Linux guys should remember it was almost a standard to roll a download of Linux kernel source .tar file with some test browser as elinks / lynx / w3c.
speedtest-screenshot-kernel-org-shot1 speedtest-screenshot-kernel-org-shot2
or if those are not at hand test connectivity on remote free shell servers whatever file downloader as wget or curl was used.
Analogical method is still possible, for example to use wget to get an idea about bandwidtch connectivity, let it roll below 500 mb from speedtest.wdc01.softlayer.com to /dev/null few times:


$ wget –output-document=/dev/null http://speedtest.wdc01.softlayer.com/downloads/test500.zip

$ wget –output-document=/dev/null http://speedtest.wdc01.softlayer.com/downloads/test500.zip

$ wget –output-document=/dev/null http://speedtest.wdc01.softlayer.com/downloads/test500.zip


# wget -O /dev/null –progress=dot:mega http://cachefly.cachefly.net/10mb.test ; date
–2020-08-07 13:56:49–  http://cachefly.cachefly.net/10mb.test
Resolving cachefly.cachefly.net (cachefly.cachefly.net)… 205.234.175.175
Connecting to cachefly.cachefly.net (cachefly.cachefly.net)|205.234.175.175|:80… connected.
HTTP request sent, awaiting response… 200 OK
Length: 10485760 (10M) [application/octet-stream]
Saving to: ‘/dev/null’

     0K …….. …….. …….. …….. …….. …….. 30%  142M 0s
  3072K …….. …….. …….. …….. …….. …….. 60%  179M 0s
  6144K …….. …….. …….. …….. …….. …….. 90%  204M 0s
  9216K …….. ……..                                    100%  197M=0.06s

2020-08-07 13:56:50 (173 MB/s) – ‘/dev/null’ saved [10485760/10485760]

Fri 07 Aug 2020 01:56:50 PM UTC


To be sure you have a real picture on remote machine Internet speed it is always a good idea to run download of random big files on a certain locations that are well known to have a very stable Internet bandwidth to the Internet backbone routers.

4. Using Simple shell script to test Internet speed


Fetch and use speedtest.sh


wget https://raw.github.com/blackdotsh/curl-speedtest/master/speedtest.sh && chmod u+x speedtest.sh && bash speedtest.sh


5. Using iperf to test connectivity between two servers 


iperf is another good tool worthy to mention that can be used to test the speed between client and server.

To use iperf install it with apt and do on the server machine to which bandwidth will be tested:


# iperf -s 


On the client machine do:


# iperf -c 192.168.1.1 


where 192.168.1.1 is the IP of the server where iperf was spawned to listen.

6. Using Netflix fast to determine Internet connection speed on host


Fast

fast is a service provided by Netflix. Its web interface is located at Fast.com and it has a command-line interface available through npm (npm is a package manager for nodejs) so if you don't have it you will have to install it first with:

# apt install –yes npm


Note that if you run on Debian this will install you some 249 new nodejs packages which you might not want to have on the system, so this is useful only for machines that has already use of nodejs.


$ fast


     82 Mbps ↓


The command returns your Internet download speed. To get your upload speed, use the -u flag:


$ fast -u


   ⠧ 80 Mbps ↓ / 8.2 Mbps ↑


7. Use speedometer / iftop to measure incoming and outgoing traffic on interface


If you're measuring connectivity on a live production server system, then you might consider that the measurement output might not be exactly correct especially if you're measuring the Uplink / Downlink on a Heavy loaded webserver / Mail Server / Samba or DNS server.
If this is the case a very useful tools to consider to extract the already taken traffic used on your Incoming and Outgoing ( TX / RX ) Network interfaces
are speedometer and iftop, they're present and installable depending on the OS via yum / apt or the respective package manager.


To install on Debian server:


# apt install –yes iftop speedometer


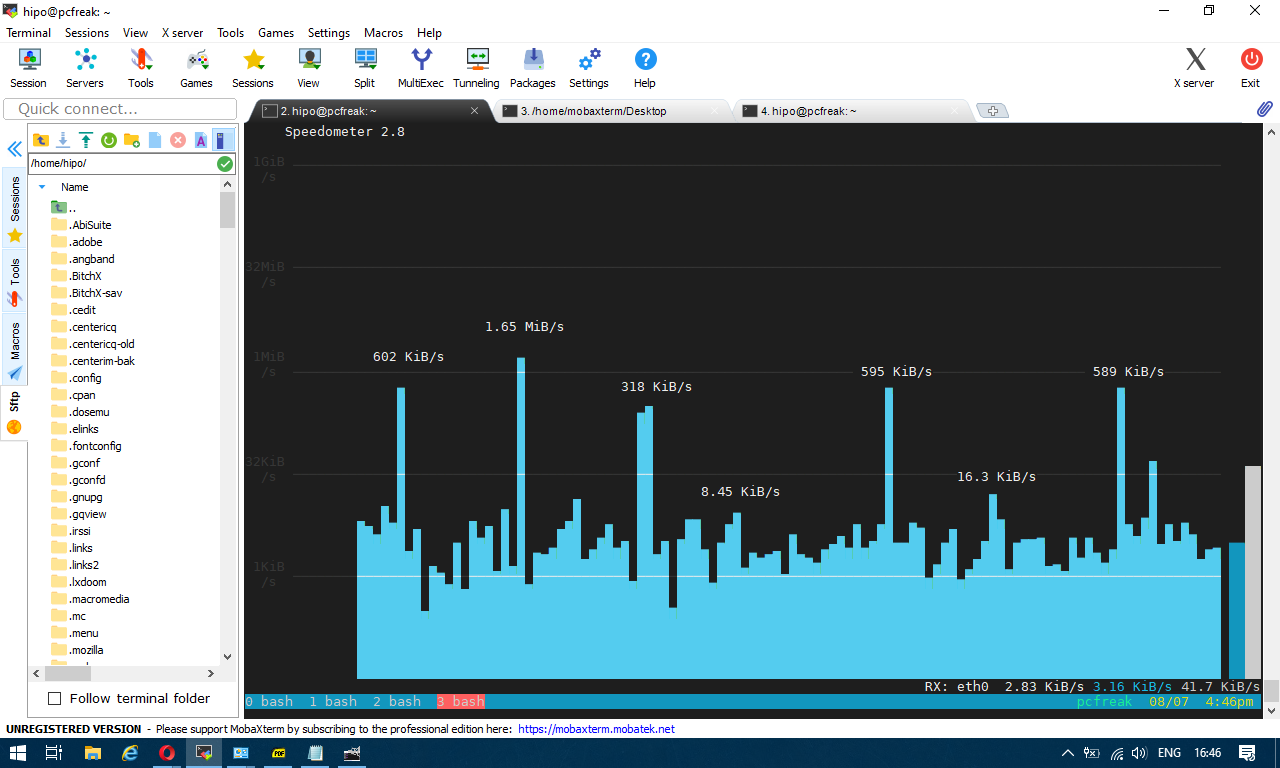
The most basic use to check the live received traffic in a nice Ncurses like text graphic is with: 


# speedometer -r 


speedometer-check-received-transmitted-network-traffic-on-linux1

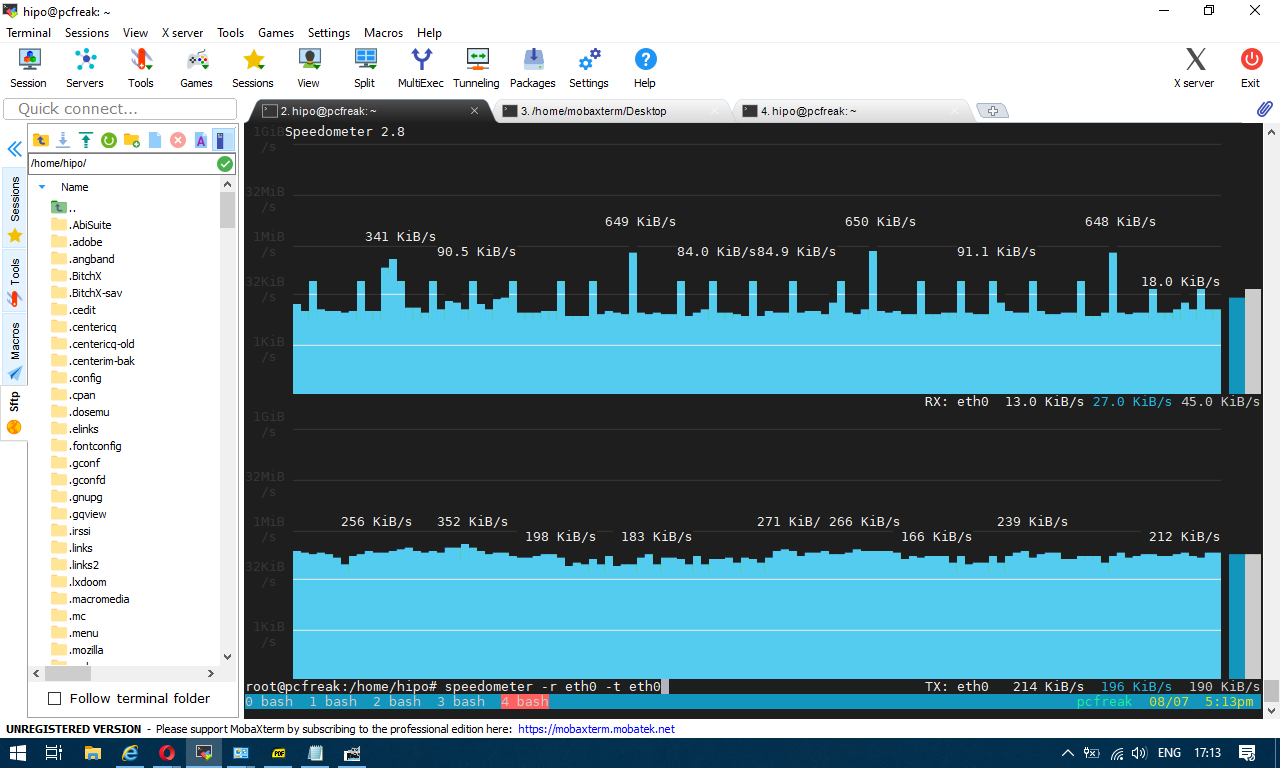
To generate real time ASCII art graph on RX / TX traffic do:


# speedometer -r eth0 -t eth0


speedometer-check-received-transmitted-network-traffic-on-linux


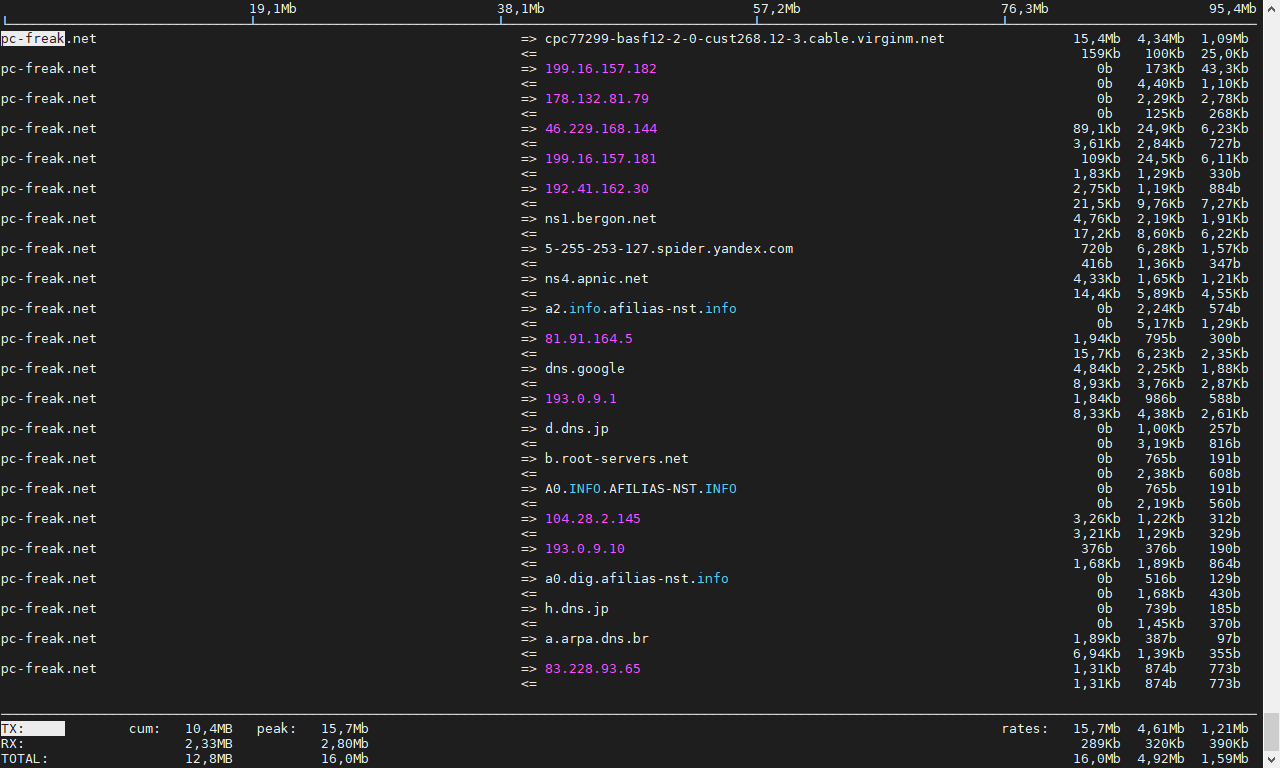
# iftop -P -i eth0


iftop-show-statistics-on-connections-screenshot-pcfreak


Enable TLS 1.2 Internet Explorer / Make TLS 1.1 and TLS 1.2 web sites work on IE howto

Monday, August 1st, 2016

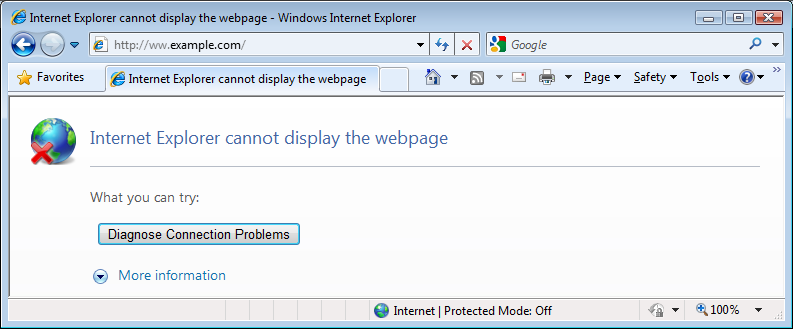
Internet-Explorer-cannot-display-the-webpage-IE-error
 

Some corporate websites and web tools especially one in DMZ-ed internal corporation networks require an encryption of TLS 1.2 (Transport Layer of Security cryptographic protocol)   TLS 1.1 protocol   both of which are already insecure (prone to vulnerabilities).

Besides the TLS 1.2 browser requirements some corporate tool web interfaces like Firewall Opening request tools etc. are often are very limited in browser compitability and built to only work with certain versions of Microsoft Internet Explorer like leys say IE (Internet Explorer) 11.

TLS 1.2 is supported across IE 8, 9, 10 and 11, so sooner or later you might be forced to reconfigure your Internet Explorer to have enabled the disabled by OS install TLS 1.2 / 1.1.

For those unaware of what TLS (Transport Layer of Security) protocol is so to say the next generation encryption protocol after SSL (Secure Socket Layer) also both TLS and SSL terms are being inter-exchangably used when referring with encrypting traffic between point (host / device etc.) A and B by using a key and a specific cryptographic algorithm.
TLS is usually more used historically in Mail Servers, even though as I said some web tools are starting to use TLS as a substitute for the SSL certificate browser encryption or even in conjunction with it.
For those who want to dig a little bit further into What is TLS? – read on technet here.

I had to enable TLS on IE and I guess sooner others will need a way to enable TLS 1.2 on Internet Explorer, so here is how this is done:
 

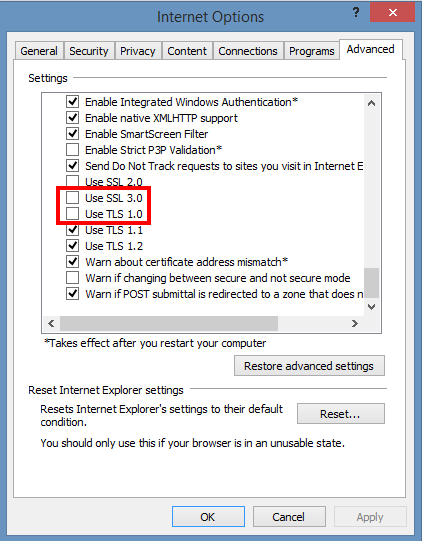
Enable-Internet-Explorer-TLS1.2-TLS-1.1-internet-options-IE-screensho


    1. On the Internet Explorer Main Menu (press Alt + F to make menu field appear)
    Select Tools > Internet Options.

    2. In the Internet Options box, select the Advanced tab.

    3. In the Security category, uncheck Use SSL 3.0 (if necessery) and Check the ticks:

    Use TLS 1.0,
    Use TLS 1.1 and Use TLS 1.2 (if available).

    4. Click OK
   
     5. Finally Exit browser and start again IE.


Once browser is relaunched, the website URL that earlier used to be showing Internet Explorer cannot display the webpagre can't connect / missing website error message will start opening normally.

Note that TLS 1.2 and 1.1 is not supported in Mozilla Firefox older browser releases though it is supported properly in current latest FF releases >=4.2.

If you  have fresh new 4.2 Firefox browser and you want to make sure it is really supporting TLS 1.1 and TLS 1.2 encrpytion:


(1) In a new tab, type or paste about:config in the address bar and press Enter/Return. Click the button promising to be careful.

(2) In the search box above the list, type or paste TLS and pause while the list is filtered

(3) If the security.tls.version.max preference is bolded and "user set" to a value other than 3, right-click > Reset the preference to restore the default value of 3

(4) If the security.tls.version.min preference is bolded and "user set" to a value other than 1, right-click > Reset the preference to restore the default value of 1

The values for these preferences mean:

1 => TLS 1.0 2 => TLS 1.1 3 => TLS 1.2


To get a more concrete and thorough information on the exact TLS / SSL cryptography cipher suits and protocol details supported by your browser check this link


N.B. ! TLS is by default disabled in many latest version browsers such as Opera, Safari etc.  in order to address the POODLE SSL / TLS cryptographic protocol vulnerability

Fiddler – Windows web debugging proxy for any browser – Linux web debugging applications

Thursday, May 29th, 2014

fiddler-web-proxy-debugging-http-https-traffic-in-windows-browser
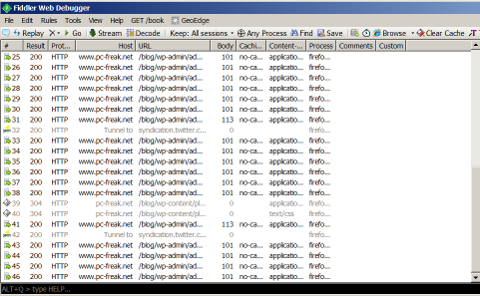
Earlier I've blogged about helpful web developer or a web hosting system administrator Web Browser plugins . Among the list of useful plugins for debugging sent / received web content on your desktop (HTTPWatchm, HTTPFox, Yslow etc.), I've found another one called Fiddler.

Telerik's Fiddler is a Browser plugin  and a Windows Desktop application to monitor HTTP and HTTPS outbound web traffic and report and provide you with various information useful for:

fiddler-web-debugger-for-browser-and-desktop-for-windows-keep-trac-and-optimize-web-traffic-to-web-servers

  • Performance Testing
  • HTTP / HTTPS
  • Traffic recording
  • Security Testing
  • Web Session Manipulation
  • Encode Decode web traffic
  • Convert strings from / to Base64, Hex, DeflatedSAML etc.
  • Log all URL requests originating from all opened browsers on your Desktop
  • Decrypt / encrypt HTTPS traffic using man in the middle techniques
  • Show tuning details for accessed web pages
     

Fiddler is available to install and use as a desktop application (requires .NET 2) or install as a browser plugin. Perhaps the coolest  Fiddler feature from my perspective is its decrypt / encrypt in Base64 and Hex available from TextWizard menu. The tool is relatively easy to use for those who have experience in web debugging, for novice here is a video explaining tool's basics.

Fiddler doesn't have a Linux build yet but it is possible to run it also on Linux using Mono Framework and a few hacks.

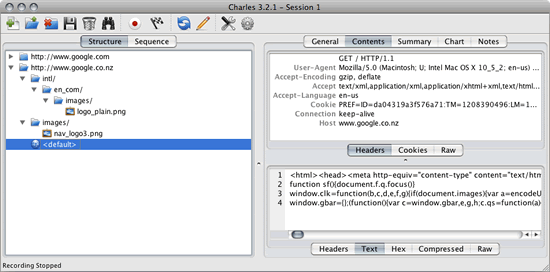
charles-proxy-web-debugging-tool-for-linux-fiddler-alternative
A good native Linux / UNIX alternatives to Fiddler are Nettool, Charles Proxy, Paros Proxy and Web Scarab.

How to create ssh tunnels / ssh tunneling on Linux and FreeBSD with openssh

Saturday, November 26th, 2011

ssh-tunnels-port-forwarding-windows-linux-bypassing-firewall-diagram
SSH tunneling
allows to send and receive traffic using a dedicated port. Using an ssh traffic can have many reasons one most common usage reason is to protect the traffic from a host to a remote server or to access port numbers which are by other means blocked by firewall, e.g.: (get around firewall filtering)
SSH tunneling works only with TCP traffic. The way to make ssh tunnel is with cmds:

host:/root# ssh -L localhost:deshost:destport username@remote-server.net
host:/root# ssh -R restport:desthost:localport username@remote-server.net
host:/root# ssh -X username@remote-server.net

This command will make ssh to bind a port on localhost of the host host:/root# machine to the host desthost:destport (destination host : destinationport). Important to say deshost is the host destination visible from the remote-server.net therefore if the connection is originating from remote-server.net this means desthost will be localhost.
Mutiple ssh tunnels to multiple ports using the above example commands is possible. Here is one example of ssh tunneling
Let’s say its necessery to access an FTP port (21) and an http port (80), listening on remote-server.net In that case desthost will be localhost , we can use locally the port (8080) insetad of 80, so it will be no necessery to make the ssh tunnel with root (admin privileges). After the ssh session gets opened both services will be accessible on the local ports.

host:/home/user$ ssh -L 21:localhost:21 -L 8080:localhost:80 user@remote-server.net

That’s all enjoy 😉

How to configure Apache to serve as load balancer between 2 or more Webservers on Linux / Apache basic cluster

Monday, October 28th, 2013

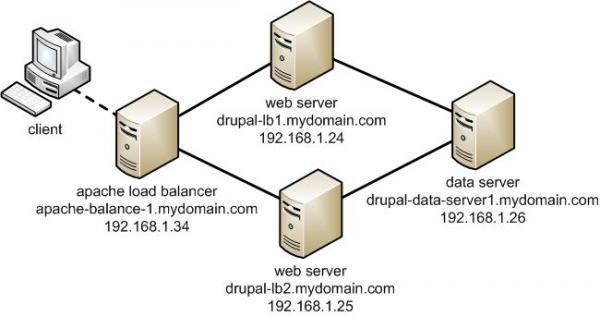
Apache doing load balancer between Apache servers Apache basic cluster howto

Any admin somehow involved in sphere of UNIX Webhosting knows Apache pretty well. I've personally used Apache for about 10 years now and until now I always used it as a single installation on a Linux. Always so far whenever the requirements for more client connections raised up, web hosting companies I worked for did a migration of Website / websites on a newer better (quicker) server hardware configuration. Everyone knows keeping a site on a single Apache server poses great RISK if the machine hangs up for a reason or gets DoSed this makes websites unavailable until reboot and poses unwanted downtime. Though I know pretty well the concept of load balancing until today I never had configured Apache to serve as Load balancer between two or more identical machines set-upped to interpret PHP / Perl scripts. Amazingly load balancing users web traffic happened to be much easier than I supposed. All necessary is a single Apache configured with mod_proxy_balancer which acts as proxy and ships HTTP requests between two Apache servers. Logically its very important that the entry traffic host with Apache mod_proxy_balancer has to be configured to only run only mod_proxy_balancer otherwise it will be eating unnecessary server memory as with each unnecessary loaded Apache module usage of memory resources raise up.

The scenario of my load balancer and 2 webserver hosts behind it goes like this:

a. Apache with load balancer with external IP address – i.e. (83.228.93.76) with DNS record for ex. www.mybalanced-webserver.com
b. Normally configured Apache to run PHP scripts with internal IP address through NAT – (Network address translation) (on 10.10.10.1) – known under host JEREMIAH
c. Second identical Apache to above host running on 10.10.10.1 with IP 10.10.10.2. with internal host ISSIAH.

N.B.! All 3 hosts are running latest  Debian GNU / Linux 7.2 Wheezy
 
After having this in mind, I proceeded with installing the on 83.228.93.76 apache and removing all unnecessary modules.

!!! Important note is if you use some already existent Apache configured to run PHP or any other unnecessary stuff – make sure you remove this otherwise expect severe performance issues !!!
1. Install Apache webserver

loadbalancer:~# apt-get install --yes apache2

2. Enable mod proxy proxy_balancer and proxy_http
On Debian Linux modules are enabled with a2enmod command;

loadbalancer:~# a2enmod proxy
loadbalancer:~# a2enmod proxy_balancer
loadbalancer:~# a2enmod proxy_http

Actually what a2enmod command does is to make symbolic links from /etc/apache2/mods-available/{proxy,proxy_balancer,proxy_http} to /etc/apache2/mods-available/{proxy,proxy_balancer,proxy_http}

3. Configure Apache mod proxy to load balance traffic between JEREMIAH and ISSAIAH webservers

loadbalancer:~# vim /etc/apache2/conf.d/proxy_balancer

/etc/apache2/conf.d/proxy-balancer

Paste inside:

<Proxy balancer://mycluster> BalancerMember http://10.0.0.1 BalancerMember http://10.0.0.4 </Proxy> ProxyPass / balancer://mycluster – See more at: http://www.elastichosts.com/support/tutorials/add-a-front-end-apache-cloud-load-balancer/#sthash.29iPnZpz.dpuf

<Proxy balancer://mycluster>
BalancerMember http://10.10.10.1
BalancerMember http://10.10.10.2
</Proxy>
ProxyPass / balancer://mycluster

<Proxy balancer://mycluster> BalancerMember http://10.0.0.1 BalancerMember http://10.0.0.4 </Proxy> ProxyPass / balancer://mycluster – See more at: http://www.elastichosts.com/support/tutorials/add-a-front-end-apache-cloud-load-balancer/#sthash.29iPnZpz.dpuf

<Proxy balancer://mycluster> BalancerMember http://10.0.0.1 BalancerMember http://10.0.0.4 </Proxy> ProxyPass / balancer://mycluster – See more at: http://www.elastichosts.com/support/tutorials/add-a-front-end-apache-cloud-load-balancer/#sthash.29iPnZpz.dpuf

<Proxy balancer://mycluster> BalancerMember http://10.0.0.1 BalancerMember http://10.0.0.4 </Proxy> ProxyPass / balancer://mycluster – See more at: http://www.elastichosts.com/support/tutorials/add-a-front-end-apache-cloud-load-balancer/#sthash.29iPnZpz.dpuf

<Proxy balancer://mycluster> BalancerMember http://10.0.0.1 BalancerMember http://10.0.0.4 </Proxy> ProxyPass / balancer://mycluster – See more at: http://www.elastichosts.com/support/tutorials/add-a-front-end-apache-cloud-load-balancer/#sthash.29iPnZpz.dpuf


4. Configure Apache Proxy to access traffic from all hosts (by default it is configured to Deny from all)

<Proxy balancer://mycluster> BalancerMember http://10.0.0.1 BalancerMember http://10.0.0.4 </Proxy> ProxyPass / balancer://mycluster – See more at: http://www.elastichosts.com/support/tutorials/add-a-front-end-apache-cloud-load-balancer/#sthash.29iPnZpz.dpuf

loadbalancer:~# vim /etc/apache2/mods-enabled/proxy.conf

Change there Deny from all to Allow from all

Deny from all
/etc/apache2/mods-enabled/proxy.conf

5. Restart Apache

loadbalancer:~# /etc/init.d/apache2 restart

Once again I have to say that above configuration is actually a basic Apache cluster so hosts behind load balancer Apache there should be machines configured to interpret scripts identically. If one Apache server of the cluster dies, the other Apache + PHP host will continue serve and deliver webserver content so no interruption will happen. This is not a round robin type of load balancer. Above configuration will distribute Webserver load requested in ratio 3/4 3 parts will be served by First server and 4th parth will be delivered by 2nd Apache.
Well, that's all load balancer is configured! Now to test it open in browser www.mybalanacer-webserver.com or try to access it by IP in my case: 83.228.93.76

a2enmod proxy

Quitting my job as IT Manager and moving to Further Horizons in Hewlett Packard

Friday, September 13th, 2013

International University College Logo IUC

I haven't blogged for a while for a plenty of reasons, I'm going through a change period in my life and as any change it is not easy.
This post will be not informative and will not teach any of my dear readers, anything on Computers its pretty personal but still for my friends it might cause interest.
Here is my personal life story over the last few months …

For a while I worked in a International University College situated in my hometown Dobrich. I was hired on position of IT Manager, and actually was doing a bit of E-Marketing to try to boost traffic to College's website – www.vumk.eu and mostly helping the old school hacker ad college system administrator over the last 10 yrs – Ertan to fix a bunch of Linux Mail / SQL and Webservers and some Windows machines. In college I learned from Ertan how to install and backups of restaurants software called BARBEQUE as well as how to fix problems with billing terminals situated in College Restaurant (3rd floor of building). Other of my work time I had to  fix infested Windows computers with viruses re-install Windowses and fix various printing and network problems of College's teachers, accountants, cash desk, marketing and rest of college  employees.

Talking about Ertan I should express my sincere tremendous Thanks (Thanks Ertan) to it for recommending me for this job position. Right before I started work in the college I was jobless for a while starting to get desperate that its impossible find work. Current IUC sysadmin – Mr. Ertan Geldiev is a remarkable man and one of the people that made great impression in my mind. Something I found interesting I can learn from Ertan was to get from his cheerful "admin" attitude. As a true hacker Ertan had this hacker attitude of playfulness I myself has for a while lost over the years. So seeing someone like this near my life make me a good favor and had a positive influence on myself.

I have learned a lot from Ertan during the 3 months and 3 days in International University College. Just for a bit of historic information earlier IUC was known as International College – Albena, also among Dobrich citizens known as The Dutch College – as earlier IUC had good relations with Dutch Universities and was issuing double degrees both Bulgarian and Dutch. Nowadays I'm not sure if still Double-degrees partnership between IUC and Dutch Universities exist, what I know for sure is college is issuing European Double Degrees in partnership with Cardiff Metropolitan University. I myself have earlier studied in the college and already know the place well thus will use this post to say a few words on my impressions on it …

International University College - one of top prestigious colleges in Eastern Europe

The college is a great place to be as you have chance to meet plenty of people both lecturers (professors), participate in the various events organized by College's as well as get involved in the many European Projects which are being handled by a European Projects department special department situated on the back of the College Building. Other positive about College is it is small and located on a peaceful town of Dobrich. This gives the bright people a lot of space for personal development, anyways on the other hand it can make you also a bad as Dobrich as a small city is a bit boring. The studies in College are good for students who want personal freedom as there is not too strict requirements for professors on how to teach.

Though college had help me grow, especially in my knowledge in Windows 7 and 8 (Ertan had a really good Windows background), I couldn't have the chance to develop myself too further in the long term. So my job offer to work in HP as Web and Middleware Implementation Engineer opened much broader opportunities for my long term IT career. Other reason I quit the College IT job was simply because I needed more money I had the vision to make a family with a girl from Belarus – Svetlana and in order to take care for her I need to earn good money. My official salary in the college was the funny for the position – 640 lv (though after a few months I was promised to have a raise and earn 400 EUR :)) . Such low sallary was for the reason I had the idea to continue studying in College and complete my Bachelor Business degree and we had agreed with the College CEO Mr. Todor Radev to extract part of my salary monthly and with that to pay my 1 semester tuition fee (2200 EUR) – necessary for my graduation assignment. Though completing the Bachelor is important phase to close in my life for a long time, I found for the moment more valuable to work for HP and earn normal living salary with which to possibly finance myself and create family with woman of my life (hopefully) in the short term.

In this post I want express my sincere thanks to all people in International College (Elena Urchenko, Krasimir – for helping me in my job duties), Pavel and Silvia for being a colleague for a while I worked partly in the Marketing Department.

Talking about Marketing Department what I did there is some Twitter Marketing (building some twitter followers) and wrote a tiny document with recommendation on how to optimize College website – vumk.eu (future version) – for better SEO ranking. This included complete analysis from user outlook to Indexing bots and site current code. 

Mr Docent Phd Todor Radev

I have to do a big underline on how great person the College President and UNI Rector – Docent Todor Radev is. I have already bitter experience studying for a while in a government universities when younger and I know from experience usually Rectors and Universities management of state universities is pure "Hell". Thanks to Mr. Todor Radev for he did me a big favor letting me quit  job just a week later (instead of 1 month as it is officially set by Bulgarian Dismissal Law and explicitly stated in my Work Contract. Also as a person my experience from Docent Radev is wonderful too. He is extremely intelligent, brilliant gentleman and  most importantly open minded and always open for innovation.
 

As a close up I would like to say Big Thanks to everyone which I worked with or met in International University College! Thanks guys for all your support and help, thanks for being work mates and friends for the time.