Posts Tagged ‘Translation’

Resolving “nf_conntrack: table full, dropping packet.” flood message in dmesg Linux kernel log

Wednesday, March 28th, 2012

nf_conntrack_table_full_dropping_packet
On many busy servers, you might encounter in /var/log/syslog or dmesg kernel log messages like

nf_conntrack: table full, dropping packet

to appear repeatingly:

[1737157.057528] nf_conntrack: table full, dropping packet.
[1737157.160357] nf_conntrack: table full, dropping packet.
[1737157.260534] nf_conntrack: table full, dropping packet.
[1737157.361837] nf_conntrack: table full, dropping packet.
[1737157.462305] nf_conntrack: table full, dropping packet.
[1737157.564270] nf_conntrack: table full, dropping packet.
[1737157.666836] nf_conntrack: table full, dropping packet.
[1737157.767348] nf_conntrack: table full, dropping packet.
[1737157.868338] nf_conntrack: table full, dropping packet.
[1737157.969828] nf_conntrack: table full, dropping packet.
[1737157.969928] nf_conntrack: table full, dropping packet
[1737157.989828] nf_conntrack: table full, dropping packet
[1737162.214084] __ratelimit: 83 callbacks suppressed

There are two type of servers, I've encountered this message on:

1. Xen OpenVZ / VPS (Virtual Private Servers)
2. ISPs – Internet Providers with heavy traffic NAT network routers
 

I. What is the meaning of nf_conntrack: table full dropping packet error message

In short, this message is received because the nf_conntrack kernel maximum number assigned value gets reached.
The common reason for that is a heavy traffic passing by the server or very often a DoS or DDoS (Distributed Denial of Service) attack. Sometimes encountering the err is a result of a bad server planning (incorrect data about expected traffic load by a company/companeis) or simply a sys admin error…

– Checking the current maximum nf_conntrack value assigned on host:

linux:~# cat /proc/sys/net/ipv4/netfilter/ip_conntrack_max
65536

– Alternative way to check the current kernel values for nf_conntrack is through:

linux:~# /sbin/sysctl -a|grep -i nf_conntrack_max
error: permission denied on key 'net.ipv4.route.flush'
net.netfilter.nf_conntrack_max = 65536
error: permission denied on key 'net.ipv6.route.flush'
net.nf_conntrack_max = 65536

– Check the current sysctl nf_conntrack active connections

To check present connection tracking opened on a system:

:

linux:~# /sbin/sysctl net.netfilter.nf_conntrack_count
net.netfilter.nf_conntrack_count = 12742

The shown connections are assigned dynamicly on each new succesful TCP / IP NAT-ted connection. Btw, on a systems that work normally without the dmesg log being flooded with the message, the output of lsmod is:

linux:~# /sbin/lsmod | egrep 'ip_tables|conntrack'
ip_tables 9899 1 iptable_filter
x_tables 14175 1 ip_tables

On servers which are encountering nf_conntrack: table full, dropping packet error, you can see, when issuing lsmod, extra modules related to nf_conntrack are shown as loaded:

linux:~# /sbin/lsmod | egrep 'ip_tables|conntrack'
nf_conntrack_ipv4 10346 3 iptable_nat,nf_nat
nf_conntrack 60975 4 ipt_MASQUERADE,iptable_nat,nf_nat,nf_conntrack_ipv4
nf_defrag_ipv4 1073 1 nf_conntrack_ipv4
ip_tables 9899 2 iptable_nat,iptable_filter
x_tables 14175 3 ipt_MASQUERADE,iptable_nat,ip_tables


II. Remove completely nf_conntrack support if it is not really necessery

It is a good practice to limit or try to omit completely use of any iptables NAT rules to prevent yourself from ending with flooding your kernel log with the messages and respectively stop your system from dropping connections.

Another option is to completely remove any modules related to nf_conntrack, iptables_nat and nf_nat.
To remove nf_conntrack support from the Linux kernel, if for instance the system is not used for Network Address Translation use:

/sbin/rmmod iptable_nat
/sbin/rmmod ipt_MASQUERADE
/sbin/rmmod rmmod nf_nat
/sbin/rmmod rmmod nf_conntrack_ipv4
/sbin/rmmod nf_conntrack
/sbin/rmmod nf_defrag_ipv4

Once the modules are removed, be sure to not use iptables -t nat .. rules. Even attempt to list, if there are any NAT related rules with iptables -t nat -L -n will force the kernel to load the nf_conntrack modules again.

Btw nf_conntrack: table full, dropping packet. message is observable across all GNU / Linux distributions, so this is not some kind of local distribution bug or Linux kernel (distro) customization.
 

III. Fixing the nf_conntrack … dropping packets error

– One temporary, fix if you need to keep your iptables NAT rules is:

linux:~# sysctl -w net.netfilter.nf_conntrack_max=131072

I say temporary, because raising the nf_conntrack_max doesn't guarantee, things will get smoothly from now on.
However on many not so heavily traffic loaded servers just raising the net.netfilter.nf_conntrack_max=131072 to a high enough value will be enough to resolve the hassle.

– Increasing the size of nf_conntrack hash-table

The Hash table hashsize value, which stores lists of conntrack-entries should be increased propertionally, whenever net.netfilter.nf_conntrack_max is raised.

linux:~# echo 32768 > /sys/module/nf_conntrack/parameters/hashsize
The rule to calculate the right value to set is:
hashsize = nf_conntrack_max / 4

– To permanently store the made changes ;a) put into /etc/sysctl.conf:

linux:~# echo 'net.netfilter.nf_conntrack_count = 131072' >> /etc/sysctl.conf
linux:~# /sbin/sysct -p

b) put in /etc/rc.local (before the exit 0 line):

echo 32768 > /sys/module/nf_conntrack/parameters/hashsize

Note: Be careful with this variable, according to my experience raising it to too high value (especially on XEN patched kernels) could freeze the system.
Also raising the value to a too high number can freeze a regular Linux server running on old hardware.

– For the diagnosis of nf_conntrack stuff there is ;

/proc/sys/net/netfilter kernel memory stored directory. There you can find some values dynamically stored which gives info concerning nf_conntrack operations in "real time":

linux:~# cd /proc/sys/net/netfilter
linux:/proc/sys/net/netfilter# ls -al nf_log/

total 0
dr-xr-xr-x 0 root root 0 Mar 23 23:02 ./
dr-xr-xr-x 0 root root 0 Mar 23 23:02 ../
-rw-r--r-- 1 root root 0 Mar 23 23:02 0
-rw-r--r-- 1 root root 0 Mar 23 23:02 1
-rw-r--r-- 1 root root 0 Mar 23 23:02 10
-rw-r--r-- 1 root root 0 Mar 23 23:02 11
-rw-r--r-- 1 root root 0 Mar 23 23:02 12
-rw-r--r-- 1 root root 0 Mar 23 23:02 2
-rw-r--r-- 1 root root 0 Mar 23 23:02 3
-rw-r--r-- 1 root root 0 Mar 23 23:02 4
-rw-r--r-- 1 root root 0 Mar 23 23:02 5
-rw-r--r-- 1 root root 0 Mar 23 23:02 6
-rw-r--r-- 1 root root 0 Mar 23 23:02 7
-rw-r--r-- 1 root root 0 Mar 23 23:02 8
-rw-r--r-- 1 root root 0 Mar 23 23:02 9


IV. Decreasing other nf_conntrack NAT time-out values to prevent server against DoS attacks

Generally, the default value for nf_conntrack_* time-outs are (unnecessery) large.
Therefore, for large flows of traffic even if you increase nf_conntrack_max, still shorty you can get a nf_conntrack overflow table resulting in dropping server connections. To make this not happen, check and decrease the other nf_conntrack timeout connection tracking values:

linux:~# sysctl -a | grep conntrack | grep timeout
net.netfilter.nf_conntrack_generic_timeout = 600
net.netfilter.nf_conntrack_tcp_timeout_syn_sent = 120
net.netfilter.nf_conntrack_tcp_timeout_syn_recv = 60
net.netfilter.nf_conntrack_tcp_timeout_established = 432000
net.netfilter.nf_conntrack_tcp_timeout_fin_wait = 120
net.netfilter.nf_conntrack_tcp_timeout_close_wait = 60
net.netfilter.nf_conntrack_tcp_timeout_last_ack = 30
net.netfilter.nf_conntrack_tcp_timeout_time_wait = 120
net.netfilter.nf_conntrack_tcp_timeout_close = 10
net.netfilter.nf_conntrack_tcp_timeout_max_retrans = 300
net.netfilter.nf_conntrack_tcp_timeout_unacknowledged = 300
net.netfilter.nf_conntrack_udp_timeout = 30
net.netfilter.nf_conntrack_udp_timeout_stream = 180
net.netfilter.nf_conntrack_icmp_timeout = 30
net.netfilter.nf_conntrack_events_retry_timeout = 15
net.ipv4.netfilter.ip_conntrack_generic_timeout = 600
net.ipv4.netfilter.ip_conntrack_tcp_timeout_syn_sent = 120
net.ipv4.netfilter.ip_conntrack_tcp_timeout_syn_sent2 = 120
net.ipv4.netfilter.ip_conntrack_tcp_timeout_syn_recv = 60
net.ipv4.netfilter.ip_conntrack_tcp_timeout_established = 432000
net.ipv4.netfilter.ip_conntrack_tcp_timeout_fin_wait = 120
net.ipv4.netfilter.ip_conntrack_tcp_timeout_close_wait = 60
net.ipv4.netfilter.ip_conntrack_tcp_timeout_last_ack = 30
net.ipv4.netfilter.ip_conntrack_tcp_timeout_time_wait = 120
net.ipv4.netfilter.ip_conntrack_tcp_timeout_close = 10
net.ipv4.netfilter.ip_conntrack_tcp_timeout_max_retrans = 300
net.ipv4.netfilter.ip_conntrack_udp_timeout = 30
net.ipv4.netfilter.ip_conntrack_udp_timeout_stream = 180
net.ipv4.netfilter.ip_conntrack_icmp_timeout = 30

All the timeouts are in seconds. net.netfilter.nf_conntrack_generic_timeout as you see is quite high – 600 secs = (10 minutes).
This kind of value means any NAT-ted connection not responding can stay hanging for 10 minutes!

The value net.netfilter.nf_conntrack_tcp_timeout_established = 432000 is quite high too (5 days!)
If this values, are not lowered the server will be an easy target for anyone who would like to flood it with excessive connections, once this happens the server will quick reach even the raised up value for net.nf_conntrack_max and the initial connection dropping will re-occur again …

With all said, to prevent the server from malicious users, situated behind the NAT plaguing you with Denial of Service attacks:

Lower net.ipv4.netfilter.ip_conntrack_generic_timeout to 60 – 120 seconds and net.ipv4.netfilter.ip_conntrack_tcp_timeout_established to stmh. like 54000

linux:~# sysctl -w net.ipv4.netfilter.ip_conntrack_generic_timeout = 120
linux:~# sysctl -w net.ipv4.netfilter.ip_conntrack_tcp_timeout_established = 54000

This timeout should work fine on the router without creating interruptions for regular NAT users. After changing the values and monitoring for at least few days make the changes permanent by adding them to /etc/sysctl.conf

linux:~# echo 'net.ipv4.netfilter.ip_conntrack_generic_timeout = 120' >> /etc/sysctl.conf
linux:~# echo 'net.ipv4.netfilter.ip_conntrack_tcp_timeout_established = 54000' >> /etc/sysctl.conf

Happy Birthday Debian! – Rejoice, Debian GNU / Linux turns 20 :)

Wednesday, August 28th, 2013

Debian Happy birthday cake with debian logo spiral - Debian Linux becomes 20 years old

 A bit outdated news but still worthy to mention as Debian GNU / Linux is important part of my life. On 16 of August this year Debian turned 20 years! I'm actively using Debian Linux for servers and Desktops over the past 13 years and for this time I've seen right before my eyes how debian grow and from buggy hobbyinst Linux distribution became a robust and rock-solid OS. Moreover Debian is now practically the most important Linux distribution around. Thanks to it currently a thousands of other world changing distributions like Ubuntu, Arch Linux, Knoppix Linux LiveCD, Linux Mint etc. Debian is truly multi platform as of time of writting supports 10 hardware architecture (platforms) – in this number Embedded devices like ARM processors, has translation of most shipped software to 73 languages and comes with about 20 000 installable software packages. Contribution of Debian GNU Linux for Free software community is immerse, hundreds of millions or even billion Debian servers or some kind of Debian based OSes are running all around the net. Besides that Debian is one of the largest if not the biggest and most influential Open Source Project. By its essence existing of Debian is just a miracle. 
Though out of date again,  lets great each other with Happy Debian Anniversary and Wish Debian a many and healthy years of successful development!

Creator of Linux kernel Linus Torvalds with a biblical name, Pope Linus second Pope of Rome

Thursday, February 16th, 2012

Western Roman Catholic Pope Linus picture, Pope after Saint apostle Peter

Linus's name is encountered once in the Scriptures (The Holy Bible) in the second book part of the New Testament scriptures:

I really like King James English version of the bible, here is the text extracted from there, mentioning Linus's name:

2 Timothy 4:21
Doe thy diligence to come before winter. Eubulus greeteth thee,
and Pudens, and Linus, and Claudia, and all the brethren. (From KJV 1611 Translation)

Here is a modernized version of the same verse taken from the New American Standard Bible Version (1995):

2 Timothy 4:21
Make every effort to come before winter. Eubulus greets you,
also Pudens and Linus and Claudia and all the brethren.

- New American Standard Version (1995)

Other curious fact maybe, even uknown to Linus Torvalds himself is Saint Linus used to be the first bishop of Rome, after the Apostles bishopship.
This makes Saint Linus the second in place Roman Catholic Pope after Saint Peter in early Western Church. There are some early sources which says Pope Clement I was the second pope of Rome, however probably this sources are erroneous, since some very important early written sources like the Apostolic Constitutions states Linus was the first bishop of Rome and was ordained by St. Paul. The same documents says Pope Linus was succeeded by Pope Clement – ordained by saint Peter.

Below's paste is taken directly from BibleGateway.com cofirming about Pope Linus being the sacond Roman Catholic Pope:

Linus
(a net), a Christian at Rome, known to St. Paul and to
Timothy, (2 Timothy 4:21) who was the first bishop of Rome after the apostles. (A.D. 64.)

Something Pope Linus is known with is, to have issued a church decree that woman should cover their heads in church.This ancient church tradition is still observed more or less in the Orthodox Church. It is not known much about how Saint Pope ruled the early Western Church but since the western and eastern Church used to be in communion in these early days, this means the nowdays Roman Catholic saint Linus is probably a saint in the Eastern Orthodox Church as well.
According to some unprovable written sources Pope Linus later suffered martyrdom and was buried in Vatican Hill next to saint apostle Peter.

St. Linus according to Church tradition passed away in the 1st securury A.D.
Below's paste is taken directly from BibleGateway.com a multilingual website location for reading the bible

Linus
(a net), a Christian at Rome, known to St. Paul and to
Timothy, (2 Timothy 4:21) who was the first bishop of Rome after the apostles. (A.D. 64.)

I've merged a picture of how saint Linus used to look with one of the pictures of Linus Torvalds. It's rather funny they actually look alike 😉 🙂 🙂

Saint Linus and Linus Torvalds creator of GNU Linux kernel

The creator of GNU/Linux kernel Linus Torvalds might not be a saint in Christian sense, but his deed is definitely saintly as he initiated the creation of the Linux kernel and decided to share its source and publish it under GPL (General Public License).
The phenomenon of GNU / Linux Free Operating System existent today and specific type of development is definitely a miracle. The general philosophy of sharing with neighbor your software is also very close to the Christian philosophy of sharing. Actually too many of the ideas of the free software and "open source" movements resemble purely Christian ideas.

The software sharing philosophy has become a reality thanks to Richard Stallman and his GNU Project, however the existence of GNU / Linux as a complete operating system become reality thanks to the Linus torvalds kernel efforts which is known under the code name Linux. Talking about names, maybe not much will know, that Linux kernel used to have a different name in the early stage of its development, its first code name was FreaX

How to add multi-lingual (multi language) support in Joomla 1.5

Friday, June 3rd, 2011

Joomfish MultiLanguage Support enable plugin

If you are facing the task to build a multi-language enabled Joomla website like me then I think my experience on building a multi-language website with Joomla CMS might be beneficial to you.

In order to build a multi-language website in Joomla you will have to use Joom!Fish multilanguage Joomla support plugin.

The plugin is a bit buggy, but in overall it will allow you to build a multi language website and consequently add the page different languate translations.

To install the plugin on your 1.5 Joomla based install;

1. Download the JoomFish plugin

Install it the usual joomla way joomla plugins are installed, via;

Extensions -> Install/Uninstall

2. Enable the Joom!Fish plugin

To do so navigate to;

Extensions -> Module Manager

Enable the module by ticking under the Enabled column on the line where you read Language Selection

3. Install Language packs for all languages which should be supported by JoomFish

Now as the JoomFish Language selection module is enabled, one needs to install the necessery Joomla Language Packs for all the languages which the Joomla based website is planned to support.

In my case I neede a three lingual website, which will support only the Languages:
 

  • Bulgarian
  • Russian
  • and

  • English

Thus I went on Joomla! Extensions Directory – extensions.joomla.org and downloaded the the three language packs I needed (English, Russian and Bulgarian).

Again the Installation of the language packs is trivial and is done through the Joomla’s:

Extensions -> Install/Uninstall

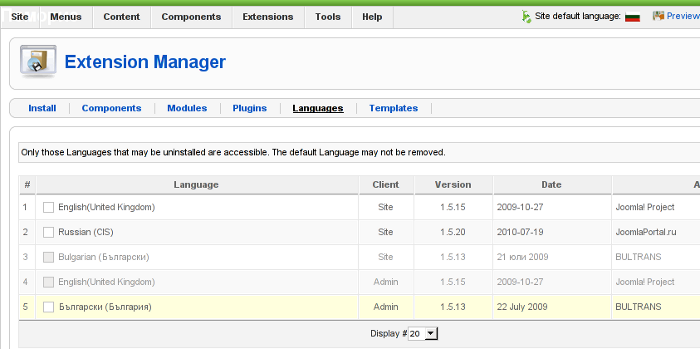
After installation to find out all the languages your Joomla installation will support you can navigate inside Joomla admin to:

Extensions -> Install/Uninstall -> Languages

Screenshot of my installed list of Joomla Language packs Screenshot of my installed list of Joomla Language Packs (Multi-Language setup)
Another way to check the list of enabled installed languages supported in your Joomla is via the menu:

Site -> Control Panel -> Language Manager

Something important here is to a default language is set in the Language Manager

4. Create translations from default installed language to the rest of the installed ones

Go to the JoomFish component through the menus:

Components -> Joom!Fish -> Control Panel

If all your language packs are correctly installed and enabled so far you should notice them listed while clicking on Content Languages

If all the Joomla Languages which your website is supposed to support are not there, this means something is generally wrong with installed lanaguage packs and you need to go back few steps and check what might be wrong, hopefully that’s not the case 😉

To immediately start translating your Joomla website to another from one language to another one, use the control menus:

Components -> Joom!Fish -> Translation

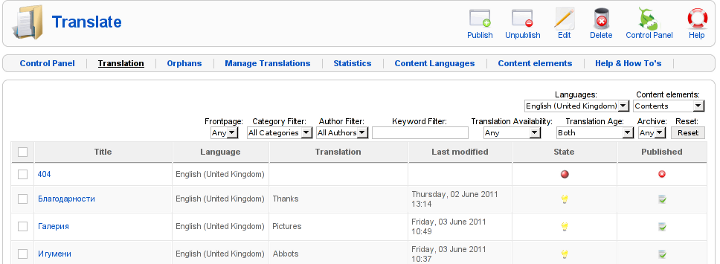
Here is screenshot on how this menu would look like:

Joomla JoomFish Plugin Translate Menu Screenshot

Notice in the above screenshot the Languages: and Content Elements dropdown menus, this ones are actually the two menus used for all language translations.

One needs to select under Languages: menu the Language to which will be translated to, while in Content Elements: has to be choseen the exact site elements which are about to be translated.

The Content Elements: necessery to be translated in most of the cases would be just Menus and Contents

Translating that will have your website user frontend be completely translated info the foreign language choosen in the Languages: dialog.

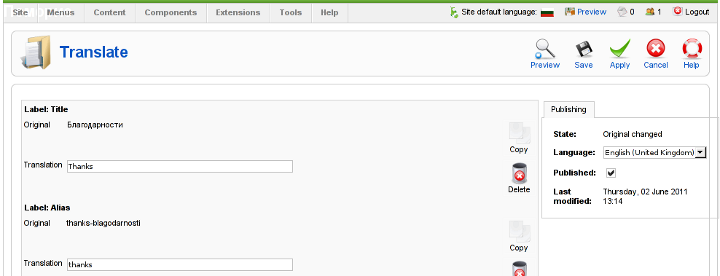
After finalizing the translations of all Articles available in Menus and Contents make sure the translation is Published, by selecting the Published tick, below I show you an example language translation edit of an article, on the left side you see the Published tick which need to be enabled, for translation to appear officially in Joomla.

Joomla Joomfish published tick enabled screenshot

After completing all the translations of elements offered by the translation window, save the translation by pressing the Apply buttonFurther on you can check the website in a new tab, if everything is okay with translations, on the down left corner of the website footer you should notice the flags of enabled languages to appear.
Clicking on each of the languages should show you the website in the language choosen (if you have previously done the translation to the respective menus).

5. Solving a minor bug in JoomlaFish which prevents translated language text to display on webpages

During translation of my website from Bulgarian to English, I have noticed a bug of JoomFish, even though I did the translation of all my Menus and website Content elements and saved the translations, refreshing the website in a new tab and choosing the desired translation was constantly displaying the error message:

“There are no translations available”

I was not able to find a good explanation on the Internet on why exactly and how this bug occurs, but by some experiments I come up with a workaround.

If you get the “There are no translations available” after properly configuring Joom!Fish Multilang support, in order to solve the error you will have to select temporary a different default website language from the one currently specified by your website.

(E.g.) go to jooma admin panel location:

Site -> Control Panel -> Language Manager

and trigger the default language configured to some of the other available ones. After reverting back in a couple of seconds this setting to your desired default language the annoying: “There are no translations available” message will disappear and your translated content will appear on the website.

6. Changing the location of language flags (language links) in Joomla’s JoomFish

I have seen plenty of people online looking for a solution on how they can change the default image flags location, which by default is placed a place which is not that intuitive and visible by the user.

Maybe I did not searched enough but from my quick research it appears there is no information available on how the placement of language flags switching menu can be changed.

Even though I couldn’t find a solution to change the langage flags in JoomFish , after a bunch of experiments I find a way to do it! 🙂

The placement of Language selector buttons can be easily adjusted through following the Joomla Admin menu:

Extensions -> Module Mamager -> Language Selection

After opening the Language Selection , you will notice the Position: dropdown menu setting. The setting has a bunch of optionsand allows you to choose the best preferred placement of the language selector flag buttons, just take few minutes to experiment which settingfits you best and choose the one most suitable to you and you’re done! 😉

Honestly I never imagined that building a multi-lingual website with Joomla will be such a piece of cake.

The only drawback with JoomFish, is the way language translation is implemented as it is not enough user friendly, anyways having the option to build multi language website for free using open source CMS solution is great. Ain’t it? 🙂

How to make NAT enable hosts in a local network to access the internet, create port forwarding to local IPs behind the router using iptables

Tuesday, August 23rd, 2011

I’m bulding new iptables firewall on one Linux server. The Debian GNU/Linux is required to act as firewall do Network Adress Translation for a small network of office PCs as well as forward some of the inbound ports to hosts from the local network located behind the router.

The local network besides the router had an IP addressing in the class C network e.g. (192.168.1.1-255)

First I procceded and enabled the Network Address Translation via the Linux kernel variable:

linux:~# sysctl -w net.ipv4.ip_forward=1
linux:~# echo 'net.ipv4.ip_forward=1' >> /etc/sysctl.conf

Initially I even forgot to switch on the net.ipv4.ip_forward to 1 (by default this value is set to 0) – GNU/Linux’s default network behaviour is not predetermined to act as network router.
However, since I haven’t configured Network Address Translation for quite some time it completely slipped my mind!

Anyways next the actual iptables rule which makes NAT possible I used is:

linux:~# /sbin/iptables -t nat -A POSTROUTING -s 192.168.1.0/24 ! -d 192.168.1.0/24 -j SNAT --to-source xxx.xxx.xxx.xxx

Whether xxx.xxx.xxx.xxx is the External IP address assigned to the router on eth0

With this very simple rules now Network the local network is capable of accessing the Internet withotu problem.

It’s a good time to say that still many system administrators, still erroneously use MASQUERADE rules instead of SNAT .
IP MASQUERADING is an ancestry from ipchains and these days should be completely abandonded, especially where no often change of primary IP address to access the internet is made.
For dial-ups or other kind of networking, where the IP addresses are often changed still IP MASQUERADING might be a good idea though.

My next goal was to make the Linux router to do port forwarding of Traffic which arrives on port 80 to a IIS server assigned with a local IP address of 192.168.1.5
I did the webserver (port 80), port forwarding from IP xxx.xxx.xxx.xxx to 192.168.1.5 with the iptables rule:

linux:~# /sbin/iptables -t nat -A PREROUTING -d xxx.xxx.xxx.xxx/32 -p tcp -m tcp --dport 80 -j DNAT --to-destination 192.168.1.5:80

There was a requirement to do port forwarding for a Windows remote Desktop running on standard port 3389 from the router to the internal Windows IP address running the IIS webserver, however the company required me to only allow access to the rdesktop 3389 port to certain real IP addresses.
Initially I thought about using the above PREROUTING rule which makes the port redirection to the IIS server and only change port 80 to port 3389 , and then use filter table INPUT chain rules like:

/sbin/iptables -A INPUT -s xx1.xx2.xx3.xx4,1xx,2xx,3xx,4xx,xxx.xxx.xxx.xxx -p tcp -m tcp --dport 3389 -j ACCEPT/sbin/iptables -A INPUT -p tcp -m tcp --dport 3389 -j REJECT --reject-with icmp-port-unreachable
32

However this did not work out, so I decided to give a try to do the same within the filter table using the FORWARD chain, like so:

FORWARD/sbin/iptables -A FORWARD -p tcp -m tcp -s xx1.xx2.xx3.xx4,1xx,2xx,3xx,4xx,xxx.xxx.xxx.xxx -p tcp -m tcp --dport 3389 -j ACCEPT
/sbin/iptables -A FORWARD -p tcp -m tcp --dport 3389 -j REJECT --reject-with icmp-port-unreachable

Adding this rules did not added any filtering to the forwarded remote desktop port. I suspected that somehow probably my above PREROUTING nat rules are read before any other rules and therefore automatically allows any IP address to port fortward traffic.
I’ve checked the iptables documentation and it seems my guess was partially right.

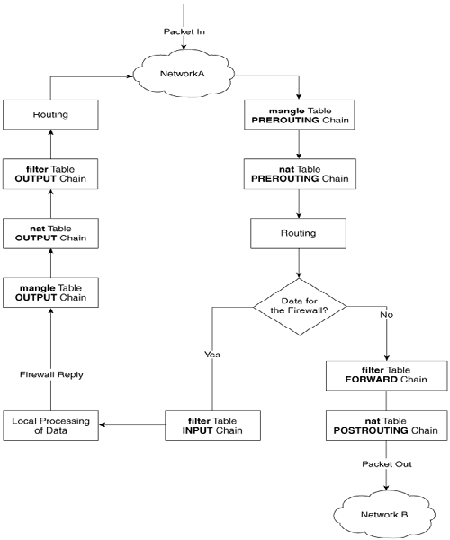
When some kind of network traffic enters the iptables firewall it first goes through the PREROUTING channel and then the traffic flows in a certain order.
iptables packet flow diagram

The iptables network packets flow is clearly seen in above’s diagram a thorough looks gives a very good idea on how packet is being processed by iptables

Finally as I couldn’t think about a good solution on how to only filter the port redirected traffic, which always firstly entered in the POSTROUTING chain, I’ve consulted with the guys in irc.freenode.net in #Netfilter.

I’m quite thanksful as a guy nicknamed Olipro has given me a pretty good picture on the port forwarding POSTROUTING problem and has provided me with a very logical easy and great fix.
He suggested that I only do port forwarding for certain IP addresses instead of allowing all IP addresses and then lookup for a way to allow only some of them and filter the rest.

The iptables rule to restrict the incoming traffic to the remote desktop forwarded port 3389 to few only allowed IP addresses looks like so:

linux:~# /sbin/iptables -t nat -A PREROUTING -d xxx.xxx.xxx.xxx/32 -s xx1.xx2.xx3.xx4,1xx,2xx,3xx,4xx,xxx.xxx.xxx.xxx -p tcp -m tcp –dport 3389 -j DNAT –to-destination 192.168.1.5:3389

Now the three sample IPs passed xx1.xx2.xx3.xx4,1xx,2xx,3xx,4xx,xxx.xxx.xxx.xxx has added to port forward traffic on 3389 to 192.168.1.5

By the way I did not know that newer versions of iptables support passing by multiple IP addresses to the –source or –destination IP. This is really great feature I’ve learned from the good guys from #Netfilter. However one should be careful when using the multiple IPs with -s or -d, it’s really important that the passed consequent IPs has no space between the , delimiter.

Now that’s all my task is completed. All computerse inside the Network 192.168.1.1-255 on the Linux router freely can access the Internet, all IPs are also capable to access the IIS server located behind the NAT as well as only certain IPs are capable of accessing to the IIS remote desktop.
Hope the article helps somebody 😉