If you're on Linux the questions like, how can I convert between video and audio formats, how to do photo editing etc. etc. have always been a taugh question as with it's diversity Linux often allows too many ways to do the same things.
In the spirit of questioning I have been recently curious, how can a subtitles be added to a flash video (.flv) video?
After some research online I've come up with the below suggested solution which uses mplayer to do the flash inclusion of the subtitles file.
While including the subtitles to the .flv file, it's best to close up all the active browsers and if running something else on the desktop close it up. Note that above's mplayer example for (.srt and .sub) subtitle files example is only appropriate for a .flv movie files which already has a third party published subtitle files.
What is interesting is that often if you want to make custom subtitles to let's say a video downloaded from Youtube on Linux the mplayer way pointed above will be useless. Why?
Well the Linux programs that allows a user to add custom subtitles to a movie does not support the flv (flash video) file format.
My idea on how to create custom subtitles and embed them into a flv movie file is very simple and it goes like this:
1. Convert the .flv file format to let's say .avi or .mpeg 2. Use gnome-subitles or subtitleeditor to create the subtitles for the .avi or .mpeg file 3. Convert back the .avi/.mpeg file with included subtitles to .flv (flash video format)
This methodology is really long and time consuming, but pitily as far as my understanding goes it's the only way to do that on your Linux until now.
To make the conversations between .flv and .avi format you will need to use the ffmpeg – (FFMpeg command line tool video converter), here is how:
You will also have to spend some time to get to know gnome-subtitles or subtitleeditor, but it won't be that long until you get the idea on how to use them.
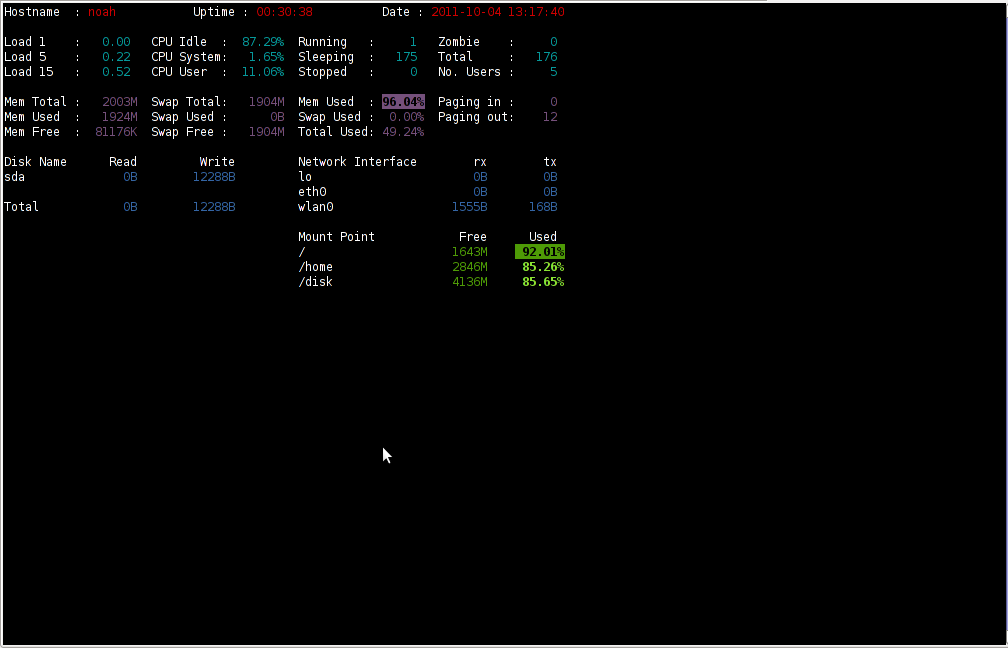
saidar is a text based ncurses program to display live statistics about general system health.
It displays in one refreshable screen (similar to top) statistics about server state of: CPU, Load, Memory, Swap, Network, I/O disk operations Besides that saidar supports a ncurses console colors, which makes it more funny to look at. Saidar extracts the statistics for system state based on libgstrap cross platform statistics library about pc system health.
On Debian, Ubuntu, Fedora, CentOS Linuxes saider is available for install straight from distribution repositories. On Debian and Ubuntu saidar is installed with cmd:
debian:~# apt-get install saidar

...
On CentOS and Fedora saidar is bundled as a part of statgrab-tools rpm package. Installing it on 64 bit CentOS with yum is with command:
Saidar is also available on FreeBSD as a part of the /usr/ports/devel/libgstrab, hence to use on my FreeBSD I had to install the libgstrab port:
freebsd# cd /usr/ports/devel/libstatgrab

freebsd# make install clean
Here is saidar running on my Desktop Debian on Thinkpad in color output:
debian:~# saidar -c
I've seen many people, who use various shell scripts to output system monitoring information, this scripts however are often written to just run without efficiency in mind and they put some let's say 1% extra load on the system CPU. This is not the case with saidar which is written in C and hence the program is optimized well for what it does.
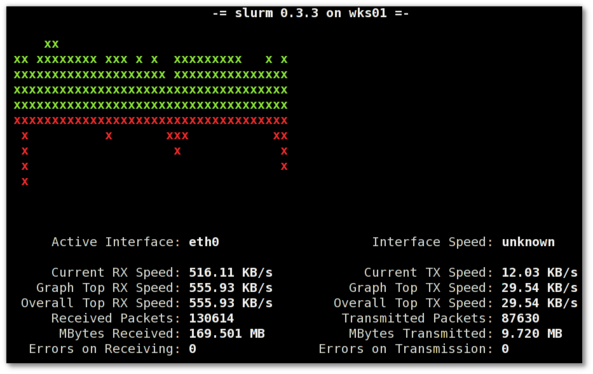
Update: Next to saidar I recommend you check out Slurm (Real Time Network Interface Monitor) it can visualizes network interface traffic using ascii graph such as on top of the article. On Debian and Ubuntu Slurm is available and easily installable via simple:
Everyone who used Linux is probably familiar with wget or has used this handy download console tools at least thousand of times. Not so many Desktop GNU / Linux users like Ubuntu and Fedora Linux users had tried using wget to do something more than single files download. Actually wget is not so popular as it used to be in earlier linux days. I've noticed the tendency for newer Linux users to prefer using curl (I don't know why).
With all said I'm sure there is plenty of Linux users curious on how a website mirror can be made through wget. This article will briefly suggest few ways to do website mirroring on linux / bsd as wget is both available on those two free operating systems.
1. Most Simple exact mirror copy of website
The most basic use of wget's mirror capabilities is by using wget's -mirror argument:
Creating a mirror like this is not a very good practice, as the links of the mirrored pages will still link to external URLs. In other words link URL will not pointing to your local copy and therefore if you're not connected to the internet and try to browse random links of the webpage you will end up with many links which are not opening because you don't have internet connection.
2. Mirroring with rewritting links to point to localhost and in between download page delay
Making mirror with wget can put an heavy load on the remote server as it fetches the files as quick as the bandwidth allows it. On heavy servers rapid downloads with wget can significantly reduce the download server responce time. Even on a some high-loaded servers it can cause the server to hang completely. Hence mirroring pages with wget without explicity setting delay in between each page download, could be considered by remote server as a kind of DoS – (denial of service) attack. Even some site administrators have already set firewall rules or web server modules configured like Apache mod_security which filter requests to IPs which are doing too frequent HTTP GET /POST requests to the web server. To make wget delay with a 10 seconds download between mirrored pages use:
The -mk stands for -m/-mirror and -k / shortcut argument for –convert-links (make links point locally), –random-wait tells wget to make random waits between o and 10 seconds between each page download request.
Some websites has a robots.txt which restricts content download with clients like wget, curl or even prohibits, crawlers to download their website pages completely.
/robots.txt restrictions are not a problem as wget has an option to disable robots.txt checking when downloading. Getting around the robots.txt restrictions with wget is possible through -e robots=off option. For instance if you want to make a local mirror copy of the whole sub-directory with all links and do it with a delay of 10 seconds between each consequential page request without reading at all the robots.txt allow/forbid rules:
4. Mirror website which is prohibiting Download managers like flashget, getright, go!zilla etc.
Sometimes when try to use wget to make a mirror copy of an entire site domain subdirectory or the root site domain, you get an error similar to:
Sorry, but the download manager you are using to view this site is not supported. We do not support use of such download managers as flashget, go!zilla, or getright
This message is produced by the site dynamic generation language PHP / ASP / JSP etc. used, as the website code is written to check on the browser UserAgent sent. wget's default sent UserAgent to the remote webserver is: Wget/1.11.4
As this is not a common desktop browser useragent many webmasters configure their websites to only accept well known established desktop browser useragents sent by client browsers. Here are few typical user agents which identify a desktop browser:
Mozilla/5.0 (Windows NT 6.1; rv:6.0) Gecko/20110814 Firefox/6.0
Mozilla/5.0 (X11; Linux i686; rv:6.0) Gecko/20100101 Firefox/6.0
Mozilla/6.0 (Macintosh; I; Intel Mac OS X 11_7_9; de-LI; rv:1.9b4) Gecko/2012010317 Firefox/10.0a4
Mozilla/5.0 (Windows NT 6.1; Win64; x64; rv:2.2a1pre) Gecko/20110324 Firefox/4.2a1pre
etc. etc.
If you're trying to mirror a website which has implied some kind of useragent restriction based on some "valid" useragent, wget has the -U option enabling you to fake the useragent.
If you get the Sorry but the download manager you are using to view this site is not supported , fake / change wget's UserAgent with cmd:
For the sake of some wget anonimity – to make wget permanently hide its user agent and pretend like a Mozilla Firefox running on MS Windows XP use .wgetrc like this in home directory.
5. Make a complete mirror of a website under a domain name
To retrieve complete working copy of a site with wget a good way is like so:
Where the arguments meaning is: -r – Retrieve recursively -k – Convert the links in documents to make them suitable for local viewing -p – Download everything (inline images, sounds and referenced stylesheets etc.) -N – Turn on time-stamping -l5 – Specify recursion maximum depth level of 5
6. Make a dynamic pages static site mirror, by converting CGI, ASP, PHP etc. to HTML for offline browsing
It is often websites pages are ending in a .php / .asp / .cgi … extensions. An example of what I mean is for instance the URL http://php.net/manual/en/tutorial.php. You see the url page is tutorial.php once mirrored with wget the local copy will also end up in .php and therefore will not be suitable for local browsing as .php extension is not understood how to interpret by the local browser. Therefore to copy website with a non-html extension and make it offline browsable in HTML there is the –html-extension option e.g.:
A good practice in mirror making is to set a download limit rate. Setting such rate is both good for UP and DOWN side (the local host where downloading and remote server). download-limit is also useful when mirroring websites consisting of many enormous files (documental movies, some music etc.). To set a download limit to add –limit-rate= option. Passing by to wget –limit-rate=200K would limit download speed to 200KB.
Other useful thing to assure wget has made an accurate mirror is wget logging. To use it pass -o ./my_mirror.log to wget.
1. Frogatto & Friends – Is an Indian Free Software (Open Source) game in the spirit of old-school jump’en runs like Commander Keen, Prehistoric, Jazz Jack Rabbit
The game is really entertaining, the graphics looks approximately nice, the music is awesome, the gamelplay is good even though after some point in the game the moment with “where should I go now, I can’t find exit” comes through and it gets boring.
Generally if you compare with all the existing jump and run arcade games free software games available for Linux and FreeBSD the game will definetely arrange itself in the list of TOP 10 free software Arcade Games and therefore its my own believe that Frogatto is a game that every GNU / Linux and FreeBSD desktop should have in Application -> Games GNOME menu.
Frogatto is rich of levels, enemies obstacles objects, places to visit (which puts it ahead of many of the linux arcade games which often miss enough game levels, has a too short game plots, or simply miss overall game diversity).
The game’s general look & feel is like a professional game and not just some tiny free software arcade, made by its authors for the sake to learn some programming, graphics or music creation.
Besides that Frogatto & Friends is multi-platform supporting all the major operating systems. Game supports:
The game is available as a deb package in Debian and Ubuntu GNU / Linuxes so to install on those deb based distributions, simply use apt:
debian:~# apt-get install frogatto

...
The above command will install two packages frogatto (containing the game’s main executable binary) and frogatto-data containinng all the game textures, levels, graphics, music etc.
BTW the package saparation on a gamename and gamename-data in Debian (for all those who have not still noticed), can be seen on most of the games with a game data that takes more disk space.
After the game is installed the only way to start the game is to run it manually through pressing ALT+F2 in GNOME or running the progrtam through gnome-terminal with cmd:
debian:~$ frogatto
Here are few more Frogatto gameplay screenshots:
I’ve noticed Frogatto is also available as an RPM package for Fedora Linux, as well as has a FreeBSD port in the /usr/ports/games/frogatto and this makes it easy to install on most free software OSes in the wild.
While checking frogatto.com , I found an interesting link to a website offering free graphics (pictures), textures and sounds for free and open source games for all those who hold interest into the development of Free Software & Open Source Games make sure you check OpenGameArt.org
OpenGameArt.org looks like a great initiative and will definitely be highly beneficial to the development of more and better FSOS Games so I wish them God speed with this noble initiative.
Frogatto is very suitable for growing kids since it doesn’t contain no violence and every now and then the main game actor the Frogatto Frog leads few lines English dialogues with some of the characters found in the quest. For none speaking English countries, the game can help the kids to learn some basic english words and thus can help develop kids intellect and knowledge And oh yeah one more criticism towards the game is the Enlish structure, it seems people who wrote the plot can work this out in the time to come. Many of the English sentences during dialogues the frog leads with the cranks he met does not sound like a common and sometimes even correct english / phrases.
Besides those little game “defect”, the game is pretty awesome and worthy to kill some time and relax from a long stressy day.
scrot and import are two commands, which can be used to take screenshot in terminal on Linux and FreeBSD:
To use scrot cmd to take screenshots on Ubuntu and Debian the scrot package has to be installed:
noah:~# apt-get install scrot

...
scrot should also be available on most other Linux distributions in the main repositories, I'll be glad to hear if someone has used it on Fedora, SUSE etc.
On FreeBSD, there is a port called scrot , to install on FreeBSD:
freebsd# cd /usr/ports/graphics/scrot

freebsd# make install clean

...
Scrot has plenty of nice arguments one can use to make a screenshot. Maybe the most handy one in my view is after a preliminary set delay before screenshot is taken.
To take screenshot with it after lets say 5 seconds delay before the screenshot:
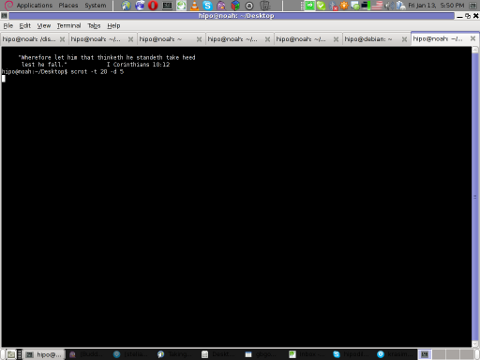
hipo@noah:~/Desktop$ scrot -t 20 -d 5
To put an year, month and day and year followed by screen resolution with scrot :
hipo@noah:~$ scrot '%Y-%m-%d_$wx$h.png'
Another way to take a screenshot of screen with command is by using ImageMagick's – import image manipulation package. To take screenshot of the current screen via terminal using import , type in xterm, gnome-termina or Gnome's Run Application (ALT+F2)
hipo@noah:~$ import -window root ScreenShot.png
To make import command to save the taken screenshot in a format (minute:hour:day:month:year)i :
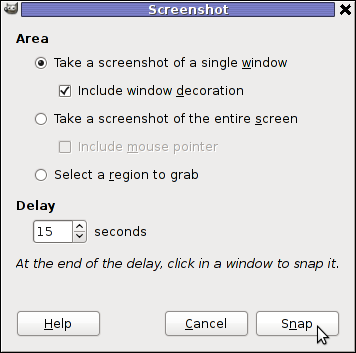
Taking a delayed screenshot is also possible via The GIMP via menus File -> Create -> Screenshot
Now here is an interesting question, what if I would like to take periodic screenshots of what I do on my Desktop to take random movie scenes from a movie I watch with totem or vlc??
This task is quite easily achiavable with a little bash shell script, I wrote:
screenshot_dir='Screenshots';

seconds='60';

if [ ! -d "$screenshot_dir" ]; then

mkdir $screenshot_dir;

fi

while [ 1 ]; do

sleep $seconds;

(import -window root $screenshot_dir/screenshot-$(date +%M_%k_%d_%m_%Y|sed -e 's/^ *//').png) &

done
To use take_screenshot_every_60_secs_import.sh just issue the script inside xterm or gnome-terminal, after that simply use your computer as you normally would. The script will take snapshots every minute and store all taken screenshots in Screenshots dir.
If you prefer to use scrot to take automatically the screenshots every lets say 5 minutes, you can use a script like:
screenshot_dir='Screenshots';

# 300 secs (5 mins)seconds='300';

if [ ! -d "$screenshot_dir" ]; then

mkdir $screenshot_dir;

fi

while [ 1 ]; do

sleep $seconds;

(scrot $screenshot_dir/'%Y-%m-%d_$wx$h.png') &

done
The script using scrot is better in terms of efficiency, the system load scrot will put on your machine will be less. Using some of this scripts will be handy if you need screenshots to Movies, Programs and favourite Free Software games. Hope this is educative to someone 😉
I've gathered a collection of 15 Audio and Video songs dedicated to the Free Software / Open Source movement . All of the songs are based on the The Free Software Song Anthem written by Richard Mathew Stallman in the year 1991. The motive of the song is a Traditional Bulgarian song called Sadi Moma Bqla Loza – translated to bulgarian to something like Maid is Planting white Vines The original Free Software Song symbolizes all free software and the Free Software Movement and GNU and is in the Bulgarian unique / specific folk rhythm of 7 / 8 beats .
Most of the songs which I post hereby could also be found and downloaded from GNU's official Free Software Song page However some of the songs were only available from Youtube in the non-free format Flash Video (flv) . Hence, since the songs were dedicated to Free Software and apparently were being spread in a non-free format they either was missing any licensing or licensed under GFDL – free music / art GNU like license. To fix up this irragularity and add some freedom in terms of audio format of spreading, I've downloaded them and used ffmpeg2theora to convert the songs to the Free / Open Standard format Ogg Vorbis I'm quite sure that many people, who use Ubuntu or Linux Mint are pretty much unfamiliar with the Free Software Songs existence, also many people most likely have never heard the Free Software Songs or even those who heard it have rarely heard more than 2 or 3 of the song variations. Hereby, I'm sure many people who are lovers of Free Software will highly benefit and get inspired to continue in the Free Software by listening to these post shared little Free Software Song Collection .
The covers of the Original version publicly sang by Richard Stallman are in different musical genres, some of the song performances are in Folklore, played on Piano other covers are performed by musical bands in pop / punk en popular music styles, there are one person performances, cheerful christmas like soundings, 8 bit free software song, Metal free software variations etc. In the collection I've included also few other nice songs which are propaganda on free software, even though not a cover of the Free Software Song , I found them myself worthy to be included in the collection..:
Herein you can download or listen all the Free Software Songs version (Enjoyment is guaranteed! 😉 ):
In short I’ll explain here what is Grsecurityhttp://www.grsecurity.net/ for all those who have not used it yet and what kind of capabilities concerning enhanced kernel security it has.
Grsecurity is a combination of patches for the Linux kernel accenting at the improving kernel security.
The typical application of GrSecurity is in the field of Linux systems which are administered through SSH/Shell, e.g. (remote hosts), though you can also configure grsecurity on a normal Linux desktop system if you want a super secured Linux desktop ;).
GrSecurity is used heavily to protect server system which require a multiple users to have access to the shell.
On systems where multiple user access is required it’s a well known fact that (malicious users, crackers or dumb script kiddies) get administrator (root) privileges with a some just poped in 0 day root kernel exploit. If you’re an administrator of a system (let’s say a web hosting) server with multiple users having access to the shell it’s also common that exploits aiming at hanging in certain daemon service is executed by some of the users. In other occasions you have users which are trying to DoS the server with some 0 day Denial of Service exploit. In all this cases GrSecurity having a kernel with grsecurity is priceless.
I would skip the details on how to compile the kernel and simply show you some picture screens with GrSecurity configuration options which are working well and needs to be set-up before a make command is issued to compile the new kernel.
After preparing the kernel source for compilation and issuing:
linux:/usr/src/kernel-source$ make menuconfig
You will have to select options like the ones you see in the pictures below:
[nggallery id=”8″]
After completing and saving your kernel config file, continue as usual with an ordinary kernel compilation, e.g.:
linux:/usr/src/kernel-source$ make

linux:/usr/src/kernel-source$ make modules

linux:/usr/src/kernel-source$ su root

linux:/usr/src/kernel-source# make modules_install

linux:/usr/src/kernel-source# make install

linux:/usr/src/kernel-source# mkinitrd -o initrd.img-2.6.xx 2.6.xx
Also make sure the grub is properly configured to load the newly compiled and installed kernel.
After a system reboot, if all is fine you should be able to boot up the grsecurity tightened newly compiled kernel, but be careful and make sure you have a backup solution before you reboot, don’t blame me if your new grsecurity patched kernel fails to boot! You’re on your own boy 😉 This article is written thanks to based originally on his article in Bulgarian. If you’re a Bulgarian you might also checkout static’s blog
If you're a using GNU / Linux for Desktop and you're already tired of creating backups by your own hacks using terminal and you want to make your life a little bit more easier and easily automate your important files back up through GUI program take a look at luckyBackup.
Luckibackup is a GUI frontend to the infamous rsync command line backup tool. Luckibackup is available as a package in almost all modern Linux distributions its very easy to setup and can save you a lot of time especially if you have to manage a number of your Workplace Desktop Office Linux based computers. Luckibackup is an absolute must have program for Linux Desktop start-up users. If you're migrating from Microsoft Windows realm and you're used to BackupPC, Luckibackup is probably the defacto Linux BackupPC substitute.
The sad news for Linux GNOME Desktop users is luckibackup is written in QT and it using it will load up a bit your notebook. It is not installed by default so once a new Linux Desktop is installed you will have to install it manually on Debian and Ubuntu based Linux-es to install Luckibackup apt-get it.
debian:~# apt-get install --yes luckibackup

...
On Fedora and CentOS Linux install LuckiBackup via yum rpm package manager
[root@centos :~]# yum -y install luckibackup

.
Luckibackup is also ported for OpenSuSE Slackware, Gentoo, Mandriva and ArchLinux. In 2009 Luckibackup won the prize of Sourceforge Community Choice Awards for "best new project".
luckyBackup copies over only the changes you've made to the source directory and nothing more. You will be surprised when your huge source is backed up in seconds (after the first backup).
Whatever changes you make to the source including adding, moving, deleting, modifying files / directories etc, will have the same effect to the destination. Owner, group, time stamps, links and permissions of files are preserved (unless stated otherwise).
Luckibackup creates different multiple backup "snapshots".Each snapshot is an image of the source data that refers to a specific date-time. Easy rollback to any of the snapshots is possible. Besides that luckibackup support Sync (just like rsync) od any directories keeping the files that were most recently modified on both of them.
Useful if you modify files on more than one PCs (using a flash-drive and don't want to bother remembering what did you use last. Luckibackup is capable of excluding certain files or directories from backups – Exclude any file, folder or pattern from backup transfer.
After each operation a logfile is created in your home folder. You can have a look at it any time you want.
luckyBackup can run in command line if you wish not to use the gui, but you have to first create the profile that is going to be executed. Type "luckybackup –help" at a terminal to see usage and supported options. There is also TrayNotification – Visual feedback at the tray area informs you about what is going on.
I juset setup a VMWare Virtual Machine on my HP notebook and installed Debian 7.0 stable Wheezy. Though VMWare identified my Office Internet and configured automatically NAT, I couldn't access the internet from a browser until I remembered all HP traffic is going through a default set browser proxy. After setting a proxy to Iceweasel, Internet pages started opening normally, however as every kind of traffic was also accessible via HP's proxy, package management with apt-get (apt-get update, apt-get install etc. were failing with errors):
# apt-get update
Ign cdrom://[Debian GNU/Linux 7.2.0 _Wheezy_ – Official i386 CD Binary-1 20131012-12:56] wheezy Release.gpg Ign cdrom://[Debian GNU/Linux 7.2.0 _Wheezy_ – Official i386 CD Binary-1 20131012-12:56] wheezy Release Ign cdrom://[Debian GNU/Linux 7.2.0 _Wheezy_ – Official i386 CD Binary-1 20131012-12:56] wheezy/main i386 Packages/DiffIndex Ign cdrom://[Debian GNU/Linux 7.2.0 _Wheezy_ – Official i386 CD Binary-1 20131012-12:56] wheezy/main Translation-en_US Err http://ftp.by.debian.org wheezy Release.gpg Could not connect to ftp.by.debian.org:80 (86.57.151.3). – connect (111: Connection refused) Err http://ftp.by.debian.org wheezy-updates Release.gpg Unable to connect to ftp.by.debian.org:http: Err http://security.debian.org wheezy/updates Release.gpg Cannot initiate the connection to security.debian.org:80 (2607:ea00:101:3c0b:207:e9ff:fe00:e595). – connect (101: Network is unreachable) [IP: 2607:ea00:101:3c0b:207:e9ff:fe00:e595 80] Reading package lists…
This error is caused because apt-get is trying to directly access above http URLs and because port 80 is filtered out from HP Office, it fails in order to make it working I had to configure apt-get to use Proxy host – here is how:
a) Create /etc/apt/apt.conf.d/02proxy file (if not already existing) and place inside:
To do it from console / gnome-terminal issue: echo ''Acquire::http::Proxy "https://web-proxy.cce.hp.com:8088";' >> /etc/apt/apt.conf.d/02proxy
echo ''Acquire::ftp::Proxy "https://web-proxy.cce.hp.com:8088";' >> /etc/apt/apt.conf.d/02proxy
That's all now apt-get will tunnel all traffic via HTTP and FTP proxy host web-proxy.cce.hp.com and apt-get works again.
Talking about Proxyfing Linux's apt-get, its possible to also set proxy shell variables, which are red and understood by many console programs like Console browsers lynx, links, elinks as well as wget and curl commands, e.g.:
To make proxy global (systemwide) for most (non-Debian specific) Linux distributions shell environments create new file /etc/profile.d/proxy.sh and place something like:
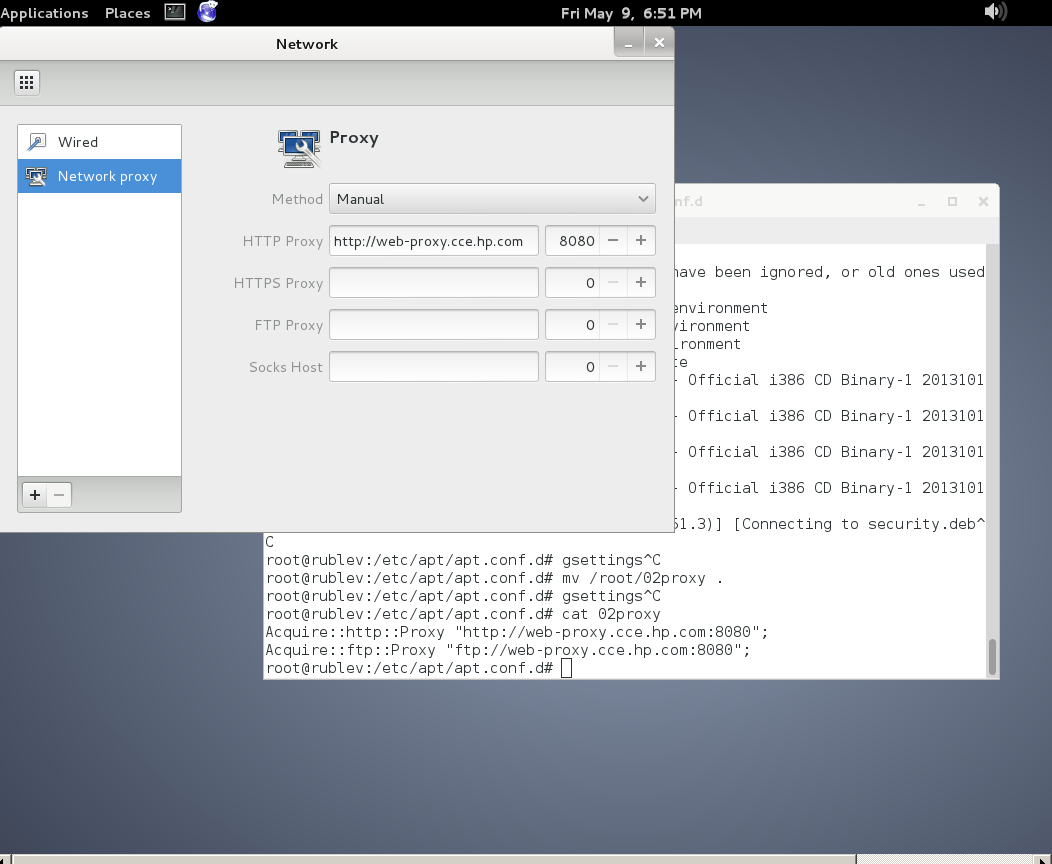
To set Global Proxy (make Proxy Systemwide) for a user in GNOME Desktop environment launch gnome-control-center
And go to Network -> Network Proxy
To make proxy settings also system wide for some GUI Gnome GTK3 applications
gsettings set org.gnome.system.proxy mode 'manual'

gsettings set org.gnome.system.proxy.http host 'your-proxy.server.com'

gsettings set org.gnome.system.proxy.http port 8080
I have a Debian GNU / Linux squeeze with bluetooth and bluetooth is started automatically on system boot. This is pretty annoying, cause I use bluetooth quite rarely. disable / enable bluetooth via terminal is controlled via Linux sysfs virtual filesystem. The command to disable bluetooth one time is:
It is efficient in terms of energy saving especially if you use often your notebook on battery to turn off bluetooth permanently and only enable it when needed with:
An alternative method to permanently disable bluetooth (on other non-Thinkpad – any brand laptops) is via rfkill (bluetooth device control interface), on Ubuntu rfkill is installed by default but Debian users has to explicitly install it via apt:
debian:~# apt-get install –yes rfkill
Once rfkill is installed on host put a line before exit 0 in /etc/local: