Posts Tagged ‘untar’

How to install and configure djbdns from source as a Cachening Localhost Proxy resolver to increase resolving efficiency on Debian 6 Squeeze

Monday, August 1st, 2011

djbdns-logo-install-configure-djbdns-from-source-on-gnu-linux-to-accelerate-server-dns-resolving
It seems DjbDNS on Debian Squeeze has been not included as a Debian package. There is still possibility to install djbdns from an older deb package or install it from source. I however decided to install it from source as finding the old Debian package for Lenny and Etch takes time, plus I'm running an amd64 version of Debian and this might even more complicate the situation.
Installing it from source is not really a Debian way but at least it works.

In this article I assume that daemontools and ucspi-tcp are preliminary installed, if not one needs to install them with:

debian:~# apt-get install ucspi-tcp daemontools daemontools-run
...

The above two ones are required as DJBDNS is originally made to run through djb's daemontools.

Here is the exact step I took to have it installed as local caching DNS server on a Debian Squeeze server:

1. Download and untar DjbDNS

debian:~# wget -q http://cr.yp.to/djbdns/djbdns-1.05.tar.gz debian:~# tar -zxvvf djbdns-1.05.tar.gz
...

2. Add DjbDNS users to /etc/passwd

Creating the below two users is not arbitrary but it's recommendable.

echo 'dnscache:*:54321:54321:dnscache:/dev/null:/dev/null' >> /etc/passwd
echo 'dnslog:*:54322:54322:dnslog:/dev/null:/dev/null' >> /etc/passwd

3. Compile DJBDNS nameserver

First it's necessery to use the below echo command to work around a common Linux bug:

debian:~# cd djbdns-1.05
debian:/root/djbdns-1.05# echo gcc -O2 -include /usr/include/errno.h > conf-cc

Next let's make it:

debian:/root/djbdns-1.05# make

4. Install the compiled djbdns binaries

debian:/root/djbdns-1.05# make setup check
# here comes some long install related output

If no errors are produced by make setup check this means that the djbdns should have installed itself fine.

As installation is compileted it's a good idea to report about the newly installed DjbDNS server if running a mail server. This info is used by Dan Bernstein to gather statistical data about the number of installations of djbdns servers throughout the world.

5. Do some general configurations to the newly installed DJBDNS

Now let's copy the list of the IP addresses of the global DNS root servers in /etc/.

debian:/root/djbdns-1.05# cp -rpf dnsroots.global /etc/ debian:/root/djbdns-1.05# ./dnscache-conf dnscache dnslog /etc/dnscache 0.0.0.0

dnscache-conf will generate some default configuration files for djbdns in /etc/dnscache

Next allow the networks which should be able to use the just installed djbdns server as a caching server:

debian:/root/djbdns-1.05# cd /etc/dnscache/root/ip
debian:/etc/dnscache/root# touch 192.168.1
debian:/root/djbdns-1.05# touch 123.123

First command will allow all ips in range 192.168.1.* to be able to access the DNS server and the second command will allow all ips from 123.123.1-255.1-255 to be able to query the server.

Some further fine tunning can be done from the files:

/etc/dnscache/env/CACHESIZE and /etc/dnscache/env/DATALIMIT

As a last step, before it's running, we have to link the /etc/dnscache to daemontools like so:

debian:/root/djbdns-1.05# ln -sf /etc/dnscache /etc/service/dnscache

If the daemontools is not linked to be accessible via /etc/service it's also a good to link it there:

debian:~# ln -sf /etc/service /

Now the DJBDNS should be running fine, to test if it's running without errors through daemontools I used:

debian:~# ps ax|grep -i readproc
5358 pts/18 R+ 0:00 grep -i readproc
11824 ? S 0:00 readproctitle service errors: ...........

If no errors are displayed it's configured and running to also test if it's capable of resolving I used the host command:

debian:~# host www.pc-freak.net localhost
Using domain server:
Name: localhost
Address: 127.0.0.1#53
Aliases:

www.pc-freak.net has address 83.228.93.76
www.pc-freak.net mail is handled by 0 mail.www.pc-freak.net.

Now the DJBDNS is properly installed and if you test it for a while with time host somehost.com localhost , you will see how quick it is in resolving.

The advantage of running DJBDNS is it does not require almost no maintance, its rock solid and great just like all other Dan Bernstein's written software.
Enjoy 😉

Fun with Apache / Nginx Webserver log – Visualize webserver access log in real time

Friday, July 18th, 2014

visualize-graphically-web-server-access-log-logstalgia-nginx-apache-log-visualize-in-gnu-linux-and-windows
If you're working in a hosting company and looking for a graphical way to Visualize access to your Linux webservers – (Apache, Nginx, Lighttpd) you will be happy to learn about Logstalgia's existence. Logstalgia is very useful if you need to convince your Boss / company clients that the webservers are exceeding the CPU / Memory hardware limits physically servers can handle. Even if you don't have to convince anyone of anything logstalgia is cool to run if you want to impress a friend and show off your 1337 4Dm!N Sk!11Z 🙂 Nostalgia is much more pleasent way to keep an eye on your Webserver log files in real time better than (tail -f)

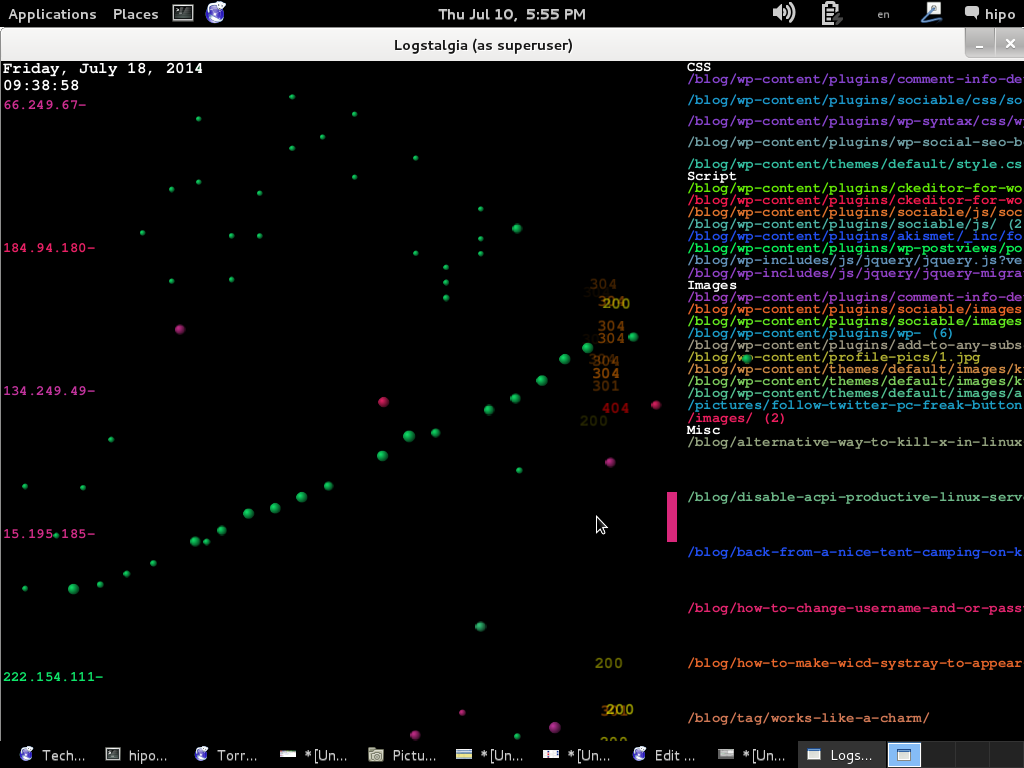
The graphical output of nostalgia is a pong-like battle game between webserver and never ending chain of web requests.

This is the official website description of Logstalgia:
 

Logstalgia is a website traffic visualization that replays web-server access logs as a pong-like battle between the web server and an never ending torrent of requests. Requests appear as colored balls (the same color as the host) which travel across the screen to arrive at the requested location. Successful requests are hit by the paddle while unsuccessful ones (eg 404 – File Not Found) are missed and pass through. The paths of requests are summarized within the available space by identifying common path prefixes. Related paths are grouped together under headings. For instance, by default paths ending in png, gif or jpg are grouped under the heading Images. Paths that don’t match any of the specified groups are lumped together under a Miscellaneous section.


To install Logstalgia on Debian / Ubuntu Linux there is a native package, so to install it run the usual:

apt-get --yes install logstalgia

Reading package lists... Done
Building dependency tree
Reading state information... Done
The following NEW packages will be installed:
logstalgia
0 upgraded, 1 newly installed, 0 to remove and 4 not upgraded.
Need to get 161 kB of archives.
After this operation, 1,102 kB of additional disk space will be used.
Get:1 http://mirrors.kernel.org/debian/ stable/main logstalgia amd64 1.0.0-1+b1 [161 kB]
Fetched 161 kB in 2s (73.9 kB/s)
Selecting previously deselected package logstalgia.
(Reading database ... 338532 files and directories currently installed.)
Unpacking logstalgia (from .../logstalgia_1.0.0-1+b1_amd64.deb) ...
Processing triggers for man-db ...
Setting up logstalgia (1.0.0-1+b1) ...


Logstalgia is easily installable from source code on non-Debian Linux distributions too, to install it on any non-debian Linux distrubution do:

cd /usr/local/src/ wget https://logstalgia.googlecode.com/files/logstalgia-1.0.5.tar.gz
 

–2014-07-18 13:53:23–  https://logstalgia.googlecode.com/files/logstalgia-1.0.3.tar.gz
Resolving logstalgia.googlecode.com… 74.125.206.82, 2a00:1450:400c:c04::52
Connecting to logstalgia.googlecode.com|74.125.206.82|:443… connected.
HTTP request sent, awaiting response… 200 OK
Length: 841822 (822K) [application/x-gzip]
Saving to: `logstalgia-1.0.3.tar.gz'

100%[=================================>] 841,822     1.25M/s   in 0.6s

2014-07-18 13:53:24 (1.25 MB/s) – `logstalgia-1.0.3.tar.gz' saved [841822/841822]

Untar the archive with:
 

tar -zxvf logstalgia-1.0.5.tar.gz

Compile and install it:

cd logstalgia
./configure
make
make install


How to use LogStalgia?

Syntax is pretty straight forward just pass the Nginx / Apache

Process Debian Linux Apache logs:

logstalgia /var/log/apache2/access.log


Process CentoS, Redhat etc. RPM based logs:

logstalgia /var/log/httpd/access.log
To process webserver log in real time with logstalgia:

tail -f /var/log/httpd/access_log | logstalgia -

To make logstalgia visualize log output you will need to have access to server physical console screen. As physical access is not possible on most dedicated servers – already colocated in some Datacenter. You can also use a local Linux PC / notebook installed with nostalgia to process webserver access logs remotely like so:

logstalgia-visualize-your-apache-nginx-lighttpd-logs-graphically-in-x-and-console-locally-and-remotely

ssh hipo@www.pc-freak.net tail -f /var/log/apache2/access.log | logstalgia --sync

Note! If you get an empty output from logstalgia, this is because of permission issues, in this example my user hipo is added in www-data Apache group – if you want to add your user to have access like me, issue on remote ssh server):
 

addgroup hipo www-data


Alterantively you can login with ssh with root, e.g. ssh root@www.pc-freak.net

If you're having a GNOME / KDE X environment on the Linux machine from which you're ssh-ing Logstalgia will visualize Webserver access.log requests inside a new X Window otherwise if you're on a Linux with just a console with no Xserver graphics it will visualize graphically web log statistics using console svgalib .


If you're planning to save output from nostalgia visualization screen for later use – lets say you have to present to your CEO statistics about all your servers  Webservers logs you can save nostalgia produced video in .ppm (netpbm) format.

Whether you have physical console access to the server:

logstalgia -1280x720 --output-ppm-stream output.ppm /var/log/httpd/access.log

Or if you just a have a PC with Linux and you want to save visualized content of access.log remotely:

ssh hipo@www.pc-freak.net tail -f /var/log/nginx/pc-freak-access.log | logstalgia -1280x720 --output-ppm-stream --sync output.ppm


ssh user@server1.cyberciti.biz tail -f /var/log/nginx/www.cyberciti.biz_access.log | logstalgia -1280x720 --output-ppm-stream --sync output.ppm

To make produced .ppm later usable you can use ffmpeg to convert to .mp4:

ffmpeg -y -r 60 -f image2pipe -vcodec ppm -i output.ppm -vcodec libx264 -preset ultrafast -pix_fmt yuv420p -crf 1 -threads 0 -bf 0 nginx.server.log.mp4

Then to play the videos use any video player, I usually use vlc and mplayer.

For complete info on Nostalgia – website access log visualizercheck home page on googlecode

If you're lazy to install Logstalgia, here is Youtube video made from its output:

Enjoy 🙂

Installing qmailmrtg (qmail graph statistics on qmail activity) on Debian Lenny

Monday, April 19th, 2010

1. First it’s necessery to have the mrtg debian package installed.
If it’s not installed then we have to install it:

debian-server:~# apt-get install mrtg

2. Second download the qmailmrtg source binary
To download the latest current source release of qmailmrtg execute:

debian-server:~# wget http://www.inter7.com/qmailmrtg7/qmailmrtg7-4.2.tar.gz

It’s a pity qmailmrtg is not available for download via debian repositories.

3. Third download the qmail.mrtg.cfg configuration file

debian-server~# wget https://www.pc-freak.net/files/qmail.mrtg.cfg

Now you have to put the file somewhere, usually it’s best to put it in the /etc/ directory.
Make sure the file is existing in /etc/qmail.mrtg.cfg
4. Untar compile and install qmailmrtg binary


debian-server:~# tar -xzvvf qmailmrtg7-4.2.tar.gz
...
debian-server:~# make && make install

strip qmailmrtg7
cp qmailmrtg7 /usr/local/bin
rm -rf *.o qmailmrtg7 checkq core
cc checkq.c -o checkq
./checkq
cc -s -O qmailmrtg7.c -o qmailmrtg7
qmailmrtg7.c: In function ‘main’:
qmailmrtg7.c:69: warning: incompatible implicit declaration of
built-in function ‘exit’
qmailmrtg7.c:93: warning: incompatible implicit declaration of
built-in function ‘exit’
qmailmrtg7.c:131: warning: incompatible implicit declaration of
built-in function ‘exit’
qmailmrtg7.c:137: warning: incompatible implicit declaration of
built-in function ‘exit’

5. Set proper file permissions according to the user you indent to execute qmailmrtg as
I personally execute it as root user, if you intend to do so as well set a permissions to
/etc/qmail.mrtg.cfg of 700.
In order to do that issue the command:

debian-server:~# chmod 700 /etc/qmail.mrtg.cfg

6. You will now need to modify the qmail.mrtg.cfg according to your needs
There you have to set a proper location where the qmailmrtg shall generate it’s html data files.
I use the /var/www/qmailmrtg qmailmrtg log file location. If you will do so as wellyou have to create the directory.

7. Create qmailmrtg html log files directory

debian-server:~# mkdir /var/log/qmailmrtg

8. Now all left is to set a proper cron line to periodically invoke qmailmrtg in order to generate qmail activity statistics.

Before we add the desired root’s crontab instructions we have to open the crontab for edit, using the command.

debian-server:~# crontab -u root -e

I personally use and recommend the following line as a line to be added to root’s crontab.

0-55/5 * * * * env LANG=C /usr/bin/mrtg /etc/qmail.mrtg.cfg > /dev/null
9. Copy index.html from qmailmrtg source directory to /var/log/qmailmrtg


debian-server:/usr/local/src/qmailmrtg7-4.2# cp -rpf index.html /var/log/qmailmrtg

10. Last step is to make sure Apache’s configuration contains lines that will enable you to access the qmail activity statistics.

The quickest way to do that in Debian running Apache 2.2 is to edit /etc/apache2/apache2.conf and add a directory Alias as follows

Alias /qmailmrtg/ "/var/www/qmailmrtg/"

Now after Apache restart /etc/init.d/apache2 restart
You should be now able to access the qmail mrtg qmail log statistics through your Apache’s default configured host.
For instance, assuming your default configured Apache host is domain.com. You’ll be able to reach the qmailmrtg statistics through an url like:

http://domain.com/qmailmrtg/

After I verified and ensured myself qmail mrtg is working correctly after all the above explained steps partook I wasn’t happy with some headlines in the index.html and the html tile of qmailmrtg,
so as a last step I manually edited the /var/www/qmailmrtg/index.html to attune it to my likings.

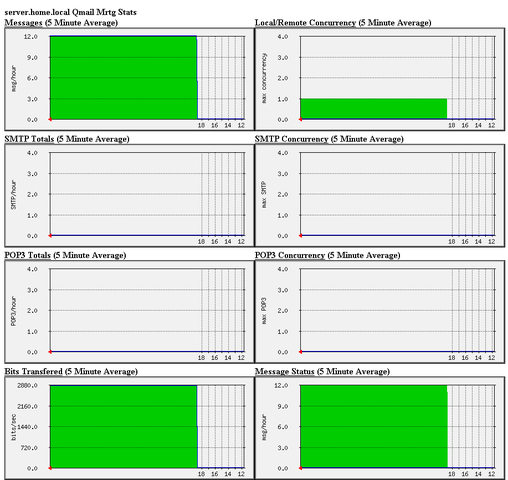
Here is a screenshot of the qmailmrtg web statistics in action.

qmail mrtg on debian lenny