Posts Tagged ‘upgrade’

Fix ruby: /usr/lib/libcrypt.so.1: version `XCRYPT_2.0′ not found in apt upgrade on Debian Linux 10

Saturday, August 5th, 2023

I've an old legacy Thinkpad Laptop that is for simplicty running Window Maker Wmaker which was laying on my home desk for almost an year and I remembered since i'm for few days in my parents home in Dobrich that it will be a good idea to update its software to the latest Debian packages to patch security issues with it. Thus if you're like me and  you tried to update your Debian 10 Linux to the latest Stable release debian packages  and you end up into a critical error that is preventing apt to to resolve conflicts (fix it with) cmds like:

# apt-get update –fix-missing

# apt –fix-broken install

As usual I looked into Google to see about solution and found few articles, claiming to have scripts that fix it but at the end nothing worked.
And the shitty error occured during the standard:

# apt-get update && apt-get upgrade

ruby: /usr/lib/libcrypt.so.1: version `XCRYPT_2.0' not found

Hence the cause and work around seemed to be very unexpected.
For some reason debian makes a link

root@noah:/lib# ls -al /lib/libcrypt.so.1
lrwxrwxrwx 1 root root 19 Aug  3 16:53 /lib/libcrypt.so.1 ->
libcrypt.so.1.bak

root@noah:/lib# ls -al /lib/libcrypt.so.1.bak
lrwxrwxrwx 1 root root 16 Jun 15  2017 /lib/libcrypt.so.1.bak -> libcrypt-2.24.so

Thus to resolve it and force the .deb upgrade package to continue it is up to simply deleting the strange simlink and re-run the

# apt-get update && apt-get upgrade

Setting up libc6:i386 (2.31-13+deb11u6) …
/usr/bin/perl: /lib/libcrypt.so.1: version `XCRYPT_2.0' not found (required by /usr/bin/perl)
dpkg: error processing package libc6:i386 (–configure):
 installed libc6:i386 package post-installation script subprocess returned error exit status 1
Errors were encountered while processing:
 libc6:i386

Few more times. If you get some critical apt failures still, each time make sure to rerun the command after doing a simple removal of the strange simbolic link with cmd:

# rm -f /lib/libcrypt.so.1

That's all folks after a short while your Debian will be updated to latest Enoy folks ! 🙂

How to fresh Upgrade mistakenly installed 32-bit Windows 10 Professional to 64-bit Windows / A failure to Disk Clone old SSD 120GB to 512GB HDD due to failed Solid State Drive

Wednesday, November 17th, 2021

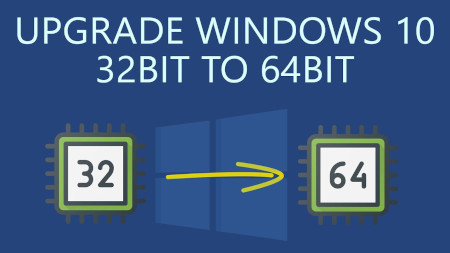
upgrade-windows-10-32-bit-to-64-bit-howto-picture

I've been Setting up a new PC with Windows OS that is a bit old a 11 years old Lenovo ThinkCentre model M90P with 8 GB of Memory, Intel(R) Core(TM) i5 CPU         650  @ 3.20GHz   3.19 GHz, Intel Q57 Express Chipset. The machine came to me with Windows 7 preinstalled and the intial goal was to migrate Windows as it is with its data from the old 120GB SSD to new 512 SSD and then to keep the machine at least a bit more up to date to upgrade the old Windows 7 to Windows 10.

This as usual seemed like a very trivial task for a System Administrator, and even if you haven't touched much of Windows as me it makes it look a piece of cake, however as always with computers, once you think you'll be done in 2 hours usually it takes 20+ . Some call it Murphy's law "If something could go wrong then it will go wrong". But putting this situation that I thought all well that's easy lets do it is a kind of a proud Thought for man and the to save us from this Passion of Proudness which according to Church fathers is the worst passion one can have and humiliate us a bit.

God allows some unforseen stuff to happen   🙂 The case with this machine whose original idea I had is to OK I Simply Duplicate the Old Hard Drive to the New one and Place the new one on the ThinkCentre is not a big deal turned to a small adventure 🙂

For this machine hardware I have to say, the old English saying "Old but Gold" is pretty true, especially after I've attached the Samsung 512GB NVME SSD Drive, which my dear friend and brother in Christ "Uncle Emilian" had received as a gift from another friend called Angel. To put even more rant, here name Emilian stems from the Greek Emilianos which translated to English means Adversary.. But anyways The old Intel SSD 120 GB drive which besides being already completely Full of Data,  turned to have Memory DATA Chips (that perhaps burn out / wasted),  so parts of the Drive were Unreadable.
I've realized the fauly SSD fact after, 
trying to first clone the drives with my Hardware Disk Clone device Orico Dual Bay 2.5 6629US3-C device and then using a simple bit to bit copy with dd command.

orico-6629us3-c2-bay-usb3-type-b2.5-type3-5.inch-sata


At first for some weird reason the Cloning of 120GB SSD HDD towards -> 512 GB newer one was unsuccessful – one of the 2 lamp indicators on Source and Destination Drives was continuiously blinking orange as it seemed data could not be read, even though I tried few times and wait for about 1 hour of time for the cloning to complete, so I first suspected that might be an issue with my  last year bought Disk Clone hardware device. So I've attached the 2 Hard Drives towards my Debian GNU / Linux 10 as USB attached drives using the "Toaster" device  and tried a classical copy   from terminal with Disk Druid e.g.


# dd if=/dev/sdb2 of=/dev/sdbc2 bs=180M status=progress conv=noerror, sync

 
dd: error reading '/dev/sdb2': Input/output error
1074889+17746 records in
1092635+0 records out
559429120 bytes (559 MB, 534 MiB) copied, 502933 s, 1.1 kB/s
dd: writing to '/dev/dc2': Input/output error
1074889+17747 records in
1092635+0 records out
559429120 bytes (559 MB, 534 MiB) copied, 502933 s, 1.1 kB/s

Finally I did a manual copy of files from /dev/sdb2 /dev/sdc2 with rsync and part of the files managed to be succesfully copied, about 55Gigabytes out of 110 managed to copy.  Luckily the data on the broken Intel 320 Series 120GB was not top secret stuff so wasting some bits wasn't the end of the world 🙂

Next, I've removed the broken 120Gb SSD which perhaps was about at least 9+ years old and attached to the Lenovo ThinkCentre, the new drive and as my dear friend wanted to have Windows again (his computer has Microsoft "Certificate of Authenticity"), e.g. that OEM Registration Serial Key for Windows 7.

Lenovo-ThinkCentre-M90p-certificate-of-authenticity

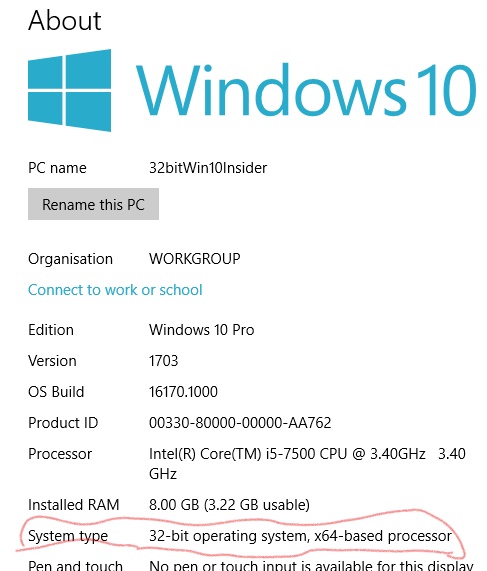
I've jumped in and used some old Flash USB Stick Drive to place again Windows 7 (in order to use the same active license) and from there on, I've used another old Windows 10 Installation Bootable stick of mine to upgrade the Windows 7 to Windows 10 (by using this Win 7 to Win 10 upgrade trick it is possible to still continue use your old Windows 7 License Key on Windows 10). So far so good, now I've had Windows 10 Professional Edition installed on the machine, but faced another issue the Memory of the Machine which is 8GB did not get fully detected the machine had detected only 3.22 GB of Memory, for some weird reason.

only-2-80-gb-usable-windows-10-problem-32-bit-cpu-cause-screenshot

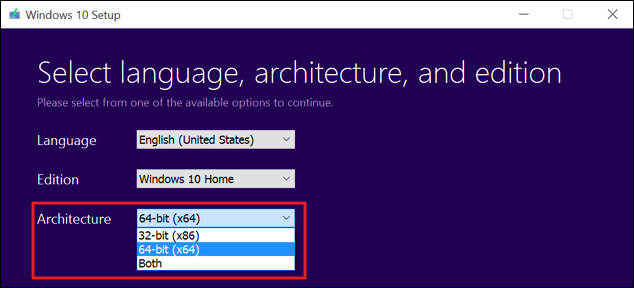
After few minutes of investigation online, I've realized, I've installed by mistake a 32 Bit version of Windows 10 Pro…So the next step was of course to upgrade to 64 bit to work around the unrecognized 5.2GB memory… To make sure my Windows 10 Installation is up-to-date I've downloaded the latest one from the Media Creation Installation Tool from Microsoft's website used the tool to burn the Downloaded Image to an Empty USB Stick (mine is 16GB but minimum required would be 4Gb) and proceeded to reboot the Lenovo Desktop machine and boot from the Windows 10 Install Flash Drive. From there on I've had to select I need to install a 64 Bit version of Windows and Skip the Licensing Key fill in Prompt Twice (act as I have no license) as Windows already could recognize the older OEM installed 32 bit install Windows key and automatically fetches the key from there.

Before proceeding to install the 64 Bit Windows, of course double check  that the Machine you have at hand has already the License Key recognized by Microsoft  is 64 Bit capable:

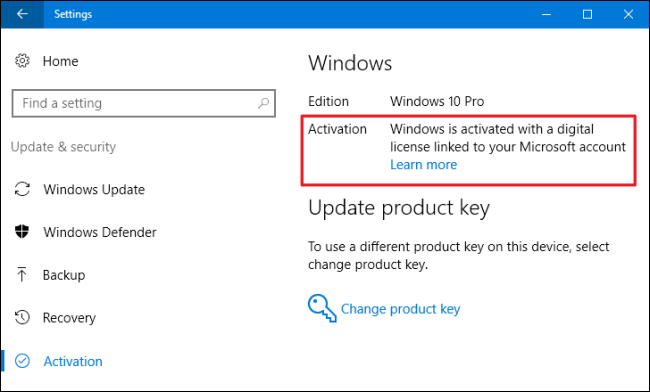
To check 32 bit version of Windows before attempted upgrade is Properly Licensed :

Settings > Update & security > Activation

check-if-windows-is-already-activated-settings-update-and-security-Activation-menus


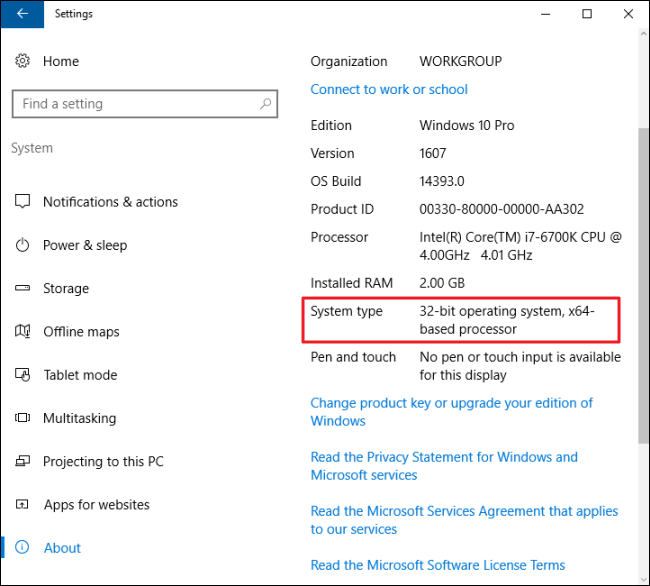
To check whether Hardware is 64 Capable:

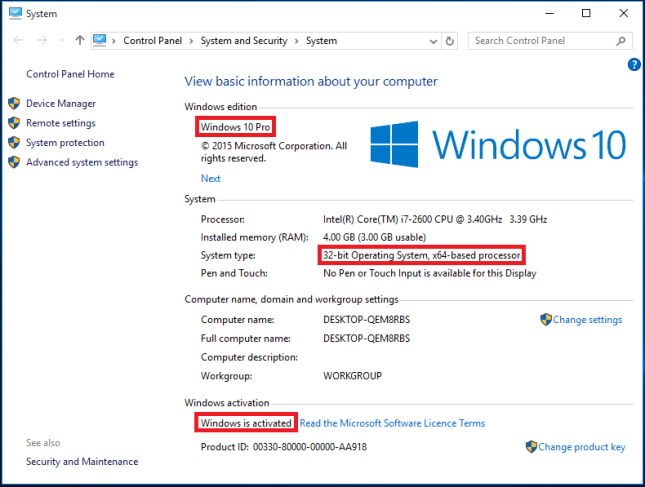
Settings -> System -> About


is-hardware-processor-64-bit-capable-windows-screenshot

32 bit Windows on x64based processor (Machine supports 64 bit OS)


windows10-OS-Installation-media-install-tool

Media Creation Tool Windows 10 MS Installer tool (make sure you select 64-bit (x86) instead of the default

From the Installer, I've installed Windows just like I install a brand new fersh Win OS and after asking the few trivial Installation Program questions landed to the new working OS and proceeded to install the usual software which are a must have on a freshly installed Windows for some of them check my previous article Essential Must have software to install on Fresh  new Windows installation host.

Procedure Instructions to safe upgrade CentOS / RHEL Linux 7 Core to latest release

Thursday, February 13th, 2020

safe-upgrade-CentOS-and_Redhat_Enterprise_Linux_RHEL-7-to-latest-stable-release

Generally upgrading both RHEL and CentOS can be done straight with yum tool just we're pretty aware and mostly anyone could do the update, but it is good idea to do some
steps in advance to make backup of any old basic files that might help us to debug what is wrong in case if the Operating System fails to boot after the routine Machine OS restart
after the upgrade that is usually a good idea to make sure that machine is still bootable after the upgrade.

This procedure can be shortened or maybe extended depending on the needs of the custom case but the general framework should be useful anyways to someone that's why
I decided to post this.

Before you go lets prepare a small status script which we'll use to report status of  sysctl installed and enabled services as well as the netstat connections state and
configured IP addresses and routing on the system.

The script show_running_services_netstat_ips_route.sh to be used during our different upgrade stages:
 

# script status ###
echo "STARTED: $(date '+%Y-%m-%d_%H-%M-%S'):" | tee /root/logs/yumcheckupdate-$(hostname)-$(date '+%Y-%m-%d_%H-%M-%S').out
systemctl list-unit-files –type=service | grep enabled
systemctl | grep ".service" | grep "running"
netstat -tulpn
netstat -r
ip a s
/sbin/route -n
echo "ENDED $(date '+%Y-%m-%d_%H-%M-%S'):" | tee /root/logs/yumcheckupdate-$(hostname)-$(date '+%Y-%m-%d_%H-%M-%S').out
####


– Save the script in any file like /root/status.sh

– Make the /root/logs directoriy.
 

[root@redhat: ~ ]# mkdir /root/logs
[root@redhat: ~ ]# vim /root/status.sh
[root@redhat: ~ ]# chmod +x /root/status.sh


1. Get a dump of CentOS installed version release and grub-mkconfig generated os_probe


[root@redhat: ~ ]# cat /etc/redhat-release  > /root/logs/redhat-release-vorher-$(hostname)-$(date '+%Y-%m-%d_%H-%M-%S').out
[root@redhat: ~ ]# cat /etc/grub.d/30_os-prober > /root/logs/grub2-efi-vorher-$(hostname)-$(date '+%Y-%m-%d_%H-%M-%S').out


2. Clear old versionlock marked RPM packages (if there are such)


On servers maintained by multitude of system administrators just like the case is inside a Global Corporations and generally in the corporate world , where people do access the systems via LDAP and more than a single person
has superuser privileges. It is a good prevention measure to use yum package management  functionality to RPM based Linux distributions called  versionlock.
versionlock for those who hear it for a first time is locking the versions of the installed RPM packages so if someone by mistake or on purpose decides to do something like :

[root@redhat: ~ ]# yum install packageversion

Having the versionlock set will prevent the updated package to be installed with a different branch package version.

Also it will prevent a playful unknowing person who just wants to upgrade the system without any deep knowledge to be able to
run

[root@redhat: ~ ]# yum upgrade

update and leave the system in unbootable state, that will be only revealed during the next system reboot.

If you haven't used versionlock before and you want to use it you can do it with:

[root@redhat: ~ ]# yum install yum-plugin-versionlock

To add all the packages for compiling C code and all the interdependend packages, you can do something like:


[root@redhat: ~ ]# yum versionlock gcc-*

If you want to clear up the versionlock, once it is in use run:

[root@redhat: ~ ]#  yum versionlock clear
[root@redhat: ~ ]#  yum versionlock list


3.  Check RPC enabled / disabled


This step is not necessery but it is a good idea to check whether it running on the system, because sometimes after upgrade rpcbind gets automatically started after package upgrade and reboot. 
If we find it running we'll need to stop and mask the service.


# check if rpc enabled
[root@redhat: ~ ]# systemctl list-unit-files|grep -i rpc
var-lib-nfs-rpc_pipefs.mount                                      static
auth-rpcgss-module.service                                        static
rpc-gssd.service                                                  static
rpc-rquotad.service                                               disabled
rpc-statd-notify.service                                          static
rpc-statd.service                                                 static
rpcbind.service                                                   disabled
rpcgssd.service                                                   static
rpcidmapd.service                                                 static
rpcbind.socket                                                    disabled
rpc_pipefs.target                                                 static
rpcbind.target                                                    static

[root@redhat: ~ ]# systemctl status rpcbind.service
● rpcbind.service – RPC bind service
   Loaded: loaded (/usr/lib/systemd/system/rpcbind.service; disabled; vendor preset: enabled)
   Active: inactive (dead)


[root@redhat: ~ ]# systemctl status rpcbind.socket
● rpcbind.socket – RPCbind Server Activation Socket
   Loaded: loaded (/usr/lib/systemd/system/rpcbind.socket; disabled; vendor preset: enabled)
   Active: inactive (dead)
   Listen: /var/run/rpcbind.sock (Stream)
           0.0.0.0:111 (Stream)
           0.0.0.0:111 (Datagram)
           [::]:111 (Stream)
           [::]:111 (Datagram)


4. Check any previously existing downloaded / installed RPMs (check yum cache)


yum install package-name / yum upgrade keeps downloaded packages via its operations inside its cache directory structures in /var/cache/yum/*.
Hence it is good idea to check what were the previously installed packages and their count.


[root@redhat: ~ ]# cd /var/cache/yum/x86_64/;
[root@redhat: ~ ]# find . -iname '*.rpm'|wc -l


5. List RPM repositories set on the server


 [root@redhat: ~ ]# yum repolist
Loaded plugins: fastestmirror, versionlock
Repodata is over 2 weeks old. Install yum-cron? Or run: yum makecache fast
Determining fastest mirrors
repo id                                                                                 repo name                                                                                                            status
!atos-ac/7/x86_64                                                                       Atos Repository                                                                                                       3,128
!base/7/x86_64                                                                          CentOS-7 – Base                                                                                                      10,019
!cr/7/x86_64                                                                            CentOS-7 – CR                                                                                                         2,686
!epel/x86_64                                                                            Extra Packages for Enterprise Linux 7 – x86_64                                                                          165
!extras/7/x86_64                                                                        CentOS-7 – Extras                                                                                                       435
!updates/7/x86_64                                                                       CentOS-7 – Updates                                                                                                    2,500


This step is mandatory to make sure you're upgrading to latest packages from the right repositories for more concretics check what is inside in confs /etc/yum.repos.d/ ,  /etc/yum.conf 
 

6. Clean up any old rpm yum cache packages


This step is again mandatory but a good to follow just to have some more clearness on what packages is our upgrade downloading (not to mix up the old upgrades / installs with our newest one).
For documentation purposes all deleted packages list if such is to be kept under /root/logs/yumclean-install*.out file

[root@redhat: ~ ]# yum clean all |tee /root/logs/yumcleanall-$(hostname)-$(date '+%Y-%m-%d_%H-%M-%S').out


7. List the upgradeable packages's latest repository provided versions


[root@redhat: ~ ]# yum check-update |tee /root/logs/yumcheckupdate-$(hostname)-$(date '+%Y-%m-%d_%H-%M-%S').out


Then to be aware how many packages we'll be updating:


[root@redhat: ~ ]#  yum check-update | wc -l


8. Apply the actual uplisted RPM packages to be upgraded


[root@redhat: ~ ]# yum update |tee /root/logs/yumupdate-$(hostname)-$(date '+%Y-%m-%d_%H-%M-%S').out


Again output is logged to /root/logs/yumcheckupate-*.out 


9. Monitor downloaded packages count real time


To make sure yum upgrade is not in some hanging state and just get some general idea in which state of the upgrade is it e.g. Download / Pre-Update / Install  / Upgrade/ Post-Update etc.
in mean time when yum upgrade is running to monitor,  how many packages has the yum upgrade downloaded from remote RPM set repositories:


[root@redhat: ~ ]#  watch "ls -al /var/cache/yum/x86_64/7Server/…OS-repository…/packages/|wc -l"


10. Run status script to get the status again


[root@redhat: ~ ]# sh /root/status.sh |tee /root/logs/status-before-$(hostname)-$(date '+%Y-%m-%d_%H-%M-%S').out


11. Add back versionlock for all RPM packs


Set all RPM packages installed on the RHEL / CentOS versionlock for all packages.


#==if needed
# yum versionlock \*


12. Get whether old software configuration is not messed up during the Package upgrade (Lookup the logs for .rpmsave and .rpmnew)


During the upgrade old RPM configuration is probably changed and yum did automatically save .rpmsave / .rpmnew saves of it thus it is a good idea to grep the prepared logs for any matches of this 2 strings :
 

[root@redhat: ~ ]#   grep -i ".rpm" /root/logs/yumupdate-server-host-2020-01-20_14-30-41.out
[root@redhat: ~ ]#  grep -i ".rpmsave" /root/logs/yumupdate-server-host-2020-01-20_14-30-41.out
[root@redhat: ~ ]#  grep -i ".rpmnew" /root/logs/yumupdate-server-host-2020-01-20_14-30-41.out


If above commands returns output usually it is fine if there is is .rpmnew output but, if you get grep output of .rpmsave it is a good idea to review the files compare with the original files that were .rpmsaved with the 
substituted config file and atune the differences with the changes manually made for some program functionality.

What are the .rpmsave / .rpmnew files ?
This files are coded files that got triggered by the RPM install / upgrade due to prewritten procedures on time of RPM build.


If a file was installed as part of a rpm, it is a config file (i.e. marked with the %config tag), you've edited the file afterwards and you now update the rpm then the new config file (from the newer rpm) will replace your old config file (i.e. become the active file).
The latter will be renamed with the .rpmsave suffix.

If a file was installed as part of a rpm, it is a noreplace-config file (i.e. marked with the %config(noreplace) tag), you've edited the file afterwards and you now update the rpm then your old config file will stay in place (i.e. stay active) and the new config file (from the newer rpm) will be copied to disk with the .rpmnew suffix.
See e.g. this table for all the details. 

In both cases you or some program has edited the config file(s) and that's why you see the .rpmsave / .rpmnew files after the upgrade because rpm will upgrade config files silently and without backup files if the local file is untouched.

After a system upgrade it is a good idea to scan your filesystem for these files and make sure that correct config files are active and maybe merge the new contents from the .rpmnew files into the production files. You can remove the .rpmsave and .rpmnew files when you're done.


If you need to get a list of all .rpmnew .rpmsave files on the server do:

[root@redhat: ~ ]#  find / -print | egrep "rpmnew$|rpmsave$


13. Reboot the system 

To check whether on next hang up or power outage the system will boot normally after the upgrade, reboot to test it.


you can :


[root@redhat: ~ ]#  reboot


either

[root@redhat: ~ ]#  shutdown -r now


or if on newer Linux with systemd in ues below systemctl reboot.target.

[root@redhat: ~ ]#  systemctl start reboot.target


14. Get again the system status with our status script after reboot

[root@redhat: ~ ]#  sh /root/status.sh |tee /root/logs/status-after-$(hostname)-$(date '+%Y-%m-%d_%H-%M-%S').out


15. Clean up any versionlocks if earlier set


[root@redhat: ~ ]# yum versionlock clear
[root@redhat: ~ ]# yum versionlock list


16. Check services and logs for problems


After the reboot Check closely all running services on system make sure every process / listening ports and services on the system are running fine, just like before the upgrade.
If the sytem had firewall,  check whether firewall rules are not broken, e.g. some NAT is not missing or anything earlier configured to automatically start via /etc/rc.local or some other
custom scripts were run and have done what was expected. 
Go through all the logs in /var/log that are most essential /var/log/boot.log , /var/log/messages … yum.log etc. that could reveal any issues after the boot. In case if running some application server or mail server check /var/log/mail.log or whenever it is configured to log.
If the system runs apache closely check the logs /var/log/httpd/error.log or php_errors.log for any strange errors that occured due to some issues caused by the newer installed packages.
Usually most of the cases all this should be flawless but a multiple check over your work is a stake for good results.
 

xorg on Toshiba Satellite L40 14B with Intel GM965 video hangs up after boot and the worst fix ever / How to reinstall Ubuntu by keeping the old personal data and programs

Wednesday, April 27th, 2011

black screen ubuntu troubles

I have updated Ubuntu version 9.04 (Jaunty) to 9.10 and followed the my previous post update ubuntu from 9.04 to Latest Ubuntu

I expected that a step by step upgrade from a release to release will work like a charm and though it does on many notebooks it doesn't on Toshiba Satellite L40

The update itself went fine, whether I used the update-manager -d and followed the above pointed tutorial, however after a system restart the PC failed to boot the X server properly, a completely blank screen with blinking cursor appeared and that was all.

I restarted the system into the 2.6.35-28-generic kernel rescue-mode recovery kernel in order to be able to enter into physical console.

Logically the first thing I did is to check /var/log/messages and /var/log/Xorg.0.log but I couldn't find nothing unusual or wrong there.

I suspected something might be wrong with /etc/X11/xorg.conf so I deleted it:

ubuntu:~# rm -f /etc/X11/xorg.conf

and attempted to re-create the xorg.conf X configuration with command:

ubuntu:~# dpkg-reconfigure xserver-xorg

This command was reported to be the usual way to reconfigure the X server settings from console, but in my case (for unknown reasons) it did nothing.

Next the command which was able to re-generate the xorg.conf file was:

ubuntu:~# X -configure

The command generates a xorg.conf sample file in /root/xorg.conf.* so I used the conf to put it in /etc/X11/xorg.conf X's default location and restarted in hope that this would fix the non-booting issue.

Very sadly again the black screen of death appeared on the notebook toshiba screen.
I further thought of completely wipe out the xorg.conf in hope that at least it might boot without the conf file but this worked out neither.

I attempted to run the Xserver with a xorg.conf configured to work with vesa as it's well known vesa X server driver is supposed to work on 99% of the video cards, as almost all of them nowdays are compatible with the vesa standard, but guess what in my case vesa worked not!

The only version of X I can boot in was the failsafe X screen mode which is available through the grub's boot menu recovery mode.

Further on I decided to try few xorg.conf which I found online and were reported to work fine with Intel GM965 internal video , and yes this was also unsucessful.

Some of my other futile attempts were: to re-install the xorg server with apt-get, reinstall the xserver-xorg-video-intel driver e.g.:

ubuntu:~# apt-get install --reinstall xserver-xorg xserver-xorg-video-intel

As nothing worked out I was completely pissed off and decided to take an alternative approach which will take a lot of time but at least will probably be succesful, I decided to completely re-install the Ubuntu from a CD after backing up the /home directory and making a list of available packages on the system, so I can further easily run a tiny bash one-liner script to install all the packages which were previously existing on the laptop before the re-install:

Here is how I did it:

First I archived the /home directory:

ubuntu:/# tar -czvf home.tar.gz home/
....

For 12GB of data with some few thousands of files archiving it took about 40 minutes.

The tar spit archive became like 9GB and I hence used sftp to upload it to a remote FTP server as I was missing a flash drive or an external HDD where I can place the just archived data.

Uploading with sftp can be achieved with a command similar to:

sftp user@yourhost.com
Password:
Connected to yourhost.com.
sftp> put home.tar.gz

As a next step to backup in a file the list of all current installed packages, before I can further proceed to boot-up with the Ubuntu Maverich 10.10 CD and prooceed with the fresh install I used command:

for i in $(dpkg -l| awk '{ print $2 }'); do
echo $i; done >> my_current_ubuntu_packages.txt

Once again I used sftp as in above example to upload my_current_update_packages.txt file to my FTP host.

After backing up all the stuff necessery, I restarted the system and booted from the CD-rom with Ubuntu.
The Ubuntu installation as usual is more than a piece of cake and even if you don't have a brain you can succeed with it, so I wouldn't comment on it 😉

Right after the installation I used the sftp client once again to fetch the home.tar.gz and my_current_ubuntu_packages.txt

I placed the home.tar.gz in /home/ and untarred it inside the fresh /home dir:

ubuntu:/home# tar -zxvf home.tar.gz

Eventually the old home directory was located in /home/home so thereon I used Midnight Commander ( the good old mc text file explorer and manager ) to restore the important user files to their respective places.

As a last step I used the my_current_ubuntu_packages.txt in combination with a tiny shell script to install all the listed packages inside the file with command:

ubuntu:~# for i in $(cat my_current_ubuntu_packagespackages.txt); do
apt-get install --yes $i; sleep 1;
done

You will have to stay in front of the computer and manually answer a ncurses interface questions concerning some packages configuration and to be honest this is really annoying and time consuming.

Summing up the overall time I spend with this stupid Toshiba Satellite L40 with the shitty Intel GM965 was 4 days, where each day I tried numerous ways to fix up the X and did my best to get through the blank screen xserver non-bootable issue, without a complete re-install of the old Ubuntu system.
This is a lesson for me that if I stumble such a shitty issues I will straight proceed to the re-install option and not loose my time with non-sense fixes which would never work.

Hope the article might be helpful to somebody else who experience some problems with Linux similar to mine.

After all at least the Ubuntu Maverick 10.10 is really good looking in general from a design perspective.
What really striked me was the placement of the close, minimize and maximize window buttons , it seems in newer Ubuntus the ubuntu guys decided to place the buttons on the left, here is a screenshot:

Left button positioning of navigation Buttons in Ubuntu 10.10

I believe the solution I explain, though very radical and slow is a solution that would always work and hence worthy 😉
Let me hear from you if the article was helpful.

Upgrade old crappy Windows 7 32 bit to Windows 10 32 bit, post install fixes and impressions / How to enter Safe Mode in Windows 10

Wednesday, June 28th, 2017

Upgrade-Windows-7-Vista-XP-to-Windows-10-upgrade-howto-observations-post-fixes

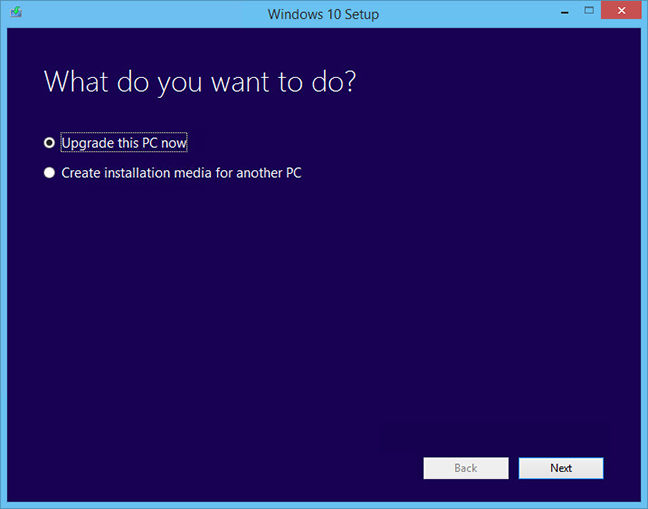
However as I've been upgrading my sister's computer previously running Windows 7 to Windows 10 (the process of upgrading is really simple you just download Windows-Media-Creation-tool from Microsoft website and the rest comes to few clicks (Accept Windows 10 User Agreement, Create current install  restore point (backup) etc.) and waiting some 30 minutes or so for the upgrade to complete.

windows-7-to-10-windows-setup-upgrade-this-pc-prompt

Then it was up to downloading some other updates on a few times and restarting the computer, each time the upgrades were made and all the computer was ready. I've installed Avira (AntiVirus) as I usually do on new PCs and downloaded a bunch of anti-malware (MalwareBytes / Rfkill  / Zemanta)  to make sure that the old upgraded  WIndows was not already infected before the upgrade and I've found a bunch of malware, that got quickly cleared up.

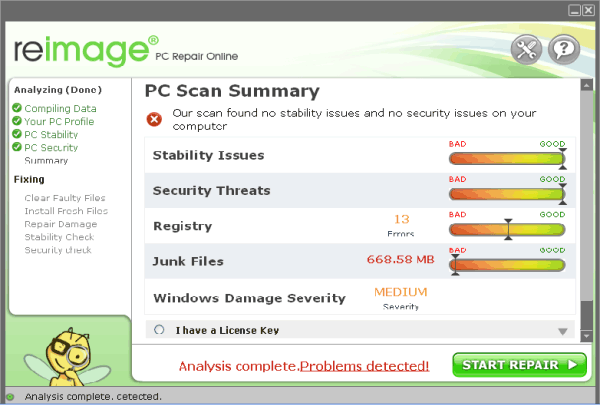
Anyways I've tried also another tool called ReimagePlus – Online Computer Repair in order to check whether there are no some broken WIndows system files after the upgrade

Reimage_Repair-Windows-fix-windows-failing-services-and-broken-windows-installations-clear-up-malware
(here I have to say I've done that besides running in an Administrator command prompt (cmd.exe) and running
 

sfc /scannow


command to check base system files integrity, which luckily showed no problems with the Win base system files.

ReimagePlus however showed some failed services and some failed programs that were previously installed from Windows 7 before the upgrade and even it showed indication for Trojan present on computer but since ReImagePlus is a payed software and I didn't have the money to spend on it, I just proceeded to clean up what was found manually.

After that the computer ran fine, with the only strange thing that some data was from hard drive was red a bit too frequently, after a short call with a close friend (Nomen) – thx man, he suggested that the frequenty hdd usage might be related to Windows Search Indexing service database rebuilt and he adviced me to disable it which I did following this article How to speed up Windows by disabling Search Index Service.

One issue worthy to mention  stumbled upon after the upgrade was problems with Windows Explorer which was frequently crashing and "restarting the Desktop", but once, I've enabled all upgrades from Microsoft and Applied them after some update failures and restarts, once all was up2date to all latest from Microsoft, Explorer started working normally.

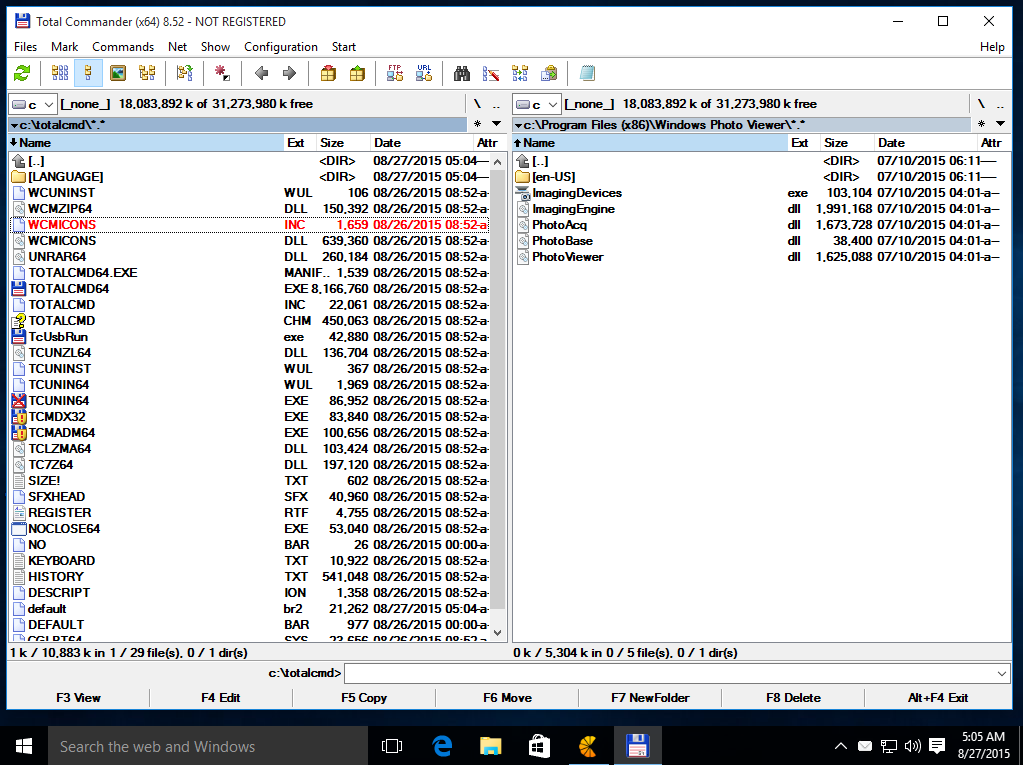
In the mean time while Windows Explorer was crashing in order to browse my file system I used the good old Win Total Command or Norton Commander for Windows – WinNC (with its most cool bizzarre own File Explorer tool).

Windows-Total-commander-tool-running-on-MS-Windows-10

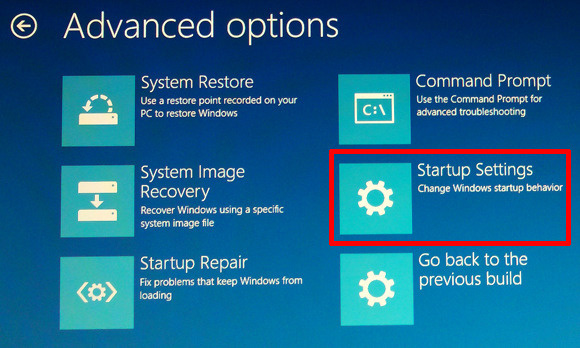
As I wanted to run a MalwareBytes scan and Antivirus under Windows Safe-Mode, I tried entering it by restarting the Computer and pressing F8 a number of times before the Windows boot screen but this didn't work as Safe-Mode boot was changed in Windows 10 to be callable in another way because of some extra Windows Boot speed up optimizations, in short the easiest way I found to enter Windows 10 Safe Mode was to Hit Start Button -> Choose Restart PC and keep pressed SHIFT button simultaneously
that calls a menu that gives you some restore options, along with safe mode options for those who want to read more on How to Enter Safe mode (Command Prompt) on Windows 10 – please read this article.

Windows-10-enable-Safe-Mode-options-screen

Once the upgrade was over and all below done unfortunately I've realized her previously installed WIndows 7 is x86 (32 bit) version and the Acer notebook 5736Z where it is being installed is actually X64 (64 bit), hence I've decided to upgrade my dear sis computer to a 64 Bit Windows 10 and researched online whether, there is some tool that is capable to upgrade WIndows 10 from 32 bit to Windows 10 64 bit just to find out the only option is to either use some program to creaty a backup of files on the PC or to manually copy files to external hard drive and reinstall with a Windows 10 64 bit bootable USB Flash or CD / DVD image, so I took my USB flash and used again Windows Media Creation Tool to burn Windows and re-install with the 64 bit iso.

If you're wonder about why I choose to re-install finally Win 10 32 bit with Win 64 bit, because you might think performance difference might be not really so dramatic, then I have to say the Acer notebook is equipped with 4 Gigabytes of RAM Memory and Windows 10 32bit  (Pro) could recognize a maximum of 3 Gigabytes (2.9 GB if I have to be precise) and 1 Gigabyte of memory stays totally unusued all the time with  Winblows 10 32 bit.

Windows-10-4gb-memory-present-only-3gb-usable-why-reason-and-solution

I've tried my best actually to not loose time to fully upgrade Windows 7 (32 bit) -> Windows 10 (64 bit) but to make Windows 7 32 bit Windows to use more than the default Limitation of 3GB of memory by using this thirt party PAE Externsion Kernel Patch
which is patching the Windows Kernel to extend the Windows support for PCs with up to 128 GB of memory however it turned out that this Patch file is not compatible with my Windows Kernel version once I followed readme instructions.

It seems the PAE (Physical Address Extension) is supported by default  by Microsoft only on 32 bit Windows Server 10 to read more on the PAE if interested give a look here.

Well that's all folks, the rest I did was to just boot from the USB drive just burned and re-install WIndows and copy my files from User profile / Downloads / Pictures / Music etc. to the same locations on the new installed Windows 10 professional 64 bit and enjoy the better performance.

How to update macos from terminal / Check and update remotely Mac OS X software from console

Friday, October 23rd, 2015

../files/how-to-update-mac-osx-notebook-from-terminalsoftware-update-command-line-mac-screnshot-1

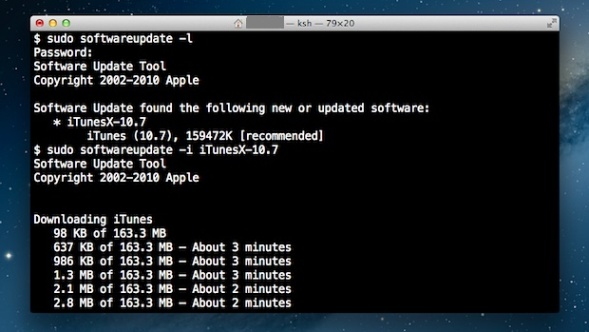
If you happen to have to deal with Mac OS X (Apple) notebook or Desktop PC (Hackintosh) etc. and you’re sysadmin or console freak being pissed off Mac’s GUI App Store update interface and you want to “keep it simple stupid” (KISS) in an Debian Linux like apt-get manner then you can also use Mac’s console application (cli) terminal to do the updates manually from command line with:

softwareupdate

command.

how-to-update-mac-osx-notebook-from-terminalsoftware-update-command-line-mac-screnshot

To get help about softwareupdate pass it on the -h flag:

softwareupdate -h

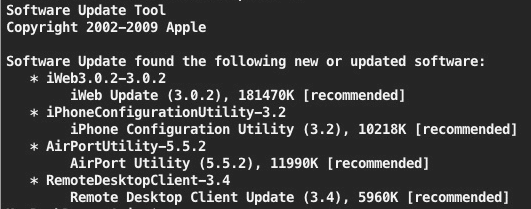
1. Get a list of available Mac OS updates

Though not a very likely scenario of course before installing it is always a wise thing to see what is being updated to make sure you will not upgrade something that you don’t want to.
This is done with:

softwareupdate -l

However in most cases you can simply skip this step as updating directly every package installed on the Mac with a new version from Apple will not affect your PC.
Anyways it is always a good idea to keep a backup image of your OS before proceeding with updates with let’s say Time Machine Mac OS backup app.

2. Install only recommended Updates from Apple store

softwareupdate -irv


Above will download all updates that are critical and thus a must to have in order to keep Mac OS security adequate.
Translated into Debian / Ubuntu Linux language, the command does pretty much the same as Linux’s:

apt-get –yes update

3. Install All Updates available from AppleStore

To install absolutely all updates provided by Apple’s package repositories run:

softwareupdate -iva

One note to make here is that always when you keep updating make sure your notebook is switched on to electricity grid otherwise if due to battery discharge it shutoffs during update your Mac will crash in a very crappy hard to recover state that might even cost you a complete re-install or a need to bring a PC to a Mac Store technical support guy so beware, you’re warned!

4. Installing all updates except Specific Softwares from Terminal

Often if you have a cracked software or a software whose GUI interface changed too much and you don’t want to upgrade it but an update is offered by Apple repos you can add the -i ingnore option:

softwareupdate -i [update_name(s)]

For example:

softwareupdate -i Safari-version-XXXX

5. View Mac OS Software Update History

The quickest way to see the update history is with System Information app, e.g.:

/Applications/Utilities/System Information.app

yum add proxy on CentOS, RHEL, Fedora Linux howto

Thursday, June 5th, 2014

yum-via-proxy-yum-package-management-mascot
Whether you had to install a CentOS server in a DMZ-ed network with paranoic system firewall rules or simply you want to use your own created RPM local repository to run RPM installs and CentOS system updates via monitored Proxy you will have to configure yum to use a proxy.

There is a standard way to do it by adding a proxy directive to /etc/yum.conf as explained in CentOS official documetnation.
However for some reason:

proxy=http://your-proxy-url.com:8080
proxy_username=yum-user
proxy_password=qwerty

proxy vars adding to /etc/yum.conf [main] section is not working on CentOS 6.5?
However there is a dirty patch by using the OS environment standard variable http_proxy
To make yum work via proxy in gnome-terminal run first:

export http_proxy=http://your-proxy-server.com:8080

or if proxy is protected by username / password run instead:

export username='yum-user'
export password='qwerty'
export http_proxy="http://$username:$password@your-proxy-server:8080/

Afterwards yum will work via the proxy, i.e.:

yum update && yum upgrade

To make http_proxy exported system wide check my previous post – Set Proxy System-Wide

Hope this helps someone.

Fixing Shellshock new critical remote bash shell exploitable vulnerability on Debian / Ubuntu / CentOS / RHEL / Fedora / OpenSuSE and Slackware

Friday, October 10th, 2014

Bash-ShellShock-remote-exploitable-Vulnerability-affecting-Linux-Mac-OSX-and-BSD-fixing-shellshock-bash-vulnerability-debian-redhat-fedora-centos-ubuntu-slackware-and-opensuse
If you still haven’t heard about the ShellShock Bash (Bourne Again) shell remote exploit vulnerability and you admin some Linux server, you will definitely have to read seriously about it. ShellShock Bash Vulnerabily has become public on Sept 24 and is described in details here.

The vulnerability allows remote malicious attacker to execute arbitrary code under certain conditions, by passing strings of code following environment variable assignments. Affected are most of bash versions starting with bash 1.14 to bash 4.3.
Even if you have patched there are some reports, there are other bash shell flaws in the way bash handles shell variables, so probably in the coming month there will be even more patches to follow.

Affected bash flaw OS-es are Linux, Mac OS and BSDs;

• Some DHCP clients

• OpenSSL servers that use ForceCommand capability in (Webserver config)

• Apache Webservers that use CGi Scripts through mod_cgi and mod_cgid as well as cgis written in bash or launching bash subshells

• Network exposed services that use bash somehow

Even though there is patch there are futher reports claiming patch ineffective from both Google developers and RedHat devs, they say there are other flaws in how batch handles variables which lead to same remote code execution.

There are a couple of online testing tools already to test whether your website or certain script from a website is vulnerable to bash remote code executions, one of the few online remote bash vulnerability scanner is here and here. Also a good usable resource to test whether your webserver is vulnerable to ShellShock remote attack is found on ShellShocker.Net.

As there are plenty of non-standard custom written scripts probably online and there is not too much publicity about the problem and most admins are lazy the vulnerability will stay unpatched for a really long time and we’re about to see more and more exploit tools circulating in the script kiddies irc botnets.

Fixing bash Shellcode remote vulnerability on Debian 5.0 Lenny.

Follow the article suggesting how to fix the remote exploitable bash following few steps on older unsupported Debian 4.0 / 3.0 (Potato) etc. – here.

Fixing the bash shellcode vulnerability on Debian 6.0 Squeeze. For those who never heard since April 2014, there is a A Debian LTS (Long Term Support) repository. To fix in Debian 6.0 use the LTS package repository, like described in following article.

If you have issues patching your Debian Wheezy 6.0 Linux bash, it might be because you already have a newer installed version of bash and apt-get is refusing to overwrite it with an older version which is provided by Debian LTS repos. The quickest and surest way to fix it is to do literally the following:


vim /etc/apt/sources.list

Paste inside to use the following LTS repositories:

deb http://http.debian.net/debian/ squeeze main contrib non-free
deb-src http://http.debian.net/debian/ squeeze main contrib non-free
deb http://security.debian.org/ squeeze/updates main contrib non-free
deb-src http://security.debian.org/ squeeze/updates main contrib non-free
deb http://http.debian.net/debian squeeze-lts main contrib non-free
deb-src http://http.debian.net/debian squeeze-lts main contrib non-free

Further on to check the available installable deb package versions with apt-get, issue:


apt-cache showpkg bash
...
...
Provides:
4.1-3+deb6u2 -
4.1-3 -
Reverse Provides:

As you see there are two installable versions of bash one from default Debian 6.0 repos 4.1-3 and the second one 4.1-3+deb6u2, another way to check the possible alternative installable versions when more than one version of a package is available is with:


apt-cache policy bash
...
*** 4.1-3+deb6u2 0
500 http://http.debian.net/debian/ squeeze-lts/main amd64 Packages
100 /var/lib/dpkg/status
4.1-3 0
500 http://http.debian.net/debian/ squeeze/main amd64 Packages

Then to install the LTS bash version on Debian 6.0 run:


apt-get install bash=4.1-3+deb6u2

Patching Ubuntu Linux supported version against shellcode bash vulnerability:
A security notice addressing Bash vulnerability in Ubuntus is in Ubuntu Security Notice (USN) here
USNs are a way Ubuntu discloses packages affected by a security issues, thus Ubuntu users should try to keep frequently an eye on Ubuntu Security Notices

apt-get update
apt-get install bash

Patching Bash Shellcode vulnerability on EOL (End of Life) versions of Ubuntu:

mkdir -p /usr/local/src/dist && cd /usr/local/src/dist
wget http://ftpmirror.gnu.org/bash/bash-4.3.tar.gz.sig
wget http://ftpmirror.gnu.org/bash/bash-4.3.tar.gz
wget http://tiswww.case.edu/php/chet/gpgkey.asc
gpg --import gpgkey.asc
gpg --verify bash-4.3.tar.gz.sig
cd ..
tar xzvf dist/bash-4.3.tar.gz
cd bash-4.3
mkdir patches && cd patches
wget -r --no-parent --accept "bash43-*" -nH -nd
ftp.heanet.ie/mirrors/gnu/bash/bash-4.3-patches/ # Use a local mirror
echo *sig | xargs -n 1 gpg --verify --quiet # see note 2

cd ..
echo patches/bash43-0?? | xargs -n 1 patch -p0 -i # see note 3 below

./configure --prefix=/usr --bindir=/bin
--docdir=/usr/share/doc/bash-4.3
--without-bash-malloc
--with-installed-readline

make
make test && make install

To solve bash vuln in recent Slackware Linux:

slackpkg update
slackpkg upgrade bash

For old Slacks, either download a patched version of bash or download the source for current installed package and apply the respective patch for the shellcode vulnerability.
There is also a GitHub project “ShellShock” Proof of Concept code demonstrating – https://github.com/mubix/shellshocker-pocs
There are also non-confirmed speculations for bash vulnerability bug to impact also:

Speculations:(Non-confirmed possibly vulnerable common server services):

• XMPP(ejabberd)

• Mailman

• MySQL

• NFS

• Bind9

• Procmail

• Exim

• Juniper Google Search

• Cisco Gear

• CUPS

• Postfix

• Qmail

Fixing ShellShock bash vulnerability on supported versions of CentOS, Redhat, Fedora

In supported versions of CentOS where EOL has not reached:

yum –y install bash

In Redhat, Fedoras recent releases to patch:

yum update bash

To upgrade the bash vulnerability in OpenSUSE:

zipper patch –cve=CVE-2014-7187

Shellcode is worser vulnerability than recent SSL severe vulnerability Hearbleed. According to Redhat and other sources this new bash vulnerability is already actively exploited in the wild and probably even worms are crawling the net stealing passwords, data and building IRC botnets for remote control and UDP flooding.

How to disable WordPress Visual Editor to solve problems Editor / Post problems after upgrade to WordPress 4.0

Monday, October 27th, 2014

wordpress-visual-editor-not-showing-problem-and-its-easy-fix-solution
Recently, I've upgraded to latest as of time of writting WordPress 4.0. The upgrade went fine however after upgrade even though I've upgraded also the CKEdit for WordPressVisual Editor stopped working. To solve the issue, my logical guess was to try to disable CKEditor:

(Plugins -> Ckeditor for WordPress (Deactivate)

However even after disabling, default WP Visual Editor continued to be not showing properly – e.g. the Publish / Save Draft / Preview buttons pane as well as the usual format text menu buttons (set text to Italic, Bold, Underline Text,  Create New Paragraph etc.) was completely missing and it was impossible to write anything in the text edit box like you see in below screenshot:

wordpress_visual_editor_missing_buttons_no-publish-button-wordpress_screenshot

I've red a lot on the internet about the issue and it seem a lot of people end up with the WordPress broken Visual Editor issue after upgrading to WP 3.9 and to WordPress 4.0. A lot of people did came to a fix, by simply disabling all WP plugins and enabling them one by one, however as I have about 50 WordPress plugins enabled in my WP blog disabling every plugins and re-enabling was too time consuming as I had to first write down all the plugins enabled and then re-enable them one by one by hand (after re-installing the wordpress version) testing after each whether the editor works or not ..
Therefore I skipped that fix and looked for another one. Other suggestions was to:

Edit wp-includes/css/editor.min.css and include at the end of file:
 

.mce-stack-layout{margin-top:20px}.wp-editor-container textarea.wp-editor-area{margin-top:67px;}


I've tried that one but for me this didn't work out ..

There were some people reporting certain plugins causing the visual editor issues such reported were:

  • NextScripts: Social Networks Auto-Poster
  • Google Sitemaps – Append UTW Tags
  • Google XML Sitemaps
  • TinyMCE Advanced (some suggested replacing TinyMCE and related scripts)
  • JS & CSS Script Optimizer … etc.
     

There were some suggestions also that the issues with Editor could be caused by the Used Blog Theme. It is true I'm using very Old WordPress theme, however as I like it so much I didn't wanted to change that one ..

Others suggested as a fix adding to site's wp-config.php:

define('CONCATENATE_SCRIPTS', false);

Unfortunately this doesn't work either.

Finally I've found the fix myself, the solution is as simple as disabling WordPress Visual Editor:

To disable WP Visual Editor:

1. Go to Upper screen right corner, after logged in to wp-admin (A drop down menu) with Edit My Profile will appear::

wordpress_edit_my_profile_screenshot
2. From Profile screen to appear select Disable the visual editor when writing scroll down to the bottom of page and click on Update Profile button to save new settings:

disable_the_visual_editor_when_writing

That's all now the Post / Edit of an Article will work again with text buttons only.

How to do (all) install packages binary upgrade FreeBSD 7.2 to FreeBSD 9.0 RELEASE

Wednesday, October 3rd, 2012

FreeBSD binary upgrade portupgrade pkgng pkg_add 7.2 to FreeBSD 9.0 RELEASE how to
In last article I’ve writen how FreeBSD version to version upgrade can be done using, as it is (mostly) mandatory to complete a packages binary upgrade right after the kernel and world update, in this article I will explain how to do BSD binary package upgrade.

Once the BSD boots with a new after succesful:


# freebsd-update upgrade -r 9.0-RELEASE && freebsd-update install

1. Upgrade FreeBSD port tree structure (skele) with latest BSD available,br />
It is necessery either to rebuild all installed packages on System or do a binary upgrade, this is because some of the installed packages might already be linked to older versions of FreeBSD 7.2 [in my case] – (or whatever older version) world you have.

1. Update BSD port tree skele to the latest published on FreeBSD download servers

It is generally wise idea to upgrade your BSD port structure immediately after BSD world and kernel upgrade.
For convenience you can use following ports-supfile (configured to fetch latest FreeBSD) ports directory structure:

Download it in /etc and run csup:


freebsd# cd /etc/
freebsd# wget -q https://www.pc-freak.net/files/ports-supfile
freebsd# csup -g -L 2 /etc/ports-supfile
Parsing supfile "/etc/ports-supfile"
Connecting to cvsup4.de.freebsd.org
Connected to 212.12.50.227
Server software version: SNAP_16_1h
MD5 authentication started
MD5 authentication successful
Negotiating file attribute support
Exchanging collection information
Establishing multiplexed-mode data connection
Running
Updating collection ports-all/cvs
Edit ports/UPDATING
....
....

The port structure upgrade takes me on my Pentium 1.8 Ghz with 1GB ramwith a 20 Mbit connectivity to the internet about 15 minutes; It could vary depending on PC hardware and Internet connectivity as well as to when for a last time the port tree was upgraded (how much new data csup has to fetch to hdd).

2. Re-build ports Index file /usr/ports/INDEX*

Onwards the ports index file needs to be rebuild;


freebsd# make index
Generating INDEX-9 - please wait..
....

Here my make index failed with an error:


*** Error code 1
1 error
********************************************************************
Before reporting this error, verify that you are running a supported
version of FreeBSD (see http://www.FreeBSD.org/ports/) and that you
have a complete and up-to-date ports collection. (INDEX builds are
not supported with partial or out-of-date ports collections -- in
particular, if you are using cvsup, you must cvsup the "ports-all"
collection, and have no "refuse" files.) If that is the case, then
report the failure to ports@FreeBSD.org together with relevant
details of your ports configuration (including FreeBSD version,
your architecture, your environment, and your /etc/make.conf
settings, especially compiler flags and WITH/WITHOUT settings).
Note: the latest pre-generated version of INDEX may be fetched
automatically with "make fetchindex".
********************************************************************
*** Error code 1

Cause this error, I had to update the index with portsnap (get already pre-generated one by another person).

portsnap has other advantages too – it doesn’t take so long time as well as load CPU less than manually building it; even better it takes shorter time to complete. This is why for (ports index updates) on productive servers it might be (probably) better to use portsnap:


freebsd# make fetchindex
/usr/ports/INDEX-9.bz2 100% of 1622 kB 203 kBps
freebsd# ls -al INDEX-*
-rw-r--r-- 1 root wheel 24216397 Mar 14 2011 INDEX-7
-rw-r--r-- 1 root wheel 36006912 Feb 8 2010 INDEX-7.db
-rw-r--r-- 1 root wheel 26526196 Oct 2 14:45 INDEX-9
freebsd# rm -f INDEX-7 INDEX-7.db

3. Do a binary package upgrade of every packages present on previous FreeBSD 7.2 install with portupgrade

It is generally also a good idea to create a dump of all system installed packages with pkg_info, before doing anything else:


freebsd# pkg_info -qoa | sort > /root/packagelist

Since my system is quite, slow I cannot afford to recompile all from BSD ports, thus I used the “old fashioned” portupgrade to complete the binary upgrade:

For “conservative” BSD users it might be better to use portupgrade, to do upgrade all installed packages with it run:


freebsd# rm /var/db/pkg/pkgdb.db && pkgdb -Ffuv && portupgrade -afpRr -m BATCH=yes
....

I got during above portupgrade errors like:


Stale dependency: brasero-2.26.0_1 --> hal-0.5.11_23 -- manually run 'pkgdb -F' to fix, or specify -O to force.

In order to solve this errors, I had to exec:


freebsd# pkgdb -Fa

Then after each time fixing the pkgdb database run:


freebsd# pkgdb -Ffuv && portupgrade -afpRr -m BATCH=yes

Besides portupgrade, the upgrade can be done using other metdhology;

a) Using a few lines shell of bash scripting loop and pkg_info and pkg_add

b) Using pkgng

4. Binary all package upgrade using pkg_info, pkg_delete, pkg_add with a while shell loop

An alternative FreeBSD installed packages upgrade to latest is with standard BSD tools combined with few lines of shell of bash while loop.

This whole update approach is thoroughfully explained in this BSD forum thread .

The update method pointed by the forum can be done by issuing (preferrably in bash shell root console):


root # pkg_info -qoa > /root/packagelist
root # pkg_delete -a -f
root # rm -r -f /boot/modules /usr/local /var/db/pkg
root # while read PKG; do pkg_add -r $( basename ${PKG} ); done < /root/packagelist

The problem with this update approach is if some packages names are changed, some packages might not be able to be found by and (respectively) will fail to fetch and install with pkg_add -r. Thus I personally don’t recommend using this .update method as it is unsafe.

5. Completing packages BSD binary upgrade with pkgng (PKG Next Generation) tool

Install pkgng from respective port, e.g.:


freebsd# cd cd /usr/ports/ports-mgmt/pkg
....
....
/usr/local/man/man8/pkg-remove.8.gz -> /usr/local/man/man8/pkg-delete.8.gz
/usr/local/man/man8/pkg-static.8.gz -> /usr/local/man/man8/pkg.8.gz
===> pkg-static (install)
install -o root -g wheel -m 555 pkg-static /usr/local/sbin
If you are upgrading from the old package format, first run:
# pkg2ng
===> Running ldconfig
/sbin/ldconfig -m /usr/local/lib
===> Registering installation for pkg-1.0.1
===> Cleaning for pkg-1.0.1
freebsd# make install clean
....

Right after installing you can use it and upgrade packs:


freebsd# cp -rpf /usr/local/etc/pkg.conf.sample /usr/local/etc/pkg.conf
freebsd# pkg update
Updating repository catalogue
repo.txz 100% 13MB 771.3KB/s 1.3MB/s 00:17
freebsd# pkg upgrade -fy
...
freebsd# pkg-static update
....
freebsd# pkg-static upgrade -fy

,,,
,,,,

P.S. I tried the pkgng for my first time, for some weird reason I was unable to upgrade my packages with it on 1 host, though literally followed update instructions on Full binary upgrade with pkgng 1.0-beta7 – Bapt tutorial . If someone knows of a better tutorial how update can be done using pkgng drop me a comment or point me to a tutorial.
The overall all packages update experience for me wasn’t so nice as it took me too much of time to upgrade. I like BSD stability but when it comes to updates its a time eater …