Posts Tagged ‘usr’

How to Increase virtualbox Linux install machine VM .VDI hard disk size to free space on root partition – Move /usr to a new partition

Tuesday, October 10th, 2017

extend-vdi-virtual-machine-partition-with-virtualbox-howto-virtualbox-logo
 

How to Increse Hard Disk size of VirtualBox Virtual Machine .VDI file to Free Space on root Partition or Howto move /usr large partition to separate new partition?


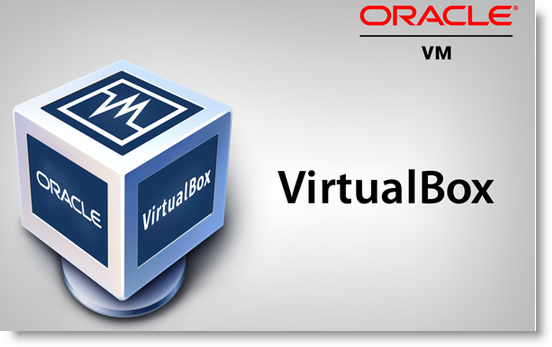
I just wondered how to increase hard disk size of Virtualbox Virtual Machine image .VDI, because for some stupid reason I've created my initial hard disk size for Linux partition to be the default 10 Gigabytes.

The problem is the packages I need to have installed on the Virtual Machine which will be a testbed for future tests of a production website applications are taking up too much space, once installed so I'm left with no space
in /var/lib/mysql for the database import. So what can I do in that case is to simply free up disk space or Merge ROOT partition with another partition.

Since merging the partition is not a trivial job and would require me to have installable CD with the Linux distro (in my case that's Debian Linux) or have a bootable USB flash drive, I preferred second approach to problem e.g. to free up disk space on ROOT partition by creating a second partition and move the /usr folder to reside there.

Before that it is of course necessery to  have extended the .VDI file using VirtualBox, so more space than the default 10GB preconfigured are available, this is easily done on Windows OS as, VBox is provided with GUI clickable option to do it, but for who knows what reason that is not the case with Linux, so Linux users only option to increase VDI file is to manually run command part of the virtualbox package, that is not a hard task really but it requires some typing and basic knowledge on how to run commands in terminal.


To .VDI resize (extend), we first go to default location where VirtualBox stores its image .VDI files (by default as of moment of writting this article – this is ~/"VrtualBox VMs"  (or home directory of logged in user dir VirtualBox VMs), the command to use is VBoxManage


root@jericho:/home/hipo# cd VirtualBox VMs/
root@jericho:/home/hipo/VirtualBox VMs# ls
Debian 6  Debian 9  Windows 10
root@jericho:/home/hipo/VirtualBox VMs# cd Debian 6/
r
oot@jericho:/home/hipo/VirtualBox VMs/Debian 6# ls
Debian 6.vbox  Debian 6.vbox-prev  Debian 6.vdi  Logs  NewVirtualDisk1.vdi  Snapshots

root@jericho:/home/hipo/VirtualBox VMs/Debian 6# VBoxManage modifyhd Debian 6.vdi –resize 20000
0%…10%…20%…30%…40%…50%…60%…70%…80%…90%…100%
root@jericho:/home/hipo/VirtualBox VMs/Debian 6#


Above command does resize the 10GB default created partition for Linux, where I have installed Linux which was 99% full of data, because of the many packages I installed to 20GB size, to make it bigger just use the respective size, be it 30000 (for 30GB) or 100000 (for 100GB) etc.

Even though in this example VBoxManage virtual partition resize command was done for GNU / Linux Operating System, it can be done for any other Operating as well to resize the size of the Virtual .VDI file (Virtual Machine) partition, be it Windows 7 / 8 / 10 or the rest of Free Operating systems FreeBSD / OpenBSD / BSD that are installed in a VM etc.

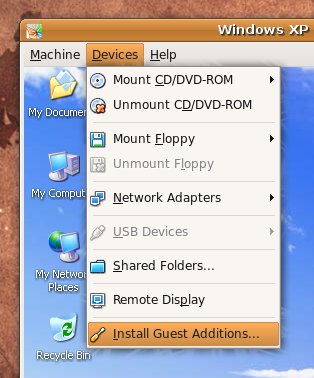
Next Launch the Virtual Machine with VBox Server client Program and install there Gparted (GNU Parted), as we'll need it to create a new Hard Disk Partition:


$ VirtualBox


Inside virtualmachine's in gnome-terminal / xterm etc. depending on the graphical environment used do install with apt-get:


debian:# apt-get install –yes gparted


debian~:# gparted


Notice that gparted has to be ran as a root superuser.


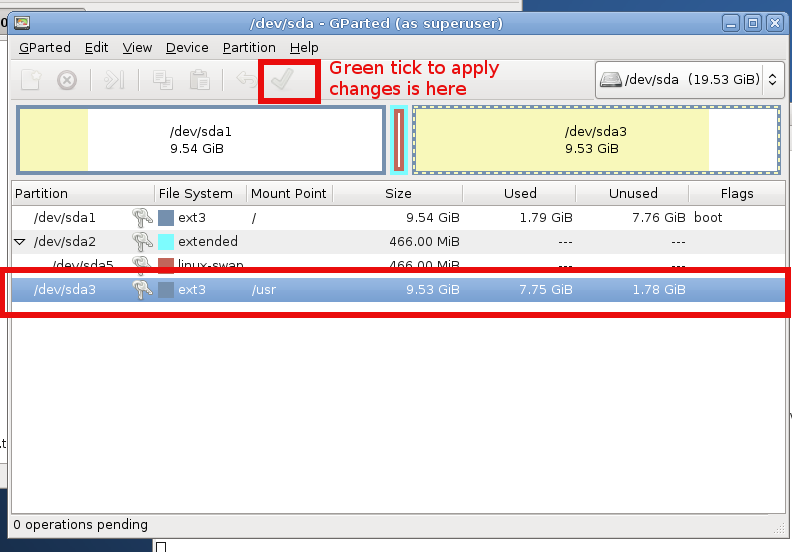
Run GParted and create new EXT3 filesystem that is 10GB (the size of the new created partition).

If you have installed Debian to place all partitions under / (root directory /dev/sda1) then the fresh new partition to create should be
/dev/sda3, anyways just look closely in EXT3 and in your case if the partiition is named differently create according to proper partition /dev/ naming.

I'll not run into details on how to create the partition with GParted as the program interface is very self-explanatory, the only thing is to apply the update to create partition and the ext3 filesystem, that's being done
with a green tick:

gparted-create-ext3-partition-howto-linux

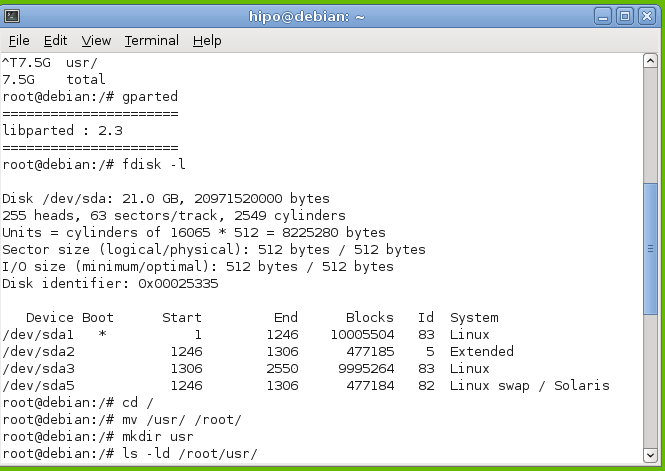
Next step is to check with fdisk whether, we have ext3 properly created  filesystem as we've done already with GPARTED:

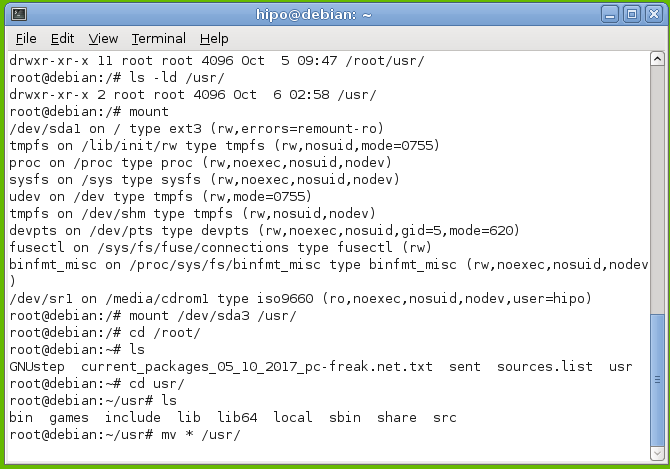
Once we have the partition created with EXT3 filesystem, we're ready to move /usr temporary to other folder, I use usually /root for the move but you can create anywhere a new folder for that and move to there.

To move to /root directory run again in terminal:


debian:~# mv /usr /root
debian:~# mkdir /usr


howto-extend-root-filesystem-disk-space-linux-move-usr-folder-to-root-temporary-debian-gnu-linux


Note that during the move operations, your Desktop icons will become without (with broken) pictures and the default Debian background picture is to disappear, that's because the GUI environment will soon realize /usr/ libraries that're periodically reloaded in memory are missing and will be unable to reload them as it does in a cycle.

That should take a few minutes, so grab a coffee or if you're a smoker (hope not as smoking kills 🙂 ), in 5 / 10 minutes time depending on your computer / server configuration, it will be over, so we're ready to create new /usr dir and mount the  new partition:


debian:~# mount /dev/sda3 /usr


howto-extend-root-filesystem-disk-space-linux-move-usr-folder-to-root-temporary-debian-gnu-linux1


Now we check with mount command whether mount is fine:


check-if-filesystem-is-properly-mounted-linux-debian-screenshot


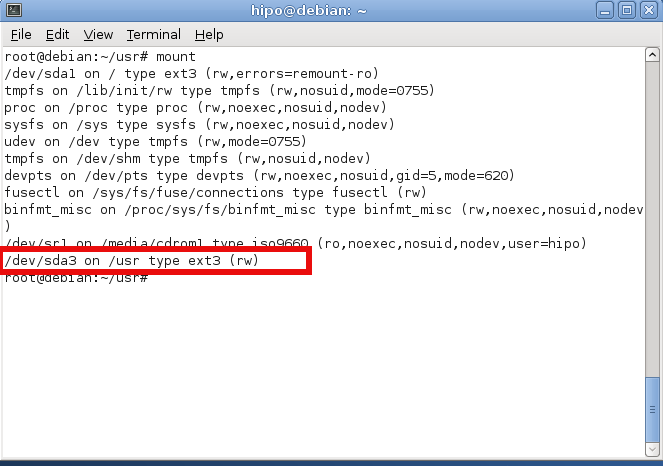
Now  /dev/sda3 is mounted under /usr  and we have to move back /root/usr directory content back to the newly mounted /usr so we run command:
 

debian:~#  mv /root/usr/* /usr/*


Finally we need to create proper records for the new partition inside /etc/fstab (fstab –FileSystem Tab file – the file which describes instructs the Linux OS what partition to boot where, what)

HOW TO CHECK LINUX UUID FOR A PARTITION??

Before adding anything to /etc/fstab you need to check the UUID of /dev/sda3 (or whatever the partition is called), without proper UUID, the system might fail to boot.
So here is how to check the UUID we'll need for config:


hipo@debian:~$ /sbin/blkid /dev/sda3
/dev/sda3: UUID="2273db4b-3069-4f78-90fc-e7483c0305bd" SEC_TYPE="ext2" TYPE="ext3"

hipo@debian:~$ ls -al /dev/disk/by-uuid/
total 0
drwxr-xr-x 2 root root 100 Oct  6 05:16 .
drwxr-xr-x 6 root root 120 Oct  6 05:16 ..
lrwxrwxrwx 1 root root  10 Oct  6 05:16 2273db4b-3069-4f78-90fc-e7483c0305bd -> ../../sda3
lrwxrwxrwx 1 root root  10 Oct  6 05:16 b98d92cd-41aa-4e18-a474-9b8df445dbe5 -> ../../sda1
lrwxrwxrwx 1 root root  10 Oct  6 05:16 f27f7448-f200-4983-b54f-b9e5206f77ac -> ../../sda5

As you can see our /dev/sda3 UUID is 2273db4b-3069-4f78-90fc-e7483c0305bd

Further on lets view and edit /etc/fstab you can also download a copy of my Virtual Machine fstab here


debian:~# cat /etc/fstab

# /etc/fstab: static file system information.
#
# Use 'blkid' to print the universally unique identifier for a
# device; this may be used with UUID= as a more robust way to name devices
# that works even if disks are added and removed. See fstab(5).
#
# <file system> <mount point>   <type>  <options>       <dump>  <pass>
proc            /proc           proc    defaults        0       0
# / was on /dev/sda1 during installation
UUID=b98d92cd-41aa-4e18-a474-9b8df445dbe5 /               ext3    errors=remount-ro 0       1
# swap was on /dev/sda5 during installation
UUID=f27f7448-f200-4983-b54f-b9e5206f77ac none            swap    sw              0       0
/dev/scd0       /media/cdrom0   udf,iso9660 user,noauto     0       0
/dev/scd1       /media/cdrom1   udf,iso9660 user,noauto     0       0


We need to add following line to  /etc/fstab:
 

UUID=2273db4b-3069-4f78-90fc-e7483c0305bd    /usr        ext3 error=remount-ro    0    1


Open the file with your favourite text editor (gedit / nano / pico / vim / joe) etc.

debian:~# vim /etc/fstab


# /etc/fstab: static file system information.
#
# Use 'blkid' to print the universally unique identifier for a
# device; this may be used with UUID= as a more robust way to name devices
# that works even if disks are added and removed. See fstab(5).
#
# <file system> <mount point>   <type>  <options>       <dump>  <pass>
proc            /proc           proc    defaults        0       0
# / was on /dev/sda1 during installation
UUID=b98d92cd-41aa-4e18-a474-9b8df445dbe5 /               ext3    errors=remount-ro 0       1
# swap was on /dev/sda5 during installation
UUID=f27f7448-f200-4983-b54f-b9e5206f77ac none            swap    sw              0       0
/dev/scd0       /media/cdrom0   udf,iso9660 user,noauto     0       0
/dev/scd1       /media/cdrom1   udf,iso9660 user,noauto     0       0

UUID=2273db4b-3069-4f78-90fc-e7483c0305bd     /usr        ext3 error=remount-ro    0    1    

Basicly it should be possible to add (for historic reasons) also instead of UUID=2273db4b-3069-4f78-90fc-e7483c0305bd  /dev/sda3
So it looks like so but, the better practice is to use UUID line given.

Well that's all folks now /usr directory will contain all your heavy root partition (disk filling) libraries and files, so you can happily use /var/lib/mysql or /var/lib/postgresql /var/www to store your web application files and import your databases.

Big thanks to Ubuntu Forums article – How do I increase the hard disk size of the Virtual Machine article for inspiring this post.

Hope that helps anyone and thanks and other comments are always welcome ! 🙂

Tools to scan a Linux / Unix Web server for Malware and Rootkits / Lynis and ISPProtect – clean Joomla / WordPress and other CMS for malware and malicious scripts and trojan codes

Monday, March 14th, 2016

Linux-BSD-Unix-Rootkit-Malware-XSS-Injection-spammer-scripts-clean-howto-manual

If you have been hacked or have been suspicious that someone has broken up in some of the shared web hosting servers you happent o manage you already probably have tried the server with rkhuter, chroot and unhide tools which gives a general guidance where a server has been compromised

However with the evolution of hacking tools out there and the boom of Web security XSS / CSS / Database injections and PHP scripts vulnerability catching an intruder especially spammers has been becoming more and more hard to achieve.

Just lately a mail server of mine's load avarage increased about 10 times, and the CPU's and HDD I/O load jump over the sky.
I started evaluating the situation to find out what exactly went wrong with the machine, starting with a hardware analysis tools and a physical check up whether all was fine with the hardware Disks / Ram etc. just to find out the machine's hardware was working perfect.
I've also thoroughfully investigated on Logs of Apache, MySQL, TinyProxy and Tor server and bind DNS and DJBDns  which were happily living there for quite some time but didn't found anything strange.

Not on a last place I investigated TOP processes (with top command) and iostat  and realized the CPU high burst lays in exessive Input / Output of Hard Drive. Checking the Qmail Mail server logs and the queue with qmail-qstat was a real surprise for me as on the queue there were about 9800 emails hanging unsent, most of which were obviously a spam, so I realized someone was heavily spamming through the server and started more thoroughfully investigating ending up to a WordPress Blog temp folder (writtable by all system users) which was existing under a Joomla directory infrastructure, so I guess someone got hacked through the Joomla and uploaded the malicious php spammer script to the WordPress blog. I've instantly stopped and first chmod 000 to stop being execuded and after examing deleted view73.php, javascript92.php and index8239.php which were full of PHP values with binary encoded values and one was full of encoded strings which after being decoding were actually the recepient's spammed emails.
BTW, the view*.php javascript*.php and index*.php files were owned by www-data (the user with which Apache was owned), so obviously someone got hacked through some vulnerable joomla or wordpress script (as joomla there was quite obscure version 1.5 – where currently Joomla is at version branch 3.5), hence my guess is the spamming script was uploaded through Joomla XSS vulnerability).

As I was unsure wheteher the scripts were not also mirrored under other subdirectories of Joomla or WP Blog I had to scan further to check whether there are no other scripts infected with malware or trojan spammer codes, webshells, rootkits etc.
And after some investigation, I've actually caught the 3 scripts being mirrored under other webside folders with other numbering on filename view34.php javascript72.php, index8123.php  etc..

I've used 2 tools to scan and catch malware the trojan scripts and make sure no common rootkit is installed on the server.

1. Lynis (to check for rootkits)
2. ISPProtect (Proprietary but superb Website malware scanner with a free trial)

1. Lynis – Universal security auditing tool and rootkit scanner

Lynis is actually the well known rkhunter, I've used earlier to check servers BSD and Linux servers for rootkits.
To have up-to-date version of Lynis, I've installed it from source:
 

cd /tmp
wget https://cisofy.com/files/lynis-2.1.1.tar.gz
tar xvfz lynis-2.1.1.tar.gz
mv lynis /usr/local/
ln -s /usr/local/lynis/lynis /usr/local/bin/lynis


Then to scan the server for rootkits, first I had to update its malware definition database with:
 

lynis update info


Then to actually scan the system:
 

lynis audit system


Plenty of things will be scanned but you will be asked on a multiple times whether you would like to conduct different kind fo system services and log files, loadable kernel module rootkits and  common places to check for installed rootkits or server placed backdoors. That's pretty annoying as you will have to press Enter on a multiple times.

lynis-asking-to-scan-for-rootkits-backdoors-and-malware-your-linux-freebsd-netbsd-unix-server

Once scan is over you will get a System Scan Summary like in below screenshot:

lynis-scanned-server-for-rootkit-summer-results-linux-check-for-backdoors-tool

Lynis suggests also a very good things that might be tampered to make the system more secure, so using some of its output when I have time I'll work out on hardening all servers.

To prevent further incidents and keep an eye on servers I've deployed Lynis scan via cron job once a month on all servers, I've placed under a root cronjob on every first dae of month in following command:


server:~# crontab -u root -e
0 3 1 * * /usr/local/bin/lynis –quick 2>&1 | mail -s "lynis output of my server" admin-mail@my-domain.com)


2. ISPProtect – Website malware scanner

ISPProtect is a malware scanner for web servers, I've used it to scan all installed  CMS systems like WordPress, Joomla, Drupal etc.
ISPProtect is great for PHP / Pyhon / Perl and other CMS based frameworks.
ISPProtect contains 3 scanning engines: a signature based malware scanner, a heuristic malware scanner, and a scanner to show the installation directories of outdated CMS systems.
Unfortunately it is not free software, but I personally used the FREE TRIAL option  which can be used without registration to test it or clean an infected system.
I first webserver first locally for the infected site and then globally for all the other shared hosting websites.

As I wanted to check also rest of hosted websites, I've run ISPProtect over the all bunch of installed websites.
Pre-requirement of ISPProtect is to have a working PHP Cli and Clamav Anti-Virus installed on the server thus on RHEL (RPM) based servers make sure you have it installed if not:
 

server:~# yum -y install php

server:~# yum -y install clamav


Debian based Linux servers web hosting  admins that doesn't have php-cli installed should run:
 

server:~# apt-get install php5-cli

server:~# apt-get install clamav


Installing ISPProtect from source is with:

mkdir -p /usr/local/ispprotect
chown -R root:root /usr/local/ispprotect
chmod -R 750 /usr/local/ispprotect
cd /usr/local/ispprotect
wget http://www.ispprotect.com/download/ispp_scan.tar.gz
tar xzf ispp_scan.tar.gz
rm -f ispp_scan.tar.gz
ln -s /usr/local/ispprotect/ispp_scan /usr/local/bin/ispp_scan


To initiate scan with ISPProtect just invoke it:
 

server:~# /usr/local/bin/ispp_scan


ispprotect-scan-websites-for-malware-and-infected-with-backdoors-or-spamming-software-source-code-files

I've used it as a trial

Please enter scan key:  trial
Please enter path to scan: /var/www

You will be shown the scan progress, be patient because on a multiple shared hosting servers with few hundred of websites.
The tool will take really, really long so you might need to leave it for 1 hr or even more depending on how many source files / CSS / Javascript etc. needs to be scanned.

Once scan is completed scan and infections found logs will be stored under /usr/local/ispprotect, under separate files for different Website Engines and CMSes:

After the scan is completed, you will find the results also in the following files:
 

Malware => /usr/local/ispprotect/found_malware_20161401174626.txt
Wordpress => /usr/local/ispprotect/software_wordpress_20161401174626.txt
Joomla => /usr/local/ispprotect/software_joomla_20161401174626.txt
Drupal => /usr/local/ispprotect/software_drupal_20161401174626.txt
Mediawiki => /usr/local/ispprotect/software_mediawiki_20161401174626.txt
Contao => /usr/local/ispprotect/software_contao_20161401174626.txt
Magentocommerce => /usr/local/ispprotect/software_magentocommerce_20161401174626.txt
Woltlab Burning Board => /usr/local/ispprotect/software_woltlab_burning_board_20161401174626.txt
Cms Made Simple => /usr/local/ispprotect/software_cms_made_simple_20161401174626.txt
Phpmyadmin => /usr/local/ispprotect/software_phpmyadmin_20161401174626.txt
Typo3 => /usr/local/ispprotect/software_typo3_20161401174626.txt
Roundcube => /usr/local/ispprotect/software_roundcube_20161401174626.txt


ISPProtect is really good in results is definitely the best malicious scripts / trojan / trojan / webshell / backdoor / spammer (hacking) scripts tool available so if your company could afford it you better buy a license and settle a periodic cron job scan of all your servers, like lets say:


server:~# crontab -u root -e
0 3  1 * *   /usr/local/ispprotect/ispp_scan –update && /usr/local/ispprotect/ispp_scan –path=/var/www –email-results=admin-email@your-domain.com –non-interactive –scan-key=AAA-BBB-CCC-DDD


Unfortunately ispprotect is quite expensive so I guess most small and middle sized shared hosting companies will be unable to afford it.
But even for a one time run this tools worths the try and will save you an hours if not days of system investigations.
I'll be glad to hear from readers if aware of any available free software alternatives to ISPProtect. The only one I am aware is Linux Malware Detect (LMD).
I've used LMD in the past but as of time of writting this article it doesn't seems working any more so I guess the tool is currently unsupported / obsolete.


How to find and Delete Duplicate files in directory on Linux server with find and fdupes command

Monday, March 16th, 2015

search-duplcate-files-linux-command-and-graphical-tools-how-to-find-duplicate-files-on-linux-mac-and-windows-os

Linux / UNIX find command is very helpful to do a lot of tasks to us admins such as Deleting empty directories to free up occupied inodes or finding and printing only empty files within a root file system within all sub-directories
There is too much of uses of find, however one that is probably rarely used known by sysadmins find command use is how to search for duplicate files on a Linux server:
 

find -not -empty -type f -printf “%s\n” | sort -rn | uniq -d | xargs -I{} -n1 find -type f -size {}c -print0 | xargs -0 md5sum | sort | uniq -w32 –all-repeated=separate

If you're curious how does duplicate files finding works, they are found by comparing file sizes and MD5 signatures, followed by a byte-by-byte comparison.

Most common application of below command is when you want to search and get rid of some old obsolete files which you forgot to delete such as old /etc/ configurations, old SQL backups and PHP / Java / Python programming code files etc.

If you have to do a regular duplicate file find on multiple servers Linux servers perhaps you should install and use  fdupes command.
On Debian Linux to install it:

root@pcfreak:/# apt-cache show fdupes|grep -i descr -A 4
Description: identifies duplicate files within given directories
 FDupes uses md5sums and then a byte by byte comparison to find
 duplicate files within a set of directories. It has several useful
 options including recursion.
Homepage: http://code.google.com/p/fdupes/


root@www.pc-freak.net:/# apt-get install –yes fdupes

To search for duplicate files with fdupes in lets /etc/ just run fdupes without arguments:


root@pcfreak:/# fdupes /etc/
/etc/magic
/etc/magic.mime

/etc/odbc.ini
/etc/.pwd.lock
/etc/environment
/etc/odbcinst.ini

/etc/shadow-
/etc/shadow


If you want to look up for all duplicate files within root directory:
 

root@pcfreak:/# fdupes -r /etc/
Building file list /


You can also find duplicate files for multiple directories by just passing all directories as arguments to fdupes


root@pcfreak:/# fdupes -r /etc/ /usr/ /root /disk /nfs_mount /nas


The -r argument (makes a recursive subdirectory search for duplicates), if you want to also see what is the size of duplicate files found add -S option


fdupes -r -S /etc/ /usr/ /root /disk /nfs_mount /nas


If you want to delete all duplicate files within lets say /etc/


root@pcfreak:/# fdupes -d /etc/

fdupes is also available and installable also on RPM based Linux distros Fedora / RHEL / CentOS etc., install on CentOS with:
 

[root@centos~ ]# yum -y install fdupes


There is also a port available for those who want to run it on FreeBSD on BSD install it from ports:


freebsd# cd /usr/ports/sysutils/fdupes
freebsd# make install clean


If you have a GUI environment installed on the server and you don't want to bother with command line to search for all duplicate files under main filesystem and other lint (junk) files take a look at FSlint

FSlint-2.02-search-for-duplicate-and-lint-files-linux-gui-tool

If you're looking for a GUI cross platform duplicate file finder tool that runs on all major used Operating Systems Mac OS X / Windows / Linux take a look at dupeGuru


How to enable VirtualBox Windows XP FullScreen with VboxGuestAdditions.iso on Ubuntu 11.10 Linux

Tuesday, January 17th, 2012

Enable_VirtualBox_Windows_XP-fullscreen-with-vboxguest-additions-iso
Right after installing Windows XP inside VirtualBox, I've found out everything works fine except the screen. Even though pressing (Right CTRL + F) was changing the Windows XP running window to FullScreen the XP screen was taking only a part of the whole screen area, where almost half of the screen was visible as simply staying blank.

A bit of research and I found the issue is caused by missing VirtualBoxGuestAdditions .

VBoxAdditions is a package which should be installed inside the VirtualBox by navigating to Devices -> Install Guest Additions

Virtualbox offers a download of a VboxGuestAdditions_4.1.2_Ubuntu.iso from url;
http://dlc.sun.edgesuite.net/virtualbox/4.1.2_Ubuntu/VBoxGuestAdditions_4.1.2_Ubuntu.iso, anyways this download fails since the URL is currently unavailable.

To fix this two ways are possible:

1. Download VBoxGuestAdditions.iso from here and put it in directory /usr/share/virtualbox , e.g.:

root@ubuntu:~# cd /usr/share/virtualbox
root@ubuntu:/usr/share/virtualbox# wget https://www.pc-freak.net/files/VBoxGuestAdditions.iso
...

2. Download and install virtualbox-guest-additions-iso_4.1.2-1_all.deb

root@ubuntu:~# wget https://www.pc-freak.net/files/virtualbox-guest-additions-iso_4.1.2-1_all.deb
...
root@ubuntu:~# dpkg -i virtualbox-guest-additions-iso_4.1.2-1_all.deb
...

Next to enable and install guest additions once again use menus:

Devices -> Install Guest Additions

VirtualBox Install Guest Additions Ubuntu Screenshot

The screen to appear next will be similar to:

VBox guest Additions windows Ubuntu

Further on follow the few dialogs to complete the installations and integration of Guest Additions and restart the Virtual machine and hooray the Windows will appear in Full screen in VirtualBox ! 😉

How to install nginx webserver from source on Debian Linux / Install Latest Nginx on Debian

Wednesday, March 23rd, 2011

Nginx install server logo
If you're running a large website consisting of a mixture of php scripts, images and html. You probably have noticed that using just one Apache server to serve all the content is not that efficient

Each Apache child (I assume you're using Apache mpm prefork consumes approximately (20MB), this means that each client connection would consume 20 mb of your server memory.
This as you can imagine is truly a suicide in terms of memory. Each request for a picture, css or simple html file would ask Apache to fork another process and will consume (20mb of extra memory form your server mem capacity)!.

Taking in consideration all this notes and the need for some efficiency here, the administrator should normally think about dividing the processing of the so called static content from the dynamic content served on the server.

Apache is really a nice webserver software but with all the loaded modules to serve dynamic content, for instance php, cgi, python etc., it's becoming not the best solution for handling a (css, javascript, html, flv, avi, mov etc. files).

Even a plain Apache server installation without (libphp, mod_rewrite mod deflate etc.) is still not dealing efficiently enough with the aforementioned static files content

Here comes the question if Apache is not that quick and efficient in serving static files, what then? The answer is caching webserver! By caching the regular static content files, your website visitors will benefit by experiencing shorter webserver responce files in downloading static contents and therefore will generally hasten your website and improve the end user's experience.

There are plenty of caching servers out there, some are a proprietary software and some are free software.

However the three most popular servers out there for static file content serving are:

  • Squid,
  • Varnish
  • Nginx

In this article as you should have already found out by the article title I'll discuss Nginx

You might ask why exactly Nginx and not some of the other twos, well simply cause Squid is too complicated to configure and on the other hand does provide lower performance than Nginx. On the other hand Varnish is also a good solution for static file webserver, but I believe it is not tested enough. However I should mention that my experience with testing varnish on my own home router is quite good by so far.

If you're further interested into varhisn cache I would suggest you checkout www.varhisn-cache.org .

Now as I have said a few words about squid and varhisn let's proceed to the essence of the article and say few words about nginx

Here is a quote describing nginx in a short and good manner directly extracted from nginx.com

nginx [engine x] is a HTTP and reverse proxy server, as well as a mail proxy server written by Igor Sysoev. It has been running for more than five years on many heavily loaded Russian sites including Rambler (RamblerMedia.com). According to Netcraft nginx served or proxied 4.70% busiest sites in April 2010. Here are some of success stories: FastMail.FM, WordPress.com.

By default nginx is available ready to be installed in Debian via apt-get, however sadly enough the version available for install is pretty much outdated as of time of writting the nginx debian version in lenny's deb package repositories is 0.6.32-3+lenny3

This version was release about 2 years ago and is currently completely outdated, therefore I found it is not a good idea to use this old and probably slower release of nginx and I jumped further to install my nginx from source:
Nginx source installation actually is very simple on Linux platforms.

1. As a first step in order to be able to succeed with the install from source make sure your system you have installed the packages:

debian:~# apt-get install libpcre3 libpcre3-dev libpcrecpp0 libssl-dev zlib1g-dev build-essential

2. Secondly download latest nginx source code tarball

Check out on http://nginx.com/download the latest stable release of nginx and further issue the commands below:

debian:~# cd /usr/local/src
debian:/usr/local/src# wget http://nginx.org/download/nginx-0.9.6.tar.gz

3.Unarchive nginx source code

debian:/usr/local/src#tar -zxvvf nginx-0.9.6.tar.gz
...

The nginx server requirements for me wasn't any special so I proceeded and used the nginx ./configure script which is found in nginx-0.9.6

4. Compline nginx server

debian:/usr/local/src# cd nginx-0.9.6
debian:/usr/local/src/nginx-0.9.6# ./configure && make && make install
+ Linux 2.6.26-2-amd64 x86_64
checking for C compiler ... found
+ using GNU C compiler
+ gcc version: 4.3.2 (Debian 4.3.2-1.1)
checking for gcc -pipe switch ... found
...
...

The last lines printed by the nginx configure script are actually the major interesting ones for administration purposes the default complation options in my case were:

Configuration summary
+ using system PCRE library
+ OpenSSL library is not used
+ md5: using system crypto library
+ sha1 library is not used
+ using system zlib library

nginx path prefix: "/usr/local/nginx"
nginx binary file: "/usr/local/nginx/sbin/nginx"
nginx configuration prefix: "/usr/local/nginx/conf"
nginx configuration file: "/usr/local/nginx/conf/nginx.conf"
nginx pid file: "/usr/local/nginx/logs/nginx.pid"
nginx error log file: "/usr/local/nginx/logs/error.log"
nginx http access log file: "/usr/local/nginx/logs/access.log"
nginx http client request body temporary files: "client_body_temp"
nginx http proxy temporary files: "proxy_temp"
nginx http fastcgi temporary files: "fastcgi_temp"
nginx http uwsgi temporary files: "uwsgi_temp"
nginx http scgi temporary files: "scgi_temp"

If you want to setup nginx server to support ssl (https) and for instance install nginx to a different server path you can use some ./configure configuration options, for instance:

./configure –sbin-path=/usr/local/sbin –with-http_ssl_module

Now before you can start the nginx server, you should also set up the nginx init script;

5. Download and set a ready to use script with cmd:

debian:~# cd /etc/init.d
debian:/etc/init.d# wget https://www.pc-freak.net/files/nginx-init-script
debian:/etc/init.d# mv nginx-init-script nginx
debian:/etc/init.d# chmod +x nginx

6. Configure Nginx

Nginx is a really easy and simple server, just like the Russians, Simple but good!
By the way it's interesting to mention nginx has been coded by a Russian, so it's robust and hard as a rock as all the other Russian creations 🙂
Nginx configuration files in a default install as the one in my case are to be found in /usr/local/nginx/conf

In the nginx/conf directory you're about to find the following list of files which concern nginx server configurations:

deiban:/usr/local/nginx:~# ls -1
fastcgi.conf
fastcgi.conf.default
fastcgi_params
fastcgi_params.default
koi-utf
koi-win
mime.types
mime.types.default
nginx.conf
nginx.conf.default
scgi_params
scgi_params.default
uwsgi_params
uwsgi_params.default
win-utf

The .default files are just a copy of the ones without the .default extension and contain the default respective file directives.

In my case I'm not using fastcgi to serve perl or php scripts via nginx so I don't need to configure the fastcgi.conf and fastcgi_params files, the scgi_params and uwsgi_params conf files are actually files which contain nginx configuration directives concerning the use of nginx to process SSI (Server Side Include) scripts and therefore I skip configuring the SSI conf files.
koi-utf and koi-win are two files which usually you don't need to configure and aims the nginx server to support the UTF-8 character encoding and the mime.types conf is a file which has a number of mime types the nginx server will know how to handle.

Therefore after all being said the only file which needs to configured is nginx.conf

7. Edit /usr/local/nginx/conf/nginx.conf

debian:/usr/local/nginx:# vim /usr/local/nginx/conf/nginx.conf

Therein you will find the following default configuration:

#gzip on;

server {
listen 80;
server_name localhost;

#charset koi8-r;

#access_log logs/host.access.log main;

location / {
root html;
index index.html index.htm;
}
#error_page 404 /404.html;

# redirect server error pages to the static page /50x.html
#
error_page 500 502 503 504 /50x.html;
location = /50x.html {
root html;
}

In the default configuration above you need to modify only the above block of code as follows:

server {
listen 80;
server_name yoursitedomain.com;

#charset koi8-r;

#access_log logs/access.log main;

location / {
root /var/www/yoursitedomain.com/html;
index index.html index.htm;
}

Change the yoursitedomain.com and /var/www/yoursitedomain.com/html with your directory and website destinations.

8. Start nginx server with nginx init script

debian:/usr/local/nginx:# /etc/init.d/nginx start
Starting nginx:

This should bring up the nginx server, if something is miss configured you will notice also some error messages, as you can see in my case in above init script output, thanksfully there are no error messages.
Note that you can also start nginx directly via invoking /usr/local/nginx/sbin/nginx binary

To check if the nginx server has properly started from the command line type:

debian:/usr/local/nginx:~# ps ax|grep -i nginx|grep -v grep
9424 ? Ss 0:00 nginx: master process /usr/local/nginx/sbin/nginx
9425 ? S 0:00 nginx: worker process

Another way to check if the web browser is ready to serve your website file conten,t you can directly access your website by pointing your browser to with http://yoursitedomain.com/, you should get your either your custom index.html file or the default nginx greeting Welcome to nginx

9. Add nginx server to start up during system boot up

debian:/usr/local/nginx:# /usr/sbin/update-rc.d -f nginx defaults

That's all now you have up and running nginx and your static file serving will require you much less system resources, than with Apache.
Hope this article was helpful to somebody, feedback on it is very welcome!

Configuring varnishd to log client IP addresses in Apache log

Wednesday, February 3rd, 2010

I realized today, that because my varnish serves incoming connections to my
apache port a really annoying problem appears.
I mean in my httpd-access.log everytime I get some visit from the Net, the
incoming IP address logged in the Apache log is originating from 127.0.0.0
e.g. (localhost). That’s a real pain in the ass, cause it prevents me from
adequately tracking visitors countries and their networks.
Therefore to fix that and configure varnish to always log my original visitors
IPs to the apache log I had to follow instructions described in.
How can I log the client IP address on the backend? in the Varnish Cache FAQ

Here I will include step by step explanation how I practically implemented
the solution as explained in the FAQ on my FreeBSD.

First I had edit:
/usr/local/etc/varnish/default.vcl
The following is currently my default.vlc file content:
backend default {.host = "127.0.0.1";.port = "8080";}sub vcl_recv {# Add a unique header containing the client addressremove req.http.X-Forwarded-For;set req.http.X-Forwarded-For = client.ip;# [...]}
Next I had to add:
varnishd_config="/usr/local/etc/varnish/default.vcl"
to my /etc/rc.conf
And then modify my:
/usr/local/etc/apache2/httpd.conf
and include:
LogFormat "%{X-Forwarded-For}i %l %u %t "%r" %>s %b "%{Referer}i" "%{User-Agent}i"" varnishcombined
as well as:
CustomLog /var/log/httpd-access.log varnishcombined
to all my VirtualHosts.

Finally it’s required to restart both varnishd and apache
pcfreak# /usr/local/etc/rc.d/varnishd restartpcfreak# /usr/local/etc/rc.d/apache2 restart

That’s all folks!

Rebuilding source rpm (redhat package manager) files to binary rpms / Update clamav toaster installation on CentOS 5

Tuesday, May 18th, 2010

Every now and then I have to build a binary rpm from a source rpm (src.rpm) file.

Last time I had to rebuild clamav-toaster-0.96.0-1.3.35.src.rpm because a the clamav toaster installationon one of the CentOS servers I maintin has reached an end of the supported maintance period for the previous clamav 0.94.

Of course I first had to download clamav-toaster-0.96.0-1.3.35.src.rpm .

[root@centos-server:~ ]# wget http://mirrors.qmailtoaster.net/clamav-toaster-0.96.0-1.3.35.src.rpm

Consequently I used the following command to rebuild the source rpm file into rpm binary

[root@centos-server:~ ]# rpmbuild --rebuild clamav-toaster-0.96.0-1.3.35.src.rpm

The aforementioned command will take a while it took like 5 minutes on my server.

As soon as the rpm build is completed your binary rpm installation file for clamav-toaster will be located in:

/usr/src/redhat/RPMS/x86_64/clamav-toaster-0.96.0-1.3.35.x86_64.rpm

To install or update the recently built clamav-toaster rpm binary issue:

[root@centos-server:~ ]# rpm -Uvh /usr/src/redhat/RPMS/x86_64/clamav-toaster-0.96.0-1.3.35.x86_64.rpm

That’s all now your outdated clamav-toaster installation should be once more up to date.
If you want to further list the content of the newly installed/updated rpm binary you will have to issue the command in your terminal:

[root@centos-server:~ ]# rpm -ql clamav-toaster

ipw3945 on kernel 2.6.30

Friday, September 4th, 2009

I’ve loosed big time trying to compile ipw3945 on my debian amd64 system running kernel 2.6.30, unfortunately at the endI couldn’t make ipw3945 run correctly. However I’ll try to explain just in case if somebody out there succeeds in running the ipw3945 driver on kernel 2.6.30. First I needed to compile the ieee80211-1.2.18 subsystem correctly. That gave me a hard time cause the damned thing won’t compile on my kernel version. I’ve googled about the solution and had to combine a couple of solutions before I succeed compiling.Here is what was required
1. First in ieee80211.module.c change proc_net for init_net.proc_net.
2. Next change in ieee80211_crypt_wep.c and ieee80211_crypt_tkip.c .page for .page_link
3. Next download ieee80211_wx.c-2.6.27.patch.txt
4. Patch ieee80211-1.2.18 e.g. in my case: # cd /usr/src/ieee80211-1.2.18; patch -p0 < ieee80211_wx.c-2.6.27.patch.txt
5. Overwrite the file ieee80211_crypt_tkip.c in /usr/src/ieee80211-1.2.18 with the following ieee80211_crypt_tkip.c file.
6. Now with God’s help you might try: # make && make install

Now let’s proceed to the compilation of the ipw3945 driver itself.

I’ve used the the ipw3945-1.2.2 driver from the Intel Pro/Wireless 3945ABG Driver Website .In kernels newer than 2.6.22 on 64 bit architectures in order to make the driver compile, you have to apply the fix-for-64-bits-2.6.22-onwards.patch patch.
Now enter the ipw3945-1.2.2 source directory and execute patch -p0 < fix-for-64-bits-2.6.22-onwards.patch ,hopefully it should patch correctly.I had to also use the ipw3945-1.2.2.patch patch.
Again patch it with: # patch -p0 < ipw3945-1.2.2.patch.

Next in order to compile it I had to execute: # make IEEE80211_INC=/usr/src/ieee80211-1.2.18 IEEE80211_IGNORE_DUPLICATE=y && make install.Next I have downloaded the ipw3945d-1.7.22 . Untarred the archive file
# tar -zxvf ipw3945d-1.7.22.tgz and last but not least:
# cp -rpf x86_64/ipw3945d /etc/init.d/The ipw3945 loaded correctly with modprobe ipw3945, however the wireless device wasn’t detected … Even though the failure to make the ipw3945 driver running what I did gave me hope that eventually if I invest some more time and efforts attempting to make it work I could eventually succeed and enjoy the benefits of a better wireless networks signal strengths. Until that happens I’ll hold up to the newer iwl3945 to use my wireless.END—–

Make QMAIL with vpopmail vchkpw, courier-authlib and courier-imap auth work without MySQL on Debian Linux qmailrocks Thibs install

Friday, September 28th, 2012

How to make qmail vpopmail vchkpw courier-authlib and courier-imap work storing mails on hard disk with qmailrocks Thibs install

Recently installed a new QMAIL, following mostly Thibs Qmailrocks install guide. I didn’t followed literally Thibs good guide, cause in his guide in few of the sections like Install Vpopmail he recommends using MySQL as a Backend to store Vpopmail email data and passwords; I prefer storing all vpopmail data on the file system as I believe it is much better especially for tiny QMAIL mail servers with less than 500 mail box accounts.

In this little article I will explain, how I made Vpopmail courier-authlib and courier-imap play nice together without storing data in SQL backend.

1. Compile vpopmail with file system data storage support

So here is how I managed to make vpopmail + courier-authlib + courier-imap, work well together:

First its necessery to compile Vpopmailin store all its users data and mail data on file system. For this in Thibs Vpopmail Intsall step compiled Vpopmail without support for MySQL, e.g. instead of using his pointed compile time ./configure, arguments I used:


# cd /downloads/vpopmail-5.4.33
# ./configure \
--enable-qmaildir=/var/qmail/ \
--enable-qmail-newu=/var/qmail/bin/qmail-newu \
--enable-qmail-inject=/var/qmail/bin/qmail-inject \
--enable-qmail-newmrh=/var/qmail/bin/qmail-newmrh \
--enable-tcprules-prog=/usr/bin/tcprules \
--enable-tcpserver-file=/etc/tcp.smtp \
--enable-clear-passwd \
--enable-many-domains \
--enable-qmail-ext \
--enable-logging=y \
--enable-auth-logging \
--enable-libdir=/usr/lib/ \
--disable-roaming-users \
--disable-passwd \
--enable-domainquotas \
--enable-roaming-users
....
....
# make && make install-strip
# cat > ~vpopmail/etc/vusagec.conf < < __EOF__
Server:
Disable = True;
__EOF__
echo 'export PATH=$PATH:/var/qmail/bin/:/home/vpopmail/bin/' > /etc/profile.d/extrapath.sh
chmod +x /etc/profile.d/extrapath.sh
source /etc/profile

A tiny shell script with all above options to compile (qmail) vpopmail without MySQL / PostgreSQL support is here

For other steps concerning creation of vpopmail/vchkpw – user/group just follow as Thibs suggests.

2. Compile and install courier-authlib-0.59.1

I’ve made mirror of courier-authlib.0.59.1.tar.gz cause this version includes support for vchkpw without mysql, its a pity newer versions of courier-authlib not any more have support for vpopmail to store its data directly on the hard disk.

Then on downlaod, compile && install courier-authlib:

Download authlib courier-authlib.0.59.1.tar.gz – (I made mirror of courier-authlib.0.59.1.tar.gz you can use my mirror or download it somewhere else from the net):


# cd /usr/local/src
# wget -q https://www.pc-freak.net/files/courier-authlib.0.59.1.tar.gz
# tar -zxvvf courier-authlib.0.59.1.tar.gz

Compile courier-authlib

# ./configure --prefix=/usr/local --exec-prefix=/usr/local --with-authvchkpw --without-authldap --without-authmysql --disable-root-check --with-ssl --with-authchangepwdir=/usr/local/libexec/authlib
....
# make && make install && make install-strip && make install-configure
....

On Debian Squeeze, this version of courier-authlib compiles fine, on Debian Lenny I use it too and there it is okay.

Unless above commands returns a compile error authlib will be installed inside /usr/local/libexec. If you get any errors it is most likely due to some missing header files. The error should be self explanatory enough, but just in case you have troubles to find what deb is necessery to install, please check here the complete list of installed packages I have on the host . In case of problems the quickest way (if on Debian Squeeze) is to install same packages, type:


# wget -q https://www.pc-freak.net/files/list_of_all_deb_necessery_installed_packages_for_authlib.txt
# for i in $(cat list_of_all_deb_necessery_installed_packages_for_authlib.txt |awk '{ print $2 }'); do
apt-get install --yes $i;
done

This is for the lazy ones though it might install you some packs you don’t like to have on your host, so just install it in case you know what you’re doing 🙂

Next step is to set proper configuration for courier-authdaemon.

3. Configure courier-authlib in /usr/local/etc/authlib

Again for the lazy ones I have prepared a good config which is working 100% with vpopmail configured to store mails on the file system, to install the “good” configs, fetch mine and put them in proper location, e.g.:


# cd /usr/local/etc
# wget -q https://www.pc-freak.net/files/authlib-config-for-qmail-with-hdd-directory-stored-userdata.tar.gz
# tar -zxvvf authlib-config-for-qmail-with-hdd-directory-stored-userdata.tar.gz
....

For those who prefer not to use my configuration as pointed above, here is what you will need to change manually in configs:

Edit /usr/local/etc/authlib/authdaemonrc and make sure there variable authmodulelist and authmodulelist and daemons=5
equals to:


authmodulelist="authvchkpw"


authmodulelistorig="authuserdb authpgsql authldap authmysql authcustom authvchkpw authpipe"


daemons=10

Bear in mind here the setting daemons, will set how many maximum parallel connections should be possible to authdaemond on new IMAP fetch mail user requests. Setting it to 10 will allow your mail server to support up to 10 users to paralelly check your mail for a tiny mail server this setting is okay if you expect higher number of parallel mail users raise the setting to some setting fitting your needs.

P.S. On some qmail installations this value has created weird problems and took me hours to debug the whole mess is caused by this setting, make sure you plan it now unless you don’t to loose some time in future.

4. Stop debian courier-authdaemon and start custom compiled one

Now all is ready and authdaemond can be started, but before that if you have installed courier-authlib as a debian package you need to stop it via init script and only when completely sure old default Debian courier-authdaemon is stopped launch the new installed one:


# /etc/init.d/courier-authdaemon stop
# s ax |grep -i authdaemond |grep -v grep
#
# /usr/local/sbin/authdaemond start
#

To make the newly custom source installed courier-authdaemon to load itself on system boot instead of the debian installed package


# dpkg -l |grep -i courier-authdaemon
ii courier-authdaemon 0.63.0-3 Courier authentication daemon

open /etc/init.d/courier-authdaemond, after line:


. /lib/lsb/init-functions

add


/usr/local/sbin/authdaemond start
exit 0

This will make the script exit once launches cmd /usr/local/sbin/authdaemond start

5. Compile and Install courier-imap

You will also have to install from courier-imap archive source, I have tested it and know Qmail + Vpopmail + Courier-Imap works for sure with version courier-imap-4.1.2.tar.bz2

As of time of writing this post courier-imap-4.11.0.tar.bz2 is the latest available for download from Courier-imap download site unfortunately this version requires higher version of >= courier-authlib-0.63

In order install courier-imap-4.1.2.tar.bz2


# cd /usr/local/src
# wget -q https://www.pc-freak.net/files/courier-imap-4.1.2.tar.bz2
# tar -jxvvf courier-imap-4.1.2.tar.bz2
...
# chown -R hipo:hipo courier-imap-4.1.2
# su hipo
$ cd courier-imap-4.1.2/
$ export CFLAGS="-DHAVE_OPEN_SMTP_RELAY -DHAVE_VLOGAUTH"
$ export COURIERAUTHCONFIG=/usr/local/bin/courierauthconfig
$ export CPPFLAGS=-I/usr/local/courier-authlib/include
$ ./configure --prefix=/usr/local/courier-imap --disable-root-check
...
$ exit
# make
...
# make install
...
# make install configure

It is recommended courier-imap to be compiled with non root username. In above code I use my username hipo, other people have to use any non-root user.

6. Set proper configuration and new init script for courier-imap

In /usr/lib/courier-imap, download following working configs (for convenience I’ve made tar with my configs):


# cd /usr/lib/courier-imap
# rm -rf etc
# wget -q https://www.pc-freak.net/files/courier-imap-config-etc.tar.gz

Then you will have to overwrite default courier-imap init script in /etc/init.d/courier-imap with another one to start the custom compiled one instead of debian default installed courier-imap


# mv /etc/init.d/courier-imap /root
# cd /etc/init.d
# wget -q https://www.pc-freak.net/files/debian-courier-imap
# mv debian-courier-imap courier-imap
# chmod +x courier-imap

This init script is written use /var/lock/subsys/courier-imap, so you will have to also create /var/lock/subsys/


# mkdir -p /var/lock/subsys

7. Start custom installed courier-imap

The start/stop init script of newly installed courier-imap is /usr/lib/courier-imap/libexec/imapd.rc


/usr/lib/courier-imap/libexec/imapd.rc start

Since a new /etc/init.dcourier-imap is installed too, it can be also used to control courier-imap start/stop.

Well thats should be enough for Courier-authlib and Courier-Authlib to communicate fine between each other and be able to connect and fetch e-mail stored in file system by vpopmail.

8. Test if Qmail IMAP proto finally works


# telnet localhost 143
Trying 127.0.0.1...
Connected to localhost.
Escape character is '^]'.
* OK [CAPABILITY IMAP4rev1 UIDPLUS CHILDREN NAMESPACE THREAD=ORDEREDSUBJECT THREAD=REFERENCES SORT QUOTA IDLE AUTH=CRAM-MD5 ACL ACL2=UNION STARTTLS] Courier-IMAP ready. Copyright 1998-2011 Double Precision, Inc. See COPYING for distribution information.
a login username@mail-domain.com my-username-password
a OK LOGIN Ok.
a LIST "" "*"
* LIST (\HasNoChildren) "." "INBOX.Sent"
* LIST (\Marked \HasChildren) "." "INBOX"
* LIST (\HasNoChildren) "." "INBOX.Drafts"
* LIST (\HasNoChildren) "." "INBOX.Trash"
a OK LIST completed
a EXAMINE Inbox
* FLAGS (\Draft \Answered \Flagged \Deleted \Seen \Recent)
* OK [PERMANENTFLAGS ()] No permanent flags permitted
* 6683 EXISTS
* 471 RECENT
* OK [UIDVALIDITY 1272460837] Ok
* OK [MYRIGHTS "acdilrsw"] ACL
a OK [READ-ONLY] Ok
* 1 FETCH (BODY[] {2619}
Return-Path:
Delivered-To: hipo@my-domain-name.com
Received: (qmail 22304 invoked by uid 1048); 24 Apr 2012 14:49:49 -0000
Received: from unknown (HELO localhost) (127.0.0.1)
by mail.my-domain-name.com with SMTP; 24 Apr 2012 14:49:49 -0000
Delivered-To: hipo@my-domain-name.com
Received: from localhost [127.0.0.1]
......
......

That’s all it works. Enjoy 🙂

How to improve Linux kernel security with GrSecurity / Maximum Linux kernel security with GrSecurity

Tuesday, May 3rd, 2011

In short I’ll explain here what is Grsecurity http://www.grsecurity.net/ for all those who have not used it yet and what kind of capabilities concerning enhanced kernel security it has.

Grsecurity is a combination of patches for the Linux kernel accenting at the improving kernel security.

The typical application of GrSecurity is in the field of Linux systems which are administered through SSH/Shell, e.g. (remote hosts), though you can also configure grsecurity on a normal Linux desktop system if you want a super secured Linux desktop ;).

GrSecurity is used heavily to protect server system which require a multiple users to have access to the shell.

On systems where multiple user access is required it’s a well known fact that (malicious users, crackers or dumb script kiddies) get administrator (root) privileges with a some just poped in 0 day root kernel exploit.
If you’re an administrator of a system (let’s say a web hosting) server with multiple users having access to the shell it’s also common that exploits aiming at hanging in certain daemon service is executed by some of the users.
In other occasions you have users which are trying to DoS the server with some 0 day Denial of Service exploit.
In all this cases GrSecurity having a kernel with grsecurity is priceless.

Installing grsecurity patched kernel is an easy task for Debian and Ubuntu and is explained in one of my previous articles.
This article aims to explain in short some configuration options for a GrSecurity tightened kernel, when one have to compile a new kernel from source.

I would skip the details on how to compile the kernel and simply show you some picture screens with GrSecurity configuration options which are working well and needs to be set-up before a make command is issued to compile the new kernel.

After preparing the kernel source for compilation and issuing:

linux:/usr/src/kernel-source$ make menuconfig

You will have to select options like the ones you see in the pictures below:

[nggallery id=”8″]

After completing and saving your kernel config file, continue as usual with an ordinary kernel compilation, e.g.:

linux:/usr/src/kernel-source$ make
linux:/usr/src/kernel-source$ make modules
linux:/usr/src/kernel-source$ su root
linux:/usr/src/kernel-source# make modules_install
linux:/usr/src/kernel-source# make install
linux:/usr/src/kernel-source# mkinitrd -o initrd.img-2.6.xx 2.6.xx

Also make sure the grub is properly configured to load the newly compiled and installed kernel.

After a system reboot, if all is fine you should be able to boot up the grsecurity tightened newly compiled kernel, but be careful and make sure you have a backup solution before you reboot, don’t blame me if your new grsecurity patched kernel fails to boot! You’re on your own boy 😉
This article is written thanks to based originally on his article in Bulgarian. If you’re a Bulgarian you might also checkout static’s blog