Posts Tagged ‘var’

Install and configure rkhunter for improved security on a PCI DSS Linux / BSD servers with no access to Internet

Wednesday, November 10th, 2021

install-and-configure-rkhunter-with-tightened-security-variables-rkhunter-logo

rkhunter or Rootkit Hunter scans systems for known and unknown rootkits. The tool is not new and most system administrators that has to mantain some good security servers perhaps already use it in their daily sysadmin tasks.

It does this by comparing SHA-1 Hashes of important files with known good ones in online databases, searching for default directories (of rootkits), wrong permissions, hidden files, suspicious strings in kernel modules, commmon backdoors, sniffers and exploits as well as other special tests mostly for Linux and FreeBSD though a ports for other UNIX operating systems like Solaris etc. are perhaps available. rkhunter is notable due to its inclusion in popular mainstream FOSS operating systems (CentOS, Fedora,Debian, Ubuntu etc.).

Even though rkhunter is not rapidly improved over the last 3 years (its last Official version release was on 20th of Febuary 2018), it is a good tool that helps to strengthen even further security and it is often a requirement for Unix servers systems that should follow the PCI DSS Standards (Payment Card Industry Data Security Standards).

Configuring rkhunter is a pretty straight forward if you don't have too much requirements but I decided to write this article for the reason there are fwe interesting options that you might want to adopt in configuration to whitelist any files that are reported as Warnings, as well as how to set a configuration that sets a stricter security checks than the installation defaults. 

1. Install rkhunter .deb / .rpm package depending on the Linux distro or BSD

  • If you have to place it on a Redhat based distro CentOS / Redhat / Fedora

[root@Centos ~]# yum install -y rkhunter


  • On Debian distros the package name is equevallent to install there exec usual:

root@debian:~# apt install –yes rkhunter

  • On FreeBSD / NetBSD or other BSD forks you can install it from the BSD "World" ports system or install it from a precompiled binary.

freebsd# pkg install rkhunter

One important note to make here is to have a fully functional Alarming from rkhunter, you will have to have a fully functional configured postfix / exim / qmail whatever mail server to relay via official SMTP so you the Warning Alarm emails be able to reach your preferred Alarm email address. If you haven't installed postfix for example and configure it you might do.

– On Deb based distros 

[root@Centos ~]#yum install postfix


– On RPM based distros

root@debian:~# apt-get install –yes postfix


and as minimum, further on configure some functional Email Relay server within /etc/postfix/main.cf
 

# vi /etc/postfix/main.cf
relayhost = [relay.smtp-server.com]

2. Prepare rkhunter.conf initial configuration


Depending on what kind of files are present on the filesystem it could be for some reasons some standard package binaries has to be excluded for verification, because they possess unusual permissions because of manual sys admin monification this is done with the rkhunter variable PKGMGR_NO_VRFY.

If remote logging is configured on the system via something like rsyslog you will want to specificly tell it to rkhunter so this check as a possible security issue is skipped via ALLOW_SYSLOG_REMOTE_LOGGING=1. 

In case if remote root login via SSH protocol is disabled via /etc/ssh/sshd_config
PermitRootLogin no variable, the variable to include is ALLOW_SSH_ROOT_USER=no

It is useful to also increase the hashing check algorithm for security default one SHA256 you might want to change to SHA512, this is done via rkhunter.conf var HASH_CMD=SHA512

Triggering new email Warnings has to be configured so you receive, new mails at a preconfigured mailbox of your choice via variable
MAIL-ON-WARNING=SetMailAddress


# vi /etc/rkhunter.conf

PKGMGR_NO_VRFY=/usr/bin/su

PKGMGR_NO_VRFY=/usr/bin/passwd

ALLOW_SYSLOG_REMOTE_LOGGING=1

# Needed for corosync/pacemaker since update 19.11.2020

ALLOWDEVFILE=/dev/shm/qb-*/qb-*

# enabled ssh root access skip

ALLOW_SSH_ROOT_USER=no

HASH_CMD=SHA512

# Email address to sent alert in case of Warnings

MAIL-ON-WARNING=Your-Customer@Your-Email-Server-Destination-Address.com

MAIL-ON-WARNING=Your-Second-Peronsl-Email-Address@SMTP-Server.com

DISABLE_TESTS=os_specific


Optionally if you're using something specific such as corosync / pacemaker High Availability cluster or some specific software that is creating /dev/ files identified as potential Risks you might want to add more rkhunter.conf options like:
 

# Allow PCS/Pacemaker/Corosync
ALLOWDEVFILE=/dev/shm/qb-attrd-*
ALLOWDEVFILE=/dev/shm/qb-cfg-*
ALLOWDEVFILE=/dev/shm/qb-cib_rw-*
ALLOWDEVFILE=/dev/shm/qb-cib_shm-*
ALLOWDEVFILE=/dev/shm/qb-corosync-*
ALLOWDEVFILE=/dev/shm/qb-cpg-*
ALLOWDEVFILE=/dev/shm/qb-lrmd-*
ALLOWDEVFILE=/dev/shm/qb-pengine-*
ALLOWDEVFILE=/dev/shm/qb-quorum-*
ALLOWDEVFILE=/dev/shm/qb-stonith-*
ALLOWDEVFILE=/dev/shm/pulse-shm-*
ALLOWDEVFILE=/dev/md/md-device-map
# Needed for corosync/pacemaker since update 19.11.2020
ALLOWDEVFILE=/dev/shm/qb-*/qb-*

# tomboy creates this one
ALLOWDEVFILE="/dev/shm/mono.*"
# created by libv4l
ALLOWDEVFILE="/dev/shm/libv4l-*"
# created by spice video
ALLOWDEVFILE="/dev/shm/spice.*"
# created by mdadm
ALLOWDEVFILE="/dev/md/autorebuild.pid"
# 389 Directory Server
ALLOWDEVFILE=/dev/shm/sem.slapd-*.stats
# squid proxy
ALLOWDEVFILE=/dev/shm/squid-cf*
# squid ssl cache
ALLOWDEVFILE=/dev/shm/squid-ssl_session_cache.shm
# Allow podman
ALLOWDEVFILE=/dev/shm/libpod*lock*


3. Set the proper mirror database URL location to internal network repository


Usually  file /var/lib/rkhunter/db/mirrors.dat does contain Internet server address where latest version of mirrors.dat could be fetched, below is how it looks by default on Debian 10 Linux.

root@debian:/var/lib/rkhunter/db# cat mirrors.dat 
Version:2007060601
mirror=http://rkhunter.sourceforge.net

As you can guess a machine that doesn't have access to the Internet neither directly, neither via some kind of secure proxy because it is in a Paranoic Demilitarized Zone (DMZ) Network with many firewalls. What you can do then is setup another Mirror server (Apache / Nginx) within the local PCI secured LAN that gets regularly the database from official database on http://rkhunter.sourceforge.net/ (by installing and running rkhunter –update command on the Mirror WebServer and copying data under some directory structure on the remote local LAN accessible server, to keep the DB uptodate you might want to setup a cron to periodically copy latest available rkhunter database towards the http://mirror-url/path-folder/)

# vi /var/lib/rkhunter/db/mirrors.dat

local=http://rkhunter-url-mirror-server-url.com/rkhunter/1.4/


A mirror copy of entire db files from Debian 10.8 ( Buster ) ready for download are here.

Update entire file property db and check for rkhunter db updates


# rkhunter –update && rkhunter –propupdate

[ Rootkit Hunter version 1.4.6 ]

Checking rkhunter data files…
  Checking file mirrors.dat                                  [ Skipped ]
  Checking file programs_bad.dat                             [ No update ]
  Checking file backdoorports.dat                            [ No update ]
  Checking file suspscan.dat                                 [ No update ]
  Checking file i18n/cn                                      [ No update ]
  Checking file i18n/de                                      [ No update ]
  Checking file i18n/en                                      [ No update ]
  Checking file i18n/tr                                      [ No update ]
  Checking file i18n/tr.utf8                                 [ No update ]
  Checking file i18n/zh                                      [ No update ]
  Checking file i18n/zh.utf8                                 [ No update ]
  Checking file i18n/ja                                      [ No update ]


rkhunter-update-propupdate-screenshot-centos-linux


4. Initiate a first time check and see whether something is not triggering Warnings

# rkhunter –check

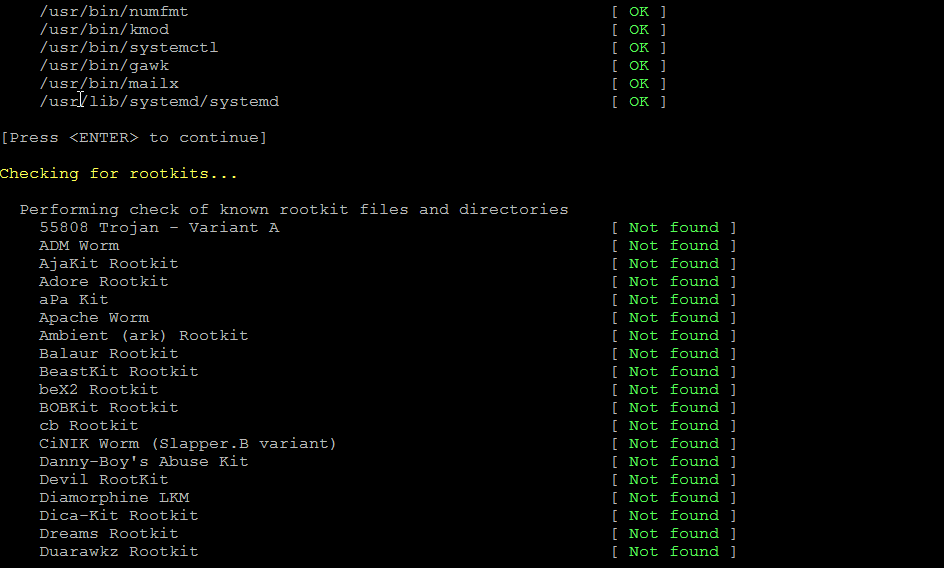
rkhunter-checking-for-rootkits-linux-screenshot

As you might have to run the rkhunter multiple times, there is annoying Press Enter prompt, between checks. The idea of it is that you're able to inspect what went on but since usually, inspecting /var/log/rkhunter/rkhunter.log is much more easier, I prefer to skip this with –skip-keypress option.

# rkhunter –check  –skip-keypress


5. Whitelist additional files and dev triggering false warnings alerts


You have to keep in mind many files which are considered to not be officially PCI compatible and potentially dangerous such as lynx browser curl, telnet etc. might trigger Warning, after checking them thoroughfully with some AntiVirus software such as Clamav and checking the MD5 checksum compared to a clean installed .deb / .rpm package on another RootKit, Virus, Spyware etc. Clean system (be it virtual machine or a Testing / Staging) machine you might want to simply whitelist the files which are incorrectly detected as dangerous for the system security.

Again this can be achieved with

PKGMGR_NO_VRFY=

Some Cluster softwares that are preparing their own /dev/ temporary files such as Pacemaker / Corosync might also trigger alarms, so you might want to suppress this as well with ALLOWDEVFILE

ALLOWDEVFILE=/dev/shm/qb-*/qb-*


If Warnings are found check what is the issue and if necessery white list files due to incorrect permissions in /etc/rkhunter.conf .

rkhunter-warnings-found-screenshot

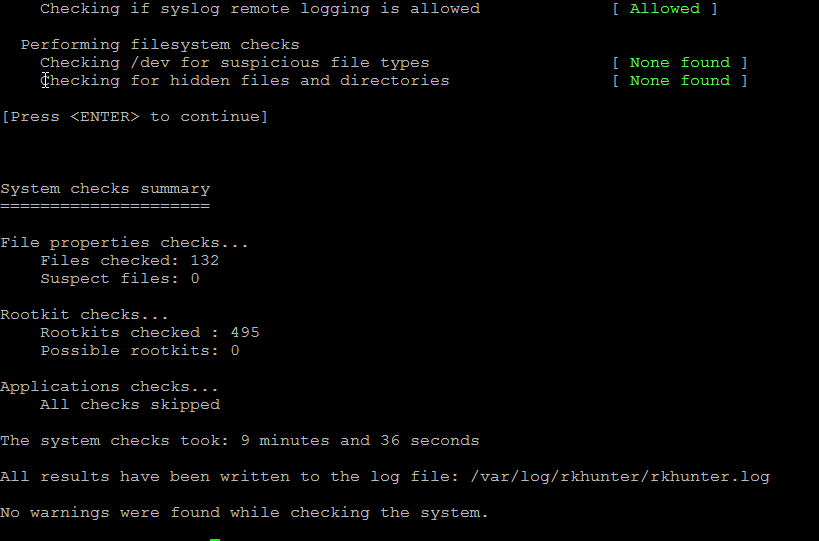
Re-run the check until all appears clean as in below screenshot.

rkhunter-clean-report-linux-screenshot

Fixing Checking for a system logging configuration file [ Warning ]

If you happen to get some message like, message appears when rkhunter -C is done on legacy CentOS release 6.10 (Final) servers:

[13:45:29] Checking for a system logging configuration file [ Warning ]
[13:45:29] Warning: The 'systemd-journald' daemon is running, but no configuration file can be found.
[13:45:29] Checking if syslog remote logging is allowed [ Allowed ]

To fix it, you will have to disable SYSLOG_CONFIG_FILE at all.
 

SYSLOG_CONFIG_FILE=NONE

Fix Out of inodes on Postfix Linux Mail Cluster. How to clean up filesystem running out of Inodes, Filesystem inodes on partition is 100% full

Wednesday, August 25th, 2021

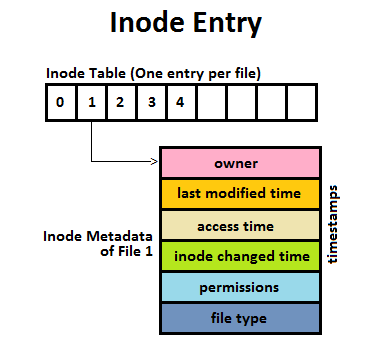
Inode_Entry_inode-table-content

Recently we have faced a strange issue with with one of our Clustered Postfix Mail servers (the cluster is with 2 nodes that each has configured Postfix daemon mail servers (running on an OpenVZ virtualized environment).
A heartbeat that checks liveability of clusters and switches nodes in case of one of the two gets broken due to some reason), pretty much a standard SMTP cluster.

So far so good but since the cluster is a kind of abondoned and is pretty much legacy nowadays and used just for some Monitoring emails from different scripts and systems on servers, it was not really checked thoroughfully for years and logically out of sudden the alarming email content sent via the cluster stopped working.

The normal sysadmin job here  was to analyze what is going on with the cluster and fix it ASAP. After some very basic analyzing we catched the problem is caused by a  "inodes full" (100% of available inodes were occupied) problem, e.g. file system run out of inodes on both machines perhaps due to a pengine heartbeat process  bug  leading to producing a high number of .bz2 pengine recovery archive files stored in /var/lib/pengine>

Below are the few steps taken to analyze and fix the problem.
 

1. Finding out about the the system run out of inodes problem


After logging on to system and not finding something immediately is wrong with inodes, all I can see from crm_mon is cluster was broken.
A plenty of emails were left inside the postfix mail queue visible with a standard command

[root@smtp1: ~ ]# postqueue -p

It took me a while to find ot the problem is with inodes because a simple df -h  was showing systems have enough space but still cluster quorum was not complete.
A bit of further investigation led me to a  simple df -i reporting the number of inodes on the local filesystems on both our SMTP1 and SMTP2 got all occupied.

[root@smtp1: ~ ]# df -i
Filesystem            Inodes   IUsed   IFree IUse% Mounted on
/dev/simfs            500000   500000  0   100% /
none                   65536      61   65475    1% /dev

As you can see the number of inodes on the Virual Machine are unfortunately depleted

Next step was to check directories occupying most inodes, as this is the place from where files could be temporary moved to a remote server filesystem or moved to another partition with space on a server locally attached drives.
Below command gives an ordered list with directories locally under the mail root filesystem / and its respective occupied number files / inodes,
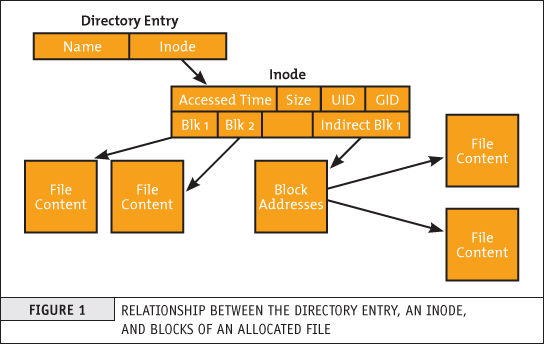
the more files under a directory the more inodes are being occupied by the files on the filesystem.


run-out-if-inodes-what-is-inode-find-out-which-filesystem-or-directory-eating-up-all-your-system-inodes-linux_inode_diagram.gif
1.1 Getting which directory consumes most of the inodes on the systems


[root@smtp1: ~ ]# { find / -xdev -printf '%h\n' | sort | uniq -c | sort -k 1 -n; } 2>/dev/null
….
…..

…….
    586 /usr/lib64/python2.4
    664 /usr/lib64
    671 /usr/share/man/man8
    860 /usr/bin
   1006 /usr/share/man/man1
   1124 /usr/share/man/man3p
   1246 /var/lib/Pegasus/prev_repository_2009-03-10-1236698426.308128000.rpmsave/root#cimv2/classes
   1246 /var/lib/Pegasus/prev_repository_2009-05-18-1242636104.524113000.rpmsave/root#cimv2/classes
   1246 /var/lib/Pegasus/prev_repository_2009-11-06-1257494054.380244000.rpmsave/root#cimv2/classes
   1246 /var/lib/Pegasus/prev_repository_2010-08-04-1280907760.750543000.rpmsave/root#cimv2/classes
   1381 /var/lib/Pegasus/prev_repository_2010-11-15-1289811714.398469000.rpmsave/root#cimv2/classes
   1381 /var/lib/Pegasus/prev_repository_2012-03-19-1332151633.572875000.rpmsave/root#cimv2/classes
   1398 /var/lib/Pegasus/repository/root#cimv2/classes
   1696 /usr/share/man/man3
   400816 /var/lib/pengine

Note, the above command orders the files from bottom to top order and obviosuly the bottleneck directory that is over-eating Filesystem inodes with an exceeding amount of files is
/var/lib/pengine
 

2. Backup old multitude of files just in case of something goes wrong with the cluster after some files are wiped out


The next logical step of course is to check what is going on inside /var/lib/pengine just to find a very ,very large amount of pe-input-*NUMBER*.bz2 files were suddenly produced.


[root@smtp1: ~ ]# ls -1 pe-input*.bz2 | wc -l
 400816


The files are produced by the pengine process which is one of the processes that is controlling the heartbeat cluster state, presumably it is done by running process:

[root@smtp1: ~ ]# ps -ef|grep -i pengine
24        5649  5521  0 Aug10 ?        00:00:26 /usr/lib64/heartbeat/pengine


Hence in order to fix the issue, to prevent some inconsistencies in the cluster due to the file deletion,  copied the whole directory to another mounted parition (you can mount it remotely with sshfs for example) or use a local one if you have one:

[root@smtp1: ~ ]# cp -rpf /var/lib/pengine /mnt/attached_storage


and proceeded to clean up some old multitde of files that are older than 2 years of times (720 days):


3. Clean  up /var/lib/pengine files that are older than two years with short loop and find command


First I made a list with all the files to be removed in external text file and quickly reviewed it by lessing it like so

[root@smtp1: ~ ]#  cd /var/lib/pengine
[root@smtp1: ~ ]# find . -type f -mtime +720|grep -v pe-error.last | grep -v pe-input.last |grep -v pe-warn.last -fprint /home/myuser/pengine_older_than_720days.txt
[root@smtp1: ~ ]# less /home/myuser/pengine_older_than_720days.txt


Once reviewing commands I've used below command to delete the files you can run below command do delete all older than 2 years that are different from pe-error.last / pe-input.last / pre-warn.last which might be needed for proper cluster operation.

[root@smtp1: ~ ]#  for i in $(find . -type f -mtime +720 -exec echo '{}' \;|grep -v pe-error.last | grep -v pe-input.last |grep -v pe-warn.last); do echo $i; done


Another approach to the situation is to simply review all the files inside /var/lib/pengine and delete files based on year of creation, for example to delete all files in /var/lib/pengine from 2010, you can run something like:
 

[root@smtp1: ~ ]# for i in $(ls -al|grep -i ' 2010 ' | awk '{ print $9 }' |grep -v 'pe-warn.last'); do rm -f $i; done


4. Monitor real time inodes freeing

While doing the clerance of old unnecessery pengine heartbeat archives you can open another ssh console to the server and view how the inodes gets freed up with a command like:


# check if inodes is not being rapidly decreased

[root@csmtp1: ~ ]# watch 'df -i'


5. Restart basic Linux services producing pid files and logs etc. to make then workable (some services might not be notified the inodes on the Hard drive are freed up)

Because the hard drive on the system was full some services started to misbehaving and /var/log logging was impacted so I had to also restart them in our case this is the heartbeat itself
that  checks clusters nodes availability as well as the logging daemon service rsyslog


# restart rsyslog and heartbeat services
[root@csmtp1: ~ ]# /etc/init.d/heartbeat restart
[root@csmtp1: ~ ]# /etc/init.d/rsyslog restart

The systems had been a data integrity legacy service samhain so I had to restart this service as well to reforce the /var/log/samhain log file to again continusly start writting data to HDD.

# Restart samhain service init script 
[root@csmtp1: ~ ]# /etc/init.d/samhain restart


6. Check up enough inodes are freed up with df

[root@smtp1 log]# df -i
Filesystem Inodes IUsed IFree IUse% Mounted on
/dev/simfs 500000 410531 19469 91% /
none 65536 61 65475 1% /dev


I had to repeat the same process on the second Postfix cluster node smtp2, and after all the steps like below check the status of smtp2 node and the postfix queue, following same procedure made the second smtp2 cluster member as expected 🙂


7. Check the cluster node quorum is complete, e.g. postfix cluster is operating normally


# Test if email cluster is ok with pacemaker resource cluster manager – lt-crm_mon
 

[root@csmtp1: ~ ]# crm_mon -1
============
Last updated: Tue Aug 10 18:10:48 2021
Stack: Heartbeat
Current DC: smtp2.fqdn.com (bfb3d029-89a8-41f6-a9f0-52d377cacd83) – partition with quorum
Version: 1.0.12-unknown
2 Nodes configured, unknown expected votes
4 Resources configured.
============

Online: [ smtp2.fqdn.com smtp1.fqdn.com ]

failover-ip (ocf::heartbeat:IPaddr2): Started csmtp1.ikossvan.de
Clone Set: postfix_clone
Started: [ smtp2.fqdn.com smtp1fqdn.com ]
Clone Set: pingd_clone
Started: [ smtp2.fqdn.com smtp1.fqdn.com ]
Clone Set: mailto_clone
Started: [ smtp2.fqdn.com smtp1.fqdn.com ]


8.  Force resend a few hundred thousands of emails left in the email queue


After some inodes gets freed up due to the file deletion, i've reforced a couple of times the queued mail servers to be immediately resent to remote mail destinations with cmd:


# force emails in queue to be resend with postfix

[root@smtp1: ~ ]# sendmail -q


– It was useful to watch in real time how the queued emails are quickly decreased (queued mails are successfully sent to destination addresses) with:


# Monitor  the decereasing size of the email queue
[root@smtp1: ~ ]# watch 'postqueue -p|grep -i '@'|wc -l'

Linux: logrotate fix log file permissions on newly created logs after rotation

Monday, July 5th, 2021

fix logrotate permission issues of newly logrotated files, howto chown chmod logrotate linux logo

If you have to administer a bunch of Web or Application servers you will definetely end up with some machines that has some logrotate misconfiguration.

Perhaps the most common one sysadmin faces is when you have rotated webserver, proxy, mail server logs that gets gzipped with a date timestamp of the rotation and a brand new files is created by logrotate. Such a thing could be seen on various Linux distributions and even a more corporate prodcution ready Linux – es like CentOS and Fedora occasionally end up with issues caused by improperly created user / group permissions (usually root:root) of logrotate. 

The wrong permissions of usually normally logging to file by a service, happens when the log file will get filled (or matches some thresholds) configured by logrotate respective config, the log rotate mechanism will rename this file gzip / bzip it depending on how it is prepared to behave and opens a new one, however the newly produced log file will not have the  read write  permission which are necessery for the respective service because the service is not running as administrator (root), lets say there is a haproxy daemon running with user / group haproxy, haproxy, like it happeed today on one of our legacy CentOS 6.5 servers.

The sad result is /var/log/haproxy.log or whatever log file stays empty forever even though the service is normally working and you end up blind not seeing what's going on …

To solve the empty file due to logrotate dumping the original file permissions to a wrong one due to misconfiguration or a lack of special configuration it is as easy as setting up the logrotated file to write down the new rotated file to a specic user, this is done with a one line addition of code with a syntax like:

create mode owner group

Below is extract from logrotate man page (man logrotate)

Immediately after rotation (before the postrotate script is run) the log file is created (with the same name as the log file just rotated).  mode  specifies the mode for the log file in octal (the same as chmod(2)), owner specifies the user name who will own the log file, and group specifies the group the log file will belong to. Any of the log file attributes may be omitted, in which case those attributes for the new file will use the same values as the original log file for the omitted attributes. This option can be disabled using the nocreate option.

 Lets say you have following /etc/logrotate.d/haproxy configuration that is instructing logrotate to do the rotation and this will create empty file with root:root after rotate:

root@haproxy2:/etc/logrotate.d# cat haproxy

/var/log/haproxy.log {
    daily
    rotate 52
    missingok
    notifempty
    compress
    delaycompress
    postrotate
        /usr/lib/rsyslog/rsyslog-rotate
    endscript
}

To make /var/log/haproxy.log be owned by haproxy user and group and chmod to certain owner permissions hence, do add inside the block something like: 


/var/log/haproxy.log {
….
        create 664 user group
….
}


i.e. :

/var/log/haproxy.log {
….
        create 644 haproxy hapoxy
….
}

To test the configuration do a logrotate config dry run do:

root@haproxy2:/etc/logrotate.d# logrotate -v -d -f /etc/logrotate.d/haproxy
WARNING: logrotate in debug mode does nothing except printing debug messages!  Consider using verbose mode (-v) instead if this is not what you want.

reading config file /etc/logrotate.d/haproxy
Reading state from file: /var/lib/logrotate/status
Allocating hash table for state file, size 64 entries
Creating new state
Creating new state
Creating new state
Creating new state
Creating new state
Creating new state
Creating new state
Creating new state
Creating new state
Creating new state
Creating new state
Creating new state


Handling 1 logs

rotating pattern: /var/log/haproxy.log  forced from command line (52 rotations)
empty log files are not rotated, old logs are removed
considering log /var/log/haproxy.log
  Now: 2021-07-05 21:51
  Last rotated at 2021-07-05 00:00
  log needs rotating
rotating log /var/log/haproxy.log, log->rotateCount is 52
dateext suffix '-20210705'
glob pattern '-[0-9][0-9][0-9][0-9][0-9][0-9][0-9][0-9]'
compressing log with: /bin/gzip

renaming /var/log/haproxy.log.8.gz to /var/log/haproxy.log.9.gz (rotatecount 52, logstart 1, i 8),
renaming /var/log/haproxy.log.7.gz to /var/log/haproxy.log.8.gz (rotatecount 52, logstart 1, i 7),
renaming /var/log/haproxy.log.6.gz to /var/log/haproxy.log.7.gz (rotatecount 52, logstart 1, i 6),
renaming /var/log/haproxy.log.5.gz to /var/log/haproxy.log.6.gz (rotatecount 52, logstart 1, i 5),
renaming /var/log/haproxy.log.4.gz to /var/log/haproxy.log.5.gz (rotatecount 52, logstart 1, i 4),
renaming /var/log/haproxy.log.3.gz to /var/log/haproxy.log.4.gz (rotatecount 52, logstart 1, i 3),
renaming /var/log/haproxy.log.2.gz to /var/log/haproxy.log.3.gz (rotatecount 52, logstart 1, i 2),
renaming /var/log/haproxy.log.1.gz to /var/log/haproxy.log.2.gz (rotatecount 52, logstart 1, i 1),
renaming /var/log/haproxy.log.0.gz to /var/log/haproxy.log.1.gz (rotatecount 52, logstart 1, i 0),
log /var/log/haproxy.log.53.gz doesn't exist — won't try to dispose of it
renaming /var/log/haproxy.log to /var/log/haproxy.log.1
creating new /var/log/haproxy.log mode = 0644 uid = 106 gid = 112
running postrotate script
running script with arg /var/log/haproxy.log: "
        /usr/lib/rsyslog/rsyslog-rotate
"


root@haproxy2:/etc/logrotate.d# grep -Ei '106|112' /etc/passwd
haproxy:x:106:112::/var/lib/haproxy:/usr/sbin/nologin

You do it for any other service respectively by editting whatever /etc/logrotate.d/file, lets say postfix's /var/log/maillog should be owned with 644 by postfix:postfix.
 

# cat /etc/logrotate/postfix
/var/log/maillog {
….
        create 664 postfix postfix
….
}

Stop haproxy log requests to /var/log/messages / Disable haproxy double logging

Friday, June 25th, 2021

haproxy-logo

On a CentOS Linux release 7.9.2009 (Core) I've running haproxies on two KVM virtual machines that are configured in a High Avaialability cluster with Corosync and Pacemaker, the machines are inherited from another admin (I did not install the servers hardware) and OS but have been received the system for support.
The old sysadmins seems to not care much about the system so they've left the haprxoy with Double logging one time under separate configured log in /var/log/haproxy/haproxyprod.log and each Haproxy TCP mode flown request has been double logged to /var/log/messages as well. As you can guess this shouldn't be so because we're wasting Hard drive space so to fix that I had to stop haproxy doble logging to /var/log/messages.

The logging is done under a separate local pointer local6 the /etc/haproxy/haproxyprod.cfg goes as follows:
 

[root@haproxy01 ~]# cat /etc/haproxy/haproxyprod.cfg

global
    # log <address> [len ] [max level [min level]]
    log 127.0.0.1 local6 debug


The logging is handled by rsyslog via the local6, so obviously to keep out the logging from /var/log/messages
The logging to the separate log file configuration in rsyslog is as follows:

local6.*                                                /var/log/haproxy/haproxyprod.log

It turned to be really easy to prevent haproxy get its requests log to /var/log/messages all I had to change is under /etc/rsyslogd.conf

local6.none config has to be placed for /var/log/messages the full line configuration in /etc/rsyslog.conf that stopped double logging is:

# Don't log private authentication messages!
*.info;mail.none;authpriv.none;cron.none;local5.none;local6.none                /var/log/messages


Reinstall all Debian packages with a copy of apt deb package list from another working Debian Linux installation

Wednesday, July 29th, 2020

Reinstall-all-Debian-packages-with-copy-of-apt-packages-list-from-another-working-Debian-Linux-installation

Few days ago, in the hurry in the small hours of the night, I've done something extremely stupid. Wanting to move out a .tar.gz binary copy of qmail installation to /var/lib/qmail with all the dependent qmail items instead of extracting to admin user /root directory (/root), I've extracted it to the main Operating system root / directrory.
Not noticing this, I've quickly executed rm -rf var with the idea to delete all directory tree under /root/var just 3 seconds later, I've realized I'm issuing the rm -rf var with the wrong location WITH a root user !!!! Being scared on what I've done, I've quickly pressed CTRL+C to immedately cancel the deletion operation of my /var.
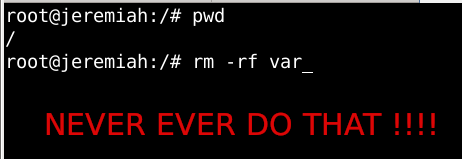
wrong-system-var-rm-linux-dont-do-that-ever-or-your-system-will-end-up-irreversably-damaged

But as you can guess, since the machine has an Slid State Drive drive and SSD memory drive are much more faster in I/O operations than the classical ATA / SATA disks. I was not quick enough to cancel the operation and I've noticed already some part of my /var have been R.I.P-pped in the heaven of directories.

This was ofcourse upsetting so for a while I rethinked the situation to get some ideas on what I can do to recover my system ASAP!!! and I had the idea of course to try to reinstall All my installed .deb debian packages to restore system closest to the normal, before my stupid mistake.

Guess my unpleasent suprise when I have realized dpkg and respectively apt-get apt and aptitude package management tools cannot anymore handle packages as Debian Linux's package dependency database has been damaged due to missing dpkg directory 


/var/lib/dpkg 


Oh man that was unpleasent, especially since I've installed plenty of stuff that is custom on my Mate based desktop and, generally reinstalling it updating the sytem to the latest Debian security updates etc. will be time consuming and painful process I wanted to omit.

So of course the logical thing to do here was to try to somehow recover somehow a database copy of /var/lib/dpkg  if that was possible, that of course led me to the idea to lookup for a way to recover my /var/lib/dpkg from backup but since I did not maintained any backup copy of my OS anywhere that was not really possible, so anyways I wondered whether dpkg does not keep some kind of database backups somewhere in case if something goes wrong with its database.
This led me to this nice Ubuntu thred which has pointed me to the part of my root rm -rf dpkg db disaster recovery solution.
Luckily .deb package management creators has thought about situation similar to mine and to give the user a restore point for /var/lib/dpkg damaged database

/var/lib/dpkg is periodically backed up in /var/backups

A typical /var/lib/dpkg on Ubuntu and Debian Linux looks like so:
 

hipo@jeremiah:/var/backups$ ls -l /var/lib/dpkg
total 12572
drwxr-xr-x 2 root root    4096 Jul 26 03:22 alternatives
-rw-r–r– 1 root root      11 Oct 14  2017 arch
-rw-r–r– 1 root root 2199402 Jul 25 20:04 available
-rw-r–r– 1 root root 2199402 Oct 19  2017 available-old
-rw-r–r– 1 root root       8 Sep  6  2012 cmethopt
-rw-r–r– 1 root root    1337 Jul 26 01:39 diversions
-rw-r–r– 1 root root    1223 Jul 26 01:39 diversions-old
drwxr-xr-x 2 root root  679936 Jul 28 14:17 info
-rw-r—– 1 root root       0 Jul 28 14:17 lock
-rw-r—– 1 root root       0 Jul 26 03:00 lock-frontend
drwxr-xr-x 2 root root    4096 Sep 17  2012 parts
-rw-r–r– 1 root root    1011 Jul 25 23:59 statoverride
-rw-r–r– 1 root root     965 Jul 25 23:59 statoverride-old
-rw-r–r– 1 root root 3873710 Jul 28 14:17 status
-rw-r–r– 1 root root 3873712 Jul 28 14:17 status-old
drwxr-xr-x 2 root root    4096 Jul 26 03:22 triggers
drwxr-xr-x 2 root root    4096 Jul 28 14:17 updates

Before proceeding with this radical stuff to move out /var/lib/dpkg/info from another machine to /var mistakenyl removed oned. I have tried to recover with the well known:

  • extundelete
  • foremost
  • recover
  • ext4magic
  • ext3grep
  • gddrescue
  • ddrescue
  • myrescue
  • testdisk
  • photorec

Linux file deletion recovery tools from a USB stick loaded with a Number of LiveCD distributions, i.e. tested recovery with:

  • Debian LiveCD
  • Ubuntu LiveCD
  • KNOPPIX
  • SystemRescueCD
  • Trinity Rescue Kit
  • Ultimate Boot CD


but unfortunately none of them couldn't recover the deleted files … 

The reason why the standard file recovery tools could not recover ?

My assumptions is after I've done by rm -rf var; from sysroot,  issued the sync (- if you haven't used it check out man sync) command – that synchronizes cached writes to persistent storage and did a restart from the poweroff PC button, this should have worked, as I've recovered like that in the past) in a normal Sys V System with a normal old fashioned blocks filesystem as EXT2 . or any other of the filesystems without a journal, however as the machine run a EXT4 filesystem with a journald and journald, this did not work perhaps because something was not updated properly in /lib/systemd/systemd-journal, that led to the situation all recently deleted files were totally unrecoverable.

1. First step was to restore the directory skele of /var/lib/dpkg

# mkdir -p /var/lib/dpkg/{alternatives,info,parts,triggers,updates}


2. Recover missing /var/lib/dpkg/status  file

The main file that gives information to dpkg of the existing packages and their statuses on a Debian based systems is /var/lib/dpkg/status

# cp /var/backups/dpkg.status.0 /var/lib/dpkg/status


3. Reinstall dpkg package manager to make package management working again

Say a warm prayer to the Merciful God ! and do:

# apt-get download dpkg
# dpkg -i dpkg*.deb


4. Reinstall base-files .deb package which provides basis of a Debian system

Hopefully everything will be okay and your dpkg / apt pair will be in normal working state, next step is to:

# apt-get download base-files
# dpkg -i base-files*.deb


5. Do a package sanity and consistency check and try to update OS package list

Check whether packages have been installed only partially on your system or that have missing, wrong or obsolete control  data  or  files.  dpkg  should suggest what to do with them to get them fixed.

# dpkg –audit

Then resynchronize (fetch) the package index files from their sources described in /etc/apt/sources.list

# apt-get update


Do apt db constistency check:

#  apt-get check


check is a diagnostic tool; it updates the package cache and checks for broken dependencies.
 

Take a deep breath ! …

Do :

ls -l /var/lib/dpkg
and compare with the above list. If some -old file is not present don't worry it will be there tomorrow.

Next time don't forget to do a regular backup with simple rsync backup script or something like Bacula / Amanda / Time Vault or Clonezilla.
 

6. Copy dpkg database from another Linux system that has a working dpkg / apt Database

Well this was however not the end of the story … There were still many things missing from my /var/ and luckily I had another Debian 10 Buster install on another properly working machine with a similar set of .deb packages installed. Therefore to make most of my programs still working again I have copied over /var from the other similar set of package installed machine to my messed up machine with the missing deleted /var.

To do so …
On Functioning Debian 10 Machine (Working Host in a local network with IP 192.168.0.50), I've archived content of /var:

linux:~# tar -czvf var_backup_debian10.tar.gz /var

Then sftped from Working Host towards the /var deleted broken one in my case this machine's hostname is jericho and luckily still had SSHD and SFTP running processes loaded in memory:

jericho:~# sftp root@192.168.0.50
sftp> get var_backup_debian10.tar.gz

Now Before extracting the archive it is a good idea to make backup of old /var remains somewhere for example somewhere in /root 
just in case if we need to have a copy of the dpkg backup dir /var/backups

jericho:~# cp -rpfv /var /root/var_backup_damaged

 
jericho:~# tar -zxvf /root/var_backup_debian10.tar.gz 
jericho:/# mv /root/var/ /

Then to make my /var/lib/dpkg contain the list of packages from my my broken Linux install I have ovewritten /var/lib/dpkg with the files earlier backupped before  .tar.gz was extracted.

jericho:~# cp -rpfv /var /root/var_backup_damaged/lib/dpkg/ /var/lib/


7. Reinstall All Debian  Packages completely scripts


I then tried to reinstall each and every package first using aptitude with aptitude this is done with

# aptitude reinstall '~i'

However as this failed, tried using a simple shell loop like below:

for i in $(dpkg -l |awk '{ print $2 }'); do echo apt-get install –reinstall –yes $i; done

Alternatively, all .deb package reninstall is also possible with dpkg –get-selections and with awk with below cmds:

dpkg –get-selections | grep -v deinstall | awk '{print $1}' > list.log;
awk '$1=$1' ORS=' ' list.log > newlist.log
;
apt-get install –reinstall $(cat newlist.log)

It can also be run as one liner for simplicity:

dpkg –get-selections | grep -v deinstall | awk '{print $1}' > list.log; awk '$1=$1' ORS=' ' list.log > newlist.log; apt-get install –reinstall $(cat newlist.log)

This produced a lot of warning messages, reporting "package has no files currently installed" (virtually for all installed packages), indicating a severe packages problem below is sample output produced after each and every package reinstall … :

dpkg: warning: files list file for package 'iproute' missing; assuming package has no files currently installed
dpkg: warning: files list file for package 'brscan-skey' missing; assuming package has no files currently installed
dpkg: warning: files list file for package 'libapache2-mod-php7.4' missing; assuming package has no files currently installed
dpkg: warning: files list file for package 'libexpat1:amd64' missing; assuming package has no files currently installed
dpkg: warning: files list file for package 'libexpat1:i386' missing; assuming package has no files currently installed
dpkg: warning: files list file for package 'php5.6-readline' missing; assuming package has no files currently installed
dpkg: warning: files list file for package 'linux-headers-4.19.0-5-amd64' missing; assuming package has no files currently installed
dpkg: warning: files list file for package 'libgraphite2-3:amd64' missing; assuming package has no files currently installed
dpkg: warning: files list file for package 'libgraphite2-3:i386' missing; assuming package has no files currently installed
dpkg: warning: files list file for package 'libbonoboui2-0:amd64' missing; assuming package has no files currently installed
dpkg: warning: files list file for package 'libxcb-dri3-0:amd64' missing; assuming package has no files currently installed
dpkg: warning: files list file for package 'libxcb-dri3-0:i386' missing; assuming package has no files currently installed
dpkg: warning: files list file for package 'liblcms2-2:amd64' missing; assuming package has no files currently installed
dpkg: warning: files list file for package 'liblcms2-2:i386' missing; assuming package has no files currently installed
dpkg: warning: files list file for package 'libpixman-1-0:amd64' missing; assuming package has no files currently installed
dpkg: warning: files list file for package 'libpixman-1-0:i386' missing; assuming package has no files currently installed
dpkg: warning: files list file for package 'gksu' missing; assuming package has no files currently installed
dpkg: warning: files list file for package 'liblogging-stdlog0:amd64' missing; assuming package has no files currently installed
dpkg: warning: files list file for package 'mesa-vdpau-drivers:amd64' missing; assuming package has no files currently installed
dpkg: warning: files list file for package 'mesa-vdpau-drivers:i386' missing; assuming package has no files currently installed
dpkg: warning: files list file for package 'libzvbi0:amd64' missing; assuming package has no files currently installed
dpkg: warning: files list file for package 'libzvbi0:i386' missing; assuming package has no files currently installed
dpkg: warning: files list file for package 'libcdparanoia0:amd64' missing; assuming package has no files currently installed
dpkg: warning: files list file for package 'libcdparanoia0:i386' missing; assuming package has no files currently installed
dpkg: warning: files list file for package 'python-gconf' missing; assuming package has no files currently installed
dpkg: warning: files list file for package 'php5.6-cli' missing; assuming package has no files currently installed
dpkg: warning: files list file for package 'libpaper1:amd64' missing; assuming package has no files currently installed
dpkg: warning: files list file for package 'mixer.app' missing; assuming package has no files currently installed

After some attempts I found a way to be able to work around the warning message, for each package by simply reinstalling the package reporting the issue with

apt –reinstall $package_name


Though reinstallation started well and many packages got reinstalled, unfortunately some packages such as apache2-mod-php5.6 and other php related ones  started failing during reinstall ending up in unfixable states right after installation of binaries from packages was successfully placed in its expected locations on disk. The failures occured during the package setup stage ( dpkg –configure $packagename) …

The logical thing to do is a recovery attempt with something like the usual well known by any Debian admin:

apt-get install –fix-missing

As well as Manual requesting to reconfigure (issue re-setup) of all installed packages also did not produced a positive result

dpkg –configure -a

But many packages were still failing due to dpkg inability to execute some post installation scripts from respective .deb files.
To work around that and continue installing the rest of packages I had to manually delete all files related to the failing package located under directory 

/var/lib/dpkg/info#

For example to omit the post installation failure of libapache2-mod-php5.6 and have a succesful install of the package next time I tried reinstall, I had to delete all /var/lib/dpkg/info/libapache2-mod-php5.6.postrm, /var/lib/dpkg/info/libapache2-mod-php5.6.postinst scripts and even sometimes everything like libapache2-mod-php5.6* that were present in /var/lib/dpkg/info dir.

The problem with this solution, however was the package reporting to install properly, but the post install script hooks were still not in placed and important things as setting permissions of binaries after install or applying some configuration changes right after install was missing leading to programs failing to  fully behave properly or even breaking up even though showing as finely installed …

The final solution to this problem was radical.
I've used /var/lib/dpkg database (directory) from ther other working Linux machine with dpkg DB OK found in var_backup_debian10.tar.gz (linux:~# host with a working dpkg database) and then based on the dpkg package list correct database responding on jericho:~# to reinstall each and every package on the system using Debian System Reinstaller script taken from the internet.
Debian System Reinstaller works but to reinstall many packages, I've been prompted again and again whether to overwrite configuration or keep the present one of packages.
To Omit the annoying [Y / N ] text prompts I had made a slight modification to the script so it finally looked like this:
 

#!/bin/bash
# Debian System Reinstaller
# Copyright (C) 2015 Albert Huang
# Copyright (C) 2018 Andreas Fendt

# This program is free software: you can redistribute it and/or modify
# it under the terms of the GNU General Public License as published by
# the Free Software Foundation, either version 3 of the License, or
# (at your option) any later version.

# This program is distributed in the hope that it will be useful,
# but WITHOUT ANY WARRANTY; without even the implied warranty of
# MERCHANTABILITY or FITNESS FOR A PARTICULAR PURPOSE.  See the
# GNU General Public License for more details.

# You should have received a copy of the GNU General Public License
# along with this program.  If not, see <http://www.gnu.org/licenses/>.

# —
# This script assumes you are using a Debian based system
# (Debian, Mint, Ubuntu, #!), and have sudo installed. If you don't
# have sudo installed, replace "sudo" with "su -c" instead.

pkgs=`dpkg –get-selections | grep -w 'install$' | cut -f 1 |  egrep -v '(dpkg|apt)'`

for pkg in $pkgs; do
    echo -e "\033[1m   * Reinstalling:\033[0m $pkg"    

    apt-get –reinstall -o Dpkg::Options::="–force-confdef" -o Dpkg::Options::="–force-confold" -y install $pkg || {
        echo "ERROR: Reinstallation failed. See reinstall.log for details."
        exit 1
    }
done


 debian-all-packages-reinstall.sh working modified version of Albert Huang and Andreas Fendt script  can be also downloaded here.

Note ! Omitting the text confirmation prompts to install newest config or keep maintainer configuration is handled by the argument:


-o Dpkg::Options::="–force-confold


I however still got few NCurses Console selection prompts during the reinstall of about 3200+ .deb packages, so even with this mod the reinstall was not completely automatic.

Note !  During the reinstall few of the packages from the list failed due to being some old unsupported packages this was ejabberd, ircd-hybrid and a 2 / 3 more.
This failure was easily solved by completely purging those packages with the usual

# dpkg –purge $packagename

and reruninng  debian-all-packages-reinstall.sh on each of the failing packages.

Note ! The failing packages were just old ones left over from Debian 8 and Debian 9 before the apt-get dist-upgrade towards 10 Duster.
Eventually I got a success by God's grance, after few hours of pains and trials, ending up in a working state package database and a complete set of freshly reinstalled packages.

The only thing I had to do finally is 2 hours of tampering why GNOME did not automatically booted after the system reboot due to failing gdm
until I fixed that I've temprary used ligthdm (x-display-manager), to do I've

dpkg –reconfigure gdm3
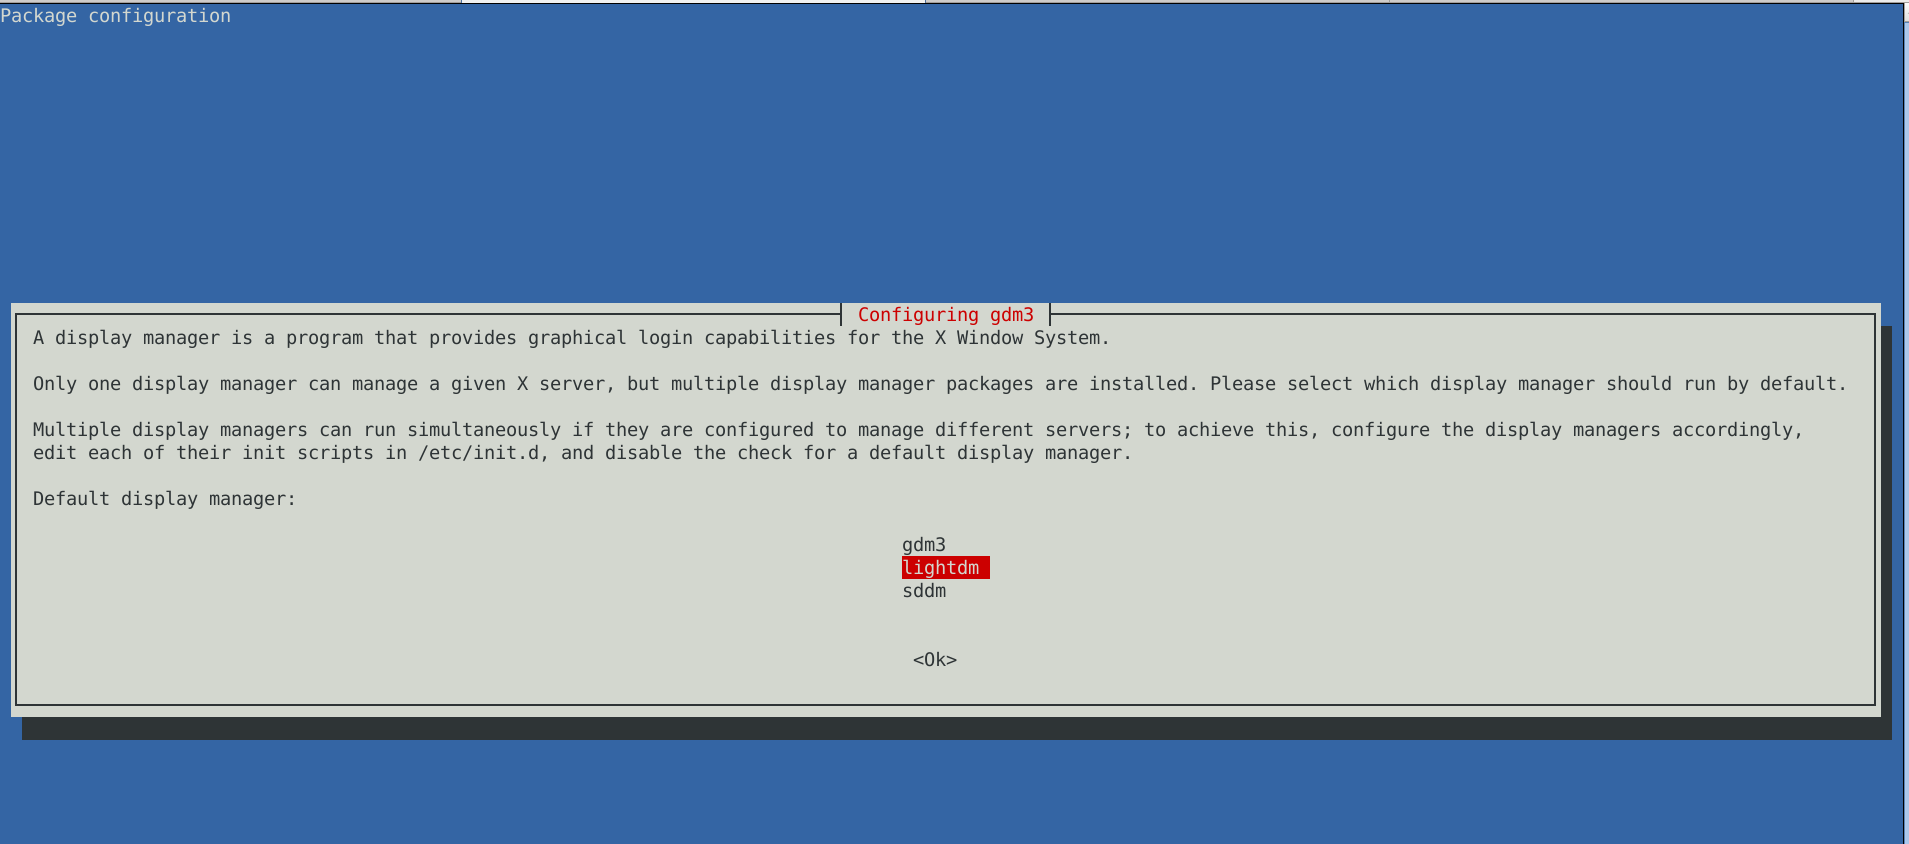
lightdm-x-display-manager-screenshot-gdm3-reconfige

 to work around this I had to also reinstall few libraries, reinstall the xorg-server, reinstall gdm and reinstall the meta package for GNOME, using below set of commands:
 

apt-get install –reinstall libglw1-mesa libglx-mesa0
apt-get install –reinstall libglu1-mesa-dev
apt install –reinstallgsettings-desktop-schemas
apt-get install –reinstall xserver-xorg-video-intel
apt-get install –reinstall xserver-xorg
apt-get install –reinstall xserver-xorg-core
apt-get install –reinstall task-desktop
apt-get install –reinstall task-gnome-desktop


As some packages did not ended re-instaled on system because on the original host from where /var/lib/dpkg db was copied did not have it I had to eventually manually trigger reinstall for those too:


apt-get install –reinstall –yes vlc
apt-get install –reinstall –yes thunderbird
apt-get install –reinstall –yes audacity
apt-get install –reinstall –yes gajim
apt-get install –reinstall –yes slack remmina
apt-get install –yes k3b
pt-get install –yes gbgoffice
pt-get install –reinstall –yes skypeforlinux
apt-get install –reinstall –yes vlc
apt-get install –reinstall –yes libcurl3-gnutls libcurl3-nss
apt-get install –yes virtualbox-5.2
apt-get install –reinstall –yes vlc
apt-get install –reinstall –yes alsa-tools-gui
apt-get install –reinstall –yes gftp
apt install ./teamviewer_15.3.2682_amd64.deb –yes


Note that some of above packages requires a properly configured third party repositories, other people might have other packages that are missing from the dpkg list and needs to be reinstalled so just decide according to your own case of left aside working system present binaries that doesn't belong to any dpkg installed package.

After a bit of struggle everything is back to normal Thanks God! 🙂 !


How to enable HaProxy logging to a separate log /var/log/haproxy.log / prevent HAProxy duplicate messages to appear in /var/log/messages

Wednesday, February 19th, 2020

haproxy-logging-basics-how-to-log-to-separate-file-prevent-duplicate-messages-haproxy-haproxy-weblogo-squares
haproxy  logging can be managed in different form the most straight forward way is to directly use /dev/log either you can configure it to use some log management service as syslog or rsyslogd for that.

If you don't use rsyslog yet to install it: 

# apt install -y rsyslog

Then to activate logging via rsyslogd we can should add either to /etc/rsyslogd.conf or create a separte file and include it via /etc/rsyslogd.conf with following content:
 

Enable haproxy logging from rsyslogd


Log haproxy messages to separate log file you can use some of the usual syslog local0 to local7 locally used descriptors inside the conf (be aware that if you try to use some wrong value like local8, local9 as a logging facility you will get with empty haproxy.log, even though the permissions of /var/log/haproxy.log are readable and owned by haproxy user.

When logging to a local Syslog service, writing to a UNIX socket can be faster than targeting the TCP loopback address. Generally, on Linux systems, a UNIX socket listening for Syslog messages is available at /dev/log because this is where the syslog() function of the GNU C library is sending messages by default. To address UNIX socket in haproxy.cfg use:

log /dev/log local2 


If you want to log into separate log each of multiple running haproxy instances with different haproxy*.cfg add to /etc/rsyslog.conf lines like:

local2.* -/var/log/haproxylog2.log
local3.* -/var/log/haproxylog3.log


One important note to make here is since rsyslogd is used for haproxy logging you need to have enabled in rsyslogd imudp and have a UDP port listener on the machine.

E.g. somewhere in rsyslog.conf or via rsyslog include file from /etc/rsyslog.d/*.conf needs to have defined following lines:

$ModLoad imudp
$UDPServerRun 514


I prefer to use external /etc/rsyslog.d/20-haproxy.conf include file that is loaded and enabled rsyslogd via /etc/rsyslog.conf:

# vim /etc/rsyslog.d/20-haproxy.conf

$ModLoad imudp
$UDPServerRun 514​
local2.* -/var/log/haproxy2.log


It is also possible to produce different haproxy log output based on the severiy to differentiate between important and less important messages, to do so you'll need to rsyslog.conf something like:
 

# Creating separate log files based on the severity
local0.* /var/log/haproxy-traffic.log
local0.notice /var/log/haproxy-admin.log


Prevent Haproxy duplicate messages to appear in /var/log/messages

If you use local2 and some default rsyslog configuration then you will end up with the messages coming from haproxy towards local2 facility producing doubled simultaneous records to both your pre-defined /var/log/haproxy.log and /var/log/messages on Proxy servers that receive few thousands of simultanous connections per second.
This is a problem since doubling the log will produce too much data and on systems with smaller /var/ partition you will quickly run out of space + this haproxy requests logging to /var/log/messages makes the file quite unreadable for normal system events which are so important to track clearly what is happening on the server daily.

To prevent the haproxy duplicate messages you need to define somewhere in rsyslogd usually /etc/rsyslog.conf local2.none near line of facilities configured to log to file:

*.info;mail.none;authpriv.none;cron.none;local2.none     /var/log/messages

This configuration should work but is more rarely used as most people prefer to have haproxy log being written not directly to /dev/log which is used by other services such as syslogd / rsyslogd.

To use /dev/log to output logs from haproxy configuration in global section use config like:
 

global
        log /dev/log local2 debug
        chroot /var/lib/haproxy
        stats socket /run/haproxy/admin.sock mode 660 level admin
        stats timeout 30s
        user haproxy
        group haproxy
        daemon

The log global directive basically says, use the log line that was set in the global section for whole config till end of file. Putting a log global directive into the defaults section is equivalent to putting it into all of the subsequent proxy sections.

Using global logging rules is the most common HAProxy setup, but you can put them directly into a frontend section instead. It can be useful to have a different logging configuration as a one-off. For example, you might want to point to a different target Syslog server, use a different logging facility, or capture different severity levels depending on the use case of the backend application. 

Insetad of using /dev/log interface that is on many distributions heavily used by systemd to store / manage and distribute logs,  many haproxy server sysadmins nowdays prefer to use rsyslogd as a default logging facility that will manage haproxy logs.
Admins prefer to use some kind of mediator service to manage log writting such as rsyslogd or syslog, the reason behind might vary but perhaps most important reason is  by using rsyslogd it is possible to write logs simultaneously locally on disk and also forward logs  to a remote Logging server  running rsyslogd service.

Logging is defined in /etc/haproxy/haproxy.cfg or the respective configuration through global section but could be also configured to do a separate logging based on each of the defined Frontend Backends or default section. 
A sample exceprt from this section looks something like:

#———————————————————————
# Global settings
#———————————————————————
global
    log         127.0.0.1 local2

    chroot      /var/lib/haproxy
    pidfile     /var/run/haproxy.pid
    maxconn     4000
    user        haproxy
    group       haproxy
    daemon

    # turn on stats unix socket
    stats socket /var/lib/haproxy/stats

#———————————————————————
defaults
    mode                    tcp
    log                     global
    option                  tcplog
    #option                  dontlognull
    #option http-server-close
    #option forwardfor       except 127.0.0.0/8
    option                  redispatch
    retries                 7
    #timeout http-request    10s
    timeout queue           10m
    timeout connect         30s
    timeout client          20m
    timeout server          10m
    #timeout http-keep-alive 10s
    timeout check           30s
    maxconn                 3000


# HAProxy Monitoring Config
#———————————————————————
listen stats 192.168.0.5:8080                #Haproxy Monitoring run on port 8080
    mode http
    option httplog
    option http-server-close
    stats enable
    stats show-legends
    stats refresh 5s
    stats uri /stats                            #URL for HAProxy monitoring
    stats realm Haproxy\ Statistics
    stats auth hproxyauser:Password___          #User and Password for login to the monitoring dashboard


#———————————————————————
# frontend which proxys to the backends
#———————————————————————
frontend ft_DKV_PROD_WLPFO
    mode tcp
    bind 192.168.233.5:30000-31050
    option tcplog
    log-format %ci:%cp\ [%t]\ %ft\ %b/%s\ %Tw/%Tc/%Tt\ %B\ %ts\ %ac/%fc/%bc/%sc/%rc\ %sq/%bq
    default_backend Default_Bakend_Name


#———————————————————————
# round robin balancing between the various backends
#———————————————————————
backend bk_DKV_PROD_WLPFO
    mode tcp
    # (0) Load Balancing Method.
    balance source
    # (4) Peer Sync: a sticky session is a session maintained by persistence
    stick-table type ip size 1m peers hapeers expire 60m
    stick on src
    # (5) Server List
    # (5.1) Backend
    server Backend_Server1 10.10.10.1 check port 18088
    server Backend_Server2 10.10.10.2 check port 18088 backup


The log directive in above config instructs HAProxy to send logs to the Syslog server listening at 127.0.0.1:514. Messages are sent with facility local2, which is one of the standard, user-defined Syslog facilities. It’s also the facility that our rsyslog configuration is expecting. You can add more than one log statement to send output to multiple Syslog servers.

Once rsyslog and haproxy logging is configured as a minumum you need to restart rsyslog (assuming that haproxy config is already properly loaded):

# systemctl restart rsyslogd.service

To make sure rsyslog reloaded successfully:

systemctl status rsyslogd.service


Restarting HAproxy

If the rsyslogd logging to 127.0.0.1 port 514 was recently added a HAProxy restart should also be run, you can do it with:
 

# /usr/sbin/haproxy -f /etc/haproxy/haproxy.cfg -D -p /var/run/haproxy.pid -sf $(cat /var/run/haproxy.pid)


Or to restart use systemctl script (if haproxy is not used in a cluster with corosync / heartbeat).

# systemctl restart haproxy.service

You can control how much information is logged by adding a Syslog level by

    log         127.0.0.1 local2 info


The accepted values are the standard syslog security level severity:

Value Severity Keyword Deprecated keywords Description Condition
0 Emergency emerg panic System is unusable A panic condition.
1 Alert alert   Action must be taken immediately A condition that should be corrected immediately, such as a corrupted system database.
2 Critical crit   Critical conditions Hard device errors.
3 Error err error Error conditions  
4 Warning warning warn Warning conditions  
5 Notice notice   Normal but significant conditions Conditions that are not error conditions, but that may require special handling.
6 Informational info   Informational messages  
7 Debug debug   Debug-level messages Messages that contain information normally of use only when debugging a program.


Logging only errors / timeouts / retries and errors is done with option:

Note that if the rsyslog is configured to listen on different port for some weird reason you should not forget to set the proper listen port, e.g.:
 

  log         127.0.0.1:514 local2 info

option dontlog-normal

in defaults or frontend section.

You most likely want to enable this only during certain times, such as when performing benchmarking tests.

(or log-format-sd for structured-data syslog) directive in your defaults or frontend
 

Haproxy Logging shortly explained


The type of logging you’ll see is determined by the proxy mode that you set within HAProxy. HAProxy can operate either as a Layer 4 (TCP) proxy or as Layer 7 (HTTP) proxy. TCP mode is the default. In this mode, a full-duplex connection is established between clients and servers, and no layer 7 examination will be performed. When in TCP mode, which is set by adding mode tcp, you should also add option tcplog. With this option, the log format defaults to a structure that provides useful information like Layer 4 connection details, timers, byte count and so on.

Below is example of configured logging with some explanations:

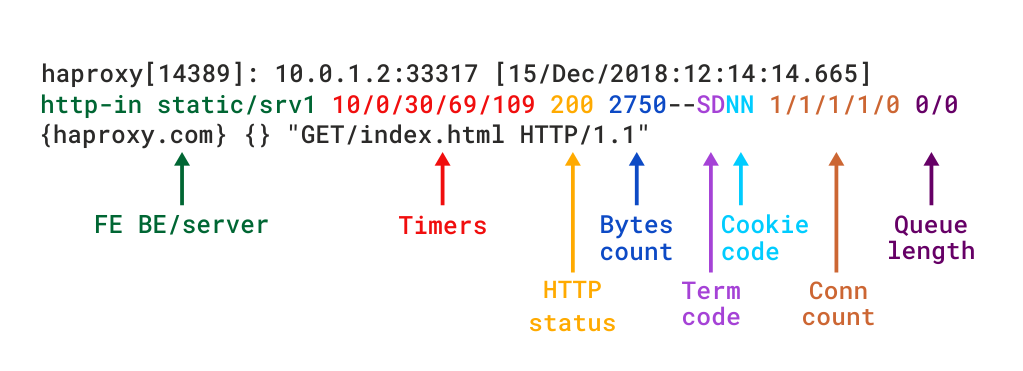
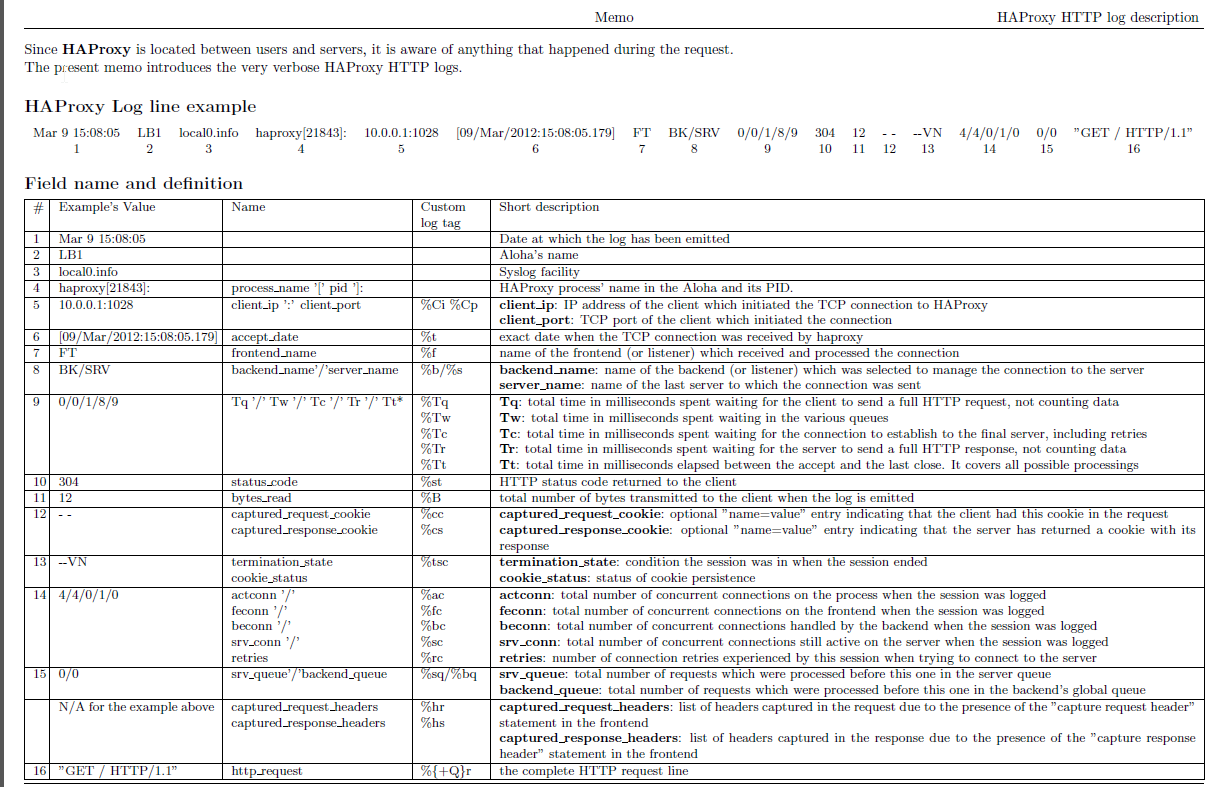
Log-format "%ci:%cp [%t] %ft %b/%s %Tw/%Tc/%Tt %B %ts %ac/%fc/%bc/%sc/%rc %sq/%bq"

haproxy-logged-fields-explained
Example of Log-Format configuration as shown above outputted of haproxy config:

Log-format "%ci:%cp [%tr] %ft %b/%s %TR/%Tw/%Tc/%Tr/%Ta %ST %B %CC %CS %tsc %ac/%fc/%bc/%sc/%rc %sq/%bq %hr %hs %{+Q}r"

haproxy_http_log_format-explained1

To understand meaning of this abbreviations you'll have to closely read  haproxy-log-format.txt. More in depth info is to be found in HTTP Log format documentation


haproxy_logging-explained

Logging HTTP request headers

HTTP request header can be logged via:
 

 http-request capture

frontend website
    bind :80
    http-request capture req.hdr(Host) len 10
    http-request capture req.hdr(User-Agent) len 100
    default_backend webservers


The log will show headers between curly braces and separated by pipe symbols. Here you can see the Host and User-Agent headers for a request:

192.168.150.1:57190 [20/Dec/2018:22:20:00.899] website~ webservers/server1 0/0/1/0/1 200 462 – – —- 1/1/0/0/0 0/0 {mywebsite.com|Mozilla/5.0 (X11; Linux x86_64) AppleWebKit/537.36 (KHTML, like Gecko) Ubuntu Chromium/71.0.3578.80 } "GET / HTTP/1.1"


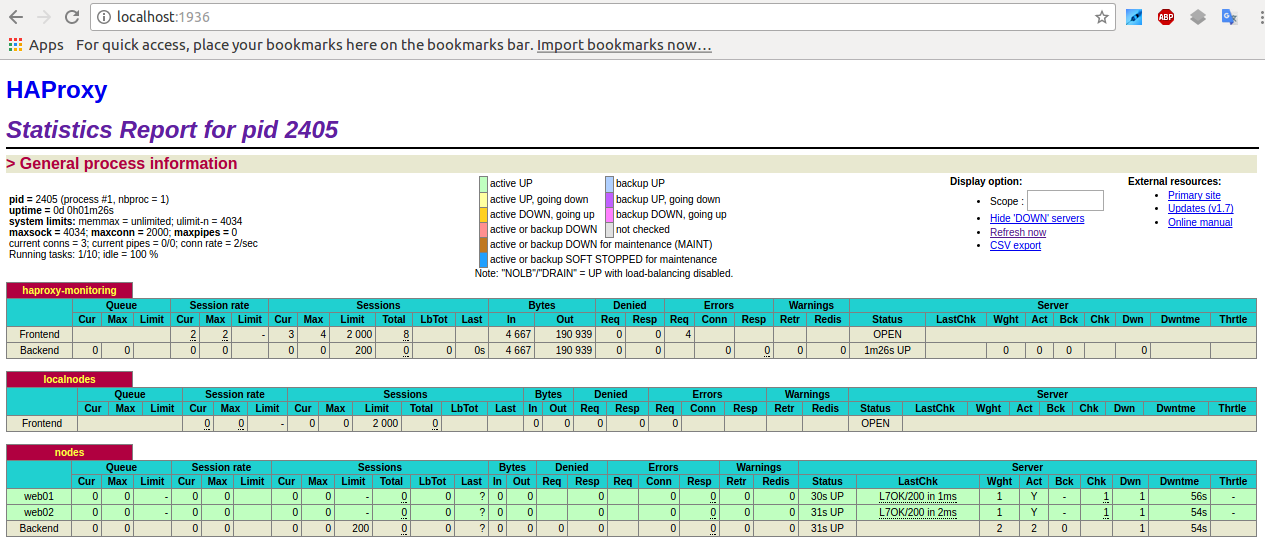
Haproxy Stats Monitoring Web interface


Haproxy is having a simplistic stats interface which if enabled produces some general useful information like in above screenshot, through which
you can get a very basic in browser statistics and track potential issues with the proxied traffic for all configured backends / frontends incoming outgoing
network packets configured nodes
 experienced downtimes etc.

haproxy-statistics-report-picture

The basic configuration to make the stats interface accessible would be like pointed in above config for example to enable network listener on address
 

https://192.168.0.5:8080/stats


with hproxyuser / password config would be:

# HAProxy Monitoring Config
#———————————————————————
listen stats 192.168.0.5:8080                #Haproxy Monitoring run on port 8080
    mode http
    option httplog
    option http-server-close
    stats enable
    stats show-legends
    stats refresh 5s
    stats uri /stats                            #URL for HAProxy monitoring
    stats realm Haproxy\ Statistics
    stats auth hproxyauser:Password___          #User and Password for login to the monitoring dashboard


Sessions states and disconnect errors on new application setup

Both TCP and HTTP logs include a termination state code that tells you the way in which the TCP or HTTP session ended. It’s a two-character code. The first character reports the first event that caused the session to terminate, while the second reports the TCP or HTTP session state when it was closed.

Here are some essential termination codes to track in for in the log:
 

Here are some termination code examples most commonly to see on TCP connection establishment errors:

Two-character code    Meaning
—    Normal termination on both sides.
cD    The client did not send nor acknowledge any data and eventually timeout client expired.
SC    The server explicitly refused the TCP connection.
PC    The proxy refused to establish a connection to the server because the process’ socket limit was reached while attempting to connect.


To get all non-properly exited codes the easiest way is to just grep for anything that is different from a termination code –, like that:

tail -f /var/log/haproxy.log | grep -v ' — '


This should output in real time every TCP connection that is exiting improperly.

There’s a wide variety of reasons a connection may have been closed. Detailed information about all possible termination codes can be found in the HAProxy documentation.
To get better understanding a very useful reading to haproxy Debug errors with  is in haproxy-logging.txt in that small file are collected all the cryptic error messages codes you might find in your logs when you're first time configuring the Haproxy frontend / backend and the backend application behind.

Another useful analyze tool which can be used to analyze Layer 7 HTTP traffic is halog for more on it just google around.

Rsync copy files with root privileges between servers with root superuser account disabled

Tuesday, December 3rd, 2019


rsync-copy-files-between-two-servers-with-root-privileges-with-root-superuser-account-disabled

Sometimes on servers that follow high security standards in companies following PCI Security (Payment Card Data Security) standards it is necessery to have a very weird configurations on servers,to be able to do trivial things such as syncing files between servers with root privileges in a weird manners.This is the case for example if due to security policies you have disabled root user logins via ssh server and you still need to synchronize files in directories such as lets say /etc , /usr/local/etc/ /var/ with root:root user and group belongings.

Disabling root user logins in sshd is controlled by a variable in /etc/ssh/sshd_config that on most default Linux OS
installations is switched on, e.g. 

grep -i permitrootlogin /etc/ssh/sshd_config
PermitRootLogin yes


Many corporations use Vulnerability Scanners such as Qualys are always having in their list of remote server scan for SSH Port 22 to turn have the PermitRootLogin stopped with:


PermitRootLogin no


In this article, I'll explain a scenario where we have synchronization between 2 or more servers Server A / Server B, whatever number of servers that have already turned off this value, but still need to
synchronize traditionally owned and allowed to write directories only by root superuser, here is 4 easy steps to acheive it.


1. Add rsyncuser to Source Server (Server A) and Destination (Server B)


a. Execute on Src Host:


groupadd rsyncuser
useradd -g 1000 -c 'Rsync user to sync files as root src_host' -d /home/rsyncuser -m rsyncuser


b. Execute on Dst Host:


groupadd rsyncuser
useradd -g 1000 -c 'Rsync user to sync files dst_host' -d /home/rsyncuser -m rsyncuser


2. Generate RSA SSH Key pair to be used for passwordless authentication


a. On Src Host
 

su – rsyncuser

ssh-keygen -t rsa -b 4096


b. Check .ssh/ generated key pairs and make sure the directory content look like.


[rsyncuser@src-host .ssh]$ cd ~/.ssh/;  ls -1

id_rsa
id_rsa.pub
known_hosts


3. Copy id_rsa.pub to Destination host server under authorized_keys


scp ~/.ssh/id_rsa.pub  rsyncuser@dst-host:~/.ssh/authorized_keys


Next fix permissions of authorized_keys file for rsyncuser as anyone who have access to that file (that exists as a user account) on the system
could steal the key and use it to run rsync commands and overwrite remotely files, like overwrite /etc/passwd /etc/shadow files with his custom crafted credentials
and hence hack you 🙂
 

Hence, On Destionation Host Server B fix permissions with:
 

su – rsyncuser; chmod 0600 ~/.ssh/authorized_keys
[rsyncuser@dst-host ~]$


An alternative way for the lazy sysadmins is to use the ssh-copy-id command


$ ssh-copy-id rsyncuser@192.168.0.180
/usr/bin/ssh-copy-id: INFO: Source of key(s) to be installed: "/root/.ssh/id_rsa.pub"
/usr/bin/ssh-copy-id: INFO: attempting to log in with the new key(s), to filter out any that are already installed
/usr/bin/ssh-copy-id: INFO: 1 key(s) remain to be installed — if you are prompted now it is to install the new keys
root@192.168.0.180's password: 


For improved security here to restrict rsyncuser to be able to run only specific command such as very specific script instead of being able to run any command it is good to use little known command= option
once creating the authorized_keys


4. Test ssh passwordless authentication works correctly


For that Run as a normal ssh from rsyncuser

On Src Host


[rsyncuser@src-host ~]$ ssh rsyncuser@dst-host


Perhaps here is time that for those who, think enabling a passwordless authentication is not enough secure and prefer to authorize rsyncuser via a password red from a secured file take a look in my prior article how to login to remote server with password provided from command line as a script argument / Running same commands on many servers 

5. Enable rsync in sudoers to be able to execute as root superuser (copy files as root)


For this step you will need to have sudo package installed on the Linux server.

Then, Execute once logged in as root on Destionation Server (Server B)


[root@dst-host ~]# grep 'rsyncuser ALL' /etc/sudoers|wc -l || echo ‘rsyncuser ALL=NOPASSWD:/usr/bin/rsync’ >> /etc/sudoers


Note that using rsync with a ALL=NOPASSWD in /etc/sudoers could pose a high security risk for the system as anyone authorized to run as rsyncuser is able to overwrite and
respectivle nullify important files on Destionation Host Server B and hence easily mess the system, even shell script bugs could produce a mess, thus perhaps a better solution to the problem
to copy files with root privileges with the root account disabled is to rsync as normal user somewhere on Dst_host and use some kind of additional script running on Dst_host via lets say cron job and
will copy gently files on selective basis.

Perhaps, even a better solution would be if instead of granting ALL=NOPASSWD:/usr/bin/rsync in /etc/sudoers is to do ALL=NOPASSWD:/usr/local/bin/some_copy_script.sh
that will get triggered, once the files are copied with a regular rsyncuser acct.


6. Test rsync passwordless authentication copy with superuser works


Do some simple copy, lets say copy files on Encrypted tunnel configurations located under some directory in /etc/stunnel on Server A to /etc/stunnel on Server B

The general command to test is like so:
 

rsync -aPz -e 'ssh' '–rsync-path=sudo rsync' /var/log rsyncuser@$dst_host:/root/tmp/


This will copy /var/log files to /root/tmp, you will get a success messages for the copy and the files will be at destination folder if succesful.


On Src_Host run:


[rsyncuser@src-host ~]$ dst=FQDN-DST-HOST; user=rsyncuser; src_dir=/etc/stunnel; dst_dir=/root/tmp;  rsync -aP -e 'ssh' '–rsync-path=sudo rsync' $src_dir  $rsyncuser@$dst:$dst_dir;


7. Copying files with root credentials via script


The simlest file to use to copy a bunch of predefined files  is best to be handled by some shell script, the most simple version of it, could look something like this.
 

#!/bin/bash
# On server1 use something like this
# On server2 dst server
# add in /etc/sudoers
# rsyncuser ALL=NOPASSWD:/usr/bin/rsync

user='rsyncuser';

dst_dir="/root/tmp";
dst_host='$dst_host';
src[1]="/etc/hosts.deny";
src[2]="/etc/sysctl.conf";
src[3]="/etc/samhainrc";
src[4]="/etc/pki/tls/";
src[5]="/usr/local/bin/";


for i in $(echo ${src[@]}); do
rsync -aPvz –delete –dry-run -e 'ssh' '–rsync-path=sudo rsync' "$i" $rsyncuser@$dst_host:$dst_dir"$i";
done


In above script as you can see, we define a bunch of files that will be copied in bash array and then run a loop to take each of them and copy to testination dir.
A very sample version of the script rsync_with_superuser-while-root_account_prohibited.sh 
 

Conclusion


Lets do short overview on what we have done here. First Created rsyncuser on SRC Server A and DST Server B, set up the key pair on both copied the keys to make passwordless login possible,
set-up rsync to be able to write as root on Dst_Host / testing all the setup and pinpointing a small script that can be used as a backbone to develop something more complex
to sync backups or keep system configurations identicatial – for example if you have doubts that some user might by mistake change a config etc.
In short it was pointed the security downsides of using rsync NOPASSWD via /etc/sudoers and few ideas given that could be used to work on if you target even higher
PCI standards.


How to build Linux logging bash shell script write_log, logging with Named Pipe buffer, Simple Linux common log files logging with logger command

Monday, August 26th, 2019

how-to-build-bash-script-for-logging-buffer-named-pipes-basic-common-files-logging-with-logger-command

Logging into file in GNU / Linux and FreeBSD is as simple as simply redirecting the output, e.g.:
 

echo "$(date) Whatever" >> /home/hipo/log/output_file_log.txt


or with pyping to tee command


echo "$(date) Service has Crashed" | tee -a /home/hipo/log/output_file_log.txt


But what if you need to create a full featured logging bash robust shell script function that will run as a daemon continusly as a background process and will output
all content from itself to an external log file?
In below article, I've given example logging script in bash, as well as small example on how a specially crafted Named Pipe buffer can be used that will later store to a file of choice.
Finally I found it interesting to mention few words about logger command which can be used to log anything to many of the common / general Linux log files stored under /var/log/ – i.e. /var/log/syslog /var/log/user /var/log/daemon /var/log/mail etc.
 

1. Bash script function for logging write_log();


Perhaps the simplest method is just to use a small function routine in your shell script like this:
 

write_log()
LOG_FILE='/root/log.txt';
{
  while read text
  do
      LOGTIME=`date "+%Y-%m-%d %H:%M:%S"`
      # If log file is not defined, just echo the output
      if [ “$LOG_FILE” == “” ]; then
    echo $LOGTIME": $text";
      else
        LOG=$LOG_FILE.`date +%Y%m%d`
    touch $LOG
        if [ ! -f $LOG ]; then echo "ERROR!! Cannot create log file $LOG. Exiting."; exit 1; fi
    echo $LOGTIME": $text" | tee -a $LOG;
      fi
  done
}


  •  Using the script from within itself or from external to write out to defined log file


echo "Skipping to next copy" | write_log


2. Use Unix named pipes to pass data – Small intro on what is Unix Named Pipe.


Named Pipe –  a named pipe (also known as a FIFO (First In First Out) for its behavior) is an extension to the traditional pipe concept on Unix and Unix-like systems, and is one of the methods of inter-process communication (IPC). The concept is also found in OS/2 and Microsoft Windows, although the semantics differ substantially. A traditional pipe is "unnamed" and lasts only as long as the process. A named pipe, however, can last as long as the system is up, beyond the life of the process. It can be deleted if no longer used.
Usually a named pipe appears as a file, and generally processes attach to it for IPC.


Once named pipes were shortly explained for those who hear it for a first time, its time to say named pipe in unix / linux is created with mkfifo command, syntax is straight foward:
 

mkfifo /tmp/name-of-named-pipe


Some older Linux-es with older bash and older bash shell scripts were using mknod.
So idea behind logging script is to use a simple named pipe read input and use date command to log the exact time the command was executed, here is the script.


#!/bin/bash
named_pipe='/tmp/output-named-pipe';
output_named_log='
/tmp/output-named-log.txt ';

if [ -p $named_pipe ]; then
rm -f $named_pipe
fi
mkfifo $named_pipe

while true; do
read LINE <$named_pipe
echo $(date): "$LINE" >>/tmp/output-named-log.txt
done


To write out any other script output and get logged now, any of your output with a nice current date command generated output write out any output content to the loggin buffer like so:


echo 'Using Named pipes is so cool' > /tmp/output-named-pipe
echo 'Disk is full on a trigger' > /tmp/output-named-pipe

  • Getting the output with the date timestamp

# cat /tmp/output-named-log.txt
Mon Aug 26 15:21:29 EEST 2019: Using Named pipes is so cool
Mon Aug 26 15:21:54 EEST 2019: Disk is full on a trigger


If you wonder why it is better to use Named pipes for logging, they perform better (are generally quicker) than Unix sockets.


3. Logging files to system log files with logger


If you need to do a one time quick way to log any message of your choice with a standard Logging timestamp, take a look at logger (a part of bsdutils Linux package), and is a command which is used to enter messages into the system log, to use it simply invoke it with a message and it will log your specified output by default to /var/log/syslog common logfile


root@linux:/root# logger 'Here we go, logging'
root@linux:/root # tail -n 3 /var/log/syslog
Aug 26 15:41:01 localhost CRON[24490]: (root) CMD (chown qscand:qscand -R /var/run/clamav/ 2>&1 >/dev/null)
Aug 26 15:42:01 localhost CRON[24547]: (root) CMD (chown qscand:qscand -R /var/run/clamav/ 2>&1 >/dev/null)
Aug 26 15:42:20 localhost hipo: Here we go, logging


If you have took some time to read any of the init.d scripts on Debian / Fedora / RHEL / CentOS Linux etc. you will notice the logger logging facility is heavily used.

With logger you can print out message with different priorities (e.g. if you want to write an error message to mail.* logs), you can do so with:
 

 logger -i -p mail.err "Output of mail processing script"


To log a normal non-error (priority message) with logger to /var/log/mail.log system log.


 logger -i -p mail.notice "Output of mail processing script"


A whole list of supported facility named priority valid levels by logger (as taken of its current Linux manual) are as so:


FACILITIES AND LEVELS
       Valid facility names are:

              auth
              authpriv   for security information of a sensitive nature
              cron
              daemon
              ftp
              kern       cannot be generated from userspace process, automatically converted to user
              lpr
              mail
              news
              syslog
              user
              uucp
              local0
                to
              local7
              security   deprecated synonym for auth

       Valid level names are:

              emerg
              alert
              crit
              err
              warning
              notice
              info
              debug
              panic     deprecated synonym for emerg
              error     deprecated synonym for err
              warn      deprecated synonym for warning

       For the priority order and intended purposes of these facilities and levels, see syslog(3).


If you just want to log to Linux main log file (be it /var/log/syslog or /var/log/messages), depending on the Linux distribution, just type', even without any shell quoting:


logger 'The reason to reboot the server Currently was a System security Update


So what others is logger useful for?

 In addition to being a good diagnostic tool, you can use logger to test if all basic system logs with its respective priorities work as expected, this is especially
useful as I've seen on a Cloud Holsted OpenXEN based servers as a SAP consultant, that sometimes logging to basic log files stops to log for months or even years due to
syslog and syslog-ng problems hungs by other thirt party scripts and programs.
To test test all basic logging and priority on system logs as expected use the following logger-test-all-basic-log-logging-facilities.sh shell script.


#!/bin/bash
for i in {auth,auth-priv,cron,daemon,kern, \
lpr,mail,mark,news,syslog,user,uucp,local0 \
,local1,local2,local3,local4,local5,local6,local7}

do        
# (this is all one line!)


for k in {debug,info,notice,warning,err,crit,alert,emerg}
do

logger -p $i.$k "Test daemon message, facility $i priority $k"

done

done

Note that on different Linux distribution verions, the facility and priority names might differ so, if you get

logger: unknown facility name: {auth,auth-priv,cron,daemon,kern,lpr,mail,mark,news, \
syslog,user,uucp,local0,local1,local2,local3,local4, \
local5,local6,local7}

check and set the proper naming as described in logger man page.


4. Using a file descriptor that will output to a pre-set log file


Another way is to add the following code to the beginning of the script

#!/bin/bash
exec 3>&1 4>&2
trap 'exec 2>&4 1>&3' 0 1 2 3
exec 1>log.out 2>&1
# Everything below will go to the file 'log.out':

The code Explaned

  •     Saves file descriptors so they can be restored to whatever they were before redirection or used themselves to output to whatever they were before the following redirect.
    trap 'exec 2>&4 1>&3' 0 1 2 3
  •     Restore file descriptors for particular signals. Not generally necessary since they should be restored when the sub-shell exits.

          exec 1>log.out 2>&1

  •     Redirect stdout to file log.out then redirect stderr to stdout. Note that the order is important when you want them going to the same file. stdout must be redirected before stderr is redirected to stdout.

From then on, to see output on the console (maybe), you can simply redirect to &3. For example
,

echo "$(date) : Do print whatever you want logging to &3 file handler" >&3


I've initially found out about this very nice bash code from serverfault.com's post how can I fully log all bash script actions (but unfortunately on latest Debian 10 Buster Linux  that is prebundled with bash shell 5.0.3(1)-release the code doesn't behave exactly, well but still on older bash versions it works fine.

Sum it up


To shortlysummarize there is plenty of ways to do logging from a shell script logger command but using a function or a named pipe is the most classic. Sometimes if a script is supposed to write user or other script output to a a common file such as syslog, logger command can be used as it is present across most modern Linux distros.
If you have a better ways, please drop a common and I'll add it to this article.


Why du and df reporting different on a filesystem / How to fix inconsistency between used space on FS and disk showing full strangeness

Wednesday, July 24th, 2019

linux-why-du-and-df-shows-different-result-inconsincy-explained-filesystem-full-oddity

If you're a sysadmin on a large server environment such as a couple of hundred of Virtual Machines running Linux OS on either physical host or OpenXen / VmWare hosted guest Virtual Machine, you might end up sometimes at an odd case where some mounted partition mount point reports its file use different when checked with
df
cmd than when checked with du command, like for example:
 

root@sqlserver:~# df -hT /var/lib/mysql
Filesystem   Type  Size Used Avail Use% Mounted On
/dev/sdb5      ext4    19G  3,4G    14G  20% /var/lib/mysql

Here the '-T' argument is used to show us the filesystem.

root@sqlserver:~# du -hsc /var/lib/mysql
0K    /var/lib/mysql/
0K    total


1. Simple debug on what might be the root cause for df / du inconsistency reporting


Of course the basic thing to do when in that weird situation is to be totally shocked how this is possible and to investigate a bit what is the biggest first level sub-directories that eat up the space on the mounted location, with du:


# du -hkx –max-depth=1 /var/lib/mysql/|uniq|sort -n
4       /var/lib/mysql/test
8       /var/lib/mysql/ezmlm
8       /var/lib/mysql/micropcfreak
8       /var/lib/mysql/performance_schema
12      /var/lib/mysql/mysqltmp
24      /var/lib/mysql/speedtest
64      /var/lib/mysql/yourls
144     /var/lib/mysql/narf
320     /var/lib/mysql/webchat_plus
424     /var/lib/mysql/goodfaithair
528     /var/lib/mysql/moonman
648     /var/lib/mysql/daniel
852     /var/lib/mysql/lessn
1292    /var/lib/mysql/gallery

The given output is in Kilobytes so it is a little bit hard to read, if you're used to Mbytes instead, do


 # du -hmx –max-depth=1 /var/lib/mysql/|uniq|sort -n|less


I've also investigated on the complete /var directory contents sorted by size with:


 # du -akx ./ | sort -n
5152564    ./cache/rsnapshot/hourly.2/localhost
5255788    ./cache/rsnapshot/hourly.2
5287912    ./cache/rsnapshot
7192152    ./cache


Even after finding out the bottleneck dirs and trying to clear up a bit, continued facing that inconsistently shown in two commands and if you're likely to be stunned like me and try … to move some files to a different filesystem to free up space or assigned inodes with a hope that shown inconsitency output will be fixed as it might be caused  due to some kernel / FS caching ?? and this will eventually make the mounted FS to refresh …

But unfortunately, if you try it you'll figure out clearing up a couple of Megas or Gigas will make no difference in cmd output.

In my exact case /var/lib/mysql is a separate mounted ext4 filesystem, however same issue was present also on a Network Filesystem (NFS) and thus, my first thought that this is caused by a network failure problem or NFS bug turned to be wrong.

After further short investigation on the inodes on the Filesystem, it was clear enough inodes are available:
 

# df -i /var/lib/mysql
Filesystem       Inodes  IUsed   IFree IUse% Mounted on
/dev/sdb5      1221600  2562 1219038   1% /var/lib/mysql


So the filled inodes count assumed issue also has been rejected.
P.S. (if you're not well familiar with them read manual, i.e. – man 7 inode).
 

– Remounting the mounted filesystem

To make sure the filesystem shown inconsistency between du and df is not due to some hanging network mount or bug, first logical thing I did is to remount the filesytem showing different in size, in my case this was done with:
 

# mount -o remount,rw -t ext4 /var/lib/mysql

For machines with NFS remote mounted storage locations, used:

# mount -o remount,rw -t nfs /var/www


FS remount did not solved it so I continued to ponder what oddity and of course I thought of a workaround (in case if this issues are caused by kernel bug or OS lib issue) reboot might be the solution, however unfortunately restarting the VMs was not a wanted easy to do solution, thus I continued investigating what is wrong …

Next check of course was to check, what kind of network connections are opened to the affected hosts with:
 

# netstat -tupanl


Did not found anything that might point me to the reported different Megabytes issue, so next step was to check what is the situation with currently opened files by running processes on the weird df / du reported systems with lsof, and boom there I observed oddity such as multiple files


# lsof -nP | grep '(deleted)'

COMMAND   PID   USER   FD   TYPE DEVICE    SIZE NLINK  NODE NAME
mysqld   2588  mysql    4u   REG 253,17      52     0  1495 /var/lib/mysql/tmp/ibY0cXCd (deleted)
mysqld   2588  mysql    5u   REG 253,17    1048     0  1496 /var/lib/mysql/tmp/ibOrELhG (deleted)
mysqld   2588  mysql    6u   REG 253,17       777884290     0  1497 /var/lib/mysql/tmp/ibmDFAW8 (deleted)
mysqld   2588  mysql    7u   REG 253,17       123667875     0 11387 /var/lib/mysql/tmp/ib2CSACB (deleted)
mysqld   2588  mysql   11u   REG 253,17       123852406     0 11388 /var/lib/mysql/tmp/ibQpoZ94 (deleted)


Notice that There were plenty of '(deleted)' STATE files shown in memory an overall of 438:


# lsof -nP | grep '(deleted)' |wc -l
438


As I've learned a bit online about the problem, I found it is also possible to find deleted unlinked files only without any greps (to list all deleted files in memory files with lsof args only):


# lsof +L1|less


The SIZE field (fourth column)  shows a number of files that are really hard in size and that are kept in open on filesystem and in memory, totally messing up with the filesystem. In my case this is temp files created by MYSQLD daemon but depending on the server provided service this might be apache's www-data, some custom perl / bash script executed via a cron job, stalled rsync jobs etc.
 

2. Check all the list open files with the mysql / root user as part of the the server filesystem inconsistency debugging with:


– Grep opened files on server by user

# lsof |grep mysql
mysqld    1312                       mysql  cwd       DIR               8,21       4096          2 /var/lib/mysql
mysqld    1312                       mysql  rtd       DIR                8,1       4096          2 /
mysqld    1312                       mysql  txt       REG                8,1   20336792   23805048 /usr/sbin/mysqld
mysqld    1312                       mysql  mem       REG               8,21      24576         20 /var/lib/mysql/tc.log
mysqld    1312                       mysql  DEL       REG               0,16                 29467 /[aio]
mysqld    1312                       mysql  mem       REG                8,1      55792   14886933 /lib/x86_64-linux-gnu/libnss_files-2.28.so


# lsof | grep root
COMMAND    PID   TID TASKCMD          USER   FD      TYPE             DEVICE   SIZE/OFF       NODE NAME
systemd      1                        root  cwd       DIR                8,1       4096          2 /
systemd      1                        root  rtd       DIR                8,1       4096          2 /
systemd      1                        root  txt       REG                8,1    1489208   14928891 /lib/systemd/systemd
systemd      1                        root  mem       REG                8,1    1579448   14886924 /lib/x86_64-linux-gnu/libm-2.28.so

Other command that helped to track the discrepancy between df and du different file usage on FS is:
 

# du -hxa  / | egrep '^[[:digit:]]{1,1}G[[:space:]]*'


3. Fixing large files kept in memory filesystem problem


What is the real reason for ending up with this file handlers opened by running backgrounded programs on the Linux OS?
It could be multiple  but most likely it is due to exceeded server / client interactions or breaking up RAM or HDD drive with writing plenty of logs on the FS without ending keeping space occupied or Programming library bugs used by hanged service leaving the FH opened on storage.

What is the solution to file system files left in memory problem?

The best solution is to first fix custom script or hanged service and then if possible to simply restart the server to make the kernel / services reload or if this is not possible just restart the problem creation processes.

Once the process is identified like in my case this was MySQL on systemd enabled newer OS distros, just do:


# systemctl restart mysqld.service


or on older init.d system V ones:

# /etc/init.d/service restart


For custom hanged scripts being listed in ps axuwef you can grep the pid and do a kill -HUP (if the script is written in a good way to recognize -HUP and restart the sub-running process properly – BE EXTRA CAREFUL IF YOU'RE RESTARTING BROKEN SCRIPTS as this might cause your running service disruptions …).

# pgrep -l script.sh
7977 script.sh


# kill -HUP PID


Now finally this should either mitigate or at best case completely solve the reported disagreement between df and du, after which the calculated / reported disk space should be back to normal and show up approximately the same (note that size changes a bit as mysql service is writting data) constantly extending the size between the two checks.


# df -hk /var/lib/mysql; du -hskc /var/lib/mysql
Filesystem       Inodes  IUsed   IFree IUse% Mounted on
/dev/sdb5        19097172 3472744 14631296  20% /var/lib/mysql
3427772    /var/lib/mysql
3427772    total


What we learned?

What I've explained in this article is why and how it comes that 'zoombie' files reside on a filesystem
appearing to be eating disk space on a mounted local or network partition, giving strange inconsistent
reports, leading to system service disruptions and impossibility to have correctly shown information on used
disk space on mounted drive.

I went through with some standard logic on debugging service / filesystem / inode issues up explainat, that led me to the finding about deleted files being kept in filesystem and producing the filesystem strange sized / showing not correct / filled even after it was extended with tune2fs and was supposed to have extra 50GBs.

Finally it was explained shortly how to HUP / restart hanging script / service to fix it.

Some few good readings that helped to fix the issue:

What to do when du and df report different usage is here
df in linux not showing correct free space after file removal is here
Why do “df” and “du” commands show different disk usage?