Posts Tagged ‘way’

Life was easier when Blackberry and Apple were just fruits

Saturday, June 30th, 2012

Life was much easier when blackberry and Apple were just fruits

Sad but true fact Life was much easier when BlackBerry and Apple were just fruits!.

I don’t know about others but I have difficulties to adjust my body to the fast pace life has taken. Life would was easy and more fun without all this technology. Now even going to a pub you can’t escape the “doom” of technology. If the tech hype continues the way it does or something drastic doesn’t happen I guess all people on earth will get completely crazy …

I thougth about how this techno-mambo jumbo can be stopped on a wide scale and the only idea I have is a weapon that blocks all tech equipment world-wide. I hope someone will develop it soon and press the destory button SOON ! 🙂

PHP system(); hide command output – How to hide displayed output with exec();

Saturday, April 7th, 2012

I've recently wanted to use PHP's embedded system(""); – external command execute function in order to use ls + wc to calculate the number of files stored in a directory. I know many would argue, this is not a good practice and from a performance view point it is absolutely bad idea. However as I was lazy to code ti in PHP, I used the below line of code to do the task:

<?
echo "Hello, ";
$line_count = system("ls -1 /dir/|wc -l");
echo "File count in /dir is $line_count \n";
?>

This example worked fine for me to calculate the number of files in my /dir, but unfortunately the execution output was also visialized in the browser. It seems this is some kind of default behaviour in both libphp and php cli. I didn't liked the behaviour so I checked online for a solution to prevent the system(); from printing its output.

What I found as a recommendations on many pages is instead of system(); to prevent command execution output one should use exec();.
Therefore I used instead of my above code:

<?
echo "Hello, ";
$line_count = exec("ls -1 /dir/|wc -l");
echo "File count in /dir is $line_count \n";
?>

By the way insetad of using exec();, it is also possible to just use ` (backtick) – in same way like in bash scripting's .

Hence the above code can be also written for short like this:

<?
echo "Hello, ";
$line_count = `ls -1 /dir/|wc -l`;
echo "File count in /dir is $line_count \n";
?>

🙂

How to run your Own / Personal Domain Web WHOIS service in a minute with SpeedyWHOIS

Thursday, April 5th, 2012

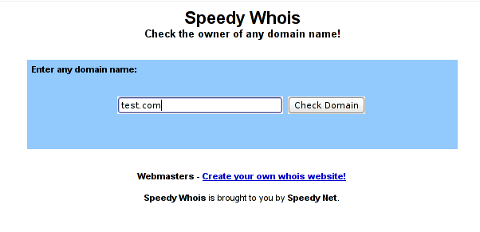
Running your own personal WHOIS service speedy whois in browser screenshot

I've been planning to run my own domain WHOIS service, for quite sime time and I always postpone or forgot to do it.
If you wonder, why would I need a (personal) web whois service, well it is way easier to use and remember for future use reference if you run it on your own URL, than wasting time in search for a whois service in google and then using some other's service to get just a simple DOMAIN WHOIS info.

So back to my post topic, I postpopned and postponed to run my own web whois, just until  yesterday, whether I have remembered about my idea to have my own whois up and running and proceeded wtih it.

To achieve my goal I checked if there is free software or (open source) software that easily does this.
I know I can write one for me from scratch, but since it would have cost me some at least a week of programming and testing and I didn't wanted to go this way.

To check if someone had already made an easy to install web whois service, I looked through in the "ultimate source for free software" sourceforge.net

Looking for the "whois web service" keywords, displayed few projects on top. But unfortunately many of the projects sources was not available anymore from http://sf.net and the project developers pages..
Thanksfully in a while, I found a project called SpeedyWhois, which PHP source was available for download.

With all prior said about project missing sources, Just in case if SpeedyWhois source  disappears in the future (like it probably) happened with, some of the other WHOIS web service projects, I've made SpeedyWhois  mirror for download here

 
Contrary to my idea that installing the web whois service might be a "pain in the ass", (like is the case  with so many free software php scripts and apps) – the installation went quite smoothly.
 
To install it I took the following 4 steps:
 
1. Download the source (zip archive) with wget 
 
# cd /var/www/whois-service;
/var/www/whois-service# wget -q https://www.pc-freak.net/files/speedywhois-0.1.4.zip
 
2. Unarchive it with unzip command 
 
 
/var/www/whois-service# unzip speedywhois-0.1.4.zip
3. Set the proper DNS records

My NS are using Godaddy, so I set my desired subdomain record from their domain name manager.
 

4. Edit Apache httpd.conf to create VirtualHost
 
This step is not mandatory, but I thought it is nice if I put the whois service under a subdomain, so add a VirtualHost to my httpd.conf
 
The Virtualhost Apache directives, I used are:
 
<VirtualHost *:80>
        ServerAdmin hipo_aT_www.pc-freak.net
        DocumentRoot /var/www/whois-service
        ServerName whois.www.pc-freak.net
        &lt;Directory /var/www/whois-service
        AllowOverride All
        Order Allow,Deny
        Allow from All
        </Directory>
</VirtualHost>
 
Onwards to take effect of new Webserver configs, I did Apache restart
 
# /usr/local/etc/rc.d/apache2 restart
 
Further on You can test whois a domain using my new installed SpeedyWHOISWeb WHOIS service  on http://whois.www.pc-freak.net
Whenever I have some free time, maybe I will work on the code, to try to add support for logging of previous whois requests and posting links pointing to the previous whois done via the web WHOIS service on the main whois page.
 
One thing that I disliked about how SpeedyWHOIS is written is, if there is no WHOIS information returned for a domain request (e.g.) a:
 
# whois domainname.com
 
returns an empty information, the script doesn't warn with a message there is no WHOIS data available for this domain or something.
 
 
This is not so important as this kind of behaviour of 'error' handling can easily be changed with minimum changes in the php code.
If you wonder, why do I need the web whois service, the answer is it is way easier to use.
I don't have more time to research a bit further on the alternative open source web whois services, so I would be glad to hear from anyone who tested other web whois service that is free comes under a FOSS license.
In the mean time, I'm sure people with a small internet websites like mine who are looking to run their OWN (personal) whois service SpeedyWHOIS does a great job.

How to take area screenshots in GNOME – Take quick area selection screenshots in G* / Linux and BSD

Thursday, March 15th, 2012

Quick Area screenshot in GNOME how to make quick area selection screenshots in Linux and FreeBSD gnome-screenshot shot

Often when, you do something on your PC, you need to make a quick screenshot of a screen area.. Yes GNOME's feature to take complete screenshots of Screen with Print Screen SysRQ and consequential picture edit with GIMP is one way, but this is far away from quick. This method to chop out of a complete display screenshot usually takes from 40 secs to 1 minute to properly cut and save a selection of the whole picture.
Another common use, that I love in GNOME is the ALT + Print Screen SysRQ key combination. alt+ print scr sysrq is handy while taking a single window screenshot is desired. Anyways often you only need to make a screenshot of a tiny area of the screen. Many people might think this is not possible currently in GNOME, but they will be wrong as there are no impossible but hard things to achieve on Linux / FreeBSD 😉

There are at least two ways using a predefined command for taking quick area screen snapshot.

1. Taking quick area screenshot by using ImageMagick's import command

To use import you will need to have installed ImageMagickswiss army knife of command line image manipulation 😉
For area screenshot with import, press ALT+F2 and type inside Run Application box:
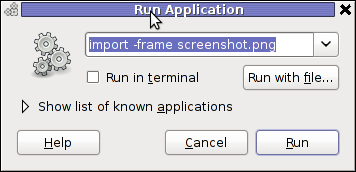
Screenshot GNOME run application GNU / Linux Debian ImageMagick import area screenshot

import -frame screenshot.png

Now make the selection of the exact screen area you would like to screeshot in file screenshot.png
Note that screenshot.png file will be saved by default in your home directory as it is read from $HOME shell variable:

hipo@noah:~$ echo $HOME/home/hipo
hipo@noah:~$ ls -al screenshot.png
-rw-r--r-- 1 hipo hipo 4950 Mar 14 21:11 screenshot.png

You see my $HOME equals /home/hipo, therefore screenshot.png just grabbed is saved in there.

One downside of taking the screenshot with import is that picture snapshot is not further edittable, if it has to be further processed with GIMP or some other graphic editor program.

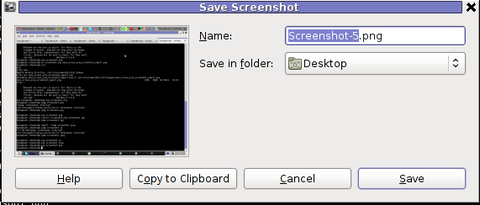
In the screenshot, below I show you one screen area of my XMMS taken with import -frame screenshot.png cmd:
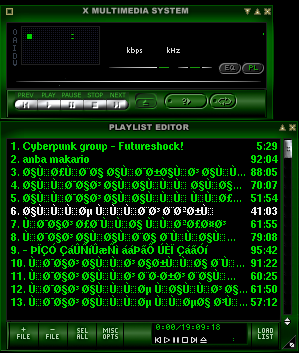
XMMS Screen Area Screenshot import screenshot

Trying to open the screenshot.png, file with GIMP displays the following error in GIMP:
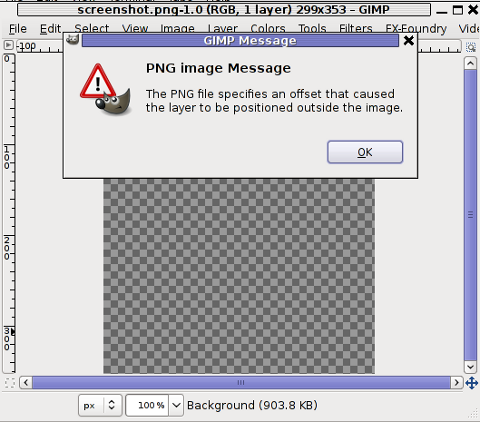
PNG image message PNG the file specifies offset that caused the layer to be positioned outiside image GIMP screenshot

Not all area snapshots taken with import -frame, create this issue sometimes screenshots are opening in GIMP but only area of the screenshot.png is visible in gimp.

Thanksfull, there is work around to this issue by converting the import generated PNG format picture to JPEG with ImageMagick's convert and then edit the .JPEG with GIMP etc.:

hipo@noah:~$ convert screenshot.png screenshot.jpg

Hence to permanently work around it, in case you intend to apply (GIMP modifications), once area snapshot is made instruct import to save its output picture in .jpeg, e.g.:

hipo@noah:~$ import -frame screenshot.jpeg

2. Taking quick area screenshot using gnome-screenshot cmd

Once again invoke the GNOME command Launcher by pressing Alt+F2 (holding alt and pressing F2) and type in the launch box:

gnome-screenshot -a
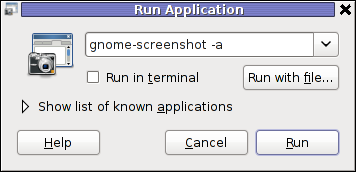
gnome-screenshot Run Application in GNOME 2.30 on Debian GNU / Linux

Below is a small area from my desktop, chopped with gnome-screenshot 🙂

GNOME desktop area chop screenshot with gnome-screenshot on my home Debian Linux

You see on above screenshot a tiny (picture) icon one of the greatest, if not the greatest bulgarian saint – saint John of Rila. St. John's lived as hermit for many years in Rila mountain and by God's grace possessed incorruptable body. His incorruptable body is still kept and can be venerated in Rila Monastery. The monastery is located 160 km from Bulgaria's capital city Sofia

St. Johns first Bulgarian established monastery Rila Monastery is currently the biggest functioing monastery in Bulgaria. The saints monastery is considered one of the most holy places in Bulgaria. If you have a travel or plan a holiday in Bulgaria, I warmly recommend you go there and venerate the saint incorruptable relics.

3. Binding keys to allow quick area screenshot taking with gnome-screenshot in GNOME

This configuration is for GNOME 2.x and is tested to work on my Debian (Squeeze 6.0), GNOME ver. 2.30.2, it should work in earlier Ubuntu versions shipped with GNOME 2.2.xx too. As I've red on the Internet it works well with Ubuntu 10.10Binding a key for screenshot area grab, should be working properly also on any GNOME 2.2.x supporting OS, including the BSD family OSes (FreeBSD, OpenBSD, NetBSD)

a) setting gnome-screenshot key binding for interactive screenshot area grab

Navigate the mouse cursor to GNOME main menus panel in left top, where you see (Applications, Places, System).
Therein use menus:

System -> Preferences -> Keybord Shortcuts -> Add ->

Alternatively if you prefer you can directly invoke the Keyboard Shortcuts configuration with command:

hipo@noah:~$ gnome-keybinding-properties

Further on, assign a shortcut by filling in something like:

name: grab-screen-area
command: gnome-screenshot -i -a
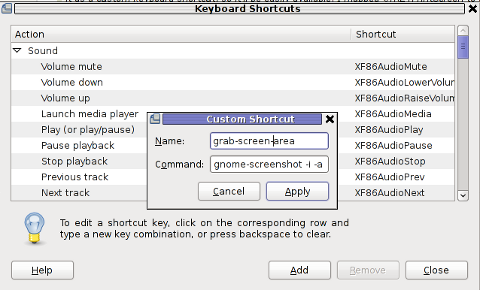
GNOME add keyboard shortcut map key for area interactive screenshot

press Apply and next map a key to the new defined key binding:
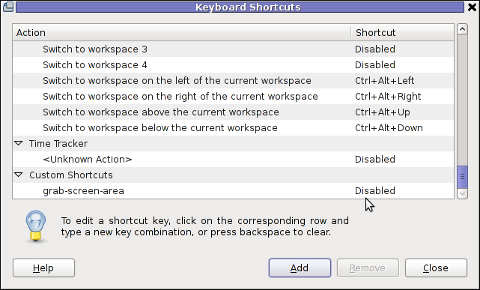
GNOME add keyboard shortcut map key

Under the Shortcut column click on Disabled and assign some key combination to invoke the cmd for example Ctrl+F4

The command gnome-screenshot -i makes gnome-screenshot, show interactive make screenshot dialog like the one in below screenshot.
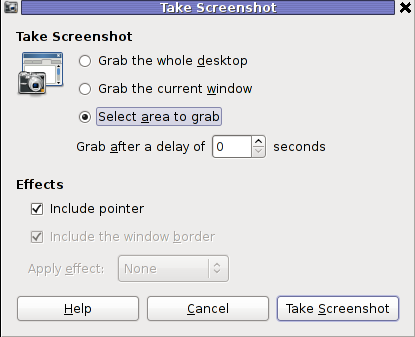
GNOME screenshot interactive screenshot select area grab shot

b) creating gnome-screenshot -a area screenshot key binding for quick area screenshots "on the fly"

The procedure is precisely the same as with adding interactive screenshot; Under Keyboard Shortcuts GNOME config assign new key binding by pressing Add button and adding:

name: grab-screen-area1
command: gnome-screenshot -a

Once again in Shortcut column in line starting with grab-screen-area1 add your desired key switch. I personally like Ctrl+Print Screen SysRQ as it is close to the default GNOME key combination assigned for taking screenshot for a Windows Alt+Print SysRq

It was logical, that this key binding should work and a direct selection mouse cursor to appear once Alt+Print SysRQ is pressed, however for some reason this is not working (hmm, maybe due to bug) ??

Thanksfully it is always possible to substitute the just assigned gnome-screenshot -a key binding with import -frame /home/hipo/Desktop/screenshot.png

If you have followed literally my article so far and you did tried to place a bind for gnome-screenshot -a, modifty grab-screen-area1 to be something like:

name: grab-screen-area1
command: import -frame /home/hipo/Desktop/screenshot.png

Where modify the path /home/hipo/Desktop/screenshot.png, to wherever you prefer the region screep capture to be stored.

c) bind keys for delayed screenshot

This also a handy binding, especially if you every now and then need to make screenshots of screen with a few secs interval.
Add one more keyboard shortcut;

name: grab-screen-area2
command: gnome-screenshot -d 5

Assign a key to make a screenshot of the active display after a delay of 5 seconds. I prefer Ctrl+F5

Onwards every time you would like to make an area screenshot, just use the defined keys:

Ctrl+F4 - will prompt you interactively for the precise type of screenshot you would like to take
Ctrl+Print SysRQ - will prompt you for a direct area to select and once selected will immediately screenshot it
Ctrl+F5 - would do delayed screenshot of entire screen after a delay of 5 seconds

4. Adding border and drop shadow effects with gnome-screenshot Actually, there is plenty of interesting things to do with Screenshots which I never thought were possible.
While reading gnome-screenshot's man page, I've stumbled to an interesting argument:

-e, --effect=EFFECT,
Add an effect to the outside of the screenshot border. EFFECT can be ``shadow'' (adding drop shadow), ``border'' (adding
rectangular space around the screenshot) or ``none'' (no effect). Default is ``none''.

This would have been a nice feature but as of time of writting this article, untofrtunately it is not working in GNOME 2.30.2. I'm not sure if this is a local Debian bug, however I suspect on other Linux distributions with different GNOME build configuration, this features might be working well. My guess here is drop shadow effect and border effect are not working because, gnome-screenshot was compiled without (support for ImageMagick?).
Anyways the way the feature is supposed to be work is by invoking commands:
:

hipo@noah:~$ gnome-screenshot --border-effect=shadow
hipo@noah:~$ nome-screenshot --border-effect=border

The same basic effects, are also available through GIMP's menus:

Image -> Effects

5. Setting default behaviour of gnome-screenshot in gconf-editor GConf (Gnome config registry db)

Experienced, GNOME users should already know about the existence of gconf-editor and the gnome registry database. For those who have don't, coming from MS-Windows background gconf-editor is GNOME (graphical environment) equivalent to Microsoft Windows registry regedit command

gconf-editor can be used to atune the way the screenshots are taken by default. To do so, launch gconf-editor cmd and follow to sub-structure:

/ -> apps -> gnome-screenshot
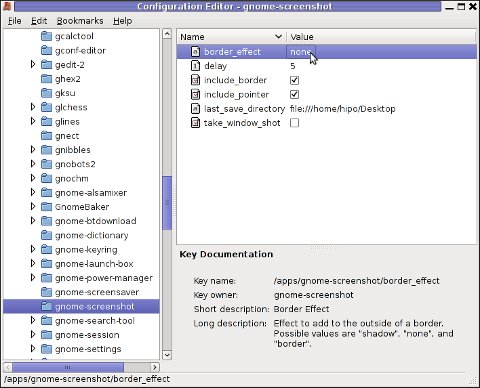
gconf-editor GNOME screenshot border effect none default gnome-screenshot gnome behaviour

The settings in above screenshot are configurations which are used by default by gnome-screenshot, right after install.
You can play with the options to change the default way PrintScreen SysRQ key press will take screenshots.
Here is one example for changing the gnome-screenshot default GNOME behaviour:
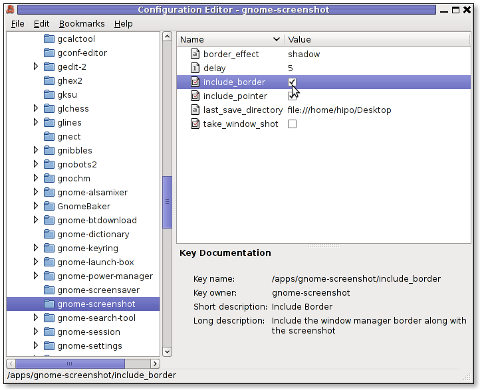
GConf Editor GNOME screenshot, border effect drop shadow and include border option set on Linux Debian

As you can see in above screenshot, I've changed my default gnome-screenshot snap taking to include a drop shadow effect:
Name | Value
border_effect | shadow include_border | (tick on)
last_save_directory | file://home/hipo/Desktop

As you see you can also control, where by default gnome-screenshot will save its screenshots, by default, its saved in $HOME/Desktop
. If you prefer some custom directory to only contain Screenshots taken for instance $HOME/Screenshots, create the directory:
hipo@noah:~$ mkdir ~/Screenshots

and then change the value for last_save_directory gconf var:

last_save_directory | file://home/hipo/Screenshots

Once settings are applied screenshots with Print Screen SysRQ key will be made with Shadow Border effect and saved in /home/hipo/Screenshots

Strangely enough, changing gnome-screenshot default screenshotting values to include screenshot effects like drop shadow or screenshot border effect works just fine.
Even though gnome-screenshot –border-effect=shadow and gnome-screenshot –border-effect=border doesn't directly affect the current screenshot to be made, I've later noticed writting this two commands in the gnome-terminal, does change the border settings for gconf-editor screenshot border.

If you enjoyed, this article and you intend to become "a professional screnshotter" :), you might also enjoy my two other articles:

Happy screenshotting 😉

FreeBSD Jumbo Frames network configuration short how to

Wednesday, March 14th, 2012

FreeBSD Jumbo Frames Howto configure FreeBSD

Recently I wrote a post on how to enable Jumbo Frames on GNU / Linux , therefore I thought it will be useful to write how Jumbo Frames network boost can be achieved on FreeBSD too.

I will skip the details of what is Jumbo Frames, as in the previous article I have thoroughfully explained. Just in short to remind you what is Jumbo Frames and why you might need it? – it is a way to increase network MTU transfer frames from the MTU 1500 to MTU of 9000 bytes

It is interesting to mention that according to specifications, the maximum Jumbo Frames MTU possible for assignment are of MTU=16128
Just like on Linux to be able to take advantage of the bigger Jumbo Frames increase in network thoroughput, you need to have a gigabyt NIC card/s on the router / server.

1. Increasing MTU to 9000 to enable Jumbo Frames "manually"

Just like on Linux, the network tool to use is ifconfig. For those who don't know ifconfig on Linux is part of the net-tools package and rewritten from scratch especially for GNU / Linux OS, whether BSD's ifconfig is based on source code taken from 4.2BSD UNIX

As you know, network interface naming on FreeBSD is different, as there is no strict naming like on Linux (eth0, eth1, eth2), rather the interfaces are named after the name of the NIC card vendor for instance (Intel(R) PRO/1000 NIC is em0), RealTek is rl0 etc.

To set Jumbro Frames Maximum Transmission Units of 9000 on FreeBSD host with a Realtek and Intel gigabyt ethernet cards use: freebsd# /sbin/ifconfig em0 192.168.1.2 mtu 9000
freebsd# /sbin/ifconfig rl0 192.168.2.2 mtu 9000

!! Be very cautious here, as if you're connected to the system remotely over ssh you might loose connection to it because of broken routing.

To prevent routing loss problems, if you're executing the above two commands remotely, you better run them in GNU screen session:

freebsd# screen
freebsd# /sbin/ifconfig em0 192.168.1.2 mtu 9000; /sbin/ifconfig rl0 192.168.1.2 mtu 9000; \
/etc/rc.d/netif restart; /etc/rc.d/routed restart

2. Check MTU settings are set to 9000

If everything is fine the commands will return empty output, to check further the MTU is properly set to 9000 issue:

freebsd# /sbin/ifconfig -a|grep -i em0em0: flags=8843<UP,BROADCAST,RUNNING,SIMPLEX,MULTICAST> metric 0 mtu 9000freebsd# /sbin/ifconfig -a|grep -i rl0
rl0: flags=8843<UP,BROADCAST,RUNNING,SIMPLEX,MULTICAST> metric 0 mtu 9000

3. Reset routing for default gateway

If you have some kind of routing assigned for em0 and rl0, network interfaces they will be affected by the MTU change and the routing will be gone. To reset the routing to the previously properly assigned routing, you have to restart the BSD init script taking care for assigning routing on system boot time:

freebsd# /etc/rc.d/routing restart
default 192.168.1.1 done
add net default: gateway 192.168.1.1
Additional routing options: IP gateway=YES.

4. Change MTU settings for NIC card with route command

There is also a way to assign higher MTU without "breaking" the working routing, e.g. avoiding network downtime with bsd route command:

freebsd# grep -i defaultrouter /etc/rc.conf
defaultrouter="192.168.1.1"
freebsd# /sbin/route change 192.168.1.1 -mtu 9000
change host 192.168.1.1

5. Finding the new MTU NIC settings on the FreeBSD host

freebsd# /sbin/route -n get 192.168.1.1
route to: 192.168.1.1
destination: 192.168.1.1
interface: em0
flags: <UP,HOST,DONE,LLINFO,WASCLONED>
recvpipe sendpipe ssthresh rtt,msec rttvar hopcount mtu expire
0 0 0 0 0 0 9000 1009

6. Set Jumbo Frames to load automatically on system load

To make the increased MTU to 9000 for Jumbo Frames support permanent on a FreeBSD system the /etc/rc.conf file is used:

The variable for em0 and rl0 NICs are ifconfig_em0 and ifconfig_rl0.
The lines to place in /etc/rc.conf should be similar to:

ifconfig_em0="inet 192.168.1.1 netmask 255.255.255.0 media 1000baseTX mediaopt half-duplex mtu 9000"

Change in the above lines the gateway address 192.168.1.1 and the netmask 255.255.255.0 to yours corresponding gw and netmask.
Also in the above example you see the half-duplex ifconfig option is set insetad of full-duplex in order to prevent some duplex mismatches. A full-duplex could be used instead, if you're completely sure on the other side of the host is configured to support full-duplex connections. Otherwise if you try to set full-duplex with other side set to half-duplex or auto-duplex a duplex mismatch will occur. If this happens insetad of taking the advantage of the Increase Jumbo Frames MTU the network connection could become slower than originally with standard ethernet MTU of 1500. One other bad side if you end up with duplex-mismatch could be a high number of loss packets and degraded thoroughout …

7. Setting Jumbo Frames for interfaces assigning dynamic IP via DHCP

If you need to assign an MTU of 9000 for a gigabyt network interfaces, which are receiving its TCP/IP network configuration over DHCP server.
First, tell em0 and rl0 network interfaces to dynamically assign IP addresses via DHCP proto by adding in /etc/rc.conf:

ifconfig_em0="DHCP"
ifconfig_rl0="DHCP"

Secondly make two files /etc/start_if.em0 and /etc/start_if.rl0 and include in each file:

ifconfig em0 media 1000baseTX mediaopt full-duplex mtu 9000
ifconfig rl0 media 1000baseTX mediaopt full-duplex mtu 9000

Copy / paste in root console:

echo 'ifconfig em0 media 1000baseTX mediaopt full-duplex mtu 9000' >> /etc/start_if.em0
echo 'ifconfig rl0 media 1000baseTX mediaopt full-duplex mtu 9000' >> /etc/start_if.rl0

Finally, to load the new MTU for both interfaces, reload the IPs with the increased MTUs:

freebsd# /etc/rc.d/routing restart
default 192.168.1.1 done
add net default: gateway 192.168.1.1

8. Testing if Jumbo Frames is working correctly

To test if an MTU packs are transferred correctly through the network you can use ping or tcpdumpa.) Testing Jumbo Frames enabled packet transfers with tcpdump

freebsd# tcpdump -vvn | grep -i 'length 9000'

You should get output like:

16:40:07.432370 IP (tos 0x0, ttl 50, id 63903, offset 0, flags [DF], proto TCP (6), length 9000) 192.168.1.2.80 > 192.168.1.1.60213: . 85825:87285(1460) ack 668 win 14343
16:40:07.432588 IP (tos 0x0, ttl 50, id 63904, offset 0, flags [DF], proto TCP (6), length 9000) 192.168.1.2.80 > 192.168.1.1.60213: . 87285:88745(1460) ack 668 win 14343
16:40:07.433091 IP (tos 0x0, ttl 50, id 63905, offset 0, flags [DF], proto TCP (6), length 9000) 192.168.1.2.80 > 192.168.1.1.60213: . 23153:24613(1460) ack 668 win 14343
16:40:07.568388 IP (tos 0x0, ttl 50, id 63907, offset 0, flags [DF], proto TCP (6), length 9000) 192.168.1.2.80 > 192.168.1.1.60213: . 88745:90205(1460) ack 668 win 14343
16:40:07.568636 IP (tos 0x0, ttl 50, id 63908, offset 0, flags [DF], proto TCP (6), length 9000) 192.168.1.2.80 > 192.168.1.1.60213: . 90205:91665(1460) ack 668 win 14343
16:40:07.569012 IP (tos 0x0, ttl 50, id 63909, offset 0, flags [DF], proto TCP (6), length 9000) 192.168.1.2.80 > 192.168.1.1.60213: . 91665:93125(1460) ack 668 win 14343
16:40:07.569888 IP (tos 0x0, ttl 50, id 63910, offset 0, flags [DF], proto TCP (6), length 9000) 192.168.1.2.80 > 192.168.1.1.60213: . 93125:94585(1460) ack 668 win 14343

b.) Testing if Jumbo Frames are enabled with ping

Testing Jumbo Frames with ping command on Linux

linux:~# ping 192.168.1.1 -M do -s 8972
PING 192.168.1.1 (192.168.1.1) 8972(9000) bytes of data.
9000 bytes from 192.168.1.1: icmp_req=1 ttl=52 time=43.7 ms
9000 bytes from 192.168.1.1: icmp_req=2 ttl=52 time=43.3 ms
9000 bytes from 192.168.1.1: icmp_req=3 ttl=52 time=43.5 ms
9000 bytes from 192.168.1.1: icmp_req=4 ttl=52 time=44.6 ms
--- 192.168.0.1 ping statistics ---
4 packets transmitted, 4 received, 0% packet loss, time 3003ms
rtt min/avg/max/mdev = 2.397/2.841/4.066/0.708 ms

If you get insetad an an output like:

From 192.168.1.2 icmp_seq=1 Frag needed and DF set (mtu = 1500)

--- 192.168.1.1 ping statistics ---
0 packets transmitted, 0 received, +4 errors

This means a packets with maximum MTU of 1500 could be transmitted and hence something is not okay with the Jumbo Frames config.
Another helpful command in debugging MTU and showing which host in a hop queue support jumbo frames is Linux's traceroute

To debug a path between host and target, you can use:

linux:~# traceroute --mtu www.google.com
...

If you want to test the Jumbo Frames configuration from a Windows host use ms-windows ping command like so:

C:\>ping 192.168.1.2 -f -l 8972
Pinging 192.168.1.2 with 8972 bytes of data:
Reply from 192.168.1.2: bytes=8972 time=2ms TTL=255
Ping statistics for 192.168.1.2:
Packets: Sent = 4, Received = 4, Lost = 0 (0% loss),
Approximate round trip times in milli-seconds:
Minimum = 2ms, Maximum = 2ms, Average = 2ms

Here -l 8972 value is actually equal to 9000. 8972 = 9000 – 20 (20 byte IP header) – 8 (ICMP header)

One more day passed

Thursday, November 29th, 2007

One more day passed. I have pains and I scream to God for guidance and help. I’m not sure where am going to as usual. Today we had to have German. I wentto the college only to find out that the German lesson is removed from the schedule. A friend of mine who is in germany Shaltev has sent me a Video of his band.The band is called viamala, here is there website http://viamala.org. I really liked there music btw. Tomorrow I have Dutch. The day was a sort of quite for me thanks and Praise be to the Lord creator. By the way my health is not well. I have pains in different organs sometimes. You know life is hard. I’m loving more and more the FreeBSD :). I watched Ice Age and currently I’m watching Ice Age 2. Great anime (I’m having fun with it. I often think of becoming a monk. Life is such a vanity.END—–

Question, Questions, Questions

Wednesday, July 23rd, 2008

I don’t know about you out there, but I’m a kind of person asking questions all the time.I really wanna serve the Lord in a way. Today my grandma came home and shared she is on a wayto go completely crazy I really am in pain for her she is so kind and good but she suffers so badlyshe suffers from diabetic foot disease I fervently pray to our creator to have mercy over her and help herand heal her disease or at least take away the pain in the Name of Jesus Our Saviour! Amen.

END—–

The Economics Exam. Or the day of a standard man :]

Tuesday, January 30th, 2007

Today. I had exam on marketing. The exam started 50 minutes later because the teachers had some sort of meating.I was able to get most of the test answers from one collegue but I’m not sure are her answers correct.I hope if God give me a help I would pass. After that me and some others from my group tried to get the anwers or the exam for our next exam which is tomorrow and is in the Accounting discipline.Unluckily we were not able to find anything. As usual I don’t know anything and I hope on a miracle and God’smercy to take the exam. I invited Habib to come home to explain me some of the matters. But my mind was toooverheaded with information so I was not in a mood for studying. After that we went out with Habib, Mitko,Toto and Sami. All started well until the Zuio’s father come to our table ( we were drinking beer on the fountain).He come and started kissing all of the guys around he started talking total bullshits to Habib and otherpersons in the coffee terrible picture The Classical “Bai Ganio” in action. After that we walked for some timewith Habib on the way to his home. And drinked a coffee on the “Zhurnalist” Coffee. Now I’m home again.After some problems luckily, I was able to start skype’s microphone to work under my FreeBSD.I have to sit on my back and study for few ours. Thanks God I didn’t have any problems with my Servers.Glory is for the Lord of Hosts.END—–

God’s Grace

Monday, March 5th, 2007

God was graceful to Habib and it looks like he hear our prayers. UK Visa was granted to Habib for the maximum period of 6 months. Praise be to God for this! Also ORDER’s tuition fee seems to stay the same as in the news in the universite website is said “By The Grace of God .. etc.” :]Also great thing it is there is peace in my home. Today I was on church and on the way for the church I met Bonchev, he was drunk and carrying accordion. He wanted to go to the Church in that state.But in the end I was able to convince him not to come to the Liturgy (It would be fun if he entered the church drunk hardly staying on his feets. I had some spiritual problems during the day mainly the Python Spirit is trying to attack me, that’s awful spirit in the name of Jesus Christ I command you to go in hell where your place is! Amen. I played today some MAME games, watched Cartoon Network,I was out on a coffee with Lily. Mitko and Habib come in the end from Sofia.

Alternative way to kill X in Linux with Alt + Printscreen + K

Sunday, October 31st, 2010

I’ve recently realized that the CTRL + ALT + BACKSPACE keyboard combination is no longer working in Debian unstable.

This good old well known keyboard combination to restart X is not working with my xorg 7.5+8 under my Gnome 2.30 desktop
However thanksfully there is another combination to kill the X server if for instance if your Gnome desktop hangs.

If that happens simply press ALT + PRINTSCREEN + K this will kill your X and then reload the (Gnome Display manager) gdm.

Another suggestion I’ve red in the forums of a way to enable back CTRL+ALT+BACKSPACE is to put in either .bashrc or .xinitrc the following command

setxkbmap -option terminate:ctrl_alt_bksp

BTW It’s better that the above command is placed in ~/.xinitrc.

I’ve also red on some forums that in newer releases of Ubuntu. The CTRL+ALT+BACKSPACE can be enabled using a specific command, e.g. with:

dontzap -disable