Posts Tagged ‘web browser’

Clean slow Windows PC / Laptop from Spyware, Malware, Viruses, Worms and Trojans – Anti-Malware Program Arsenal

Monday, January 26th, 2015

clean-slow-Windows-computer-notebook-laptop-from-malware-spyware-viruses-worms-and-trojans

Malware Bytes is a great tool to clean a PC in a quick and efficient way from Malware /  Spyware that wormed while browsing infectious site on the internet.
But sometimes PCs that has to be fixed are so badly infected with Spyware, Malware and Viruses that even after running Malware Bytes on boot time, left Work or Viruses do automatically download from the Internet or have been polymorphically renamed to a newer one that escapes Malware Bytes badware database and heroistics
Such problematic PCs are usually unmaintained user PCs whose Anti-Virus procetion with Nod32 or Kaspersky licensing has long expired leaving the PC without any mean of protection / PCs with removed Firewall / AV Program (due to Virus or Malware Infection) or on Computers which were used actively to download Cracked Programs, Games – by small kids or PCs used for watching heavily Porn (by teenagers).

Here is a List of Top Iseful FreeWare anti-Malware softwares, you can use in combination with MalwareBytes to (Clean) / Fix a Windows PC that is in almost unsolvable state (and obviously needs re-install) but contains too much software either obsolete or hard (time wasting) to configure:

Below anti-malware goodies helps in “Resurrecting” even the worst infected PC, so I believe every Win Admin should know them well and in computer clubs and university Windows computer networks with Internet it is recommended to check computers at least once a year …

1. Remove Bootkits and Trojans with Kaspersky TDSSKiller

Bootkit is a rootkit which loads when Windows system boots.  To search and destroy bootkits – Download the latest official version of Kaspersky TDSSKiller.

remove-bootkits-and-trojans-with-kaspersky-tdsskiller-screenshot-anti-malware

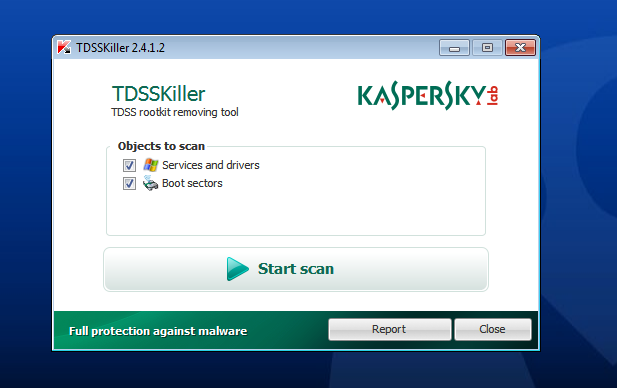
KASPERSKY TDSSKILLER DOWNLOAD LINK Run Kaspersky (after changing parameters  – enable Detect TDLFS file system) and remove any found infections

2. Download and use latest official version of RKill to terminate any malicious processes running in background

rkill-terminate-any-malicious-spyware-malware-processes-running-in-background-rkill-logo

Please note that you will have to rename version of RKILL so that malicious software won’t block this utility from running. (link will automatically download RKILL renamed as iExplore.exe)
Double click on iExplore.exe to start RKill and stop any processes associated with Luhe.Sirefef.A.

rkill-terminate-trojan-spyware-processes-windows-xp-7-screenshot

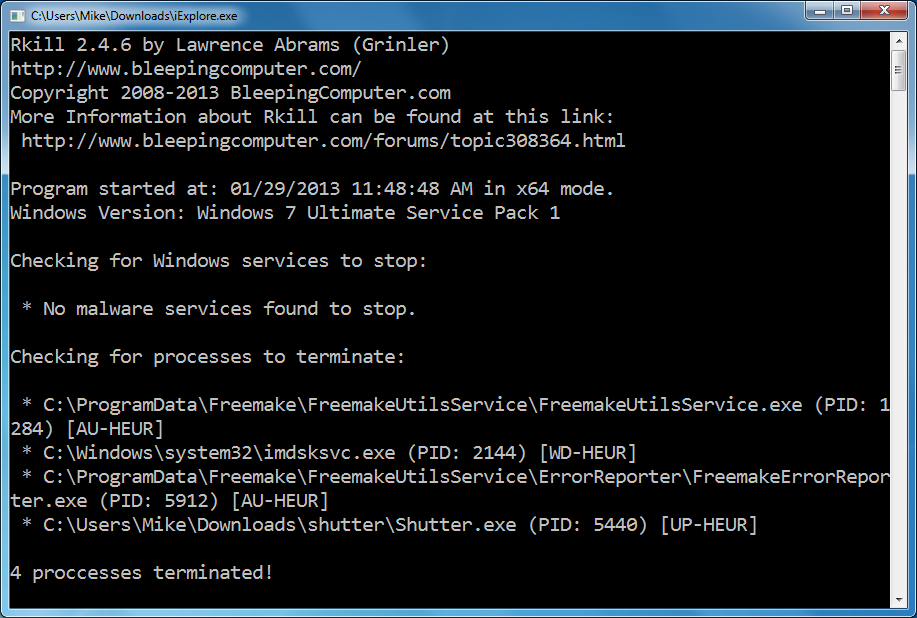
RKill will now start working in the background, please be patient while the program looks for any malicious process and tries to end them.
When the Rkill utility has completed its task, it will generate a log.

Do not reboot your computer after running RKill as the malware programs will start again.

When the Rkill utility has completed its task, it will generate a log. Do not reboot computer after running RKill as the malware programs will start again.

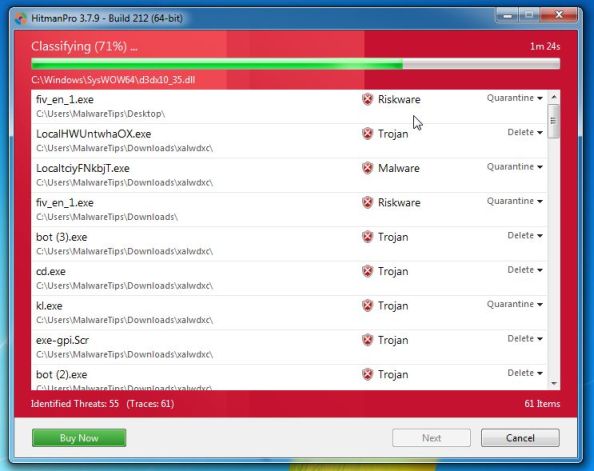
3. Clean (any remaining) malware from your computer with HitmanPro

clean-remaining-malware-from-computer-with-hitmanpro-scanning-screenshot

HITMANPRO DOWNLOAD LINK is here

My Mirror of HitmanPro 3.7 (32 bit) Windows version is here
My Mirror of HitmanPro 3.7 (64 bit) Windows version is here

Because HitmanPro is unfortunately proprietary software, when you run a scan on the computer “Activate free license” button to begin the free 30 days trial, and remove all the malicious files found on your computer.

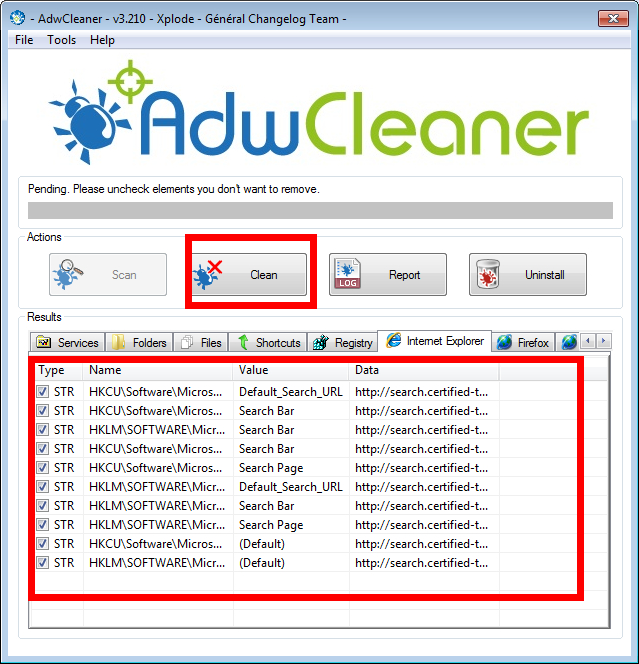
4. Remove Windows adware with AdwCleaner

The AdwCleaner utility will scan your computer and web browser for the malicious files, browser extensions and registry keys, that may have been installed on your computer without your knowledge.

adwcleaner-clean-remove-delete-adware-with-AdwCleaner-found-malware-screenshot

Here isAdwCleaner utility ADWCLEANER DOWNLOAD LINK 
My Download AdwCleaner 4.109 is here

Note that before starting AdwCleaner, close all open programs and internet browsers. After finishing scan AdwCleaner requires a reboot (always backup cause you never know what can happen).

5. Remove any malicious registry keys added by malware with RogueKiller

remove-any-malicious-registry-keys-added-by-malware-with-RogueKiller

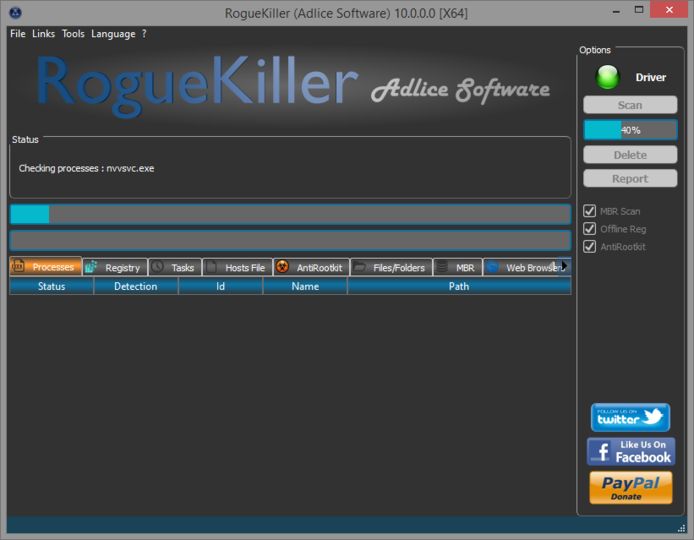
RogueKiller is a utility that will scan for the unwanted registry keys and any other malicious files on your computer. It is pretty much like the free software Little Registry Cleaner but it is specialised in removing common malware left junk keys.

download the latest official version of RogueKiller from the below links.

ROGUEKILLER x86 DOWNLOAD LINK (For 32-bit machines)
ROGUEKILLER x64 DOWNLOAD LINK (For 64-bit machines)

Download Mirror link of Roguekiller X86 is here
Download Mirror link of Roguekiller X64 is here

Wait for the Prescan to complete.This should take only a few seconds,  then click on the “Scan” button to perform a system scan. After scan complete delete any found hax0r malicious registries

6. Purge any leftover infections on your computer with Emsisoft Anti-Malware

purge-any-left-over-infections-on-your-computer-with-EmsiSoft-anti-malware

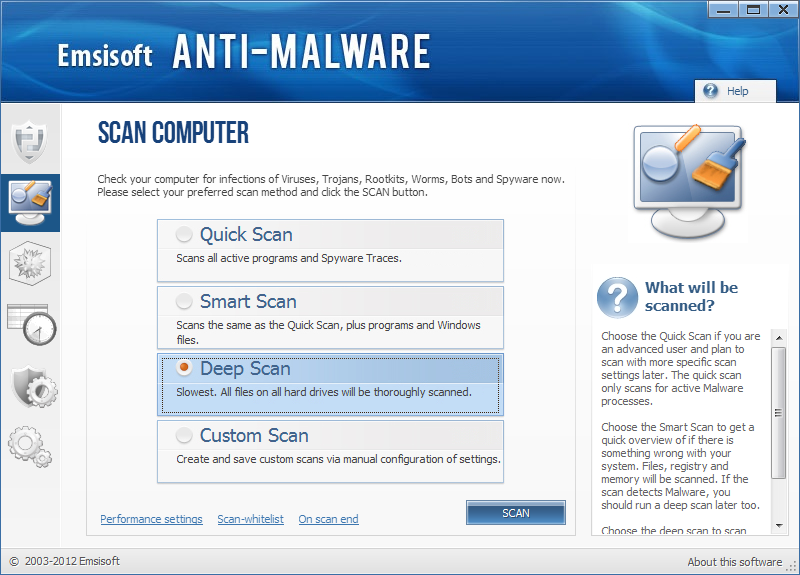
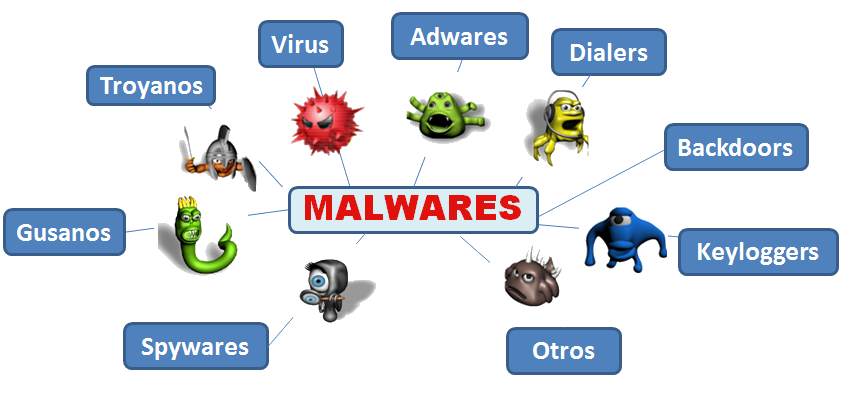
Emsisoft scan (potentially) infected PC for Viruses, Trojans, Spyware, Adware, Worms, Dialers, Keyloggers and other badware.

DOWNLOAD EMSISOFT EMERGENCY KIT HERE  – The link will open in new window tab. Note that EmsiSoftEmergencyKit is huge 168 Mbs!

My mirror of EmsiSoft Emergency kit is here

It is recommended to do the SMART Scan as it is more complete, though if you're in a hurry Quick Scan might also find something ugly. Once Scan completes Quarantine any found infected items.

It is best if all of the 7 Win cleaners are run, e.g.:

(TDSSKiller, RKill, HitmanPro, AdwCleaner, RogueKiller, Little Registry Cleaner  and EmsiSoft) in a consequential order as they're shown in article). Finally a run of Malware Bytes just to make sure nothing has remained is a good idea too.

Hopefully now you should be malware free. If you know other useful Anti-Spyware tools that helped you in case of PC Malware Slowness problems (constant Hard Disk read writes), please drop a comment and I will include them in this list). 
Once badware is removed from your PC or laptop the CPU should no longer show constantly busy with some strange process in taskmgr and notebook should be much more responsive (and if you have power management enabled) it will consume less energy reducing your electricity bills 🙂
 

Any feedback on experience with running above bunch of anti spy programs is also mostly welcome. 

How to configure equivalent of Linux /etc/resolv.conf search domain.com in MS Windows – DNS Suffix

Thursday, June 26th, 2014

windows-append-dns-suffixes-on-windows-equivalent-of-linux-search-in-resolv-conf-screenshot

Linux's default file that defines what DNS servers will be used /etc/resolv.conf typically contains directives with the default search domain or domains; used for FQDN (Fully Qualified Domain Name) completion when no domain suffix is supplied as part of the  DNS query. Lets say sub-domains under domain.com  has to be accessed (in /etc/resolv.conf) there is:

search domain.com

That is very handy whether you have to ssh or open in web browser (sites) or multiple servers each residing under a single main domain name (for example:
server1.domain.com, server2.domain.com, server3.domain.com etc.) by typing in browser or SSH by only passing the sub-domain name i.e.:
 

http://server1
http://server2

or

ssh user@server1
ssh user@server2


Here is /etc/resolv.conf from www.pc-freak.net

# cat /etc/resolv.conf

domain www.pc-freak.net
search www.pc-freak.net bergon.net


Here is example of what I mean, ascii-games is a sub-domain of www.pc-freak.net (ascii-games.www.pc-freak.net) and is resolved with no need to type full FQDN


# host ascii-games
ascii-games.www.pc-freak.net has address 83.228.93.76


The DNS server knows that all failed to resolve queries by set DNS should be searched (resolved) under the defined search domain, i.e. each DNS query for server2, serverX (would try to be resolved as a subdomain of domain.com).

Therefore, a very good question is what is Microsoft Windows (2000, 2003, 8) OS equivalent way to define search domain.com into /etc/resolv.conf?

In Windows the same /etc/resolv.conf hosts search is done using the so called "DNS Suffixes".

DNS Suffixes are used for resolv of (domain name strings with no dots).

Adding a new DNS Suffix in Windows is done from

windows-control-panel-network-connections-screeshot-add-dns-suffix-equivalent-to-linux-resolv-conf-search


Control Panel -> Network and Sharing Center -> Change Adapter Settings


Here select LAN card Adapter used to bring Internet to Win host,be it Local Area Connection or

Wireless Network Connection

 and choose:

Properties


windows-append-dns-suffixes-on-windows-equivalent-of-linux-search-in-resolv-conf-screenshot


From

Network Connection Properties

dialog select

Internet Protocol Version 4 (TCP/IPv4)

and again click on

Properties


network-properties-internet-protocol-version4_tcp_ipv4-windows-settings-screenshot-advanced-tab-add-dns-suffix

On next dialog click on


Advanced (button) -> DNS (tab)

windows-append-dns-suffixes-on-windows-equivalent-of-linux-search-in-resolv-conf-screenshot


In field
 

DNS Suffix for this connection

fill in host which you would like to resolve with no need for FQDN and press the

Add


(exactly like adding search www.pc-freak.net in  /etc/resolv.conf on Linux host). Add multiple hosts DNS Suffix, if you want to access subdomains naming from multiple base domain.

Fix to “413 Request Entity Too Large” error in Nginx webserver and what causes it

Friday, November 14th, 2014

nginx_413_request_entity_too_large-fix

If you administer NGINX caching server serving static files content and redirecting some requests to Apache and you end up with errors when uploading big files (using HTTP PUT method), even though in Apache's PHP  upload_max_filesize is set to relatively high number upload_max_filesize = 60M.

Here is what happens during hand shake of web-browser -> server interaction 'till status is returned:
 

Web browser or Webcrawler robot goes through the following phases while talking to Web server:


1. Obtain an IP address from the IP name of the site (base on site URL without the leading 'http://'). 
This is provided by domain name servers (DNSs) configured for PC.
2. Open an IP socket connection to that IP address.
3. Write an HTTP data stream through that socket
(4) Receive an HTTP data stream back from the Web server in response. 
This data stream contains status codes whose values are determined by the HTTP protocol
whether successful. 


In the case the is recognized and reported to client 'web browser', causing the error.

The fix is to also increase max file upload limit in NGINX this is done via:
 
client_max_body_size variable in /usr/local/nginx/nginx.conf (or /etc/nginx/nginx.conf whether Nginx is installed from package).
Here is extract from nginx.conf

http {
    include       mime.types;
    default_type  application/octet-stream;
    sendfile        on;
    keepalive_timeout  65;


    server {
        client_max_body_size 60M;
        listen       80;
        server_name  localhost;

        # Main location
        location / {
            proxy_pass         http://127.0.0.1:8000/;
        }
    }
}


To make new configuration active Restart Nginx:

/etc/init.d/nginx restart

How to install Google Chrome web browser on Debian 7 Wheezy Linux

Wednesday, September 4th, 2013

How to install Google Chrome web browser on Debian Gnu Linux Chrome and tux logo
Just installed Debian 7 Linux and wondered how to install Google Chrome Browser on Debian Wheezy. It took me a while until I figure it out, as direct download from Google after searching for Chrome Linux had library requirements which are missing from Debian 7 Wheezy repositories.
Here is how;

1. Add  Wheezy Backports and Google's Chrome Repository to /etc/apt/sources.list

echo 'deb http://ftp.debian.org/debian/ wheezy-backports main contrib non-free' >> /etc/apt/sources.list
echo 'deb http://dl.google.com/linux/chrome/deb/ stable main' >> /etc/apt/sources.list

2. Install Google Chrome with apt-get

Here you have few options install Google Chrome Beta (whether you prefer you're an innovator), install unstable – if you prefer latest functionality and don't count on stability or install stable version.

a) Install Google Chrome Beta

apt-get install --yes google-chrome-beta

b) Install Google Chrome Unstable

apt-get install --yes google-chrome-unstable

c) Install Google Stable

apt-get install --yes google-chrome-stable

I personally prefer always to keep stable so prefer to install google-chrome-stable.

Only reason I need Google-Chrome is for testing how websites looks with it. Otherwise I don't recommend this browser to anyone who cares for his security. Obviously as Chrome is product of Google it is almost certainly it keeps complete surveillance on what you do on the net.

That's all happy web development with Chrome on Debian 🙂
 

Test your web browser compatability with Acid3 test

Wednesday, January 25th, 2012

Acid3 Test is a group of browser compitability tests. Acid3 test is a good indicator on how Web ready is your browser.

Acidtest is part of the web standards project. Latest Firefox 9.0.1 passes the test on 100% (100/100).
I've tried it with Epiphany and it scored only 67/100, still I'm using Epiphany on daily basis and I'm quite happy with it.
Acid3 browser compitability Test Firefox 9.0.1
The tests involved are testing browser for:
 

  • DOM
  • DOM2
  • Checks on HTML tables and forms browser rendering
  • SVG compitability testing
  • DOM1 and DOM2 compitability
  • Various ECMA Script Javascript compitability tests
  • Unicode (UTF-16 and UTF-8) browser compitability
  • XHML, SMIL, CSS, HTML compitability
  • Content-type image/png, text plain etc.

Acid3 browser test fail
The Acid3 test is written itself in Javascript. It consists of 6 testing "stages" (buckets) upon which the browser tested is evaluated.
Each of the test is represented visually by a rectangle. If the a test stage is passed you see a new rectangle appearing in the tested browser.
In wikipedia, there is a thorough list with web browsers by type and engine and the level of support for the Acid3 test.
The test is of great use if you're web developer.