Posts Tagged ‘web interface’

How to auto restart CentOS Linux server with software watchdog (softdog) to reduce server downtime

Wednesday, August 10th, 2011

How to auto restart centos with software watchdog daemon to mitigate server downtimes, watchdog linux artistic logo

I’m in charge of dozen of Linux servers these days and therefore am required to restart many of the servers with a support ticket (because many of the Data Centers where the servers are co-located does not have a web interface or IPKVM connected to the server for that purpose). Therefore the server restart requests in case of crash sometimes gets processed in few hours or in best case in at least half an hour.

I’m aware of the existence of Hardware Watchdog devices, which are capable to detect if a server is hanged and auto-restart it, however the servers I administrate does not have Hardware support for Watchdog timer.

Thanksfully there is a free software project called Watchdog which is easily configured and mitigates the terrible downtimes caused every now and then by a server crash and respective delays by tech support in Data Centers.

I’ve recently blogged on the topic of Debian Linux auto-restart in case of kernel panic , however now i had to conifgure watchdog on some dozen of CentOS Linux servers.

It appeared installation & configuration of Watchdog on CentOS is a piece of cake and comes to simply following few easy steps, which I’ll explain quickly in this post:

1. Install with yum watchdog to CentOS

[root@centos:/etc/init.d ]# yum install watchdog
...

2. Add to configuration a log file to log watchdog activities and location of the watchdog device

The quickest way to add this two is to use echo to append it in /etc/watchdog.conf:

[root@centos:/etc/init.d ]# echo 'file = /var/log/messages' >> /etc/watchdog.conf
echo 'watchdog-device = /dev/watchdog' >> /etc/watchdog.conf

3. Load the softdog kernel module to initialize the software watchdog via /dev/watchdog

[root@centos:/etc/init.d ]# /sbin/modprobe softdog

Initialization of softdog should be indicated by a line in dmesg kernel log like the one above:

[root@centos:/etc/init.d ]# dmesg |grep -i watchdog
Software Watchdog Timer: 0.07 initialized. soft_noboot=0 soft_margin=60 sec (nowayout= 0)

4. Include the softdog kernel module to load on CentOS boot up

This is necessery, because otherwise after reboot the softdog would not be auto initialized and without it being initialized, the watchdog daemon service could not function as it does automatically auto reboots the server if the /dev/watchdog disappears.

It’s better that the softdog module is not loaded via /etc/rc.local but the default CentOS methodology to load module from /etc/rc.module is used:

[root@centos:/etc/init.d ]# echo modprobe softdog >> /etc/rc.modules
[root@centos:/etc/init.d ]# chmod +x /etc/rc.modules

5. Start the watchdog daemon service

The succesful intialization of softdog in step 4, should have provided the system with /dev/watchdog, before proceeding with starting up the watchdog daemon it’s wise to first check if /dev/watchdog is existent on the system. Here is how:

[root@centos:/etc/init.d ]# ls -al /dev/watchdogcrw------- 1 root root 10, 130 Aug 10 14:03 /dev/watchdog

Being sure, that /dev/watchdog is there, I’ll start the watchdog service.

[root@centos:/etc/init.d ]# service watchdog restart
...

Very important note to make here is that you should never ever configure watchdog service to run on boot time with chkconfig. In other words the status from chkconfig for watchdog boot on all levels should be off like so:

[root@centos:/etc/init.d ]# chkconfig --list |grep -i watchdog
watchdog 0:off 1:off 2:off 3:off 4:off 5:off 6:off

Enabling the watchdog from the chkconfig will cause watchdog to automatically restart the system as it will probably start the watchdog daemon before the softdog module is initialized. As watchdog will be unable to read the /dev/watchdog it will though the system has hanged even though the system might be in a boot process. Therefore it will end up in an endless loops of reboots which can only be fixed in a linux single user mode!!! Once again BEWARE, never ever activate watchdog via chkconfig!

Next step to be absolutely sure that watchdog device is running it can be checked with normal ps command:

[root@centos:/etc/init.d ]# ps aux|grep -i watchdog
root@hosting1-fr [~]# ps axu|grep -i watch|grep -v greproot 18692 0.0 0.0 1816 1812 ? SNLs 14:03 0:00 /usr/sbin/watchdog
root 25225 0.0 0.0 0 0 ? ZN 17:25 0:00 [watchdog] <defunct>

You have probably noticed the defunct state of watchdog, consider that as absolutely normal, above output indicates that now watchdog is properly running on the host and waiting to auto reboot in case of sudden /dev/watchdog disappearance.

As a last step before, after being sure its initialized properly, it’s necessery to add watchdog to run on boot time via /etc/rc.local post init script, like so:

[root@centos:/etc/init.d ]# echo 'echo /sbin/service watchdog start' >> /etc/rc.local

Now enjoy, watchdog is up and running and will automatically restart the CentOS host 😉

How to check Host is up with Nagios for servers with disabled ICMP (ping) protocol

Friday, July 15th, 2011

At the company where I administrate some servers, they’re running Nagios to keep track of the servers status and instantly report if problems with connectivity to certain servers occurs.

Now one of the servers which had configured UP host checks is up, but because of heavy ICMP denial of service attacks to the servers the ICMP protocol ping is completely disabled.

In Nagios this host was constantly showing as DOWN in the usual red color, so nagios reported issue even though all services on the client are running fine.

As this is quite annoying, I checked if Nagios supports host checking without doing the ICMP ping test. It appeared it does through something called in nagios Submit passive check result for host

Enabling the “Submit passive check result for this host” could be done straight from Nagios’s web interface (so I don’t even have to edit configurations! ;).
Here is how I did it. In Nagios I had to navigate to:

Hosts -> Click over my host (hosting1) which showed in red as down

Nagios disable ICMP ping report for hosts

You see my down host which I clicked over showing in red in above pic.

On next Nagios screen I had to select, Disable active checks of this host

Nagios Disable active ICMP checks of this host
and press on the Commit button.

Next following text appears on browser:

Your command request was successfully submitted to Nagios for processing.

Note: It may take a while before the command is actually processed.

Afterwards I had to click on Submit passive check result for this host and in:
Check Output to type in:

check_tcp -p 80

Here is the Screenshot of the Command Options dialog:

Nagios submit passive check with check TCP -p 80

That’s all now Nagious should start checking the down host by doing a query if the webserver on port 80 is up and running instead of pinging it.
As well as the server is no longer shown in the Nagio’s Down host list.

Howto remote access Windows PC which is behind Vivacom ADSL (Commtrend SmartAX MT882 router) modem with VNC server

Wednesday, May 11th, 2011

I had been assigned the not easy task to make a Windows XP Pro which is located behind an ADSL modem to be remotely accessible via VNC

The Windows is connected to the Bulgarian Vivacom Intrnet provider through their ADSL service and hence there is an ADSL router modem which is configured to disallow all inbuond connections by default.

The Windows Pro PC where the VNC server was needed to be accessible did not have a real IP address (e.g. was assigned a virtual IP address by the ADSL modem.

The exact ADSL model used to connect the computer via a lan cable to the internet was Huawei SmartAX MT882

As the device is owned by Vivacom (the ex BTK tele communication company) I did not have any admin user and pass credentials for the ADSL modem to configure the ADSL router to do a port NAT forwarding of port 5800 and 5900 used by the VNC software I installed on the PC (TightVNC)

Nevertheless the missing user and password I decided to check in google if I can find some default passwords that Vivacom ADSL modems are configured to work with

After a few minutes spend in Google I already had found few passwords which were said to work fine with the Vivacom ADSL router.
Here are the passwords I found for the Vivacom ADSL Internet modems:

ZTE ZXDSL 832
username: root
password:GSrootaccess

ZTE ZXDSL 831
username:root
password:GSrootaccess

ZTE
username:root
password:831access

Huawei SmartAX MT882
username:root
password:MT882rootaccess

ZTE ZXDSL-531b
username: root
password:warmWLspot

I tried some old school brute force techniques 😉 by trying all the passwords via the ADSL web interface located on http://192.168.1.1 (I was not sure which model the Vivacom ADSL modem is as on the router there was nothing written concerning the modem type but only the Vivacom logo was present.

After a bit of time I already knew that the ADSL modem model, user and pass was:

Huawei SmartAX MT882
-------------------------------
user: root
pass: MT882rootaccess

My next step was to configure port forwarding for the SmartAX MT882 ADSL in order to achieve from modem’s web administrator I had to follow the menus:

Advanced Setup -> Virtual Servers

ADSL virtual servers menu screen

Next in the NAT — Virtual Servers section I pressed the Add button to create new automatic redirection (port forwarding) rule.

Virtual Server port forwarding screen
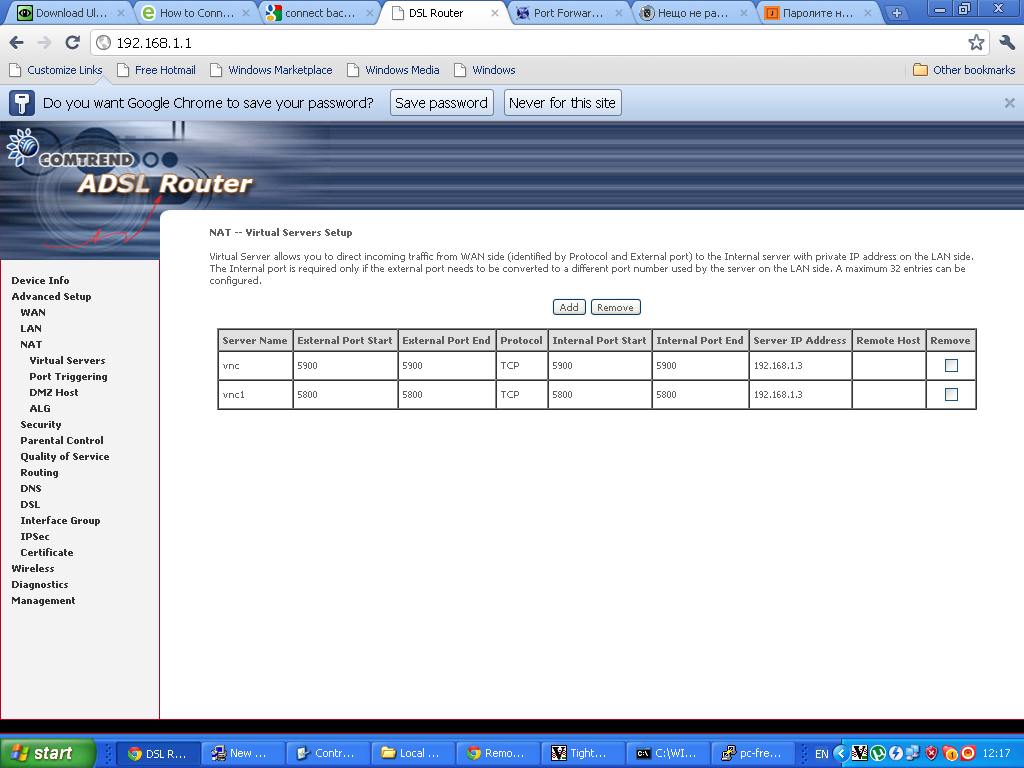
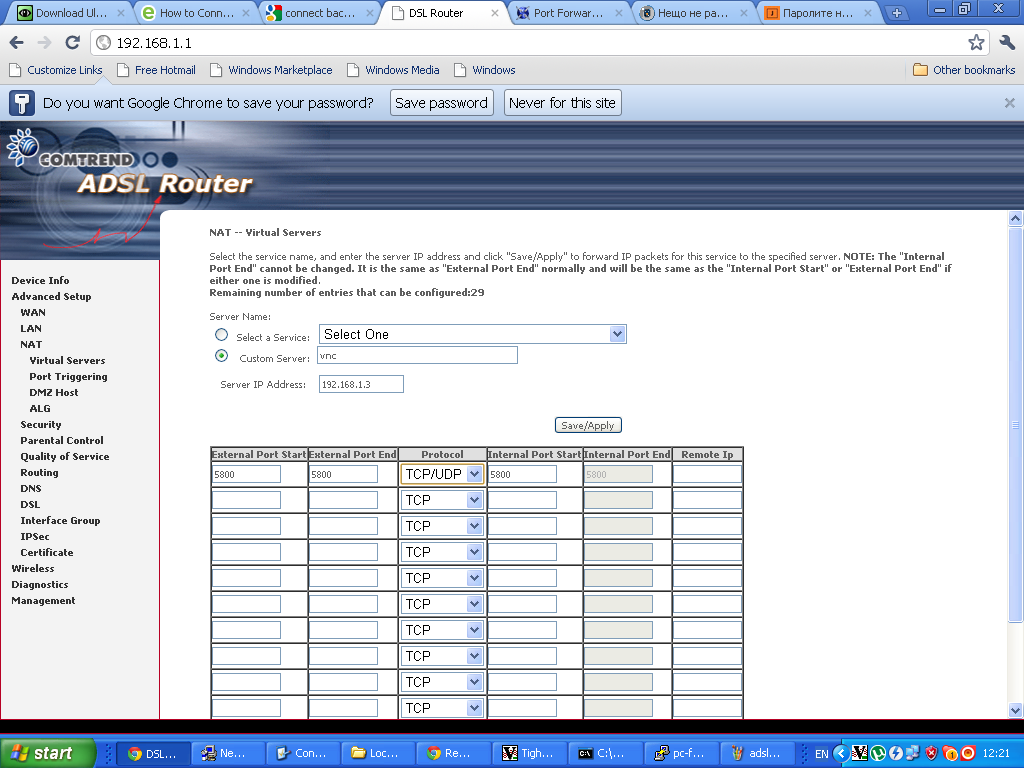
Configuring ADSL SmartAX MT882 TightVNC NAT port redirection screenTightVNC requires also NAT port redirection rule for port 5900 in order to be able to connect to the VNC server behind the dsl, so analogically I added a Virtual Server NAT rule for port 5900.

Note that the private IP address of the Windows host was assigned by the ADSL router to the ip 192.168.1.3

Further on I expected the adsl port forwarding created rule would now allow me to connect to the VNC server on the pc located behind the dsl firewall, but I was wrong… even though all seemed to be configured just fine in the ADSL router still the port unmbers 5800 and 5900 were showing up as closed during nmap scan as well as a simple telnet connection to port 5800 and 5900 failed to get established.

My logical assumption was that some configured Firewall on the Windows PC is blocking port connections to 5800 and 5900 thus I decided to check the default Windows Firewall settings as a first possible cause for the vnc ports being blocked.

I did that via the Windows menus:

Start -> Settings -> Control Panel -> Windows Firewall

However weirly enought it seemed the Windows Firewall was disabled e.g. the Off (not recommended) option was set for the firewall.

A bunch of other lookup over all the running system and services on the windows hosts I have found the PC is protected by NOD32 Antivirus – Personal Firewall

The default behaviour of NOD32’s Persnal firewall was extremely restrictive and I found it’s causing a port filter of the 5800 and 5900 vnc connection ports.

To solve the filtering nod32 did I had to open NOD32 and navigate to the following menus:

Setup -> Personal Firewall -> Configure rules and Zones

In the Zone and rule setup menu config window I had to further press on:
New button to add new personal firewall rule.

In the New rule: menu I filled in the following info:
In the General tab:

Name: vnc
Direction: Both
Action: Allow

In the tab Local

I pressed over the Add Port

Number: 5800

in the Remote tab once again I had to fill in:
Number: 5800

Then to confirm settings just pressed OK

Next on I added in the same manner an allow rule for port 5900.

After this settings I restarted the NOD32 firewall to make sure the new settings takes place by pressing over the Personal firewall button Disable filtering: allow all traffic and right after enabling the firewall once again.

Now remote tightvnc connections to the Windows XP Pro pc works like a charm once again, Thanks God 😉