Posts Tagged ‘weird reason’
Wednesday, November 17th, 2021 
I've been Setting up a new PC with Windows OS that is a bit old a 11 years old Lenovo ThinkCentre model M90P with 8 GB of Memory, Intel(R) Core(TM) i5 CPU 650 @ 3.20GHz 3.19 GHz, Intel Q57 Express Chipset. The machine came to me with Windows 7 preinstalled and the intial goal was to migrate Windows as it is with its data from the old 120GB SSD to new 512 SSD and then to keep the machine at least a bit more up to date to upgrade the old Windows 7 to Windows 10.
This as usual seemed like a very trivial task for a System Administrator, and even if you haven't touched much of Windows as me it makes it look a piece of cake, however as always with computers, once you think you'll be done in 2 hours usually it takes 20+ . Some call it Murphy's law "If something could go wrong then it will go wrong". But putting this situation that I thought all well that's easy lets do it is a kind of a proud Thought for man and the to save us from this Passion of Proudness which according to Church fathers is the worst passion one can have and humiliate us a bit.
God allows some unforseen stuff to happen 🙂 The case with this machine whose original idea I had is to OK I Simply Duplicate the Old Hard Drive to the New one and Place the new one on the ThinkCentre is not a big deal turned to a small adventure 🙂
For this machine hardware I have to say, the old English saying "Old but Gold" is pretty true, especially after I've attached the Samsung 512GB NVME SSD Drive, which my dear friend and brother in Christ "Uncle Emilian" had received as a gift from another friend called Angel. To put even more rant, here name Emilian stems from the Greek Emilianos which translated to English means Adversary.. But anyways The old Intel SSD 120 GB drive which besides being already completely Full of Data, turned to have Memory DATA Chips (that perhaps burn out / wasted), so parts of the Drive were Unreadable.
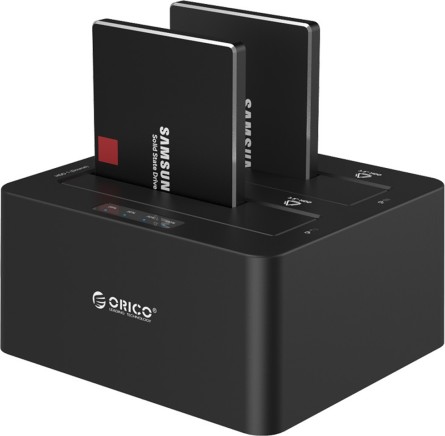
I've realized the fauly SSD fact after, trying to first clone the drives with my Hardware Disk Clone device Orico Dual Bay 2.5 6629US3-C device and then using a simple bit to bit copy with dd command.
At first for some weird reason the Cloning of 120GB SSD HDD towards -> 512 GB newer one was unsuccessful – one of the 2 lamp indicators on Source and Destination Drives was continuiously blinking orange as it seemed data could not be read, even though I tried few times and wait for about 1 hour of time for the cloning to complete, so I first suspected that might be an issue with my last year bought Disk Clone hardware device. So I've attached the 2 Hard Drives towards my Debian GNU / Linux 10 as USB attached drives using the "Toaster" device and tried a classical copy from terminal with Disk Druid e.g.
# dd if=/dev/sdb2 of=/dev/sdbc2 bs=180M status=progress conv=noerror, sync
dd: error reading '/dev/sdb2': Input/output error
1074889+17746 records in
1092635+0 records out
559429120 bytes (559 MB, 534 MiB) copied, 502933 s, 1.1 kB/s
dd: writing to '/dev/dc2': Input/output error
1074889+17747 records in
1092635+0 records out
559429120 bytes (559 MB, 534 MiB) copied, 502933 s, 1.1 kB/s
Finally I did a manual copy of files from /dev/sdb2 /dev/sdc2 with rsync and part of the files managed to be succesfully copied, about 55Gigabytes out of 110 managed to copy. Luckily the data on the broken Intel 320 Series 120GB was not top secret stuff so wasting some bits wasn't the end of the world 🙂
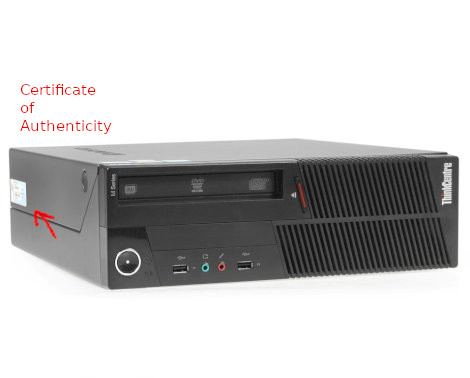
Next, I've removed the broken 120Gb SSD which perhaps was about at least 9+ years old and attached to the Lenovo ThinkCentre, the new drive and as my dear friend wanted to have Windows again (his computer has Microsoft "Certificate of Authenticity"), e.g. that OEM Registration Serial Key for Windows 7.
I've jumped in and used some old Flash USB Stick Drive to place again Windows 7 (in order to use the same active license) and from there on, I've used another old Windows 10 Installation Bootable stick of mine to upgrade the Windows 7 to Windows 10 (by using this Win 7 to Win 10 upgrade trick it is possible to still continue use your old Windows 7 License Key on Windows 10). So far so good, now I've had Windows 10 Professional Edition installed on the machine, but faced another issue the Memory of the Machine which is 8GB did not get fully detected the machine had detected only 3.22 GB of Memory, for some weird reason.
After few minutes of investigation online, I've realized, I've installed by mistake a 32 Bit version of Windows 10 Pro…So the next step was of course to upgrade to 64 bit to work around the unrecognized 5.2GB memory… To make sure my Windows 10 Installation is up-to-date I've downloaded the latest one from the Media Creation Installation Tool from Microsoft's website used the tool to burn the Downloaded Image to an Empty USB Stick (mine is 16GB but minimum required would be 4Gb) and proceeded to reboot the Lenovo Desktop machine and boot from the Windows 10 Install Flash Drive. From there on I've had to select I need to install a 64 Bit version of Windows and Skip the Licensing Key fill in Prompt Twice (act as I have no license) as Windows already could recognize the older OEM installed 32 bit install Windows key and automatically fetches the key from there.
Before proceeding to install the 64 Bit Windows, of course double check that the Machine you have at hand has already the License Key recognized by Microsoft is 64 Bit capable:
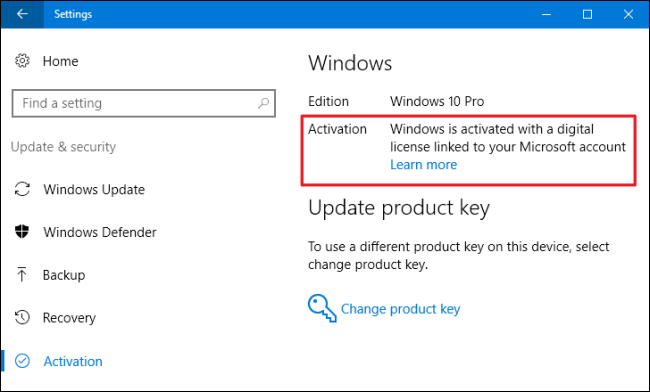
To check 32 bit version of Windows before attempted upgrade is Properly Licensed :
Settings > Update & security > Activation
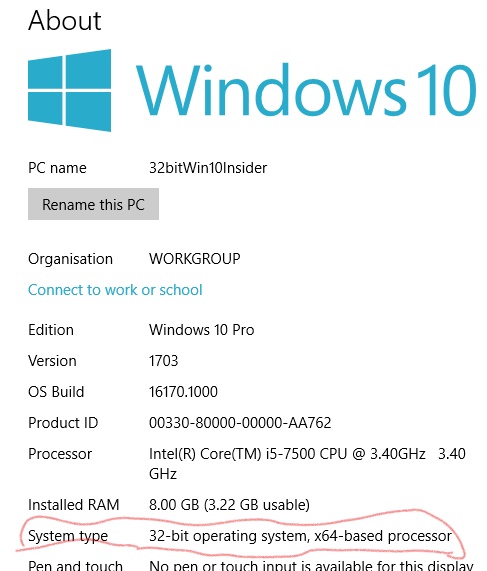
To check whether Hardware is 64 Capable:
Settings -> System -> About
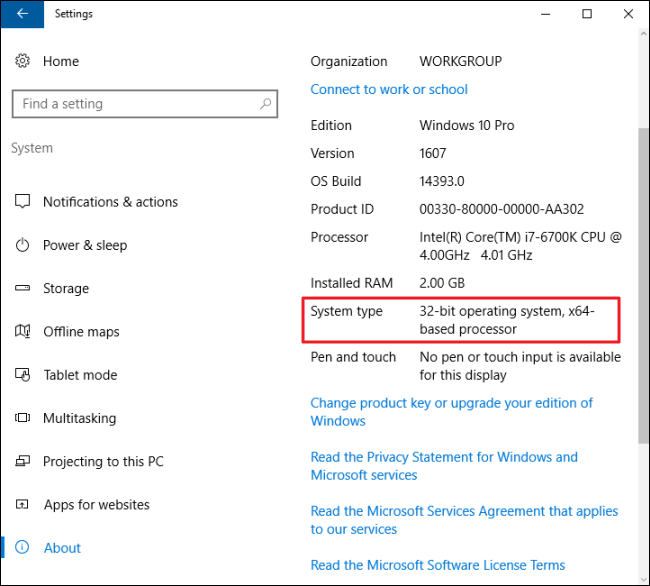
32 bit Windows on x64based processor (Machine supports 64 bit OS)
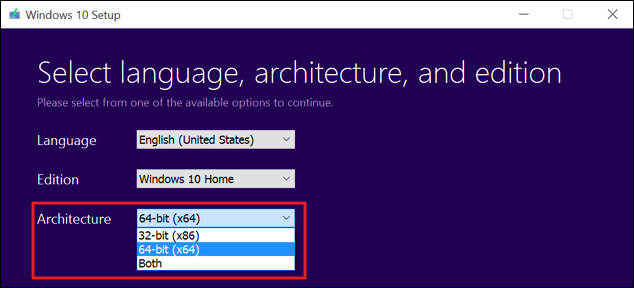
Media Creation Tool Windows 10 MS Installer tool (make sure you select 64-bit (x86) instead of the default
From the Installer, I've installed Windows just like I install a brand new fersh Win OS and after asking the few trivial Installation Program questions landed to the new working OS and proceeded to install the usual software which are a must have on a freshly installed Windows for some of them check my previous article Essential Must have software to install on Fresh new Windows installation host.
Tags: Bit Windows, check, copy, dd, dev, fresh, Hardware Disk Clone, How to, machine, reading, Solid State Drive, upgrade, weird reason
Posted in Everyday Life, Various, Windows | No Comments »
Sunday, September 20th, 2009 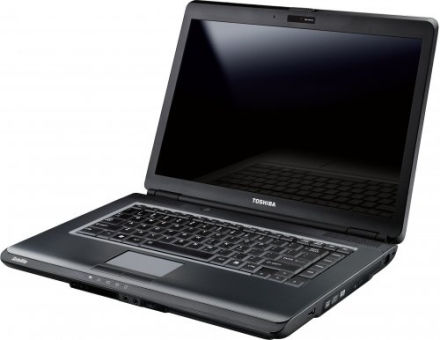
Today I had the task to Install Ubuntu GNU / Linux on Toshiba L300 PLSBGE Laptop.
I had already installed Windows Vista Enterprise on the notebook. Thus I used Acronis Disk Directory Suite to partition the harddrive for Ubuntu even though I could have used the gparted included on Ubuntu’s installation CD. I’ve asked specificly if
I could use the Ubuntu CD to repartition my hard drive in #ubuntu in irc.freenode.net.
The answer was positive it’s absolutely safe to resize an NTFS partition using Ubuntu’s installation LiveCD and gparted.That seems like a good news for all of us the free software users / enthusiasts / hobbyists etc.
I hated the default Ubuntu behaviour it automatically decided to install itself on a automatically created 2.5 GB partition.
I thought it won’t be so dumb to install itself on such a tiny partition. Well guess what I was wrong IT WAS SO DUMB!
Even though I had already 80 GB ext3 partition. Ubuntu’s default behaviour was to install on an automatically created 2.5GB partition.
Right after the installation I was stunned just to realize there was no free space on the drive where the dumbass installed itself.
After that I had some issues deleting the already cretead partitions, which for some reason messed up. Luckily the good old fdisk fixed the situation so I could easily delete all the partitions except the vista and recreate them again using gparted with Ubuntu’s install LiveCD. The install was completely flawless. Everything worked out of the box, no external efforts to fix broken stuff like usually happens in Linux fantastic! The only broken thing was that switching to plain console with ctrl+alt+f1 would visualize a non working display output and I couldn’t see the ttys at all. That wasn’t such a hassle since the system is planned to work only in GUI mode. I guess Ubuntu is going through a real development with a positive end results. Even external USB printer Canon PIXMA IP3300 worked by simply plugging it in. For some weird reason to make the printer work correctly I had to use driver for Canon PIXMA IP3000. Anyways it worked with it and the printer started printing correctly even though officially on some of the linux printers databases it’s reported the printer won’t work correctly never ever.END—–
Tags: default behaviour, fdisk, free software users, good, hard drive, partitions, printer work, Ubuntu 9.04 Jaunty on Toshiba L300 PLSBGE Laptop, weird reason, working
Posted in Linux, Linux on Laptops | 1 Comment »
Sunday, March 10th, 2013 
Yesterday, I had to fix another Windows XP computer infested with Spyware and Viruses. Thanksfully I cleaned it up as usual using standard combination of Malware Bytes + Little Registry Cleaner and Avira. The PC haven't been updated recently and running still Windows XP SP2, thus to make Avira running I had to install SP3 as Avira nowdays depends on Win SP3. After clean up it worked much better, though it is not 100% sure if some kind of malicious software is still not on PC.
After all seemed fine on this Russian Windows XP, there was one thing still problematic – Skype. For some weird reason whenever user from Skype contact list is messaged, it was impossible to send the message with Enter key. I tried checking if all seems fine in Keyboard Settings and Regional Settings in Windows Control Center, cause XP version was with Russian Language Pack and I suspected the Language Pack might mess up something in how Keyboard keys are mapped but all seemed fine there. One important note to make here is PC is running on old hardware and had an old standard PS/2 Keyboard detected as PS/2 – 101 – 102 keys standard keyboard. I tried re-installing the keyboard driver, trying to auto-detect however driver detected for this keyboard seemed to be latest issued for PS/2 Keyboards from Microsoft so after update Skype can't send message bug was still present and respectively the only way to communicate with people from contact list was to Call the person and speak. I researched online on the problem and found a multitude of users complaining to face the same Skype messaging – Enter key not working, unfortunately noone online seemed to have found a solution. I've seen some suggestions to use Skype settings to re-map Enter key but on this Skype 6.2.0.106 the option to remap how Enter key reacts wasn't present. Thus I decided to try to downgrade Skype 6 to Skype 5 here is a mirror of Skype 5 -and try if this helps. After Uninstalling Skype 6 and installing Skype 5 – enter key started working again so mission accomplished 🙂 If you happen to have the annoying Enter key not working in skype bug just downgrade to any below version to 6 and all will be fine. Drop me a comment if you experience the same bug with Win and Skype version.
Finally, be sure not to upgrade further Skype to avoid problems. Last but not least, there is even some advantages in older skype releases, the interface is simpler – making work with skype easier.
Tags: contact list, keyboard driver, keyboards, nowdays, old hardware, regional settings, registry cleaner, russian windows, Skype, Spyware, Viruses, weird reason, windows control, windows xp, windows xp sp2
Posted in Everyday Life, Various, Windows | No Comments »
Friday, April 8th, 2011 I needed to convert a bunch of files from WAV to MP3 format on my Linux desktop.
I’ve placed all my wav files to the directory /home/hipo/wav
And then I issued the small one liner script to convert the .wav files to .mp3 using the niftly lame linux mp3 convertor.
Here is how I did it:
linux-desktop:~$ cd wav

linux-desktop:/home/hipo/wav$ for i in *.wav; do

new_name=$(echo $i |sed -e 's#wav#mp3#g');

lame -V0 -h -b 160 --vbr-new "$i" "$new_name";

done
After executing the little script you might go and have a coffee, if you have thousands of files, each file convertion takes about 10-15 seconds of time (speed depends on your CPU).
Here is some output from a lame convertion to mp3 taking place:
Encoding as 8 kHz single-ch MPEG-2.5 Layer III VBR(q=0)

Frame | CPU time/estim | REAL time/estim | play/CPU | ETA

27237/27237 (100%)| 0:12/ 0:12| 0:12/ 0:12| 155.89x| 0:00

64 [27237] ***************************************************************

----------------------------------------------

kbps mono % long switch short %

64.0 100.0 84.1 8.9 7.0
If you want to save my convertion quickly for a later, download my Convert WAV to mp3 from a directory with lame shell script here
Actually there are plenty of other ways to convert wav to mp3 on Linux through mplayer, ffmpeg even with mpg123.
There are also some GUI programs that could do the convertion like winff , however for some weird reason after installing WinFF on my debian it was not able to complete convertion to mp3?!
But it doesn’t matter, the good news is I did what I wanted to via the simple lame program and the above script, hope it helps somebody out there.
Tags: coffee, Convert, convertion, convertor, cpu time, Desktop, desktop cd, download, estim, eta, ffmpeg, file, format, Frame, gui programs, hipo, linux desktop, linux mp3, mpg, mpg123, place, real time, reason, script, Shell, shell script, time, time speed, v0, VBR, WAV, wav files, wav mp3, weird reason, WinFF
Posted in Linux and FreeBSD Desktop, Linux Audio & Video | 8 Comments »
Friday, July 29th, 2011 I’ve recently had to manually assign a static IP address on one of the servers I manage, here is how I did it:
debian:~# vim /etc/network/interfaces
Inside the file I placed:
# The primary network interface

allow-hotplug eth0
auto eth0
iface eth0 inet static address 192.168.0.2 netmask 255.255.255.0 broadcast 192.168.0.0 gateway 192.168.0.1 dns-nameservers 8.8.8.8 8.8.4.4 208.67.222.222 208.67.220.220
The broadcast and gateway configuration lines are not obligitory.
dns-nameservers would re-create /etc/resolv.conf file with the nameserver values specified which in these case are Google Public DNS servers and OpenDNS servers.
Very important variable is allow-hotplug eth0
If these variable with eth0 lan interface is omitted or missing (due to some some weird reason), the result would be the output you see from the command below:
debian:~# /etc/init.d/networking restart

Running /etc/init.d/networking restart is deprecated because it may not enable again some interfaces ... (warning).

Reconfiguring network interfaces...
Besides the /etc/init.d/networking restart is deprecated because it may not enable again some interfaces … (warning). , if the allow-hotplug eth0 variable is omitted the eth0 interface would not be brough up on next server boot or via the networking start/stop/restart init script.
My first reaction when I saw the message was that probably I’ll have to use invoke-rc.d, e.g.:
debian:~# invoke-rc.d networking restart

Running invoke-rc.d networking restart is deprecated because it may not enable again some interfaces ... (warning).
However as you see from above’s command output, running invoke-rc.d helped neither.
I was quite surprised with the inability to bring my network up for a while with the networking init script.
Interestingly using the command:
debian:~# ifup eth0
was able to succesfully bring up the network interface, whether still invoke-rc.d networking start failed.
After some wondering I finally figured out that the eth0 was not brought up by networking init script, because auto eth0 or allow-hotplug eth0 (which by the way are completely interchangable variables) were missing.
I added allow-hotplug eth0 and afterwards the networking script worked like a charm 😉
Tags: Auto, broadcast, configure, debian gnu, DNS, dns nameservers, etc network, eth, file, gateway, GNU, google, inet, init, interfacesInside, lan interface, Linux, nameserver, nbsp, nbsp nbsp nbsp nbsp nbsp, Netmask, network interface, network interfaces, Networking, OpenDNS, public dns servers, reason, resolv, script, server boot, Start, static address, static ip address, vim, weird reason
Posted in Linux, System Administration, Various | No Comments »
Thursday, June 2nd, 2011 he Joomla CMS default behaviour is that Page titles of the Joomla Articles created are always set to the page Title assigned to each of the articles.
This is not very good behaviour in terms of SEO, as the page title of each link on the main page is different and there is no continuous repeating pattern in all of the joomla pages.
Everyone that has even basic idea of SEO knows that page titles are very important weight factor to make indexing inside Search Engines succesful.
There is a well know SEO rule which is the more reoccuring pattern one has in his page titles, more is stressed on the keywords contained in the title.
As I said for some weird reason Joomla has no common page Title for all my the created Article pages linked via the Main Menu*
Thus in order to improve this bad default Joomla SEO behaviour one has to change the default auto assigned titles for created pages, manually.
Two things are necessery to change each of the joomla already existing TITLES.
1. Go to each of the pages (.e.g. Home etc.) and change the Parameters System Page Title settings
After logging in with administrator in Joomla, navigate to
Menus -> Main Menu*
Further on choose a menu item from all your existing items, let’s say Home and click on it.
On the left side below the Save, Apply, Close and Help buttons you will notice the menus:
Parameters (Basic), Parameters (Component), Parameters (System)
When clicked on Parameters (System) a submenu will appear:
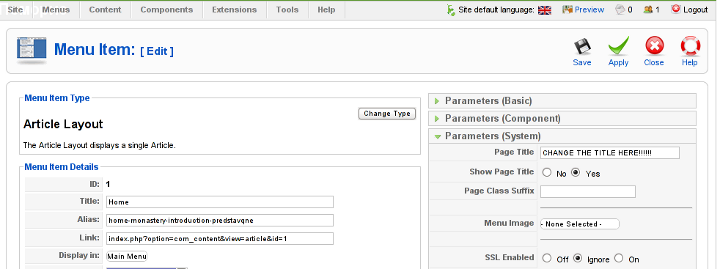
Above is a screenshot of the up-described Parameters (System) [Page Title] location
You need to change where it reads on the screenshot CHANGE THE TITLE HERE !!!!!! 😉
After entering your own desired page title go and save the article via the Apply or Save button (also visible in the screenshot).
Now as the custom Page Title is set, next step is to enable the custom Page Title for the respective Article in Article Manager
2. Enable custom Page Title for created pages in Joomla
Go to the Article Manager by following the menus:
Content -> Article Manager
Select the Article of which you want to change the Page Title to some custom text and click over it.
As the article opens for edit in an html editor, navigate to Parameters (Advanced) tab and therein change the Show Title from default setting value:
Use Global
to
Yes
Once again use the Save or Apply button to confirm the new settings and open your website in a new tab, try to browse and check the title of the articles parameters just edited. It should show up in the Title (page heading) the custom input Title.
Now repeat the same procedure for all pages (Articles), existing in Joomla to attune the Page Titles to some Google friendly strings and enjoy the better Search engine indexing which should likely follow.
Tags: article manager, Auto, Button, cms, Component, component parameters, custom, default behaviour, Draft, everyone, Global, good behaviour, home, indexing, location, menu, menus, necessery, page, page titles, Parameters, reason, screenshot, Search, search engines, SEO, show, submenu, tab, text, value, weird reason
Posted in Joomla, Various, Web and CMS | No Comments »
Tuesday, July 19th, 2011 
Yesterday I was at a friend of mine who has recently installed Ubuntu 11.04 to his already oldish Desktop computer.
The system was 1.4Ghz (amd) with 512 RAM and some kind of Dell Trinitron 19 inch monitor
Even though he tried hard to make his NVIDIA GeForce FX 5500 ‘s drive to work properly with Ubuntu Natty Narwhal, he just has messed it even more.
As I always like helping people and I’m joyful for people who want to migrate to Linux, I took some time to make his NVIDIA GeForce work with this Ubuntu release.
First I tried to make it work by using some of the official NVIDIA Linux drivers located on nvidia.com following some online tutorial for Ubuntu claiming that it works but actually it didn’t, so finally after a bit of experimentation I found a way to make this video card work.
Here is how:
1. Install the following Ubuntu packages
root@ubuntu:~# apt-get install nouveau-firmware nvidia-173 nvidia-173-kernel-source

nvidia-cg-toolkit nvidia-common nvidia-current nvidia-glx-173 nvidia-settings

...
2. Load in the kernel and set to be auto loaded on boot nvidia’s driver kernel module nvidia-173
root@ubuntu:~# depmod -a;

root@ubutnu:~# modprobe nvidia-173

root@ubuntu:~# echo nvidia-173 >> /etc/modules
3. Stop temporary (Gnome dipsplay manager) gdm
root@ubuntu:~# service gdm stop

...
4. Use nvidia-xconfig to generate a working version of /etc/X11/xorg.conf for Nvidia
root@ubuntu:~# nvidia-xconfig

..
nvidia-xconfig will generate new /etc/X11/xorg.conf configuration corresponding to the Nvidia GeForce Fx 5500 and will move the old xorg.conf to xorg.conf.backup.
5. Start the gdm manager to be running again
root@ubuntu:~# service gdm start

...
Now the Xserver will start in a terrible mode of 640×480, probably because Ubuntu was unable to define correct VerticalSync and HorizontalSync for the 19 inch Dell Trinitron monitor or for some other weird reason, to fix this it’s quite easy though.
The fix to the NVIDIA GeForce 5500 running in 640×480 mode is done straigh via Gnome menus.
6. Use Gnome’s System -> Preferences -> Monitors to set raise up the Xserver resolution
Navigate to Gnome’s menus:
System -> Preferences -> Monitors
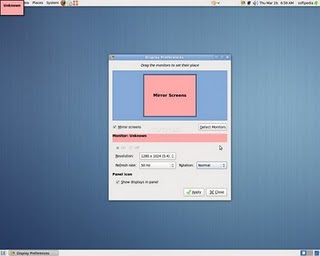
Here you will have to select more appropriate resolution and a different refresh rate, which in my case was 1024×768 and further on to store the settings press the Apply button.
One oddity here was that according to the Monitor Preferences the refresh rate was running on 54 Hz which I don’t believe was the case as I guess it’s some kind of Gnome or Ubuntu bug. I changed the 54 Hz Refresh Rate to 50 Hz as using the 54 Hz refresh rate as the screen had a minor vibrations observable if one takes a thorough look on the screen.
Setting the NVIDIA GeForce 5500 driver to work with 50 Hz Refresh Rate in Gnome loooked like the Windows’s 85 Hz RR and looked quite nice so I left it this way.
Finally to test the newly installed driver 3D acceleration I used glxgears.
7. Install glxgears in order to be able to test that 3D acceleration on Nvidia works fine
root@ubuntu:~# apt-get install mesa-utils
After installing mesa-utils which nowdays contains glxgears executable one needs to execute the glxgears binary.
root@ubuntu:~# glxgears
Immediately after a window containing the glxgears should popup on the screen, like shown in below screenshot

glxgears showed 3d acceleration works fine as the performance for 3d rendering shown was quite good and therefore 3D acceleration was running fine.
And that was it now the video works like and my friends, can enjoy the fun to have a generally virus Free OS 😉
Tags: amd, card, com, dell trinitron monitor, Desktop, desktop computer, drive, firmware nvidia, geforce 5500, geforce fx 5500, Gnome, Install, kernel module, kernel source, Linux, linux drivers, Load, manager, monitorEven, narwhal, nvidia, nvidia geforce fx 5500, packagesroot, RAM, root, s driver, screen, time, toolkit, Ubuntu, ubutnu, video, video card, weird reason, work, xconfig, Xorg, xserver
Posted in Linux and FreeBSD Desktop, Linux Audio & Video | 1 Comment »
Monday, May 23rd, 2011 One of the Qmail server installations I’m taking care of’s clamd antivirus process started loading the system heavily.
After a bit of log reading and investigation I’ve found the following error in my /var/log/clamd/current
@400000004dda1e1815cf03f4 ERROR: LOCAL: Socket file /tmp/clamd.socket is in use by another process.
I’ve noticed in my process list that actually I do have two processes clamd :
11608 ? Sl 0:05 /usr/local/sbin/clamd

11632 ? S 0:00 /usr/bin/multilog t /var/log/clamd

16013 ? Sl 0:06 /usr/local/sbin/clamd
It appeared that for some weird reason one of the clamd process was failing to connect constantly to the clam server socket /tmp/clamd.socket and each time it tried to connect and failed to connect to the socket the system gets about 5% of extra load …
Resolving the issues was a piece of cake, all I had to do is stop the clamd server delete the /tmp/clamd.socket and relaunch the clamd server.
Here is exactly the commands I issued:
debian:~# cd /service/

debian:/service# svc -a clamd

debian:/service# svc -h clamd

debian:/service# svc -d clamd

debian:/service# rm -f /tmp/clamd.socket

debian:/service# svc -u clamd
Afterwards the clamd extra load went out and in /var/log/clamd/current I can see clamd loads fine without errors, e.g.:
Listening daemon: PID: 16013

MaxQueue set to: 150

No stats for Database check - forcing reload

Reading databases from /usr/local/share/clamav

Database correctly reloaded (966822 signatures)

SelfCheck: Database status OK.

...
Tags: antivirus, care, cd service, clam, clamddebian, Database, database check, database status, databases, dda, debian cd, ERROR, file tmp, investigation, LOCAL, multilog, PID, piece of cake, Qmail, reading, reason, rm, sbin, SelfCheck, server installations, server socket, share, signatures, Socket, socketdebian, time, tmp, use, var, weird reason
Posted in Linux, System Administration | 1 Comment »


