32.8 PXE Booting with an NFS Root File System
Written by Craig Rodrigues.The Intel® Preboot eXecution Environment (PXE) allows booting the operating system over the network. PXE support is usually provided in the BIOS of modern motherboards, where it can be enabled in the BIOS settings which enable booting from the network. A fully functioning PXE setup also requires properly configured DHCP and TFTP servers.
When the host computer boots, it receives information over DHCP about where to obtain the initial boot loader via TFTP. After the host computer receives this information, it downloads the boot loader via TFTP, and then executes the boot loader. This is documented in section 2.2.1 of the Preboot Execution Environment (PXE) Specification. In FreeBSD, the boot loader retrieved during the PXE process is /boot/pxeboot. After /boot/pxeboot executes, the FreeBSD kernel is loaded, and the rest of the FreeBSD bootup sequence proceeds. Refer to Chapter 13 for more information about the FreeBSD booting process.
32.8.1 Setting Up the chroot Environment for the NFS Root File System
-
Choose a directory which will have a FreeBSD installation which will be NFS mountable. For example, a directory such as /b/tftpboot/FreeBSD/install can be used.
# export NFSROOTDIR=/b/tftpboot/FreeBSD/install # mkdir -p ${NFSROOTDIR} -
Enable the NFS server by following the instructions in Section 30.3.2.
-
Export the directory via NFS by adding the following to /etc/exports:
/b -ro -alldirs
-
Restart the NFS server:
# /etc/rc.d/nfsd restart
-
Enable inetd(8) by following the steps outlined in Section 30.2.2.
-
Add the following line to /etc/inetd.conf:
tftp dgram udp wait root /usr/libexec/tftpd tftpd -l -s /b/tftpboot
-
Restart inetd:
# /etc/rc.d/inetd restart
-
Rebuild the FreeBSD kernel and userland:
# cd /usr/src
# make buildworld
# make buildkernel
-
Install FreeBSD into the directory mounted over NFS:
# make installworld DESTDIR=${NFSROOTDIR} # make installkernel DESTDIR=${NFSROOTDIR} # make distribution DESTDIR=${NFSROOTDIR} -
Test that the TFTP server works and can download the boot loader which will be obtained via PXE:
# tftp localhost
tftp> get FreeBSD/install/boot/pxeboot
Received 264951 bytes in 0.1 seconds
-
Edit ${NFSROOTDIR}/etc/fstab and create an entry to mount the root file system over NFS:
# Device                                         Mountpoint    FSType   Options  Dump Pass
myhost.example.com:/b/tftpboot/FreeBSD/install       /         nfs      ro        0    0
Replace myhost.example.com with the hostname or IP address of your NFS server. In this example, the root file system is mounted "read-only" in order to prevent NFS clients from potentially deleting the contents of the root file system.
-
Set the root password in the chroot(8) environment.
# chroot ${NFSROOTDIR}
# passwd
This will set the root password for client machines which are PXE booting.
-
Enable ssh root logins for client machines which are PXE booting by editing ${NFSROOTDIR}/etc/ssh/sshd_config and enabling the PermitRootLogin option. This is documented in sshd_config(5).
-
Perform other customizations of the chroot(8) environment in ${NFSROOTDIR}. These customizations could include things like adding packages with pkg_add(1), editing the password file with vipw(8), or editing amd.conf(5) maps for automounting. For example:
# chroot ${NFSROOTDIR}
# pkg_add -r bash
32.8.2 Configuring Memory File Systems Used by /etc/rc.initdiskless
If you boot from an NFS root volume, /etc/rc detects that you booted over NFS and runs the /etc/rc.initdiskless script. Read the comments in this script to understand what is going on. We need to make /etc and /var memory backed file systems because these directories need to be writable, but the NFS root directory is read-only.
# chroot ${NFSROOTDIR}
# mkdir -p conf/base
# tar -c -v -f conf/base/etc.cpio.gz --format cpio --gzip etc
# tar -c -v -f conf/base/var.cpio.gz --format cpio --gzip var
When the system boots, memory file systems for /etc and /var will be created and mounted, and the contents of the cpio.gz files will be copied into them.
32.8.3 Setting up the DHCP Server
PXE requires a TFTP server and a DHCP server to be set up. The DHCP server does not necessarily need to be the same machine as the TFTP server, but it needs to be accessible in your network.
-
Install the DHCP server by following the instructions documented at Section 30.5.7. Make sure that /etc/rc.conf and /usr/local/etc/dhcpd.conf are correctly configured.
-
In /usr/local/etc/dhcpd.conf, configure the next-server, filename, and option root-path settings, to specify your TFTP server IP address, the path to /boot/pxeboot in TFTP, and the path to the NFS root file system. Here is a sample dhcpd.conf setup:
subnet 192.168.0.0 netmask 255.255.255.0 {
   range 192.168.0.2 192.168.0.3 ;
   option subnet-mask 255.255.255.0 ;
   option routers 192.168.0.1 ;
   option broadcast-address 192.168.0.255 ;
   option domain-name-server 192.168.35.35, 192.168.35.36 ;
   option domain-name "example.com";

   # IP address of TFTP server
   next-server 192.168.0.1 ;

   # path of boot loader obtained
   # via tftp
   filename "FreeBSD/install/boot/pxeboot" ;

   # pxeboot boot loader will try to NFS mount this directory for root FS
   option root-path "192.168.0.1:/b/tftpboot/FreeBSD/install/" ;

}
32.8.4 Configuring the PXE Client and Debugging Connection Problems
-
When the client machine boots up, enter the BIOS configuration menu. Configure the BIOS to boot from the network. If all your previous configuration steps are correct, then everything should "just work".
-
Use the net/wireshark port to debug the network traffic involved during the PXE booting process, which is illustrated in the diagram below. In Section 32.8.3, an example configuration is shown where the DHCP, TFTP, and NFS servers are actually on the same machine. However, these severs can be on separate machines.
Figure 32-1. PXE Booting process with NFS root mount
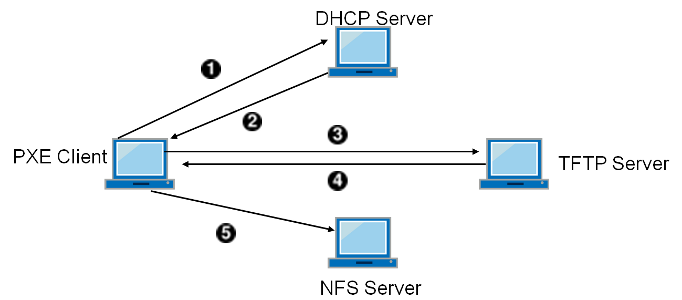

- Client broadcasts DHCPDISCOVER.

- DHCP server responds with IP address, next-server, filename, and root-path.

- Client sends TFTP request to next-server asking to retrieve filename.

- TFTP server responds and sends filename to client.

- Client executes filename which is pxeboot(8). pxeboot(8) loads the kernel. When the kernel executes, the root filesystem specified by root-path is mounted over NFS.
-
Make sure that the pxeboot file can be retrieved by TFTP. On your TFTP server, look in /var/log/xferlog to ensure that the pxeboot file is being retrieved from the correct location. To test the configuration from dhcpd.conf above:
# tftp 192.168.0.1
tftp> get FreeBSD/install/boot/pxeboot
Received 264951 bytes in 0.1 seconds
Read tftpd(8) and tftp(1). The BUGS sections in these pages document some limitations with TFTP.
-
Make sure that the root file system can be mounted via NFS. To test configuration from dhcpd.conf above:
# mount -t nfs 192.168.0.1:/b/tftpboot/FreeBSD/install /mnt
-
Read the code in src/sys/boot/i386/libi386/pxe.c to understand how the pxeboot loader sets variables like boot.nfsroot.server and boot.nfsroot.path. These variables are then used in the NFS diskless root mount code in src/sys/nfsclient/nfs_diskless.c.
-
Read pxeboot(8) and loader(8).