Archive for October, 2018

How to install custom Font files on Linux with font-viewer, fc-cache, font-manager – Install Church Slavonic fonts on GNU / Linux

Saturday, October 27th, 2018

install-custom-fonts-on-linux-easily-linux-libertine-alphabet-typography-font-u-shaped

If you're regularly using GIMP for Image Editing or LibreOffice for Office stuff or any other program that you might use to add / edit fonts, then you certainly will come to a point wondering how to manually add new .TTF (TrueType Fonts) or .AFM .PBM.
Using apt-get  install tool multiple fonts can be searched in Debian / Ubuntu repos, but adding a third party fonts provided by some random graphics designer is a necessity.

For example earlier I've blogged on What is Church Slavonic and collected a large collection pack of Church Slavonic fonts ready which I used to install at that time on a Windows 7 PC, question comes how this fonts once downloaded can be added / installed so Xorg running and Font rendering programs on GNU / Linux are aware of the new downloaded fonts and can be used in various programs?

gnome-font-viewer-program-gnu-linux-screenshot

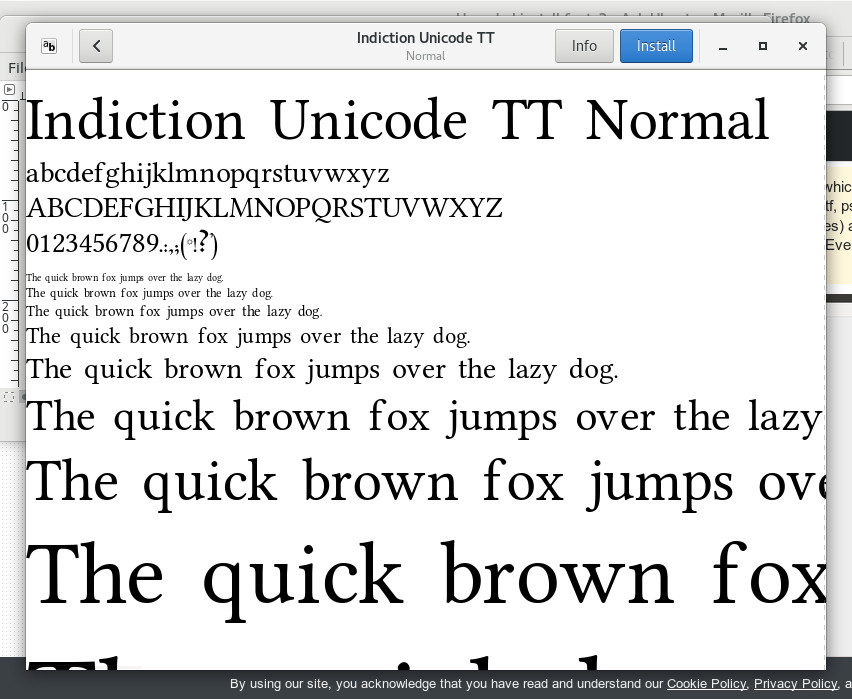
The easiest way to install font in Linux is to Double click over the new font you want to install that would run Font Viewer program in GNOME GUI environment when clicked over fonts the  gnome-font-viewer) opens, however it is tedicious task to install in that manner if you have to instal some new 100 or 200 fonts by clicking over each.

To make the new downloaded pack of fonts on a user level it is as simple as downloading the number of fonts and placing them in $HOME/fonts folder e.g. in ~/.fonts (in some distributions placing the new fonts under ~/usr/local/share/fonts makes them available for use on next Xsession login.

To make new fonts available system-wide (e.g. for all existing or logged in in Xorg) users it is as simple as copying all new font files (TTF, PFM, PFB etc.) you'd like to add to /usr/local/share/fonts:
 

# cp -rpf ~/Desktop/fonts-folder/* /usr/local/share/fonts/


And run fs-cache to rescan and build new font cache files based on the fonts copied


 fc-cache -f -v


To check whether the new fonts are present you can list all available fonts with:


fc-list


/usr/share/fonts/truetype/lato/Lato-Medium.ttf: Lato,Lato Medium:style=Medium,Regular
/usr/share/fonts/truetype/msttcorefonts/comicbd.ttf: Comic Sans MS:style=Bold,Negreta,tučné,fed,Fett,Έντονα,Negrita,Lihavoitu,Gras,Félkövér,Grassetto,
Vet,Halvfet,Pogrubiony,Negrito,Полужирный,Fet,Kalın,Krepko,Lodia
/usr/share/fonts/truetype/lato/Lato-SemiboldItalic.ttf: Lato,
Lato Semibold:style=Semibold Italic,Italic
/usr/local/share/fonts/TriKUcs.pfb: Triodion kUcs:style=Regular
/usr/share/fonts/truetype/dejavu/DejaVuSerif-Bold.ttf: DejaVu Serif:style=Bold
/usr/local/share/fonts/OglUcs8.ttf: Oglavie Ucs:style=Regular
/usr/share/fonts/truetype/noto/NotoSansThai-Regular.ttf: Noto Sans Thai:style=Regular
/usr/local/share/fonts/freefont-20080323/FreeSerifBold.ttf: FreeSerif:style=Bold,polkrepko
/usr/local/share/fonts/TITUSEN.TTF: Titus SyriacEstrangelo:style=Regular
/usr/local/share/fonts/feofanucs.ttf: Feofan Ucs:style=Regular
/usr/local/share/fonts/OstgDSoIEUcs8.ttf: Ostrog\-Dol ieUcs:style=SpacedOut
/usr/share/fonts/truetype/dejavu/DejaVuSansMono.ttf: DejaVu Sans Mono:style=Book
/usr/share/fonts/truetype/noto/NotoSansCypriot-Regular.ttf: Noto Sans Cypriot:style=Regular
/usr/local/share/fonts/ZlatUcs.pfb: Zlatoust Ucs:style=Regular
..
.


To look for a certain font supposed to be installed run cmd:


fc-list|grep -i "Times New Roman"
/usr/share/fonts/truetype/msttcorefonts/Times_New_Roman.ttf: Times New Roman:style=Regular,Normal,obyčejné,Standard,Κανονικά,
Normaali,Normál,Normale,Standaard,Normalny,Обычный,Normálne,Navadno,thường,Arrunta


fc-list|grep -i "slavonic"
/usr/local/share/fonts/TITUSN__.TTF: Titus Slavonic:style=Normal


gnome-font-viewer-program-gnu-linux-screenshot

Another good tool for GNOME users is font-manager if you don't have it already installed:


apt-get install font-manager


One of the cool things about it is it can show you Licensing of each of system installed fonts the full list of font character sets and could visualize you different pixel font sizes in the so called "waterfall" font view.

Ansible Quick Start Cheatsheet for Linux admins and DevOps engineers

Wednesday, October 24th, 2018

ansible-quick-start-cheetsheet-ansible-logo

Ansible is widely used (Configuration management, deployment, and task execution system) nowadays for mass service depoyments on multiple servers and Clustered environments like, Kubernetes clusters (with multiple pods replicas) virtual swarms running XEN / IPKVM virtualization hosting multiple nodes etc. .

Ansible can be used to configure or deploy GNU / Linux tools and services such as Apache / Squid / Nginx / MySQL / PostgreSQL. etc. It is pretty much like Puppet (server / services lifecycle management) tool , except its less-complecated to start with makes it often a choose as a tool for mass deployment (devops) automation.

Ansible is used for multi-node deployments and remote-task execution on group of servers, the big pro of it it does all its stuff over simple SSH on the remote nodes (servers) and does not require extra services or listening daemons like with Puppet. It combined with Docker containerization is used very much for later deploying later on inside Cloud environments such as Amazon AWS / Google Cloud Platform / SAP HANA / OpenStack etc.

Ansible-Architechture-What-Is-Ansible-Edureka

0. Instaling ansible on Debian / Ubuntu Linux


Ansible is a python script and because of that depends heavily on python so to make it running, you will need to have a working python installed on local and remote servers.

Ansible is as easy to install as running the apt cmd:


# apt-get install –yes ansible
 

The following additional packages will be installed:
  ieee-data python-jinja2 python-kerberos python-markupsafe python-netaddr python-paramiko python-selinux python-xmltodict python-yaml
Suggested packages:
  sshpass python-jinja2-doc ipython python-netaddr-docs python-gssapi
Recommended packages:
  python-winrm
The following NEW packages will be installed:
  ansible ieee-data python-jinja2 python-kerberos python-markupsafe python-netaddr python-paramiko python-selinux python-xmltodict python-yaml
0 upgraded, 10 newly installed, 0 to remove and 1 not upgraded.
Need to get 3,413 kB of archives.
After this operation, 22.8 MB of additional disk space will be used.

apt-get install –yes sshpass


Installing Ansible on Fedora Linux is done with:


# dnf install ansible –yes sshpass


On CentOS to install:
 

# yum install ansible –yes sshpass

sshpass needs to be installed only if you plan to use ssh password prompt authentication with ansible.

Ansible is also installable via python-pip tool, if you need to install a specific version of ansible you have to use it instead, the package is available as an installable package on most linux distros.

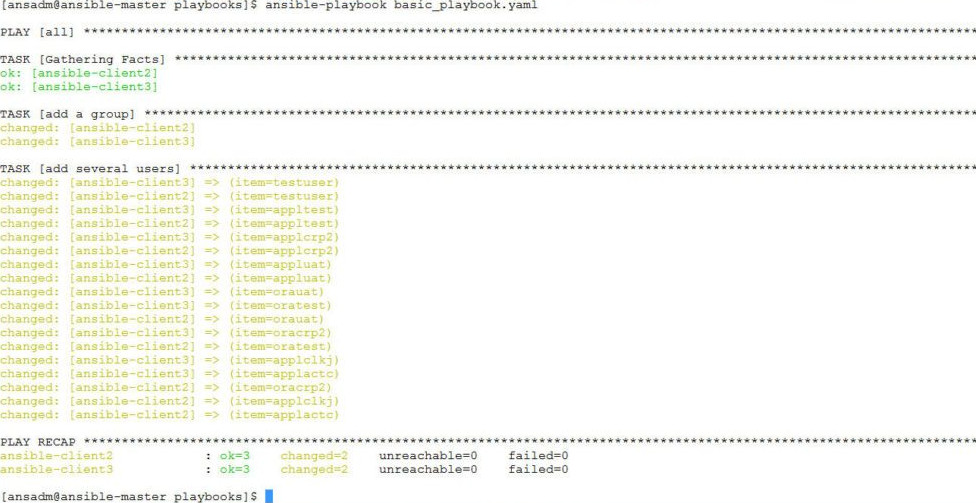
Ansible has a lot of pros and cons and there are multiple articles already written on people for and against it in favour of Chef or Puppet As I recently started learning Ansible. The most important thing to know about Ansible is though many of the things can be done directly using a simple command line, the tool is planned for remote installing of server services using a specially prepared .yaml format configuration files. The power of Ansible comes of the use of Ansible Playbooks which are yaml scripts that tells ansible how to do its activities step by step on remote server. In this article, I'm giving a quick cheat sheet to start quickly with it.
 

1. Remote commands execution with Ansible
 

First thing to do to start with it is to add the desired hostnames ansible will operate with it can be done either globally (if you have a number of remote nodes) to deploy stuff periodically by using /etc/ansible/hosts or use a custom host script for each and every ansible custom scripts developed.

a. Ansible main config files

A common ansible /etc/ansible/hosts definition looks something like that:


# cat /etc/ansible/hosts
[mysqldb]
10.69.2.185
10.69.2.186
[master]
10.69.2.181
[slave]
10.69.2.187
[db-servers]
10.69.2.181
10.69.2.187
[squid]
10.69.2.184

Host to execute on can be also provided via a shell variable $ANSIBLE_HOSTS
b) is remote hosts reachable / execute commands on all remote host

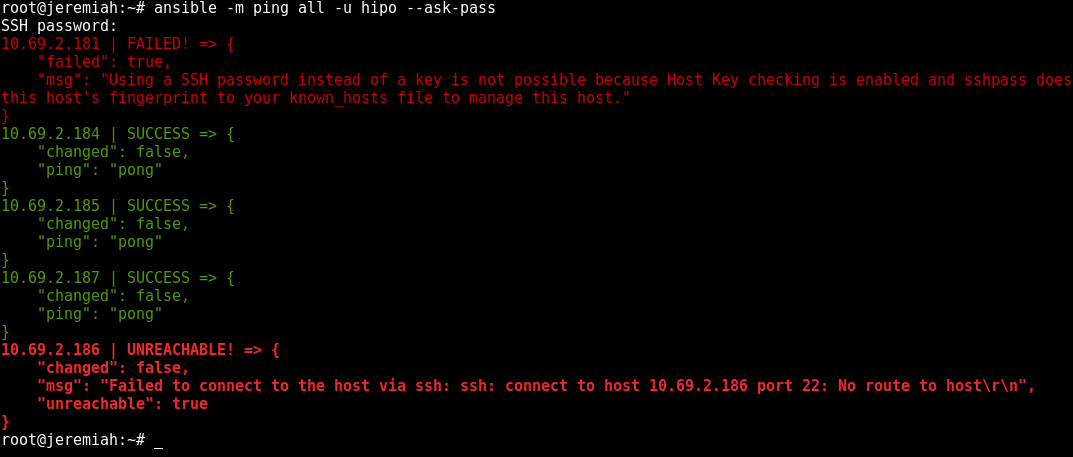
To test whether hour hosts are properly configure from /etc/ansible/hosts you can ping all defined hosts with:


ansible all -m ping


ansible-check-hosts-ping-command-screenshot

This makes ansible try to remote to remote hosts (if you have properly configured SSH public key authorization) the command should return success statuses on every host.


ansible all -a "ifconfig -a"


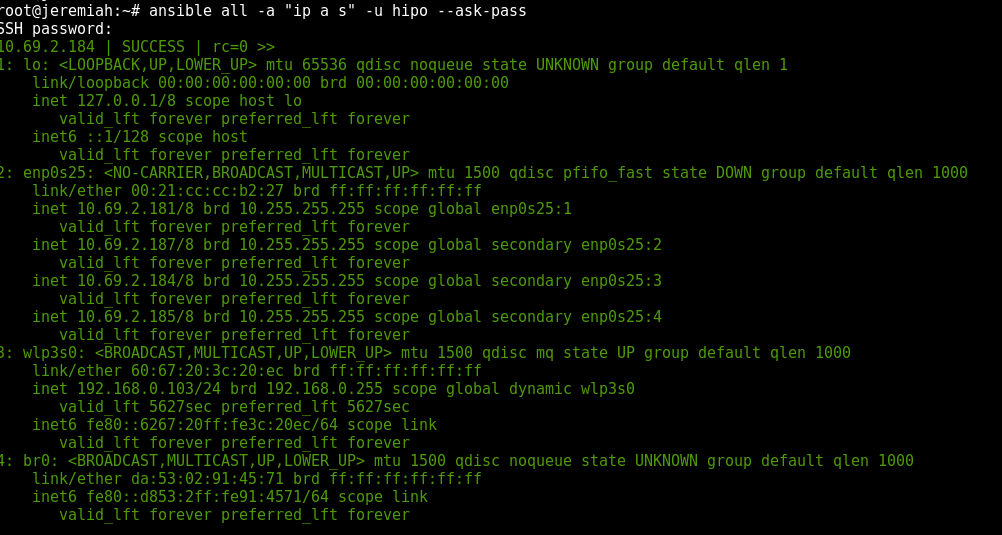
If you don't have SSH keys configured you can also authenticate with an argument (assuming) all hosts are configured with same password with:


ansible all –ask-pass -a "ip all show" -u hipo –ask-pass


ansible-show-ips-ip-a-command-screenshot-linux

If you have configured group of hosts via hosts file you can also run certain commands on just a certain host group, like so:


ansible <host-group> -a <command>

It is a good idea to always check /etc/ansible/ansible.cfg which is the system global (main red ansible config file).

c) List defined host groups
 

ansible localhost -m debug -a 'var=groups.keys()'
ansible localhost -m debug -a 'var=groups'

d) Searching remote server variables


# Search remote server variables
ansible localhost -m setup -a 'filter=*ipv4*'


ansible localhost -m setup -a 'filter=ansible_domain'


ansible all -m setup -a 'filter=ansible_domain'


# uninstall package on RPM based distros
ansible centos -s -m yum -a "name=telnet state=absent"
# uninstall package on APT distro
ansible localhost -s -m apt -a "name=telnet state=absent"


2. Debugging – Listing information about remote hosts (facts) and state of a host


# All facts for one host
ansible -m setup
  # Only ansible fact for one host
ansible
-m setup -a 'filter=ansible_eth*'
# Only facter facts but for all hosts
ansible all -m setup -a 'filter=facter_*'


To Save outputted information per-host in separate files in lets say ~/ansible/host_facts


ansible all -m setup –tree ~/ansible/host_facts


3. Playing with Playbooks deployment scripts


a) Syntax Check of a playbook yaml


ansible-playbook –syntax-check


b) Run General Infos about a playbook such as get what a playbook would do on remote hosts (tasks to run) and list-hosts defined for a playbook (like above pinging).


ansible-playbook –list-hosts
ansible-playbook
–list-tasks


To get the idea about what an yaml playbook looks like, here is example from official ansible docs, that deploys on remote defined hosts a simple Apache webserver.


– hosts: webservers
  vars:
    http_port: 80
    max_clients: 200
  remote_user: root
  tasks:
  – name: ensure apache is at the latest version
    yum:
      name: httpd
      state: latest
  – name: write the apache config file
    template:
      src: /srv/httpd.j2
      dest: /etc/httpd.conf
    notify:
    – restart apache
  – name: ensure apache is running
    service:
      name: httpd
      state: started
  handlers:
    – name: restart apache
      service:
        name: httpd
        state: restarted

To give it a quick try save the file as webserver.yml and give it a run via ansible-playbook command
 

ansible-playbook -s playbooks/webserver.yml


The -s option instructs ansible to run play on remote server with super user (root) privileges.

The power of ansible is its modules, which are constantly growing over time a complete set of Ansible supported modules is in its official documenation.

Ansible-running-playbook-Commands-Task-script-Successful-output-1024x536

There is a lot of things to say about playbooks, just to give the brief they have there own language like a  templates, tasks, handlers, a playbook could have one or multiple plays inside (for instance instructions for deployment of one or more services).

The downsides of playbooks are they're so hard to write from scratch and edit, because yaml syntaxing is much more stricter than a normal oldschool sysadmin configuration file.
I've stucked with problems with modifying and writting .yaml files and I should say the community in #ansible in irc.freenode.net was very helpful to help me debug the obscure errors.

yamllint (The YAML Linter tool) comes handy at times, when facing yaml syntax errors, to use it install via apt:
 

# apt-get install –yes yamllint


a) Running ansible in "dry mode" just show what ansible might do but not change anything
 

ansible-playbook playbooks/PLAYBOOK_NAME.yml –check


b) Running playbook with different users and separate SSH keys


ansible-playbook playbooks/your_playbook.yml –user ansible-user
 
ansible -m ping hosts –private-key=~/.ssh/keys/custom_id_rsa -u centos


c) Running ansible playbook only for certain hostnames part of a bigger host group


ansible-playbook playbooks/PLAYBOOK_NAME.yml –limit "host1,host2,host3"


d) Run Ansible on remote hosts in parallel

To run in raw of 10 hosts in parallel
 

# Run 10 hosts parallel
ansible-playbook <File.yaml> -f 10            


e) Passing variables to .yaml scripts using commandline

Ansible has ability to pre-define variables from .yml playbooks. This variables later can be passed from shell cli, here is an example:

# Example of variable substitution pass from command line the var in varsubsts.yaml if present is defined / replaced ansible-playbook playbooks/varsubst.yaml –extra-vars "myhosts=localhost gather=yes pkg=telnet"


4. Ansible Galaxy (A Docker Hub) like large repository with playbook (script) files


Ansible Galaxy has about 10000 active users which are contributing ansible automation playbooks in fields such as Development / Networking / Cloud / Monitoring / Database / Web / Security etc.

To install from ansible galaxy use ansible-galaxy

# install from galaxy the geerlingguy mysql playbook
ansible-galaxy install geerlingguy.mysql


The available packages you can use as a template for your purpose are not so much as with Puppet as Ansible is younger and not corporate supported like Puppet, anyhow they are a lot and does cover most basic sysadmin needs for mass deployments, besides there are plenty of other unofficial yaml ansible scripts in various github repos.

How to install KVM Kernel-based Virtual Machine Virtualization on Linux

Sunday, October 14th, 2018

install-KVM-Kernel-based-Virtual-Machine-virtualization-on-Linux

If you want to run multiple virtual machines on GNU / Linux server or your Linux powered Desktop you have the possibility to use a couple of Virtual Machines just to name a few VirtualBox and VMWare are the option the native way to do it is using the Linux kernel via a loadable kernel module called KVM (Kernel-based Virtual Machine).
Though Oracle's Virtualbox generally works and you could add new test beds virtual machines (install multiple Linux / *BSD OS) it is not fully Free Software and not even fully open source licensed, VMWare even though superior as a Virtualization product is proprietary and its application costs a lot of money which not each develpoper or small / mid-sized company could afford.

Once the kvm.ko module is loaded your Linux kernel turns into a full-featured Virtual Machine Hypervisor.
Starting with Linux kernel 2.6.X the KVM Hypervisor is available and easy to install virtually all modern Linux distributions Redhat / CentOS Debian / Ubuntu etc. support it and its up to running few commands to install and start using the Power of Kernel embedded Virtualization.

KVM could be used to run in parallel multiple Operating Systems such as Windows / Linux / FreeBSD and others of BSDs family,  each running under a separate virtual machine with its private dedicated (isolated), disc, graphic card, network card etc.

To start up I assume you have already installed some kind of Linux distribution either locally or on a remote dedicated server.
 

1. Installing KVM on Debian GNU / Linux / Ubuntu / Mint and other deb based distros


Using APT tool install below packages:


root@jeremiah:~# apt install –yes qemu-kvm libvirt-clients libvirt-daemon-system bridge-utils libguestfs-tools genisoimage virtinst libosinfo-bin


2. Installing virt-manager GUI to manage Virtual servers


root@jeremiah:~# apt-cache show virt-manager|grep -i desc -A 1
Description-en: desktop application for managing virtual machines
 It presents a summary view of running domains and their live performance &

Description-md5: 9f7f584744b77cdacc2291f2a8ac220e
Homepage: http://virt-manager.et.redhat.com/


root@jeremiah:~# apt install –yes virt-manager


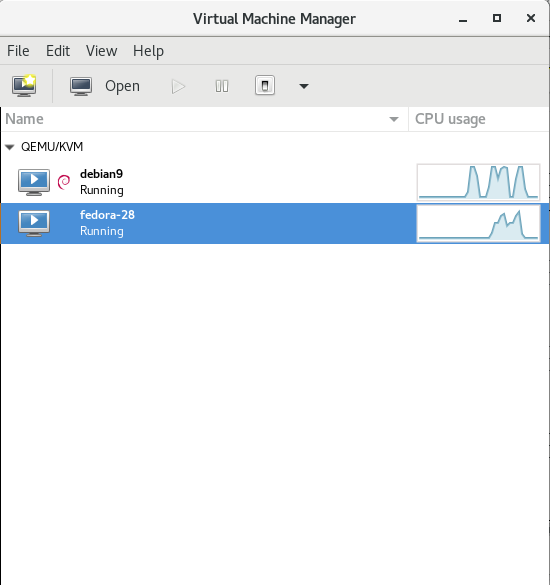
virtual-manager-kvm-gnu-linux-virtual-machines-cpu-hdd-load-statistics-screenshot


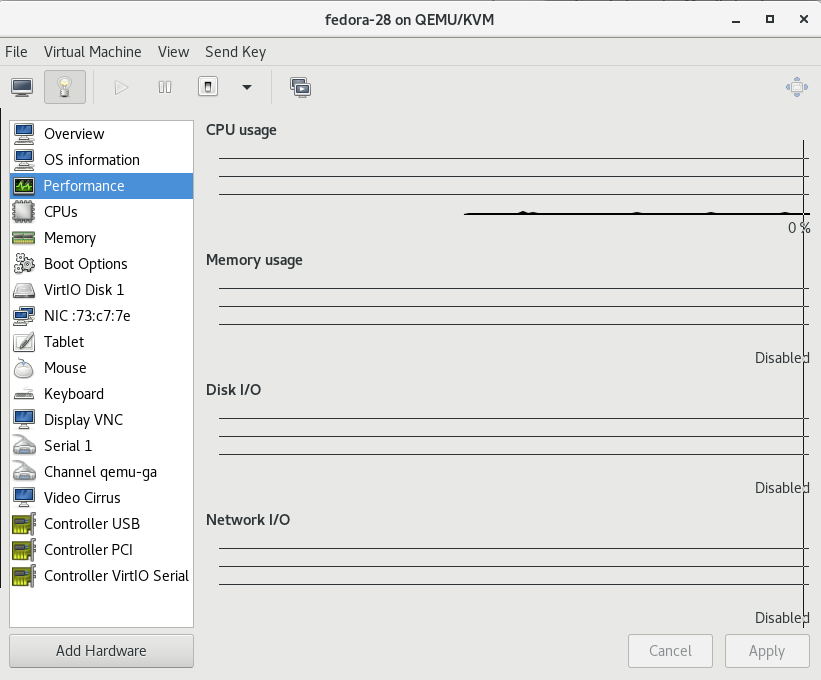
virtual-manager-fedora-28-linux-virtual-machine-settings-screenshot


3. Configure bridged networking to allow access to newly configured VMs

Bridging has to be added via /etc/network/interfaces therefore it is a good idea to create a backup of it before modifying:


# cp -rpf /etc/network/interfaces /etc/network/interfaces.bakup-$(echo $(date '+%Y-%m-%d-%H'))


# vim /etc/network/interfaces

auto br0
 iface br0 inet static
         address 10.15.44.26
         netmask 255.255.255.192
         broadcast 10.15.44.63
         dns-nameservers 10.0.80.11 10.0.80.12
         # set static route for LAN
      post-up route add -net 10.0.0.0 netmask 255.0.0.0 gw 10.18.44.1
      post-up route add -net 161.26.0.0 netmask 255.255.0.0 gw 10.18.44.1
         bridge_ports eth0
         bridge_stp off
         bridge_fd 0
         bridge_maxwait 0
 
 # br1 setup with static wan IPv4 with ISP router as a default gateway
 auto br1
 iface br1 inet static
         address 192.168.222.51
         netmask 255.255.255.248
         broadcast 192.168.222.55
         gateway 192.168.222.49
         bridge_ports eth1
         bridge_stp off
         bridge_fd 0
         bridge_maxwait 0


Once file is saved in vim editor restart the networking.


# systemctl restart network.manager


To verify whether the bridge has been succesfully upped.


root@jeremiah:/home/hipo/kvm# brctl show
bridge name    bridge id        STP enabled    interfaces
virbr0        8000.525400cb1cd1    yes        virbr0-nic


4. List all installable Virtual OS images
 

root@jeremiah:/home/hipo/kvm# virt-builder -list
centos-6                 x86_64     CentOS 6.6
centos-7.0               x86_64     CentOS 7.0
centos-7.1               x86_64     CentOS 7.1
centos-7.2               aarch64    CentOS 7.2 (aarch64)
centos-7.2               x86_64     CentOS 7.2
centos-7.3               x86_64     CentOS 7.3
centos-7.4               x86_64     CentOS 7.4
centos-7.5               x86_64     CentOS 7.5
cirros-0.3.1             x86_64     CirrOS 0.3.1
cirros-0.3.5             x86_64     CirrOS 0.3.5
debian-6                 x86_64     Debian 6 (Squeeze)
debian-7                 sparc64    Debian 7 (Wheezy) (sparc64)
debian-7                 x86_64     Debian 7 (wheezy)
debian-8                 x86_64     Debian 8 (jessie)
debian-9                 x86_64     Debian 9 (stretch)
fedora-18                x86_64     Fedora® 18
fedora-19                x86_64     Fedora® 19
fedora-20                x86_64     Fedora® 20
fedora-21                aarch64    Fedora® 21 Server (aarch64)
fedora-21                armv7l     Fedora® 21 Server (armv7l)
fedora-21                ppc64      Fedora® 21 Server (ppc64)
fedora-21                ppc64le    Fedora® 21 Server (ppc64le)
fedora-21                x86_64     Fedora® 21 Server
fedora-22                aarch64    Fedora® 22 Server (aarch64)
fedora-22                armv7l     Fedora® 22 Server (armv7l)
fedora-22                i686       Fedora® 22 Server (i686)
fedora-22                x86_64     Fedora® 22 Server
fedora-23                aarch64    Fedora® 23 Server (aarch64)
fedora-23                armv7l     Fedora® 23 Server (armv7l)
fedora-23                i686       Fedora® 23 Server (i686)
fedora-23                ppc64      Fedora® 23 Server (ppc64)
fedora-23                ppc64le    Fedora® 23 Server (ppc64le)
fedora-23                x86_64     Fedora® 23 Server
fedora-24                aarch64    Fedora® 24 Server (aarch64)
fedora-24                armv7l     Fedora® 24 Server (armv7l)
fedora-24                i686       Fedora® 24 Server (i686)
fedora-24                x86_64     Fedora® 24 Server
fedora-25                aarch64    Fedora® 25 Server (aarch64)
fedora-25                armv7l     Fedora® 25 Server (armv7l)
fedora-25                i686       Fedora® 25 Server (i686)
fedora-25                ppc64      Fedora® 25 Server (ppc64)
fedora-25                ppc64le    Fedora® 25 Server (ppc64le)
fedora-25                x86_64     Fedora® 25 Server
fedora-26                aarch64    Fedora® 26 Server (aarch64)
fedora-26                armv7l     Fedora® 26 Server (armv7l)
fedora-26                i686       Fedora® 26 Server (i686)
fedora-26                ppc64      Fedora® 26 Server (ppc64)
fedora-26                ppc64le    Fedora® 26 Server (ppc64le)
fedora-26                x86_64     Fedora® 26 Server
fedora-27                aarch64    Fedora® 27 Server (aarch64)
fedora-27                armv7l     Fedora® 27 Server (armv7l)
fedora-27                i686       Fedora® 27 Server (i686)
fedora-27                ppc64      Fedora® 27 Server (ppc64)
fedora-27                ppc64le    Fedora® 27 Server (ppc64le)
fedora-27                x86_64     Fedora® 27 Server
fedora-28                i686       Fedora® 28 Server (i686)
fedora-28                x86_64     Fedora® 28 Server
freebsd-11.1             x86_64     FreeBSD 11.1
scientificlinux-6        x86_64     Scientific Linux 6.5
ubuntu-10.04             x86_64     Ubuntu 10.04 (Lucid)
ubuntu-12.04             x86_64     Ubuntu 12.04 (Precise)
ubuntu-14.04             x86_64     Ubuntu 14.04 (Trusty)
ubuntu-16.04             x86_64     Ubuntu 16.04 (Xenial)
ubuntu-18.04             x86_64     Ubuntu 18.04 (bionic)
opensuse-13.1            x86_64     openSUSE 13.1
opensuse-13.2            x86_64     openSUSE 13.2
opensuse-42.1            x86_64     openSUSE Leap 42.1
opensuse-tumbleweed      x86_64     openSUSE Tumbleweed


5. Create Virtual Machine OS-es from scratch with virt-builder

Below we'll create two images one for Fedora 28 and 1 for Debian 9 using the virt-builder (a tool to build virtual images quickly), the images that could be used are shown through below virt-builder –list command.
 

# iso='fedora-28';
# iso1='debian-9';


# sudo virt-builder $iso \
     –size=10G \
     –format qcow2 -o /var/lib/libvirt/images/$iso-vm1.qcow2 \
     –hostname $iso-vm1 \
     –network \
     –timezone Europe/Sofia


[   3.3] Downloading: http://libguestfs.org/download/builder/fedora-28.xz
[   5.2] Planning how to build this image
[   5.2] Uncompressing
[  20.8] Resizing (using virt-resize) to expand the disk to 10.0G
[  50.8] Opening the new disk
[  53.7] Setting a random seed
[  53.7] Setting the hostname: fedora-28-vm1
[  53.7] Setting the timezone: Europe/Sofia
[  53.7] Setting passwords
virt-builder: Setting random password of root to YMTkxaJIkEU24Ytf

[  54.7] Finishing off
                   Output file: /var/lib/libvirt/images/fedora-28-vm1.qcow2
                   Output size: 10.0G
                 Output format: qcow2
            Total usable space: 9.3G
                    Free space: 8.2G (87%)


# sudo virt-builder $iso1 \
     –size=10G \
     –format qcow2 -o /var/lib/libvirt/images/$iso-vm1.qcow2 \
     –hostname $iso1-vm1 \
     –network \
     –timezone Europe/Sofia


[   3.2] Downloading: http://libguestfs.org/download/builder/debian-9.xz
[   4.1] Planning how to build this image
[   4.1] Uncompressing
[  16.9] Resizing (using virt-resize) to expand the disk to 10.0G
[  40.1] Opening the new disk
[  42.9] Setting a random seed
virt-builder: warning: random seed could not be set for this type of guest
[  42.9] Setting the hostname: debian-9-vm1
[  43.6] Setting the timezone: Europe/Sofia
[  43.6] Setting passwords
virt-builder: Setting random password of root to JtzEYGff9KxL5jCR
[  44.3] Finishing off
                   Output file: /var/lib/libvirt/images/debian-9-vm1.qcow2
                   Output size: 10.0G
                 Output format: qcow2
            Total usable space: 9.8G
                    Free space: 9.0G (91%)


vim bridged.xml

<network>
  <name>br0</name>
  <forward mode="bridge"/>
  <bridge name="br0"/>
</network>


# sudo virsh net-define –file bridged.xml
# sudo virsh net-autostart br0
# sudo virsh net-start br0


Above two commands will download pre-packaged KVM isos and store them inside /var/lib/libvirt/images/ you see also the root (administrator) password for both ISOs printed out.


root@jeremiah:/home/hipo/kvm# ls -ld /var/lib/libvirt/images/*
-rw-r–r– 1 root         root         10739318784 Oct 12 23:45 /var/lib/libvirt/images/debian-9-vm1.qcow2
-rw-r–r– 1 root         root         10739318784 Oct 12 23:46 /var/lib/libvirt/images/fedora-28-vm1.qcow2


To access directly the new created VMs as we have specified the –vnc option it is possible to directly vnc to the new host with VNC client (in linux I use vncviewer), on Windows you can use something like TightVNC.
 

6. Use official Linux distributions ISO boot files to install into KVM VM


Those who would like to run inside KVM VM Linux could do it directly using installable ISO files and install the set of Linux with the required packages, just like installing a fresh new Linux on a bare-metal machine.
To do so download your ISO image from the net (either from official distro website or a mirror website, in case if you need to spin an older version) and use virt-install to run the installer inside KVM.


root@jeremiah:~# cd /var/lib/libvirt/boot/;
root@jeremiah:~# wget http://mirrors.netix.net/centos/7.5.1804/isos/x86_64/CentOS-7-x86_64-DVD-1804.iso


# sudo virt-install \
–virt-type=kvm \
–name centos7 \
–ram 2048 \
–vcpus=2 \
–os-variant=centos7.0 \
–virt-type=kvm \
–hvm \
–cdrom=/var/lib/libvirt/boot/CentOS-7-x86_64-DVD-1804.iso \
–network=bridge=br0,model=virtio \
–network=bridge=br1,model=virtio \
–graphics vnc \
–disk path=/var/lib/libvirt/images/centos7.qcow2,size=40,bus=virtio,format=qcow2


7. List newly created VMs with Virsh command


root@jeremiah:/home/hipo/kvm# virsh list –all
 Id    Name                           State
—————————————————-
 3     fedora-28                      running
 –     debian9                        shut off


The –all parameter lists all available VMs ready to spin, if you want to check what are the VMs that are only running use instead:


root@jeremiah:/home/hipo/kvm# virsh list
 Id    Name                           State
—————————————————-
 3     fedora-28                      running


8. Install Virtual Machine OS-es

Below lines will install 2 Virtual machines one Fedora 28 and Debian 9


 os='fedora-28';
virt-install –import –name $os \
    –ram 2048 \
    –vcpu 2 \
    –disk path=/var/lib/libvirt/images/$os-vm1.qcow2,format=qcow2 \
    –os-variant fedora-unknown \
    –network=bridge=br0,model=virtio \
    –noautoconsole \
  –hvm \
  –graphics vnc

os='debian9';
virt-install –import –name $os     \
–ram 2048     \
–vcpu 2     \
–disk path=/var/lib/libvirt/images/$os-vm1.qcow2,format=qcow2     \
–os-variant debian9     –network=bridge=br0,model=virtio     \
–noautoconsole \
–hvm \
–graphics vnc


To deploy more just change the virtual machine type in os variable and modify the –os-variant variable to match the distribution name, to get the correct –os-variant variables that can be passed use osinfo-query below is output of the cmd:


root@jeremiah:/home/hipo/kvm# osinfo-query os
 Short ID             | Name                                               | Version  | ID                                      
———————-+—————————————————-+———-+—————————————–
 altlinux1.0          | Mandrake RE Spring 2001                            | 1.0      | http://altlinux.org/altlinux/1.0        
 altlinux2.0          | ALT Linux 2.0                                      | 2.0      | http://altlinux.org/altlinux/2.0        
 altlinux2.2          | ALT Linux 2.2                                      | 2.2      | http://altlinux.org/altlinux/2.2        
 altlinux2.4          | ALT Linux 2.4                                      | 2.4      | http://altlinux.org/altlinux/2.4        
 altlinux3.0          | ALT Linux 3.0                                      | 3.0      | http://altlinux.org/altlinux/3.0        
 altlinux4.0          | ALT Linux 4.0                                      | 4.0      | http://altlinux.org/altlinux/4.0        
 altlinux4.1          | ALT Linux 4.1                                      | 4.1      | http://altlinux.org/altlinux/4.1        
 altlinux5.0          | ALT Linux 5.0                                      | 5.0      | http://altlinux.org/altlinux/5.0        
 altlinux6.0          | ALT Linux 6.0                                      | 6.0      | http://altlinux.org/altlinux/6.0        
 altlinux7.0          | ALT Linux 7.0                                      | 7.0      | http://altlinux.org/altlinux/7.0        
 centos6.0            | CentOS 6.0                                         | 6.0      | http://centos.org/centos/6.0            
 centos6.1            | CentOS 6.1                                         | 6.1      | http://centos.org/centos/6.1            
 centos6.2            | CentOS 6.2                                         | 6.2      | http://centos.org/centos/6.2            
 centos6.3            | CentOS 6.3                                         | 6.3      | http://centos.org/centos/6.3            
 centos6.4            | CentOS 6.4                                         | 6.4      | http://centos.org/centos/6.4            
 centos6.5            | CentOS 6.5                                         | 6.5      | http://centos.org/centos/6.5            
 centos6.6            | CentOS 6.6                                         | 6.6      | http://centos.org/centos/6.6            
 centos6.7            | CentOS 6.7                                         | 6.7      | http://centos.org/centos/6.7            
 centos6.8            | CentOS 6.8                                         | 6.8      | http://centos.org/centos/6.8            
 centos6.9            | CentOS 6.9                                         | 6.9      | http://centos.org/centos/6.9            
 centos7.0            | CentOS 7.0                                         | 7.0      | http://centos.org/centos/7.0            
 debian1.1            | Debian Buzz                                        | 1.1      | http://debian.org/debian/1.1            
 debian1.2            | Debian Rex                                         | 1.2      | http://debian.org/debian/1.2            
 debian1.3            | Debian Bo                                          | 1.3      | http://debian.org/debian/1.3            
 debian2.0            | Debian Hamm                                        | 2.0      | http://debian.org/debian/2.0            
 debian2.1            | Debian Slink                                       | 2.1      | http://debian.org/debian/2.1            
 debian2.2            | Debian Potato                                      | 2.2      | http://debian.org/debian/2.2            
 debian3              | Debian Woody                                       | 3        | http://debian.org/debian/3              
 debian3.1            | Debian Sarge                                       | 3.1      | http://debian.org/debian/3.1            
 debian4              | Debian Etch                                        | 4        | http://debian.org/debian/4              
 debian5              | Debian Lenny                                       | 5        | http://debian.org/debian/5              
 debian6              | Debian Squeeze                                     | 6        | http://debian.org/debian/6              
 debian7              | Debian Wheezy                                      | 7        | http://debian.org/debian/7              
 debian8              | Debian Jessie                                      | 8        | http://debian.org/debian/8              
 debian9              | Debian Stretch                                     | 9        | http://debian.org/debian/9              
 debiantesting        | Debian Testing                                     | testing  | http://debian.org/debian/testing        
 fedora-unknown       | Fedora                                             | unknown  | http://fedoraproject.org/fedora/unknown
 fedora1              | Fedora Core 1                                      | 1        | http://fedoraproject.org/fedora/1       
 fedora10             | Fedora 10                                          | 10       | http://fedoraproject.org/fedora/10      
 fedora11             | Fedora 11                                          | 11       | http://fedoraproject.org/fedora/11      
 fedora12             | Fedora 12                                          | 12       | http://fedoraproject.org/fedora/12      
 fedora13             | Fedora 13                                          | 13       | http://fedoraproject.org/fedora/13      
 fedora14             | Fedora 14                                          | 14       | http://fedoraproject.org/fedora/14      
 fedora15             | Fedora 15                                          | 15       | http://fedoraproject.org/fedora/15      
 fedora16             | Fedora 16                                          | 16       | http://fedoraproject.org/fedora/16      
 fedora17             | Fedora 17                                          | 17       | http://fedoraproject.org/fedora/17      
 fedora18             | Fedora 18                                          | 18       | http://fedoraproject.org/fedora/18      
 fedora19             | Fedora 19                                          | 19       | http://fedoraproject.org/fedora/19      
 fedora2              | Fedora Core 2                                      | 2        | http://fedoraproject.org/fedora/2       
 fedora20             | Fedora 20                                          | 20       | http://fedoraproject.org/fedora/20      
 fedora21             | Fedora 21                                          | 21       | http://fedoraproject.org/fedora/21      
 fedora22             | Fedora 22                                          | 22       | http://fedoraproject.org/fedora/22      
 fedora23             | Fedora 23                                          | 23       | http://fedoraproject.org/fedora/23      
 fedora24             | Fedora 24                                          | 24       | http://fedoraproject.org/fedora/24      
 fedora25             | Fedora 25                                          | 25       | http://fedoraproject.org/fedora/25      
 fedora26             | Fedora 26                                          | 26       | http://fedoraproject.org/fedora/26      
 fedora3              | Fedora Core 3                                      | 3        | http://fedoraproject.org/fedora/3       
 fedora4              | Fedora Core 4                                      | 4        | http://fedoraproject.org/fedora/4       
 fedora5              | Fedora Core 5                                      | 5        | http://fedoraproject.org/fedora/5       
 fedora6              | Fedora Core 6                                      | 6        | http://fedoraproject.org/fedora/6       
 fedora7              | Fedora 7                                           | 7        | http://fedoraproject.org/fedora/7       
 fedora8              | Fedora 8                                           | 8        | http://fedoraproject.org/fedora/8       
 fedora9              | Fedora 9                                           | 9        | http://fedoraproject.org/fedora/9       
 freebsd1.0           | FreeBSD 1.0                                        | 1.0      | http://freebsd.org/freebsd/1.0          
 freebsd10.0          | FreeBSD 10.0                                       | 10.0     | http://freebsd.org/freebsd/10.0         
 freebsd10.1          | FreeBSD 10.1                                       | 10.1     | http://freebsd.org/freebsd/10.1         
 freebsd10.2          | FreeBSD 10.2                                       | 10.2     | http://freebsd.org/freebsd/10.2         
 freebsd10.3          | FreeBSD 10.3                                       | 10.3     | http://freebsd.org/freebsd/10.3         
 freebsd10.4          | FreeBSD 10.4                                       | 10.4     | http://freebsd.org/freebsd/10.4         
 freebsd11.0          | FreeBSD 11.0                                       | 11.0     | http://freebsd.org/freebsd/11.0         
 freebsd11.1          | FreeBSD 11.1                                       | 11.1     | http://freebsd.org/freebsd/11.1         
 freebsd2.0           | FreeBSD 2.0                                        | 2.0      | http://freebsd.org/freebsd/2.0          
 freebsd2.0.5         | FreeBSD 2.0.5                                      | 2.0.5    | http://freebsd.org/freebsd/2.0.5        
 freebsd2.2.8         | FreeBSD 2.2.8                                      | 2.2.8    | http://freebsd.org/freebsd/2.2.8        
 freebsd2.2.9         | FreeBSD 2.2.9                                      | 2.2.9    | http://freebsd.org/freebsd/2.2.9        
 freebsd3.0           | FreeBSD 3.0                                        | 3.0      | http://freebsd.org/freebsd/3.0          
 freebsd3.2           | FreeBSD 3.2                                        | 3.2      | http://freebsd.org/freebsd/3.2          
 freebsd4.0           | FreeBSD 4.0                                        | 4.0      | http://freebsd.org/freebsd/4.0          
 freebsd4.1           | FreeBSD 4.1                                        | 4.1      | http://freebsd.org/freebsd/4.1          
 freebsd4.10          | FreeBSD 4.10                                       | 4.10     | http://freebsd.org/freebsd/4.10         
 freebsd4.11          | FreeBSD 4.11                                       | 4.11     | http://freebsd.org/freebsd/4.11         
 freebsd4.2           | FreeBSD 4.2                                        | 4.2      | http://freebsd.org/freebsd/4.2          
 freebsd4.3           | FreeBSD 4.3                                        | 4.3      | http://freebsd.org/freebsd/4.3          
 freebsd4.4           | FreeBSD 4.4                                        | 4.4      | http://freebsd.org/freebsd/4.4          
 freebsd4.5           | FreeBSD 4.5                                        | 4.5      | http://freebsd.org/freebsd/4.5          
 freebsd4.6           | FreeBSD 4.6                                        | 4.6      | http://freebsd.org/freebsd/4.6          
 freebsd4.7           | FreeBSD 4.7                                        | 4.7      | http://freebsd.org/freebsd/4.7          
 freebsd4.8           | FreeBSD 4.8                                        | 4.8      | http://freebsd.org/freebsd/4.8          
 freebsd4.9           | FreeBSD 4.9                                        | 4.9      | http://freebsd.org/freebsd/4.9          
 freebsd5.0           | FreeBSD 5.0                                        | 5.0      | http://freebsd.org/freebsd/5.0          
 freebsd5.1           | FreeBSD 5.1                                        | 5.1      | http://freebsd.org/freebsd/5.1          
 freebsd5.2           | FreeBSD 5.2                                        | 5.2      | http://freebsd.org/freebsd/5.2          
 freebsd5.2.1         | FreeBSD 5.2.1                                      | 5.2.1    | http://freebsd.org/freebsd/5.2.1        
 freebsd5.3           | FreeBSD 5.3                                        | 5.3      | http://freebsd.org/freebsd/5.3          
 freebsd5.4           | FreeBSD 5.4                                        | 5.4      | http://freebsd.org/freebsd/5.4          
 freebsd5.5           | FreeBSD 5.5                                        | 5.5      | http://freebsd.org/freebsd/5.5          
 freebsd6.0           | FreeBSD 6.0                                        | 6.0      | http://freebsd.org/freebsd/6.0          
 freebsd6.1           | FreeBSD 6.1                                        | 6.1      | http://freebsd.org/freebsd/6.1          
 freebsd6.2           | FreeBSD 6.2                                        | 6.2      | http://freebsd.org/freebsd/6.2          
 freebsd6.3           | FreeBSD 6.3                                        | 6.3      | http://freebsd.org/freebsd/6.3          
 freebsd6.4           | FreeBSD 6.4                                        | 6.4      | http://freebsd.org/freebsd/6.4          
 freebsd7.0           | FreeBSD 7.0                                        | 7.0      | http://freebsd.org/freebsd/7.0          
 freebsd7.1           | FreeBSD 7.1                                        | 7.1      | http://freebsd.org/freebsd/7.1          
 freebsd7.2           | FreeBSD 7.2                                        | 7.2      | http://freebsd.org/freebsd/7.2          
 freebsd7.3           | FreeBSD 7.3                                        | 7.3      | http://freebsd.org/freebsd/7.3          
 freebsd7.4           | FreeBSD 7.4                                        | 7.4      | http://freebsd.org/freebsd/7.4          
 freebsd8.0           | FreeBSD 8.0                                        | 8.0      | http://freebsd.org/freebsd/8.0          
 freebsd8.1           | FreeBSD 8.1                                        | 8.1      | http://freebsd.org/freebsd/8.1          
 freebsd8.2           | FreeBSD 8.2                                        | 8.2      | http://freebsd.org/freebsd/8.2          
 freebsd8.3           | FreeBSD 8.3                                        | 8.3      | http://freebsd.org/freebsd/8.3          
 freebsd8.4           | FreeBSD 8.4                                        | 8.4      | http://freebsd.org/freebsd/8.4          
 freebsd9.0           | FreeBSD 9.0                                        | 9.0      | http://freebsd.org/freebsd/9.0          
 freebsd9.1           | FreeBSD 9.1                                        | 9.1      | http://freebsd.org/freebsd/9.1          
 freebsd9.2           | FreeBSD 9.2                                        | 9.2      | http://freebsd.org/freebsd/9.2          
 freebsd9.3           | FreeBSD 9.3                                        | 9.3      | http://freebsd.org/freebsd/9.3          
 freedos1.2           | FreeDOS 1.2                                        | 1.2      | http://freedos.org/freedos/1.2          
 gnome-continuous-3.10 | GNOME 3.10                                         | 3.10     | http://gnome.org/gnome-continuous/3.10  
 gnome-continuous-3.12 | GNOME 3.12                                         | 3.12     | http://gnome.org/gnome-continuous/3.12  
 gnome-continuous-3.14 | GNOME 3.14                                         | 3.14     | http://gnome.org/gnome-continuous/3.14  
 gnome3.6             | GNOME 3.6                                          | 3.6      | http://gnome.org/gnome/3.6              
 gnome3.8             | GNOME 3.8                                          | 3.8      | http://gnome.org/gnome/3.8              
 macosx10.0           | MacOS X Cheetah                                    | 10.0     | http://apple.com/macosx/10.0            
 macosx10.1           | MacOS X Puma                                       | 10.1     | http://apple.com/macosx/10.1            
 macosx10.2           | MacOS X Jaguar                                     | 10.2     | http://apple.com/macosx/10.2            
 macosx10.3           | MacOS X Panther                                    | 10.3     | http://apple.com/macosx/10.3            
 macosx10.4           | MacOS X Tiger                                      | 10.4     | http://apple.com/macosx/10.4            
 macosx10.5           | MacOS X Leopard                                    | 10.5     | http://apple.com/macosx/10.5            
 macosx10.6           | MacOS X Snow Leopard                               | 10.6     | http://apple.com/macosx/10.6            
 macosx10.7           | MacOS X Lion                                       | 10.7     | http://apple.com/macosx/10.7            
 mageia1              | Mageia 1                                           | 1        | http://mageia.org/mageia/1              
 mageia2              | Mageia 2                                           | 2        | http://mageia.org/mageia/2              
 mageia3              | Mageia 3                                           | 3        | http://mageia.org/mageia/3              
 mageia4              | Mageia 4                                           | 4        | http://mageia.org/mageia/4              
 mageia5              | Mageia 5                                           | 5        | http://mageia.org/mageia/5              
 mageia6              | Mageia 6                                           | 6        | http://mageia.org/mageia/6              
 mandrake10.0         | Mandrake Linux 10.0                                | 10.0     | http://mandriva.com/mandrake/10.0       
 mandrake10.1         | Mandrake Linux 10.1                                | 10.1     | http://mandriva.com/mandrake/10.1       
 mandrake10.2         | Mandrake Linux 10.2                                | 10.2     | http://mandriva.com/mandrake/10.2       
 mandrake5.1          | Mandrake Linux 5.1                                 | 5.1      | http://mandriva.com/mandrake/5.1        
 mandrake5.2          | Mandrake Linux 5.2                                 | 5.2      | http://mandriva.com/mandrake/5.2        
 mandrake5.3          | Mandrake Linux 5.3                                 | 5.3      | http://mandriva.com/mandrake/5.3        
 mandrake6.0          | Mandrake Linux 6.0                                 | 6.0      | http://mandriva.com/mandrake/6.0        
 mandrake6.1          | Mandrake Linux 6.1                                 | 6.1      | http://mandriva.com/mandrake/6.1        
 mandrake7.0          | Mandrake Linux 7.0                                 | 7.0      | http://mandriva.com/mandrake/7.0        
 mandrake7.1          | Mandrake Linux 7.1                                 | 7.1      | http://mandriva.com/mandrake/7.1        
 mandrake7.2          | Mandrake Linux 7.2                                 | 7.2      | http://mandriva.com/mandrake/7.2        
 mandrake8.0          | Mandrake Linux 8.0                                 | 8.0      | http://mandriva.com/mandrake/8.0        
 mandrake8.1          | Mandrake Linux 8.1                                 | 8.1      | http://mandriva.com/mandrake/8.1        
 mandrake8.2          | Mandrake Linux 8.2                                 | 8.2      | http://mandriva.com/mandrake/8.2        
 mandrake9.0          | Mandrake Linux 9.0                                 | 9.0      | http://mandriva.com/mandrake/9.0        
 mandrake9.1          | Mandrake Linux 9.1                                 | 9.1      | http://mandriva.com/mandrake/9.1        
 mandrake9.2          | Mandrake Linux 9.2                                 | 9.2      | http://mandriva.com/mandrake/9.2        
 mandriva2006.0       | Mandriva Linux 2006.0                              | 2006.0   | http://mandriva.com/mandriva/2006.0     
 mandriva2007         | Mandriva Linux 2007                                | 2007     | http://mandriva.com/mandriva/2007       
 mandriva2007.1       | Mandriva Linux 2007 Spring                         | 2007.1   | http://mandriva.com/mandriva/2007.1     
 mandriva2008.0       | Mandriva Linux 2008                                | 2008.0   | http://mandriva.com/mandriva/2008.0     
 mandriva2008.1       | Mandriva Linux 2008 Spring                         | 2008.1   | http://mandriva.com/mandriva/2008.1     
 mandriva2009.0       | Mandriva Linux 2009                                | 2009.0   | http://mandriva.com/mandriva/2009.0     
 mandriva2009.1       | Mandriva Linux 2009 Spring                         | 2009.1   | http://mandriva.com/mandriva/2009.1     
 mandriva2010.0       | Mandriva Linux 2010                                | 2010.0   | http://mandriva.com/mandriva/2010.0     
 mandriva2010.1       | Mandriva Linux 2010 Spring                         | 2010.1   | http://mandriva.com/mandriva/2010.1     
 mandriva2010.2       | Mandriva Linux 2010.2                              | 2010.2   | http://mandriva.com/mandriva/2010.2     
 mandriva2011         | Mandriva Linux 2011                                | 2011     | http://mandriva.com/mandriva/2011       
 mbs1.0               | Mandriva Business Server 1.0                       | 1.0      | http://mandriva.com/mbs/1.0             
 mes5                 | Mandriva Enterprise Server 5.0                     | 5.0      | http://mandriva.com/mes/5.0             
 mes5.1               | Mandriva Enterprise Server 5.1                     | 5.1      | http://mandriva.com/mes/5.1             
 msdos6.22            | Microsoft MS-DOS 6.22                              | 6.22     | http://microsoft.com/msdos/6.22         
 netbsd0.8            | NetBSD 0.8                                         | 0.8      | http://netbsd.org/netbsd/0.8            
 netbsd0.9            | NetBSD 0.9                                         | 0.9      | http://netbsd.org/netbsd/0.9            
 netbsd1.0            | NetBSD 1.0                                         | 1.0      | http://netbsd.org/netbsd/1.0            
 netbsd1.1            | NetBSD 1.1                                         | 1.1      | http://netbsd.org/netbsd/1.1            
 netbsd1.2            | NetBSD 1.2                                         | 1.2      | http://netbsd.org/netbsd/1.2            
 netbsd1.3            | NetBSD 1.3                                         | 1.3      | http://netbsd.org/netbsd/1.3            
 netbsd1.4            | NetBSD 1.4                                         | 1.4      | http://netbsd.org/netbsd/1.4            
 netbsd1.5            | NetBSD 1.5                                         | 1.5      | http://netbsd.org/netbsd/1.5            
 netbsd1.6            | NetBSD 1.6                                         | 1.6      | http://netbsd.org/netbsd/1.6            
 netbsd2.0            | NetBSD 2.0                                         | 2.0      | http://netbsd.org/netbsd/2.0            
 netbsd3.0            | NetBSD 3.0                                         | 3.0      | http://netbsd.org/netbsd/3.0            
 netbsd4.0            | NetBSD 4.0                                         | 4.0      | http://netbsd.org/netbsd/4.0            
 netbsd5.0            | NetBSD 5.0                                         | 5.0      | http://netbsd.org/netbsd/5.0            
 netbsd5.1            | NetBSD 5.1                                         | 5.1      | http://netbsd.org/netbsd/5.1            
 netbsd6.0            | NetBSD 6.0                                         | 6.0      | http://netbsd.org/netbsd/6.0            
 netbsd6.1            | NetBSD 6.1                                         | 6.1      | http://netbsd.org/netbsd/6.1            
 netbsd7.0            | NetBSD 7.0                                         | 7.0      | http://netbsd.org/netbsd/7.0            
 netbsd7.1            | NetBSD 7.1                                         | 7.1      | http://netbsd.org/netbsd/7.1            
 netbsd7.1.1          | NetBSD 7.1.1                                       | 7.1.1    | http://netbsd.org/netbsd/7.1.1          
 netware4             | Novell Netware 4                                   | 4        | http://novell.com/netware/4             
 netware5             | Novell Netware 5                                   | 5        | http://novell.com/netware/5             
 netware6             | Novell Netware 6                                   | 6        | http://novell.com/netware/6             
 openbsd4.2           | OpenBSD 4.2                                        | 4.2      | http://openbsd.org/openbsd/4.2          
 openbsd4.3           | OpenBSD 4.3                                        | 4.3      | http://openbsd.org/openbsd/4.3          
 openbsd4.4           | OpenBSD 4.4                                        | 4.4      | http://openbsd.org/openbsd/4.4          
 openbsd4.5           | OpenBSD 4.5                                        | 4.5      | http://openbsd.org/openbsd/4.5          
 openbsd4.8           | OpenBSD 4.8                                        | 4.8      | http://openbsd.org/openbsd/4.8          
 openbsd4.9           | OpenBSD 4.9                                        | 4.9      | http://openbsd.org/openbsd/4.9          
 openbsd5.0           | OpenBSD 5.0                                        | 5.0      | http://openbsd.org/openbsd/5.0          
 openbsd5.1           | OpenBSD 5.1                                        | 5.1      | http://openbsd.org/openbsd/5.1          
 openbsd5.2           | OpenBSD 5.2                                        | 5.2      | http://openbsd.org/openbsd/5.2          
 openbsd5.3           | OpenBSD 5.3                                        | 5.3      | http://openbsd.org/openbsd/5.3          
 openbsd5.4           | OpenBSD 5.4                                        | 5.4      | http://openbsd.org/openbsd/5.4          
 openbsd5.5           | OpenBSD 5.5                                        | 5.5      | http://openbsd.org/openbsd/5.5          
 openbsd5.6           | OpenBSD 5.6                                        | 5.6      | http://openbsd.org/openbsd/5.6          
 openbsd5.7           | OpenBSD 5.7                                        | 5.7      | http://openbsd.org/openbsd/5.7          
 openbsd5.8           | OpenBSD 5.8                                        | 5.8      | http://openbsd.org/openbsd/5.8          
 openbsd5.9           | OpenBSD 5.9                                        | 5.9      | http://openbsd.org/openbsd/5.9          
 openbsd6.0           | OpenBSD 6.0                                        | 6.0      | http://openbsd.org/openbsd/6.0          
 openbsd6.1           | OpenBSD 6.1                                        | 6.1      | http://openbsd.org/openbsd/6.1          
 openbsd6.2           | OpenBSD 6.2                                        | 6.2      | http://openbsd.org/openbsd/6.2          
 opensolaris2009.06   | OpenSolaris 2009.06                                | 2009.06  | http://sun.com/opensolaris/2009.06      
 opensuse-factory     | openSUSE                                           | factory  | http://opensuse.org/opensuse/factory    
 opensuse-unknown     | openSUSE                                           | unknown  | http://opensuse.org/opensuse/unknown    
 opensuse10.2         | openSUSE 10.2                                      | 10.2     | http://opensuse.org/opensuse/10.2       
 opensuse10.3         | openSUSE 10.3                                      | 10.3     | http://opensuse.org/opensuse/10.3       
 opensuse11.0         | openSUSE 11.0                                      | 11.0     | http://opensuse.org/opensuse/11.0       
 opensuse11.1         | openSUSE 11.1                                      | 11.1     | http://opensuse.org/opensuse/11.1       
 opensuse11.2         | openSUSE 11.2                                      | 11.2     | http://opensuse.org/opensuse/11.2       
 opensuse11.3         | openSUSE 11.3                                      | 11.3     | http://opensuse.org/opensuse/11.3       
 opensuse11.4         | openSUSE 11.4                                      | 11.4     | http://opensuse.org/opensuse/11.4       
 opensuse12.1         | openSUSE 12.1                                      | 12.1     | http://opensuse.org/opensuse/12.1       
 opensuse12.2         | openSUSE 12.2                                      | 12.2     | http://opensuse.org/opensuse/12.2       
 opensuse12.3         | openSUSE 12.3                                      | 12.3     | http://opensuse.org/opensuse/12.3       
 opensuse13.1         | openSUSE 13.1                                      | 13.1     | http://opensuse.org/opensuse/13.1       
 opensuse13.2         | openSUSE 13.2                                      | 13.2     | http://opensuse.org/opensuse/13.2       
 opensuse42.1         | openSUSE Leap 42.1                                 | 42.1     | http://opensuse.org/opensuse/42.1       
 opensuse42.2         | openSUSE Leap 42.2                                 | 42.2     | http://opensuse.org/opensuse/42.2       
 opensuse42.3         | openSUSE Leap 42.3                                 | 42.3     | http://opensuse.org/opensuse/42.3       
 opensusetumbleweed   | openSUSE Tumbleweed                                | tumbleweed | http://opensuse.org/opensuse/tumbleweed
 rhel-atomic-7.0      | Red Hat Enterprise Linux Atomic Host 7.0           | 7.0      | http://redhat.com/rhel-atomic/7.0       
 rhel-atomic-7.1      | Red Hat Enterprise Linux Atomic Host 7.1           | 7.1      | http://redhat.com/rhel-atomic/7.1       
 rhel-atomic-7.2      | Red Hat Enterprise Linux Atomic Host 7.2           | 7.2      | http://redhat.com/rhel-atomic/7.2       
 rhel2.1              | Red Hat Enterprise Linux 2.1                       | 2.1      | http://redhat.com/rhel/2.1              
 rhel2.1.1            | Red Hat Enterprise Linux 2.1 Update 1  
/etc/bind/masters/elinvent.com            | 2.1.1    | http://redhat.com/rhel/2.1.1            
 rhel2.1.2            | Red Hat Enterprise Linux 2.1 Update 2              | 2.1.2    | http://redhat.com/rhel/2.1.2            
 rhel2.1.3            | Red Hat Enterprise Linux 2.1 Update 3              | 2.1.3    | http://redhat.com/rhel/2.1.3            
 rhel2.1.4            | Red Hat Enterprise Linux 2.1 Update 4              | 2.1.4    | http://redhat.com/rhel/2.1.4            
 rhel2.1.5            | Red Hat Enterprise Linux 2.1 Update 5              | 2.1.5    | http://redhat.com/rhel/2.1.5            
 rhel2.1.6            | Red Hat Enterprise Linux 2.1 Update 6              | 2.1.6    | http://redhat.com/rhel/2.1.6            
 rhel2.1.7            | Red Hat Enterprise Linux 2.1 Update 7              | 2.1.7    | http://redhat.com/rhel/2.1.7            
 rhel3                | Red Hat Enterprise Linux 3                         | 3        | http://redhat.com/rhel/3                
 rhel3.1              | Red Hat Enterprise Linux 3 Update 1                | 3.1      | http://redhat.com/rhel/3.1              
 rhel3.2              | Red Hat Enterprise Linux 3 Update 2                | 3.2      | http://redhat.com/rhel/3.2              
 rhel3.3              | Red Hat Enterprise Linux 3 Update 3                | 3.3      | http://redhat.com/rhel/3.3              
 rhel3.4              | Red Hat Enterprise Linux 3 Update 4                | 3.4      | http://redhat.com/rhel/3.4              
 rhel3.5              | Red Hat Enterprise Linux 3 Update 5                | 3.5      | http://redhat.com/rhel/3.5              
 rhel3.6              | Red Hat Enterprise Linux 3 Update 6                | 3.6      | http://redhat.com/rhel/3.6              
 rhel3.7              | Red Hat Enterprise Linux 3 Update 7                | 3.7      | http://redhat.com/rhel/3.7              
 rhel3.8              | Red Hat Enterprise Linux 3 Update 8                | 3.8      | http://redhat.com/rhel/3.8              
 rhel3.9              | Red Hat Enterprise Linux 3 Update 9                | 3.9      | http://redhat.com/rhel/3.9              
 rhel4.0              | Red Hat Enterprise Linux 4.0                       | 4.0      | http://redhat.com/rhel/4.0              
 rhel4.1              | Red Hat Enterprise Linux 4.1                       | 4.1      | http://redhat.com/rhel/4.1              
 rhel4.2              | Red Hat Enterprise Linux 4.2                       | 4.2      | http://redhat.com/rhel/4.2              
 rhel4.3              | Red Hat Enterprise Linux 4.3                       | 4.3      | http://redhat.com/rhel/4.3              
 rhel4.4              | Red Hat Enterprise Linux 4.4                       | 4.4      | http://redhat.com/rhel/4.4              
 rhel4.5              | Red Hat Enterprise Linux 4.5                       | 4.5      | http://redhat.com/rhel/4.5              
 rhel4.6              | Red Hat Enterprise Linux 4.6                       | 4.6      | http://redhat.com/rhel/4.6              
 rhel4.7              | Red Hat Enterprise Linux 4.7                       | 4.7      | http://redhat.com/rhel/4.7              
 rhel4.8              | Red Hat Enterprise Linux 4.8                       | 4.8      | http://redhat.com/rhel/4.8              
 rhel4.9              | Red Hat Enterprise Linux 4.9                       | 4.9      | http://redhat.com/rhel/4.9              
 rhel5.0              | Red Hat Enterprise Linux 5.0                       | 5.0      | http://redhat.com/rhel/5.0              
 rhel5.1              | Red Hat Enterprise Linux 5.1                       | 5.1      | http://redhat.com/rhel/5.1              
 rhel5.10             | Red Hat Enterprise Linux 5.10                      | 5.10     | http://redhat.com/rhel/5.10             
 rhel5.11             | Red Hat Enterprise Linux 5.11                      | 5.11     | http://redhat.com/rhel/5.11             
 rhel5.2              | Red Hat Enterprise Linux 5.2                       | 5.2      | http://redhat.com/rhel/5.2              
 rhel5.3              | Red Hat Enterprise Linux 5.3                       | 5.3      | http://redhat.com/rhel/5.3              
 rhel5.4              | Red Hat Enterprise Linux 5.4                       | 5.4      | http://redhat.com/rhel/5.4              
 rhel5.5              | Red Hat Enterprise Linux 5.5                       | 5.5      | http://redhat.com/rhel/5.5              
 rhel5.6              | Red Hat Enterprise Linux 5.6                       | 5.6      | http://redhat.com/rhel/5.6              
 rhel5.7              | Red Hat Enterprise Linux 5.7                       | 5.7      | http://redhat.com/rhel/5.7              
 rhel5.8              | Red Hat Enterprise Linux 5.8                       | 5.8      | http://redhat.com/rhel/5.8              
 rhel5.9              | Red Hat Enterprise Linux 5.9                       | 5.9      | http://redhat.com/rhel/5.9              
 rhel6.0              | Red Hat Enterprise Linux 6.0                       | 6.0      | http://redhat.com/rhel/6.0              
 rhel6.1              | Red Hat Enterprise Linux 6.1                       | 6.1      | http://redhat.com/rhel/6.1              
 rhel6.2              | Red Hat Enterprise Linux 6.2                       | 6.2      | http://redhat.com/rhel/6.2              
 rhel6.3              | Red Hat Enterprise Linux 6.3                       | 6.3      | http://redhat.com/rhel/6.3              
 rhel6.4              | Red Hat Enterprise Linux 6.4                       | 6.4      | http://redhat.com/rhel/6.4              
 rhel6.5              | Red Hat Enterprise Linux 6.5                       | 6.5      | http://redhat.com/rhel/6.5              
 rhel6.6              | Red Hat Enterprise Linux 6.6                       | 6.6      | http://redhat.com/rhel/6.6              
 rhel6.7              | Red Hat Enterprise Linux 6.7                       | 6.7      | http://redhat.com/rhel/6.7              
 rhel6.8              | Red Hat Enterprise Linux 6.8                       | 6.8      | http://redhat.com/rhel/6.8              
 rhel6.9              | Red Hat Enterprise Linux 6.9                       | 6.9      | http://redhat.com/rhel/6.9              
 rhel7.0              | Red Hat Enterprise Linux 7.0                       | 7.0      | http://redhat.com/rhel/7.0              
 rhel7.1              | Red Hat Enterprise Linux 7.1                       | 7.1      | http://redhat.com/rhel/7.1              
 rhel7.2              | Red Hat Enterprise Linux 7.2                       | 7.2      | http://redhat.com/rhel/7.2              
 rhel7.3              | Red Hat Enterprise Linux 7.3                       | 7.3      | http://redhat.com/rhel/7.3              
 rhel7.4              | Red Hat Enterprise Linux 7.4                       | 7.4      | http://redhat.com/rhel/7.4              
 rhl1.0               | Red Hat Linux 1.0                                  | 1.0      | http://redhat.com/rhl/1.0               
 rhl1.1               | Red Hat Linux 1.1                                  | 1.1      | http://redhat.com/rhl/1.1               
 rhl2.0               | Red Hat Linux 2.0                                  | 2.0      | http://redhat.com/rhl/2.0               
 rhl2.1               | Red Hat Linux 2.1                                  | 2.1      | http://redhat.com/rhl/2.1               
 rhl3.0.3             | Red Hat Linux 3.0.3                                | 3.0.3    | http://redhat.com/rhl/3.0.3             
 rhl4.0               | Red Hat Linux 4.0                                  | 4.0      | http://redhat.com/rhl/4.0               
 rhl4.1               | Red Hat Linux 4.1                                  | 4.1      | http://redhat.com/rhl/4.1               
 rhl4.2               | Red Hat Linux 4.2                                  | 4.2      | http://redhat.com/rhl/4.2               
 rhl5.0               | Red Hat Linux 5.0                                  | 5.0      | http://redhat.com/rhl/5.0               
 rhl5.1               | Red Hat Linux 5.1                                  | 5.1      | http://redhat.com/rhl/5.1               
 rhl5.2               | Red Hat Linux 5.2                                  | 5.2      | http://redhat.com/rhl/5.2               
 rhl6.0               | Red Hat Linux 6.0                                  | 6.0      | http://redhat.com/rhl/6.0               
 rhl6.1               | Red Hat Linux 6.1                                  | 6.1      | http://redhat.com/rhl/6.1               
 rhl6.2               | Red Hat Linux 6.2                                  | 6.2      | http://redhat.com/rhl/6.2               
 rhl7                 | Red Hat Linux 7                                    | 7        | http://redhat.com/rhl/7                 
 rhl7.1               | Red Hat Linux 7.1                                  | 7.1      | http://redhat.com/rhl/7.1               
 rhl7.2               | Red Hat Linux 7.2                                  | 7.2      | http://redhat.com/rhl/7.2               
 rhl7.3               | Red Hat Linux 7.3                                  | 7.3      | http://redhat.com/rhl/7.3               
 rhl8.0               | Red Hat Linux 8.0                                  | 8.0      | http://redhat.com/rhl/8.0               
 rhl9                 | Red Hat Linux 9                                    | 9        | http://redhat.com/rhl/9                 
 sled10               | SUSE Linux Enterprise Desktop 10                   | 10       | http://suse.com/sled/10                 
 sled10sp1            | SUSE Linux Enterprise Desktop 10 SP1               | 10.1     | http://suse.com/sled/10.1               
 sled10sp2            | SUSE Linux Enterprise Desktop 10 SP2               | 10.2     | http://suse.com/sled/10.2               
 sled10sp3            | SUSE Linux Enterprise Desktop 10 SP3               | 10.3     | http://suse.com/sled/10.3               
 sled10sp4            | SUSE Linux Enterprise Desktop 10 SP4               | 10.4     | http://suse.com/sled/10.4               
 sled11               | SUSE Linux Enterprise Desktop 11                   | 11       | http://suse.com/sled/11                 
 sled11sp1            | SUSE Linux Enterprise Desktop 11 SP1               | 11.1     | http://suse.com/sled/11.1               
 sled11sp2            | SUSE Linux Enterprise Desktop 11 SP2               | 11.2     | http://suse.com/sled/11.2               
 sled11sp3            | SUSE Linux Enterprise Desktop 11 SP3               | 11.3     | http://suse.com/sled/11.3               
 sled11sp4            | SUSE Linux Enterprise Desktop 11 SP4               | 11.4     | http://suse.com/sled/11.4               
 sled12               | SUSE Linux Enterprise Desktop 12                   | 12       | http://suse.com/sled/12                 
 sled12sp1            | SUSE Linux Enterprise Desktop 12 SP1               | 12.1     | http://suse.com/sled/12.1               
 sled12sp2            | SUSE Linux Enterprise Desktop 12 SP2               | 12.2     | http://suse.com/sled/12.2               
 sled9                | SUSE Linux Enterprise Desktop 9                    | 9        | http://suse.com/sled/9                  
 sles10               | SUSE Linux Enterprise Server 10            
/etc/bind/masters/elinvent.com        | 10       | http://suse.com/sles/10                 
 sles10sp1            | SUSE Linux Enterprise Server 10 SP1                | 10.1     | http://suse.com/sles/10.1               
 sles10sp2            | SUSE Linux Enterprise Server 10 SP2                | 10.2     | http://suse.com/sles/10.2               
 sles10sp3            | SUSE Linux Enterprise Server 10 SP3                | 10.3     | http://suse.com/sles/10.3               
 sles10sp4            | SUSE Linux Enterprise Server 10 SP4                | 10.4     | http://suse.com/sles/10.4               
 sles11               | SUSE Linux Enterprise Server 11                    | 11       | http://suse.com/sles/11                 
 sles11sp1            | SUSE Linux Enterprise Server 11 SP1                | 11.1     | http://suse.com/sles/11.1               
 sles11sp2            | SUSE Linux Enterprise Server 11 SP2                | 11.2     | http://suse.com/sles/11.2               
 sles11sp3            | SUSE Linux Enterprise Server 11 SP3                | 11.3     | http://suse.com/sles/11.3               
 sles11sp4            | SUSE Linux Enterprise Server 11 SP4                | 11.4     | http://suse.com/sles/11.4               
 sles12               | SUSE Linux Enterprise Server 12                    | 12       | http://suse.com/sles/12                 
 sles12sp1            | SUSE Linux Enterprise Server 12 SP1                | 12.1     | http://suse.com/sles/12.1               
 sles12sp2            | SUSE Linux Enterprise Server 12 SP2                | 12.2     | http://suse.com/sles/12.2               
 sles9                | SUSE Linux Enterprise Server 9                     | 9        | http://suse.com/sles/9                  
 solaris10            | Solaris 10                                         | 10       | http://sun.com/solaris/10               
 solaris11            | Oracle Solaris 11                                  | 11       | http://oracle.com/solaris/11            
 solaris9             | Solaris 9                                          | 9        | http://sun.com/solaris/9                
 ubuntu10.04          | Ubuntu 10.04 LTS                                   | 10.04    | http://ubuntu.com/ubuntu/10.04          
 ubuntu10.10          | Ubuntu 10.10                                       | 10.10    | http://ubuntu.com/ubuntu/10.10          
 ubuntu11.04          | Ubuntu 11.04                                       | 11.04    | http://ubuntu.com/ubuntu/11.04          
 ubuntu11.10          | Ubuntu 11.10                                       | 11.10    | http://ubuntu.com/ubuntu/11.10          
 ubuntu12.04          | Ubuntu 12.04 LTS                                   | 12.04    | http://ubuntu.com/ubuntu/12.04          
 ubuntu12.10          | Ubuntu 12.10                                       | 12.10    | http://ubuntu.com/ubuntu/12.10          
 ubuntu13.04          | Ubuntu 13.04                                       | 13.04    | http://ubuntu.com/ubuntu/13.04          
 ubuntu13.10          | Ubuntu 13.10                                       | 13.10    | http://ubuntu.com/ubuntu/13.10          
 ubuntu14.04          | Ubuntu 14.04 LTS                                   | 14.04    | http://ubuntu.com/ubuntu/14.04          
 ubuntu14.10          | Ubuntu 14.10                                       | 14.10    | http://ubuntu.com/ubuntu/14.10          
 ubuntu15.04          | Ubuntu 15.04                                       | 15.04    | http://ubuntu.com/ubuntu/15.04          
 ubuntu15.10          | Ubuntu 15.10                                       | 15.10    | http://ubuntu.com/ubuntu/15.10          
 ubuntu16.04          | Ubuntu 16.04                                       | 16.04    | http://ubuntu.com/ubuntu/16.04          
 ubuntu16.10          | Ubuntu 16.10                                       | 16.10    | http://ubuntu.com/ubuntu/16.10          
 ubuntu17.04          | Ubuntu 17.04                                       | 17.04    | http://ubuntu.com/ubuntu/17.04          
 ubuntu17.10          | Ubuntu 17.10                                       | 17.10    | http://ubuntu.com/ubuntu/17.10          
 ubuntu4.10           | Ubuntu 4.10                                        | 4.10     | http://ubuntu.com/ubuntu/4.10           
 ubuntu5.04           | Ubuntu 5.04                                        | 5.04     | http://ubuntu.com/ubuntu/5.04           
 ubuntu5.10           | Ubuntu 5.10                                        | 5.10     | http://ubuntu.com/ubuntu/5.10           
 ubuntu6.06           | Ubuntu 6.06 LTS                                    | 6.06     | http://ubuntu.com/ubuntu/6.06           
 ubuntu6.10           | Ubuntu 6.10                                        | 6.10     | http://ubuntu.com/ubuntu/6.10           
 ubuntu7.04           | Ubuntu 7.04                                        | 7.04     | http://ubuntu.com/ubuntu/7.04           
 ubuntu7.10           | Ubuntu 7.10                                        | 7.10     | http://ubuntu.com/ubuntu/7.10           
 ubuntu8.04           | Ubuntu 8.04 LTS                                    | 8.04     | http://ubuntu.com/ubuntu/8.04           
 ubuntu8.10           | Ubuntu 8.10                                        | 8.10     | http://ubuntu.com/ubuntu/8.10           
 ubuntu9.04           | Ubuntu 9.04                                        | 9.04     | http://ubuntu.com/ubuntu/9.04           
 ubuntu9.10           | Ubuntu 9.10                                        | 9.10     | http://ubuntu.com/ubuntu/9.10           
 win1.0               | Microsoft Windows 1.0                              | 1.0      | http://microsoft.com/win/1.0            
 win10                | Microsoft Windows 10                               | 10.0     | http://microsoft.com/win/10             
 win2.0               | Microsoft Windows 2.0                              | 2.0      | http://microsoft.com/win/2.0            
 win2.1               | Microsoft Windows 2.1                              | 2.1      | http://microsoft.com/win/2.1            
 win2k                | Microsoft Windows 2000                             | 5.0      | http://microsoft.com/win/2k             
 win2k12              | Microsoft Windows Server 2012                      | 6.3      | http://microsoft.com/win/2k12           
 win2k12r2            | Microsoft Windows Server 2012 R2                   | 6.3      | http://microsoft.com/win/2k12r2         
 win2k3               | Microsoft Windows Server 2003                      | 5.2      | http://microsoft.com/win/2k3            
 win2k3r2             | Microsoft Windows Server 2003 R2                   | 5.2      | http://microsoft.com/win/2k3r2          
 win2k8               | Microsoft Windows Server 2008                      | 6.0      | http://microsoft.com/win/2k8            
 win2k8r2             | Microsoft Windows Server 2008 R2                   | 6.1      | http://microsoft.com/win/2k8r2          
 win3.1               | Microsoft Windows 3.1                              | 3.1      | http://microsoft.com/win/3.1            
 win7                 | Microsoft Windows 7                                | 6.1      | http://microsoft.com/win/7              
 win8                 | Microsoft Windows 8                                | 6.2      | http://microsoft.com/win/8              
 win8.1               | Microsoft Windows 8.1                              | 6.3      | http://microsoft.com/win/8.1            
 win95                | Microsoft Windows 95                               | 4.0      | http://microsoft.com/win/95             
 win98                | Microsoft Windows 98                               | 4.1      | http://microsoft.com/win/98             
 winme                | Microsoft Windows Millennium Edition               | 4.9      | http://microsoft.com/win/me             
 winnt3.1             | Microsoft Windows NT Server 3.1                    | 3.1      | http://microsoft.com/winnt/3.1          
 winnt3.5             | Microsoft Windows NT Server 3.5                    | 3.5      | http://microsoft.com/winnt/3.5          
 winnt3.51            | Microsoft Windows NT Server 3.51                   | 3.51     | http://microsoft.com/winnt/3.51         
 winnt4.0             | Microsoft Windows NT Server 4.0                    | 4.0      | http://microsoft.com/winnt/4.0          
 winvista             | Microsoft Windows Vista                            | 6.0      | http://microsoft.com/win/vista          
 winxp                | Microsoft Windows XP                               | 5.1      | http://microsoft.com/win/xp  


9. Start / Stop listed KVM Virtual Machine


root@jeremiah:~# virsh list –all
 Id    Name                           State
—————————————————-
 3     fedora-28                      running
 –     debian9                        shut off


To start debian9 linux virtual machine that is currently off


root@jeremiah:~# virsh start fedora-28
Domain fedora-28 started


root@jeremiah:/home/hipo# virsh start debian9
error: Failed to start domain debian9
error: Requested operation is not valid: network 'default' is not active

root@jeremiah:/home/hipo# virsh net-list –all
Name                 State      Autostart     Persistent
———————————————————-
br0                  active     yes           yes
default              inactive   no            yes


root@jeremiah:/home/hipo# virsh net-start default
Network default started

root@jeremiah:/home/hipo# virsh start debian9
Domain debian9 started


10. Attach to running VM with virsh or virt-manager


root@jeremiah:~# virsh list
 Id    Name                           State
—————————————————-
 1     fedora-28                      running
 3     debian9                        running

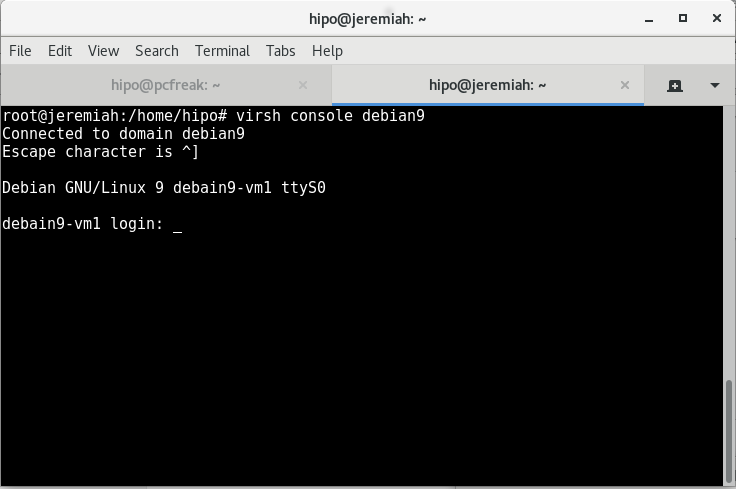
root@jeremiah:~# virsh connect debian9


Note that to make the login prompt appear you have to press enter once after the ^] connection string appears


kvm-connect-to-virtual-machine-with-virsh-command-screenshot-howto

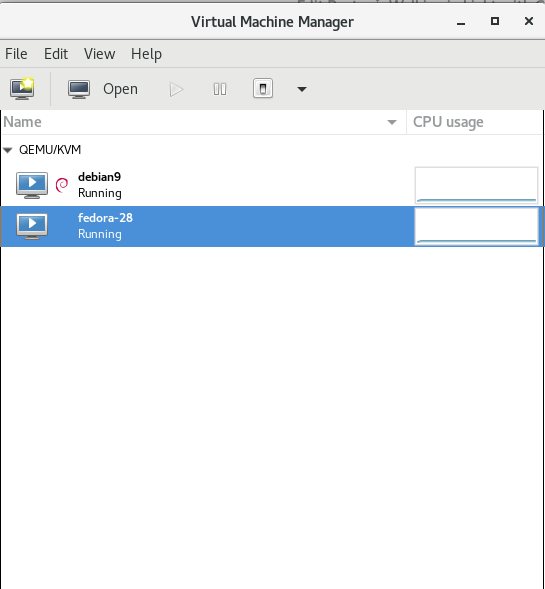
An alternative way is to use virt-manager GUI KVM desktop management interface and click over the Virtual Machine Guest name, in same fashion like in VirtualBox.

virtual-manager-virt-manager-screenshot-with-Virtual-Machines-inside-on-Debian-Linux

virt-manager-gui-interface-connect-to-fedora-28-virtual-machine

If you have KVM running on your Linux desktop PC / notebook you can also connect via VNC with virsh command.


root@jericho:~# virsh vncdisplay centos7


Another handy thing is to expose the Virtualized Guest OS with VNC in order to be able to connect and manage installation or further Linux configuration via VNC using an SSH Tunnel with port forwarding:


$ ssh hipo@www.pc-freak.net -L 5901:127.0.0.1:5901


11.  Start / Shutdown / Suspend / Reboot (safe reboot) a VM guest machine domain


root@jericho:~# virsh shutdown debian9
root@jericho:~# virsh start fedora-28
root@jericho:~# virsh suspend debian9
root@jericho:~# virsh reboot fedora-28


12. Remove / Delete KVM Virtual Machines domain


root@jeremiah:~# virsh undefine fedora-28
root@jeremiah:~# virsh destroy fedora-28


Closing words


Using KVM to experiment with different OS distributions is really fun just like you can easily run a number of the major most popular Linux Distributions and a set of different versions. It takes few minutes to have a fully functional Linux to play with and it saves a lot of hassles when dealing with GNU / Linux and FreeBSD, doing so in Virtualbox for me prooved to be much more complicated (not to mention that often Virtualbox had an ugly bugs so even Importing an Appliance as a Guest VM with an official distro OS-es failed with weird errors.
One other very practical use of Kerkel-based Virtualization is if you want to run your servers using own Micro-Services architecture (e.g. run multiple Linux OS-es each running a separate Apache / Nginx / MySQL / PostGreSQL / Backup / Storage) etc. all of it running on a single dedicated server or a self-hosted bare-metal
There are plenty of Web Interfaces for Management KVM (proprietary and free software) that could even futher simplify the use and deploy / destory of KVM VMs.
All that makes possible running your own Linux or Web hosting provider a relatively easy task and seriously could cut business expenses and operational (maintenance) costs.

If you plan to run youw own hosting company, I can help you establish your infrastructure and advise you on the right technologies to use.


How to make Reverse SSH Tunnel to servers behind NAT

Thursday, October 11th, 2018

create-reverse-ssh-tunnel-reverse_ssh_diagram-connection

Those who remember the times of IRC chatting long nights and the need to be c00l guy and enter favorite IRC server through a really bizarre hostname, you should certainly remember the usefulness of Reverse SSH Tunnels to appear in IRC /whois like connecting from a remote host (mask yourself) from other IRC guys where are you physically.

The idea of Reverse SSH is to be able to SSH (or other protocols) connect to IPs that are situated behind a NAT server/s.
Creating SSH Reverse Tunnel is an easy task and up to 2 simple SSH commands
,

To better explain how SSH tunnel is achieved, here is a scenario:

A. Linux host behind NAT IP: 192.168.10.70 (Destination host)
B. (Source Host) of Machine with External Public Internet IP 83.228.93.76 through which SSH Tunnel will be established to 192.168.10.70.

1. Create SSH Revere SSH from Destination to Source host (with Public IP)

Connect to the remote machine which has a real IP address and make port of the reverse SSH connection open (remove any firewall), lets say port 23000.

ssh -R 23000:127.0.0.1:22 username@DOMAIN.com -oPort=33

NB! On destination and source servers make sure you have enabled in /etc/ssh/sshd_config
 

AllowAgentForwarding yes
AllowTCPForwarding yes
PermitTunnel yes


2. Connect from Source IP to Destination through the established SSH tunnelling


Connecting to DOMAIN.com through ssh on 23000 will connect you to the back machine with the unreal IP address.
 

ssh local-username@127.0.0.1 -p 23000


ssh -L 19999:localhost:19999 middleman@178.78.78.78

If you want other server with hostname whatever-host.com to access the Reverse SSH Tunneled server you can do it via external IP which in my case is 83.228.93.76

From whatever-host.com just do:

 ssh username@82.228.93.76


reverse_tunnel-linux-diagram-explained
A text diagram of SSH Tunnel looks something like that:

Destination (192.168.10.70) <- |NAT| <- Source (83.228.93.76) <- whatever-host.com


Above examples should work not only on Linux but on NetBSD / OpenBSD / FreeBSD or any other UNIX system with a modern SSH client installed.

Display Content of SSL certificate .pem file with openssl command

Thursday, October 11th, 2018

display-content-of-pem-der-and-scr-file-how-to-view-pem-file-linux

If you have generated a .pem formatted SSL certificate or you have multiple .pem SSL certificates and you're not sure which .pem file is generated for which domain / subdomain it is useful to Display content of SSL Certificate .PEM file with openssl command.

Viewing certificate's content is also very useful if you have hosted multiple websites hosted on a server and you want to check which of the SSLs assigned in the Virtualhosts has Expired (for example if you have domains that expire in short term period (365 days).


1. How to Display Content of SSL certificate .pem file?


root@pcfreak:~# openssl x509 -in cert.pem -text
Certificate:
    Data:
        Version: 3 (0x2)
        Serial Number:
            04:d1:ad:55:91:f3:f9:ef:3e:53:ea:2c:3a:f4:5f:e6:ce:c1
    Signature Algorithm: sha256WithRSAEncryption
        Issuer: C = US, O = Let's Encrypt, CN = Let's Encrypt Authority X3
        Validity
            Not Before: Oct 10 17:49:34 2018 GMT
            Not After : Jan  8 17:49:34 2019 GMT
        Subject: CN = mail.www.pc-freak.net

        Subject Public Key Info:
            Public Key Algorithm: rsaEncryption
                Public-Key: (2048 bit)
                Modulus:
                    00:bb:b0:c9:1c:83:82:61:47:f9:c2:73:60:c0:48:
                    e6:0c:f2:a1:ff:db:ae:f1:84:17:14:5d:fc:a3:b2:
                    e4:00:3a:d1:85:42:90:da:41:a9:e9:a8:af:20:3d:
                    12:ef:8e:ca:61:a1:71:f2:cc:43:bf:40:0d:fa:08:
                    7d:d9:61:2b:ea:5d:30:e0:52:43:db:18:30:92:0c:
                    2c:ce:87:93:84:ea:91:61:b7:70:db:11:7c:b6:a4:
                    33:de:d8:3f:d6:61:47:42:f2:36:12:7f:3d:e3:f7:
                    5b:11:3e:1c:f0:af:96:cd:61:8a:1a:a0:f0:b5:23:
                    65:73:b6:b4:9c:19:a7:09:dd:43:96:37:ac:48:fc:
                    21:07:02:52:67:26:2c:81:24:f4:d7:10:e6:f4:12:
                    69:53:ef:91:2a:15:6a:21:06:22:ea:fe:31:38:82:
                    b4:5a:b5:9b:67:90:16:b8:31:e8:27:38:f2:41:b9:
                    19:02:8f:c7:6e:e1:2c:84:75:19:6d:bb:30:3b:d2:
                    02:f0:65:f1:76:82:15:9c:ce:31:3a:d4:7c:83:ca:
                    d1:f9:e1:b7:76:f6:78:93:47:d2:00:f9:63:aa:94:
                    41:d4:78:d0:ee:bc:e6:e9:14:14:e4:ae:54:31:88:
                    f8:58:8d:7b:3e:9f:87:5c:f2:04:e5:07:e0:4c:9a:
                    81:eb
                Exponent: 65537 (0x10001)
        X509v3 extensions:
            X509v3 Key Usage: critical
                Digital Signature, Key Encipherment
            X509v3 Extended Key Usage:
                TLS Web Server Authentication, TLS Web Client Authentication
            X509v3 Basic Constraints: critical
                CA:FALSE
            X509v3 Subject Key Identifier:
                DB:AB:81:E3:14:5F:6D:BE:B4:78:7B:5E:7D:FB:66:BF:56:37:C5:1D
            X509v3 Authority Key Identifier:
                keyid:A8:4A:6A:63:04:7D:DD:BA:E6:D1:39:B7:A6:45:65:EF:F3:A8:EC:A1


            Authority Information Access:
                OCSP – URI:http://ocsp.int-x3.letsencrypt.org
                CA Issuers – URI:http://cert.int-x3.letsencrypt.org/

            X509v3 Subject Alternative Name:
                DNS:mail.www.pc-freak.net
            X509v3 Certificate Policies:
                Policy: 2.23.140.1.2.1
                Policy: 1.3.6.1.4.1.44947.1.1.1
                  CPS: http://cps.letsencrypt.org
                  User Notice:
                    Explicit Text: This Certificate may only be relied upon by Relying Parties and only in accordance with the Certificate Policy found at https://letsencrypt.org/repository/

            CT Precertificate SCTs:
                Signed Certificate Timestamp:
                    Version   : v1 (0x0)
                    Log ID    : E2:69:4B:AE:26:E8:E9:40:09:E8:86:1B:B6:3B:83:D4:
                                3E:E7:FE:74:88:FB:A4:8F:28:93:01:9D:DD:F1:DB:FE
                    Timestamp : Oct 10 18:49:34.453 2018 GMT
                    Extensions: none
                    Signature : ecdsa-with-SHA256
                                30:46:02:21:00:D6:DE:47:AD:D2:32:BE:BE:DD:B3:EB:
                                EE:84:9E:02:8A:4F:33:E2:63:21:D5:F7:4D:47:82:92:
                                AB:B9:0A:49:62:02:21:00:E8:7D:17:81:32:E3:4F:CF:
                                2D:79:8C:97:46:E1:EF:5E:99:F4:8A:8B:B5:6D:23:5F:
                                05:84:E2:14:6A:56:8E:A0
                Signed Certificate Timestamp:
                    Version   : v1 (0x0)
                    Log ID    : 29:3C:51:96:54:C8:39:65:BA:AA:50:FC:58:07:D4:B7:
                                6F:BF:58:7A:29:72:DC:A4:C3:0C:F4:E5:45:47:F4:78
                    Timestamp : Oct 10 18:49:34.451 2018 GMT
                    Extensions: none
                    Signature : ecdsa-with-SHA256
                                30:44:02:20:6C:8E:E7:E2:70:AD:33:A6:5C:E0:89:84:
                                FB:0B:F6:E1:5C:05:06:0A:A8:DB:8B:1C:7A:D0:52:99:
                                5F:3F:A2:64:02:20:4B:CD:0B:E7:A0:27:04:31:19:18:
                                58:99:51:73:49:6B:77:25:A7:E7:5B:10:8C:BD:ED:54:
                                03:DD:40:E4:2D:31
    Signature Algorithm: sha256WithRSAEncryption
         9c:86:b3:34:64:af:ac:9d:c4:d3:a7:cc:fc:8a:32:18:75:95:
         95:47:9b:9c:3c:0e:3b:61:f9:88:61:38:1a:a6:92:69:3d:14:
         6a:53:13:14:65:e6:ca:fa:b9:8e:48:c9:d4:73:f6:e4:74:8a:
         1f:2b:f2:14:86:f1:18:55:26:1b:a0:97:89:15:0b:62:c6:2b:
         27:81:6f:60:af:55:68:b3:2c:5b:10:56:a2:7d:28:cb:8e:fc:
         f0:21:65:78:9b:3a:52:d3:9d:27:ff:d7:24:95:de:0f:d8:3d:
         a2:43:6e:fc:a5:2d:f2:ad:37:e9:ea:db:b5:75:b8:7c:ad:23:
         45:1d:bd:fe:4e:36:c7:f4:e2:3d:47:c9:06:fc:cb:75:ba:d4:
         0a:90:17:ea:e1:7f:49:e6:68:27:97:8a:70:c7:50:e9:19:4a:
         8a:21:18:26:79:a3:61:ff:1b:26:9e:fe:85:8f:20:ed:c6:4d:
         c1:0e:04:21:a8:05:d4:29:69:99:53:63:81:c7:d5:58:71:df:
         02:b5:94:c9:36:48:c9:35:80:ab:71:78:d9:12:f6:f5:10:25:
         3d:38:c5:40:75:25:b1:95:18:d8:1c:96:f1:c6:1a:d2:c4:99:
         f5:01:2e:f4:e1:4a:1f:10:42:0e:34:ed:92:8e:53:9f:c2:7b:
         11:51:78:6a
—–BEGIN CERTIFICATE—–
MIIGDTCCBPWgAwIBAgISBNGtVZHz+e8+U+osOvRf5s7BMA0GCSqGSIb3DQEBCwUA
MEoxCzAJBgNVBAYTAlVTMRYwFAYDVQQKEw1MZXQncyBFbmNyeXB0MSMwIQYDVQQD
ExpMZXQncyBFbmNyeXB0IEF1dGhvcml0eSBYMzAeFw0xODEwMTAxNzQ5MzRaFw0x
OTAxMDgxNzQ5MzRaMBwxGjAYBgNVBAMTEW1haWwucGMtZnJlYWsubmV0MIIBIjAN
BgkqhkiG9w0BAQEFAAOCAQ8AMIIBCgKCAQEAu7DJHIOCYUf5wnNgwEjmDPKh/9uu
8YQXFF38o7LkADrRhUKQ2kGp6aivID0S747KYaFx8sxDv0AN+gh92WEr6l0w4FJD
2xgwkgwszoeThOqRYbdw2xF8tqQz3tg/1mFHQvI2En894/dbET4c8K+WzWGKGqDw
tSNlc7a0nBmnCd1DljesSPwhBwJSZyYsgST01xDm9BJpU++RKhVqIQYi6v4xOIK0
WrWbZ5AWuDHoJzjyQbkZAo/HbuEshHUZbbswO9IC8GXxdoIVnM4xOtR8g8rR+eG3
dvZ4k0fSAPljqpRB1HjQ7rzm6RQU5K5UMYj4WI17Pp+HXPIE5QfgTJqB6wIDAQAB
o4IDGTCCAxUwDgYDVR0PAQH/BAQDAgWgMB0GA1UdJQQWMBQGCCsGAQUFBwMBBggr
BgEFBQcDAjAMBgNVHRMBAf8EAjAAMB0GA1UdDgQWBBTbq4HjFF9tvrR4e159+2a/
VjfFHTAfBgNVHSMEGDAWgBSoSmpjBH3duubRObemRWXv86jsoTBvBggrBgEFBQcB
AQRjMGEwLgYIKwYBBQUHMAGGImh0dHA6Ly9vY3NwLmludC14My5sZXRzZW5jcnlw
dC5vcmcwLwYIKwYBBQUHMAKGI2h0dHA6Ly9jZXJ0LmludC14My5sZXRzZW5jcnlw
dC5vcmcvMBwGA1UdEQQVMBOCEW1haWwucGMtZnJlYWsubmV0MIH+BgNVHSAEgfYw
gfMwCAYGZ4EMAQIBMIHmBgsrBgEEAYLfEwEBATCB1jAmBggrBgEFBQcCARYaaHR0
cDovL2Nwcy5sZXRzZW5jcnlwdC5vcmcwgasGCCsGAQUFBwICMIGeDIGbVGhpcyBD
ZXJ0aWZpY2F0ZSBtYXkgb25seSBiZSByZWxpZWQgdXBvbiBieSBSZWx5aW5nIFBh
cnRpZXMgYW5kIG9ubHkgaW4gYWNjb3JkYW5jZSB3aXRoIHRoZSBDZXJ0aWZpY2F0
ZSBQb2xpY3kgZm91bmQgYXQgaHR0cHM6Ly9sZXRzZW5jcnlwdC5vcmcvcmVwb3Np
dG9yeS8wggEEBgorBgEEAdZ5AgQCBIH1BIHyAPAAdwDiaUuuJujpQAnohhu2O4PU
Puf+dIj7pI8okwGd3fHb/gAAAWZfUA/1AAAEAwBIMEYCIQDW3ket0jK+vt2z6+6E
ngKKTzPiYyHV901HgpKruQpJYgIhAOh9F4Ey40/PLXmMl0bh716Z9IqLtW0jXwWE
4hRqVo6gAHUAKTxRllTIOWW6qlD8WAfUt2+/WHopctykwwz05UVH9HgAAAFmX1AP
8wAABAMARjBEAiBsjuficK0zplzgiYT7C/bhXAUGCqjbixx60FKZXz+iZAIgS80L
56AnBDEZGFiZUXNJa3clp+dbEIy97VQD3UDkLTEwDQYJKoZIhvcNAQELBQADggEB
AJyGszRkr6ydxNOnzPyKMhh1lZVHm5w8Djth+YhhOBqmkmk9FGpTExRl5sr6uY5I
ydRz9uR0ih8r8hSG8RhVJhugl4kVC2LGKyeBb2CvVWizLFsQVqJ9KMuO/PAhZXib
OlLTnSf/1ySV3g/YPaJDbvylLfKtN+nq27V1uHytI0Udvf5ONsf04j1HyQb8y3W6
1AqQF+rhf0nmaCeXinDHUOkZSoohGCZ5o2H/Gyae/oWPIO3GTcEOBCGoBdQpaZlT
Y4HH1Vhx3wK1lMk2SMk1gKtxeNkS9vUQJT04xUB1JbGVGNgclvHGGtLEmfUBLvTh
Sh8QQg407ZKOU5/CexFReGo=
—–END CERTIFICATE—–


Same way a .der files content / encryption algorithm and domain name could be grasped.
 

root@pcfreak:~# openssl x509 -in cert.der -inform der -text
Certificate:
    Data:
        Version: 3 (0x2)
        Serial Number:
            ad:c2:96:6f:4b:db:31:5c
    Signature Algorithm: sha256WithRSAEncryption
        Issuer: CN = example.com
        Validity
            Not Before: Jun 22 04:00:37 2015 GMT
            Not After : Jul 22 04:00:37 2015 GMT

        Subject: CN = example.com
        Subject Public Key Info:
            Public Key Algorithm: rsaEncryption
                Public-Key: (512 bit)

                Modulus:
                    00:ac:75:73:b4:51:ed:1f:dd:ae:70:52:43:fc:df:
                    c7:5b:d0:2c:75:1b:14:b8:75:01:04:10:e5:1f:03:
                    65:45:dd:df:a7:9f:34:ae:fd:be:e9:05:84:df:47:
                    16:81:d9:89:4b:ce:8e:6d:1c:fa:95:44:e8:af:84:
                    74:4f:ed:c2:e5
                Exponent: 65537 (0x10001)
        X509v3 extensions:
            X509v3 Subject Key Identifier:
                26:CF:C8:ED:4B:D7:94:B2:E4:25:03:58:24:8F:04:C0:74:D5:97:8A
            X509v3 Authority Key Identifier:
                keyid:26:CF:C8:ED:4B:D7:94:B2:E4:25:03:58:24:8F:04:C0:74:D5:97:8A


            X509v3 Basic Constraints:
                CA:TRUE
    Signature Algorithm: sha256WithRSAEncryption
         0c:8b:ff:12:80:9e:4c:90:bc:26:b0:96:20:ab:76:0c:64:71:
         d2:15:48:a5:33:f6:47:e4:03:df:76:5e:0f:cd:e1:1b:5e:d1:
         4d:c2:1f:8d:b8:63:2f:c9:7d:6e:5c:3b:cb:cd:a3:d0:d8:27:
         74:66:a3:76:06:a5:fb:81:3a:b6
—–BEGIN CERTIFICATE—–
MIIBdTCCAR+gAwIBAgIJAK3Clm9L2zFcMA0GCSqGSIb3DQEBCwUAMBYxFDASBgNV
BAMMC2V4YW1wbGUuY29tMB4XDTE1MDYyMjA0MDAzN1oXDTE1MDcyMjA0MDAzN1ow
FjEUMBIGA1UEAwwLZXhhbXBsZS5jb20wXDANBgkqhkiG9w0BAQEFAANLADBIAkEA
rHVztFHtH92ucFJD/N/HW9AsdRsUuHUBBBDlHwNlRd3fp580rv2+6QWE30cWgdmJ
S86ObRz6lUTor4R0T+3C5QIDAQABo1AwTjAdBgNVHQ4EFgQUJs/I7UvXlLLkJQNY
JI8EwHTVl4owHwYDVR0jBBgwFoAUJs/I7UvXlLLkJQNYJI8EwHTVl4owDAYDVR0T
BAUwAwEB/zANBgkqhkiG9w0BAQsFAANBAAyL/xKAnkyQvCawliCrdgxkcdIVSKUz
9kfkA992Xg/N4Rte0U3CH424Yy/JfW5cO8vNo9DYJ3Rmo3YGpfuBOrY=
—–END CERTIFICATE—–


2. How to display content and info about .CSR (Certificate Signing request)


root@pcfreak:~# openssl req -in cert.csr -noout -text
 

Certificate Request:
    Data:
        Version: 1 (0x0)
        Subject: C = BG, ST = BG, L = Dobrich, O = Pc Freak, CN = mail.www.pc-freak.net, emailAddress = hipo@www.pc-freak.net
        Subject Public Key Info:
            Public Key Algorithm: rsaEncryption
                Public-Key: (2048 bit)
                Modulus:
                    00:b1:83:a7:07:62:19:d4:60:95:58:49:de:b3:48:
                    a8:39:31:fa:5a:bd:2b:d6:73:94:50:36:72:74:18:
                    58:b6:27:d3:0b:26:75:15:a8:ba:1b:77:a7:c9:54:
                    96:1f:c7:8d:da:bd:c9:17:91:53:85:9e:0a:f4:71:
                    3c:fb:d6:e4:75:41:c1:95:32:e1:22:fc:7b:1f:36:
                    23:12:00:ca:37:27:d5:f9:9b:29:48:4a:51:95:d1:
                    40:d0:ea:94:51:98:98:6b:d3:d9:79:1d:a1:65:bb:
                    a9:d1:ab:c9:46:6e:03:ee:24:45:e5:f2:73:e5:f4:
                    82:4a:08:57:b1:06:52:c3:cc:42:9a:02:5b:7a:7c:
                    bd:34:d5:5f:d7:ba:ef:27:d5:3d:97:16:69:06:c7:
                    c1:06:5e:d9:07:16:3f:a3:61:50:9d:dd:ea:95:32:
                    f1:ee:93:82:48:df:20:8b:ae:d2:95:89:05:e4:3d:
                    0c:d7:e1:cf:07:ae:55:84:11:06:92:be:34:b4:a2:
                    a1:ce:07:06:bf:21:bc:80:e2:03:d2:85:b4:64:02:
                    8d:cd:d2:86:1c:49:41:52:43:a8:12:f8:ef:2c:f4:
                    be:a0:dc:ac:ea:27:3a:f9:ab:ab:27:da:28:63:1d:
                    10:5a:4f:b8:51:42:40:ae:be:c0:2d:e9:a3:5a:5a:
                    23:7f
                Exponent: 65537 (0x10001)
        Attributes:
            a0:00
    Signature Algorithm: sha256WithRSAEncryption
         47:f0:54:cd:5e:46:6f:2c:cc:48:7e:85:f0:a8:96:10:ca:a3:
         15:98:77:d3:02:95:8c:67:84:e3:55:d2:0c:e8:d5:a7:ba:82:
         95:fb:ce:73:4c:bc:8f:da:85:97:0c:a8:59:32:b3:a4:af:0a:
         80:4c:78:7f:62:cd:1b:00:01:e8:51:27:9c:eb:75:29:80:e9:
         99:24:fc:86:e2:09:28:be:47:5a:1d:bf:b1:b4:c4:29:4e:6e:
         f3:70:b4:58:f8:d9:a6:63:03:8b:a1:ef:ee:6d:1a:35:33:1e:
         b2:32:25:c1:33:37:3d:46:82:37:9b:0d:4c:40:20:ae:ff:e0:
         cc:51:a2:6b:dd:74:26:d6:93:26:89:c7:76:29:13:cf:6e:5a:
         0f:7c:1b:f5:80:be:3b:6a:a3:c0:10:cd:07:1e:a2:31:8b:49:
         94:d7:63:cf:93:8d:80:03:75:4a:76:b4:cd:14:fe:96:62:61:
         6b:96:8f:c0:a5:ef:67:c7:5e:c0:a5:4b:4f:95:57:b6:43:03:
         8b:6d:10:5f:ab:f2:95:54:ba:85:8e:8b:c1:99:ea:fd:3f:5e:
         23:01:d4:27:f3:e9:20:37:c4:05:47:30:67:94:53:f0:87:27:
         48:73:57:55:f2:70:04:b1:e9:29:eb:2e:2c:9a:cc:55:f4:cc:
         a4:71:c2:5a


That's all folks 🙂


Preparing your Linux to work with the Cloud providers – Installing aws , gcloud, az, oc, cf CLI Cloud access command interfaces

Wednesday, October 10th, 2018

howto Install-Cloud-access-tools-for-google-aws-azure-openshift-cloud-foundryCloud_computing-explained-on-linux.svg

If you're a sysadmin / developer whose boss requires a migration of Stored Data, Database structures or Web Objects to Amazon Web Services / Google Clourd or you happen to be a DevOps Engineer you will certainly need to have installed as a minimumum amazon AWS and Google Clouds clients to do daily routines and script stuff in managing cloud resources without tampering to use the Web GUI interface.

Here is how to install the aws, gcloud, oc, az and cf next to your kubernetes client (kubectl) on your Linux Desktop.
 

1. Install Google Cloud  gcloud (to manage Google Cloud platform resources and developer workflow
 

google-cloud-logo

Here is few cmds to run to install  gcloud, gcloud alpha, gcloud beta, gsutil, and bq commands to manage your Google Cloud from CLI

a.) On Debian / Ubuntu / Mint or any other deb based distro

# Create environment variable for correct distribution
export CLOUD_SDK_REPO="cloud-sdk-$(lsb_release -c -s)"


# Add the Cloud SDK distribution URI as a package source
# echo "deb http://packages.cloud.google.com/apt $CLOUD_SDK_REPO main" | sudo tee -a /etc/apt/sources.list.d/google-cloud-sdk.list


# Import the Google Cloud Platform public key
$ sudo curl https://packages.cloud.google.com/apt/doc/apt-key.gpg | sudo apt-key add –


# Update the package list and install the Cloud SDK
$ sudo apt-get update && sudo apt-get install google-cloud-sdk


b) On CentOS, RHEL, Fedora Linux and other rpm based ones
 

$ sudo tee -a /etc/yum.repos.d/google-cloud-sdk.repo << EOM
[google-cloud-sdk]
name=Google Cloud SDK
baseurl=https://packages.cloud.google.com/yum/repos/cloud-sdk-el7-x86_64
enabled=1
gpgcheck=1
repo_gpgcheck=1
gpgkey=https://packages.cloud.google.com/yum/doc/yum-key.gpg
       https://packages.cloud.google.com/yum/doc/rpm-package-key.gpg
EOM

# yum install google-cloud-sdk


That's all now the text client to talk to Google Cloud's API gcloud is installed under
/usr/bin/gcloud

Latest install instructions of Google Cloud SDK are here.


2. Install AWS Cloud command line interface tool for managing AWS (Amazon Web Services)
 

AmazonWebservices_Logo.svg

AWS client is dependent on Python PIP so before you proceed you will have to install python-pip deb package if on Debian / Ubuntu Linux use apt:


# apt-get install –yes python-pip


It is also possible to install newest version of PIP a tiny shell script provided by Amazon get-pip.py


# curl -O https://bootstrap.pypa.io/get-pip.py
# python get-pip.py –user


# pip install awscli –upgrade –user


3. Install Azure Cloud Console access CLI command interface
 

Microsoft_Azure_Cloud-Logo.svg

On Debian / Ubuntu or any other deb based distro:

# AZ_REPO=$(lsb_release -cs)
# echo "deb [arch=amd64] https://packages.microsoft.com/repos/azure-cli/ $AZ_REPO main" | \
$ sudo tee /etc/apt/sources.list.d/azure-cli.list

# curl -L https://packages.microsoft.com/keys/microsoft.asc | sudo apt-key add –
$ sudo apt-get update
$ sudo apt-get install apt-transport-https azure-cli


Finaly to check that Azure CLI is properly installed run simple login with:


$ az login


$ sudo rpm –import https://packages.microsoft.com/keys/microsoft.asc
$ sudo sh -c 'echo -e "[azure-cli]\nname=Azure CLI\nbaseurl=https://packages.microsoft.com/yumrepos/azure-cli\nenabled=1\ngpgcheck=1\ngpgkey=https://packages.microsoft.com/keys/microsoft.asc" > /etc/yum.repos.d/azure-cli.repo'
$ sudo yum install azure-cli

$ az login


For Latest install instructions check Amazon's documentation here

4. Install OpenShift OC CLI tool to access OpenShift Open Source Cloud


OpenShift-Redhat-cloud-platform

Even thought OpenShift has its original Redhat produced package binaries, if you're not on RPM distro it is probably
best to install using official latest version from openshift github repo.


As of time of writting this article this is done with:


# wget https://github.com/openshift/origin/releases/download/v1.5.1/openshift-origin-client-tools-v1.5.1-7b451fc-linux-64bit.tar.gz
tar –xvf openshift-origin-client-tools-v1.5.1-7b451fc-linux-64bit.tar.gz


# # mv openshift-origin-client-tools-v1.5.1-7b451fc-linux-64bit oc-tool


# cd oc-tool
# echo'export PATH=$HOME/oc-tool:$PATH' >> ~/.bashrc


To test openshift, try to login to OpenShift cloud:


$ oc login
Server [https://localhost:8443]: https://128.XX.XX.XX:8443


Latest install instructions on OC here

5. Install Cloud Foundry cf CLI Cloud access tool

cloud-foundry-cloud-logo

a) On Debian / Ubuntu Linux based distributions, do run:


$ wget -q -O – https://packages.cloudfoundry.org/debian/cli.cloudfoundry.org.key | sudo apt-key add –
$ echo "deb https://packages.cloudfoundry.org/debian stable main" | sudo tee /etc/apt/sources.list.d/cloudfoundry-cli.list
$ sudo apt-get update
$ sudo apt-get install cf-cli


b) On RHEL Enterprise Linux / CentOS and Fedoras


$ sudo wget -O /etc/yum.repos.d/cloudfoundry-cli.repo https://packages.cloudfoundry.org/fedora/cloudfoundry-cli.repo
$ sudo yum install cf-cli


For latest install insructions on cf cli check Cloud Foundry's install site

There plenty of other Cloud providers with the number exponentially growing and most have their own custom cli tools to access but as there use is not so common as the 5 ones mentioned below, I've omited 'em. If you're interested to know the complete list of Cloud Providers providing Cloud Services check here.

6. Install Ruby GEMs RHC tools collection

If you have to work with Redhat Cloud Storage / OpenShift you will perhaps want to install also (RHC) Redhat Collection Tools.

Assuming that the Linux system is running an up2date version of ruby programming language do run:


root@jeremiah:~# gem install rhc
Fetching: net-ssh-5.0.2.gem (100%)
Successfully installed net-ssh-5.0.2
Fetching: net-ssh-gateway-2.0.0.gem (100%)
Successfully installed net-ssh-gateway-2.0.0
Fetching: net-ssh-multi-1.2.1.gem (100%)
Successfully installed net-ssh-multi-1.2.1
Fetching: minitar-0.7.gem (100%)
The `minitar` executable is no longer bundled with `minitar`. If you are
expecting this executable, make sure you also install `minitar-cli`.
Successfully installed minitar-0.7
Fetching: hashie-3.6.0.gem (100%)
Successfully installed hashie-3.6.0
Fetching: powerbar-1.0.18.gem (100%)
Successfully installed powerbar-1.0.18
Fetching: minitar-cli-0.7.gem (100%)
Successfully installed minitar-cli-0.7
Fetching: archive-tar-minitar-0.6.1.gem (100%)
'archive-tar-minitar' has been deprecated; just install 'minitar'.
Successfully installed archive-tar-minitar-0.6.1
Fetching: highline-1.6.21.gem (100%)
Successfully installed highline-1.6.21
Fetching: commander-4.2.1.gem (100%)
Successfully installed commander-4.2.1
Fetching: httpclient-2.6.0.1.gem (100%)
Successfully installed httpclient-2.6.0.1
Fetching: open4-1.3.4.gem (100%)
Successfully installed open4-1.3.4
Fetching: rhc-1.38.7.gem (100%)
===========================================================================


If this is your first time installing the RHC tools, please run 'rhc setup'

===========================================================================
Successfully installed rhc-1.38.7
Parsing documentation for net-ssh-5.0.2
Installing ri documentation for net-ssh-5.0.2
Parsing documentation for net-ssh-gateway-2.0.0
Installing ri documentation for net-ssh-gateway-2.0.0
Parsing documentation for net-ssh-multi-1.2.1
Installing ri documentation for net-ssh-multi-1.2.1
Parsing documentation for minitar-0.7
Installing ri documentation for minitar-0.7
Parsing documentation for hashie-3.6.0
Installing ri documentation for hashie-3.6.0
Parsing documentation for powerbar-1.0.18
Installing ri documentation for powerbar-1.0.18
Parsing documentation for minitar-cli-0.7
Installing ri documentation for minitar-cli-0.7
Parsing documentation for archive-tar-minitar-0.6.1
Installing ri documentation for archive-tar-minitar-0.6.1
Parsing documentation for highline-1.6.21
Installing ri documentation for highline-1.6.21
Parsing documentation for commander-4.2.1
Installing ri documentation for commander-4.2.1
Parsing documentation for httpclient-2.6.0.1
Installing ri documentation for httpclient-2.6.0.1
Parsing documentation for open4-1.3.4
Installing ri documentation for open4-1.3.4
Parsing documentation for rhc-1.38.7
Installing ri documentation for rhc-1.38.7
Done installing documentation for net-ssh, net-ssh-gateway, net-ssh-multi, minitar, hashie, powerbar, minitar-cli, archive-tar-minitar, highline, commander, httpclient, open4, rhc after 10 seconds
13 gems installed
root@jeremiah:~#

To start with rhc next do:
 

rhc setup
rhc app create my-app diy-0.1


and play with it to install software create services on the Redhat cloud.


Closure

This are just of the few of the numerous tools available and I definitely understand there is much more to be said on the topic.
If you can remember other tools tor interesting cloud starting up tips about stuff to do on a fresh installed Linux PC to make life easier with Cloud / PaaS / SaaS / DevOps engineer please drop a comment.

Change Linux Wireless Access Point connection from text terminal with iwconfig

Monday, October 8th, 2018

wireless-change-wireless-network-to-connect-to-using-console

If you have configured a couple of Wireless connections at home or work on your Laptop  and each of the remote Wi-FI access points are at different distance (some APs are situated at closer range than others) and your Linux OS keeps connecting sometimes to the wrong AP by default you'll perhaps want to change that behavior, so you keep connected to the Wi-Fi AP that has the best Link Quality (is situatated physically at closest location to your laptop integrated wifi card).
Using a Graphical tool such as Gnome Network Manager / Wicd Network Manager or KDE's Network Manager is great and easy way to do it but sometimes if you do upgrade of your GNU / Linux and the upgrade fails and your Graphical Environment GNOME / KDE / OpenBox / Window Maker or whatever Window Manager you use fails to start it is super handy to use text console (terminal) to connect to the right wiki in order to do a deb / rpm package rollback to revert your GUI environment or Xorg to the older working release.

Connection to WPA or WEP protected APs on GNU / Linux on a low level is done by /sbin/iwlist , /sbin/iwconfig and wpa_supplicant

wpasupplicant and network-manager (if you're running Xorg server).


/sbin/iwlist scan


wlp3s0    Scan completed :
          Cell 01 – Address: 10:FE:ED:43:CB:0E
                    Channel:6
                    Frequency:2.437 GHz (Channel 6)
                    Quality=64/70  Signal level=-46 dBm  
                    Encryption key:on
                    ESSID:"Magdanoz"
                    Bit Rates:1 Mb/s; 2 Mb/s; 5.5 Mb/s; 11 Mb/s; 6 Mb/s
                              9 Mb/s; 12 Mb/s; 18 Mb/s
                    Bit Rates:24 Mb/s; 36 Mb/s; 48 Mb/s; 54 Mb/s
                    Mode:Master
                    Extra:tsf=00000032cff7c214
                    Extra: Last beacon: 144ms ago
                    IE: Unknown: 00084D616764616E6F7A
                    IE: Unknown: 010882848B960C121824
                    IE: Unknown: 030106
                    IE: Unknown: 0706555320010B1B
                    IE: Unknown: 2A0100
                    IE: IEEE 802.11i/WPA2 Version 1
                        Group Cipher : TKIP
                        Pairwise Ciphers (2) : CCMP TKIP
                        Authentication Suites (1) : PSK
                    IE: Unknown: 32043048606C


iwlist command is used to get more detailed wireless info from a wireless interface (in terminal this command shows you the wifi networks available to connect to and various info such as the type of Wifi network the Wifi Name / network quality Frequency (is it it spreading the wifi signal at 2.4 Ghz or 5 Ghz frequency) etc.


# ifconfig interafce_name down


For example on my Thinkpad the wifi interface is wlp3s0 to check what is yours do ifconfig -a e.g.


root@jeremiah:~# /sbin/ifconfig -a
enp0s25: flags=4099<UP,BROADCAST,MULTICAST>  mtu 1500
        ether 00:21:cc:cc:b2:27  txqueuelen 1000  (Ethernet)
        RX packets 0  bytes 0 (0.0 B)
        RX errors 0  dropped 0  overruns 0  frame 0
        TX packets 0  bytes 0 (0.0 B)
        TX errors 0  dropped 0 overruns 0  carrier 0  collisions 0
        device interrupt 20  memory 0xf3900000-f3920000  


lo: flags=73<UP,LOOPBACK,RUNNING>  mtu 65536
        inet 127.0.0.1  netmask 255.0.0.0
        inet6 ::1  prefixlen 128  scopeid 0x10<host>
        loop  txqueuelen 1  (Local Loopback)
        RX packets 350  bytes 28408 (27.7 KiB)
        RX errors 0  dropped 0  overruns 0  frame 0
        TX packets 350  bytes 28408 (27.7 KiB)
        TX errors 0  dropped 0 overruns 0  carrier 0  collisions 0

wlp3s0: flags=4163<UP,BROADCAST,RUNNING,MULTICAST>  mtu 1500
        inet 192.168.0.103  netmask 255.255.255.0  broadcast 192.168.0.255
        inet6 fe80::6267:20ff:fe3c:20ec  prefixlen 64  scopeid 0x20<link>
        ether 60:67:20:3c:20:ec  txqueuelen 1000  (Ethernet)
        RX packets 299735  bytes 362561115 (345.7 MiB)
        RX errors 0  dropped 1  overruns 0  frame 0
        TX packets 278518  bytes 96996135 (92.5 MiB)
        TX errors 0  dropped 0 overruns 0  carrier 0  collisions 0


Next use iwconfig on Debian / Ubuntu Linux it is part of wireless-tools deb package.


root@jeremiah:~# /sbin/iwconfig interface essid "Your-Acess-Point-name"


To check whether you're connected to a wireless network you can do:

https://www.pc-freak.net/images/check-wireless-frequency-access-point-mac-and-wireless-name-iwconfig-linux

root@jeremiah:~# iwconfig
enp0s25   no wireless extensions.


lo        no wireless extensions.

wlp3s0    IEEE 802.11  ESSID:"Magdanoz"  
          Mode:Managed  Frequency:2.437 GHz  Access Point: 10:FE:ED:43:CB:0E   
          Bit Rate=150 Mb/s   Tx-Power=15 dBm   
          Retry short limit:7   RTS thr:off   Fragment thr:off
          Encryption key:off
          Power Management:off
          Link Quality=61/70  Signal level=-49 dBm  
          Rx invalid nwid:0  Rx invalid crypt:0  Rx invalid frag:0
          Tx excessive retries:5  Invalid misc:1803   Missed beacon:0


N.B. ! To get a list of all your PC network interfaces you can use cmd:


root@jeremiah:/home/hipo# ls -al /sys/class/net/
total 0
drwxr-xr-x  2 root root 0 Oct  8 22:53 .
drwxr-xr-x 52 root root 0 Oct  8 22:53 ..
lrwxrwxrwx  1 root root 0 Oct  8 22:53 enp0s25 -> ../../devices/pci0000:00/0000:00:19.0/net/enp0s25
lrwxrwxrwx  1 root root 0 Oct  8 22:53 lo -> ../../devices/virtual/net/lo
lrwxrwxrwx  1 root root 0 Oct  8 22:53 wlp3s0 -> ../../devices/pci0000:00/0000:00:1c.1/0000:03:00.0/net/wlp3s0

show-all-network-interfaces-with-netstat-linux

or use netstat like so:

root@jeremiah:/home/hipo# netstat -i | column -t
Kernel   Interface  table
Iface    MTU        RX-OK   RX-ERR  RX-DRP  RX-OVR  TX-OK   TX-ERR  TX-DRP  TX-OVR  Flg
enp0s25  1500       0       0       0       0       0       0       0       0       BMU
lo       65536      590     0       0       0       590     0       0       0       LRU
wlp3s0   1500       428112  0       1       0       423538  0       0       0       BMRU


To get only the Wireless network card interface on Linux (e.g. find out which of the listed above interfaces is your wireless adapter's name), use iw command (that shows devices and their configuration):


root@jeremiah:/home/hipo# iw dev
phy#0
    Interface wlp3s0
        ifindex 3
        wdev 0x1
        addr 60:67:20:3c:20:ec
        type managed
        channel 6 (2437 MHz), width: 40 MHz, center1: 2427 MHz
        txpower 15.00 dBm


linux-wireless-terminal-console-check-wireless-interfaces-command

  • If you need to get only the active Wireless adapter device assigned by Linux kernel


root@jeremiah:~# iw dev | awk '$1=="Interface"{print $2}'


To check the IP / Netmask and Broadcase address assigned by connected Access Point use ifconfig
with your Laptop Wireless Interface Name.

show-extra-information-ip-netmask-broadcast-about-wireless-interface-linux

root@jeremiah:~# /sbin/ifconfig wlp3s0
wlp3s0: flags=4163<UP,BROADCAST,RUNNING,MULTICAST>  mtu 1500
        inet 192.168.0.103  netmask 255.255.255.0  broadcast 192.168.0.255
        inet6 fe80::6267:20ff:fe3c:20ec  prefixlen 64  scopeid 0x20<link>
        ether 60:67:20:3c:20:ec  txqueuelen 1000  (Ethernet)
        RX packets 319534  bytes 365527097 (348.5 MiB)
        RX errors 0  dropped 1  overruns 0  frame 0
        TX packets 285464  bytes 99082701 (94.4 MiB)
        TX errors 0  dropped 0 overruns 0  carrier 0  collisions 0


As you can see in above 3 examples iwconfig could configure various settings regarding the wireless network interface.

It is really annoying because sometimes if you have configured your Linux to connect to multiple access points, the wifi adapter might keep connecting to an access point that is more distanced from you and because of that the Bandwidth might be slower and that could impact your Internet connectivity, to fix that and get rid of any networks that are automatically set to connect to that you don't want to, just delete the correspodning files (the Wifi file name coincides with the Wireless AP network name).
All stored Wi-FI access points that your Linux is configured to connect to are stored inside /etc/NetworkManager/system-connections/

For example to delete an auto connection to wireless router with a name NetGear do:


root@jeremiah:~# rm -f /etc/NetworkManager/system-connections/NetGear


For a complete list of stored Wifi Networks that your PC might connect (and authorize to if configured so) do:


root@jeremiah:~# ls -a /etc/NetworkManager/system-connections/
Magdanoz
NetGear

LinkSys
Cobra
NetIs
WirelessNet


After deleting the required Networks you want your computer to not automatically connect to to make NetworkManager aware of that restart it with:
 

hipo@jeremiah:~# systemctl restart NetworkManager.service


or if you hate systemd like I do just use the good old init script to restart:


hipo@jeremiah:~# /etc/init.d/network-manager restart


To get some more informatoin on the exact network you're connected, you can run:

show-information-about-wireless-connection-on-gnu-linux


hipo@jeremiah:~# systemctl status NetworkManager.service
● NetworkManager.service – Network Manager
   Loaded: loaded (/lib/systemd/system/NetworkManager.service; enabled; vendor preset: enabled)
   Active: active (running) since Mon 2018-10-08 22:35:09 EEST; 15s ago
     Docs: man:NetworkManager(8)
 Main PID: 13721 (NetworkManager)
    Tasks: 5 (limit: 4915)
   CGroup: /system.slice/NetworkManager.service
           ├─13721 /usr/sbin/NetworkManager –no-daemon
           └─13742 /sbin/dhclient -d -q -sf /usr/lib/NetworkManager/nm-dhcp-helper -pf /var/run/dhclient-wlp3s0.pid -lf /var/lib/NetworkManager/dhclie


Oct 08 22:35:15 jeremiah NetworkManager[13721]:   [1539027315.6657] dhcp4 (wlp3s0): state changed unknown -> bound
Oct 08 22:35:15 jeremiah dhclient[13742]: bound to 192.168.0.103 — renewal in 2951 seconds.
Oct 08 22:35:15 jeremiah NetworkManager[13721]:
  [1539027315.6735] device (wlp3s0): state change: ip-config -> ip-check (reason 'none') [70 80
Oct 08 22:35:15 jeremiah NetworkManager[13721]:
  [1539027315.6744] device (wlp3s0): state change: ip-check -> secondaries (reason 'none') [80 9
Oct 08 22:35:15 jeremiah NetworkManager[13721]:
  [1539027315.6747] device (wlp3s0): state change: secondaries -> activated (reason 'none') [90
Oct 08 22:35:15 jeremiah NetworkManager[13721]:
  [1539027315.6749] manager: NetworkManager state is now CONNECTED_LOCAL
Oct 08 22:35:15 jeremiah NetworkManager[13721]:
  [1539027315.6812] manager: NetworkManager state is now CONNECTED_GLOBAL
Oct 08 22:35:15 jeremiah NetworkManager[13721]:
  [1539027315.6813] policy: set 'Magdanoz' (wlp3s0) as default for IPv4 routing and DNS
Oct 08 22:35:15 jeremiah NetworkManager[13721]:
  [1539027315.6816] device (wlp3s0): Activation: successful, device activated.
Oct 08 22:35:15 jeremiah NetworkManager[13721]:
  [1539027315.6823] manager: startup complete


Set mcedit as default text editor for mc (midnight commander) on Linux

Thursday, October 4th, 2018

set-default-text-editor-for-midnight-commander-to-mcedit-linux-howto

If you're a vim (VI Improved) fan and you set your Linux server / desktop to use VIM as a default text editor, for those who don't know this is done either locally for user (if you're not superuser on remote server) by adding:

export VISUAL=vim
export EDITOR="$VISUAL"

to ~/.bashrc or ~/.bash_profile, e.g.


echo 'export VISUAL=vim; export EDITOR="$VISUAL"' >> ~/.bashrc
echo 'export VISUAL=vim; export EDITOR="$VISUAL"' >> ~/.bash_profile


or if you're root on the system e.g. it is your Linux desktop / administered by you (debian / ubuntu) server to set VIM as default text editor for all applications with cmd:


 # update-alternatives –config editor


or if you haven't unset the EDITOR variable the default behavior on some Ubuntu (10.10) etc. versions mc editting would edit with nano text editor.

Just like me however you work also regularly with Midnight Commander (mc) the Linux equivalent of good old Norton Commander you might end up with Midnight Commander opening your files with F4 command with VIM text editor instead of the default.

So here is how to change this behavior in order to end up editting with mcedit any edited file via mc:

mc-menu-options-layout-screenshot

1. Press F9 to Activate the top menu.
2. Press o to Select the Option menu.
3. Press c to Open the configuration dialog.
4. Press i to Toggle the use internal edit option.
5. Press s to Save your preferences.

midnight-commander-configure-options-use-internal-edit-screenshot
Hooray, you're done now mc will use mcedit again as default just like it was intended to be in old times on most GNU / Linux distributions.
Enjoy!
 

Run multiple PHP versions (PHP 5 and PHP 7) with NGINX on the same server howto

Wednesday, October 3rd, 2018

how-to-run-multiple-php-versions-on-same-Linux-server-nginx-webserver-php5-7-logo

It is common sysadmin task to have two versions of PHP running on the same physical or Virtual server to be able to run simultaneously old PHP 5.X legacy applications and PHP 7.X written websites / web applications.

In the past this task was much more complicated than today  you had to compile for example Apache and PHP modules from source and enable it through fastcgi.
Today with the raise of NGINX Web Server and its possibility to run much of the PHP Apps running on top of Apache.
For the sake of this tutorial I'll be using Debian Strecth 9.0.
The reason to use NGINX instead of Apache for this tutorial are numerous, it is light weight (uses less resources – CPU ./ Memory) it is secure smaller in size.
 

1. Install NGINX Web Server


# apt-get install –yes nginx 


2. Install PHP.7.0 FPM module


# apt-get install php7.0-cli php7.0-fpm


3. Install PHP 5.6 FPM Using external deb repository

Debian default repositories does not include support for PHP 5.6, hence we need to add the respective repositories providing PHP 5.6


# apt-get install apt-transport-https


# curl https://packages.sury.org/php/apt.gpg | apt-key add –
echo 'deb https://packages.sury.org/php/ stretch main' > /etc/apt/sources.list.d/deb.sury.org.list
apt-get update


Next install PHP 5.6 from just added repos


# apt-get install –yes php5.6-cli php5.6-fpm


4. Check Multiple PHP versions PHP 5 and PHP 7 aree properly installed 


# php7.0 -v
PHP 7.0.15-1 (cli)
# php5.6 -v


Debian has a default set-up for PHP CLI (Console Interface command) pointing to PHP 7.0, e.g.


# php -v
PHP 7.0.15-1 (cli)


If you prefer to use as prefer PHP 5.6 instead you can do it with debian update-alternative cmd:


# update-alternatives –config php


5. Configure both installed PHP -es

Edit /etc/php/7.0/fpm/pool.d/www.conf and look for the listen option. It should equal to /run/php/php7.0-fpm.sock or something alike.
Now do the same for 5.6, it should contain the same with just 5.6 instead of 7.0. Note that it could also be a bind address, i.e. IP address with port (which is performance-wise more suitable for production than sockets). 


6. Configuring NGINX webserver


Nginx configuration files are stored in /etc/nginx 

– On Debian the .deb package structure of nginx is is made that all available virtual hosts for nginx just like for Apache are stored  in sites-available directory and production enabled virtualhosts are symlinks to sites-enabled

– Shared configuration for reuse among multiple domains is stored in inside the snippets directory

– fastcgi.conf file contains FastCGI specific variables that are passed to PHP

– The snippets/fastcgi-php.conf is just a helper file to prepare configuration that is passed to PHP module

It is a good idea to remove any unnecessery configuration from /etc/nginx/sites-enabled 
 

7. Create configuration for PHP 7.0


To make simple the test the main (root) directory of nginx will be set to have a simple phpinfo(); file.
 

mkdir /var/www/site-with-php7
echo -e '<?php\nphpinfo();' > /var/www/site-with-php7/index.php 


Then create actual Nginx configuration


# vim /etc/nginx/sites-available/site-with-enabed-php7.X


server {
    listen 8770 default_server;
    listen [::]:8870 default_server;

    server_name _;
    root /var/www/site-with-php7;
    index index.php;
    location / {
        include snippets/fastcgi-php.conf;
        fastcgi_pass unix:/run/php/php7.0-fpm.sock; # adjust for the listen setting discussed above
    }


As seen from configuration PHP 7 will be serving PHP scripts written for php 7  on TCP port 8870


8. Create configuration for PHP 5.6


# mkdir /var/www/site-with-php5.6
# echo -e '<?php\nphpinfo();' > /var/www/site-with-php5.6/index.php


server {
    listen 8756 default_server;
    listen [::]:8856 default_server;

    server_name _;
    root /var/www/site-with-php5.6;
    index index.php;
    location / {
        include snippets/fastcgi-php.conf;
        fastcgi_pass unix:/run/php/php5.6-fpm.sock; # adjust for the listen setting discussed above
    }
}

As you see from configuration PHP 5.6 will be serving PHP 5.6 files on TCP port 8756

To enable both NGINX configurations to load enable both nginx vhosts as there is no a2ensite like for enabling NGINX configurations the following  cmd does it
 

# ln -s /etc/nginx/sites-available/site-with-php5.6 /etc/nginx/sites-enabled/
#  ln -s /etc/nginx/sites-available/site-with-php7.0 /etc/nginx/sites-enabled/

To load the new NGINX Virtualhost configurations, restart next:
 

# systemctl reload nginx.service


9. Testing NGINX + PHP configuration set-up on port 8870 / 8876


– Test NGINX connection on 8876
 

lynx -dump http://localhost:8870

– Test NGINX connection on 8870
 

lynx -dump http://localhost:8870

Both commands should dump you output from PHP 7 (if your server lacks lynx i warmly recommend it, though you can use wget to test).


To sum it up


Even though generally it is a bad idea to have 2 instances of application service be it NGINX / Apache from security point of view, it is sometimes a necessity especially when you
or your customers are unwilling to invest money for upgrade of their websites / application infrastructure and if the clients want to keep obsolete PHP code and mix it with a new.
Still migration will be required as you would perhaps want to have some kind of Load Balancer round robin with another NGINX / Apache or Haproxy to make different applications
open under a separate CDN hostname
.