Archive for March, 2022

How to disable Windows pagefile.sys and hiberfil.sys to temporary or permamently save disk space if space is critically low

Monday, March 28th, 2022

howto-pagefile-hiberfil.sys-remove-reduce-increase-increase-size-windows-logo

Sometimes you have to work with Windows 7 / 8 / 10 PCs  etc. that has a very small partition C:\
drive or othertimes due to whatever the disk got filled up with time and has only few megabytes left
and this totally broke up the windows performance as Windows OS becomes terribly sluggish and even
simple things as opening Internet Browser (Chrome / Firefox / Opera ) or Windows Explorer stones the PC performance.

You might of course try to use something like Spacesniffer tool (a great tool to find lost data space on PC s short description on it is found in my previous article how to
delete temporary Internet Files and Folders to to speed up and free disk space
 ) or use CCleaner to clean up a bit the pc.
Sometimes this is not enough though or it is not possible to do at all the main
partition disk C:\ is anyhow too much low (only 30-50MB are available on HDD) or the Physical or Virtual Machine containing the OS is filled with important data
and you couldn't risk to remove anything including Internet Temporary files, browsing cookies … whatever.

Lets say you are the fate chosen guy as sysadmin to face this uneasy situation and have no easy
way to add disk space from another present free space partition or could not add a new SATA hard drive
SSD drive, what should you do?
 

The solution wipe off pagefile.sys and hiberfil.sys

Usually every Windows installation has a pagefile.sys and hiberfil.sys.

  • pagefile.sys – is the default file that is used as a swap file, immediately once the machine runs out of memory. For Unix / Linux users better understanding pagefile.sys is the equivallent of Linux's swap partition. Of course as the pagefile is in a file and not in separate partition the swapping in Windows is perhaps generally worse than in Linux.
  • hiberfil.sys – is used to store data from the machine on machine Hibernation (for those who use the feature)


Pagefile.sys which depending on the configured RAM memory on the OS could takes up up to 5 – 8 GB, there hanging around doing nothing but just occupying space. Thus a temporary workaround that could free you some space even though it will degrade performance and on servers and production machines this is not a good solution on just user machines, where you temporary need to free space any other important task you can free up space
by seriously reducing the preconfigured default size of pagefile.sys (which usually is 1.5 times the active memory on the OS – hence if you have 4GB you would have a 6Gigabytes of pagefile.sys).

Other possibility especially on laptop and movable devices running Win OS is to disable hiberfil.sys, read below how this is done.


The temporary solution here is to simply free space by either reducing the pagefile.sys or completely disabling it


1. Disable pagefile.sys on Windows XP, Windows 7 / 8 / 10 / 11


The GUI interface to disable pagefile across all NT based Windows OS-es is quite similar, the only difference is newer versions of Windows has slightly more options.


1.1 Disable pagefile on Windows XP


Quickest way is to find pagefile.sys settings from GUI menus

1. Computer (My Computer) – right click mouse
2. Properties (System Preperties will appear)
3. Advanced (tab) 
4. Settings
5. Advanced (tab)
6. Change button

windows-xp-pagefile-disable-screenshot

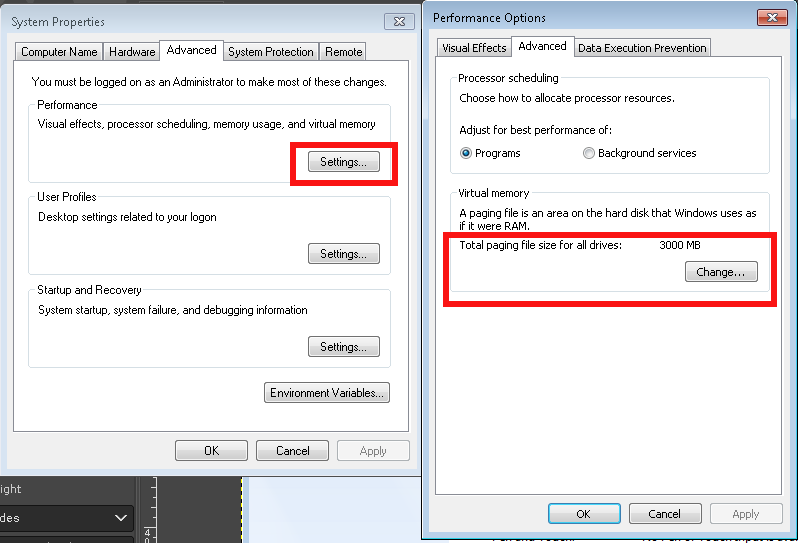
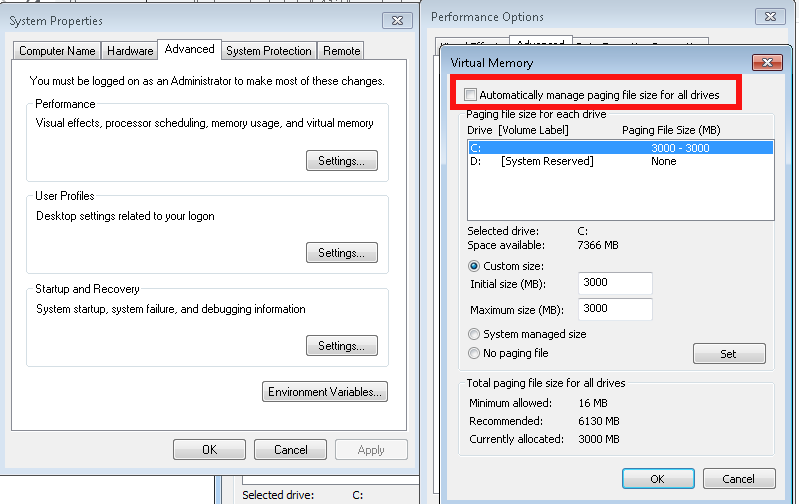
1.2 Disable pagefile on Windows 7


advanced-system-settings-control-panel-system-and-security-screenshot

windows-system-properties-screenshot-properties-advanced-change-Virtual-memory-pagefile-screenshot

system-properties-performance-options
 

Once applied you'll be required to reboot the PC

How-to-turn-off-Virtual-Memory-Paging_File-in-Windows-7-restart


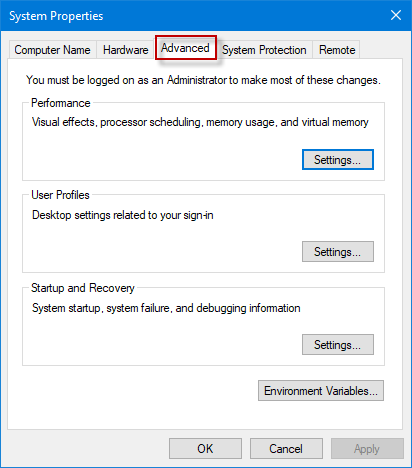
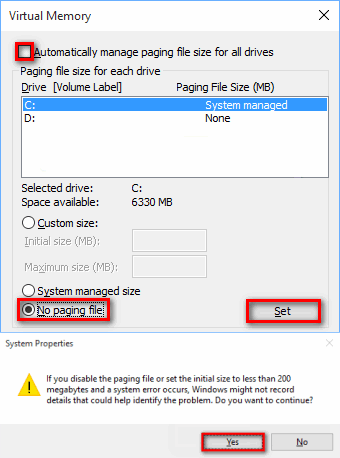
1.3 Disable Increase / Decrease pagefile.sys on Windows 10 / Win 11
 

open-system-properties-advanced-win10

win10-performance-options-menu-screenshot

configure-virtual-memory-win-10-screenshot


1.4 Make Windows clear pagefile.sys on shutdown

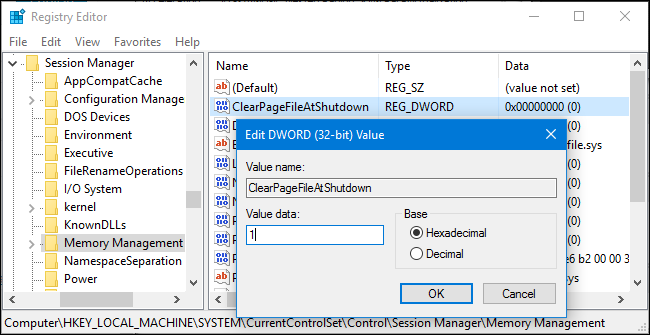
On home PCs it might be useful thing to clear up ( nullify) pagefile.sys on shutdown, that could save you some disk space on every reboot, until file continuously grows to its configured Maximum.

Run

regedit

Modify registry key at location


HKEY_LOCAL_MACHINE\SYSTEM\CurrentControlSet\Control\Session Manager\Memory Management

windows-clean-up-pagefile-sys-file-on-shutdown-or-reboot-registry-editor-value-screenshot

You can apply the value also via a registry file you can get the Enable Clearpagefile at shutdown here .reg.
 

2. Manipulating pagefile.sys size and file delete from command line with wmic tool 

For scripting purposes you might want to use the wmic pagefile which can do increase / decrase or delete the file without GUI, that is very helpful if you have to admin a Windows Domain (Active Directory)
 

[hipo.WINDOWS-PC] ➤ wmic pagefile /?

PAGEFILE – Virtual memory file swapping management.

HINT: BNF for Alias usage.
(<alias> [WMIObject] | [] | [] ) [].

USAGE:

PAGEFILE ASSOC []
PAGEFILE CREATE <assign list>
PAGEFILE DELETE
PAGEFILE GET [] []
PAGEFILE LIST [] []


[hipo.WINDOWS-PC] ➤ wmic pagefile
AllocatedBaseSize  Caption          CurrentUsage  Description      InstallDate                Name             PeakUsage  Status  TempPageFile
4709               C:\pagefile.sys  499           C:\pagefile.sys  20200912061902.938000+180  C:\pagefile.sys  525                FALSE


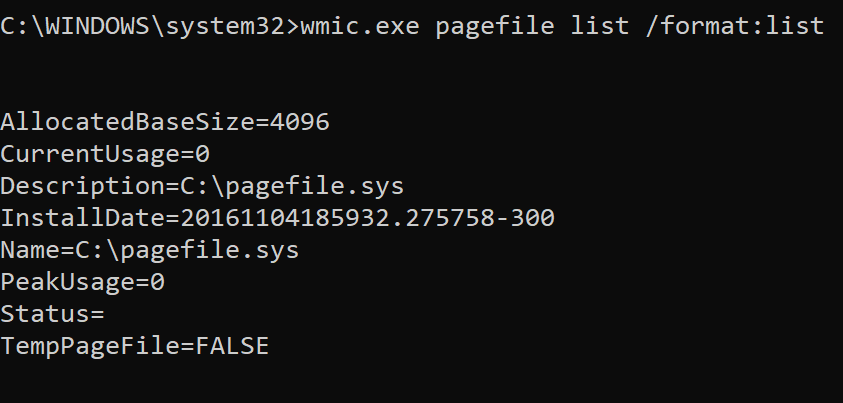
[hipo.WINDOWS-PC] ➤ wmic pagefile list /format:list

AllocatedBaseSize=4709
CurrentUsage=499
Description=C:\pagefile.sys
InstallDate=20200912061902.938000+180
Name=C:\pagefile.sys
PeakUsage=525
Status=
TempPageFile=FALSE

wmic-pagefile-command-line-tool-for-windows-default-output-screenshot


  • To change the Initial Size or Maximum Size of Pagefile use:
     

➤ wmic pagefileset where name="C:\\pagefile.sys" set InitialSize=2048,MaximumSize=2048

  • To move the pagefile / change location of pagefile to less occupied disk drive partition (i.e. D:\ drive)


    Sometimes you might have multiple drives on the PC and some of them might be having multitudes of gigabytes while main drive C:\ could be fully occupied due to initial install bad drive organization, in that case a good work arount to save you space so you can work normally with the server is just to temporary or permanently move pagefile to another drive.

wmic pagefileset where name="D:\\pagefile.sys" set InitialSize=2048,MaximumSize=2048


!! CONSIDER !!! 

That if you have the option to move the pagefile.sys for best performance it is advicable to place the file inside another physical disk, preferrably a Solid State Drive one, SATA disks are too slow and reduced Input / Output disk operations will lead to degraded performance, if there is lack of memory (i.e. pagefile.sys is actively open read and wrote in).
 

  • To delete pagefile.sys 
     

➤ wmic pagefileset where name="C:\\pagefile.sys" delete


If for some reason you prefer to not use wmic but simple del command you can delete pagefile.sys also by:

Removing file default "Hidden" and "system" file attributes – set for security reasons as the file is a system file usually not touched by user. This will save you from "permission denied" errors:
 

➤ attrib -s -h %systemdrive%\pagefile.sys


Delete the file:
 

➤ del /a /q %systemdrive%\pagefile.sys


3. Disable hibernation on Windows 7 / 8 and Win 10 / 11

Disabling hibernation file hiberfil.sys can also free up some space, especially if the hibernation has been actively used before and the file is written with data. Of course, that is more common on notebooks.
Windows hibernation has significantly improved over time though i didn't have very pleasant experience in the past and I prefer to disable it just in case.
 

3.1 Disable Windows 7 / 8 / 10 / 11 hibernation from GUI 

Disable it through:

Control Panel -> All Control Panel Items -> Power Options -> Edit Plan Settings -> Change advanced power settings


 like shown in below screenshot:

Windqows-power-options-Advanced-settings-Allow-Hybrid-sleep-option-menu-screenshot


3.2 Disable Windows 7 / 8 / 10 / 11 hibernation from command line

Disable hibernation Is done in the same way through the powercfg.exe command, to disable it
if you're cut of disk space and you want to save space from it:

run as Administrator in Command Line Windows (cmd.exe)
 

powercfg.exe /hibernate off

If you later need to switch on hibernation
 

powercfg.exe /hibernate on


disable-hiberfile-windows-screenshot

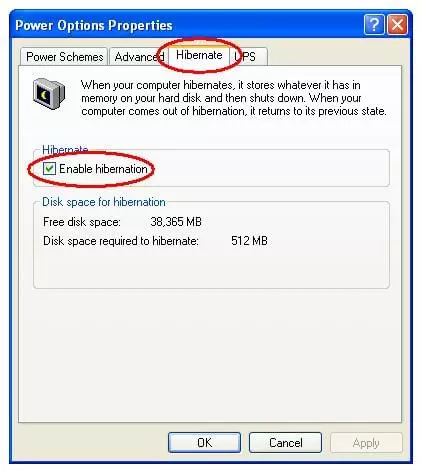
3.3 Disable Windows hibernation on legacy Windows XP

On XP to disable hibernation open

1. Power Options Properties
2. Select Hibernate
3. Select Enable Hibernation to clear the checkbox and disable Hibernation mode. 
4. Select OK to apply the change.

Close the Power Options Properties box. 

enable-disable-hibernate-windows-xp-menu-screenshot

To sum it up

We have learned some basics on Windows swapping and hibernation and i've tried to give some insight on how thiese files if misconfigured could lead to degraded Win OS performance. In any case using SSD as of 2022 to store both files is a best practice for machines that has plenty of memory always try to completely disable / remove the files. It was shown how  to manage pagefile.sys and hiberfil.sys across Windows Operating Systems different versions both from GUI and via command line as well as how you can configure pagefile.sys to be cleared up on pc reboot.
 

Saint Luke of Odrin, a Glorious Bulgarian XVI century Christ martyr who publicly refuted Islam, feast day 23 of March

Wednesday, March 23rd, 2022

Saint_Lukas-of-Odrin-Adreanopolis-icon-Bulgarian-martyr-saint-of-ottoman-time

Holy Reverend Martyr Luka (the bulgarian name for Luke) was born in city of today's Edirne ( Odrin ) formerly known as Adreanopolis to pious Bulgarian parents – Atanas and Dominica. After the early death of his father, his mother gave him to a rich merchant from (Zagor) today's city Stara Zagora in Bulgaria, who treated him like a son.
The merchant once went to Russia, taking 13-year-old Luka with him.
On his return he stopped in Constantinople.

There Luca quarreled with a turk and started beating him. Then the enraged Turks captured him and wanted to kill him.
The frightened Luke shouted: "Let me go! I will convert to Islam!"

The turk immediately took him in and forced him to renounce Christ and convert to Islam, which the young boy did out of fear.
But after the fear passed, Luke became frightened by his action, lost his joy, and began to repent bitterly.

He reported himself to his batismal father (have to say at that time the importance of the God-father was very enormous much more than today). 
His father tried to release him with the help of the Russian ambassador.
But the evil turk, instead of freeing the boy, tied his hands and forcibly circumcised him.

After some time, Luca managed to escape from this Turkish home where he was forced to work as being counted a member of Islamic community and introduced himself to the Russian ambassador, who in attempt to save him from his slavery, sent him to the cities of Smyrna and Tire.
There Luke became seriously ill and, fearing death, called a Christian priest.
After hearing his confession, the priest advised him to retire to Mount Athos and repent there under the guidance of virtuous men.
After his recovery, he actually followed the advice of the clergyman and entered the Iviron  Athos Monastery, where he was restored to his Christian faith through the sacrament of Holy Anointing.

Saint_Loukas-Mytilene-confessor-Christian-martyr-who-denounced-Islam-neomartyr

Saint Luka of Odrin ( Adreanopolis ), the saint is well known in Greece as Saint Luke of Mytiliny (Mytilene a main city
in Lesbos Island Greece)

From there he moved to the Stavronikita Monastery, where he received a monastic vow.
But the enemy of human salvation did not give him peace.
Continuously Driven by temptations, he fled from one monastery to another. He went to the  Bulgarian "Zografski" ( Zographou ) monastery (from where he returned to the world, but failed to calm down, came to Mount Athos again) and then consequentlially to  Xyropotamou, Koutloumousiou  ( Kutlumush ), Saint John's Scyte, Grigoriou (Grigoriat), Saint. Anna Scyte.

Saint_Loukas of-Odrin-Adrianople-icon

Thinking about why he has no peace during all this time, but always moving from place to place, he came to the conclusion that this is a punishment from God for his denial of the Christian faith.

So he came up with the idea of ​​martyrdom (as a mean to redeem his sin) and shared it with some clergy: no one dared to recommend a martyrdom to him because of his youth.
But in the end, seeing his unwavering determination, the priest Ananias gave him a cell rule in preparation for martyrdom for Christ. Then the clergyman Visarion cut his hair in a Great Schema " μεγαλόσχημος" monastic vows and went with him to the island of Mytilene (today in Greece).

After partaking in the Holy Mysteries of Christ, St. Luke dressed as a Turk and went to the Qadi (Judge – qadis have been an institution in cities in Turkish empire pretty much like today's Courts).

He told allegorically how he was forcibly converted to Islam, openly renounced ungodly Islam and professed the Christian faith in the following way:

He went beforte the kadi and asked him in loud voice,

"Is it just for me to be deceived, a child like myself?"

The kadi asked,
"And who deceived you?"

Luka responded,

"Someone deceive me, giving me a badge of islam [meaning circumcision."

The kadi then asked to see the badge. But when Luke went to open his clothing, those
present in the courthouse finally understood what he meant and shouted for him to stop.

Luka then said,

"Being a young child of thirteen, I was deceived by you
and I came over to your religion, not being able to discern
the truth from falsehood. I therefore remained
with what is false and a lie for some time because I
understood your religion was not true, but false.
And he whom you call a prophet is not a prophet but a
deceiver and a mythmaker, and he has deceived all of
you and you believed him . Having therefore been
informed that your religion is darknes, I reject
it before you and I confess my former Christian faith
which is true light. I believe and worship a true God,
my Lord Jesus Christ who will come to judge all
the world, the living and the ded, and who will render to
each according to his works. If you do not believe in
HIm. as I do, you will all be damned."


The kadi further asked Luka where he is from and he said he has came to this place by ship from Russia as Russia has been considered the only country protectorof Orthodox Christians in the empire and
wanting to protect his relatives and the Church hierarchy in the Empire from from further beating or destructions of Churches and arrests of Orthodox Priests and clergy within the empire by the turks.

He further asked:
"Where are you staying?"

"Nowhere. I did not stop anywhere, but came straight here."

The kadi turned to the others in court and said,

"He is crazy. See if he recognized his own shoes."

Luka turned and immediately rushed to find his shoes and showed them
to the kadi and said,

"I am not crazy, as you say. Here are my shoes. I brought them in Constantinople."

The kadi said,
"I am sorry for you son.
If you do not listen to me,
you will suffer many torments, many of which
you have not even heard. So think well."

Luka replied:

"I have already though on all the torments which you
can inflict on me, and I have come. So, whatever you
plan to do to me, do it quickly, without delay, and be
assured that I am clean and blameless and I will not deny
my faith. I am an Orthodox Christian and I will die an
Orthodox Christian. I worship Christ and it is Christ
whom I desire. I confess him here where I once
denied Him in ignorance and I proclaim Him with true knowledge."

All-Bulgariasn-saints-Church-service-icon-Vsi_Bylgarski_svetii_sluzhba
All Bulgarian Saints icon, Christ in Glory surrounded by
Bulgarian saints – below Christ throne – Saint King Boris the Baptizer
and Saint Patriarch Euthimius, the monastery on the Bottom Rila Monastery
The first by importance and Largest Monastery in Bulgaria, Saint Loukas of Adreanopolis
is also commemorated on this date too

Neither the caresses and promises of the Muslims nor the threats of torture could shake the hard young man in his determination to die for Christ. The Turks beat him severely and threw him in prison, shackling his legs. At that time all the churches were praying for the martyr.
The Metropolitan of the island and the Elder Visarion managed beseech to send him to prison the Holy Mysteries of Christ for the last communion.
Finally, the judge saw Luke's unwavering firmness and sentenced him to death by hanging.
When the executioner hoped for the noose around his neck, he said,
"Confess Muhammad, our great prophet, and we will let you go!"

The Holy Martyr replied,

"I believe in my Lord Jesus Christ and I worship Him alone!"

St. Luke was hanged on March 23, 1802 at the age of 16.

The holy body of the martyr remained hanging on the gallows for three days, but during all this time it remained white and beautiful, emitting an unusual fragrance.
After three days, the Turks tied a large stone around his neck and his body was thrown into the depths of the sea, but instead of sinking, it remained with the stone on the water surface. When night came, the Christians found him on the shore and handed him over to the earth with due honors. The other clothes of the Venerable Martyr received healing power and by touching them the sick received healing.


Let by the Holy Prayers of Saint Luka of Odrin, God quickly grant all People worldwide more peace, love, hope, faith and wisdom that are so desperately needed today !

Text on the living of the saint  extracted from:
1.  Lives of the Saints. Ed. † Bishop Parthenius (Levkijski) of Lefkada, archim. Dr. Athanasius (Bonchev). Synodal Publishing House, Sofia, 1991
2. Witness for Christ: Orthodox Christian Neomartyrs of the Ottoman Period 1437 – 1860 by Nomikos Michael Vaporis p. 252-257


Monitoring chronyd time service is synchronized, get additional time server values with Zabbix userparameter script

Monday, March 21st, 2022

monitoring-chronyc-time-server-synchronization-zabbix-logo

If you''re running a server infrastructure and your main monitoring system is Zabbix. Then a vital check you might want to setup is to monitor the server time synchronization to a central server. In newer Linux OS-es ntpd time server is started to be used lesser and many modern Linux distributions used in the corporate realm are starting to recommend using chrony as a time synchronization client / server.

In this article, I'll show you how you can quickly setup monitoring of chronyd process and monitoring whether the time is successfully synchronizing with remote Chronyd time server. This will be done with a tiny one liner shell script setup as userparameter It is relatively easy then to setup an Action Alert


1. Create userparameter script to send parsed chronyd time synchronization to Zabbix Server

chronyc tracking provides plenty of useful data which can give many details about info such as offset, skew, root delay, stratum, update interval.

[root@server: ~]# chronyc tracking
Reference ID    : 0A32EF0B (fkf-intp01.intcs.meshcore.net)
Stratum         : 3
Ref time (UTC)  : Fri Mar 18 12:42:31 2022
System time     : 0.000032544 seconds fast of NTP time
Last offset     : +0.000031102 seconds
RMS offset      : 0.000039914 seconds
Frequency       : 3.037 ppm slow
Residual freq   : +0.000 ppm
Skew            : 0.023 ppm
Root delay      : 0.017352410 seconds
Root dispersion : 0.004285847 seconds
Update interval : 1041.6 seconds
Leap status     : Normal

[root@server zabbix_agentd.d]# cat userparameter_chrony.conf 
UserParameter=chrony.json,chronyc -c tracking | sed -e s/'^'/'{"chrony":[“‘/g -e s/’$’/'”]}'/g -e s/','/'","'/g
[root@server zabbix_agentd.d]#

The -c option passed to chronyc is printing the chronyc tracking command ouput data in comma-separated values ( CSV ) format.

2. Create Necessery Item key to get chronyd processes and catch the userparameter data


  • First lets create a an Item key to calculate the chronyd daemon proc.num
    proc.num – simply returns the number of processes in the process list just like a simple
    pgrep servicename command does.


monitroing-chronyc_zabbix_item_report_to-zabbix

Second lets create the Item for the userparameter script, the chrony.json key should be the same as the key given in the userparameter script.

obtain-chronyc-statistic-variables-from-remote-chronyd-to-zabbix-windows

Create Chrony Zabbix Triggers 
 

Expression 

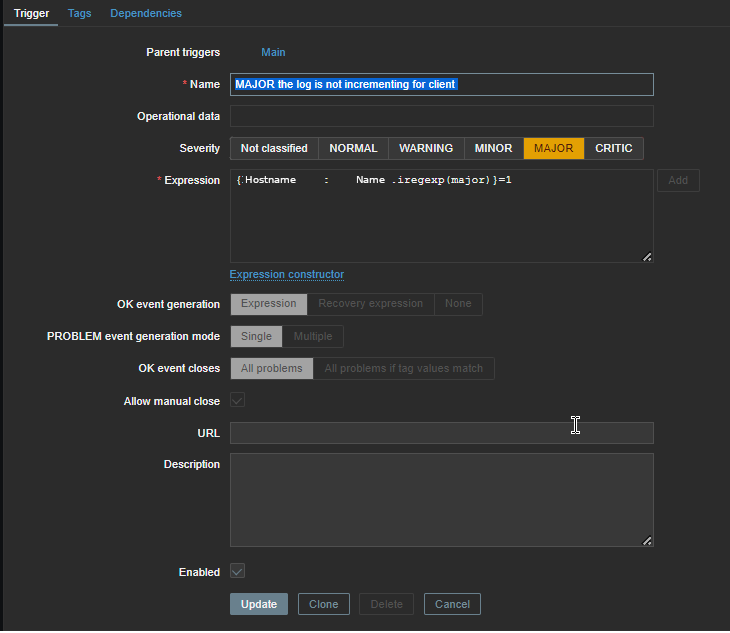
{server-host:proc.num[chronyd].last()}<1


will be triggered if the process of chronyd on the server is less than 1


chronyc_monitoring_process-is-not-running-screenshot

Next configure

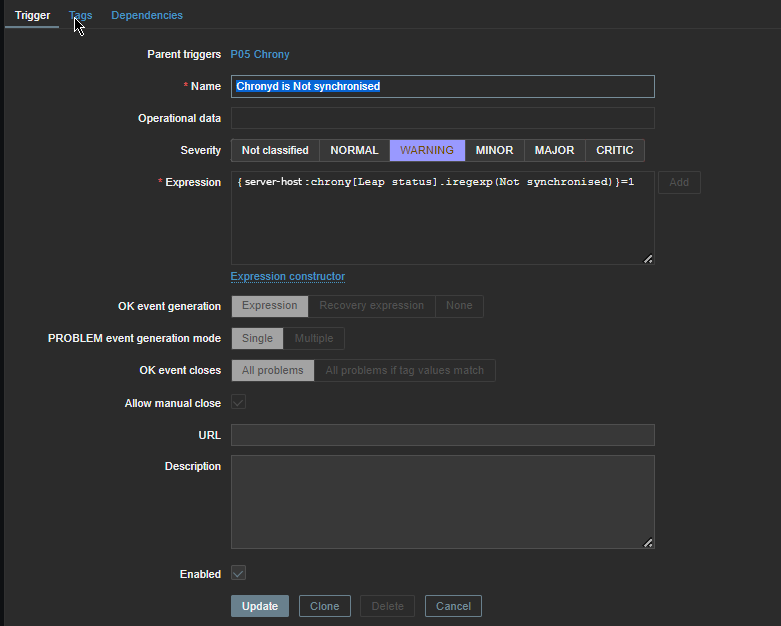
{server-host:chrony[Leap status].iregexp[Not synchronised) ]=1


to trigger Alert Chronyd is Not synchronized if the Expression check occurs.

chronyd-is-not-synchronized-trigger-iregexp

Reload the zabbix-agent on the server
 

To make zabbix-agent locally installed on the machine read the userparameter into memory  (in my case this is zabbix-agent-4.0.28-1.el8.x86_64) installed on Redhat 8.3 (Ootpa), you have to restart it.

[root@server: ~]# systemctl restart zabbix-agent
[root@server: ~]# systemctl status zabbix-agent

● zabbix-agent.service – Zabbix Agent
   Loaded: loaded (/usr/lib/systemd/system/zabbix-agent.service; enabled; vendor preset: disabled)
   Active: active (running) since Thu 2021-12-16 16:41:02 CET; 3 months 0 days ago
 Main PID: 862165 (zabbix_agentd)
    Tasks: 6 (limit: 23662)
   Memory: 20.6M
   CGroup: /system.slice/zabbix-agent.service
           ├─862165 /usr/sbin/zabbix_agentd -c /etc/zabbix/zabbix_agentd.conf
           ├─862166 /usr/sbin/zabbix_agentd: collector [idle 1 sec]
           ├─862167 /usr/sbin/zabbix_agentd: listener #1 [waiting for connection]
           ├─862168 /usr/sbin/zabbix_agentd: listener #2 [waiting for connection]
           ├─862169 /usr/sbin/zabbix_agentd: listener #3 [waiting for connection]
           └─862170 /usr/sbin/zabbix_agentd: active checks #1 [idle 1 sec]

Warning: Journal has been rotated since unit was started. Log output is incomplete or unavailable.


In a short while you should be seeing in the chrony.json key History data fed by the userparameter Script.

In Zabbix Latest data, you will see plenty of interesting time synchronization data get reported such as Skew, Stratum, Root Delay, Update Interval, Frequency etc.

chronyd-zabbix-reported-time-synchronization-offset-leap-residual-freq-root-delay-screenshot

To have an email Alerting further, go and setup a new Zabbix Action based on the Trigger with your likings and you're done. 
The tracked machine will be in zabbix to make sure your OS clock is not afar from the time server. Repeat the same steps if you need to track chronyd is up running and synchronized on few machines, or if you have to make it for dozens setup a Zabbix template.

Monitor service log is continously growing with Zabbix on Windows with batch userparameter script and trigger Alert if log is unchanged

Thursday, March 17th, 2022

monitor-if-log-file-is-growing-with-zabbix-zabbix-userparameter-script-howto

Recently we had an inteteresting Monitoring work task to achieve. We have an Application that is constantly simulating encrypted connections traffic to a remote side machine and sending specific data on TCP/IP ports.
Communiucation between App Server A -> App Server B should be continous and if all is working as expected App Server A messages output are logged in the Application log file on the machine which by the way Runs
Windows Server 2020.

Sometimes due to Network issues this constant reconnections from the Application S. A to the remote checked machine TCP/IP ports gets interrupted due to LAN issues or a burned Network Switch equipment, misconfiguration on the network due to some Network admin making stoopid stuff etc..

Thus it was important to Monitor somehow whether the log is growing or not and feed the output of whether Application log file is growing or it stuck to a Central Zabbix Server. 
To be able to better understand the task, lets divide the desired outcome in few parts on required:

1. Find The latest file inside a folder C:\Path-to-Service\Monitoring\Log\
2. Open the and check it is current logged records and log the time
3. Re-open file in a short while and check whether in few seconds new records are written
4. Report the status out to Zabbix
5. Make Zabbix Item / Trigger / Action in case if monitored file is not growing

In below article I'll briefly explain how Monitoring a Log on a Machine for growing was implemented using a pure good old WIN .BAT (.batch) script and Zabbix Userparameter key


1. Enable userparameter script for Local Zabbix-Agent on the Windows 10 Server Host


Edit Zabbix config file usually on Windows Zabbix installs file is named:

zabbix_agentd.win ]


Uncomment the following lines to enable userparameter support for zabbix-agentd:


# Include=c:\zabbix\zabbix_agentd.userparams.conf

Include=c:\zabbix\zabbix_agentd.conf.d\

# Include=c:\zabbix\zabbix_agentd.conf.d\*.conf


2. Create folders for userparameter script and for the userparameter.conf

Before creating userparameter you can to create the folder and grant permissions

Folder name under C:\Zabbix -> zabbix_agentd.conf.d

If you don't want to use Windows Explorer) but do it via cmd line:

C:\Users\LOGUser> mkdir \Zabbix\zabbix_agentd.conf\
C:\User\LOGUser> mkdir \Zabbix\zabbix_scripts\


3. Create Userparameter with some name file ( Userparameter-Monitor-Grow.conf )

In the directory C:\Zabbix\zabbix_agentd.conf.d you should create a config file like:
Userparameter-Monitor-Grow.conf and in it you should have a standard userparameter key and script so file content is:

UserParameter=service.check,C:\Zabbix\zabbix_scripts\GROW_LOG_MONITOR-USERPARAMETER.BAT


4. Create the Batch script that will read the latest file in the service log folder and will periodically check and report to zabbix that file is changing

notepad C:\Zabbix\zabbix_scripts\GROW_LOG_MONITOR-USERPARAMETER.BAT

REM "SCRIPT MONITOR IF FILE IS GROWING OR NOT"
@echo off

set work_dir=C:\Path-to-Service\Monitoring\Log\

set client=client Name

set YYYYMMDD=%DATE:~10,4%%DATE:~4,2%%DATE:~7,2%

set name=csv%YYYYMMDD%.csv

set mytime=%TIME:~0,8%

for %%I in (..) do set CurrDirName=%%~nxI


setlocal EnableDelayedExpansion

set "line1=findstr /R /N "^^" %work_dir%\output.csv | find /C ":""


for /f %%a in ('!line1!') do set number1=%%a

set "line2=findstr /R /N "^^" %work_dir%\%name% | find /C ":""


for /f %%a in ('!line2!') do set number2=%%a


IF  %number1% == %number2% (

echo %YYYYMMDD% %mytime% MAJOR the log is not incrementing for %client%

echo %YYYYMMDD% %mytime% MAJOR the log is not incrementing for %client% >> monitor-grow_err.log

) ELSE (

echo %YYYYMMDD% %mytime% NORMAL the log is incrementing for %client%

SETLOCAL DisableDelayedExpansion

del %work_dir%\output.csv

FOR /F "usebackq delims=" %%a in (`"findstr /n ^^ %work_dir%\%name%"`) do (

    set "var=%%a"

    SETLOCAL EnableDelayedExpansion

    set "var=!var:*:=!"

    echo(!var! >> %work_dir%\output.csv

    ENDLOCAL

)

)


To download GROW_LOG_MONITOR-USERPARAMETER.BAT click here.
The script needs to have configured the path to directory containing multiple logs produced by the Monitored Application.
As prior said it will, list the latest created file based on DATE timestamp in the folder will output a simple messages:

If the log file is being fed with data the script will output to output.csv messages continuously, either:

%%mytime%% NORMAL the log is incrementing for %%client%%

Or if the Monitored application log is not writting anything for a period it will start writting messages

%%mytime%%mytime MAJOR the log is not incrementing for %client%

The messages will also be sent in Zabbix.

Before saving the script make sure you modify the Full Path location to the Monitored file for growing, i.e.:

set work_dir=C:\Path-to-Service\Monitoring\Log\


5. Create The Zabbix Item

Set whatever service.check name you would like and a check interval to fetch the info from the userparameter (if you're dealing with very large log files produced by Monitored log of application, then 10 minutes might be too frequent, in most cases 10 minutes should be fine)
monitor-if-log-grows-windows-zabbix-item-service-check-screenshot
 

6. Create Zabbix Trigger


You will need a Trigger something similar to below:

Now considering that zabbix server receives correctly data from the client and the monitored log is growing you should in Zabbix:

%%mytime%% NORMAL the log is incrementing for %%client%%


7. Lastly create an Action to send Email Alert if log is not growing

Create Linux High Availability Load Balancer Cluster with Keepalived and Haproxy on Linux

Tuesday, March 15th, 2022

keepalived-logo-linux

Configuring a Linux HA (High Availibiltiy) for an Application with Haproxy is already used across many Websites on the Internet and serious corporations that has a crucial infrastructure has long time
adopted and used keepalived to provide High Availability Application level Clustering.
Usually companies choose to use HA Clusters with Haproxy with Pacemaker and Corosync cluster tools.
However one common used alternative solution if you don't have the oportunity to bring up a High availability cluster with Pacemaker / Corosync / pcs (Pacemaker Configuration System) due to fact machines you need to configure the cluster on are not Physical but VMWare Virtual Machines which couldn't not have configured a separate Admin Lans and Heartbeat Lan as we usually do on a Pacemaker Cluster due to the fact the 5 Ethernet LAN Card Interfaces of the VMWare Hypervisor hosts are configured as a BOND (e.g. all the incoming traffic to the VMWare vSphere  HV is received on one Virtual Bond interface).

I assume you have 2 separate vSphere Hypervisor Physical Machines in separate Racks and separate switches hosting the two VMs.
For the article, I'll call the two brand new brought Virtual Machines with some installation automation software such as Terraform or Ansible – vm-server1 and vm-server2 which would have configured some recent version of Linux.

In that scenario to have a High Avaiability for the VMs on Application level and assure at least one of the two is available at a time if one gets broken due toe malfunction of the HV, a Network connectivity issue, or because the VM OS has crashed.
Then one relatively easily solution is to use keepalived and configurea single High Availability Virtual IP (VIP) Address, i.e. 10.10.10.1, which would float among two VMs using keepalived so at a time at least one of the two VMs would be reachable on the Network.
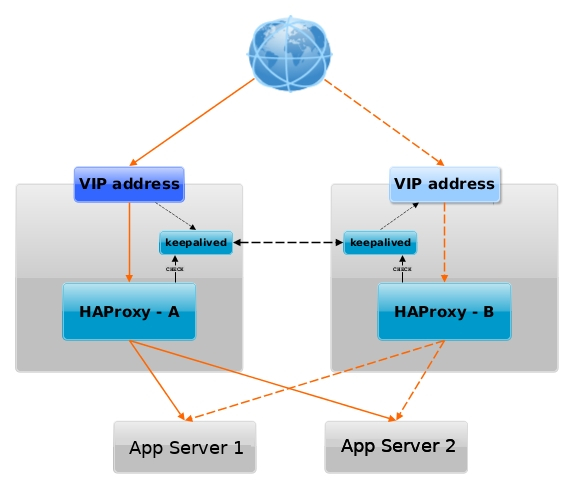
haproxy_keepalived-vip-ip-diagram-linux

Having a VIP IP is quite a common solution in corporate world, as it makes it pretty easy to add F5 Load Balancer in front of the keepalived cluster setup to have a 3 Level of security isolation, which usually consists of:

1. Physical (access to the hardware or Virtualization hosts)
2. System Access (The mechanism to access the system login credetials users / passes, proxies, entry servers leading to DMZ-ed network)
3. Application Level (access to different programs behind L2 and data based on the specific identity of the individual user,
special Secondary UserID,  Factor authentication, biometrics etc.)


1. Install keepalived and haproxy on machines

Depending on the type of Linux OS:

On both machines
 

[root@server1:~]# yum install -y keepalived haproxy

If you have to install keepalived / haproxy on Debian / Ubuntu and other Deb based Linux distros

[root@server1:~]# apt install keepalived haproxy –yes

2. Configure haproxy (haproxy.cfg) on both server1 and server2


Create some /etc/haproxy/haproxy.cfg configuration


[root@server1:~]vim /etc/haproxy/haproxy.cfg

#———————————————————————
# Global settings
#———————————————————————
global
    log          127.0.0.1 local6 debug
    chroot       /var/lib/haproxy
    pidfile      /run/haproxy.pid
    stats socket /var/lib/haproxy/haproxy.sock mode 0600 level admin 
    maxconn      4000
    user         haproxy
    group        haproxy
    daemon
    #debug
    #quiet

#———————————————————————
# common defaults that all the 'listen' and 'backend' sections will
# use if not designated in their block
#———————————————————————
defaults
    mode        tcp
    log         global
#    option      dontlognull
#    option      httpclose
#    option      httplog
#    option      forwardfor
    option      redispatch
    option      log-health-checks
    timeout connect 10000 # default 10 second time out if a backend is not found
    timeout client 300000
    timeout server 300000
    maxconn     60000
    retries     3

#———————————————————————
# round robin balancing between the various backends
#———————————————————————

listen FRONTEND_APPNAME1
        bind 10.10.10.1:15000
        mode tcp
        option tcplog
#        #log global
        log-format [%t]\ %ci:%cp\ %bi:%bp\ %b/%s:%sp\ %Tw/%Tc/%Tt\ %B\ %ts\ %ac/%fc/%bc/%sc/%rc\ %sq/%bq
        balance roundrobin
        timeout client 350000
        timeout server 350000
        timeout connect 35000
        server app-server1 10.10.10.55:30000 weight 1 check port 68888
        server app-server2 10.10.10.55:30000 weight 2 check port 68888

listen FRONTEND_APPNAME2
        bind 10.10.10.1:15000
        mode tcp
        option tcplog
        #log global
        log-format [%t]\ %ci:%cp\ %bi:%bp\ %b/%s:%sp\ %Tw/%Tc/%Tt\ %B\ %ts\ %ac/%fc/%bc/%sc/%rc\ %sq/%bq
        balance roundrobin
        timeout client 350000
        timeout server 350000
        timeout connect 35000
        server app-server1 10.10.10.55:30000 weight 5
        server app-server2 10.10.10.55:30000 weight 5 


You can get a copy of above haproxy.cfg configuration here.
Once configured roll it on.

[root@server1:~]#  systemctl start haproxy
 
[root@server1:~]# ps -ef|grep -i hapro
root      285047       1  0 Mar07 ?        00:00:00 /usr/sbin/haproxy -Ws -f /etc/haproxy/haproxy.cfg -p /run/haproxy.pid
haproxy   285050  285047  0 Mar07 ?        00:00:26 /usr/sbin/haproxy -Ws -f /etc/haproxy/haproxy.cfg -p /run/haproxy.pid

Bring up the haproxy also on server2 machine, by placing same configuration and starting up the proxy.
 

[root@server1:~]vim /etc/haproxy/haproxy.cfg


3. Configure keepalived on both servers

We'll be configuring 2 nodes with keepalived even though if necessery this can be easily extended and you can add more nodes.
First we make a copy of the original or existing server configuration keepalived.conf (just in case we need it later on or if you already had something other configured manually by someone – that could be so on inherited servers by other sysadmin)
 

[root@server1:~]# mv /etc/keepalived/keepalived.conf /etc/keepalived/keepalived.conf.orig
[root@server2:~]# mv /etc/keepalived/keepalived.conf /etc/keepalived/keepalived.conf.orig

a. Configure keepalived to serve as a MASTER Node


[root@server1:~]# vim /etc/keepalived/keepalived.conf

Master Node
global_defs {
  router_id server1-fqdn # The hostname of this host.
  
  enable_script_security
  # Synchro of the state of the connections between the LBs on the eth0 interface
   lvs_sync_daemon eth0
 
notification_email {
        linuxadmin@notify-domain.com     # Email address for notifications 
    }
 notification_email_from keepalived@server1-fqdn        # The from address for the notifications
    smtp_server 127.0.0.1                       # SMTP server address
    smtp_connect_timeout 15
}

vrrp_script haproxy {
  script "killall -0 haproxy"
  interval 2
  weight 2
  user root
}

vrrp_instance LB_VIP_QA {
  virtual_router_id 50
  advert_int 1
  priority 51

  state MASTER
  interface eth0
  smtp_alert          # Enable Notifications Via Email
  
  authentication {
              auth_type PASS
              auth_pass testp141

    }
### Commented because running on VM on VMWare
##    unicast_src_ip 10.44.192.134 # Private IP address of master
##    unicast_peer {
##        10.44.192.135           # Private IP address of the backup haproxy
##   }

#        }
# master node with higher priority preferred node for Virtual IP if both keepalived up
###  priority 51
###  state MASTER
###  interface eth0
  virtual_ipaddress {
     10.10.10.1 dev eth0 # The virtual IP address that will be shared between MASTER and BACKUP
  }
  track_script {
      haproxy
  }
}


 To dowload a copy of the Master keepalived.conf configuration click here

Below are few interesting configuration variables, worthy to mention few words on, most of them are obvious by their names but for more clarity I'll also give a list here with short description of each:


  • vrrp_instance – defines an individual instance of the VRRP protocol running on an interface.
  • state – defines the initial state that the instance should start in (i.e. MASTER / SLAVE )state –
  • interface – defines the interface that VRRP runs on.
  • virtual_router_id – should be unique value per Keepalived Node (otherwise slave master won't function properly)
  • priority – the advertised priority, the higher the priority the more important the respective configured keepalived node is.
  • advert_int – specifies the frequency that advertisements are sent at (1 second, in this case).
  • authentication – specifies the information necessary for servers participating in VRRP to authenticate with each other. In this case, a simple password is defined.
    only the first eight (8) characters will be used as described in  to note is Important thing
    man keepalived.conf – keepalived.conf variables documentation !!! Nota Bene !!! – Password set on each node should match for nodes to be able to authenticate !
  • virtual_ipaddress – defines the IP addresses (there can be multiple) that VRRP is responsible for.
  • notification_email – the notification email to which Alerts will be send in case if keepalived on 1 node is stopped (e.g. the MASTER node switches from host 1 to 2)
  • notification_email_from – email address sender from where email will originte
    ! NB ! In order for notification_email to be working you need to have configured MTA or Mail Relay (set to local MTA) to another SMTP – e.g. have configured something like Postfix, Qmail or Postfix

b. Configure keepalived to serve as a SLAVE Node

[root@server1:~]vim /etc/keepalived/keepalived.conf
 

#Slave keepalived
global_defs {
  router_id server2-fqdn # The hostname of this host!

  enable_script_security
  # Synchro of the state of the connections between the LBs on the eth0 interface
  lvs_sync_daemon eth0
 
notification_email {
        linuxadmin@notify-host.com     # Email address for notifications
    }
 notification_email_from keepalived@server2-fqdn        # The from address for the notifications
    smtp_server 127.0.0.1                       # SMTP server address
    smtp_connect_timeout 15
}

vrrp_script haproxy {
  script "killall -0 haproxy"
  interval 2
  weight 2
  user root
}

vrrp_instance LB_VIP_QA {
  virtual_router_id 50
  advert_int 1
  priority 50

  state BACKUP
  interface eth0
  smtp_alert          # Enable Notifications Via Email

authentication {
              auth_type PASS
              auth_pass testp141
}
### Commented because running on VM on VMWare    
##    unicast_src_ip 10.10.192.135 # Private IP address of master
##    unicast_peer {
##        10.10.192.134         # Private IP address of the backup haproxy
##   }

###  priority 50
###  state BACKUP
###  interface eth0
  virtual_ipaddress {
     10.10.10.1 dev eth0 # The virtual IP address that will be shared betwee MASTER and BACKUP.
  }
  track_script {
    haproxy
  }
}


Download the keepalived.conf slave config here


c. Set required sysctl parameters for haproxy to work as expected
 

[root@server1:~]vim /etc/sysctl.conf
#Haproxy config
# haproxy
net.core.somaxconn=65535
net.ipv4.ip_local_port_range = 1024 65000
net.ipv4.ip_nonlocal_bind = 1
net.ipv4.tcp_tw_reuse = 1
net.ipv4.tcp_max_syn_backlog = 10240
net.ipv4.tcp_max_tw_buckets = 400000
net.ipv4.tcp_max_orphans = 60000
net.ipv4.tcp_synack_retries = 3

4. Test Keepalived keepalived.conf configuration syntax is OK


[root@server1:~]keepalived –config-test
(/etc/keepalived/keepalived.conf: Line 7) Unknown keyword 'lvs_sync_daemon_interface'
(/etc/keepalived/keepalived.conf: Line 21) Unable to set default user for vrrp script haproxy – removing
(/etc/keepalived/keepalived.conf: Line 31) (LB_VIP_QA) Specifying lvs_sync_daemon_interface against a vrrp is deprecated.
(/etc/keepalived/keepalived.conf: Line 31)              Please use global lvs_sync_daemon
(/etc/keepalived/keepalived.conf: Line 35) Truncating auth_pass to 8 characters
(/etc/keepalived/keepalived.conf: Line 50) (LB_VIP_QA) track script haproxy not found, ignoring…

I've experienced this error because first time I've configured keepalived, I did not mention the user with which the vrrp script haproxy should run,
in prior versions of keepalived, leaving the field empty did automatically assumed you have the user with which the vrrp script runs to be set to root
as of RHELs keepalived-2.1.5-6.el8.x86_64, i've been using however this is no longer so and thus in prior configuration as you can see I've
set the user in respective section to root.
The error Unknown keyword 'lvs_sync_daemon_interface'
is also easily fixable by just substituting the lvs_sync_daemon_interface and lvs_sync_daemon and reloading
keepalived etc.

Once keepalived is started and you can see the process on both machines running in process list.

[root@server1:~]ps -ef |grep -i keepalived
root     1190884       1  0 18:50 ?        00:00:00 /usr/sbin/keepalived -D
root     1190885 1190884  0 18:50 ?        00:00:00 /usr/sbin/keepalived -D

Next step is to check the keepalived statuses as well as /var/log/keepalived.log

If everything is configured as expected on both keepalived on first node you should see one is master and one is slave either in the status or the log

[root@server1:~]#systemctl restart keepalived


[root@server1:~]systemctl status keepalived|grep -i state
Mar 14 18:59:02 server1-fqdn Keepalived_vrrp[1192003]: (LB_VIP_QA) Entering MASTER STATE

[root@server1:~]systemctl status keepalived

● keepalived.service – LVS and VRRP High Availability Monitor
   Loaded: loaded (/usr/lib/systemd/system/keepalived.service; enabled; vendor preset: disabled)
   Active: inactive (dead) since Mon 2022-03-14 18:15:51 CET; 32min ago
  Process: 1187587 ExecStart=/usr/sbin/keepalived $KEEPALIVED_OPTIONS (code=exited, status=0/SUCCESS)
 Main PID: 1187589 (code=exited, status=0/SUCCESS)

Mar 14 18:15:04 server1lb-fqdn Keepalived_vrrp[1187590]: Sending gratuitous ARP on eth0 for 10.44.192.142
Mar 14 18:15:50 server1lb-fqdn systemd[1]: Stopping LVS and VRRP High Availability Monitor…
Mar 14 18:15:50 server1lb-fqdn Keepalived[1187589]: Stopping
Mar 14 18:15:50 server1lb-fqdn Keepalived_vrrp[1187590]: (LB_VIP_QA) sent 0 priority
Mar 14 18:15:50 server1lb-fqdn Keepalived_vrrp[1187590]: (LB_VIP_QA) removing VIPs.
Mar 14 18:15:51 server1lb-fqdn Keepalived_vrrp[1187590]: Stopped – used 0.002007 user time, 0.016303 system time
Mar 14 18:15:51 server1lb-fqdn Keepalived[1187589]: CPU usage (self/children) user: 0.000000/0.038715 system: 0.001061/0.166434
Mar 14 18:15:51 server1lb-fqdn Keepalived[1187589]: Stopped Keepalived v2.1.5 (07/13,2020)
Mar 14 18:15:51 server1lb-fqdn systemd[1]: keepalived.service: Succeeded.
Mar 14 18:15:51 server1lb-fqdn systemd[1]: Stopped LVS and VRRP High Availability Monitor

[root@server2:~]systemctl status keepalived|grep -i state
Mar 14 18:59:02 server2-fqdn Keepalived_vrrp[297368]: (LB_VIP_QA) Entering BACKUP STATE

[root@server1:~]# grep -i state /var/log/keepalived.log
Mar 14 18:59:02 server1lb-fqdn Keepalived_vrrp[297368]: (LB_VIP_QA) Entering MASTER STATE
 

a. Fix Keepalived SECURITY VIOLATION – scripts are being executed but script_security not enabled.
 

When configurating keepalived for a first time we have faced the following strange error inside keepalived status inside keepalived.log 
 

Feb 23 14:28:41 server1 Keepalived_vrrp[945478]: SECURITY VIOLATION – scripts are being executed but script_security not enabled.


To fix keepalived SECURITY VIOLATION error:

Add to /etc/keepalived/keepalived.conf on the keepalived node hosts
inside 

global_defs {}

After chunk
 

enable_script_security

include

# Synchro of the state of the connections between the LBs on the eth0 interface
  lvs_sync_daemon_interface eth0


5. Prepare rsyslog configuration and Inlcude additional keepalived options
to force keepalived log into /var/log/keepalived.log

To force keepalived log into /var/log/keepalived.log on RHEL 8 / CentOS and other Redhat Package Manager (RPM) Linux distributions

[root@server1:~]# vim /etc/rsyslog.d/48_keepalived.conf

#2022/02/02: HAProxy logs to local6, save the messages
local7.*                                                /var/log/keepalived.log
if ($programname == 'Keepalived') then -/var/log/keepalived.log
if ($programname == 'Keepalived_vrrp') then -/var/log/keepalived.log
& stop

[root@server:~]# touch /var/log/keepalived.log

Reload rsyslog to load new config
 

[root@server:~]# systemctl restart rsyslog
[root@server:~]# systemctl status rsyslog


rsyslog.service – System Logging Service
   Loaded: loaded (/usr/lib/systemd/system/rsyslog.service; enabled; vendor preset: enabled)
  Drop-In: /etc/systemd/system/rsyslog.service.d
           └─rsyslog-service.conf
   Active: active (running) since Mon 2022-03-07 13:34:38 CET; 1 weeks 0 days ago
     Docs: man:rsyslogd(8)

           https://www.rsyslog.com/doc/
 Main PID: 269574 (rsyslogd)
    Tasks: 6 (limit: 100914)
   Memory: 5.1M
   CGroup: /system.slice/rsyslog.service
           └─269574 /usr/sbin/rsyslogd -n

Mar 15 08:15:16 server1lb-fqdn rsyslogd[269574]: — MARK —
Mar 15 08:35:16 server1lb-fqdn rsyslogd[269574]: — MARK —
Mar 15 08:55:16 server1lb-fqdn rsyslogd[269574]: — MARK —


If once keepalived is loaded but you still have no log written inside /var/log/keepalived.log

[root@server1:~]# vim /etc/sysconfig/keepalived
 KEEPALIVED_OPTIONS="-D -S 7"

[root@server2:~]# vim /etc/sysconfig/keepalived
 KEEPALIVED_OPTIONS="-D -S 7"

[root@server1:~]# systemctl restart keepalived.service
[root@server1:~]#  systemctl status keepalived

● keepalived.service – LVS and VRRP High Availability Monitor
   Loaded: loaded (/usr/lib/systemd/system/keepalived.service; enabled; vendor preset: disabled)
   Active: active (running) since Thu 2022-02-24 12:12:20 CET; 2 weeks 4 days ago
 Main PID: 1030501 (keepalived)
    Tasks: 2 (limit: 100914)
   Memory: 1.8M
   CGroup: /system.slice/keepalived.service
           ├─1030501 /usr/sbin/keepalived -D
           └─1030502 /usr/sbin/keepalived -D

Warning: Journal has been rotated since unit was started. Log output is incomplete or unavailable.

[root@server2:~]# systemctl restart keepalived.service
[root@server2:~]# systemctl status keepalived

6. Monitoring VRRP traffic of the two keepaliveds with tcpdump
 

Once both keepalived are up and running a good thing is to check the VRRP protocol traffic keeps fluently on both machines.
Keepalived VRRP keeps communicating over the TCP / IP Port 112 thus you can simply snoop TCP tracffic on its protocol.
 

[root@server1:~]# tcpdump proto 112

tcpdump: verbose output suppressed, use -v or -vv for full protocol decode
listening on eth0, link-type EN10MB (Ethernet), capture size 262144 bytes
11:08:07.356187 IP server1lb-fqdn > vrrp.mcast.net: VRRPv2, Advertisement, vrid 50, prio 53, authtype simple, intvl 1s, length 20
11:08:08.356297 IP server1lb-fqdn > vrrp.mcast.net: VRRPv2, Advertisement, vrid 50, prio 53, authtype simple, intvl 1s, length 20
11:08:09.356408 IP server1lb-fqdn > vrrp.mcast.net: VRRPv2, Advertisement, vrid 50, prio 53, authtype simple, intvl 1s, length 20
11:08:10.356511 IP server1lb-fqdn > vrrp.mcast.net: VRRPv2, Advertisement, vrid 50, prio 53, authtype simple, intvl 1s, length 20
11:08:11.356655 IP server1lb-fqdn > vrrp.mcast.net: VRRPv2, Advertisement, vrid 50, prio 53, authtype simple, intvl 1s, length 20

[root@server2:~]# tcpdump proto 112

tcpdump: verbose output suppressed, use -v or -vv for full protocol decode
​listening on eth0, link-type EN10MB (Ethernet), capture size 262144 bytes
11:08:07.356187 IP server1lb-fqdn > vrrp.mcast.net: VRRPv2, Advertisement, vrid 50, prio 53, authtype simple, intvl 1s, length 20
11:08:08.356297 IP server1lb-fqdn > vrrp.mcast.net: VRRPv2, Advertisement, vrid 50, prio 53, authtype simple, intvl 1s, length 20
11:08:09.356408 IP server1lb-fqdn > vrrp.mcast.net: VRRPv2, Advertisement, vrid 50, prio 53, authtype simple, intvl 1s, length 20
11:08:10.356511 IP server1lb-fqdn > vrrp.mcast.net: VRRPv2, Advertisement, vrid 50, prio 53, authtype simple, intvl 1s, length 20
11:08:11.356655 IP server1lb-fqdn > vrrp.mcast.net: VRRPv2, Advertisement, vrid 50, prio 53, authtype simple, intvl 1s, length 20

As you can see the VRRP traffic on the network is originating only from server1lb-fqdn, this is so because host server1lb-fqdn is the keepalived configured master node.

It is possible to spoof the password configured to authenticate between two nodes, thus if you're bringing up keepalived service cluster make sure your security is tight at best the machines should be in a special local LAN DMZ, do not configure DMZ on the internet !!! 🙂 Or if you eventually decide to configure keepalived in between remote hosts, make sure you somehow use encrypted VPN or SSH tunnels to tunnel the VRRP traffic.

[root@server1:~]tcpdump proto 112 -vv
tcpdump: listening on eth0, link-type EN10MB (Ethernet), capture size 262144 bytes
11:36:25.530772 IP (tos 0xc0, ttl 255, id 59838, offset 0, flags [none], proto VRRP (112), length 40)
    server1lb-fqdn > vrrp.mcast.net: vrrp server1lb-fqdn > vrrp.mcast.net: VRRPv2, Advertisement, vrid 50, prio 53, authtype simple, intvl 1s, length 20, addrs: VIPIP_QA auth "testp431"
11:36:26.530874 IP (tos 0xc0, ttl 255, id 59839, offset 0, flags [none], proto VRRP (112), length 40)
    server1lb-fqdn > vrrp.mcast.net: vrrp server1lb-fqdn > vrrp.mcast.net: VRRPv2, Advertisement, vrid 50, prio 53, authtype simple, intvl 1s, length 20, addrs: VIPIP_QA auth "testp431"

Lets also check what floating IP is configured on the machines:

[root@server1:~]# ip -brief address show
lo               UNKNOWN        127.0.0.1/8 
eth0             UP             10.10.10.5/26 10.10.10.1/32 

The 10.10.10.5 IP is the main IP set on LAN interface eth0, 10.10.10.1 is the floating IP which as you can see is currently set by keepalived to listen on first node.

[root@server2:~]# ip -brief address show |grep -i 10.10.10.1

An empty output is returned as floating IP is currently configured on server1

To double assure ourselves the IP is assigned on correct machine, lets ping it and check the IP assigned MAC  currently belongs to which machine.
 

[root@server2:~]# ping 10.10.10.1
PING 10.10.10.1 (10.10.10.1) 56(84) bytes of data.
64 bytes from 10.10.10.1: icmp_seq=1 ttl=64 time=0.526 ms
^C
— 10.10.10.1 ping statistics —
1 packets transmitted, 1 received, 0% packet loss, time 0ms
rtt min/avg/max/mdev = 0.526/0.526/0.526/0.000 ms

[root@server2:~]# arp -an |grep -i 10.44.192.142
? (10.10.10.1) at 00:48:54:91:83:7d [ether] on eth0
[root@server2:~]# ip a s|grep -i 00:48:54:91:83:7d
[root@server2:~]# 

As you can see from below output MAC is not found in configured IPs on server2.
 

[root@server1-fqdn:~]# /sbin/ip a s|grep -i 00:48:54:91:83:7d -B1 -A1
 eth0: <BROADCAST,MULTICAST,UP,LOWER_UP> mtu 1500 qdisc mq state UP group default qlen 1000
    link/ether 00:48:54:91:83:7d brd ff:ff:ff:ff:ff:ff
inet 10.10.10.1/26 brd 10.10.1.191 scope global noprefixroute eth0

Pretty much expected MAC is on keepalived node server1.


7. Testing keepalived on server1 and server2 maachines VIP floating IP really works
 

To test the overall configuration just created, you should stop keeaplived on the Master node and in meantime keep an eye on Slave node (server2), whether it can figure out the Master node is gone and switch its
state BACKUP to save MASTER. By changing the secondary (Slave) keepalived to master the floating IP: 10.10.10.1 will be brought up by the scripts on server2.

Lets assume that something went wrong with server1 VM host, for example the machine crashed due to service overload, DDoS or simply a kernel bug or whatever reason.
To simulate that we simply have to stop keepalived, then the broadcasted information on VRRP TCP/IP proto port 112 will be no longer available and keepalived on node server2, once
unable to communicate to server1 should chnage itself to state MASTER.

[root@server1:~]# systemctl stop keepalived
[root@server1:~]# systemctl status keepalived

● keepalived.service – LVS and VRRP High Availability Monitor
   Loaded: loaded (/usr/lib/systemd/system/keepalived.service; enabled; vendor preset: disabled)
   Active: inactive (dead) since Tue 2022-03-15 12:11:33 CET; 3s ago
  Process: 1192001 ExecStart=/usr/sbin/keepalived $KEEPALIVED_OPTIONS (code=exited, status=0/SUCCESS)
 Main PID: 1192002 (code=exited, status=0/SUCCESS)

Mar 14 18:59:07 server1lb-fqdn Keepalived_vrrp[1192003]: Sending gratuitous ARP on eth0 for 10.10.10.1
Mar 15 12:11:32 server1lb-fqdn systemd[1]: Stopping LVS and VRRP High Availability Monitor…
Mar 15 12:11:32 server1lb-fqdn Keepalived[1192002]: Stopping
Mar 15 12:11:32 server1lb-fqdn Keepalived_vrrp[1192003]: (LB_VIP_QA) sent 0 priority
Mar 15 12:11:32 server1lb-fqdn Keepalived_vrrp[1192003]: (LB_VIP_QA) removing VIPs.
Mar 15 12:11:33 server1lb-fqdn Keepalived_vrrp[1192003]: Stopped – used 2.145252 user time, 15.513454 system time
Mar 15 12:11:33 server1lb-fqdn Keepalived[1192002]: CPU usage (self/children) user: 0.000000/44.555362 system: 0.001151/170.118126
Mar 15 12:11:33 server1lb-fqdn Keepalived[1192002]: Stopped Keepalived v2.1.5 (07/13,2020)
Mar 15 12:11:33 server1lb-fqdn systemd[1]: keepalived.service: Succeeded.
Mar 15 12:11:33 server1lb-fqdn systemd[1]: Stopped LVS and VRRP High Availability Monitor.


On keepalived off, you will get also a notification Email on the Receipt Email configured from keepalived.conf from the working keepalived node with a simple message like:

=> VRRP Instance is no longer owning VRRP VIPs <=

Once keepalived is back up you will get another notification like:

=> VRRP Instance is now owning VRRP VIPs <=

[root@server2:~]# systemctl status keepalived
● keepalived.service – LVS and VRRP High Availability Monitor
   Loaded: loaded (/usr/lib/systemd/system/keepalived.service; enabled; vendor preset: disabled)
   Active: active (running) since Mon 2022-03-14 18:13:52 CET; 17h ago
  Process: 297366 ExecStart=/usr/sbin/keepalived $KEEPALIVED_OPTIONS (code=exited, status=0/SUCCESS)
 Main PID: 297367 (keepalived)
    Tasks: 2 (limit: 100914)
   Memory: 2.1M
   CGroup: /system.slice/keepalived.service
           ├─297367 /usr/sbin/keepalived -D -S 7
           └─297368 /usr/sbin/keepalived -D -S 7

Mar 15 12:11:33 server2lb-fqdn Keepalived_vrrp[297368]: Sending gratuitous ARP on eth0 for 10.10.10.1
Mar 15 12:11:33 server2lb-fqdn Keepalived_vrrp[297368]: Remote SMTP server [127.0.0.1]:25 connected.
Mar 15 12:11:33 server2lb-fqdn Keepalived_vrrp[297368]: SMTP alert successfully sent.
Mar 15 12:11:38 server2lb-fqdn Keepalived_vrrp[297368]: (LB_VIP_QA) Sending/queueing gratuitous ARPs on eth0 for 10.10.10.1
Mar 15 12:11:38 server2lb-fqdn Keepalived_vrrp[297368]: Sending gratuitous ARP on eth0 for 10.10.10.1

[root@server2:~]#  ip addr show|grep -i 10.10.10.1
    inet 10.10.10.1/32 scope global eth0
    

As you see the VIP is now set on server2, just like expected – that's OK, everything works as expected. If the IP did not move double check the keepalived.conf on both nodes for errors or misconfigurations.

To recover the initial order of things so server1 is MASTER and server2 SLAVE host, we just have to switch on the keepalived on server1 machine.

[root@server1:~]# systemctl start keepalived

The automatic change of server1 to MASTER node and respective move of the VIP IP is done because of the higher priority (of importance we previously configured on server1 in keepalived.conf).
 

What we learned?
 

So what we learned in  this article?
We have seen how to easily install and configure a High Availability Load balancer with Keepalived with single floating VIP IP address with 1 MASTER and 1 SLAVE host and a Haproxy example config with few frontends / App backends. We have seen how the config can be tested for potential errors and how we can monitor whether the VRRP2 network traffic flows between nodes and how to potentially debug it further if necessery.
Further on rawly explained some of the keepalived configurations but as keepalived can do pretty much more,for anyone seriously willing to deal with keepalived on a daily basis or just fine tune some already existing ones, you better read closely its manual page "man keepalived.conf" as well as the official Redhat Linux documentation page on setting up a Linux cluster with Keepalived (Be prepare for a small nightmare as the documentation of it seems to be a bit chaotic, and even I would say partly missing or opening questions on what does the developers did meant – not strange considering the havoc that is pretty much as everywhere these days.)

Finally once keepalived hosts are prepared, it was shown how to test the keepalived application cluster and Floating IP does move between nodes in case if one of the 2 keepalived nodes is inaccessible.

The same logic can be repeated multiple times and if necessery you can set multiple VIPs to expand the HA reachable IPs solution.
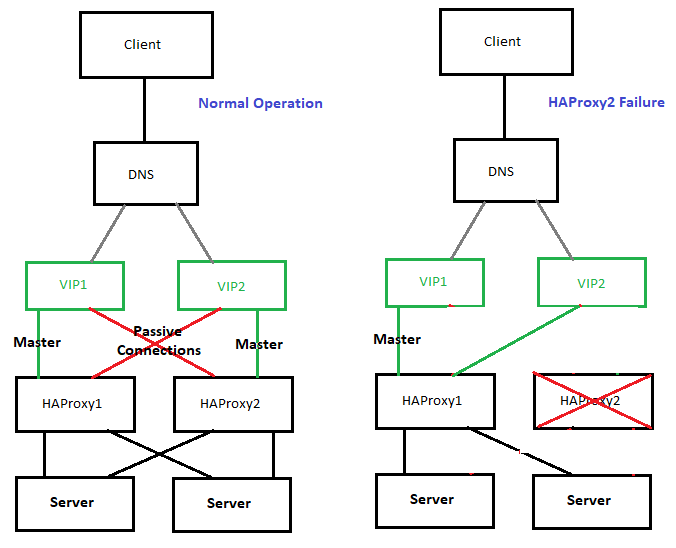
high-availability-with-two-vips-example-diagram

The presented idea is with haproxy forward Proxy server to proxy requests towards Application backend (servince machines), however if you need to set another set of server on the flow to  process HTML / XHTML / PHP / Perl / Python  programming code, with some common Webserver setup ( Nginx / Apache / Tomcat / JBOSS) and enable SSL Secure certificate with lets say Letsencrypt, this can be relatively easily done. If you want to implement letsencrypt and a webserver check this redundant SSL Load Balancing with haproxy & keepalived article.

That's all folks, hope you enjoyed.
If you need to configure keepalived Cluster or a consultancy write your query here 🙂

In Praise of Holy 40 Martyrs of Sebaste – a medieval work by Saint Clement of Ohrid (The Wonderworker)

Wednesday, March 9th, 2022

Holy_40_Martyrs-martyrdom-Bulgarian-icon

I consider / think for the will of the same mind and the equality of wisdom of these fourty martyrs and in amazement, I resort to Christ,  by whom clearly comes every good giving and every gift, as the Many-Blessed Paul said and blessed: “Thou are Christ – a God’s power and wisdom.” And with that power, were filled the many-blessed fourty warriors, martyrs for Christ.

They shone in the world like the brightest stars and illuminated the whole universe with the rays of the knowledge of God, having among them the spiritual sun – Christ. Illuminated by its light and adorned with great beauty, they blossomed with special faith like fragrant lilies, abundantly watered with the dew of the Holy Spirit. Decorating themselves with good deeds, they became beloved of their Lord, because in purity and love they surpassed each other. They shone like lamps with spiritual radiance: some with fasting and abstinence, others with good faith and hospitality; some with kneeling prayer and sincerity, and others with humility and meekness; some with vigilance and sincere love, and others with love and mercy for the poor. Indeed, the power of the Holy Spirit was with them, urging them to every good deed and by faith protecting them from every calamity.

And so, they were as homogeneous in appearance and beauty. Weaved through faith and love like a golden necklace, they were connected to each other by unanimity. Leaving the vain way of life, they zealously wished to stand before the unspoken glory of God through good deeds and sincere love. They urged each other to hurry to the holy path of feat. Instead of armor, they put on the faith, and instead of a shield, they armed themselves with The Cross and appeared in battle like Lightning – Riding against thousands and tens of thousands and were glorified with Victory. They fought a double war – with Visible and Invisible enemies.

Ivory_Relief-from-Constantinople_40_Martyr-10th-century-now-kept-in_Bode-museum-Berlin

Ivory Relief icon 40 Martyr 10th century from Constantinople now kept in Bode museum Berlin

The devil, who could not see their beauty and faith, as well as their pure life, fought against them by entering the malevolent court of Licinius, who was autocratic at the time. He raised persecution against Christians. Wanting to deceitfully capture the faithful martyrs, Licinius forced everyone to worship idols. But the ancient prophet proclaimed and said: “Lord will not leave the rod of the wicked on the lot of the righteous, so that the righteous do not stretch out their hands to iniquity. Lord, do good to the good and to the righteous at heart! ” With this light they illuminated themselves, striving brilliantly and wonderfully in martyrdom, despising the ordinary pleasure of joy. Cheering each other on, they said to each other, “Brethren, let us not be afraid of this short-lived torment, which passes quickly like a shadow, but brings us into the eternal dwellings. Therefore, brothers, stand firmly armed against the adversery-enemy, so that we may be adorned with victorious crowns of Christ God!
Because for the sake of earthly life and for the sake of the mortal king we did not spare ourselves in battles, but, having fallen into many troubles, protected by the power of God, we emerged victorious, then – if we try to follow him, taking upon ourselves his voluntary sufferings, we hope that he will be with us, as he promised: “When you are taken to assemblies, to authorities, to prisons, to kings and princes, and to tormentors for my name's sake, do not worry about what to say or what to answer, for I will give you words and wisdom that all your adversaries will not be able to resist or contradict. And do not be afraid of those who kill the body and can do no harm to the soul; but be afraid of him; who, after the murder, has the power to throw into hell. "

With these words, they learned and supported each other, and powerfully trampled on the devil's cunning. They gladly endured all kinds of sorrows, saying to themselves the apostolic word: "God is not unjust, brethren, to forget your labor."

40_Holy_Martyrs-of-Sebaste-Sebastia-in-the-ice-cold-lake-icon

40 Holy Martyrs of Sebaste martyrdon in the Lake Εκκλησιαστικό Μουσείο (Alexandrupoli, Greece Church Museum)

When they stood at night, in the cold, in the middle of the swamp, near the town of Sebastia, here is one of them, turning away, ran to the bathroom (built near the plateau) and, touching the heat, it melted like ice and died. And suddenly an unspeakable light shone from the sky on them, and the cold turned from it into warmth. And forty crowns descended from heaven upon their heads. Only one wreath remained, with nowhere to stop.The guardian, seeing this miracle, took off his clothes, jumped to the martyrs and cried out in a loud voice: “I believe in the Son of God Jesus Christ, in whom even these holy martyrs believe; may He honor me with the same glory, so that I may complete with them a martyr's deed! ” And immediately the crown of unspeakable glory descended on his head and stood. This is God's mercy, as the Lord Himself said, "The last shall be first, and the first last."

oly_Forty_Martyrs_Church-in-Veliko-Tarnovo-Trnov-Bulgaria
Church of Holy Martyrs, ex-Capital of Bulgarian Empire Tarnovo / Trnov, Bulgaria

Therefore, how can we praise the most holy company, from which this wretched man fell away, as Judas once fell away from God's chosen company, and as the devil fell away from the angelic staff and from the light and became the ruler of darkness and deserved eternal torment. His envy engulfed this wretched man. But still the devil was trampled by the invincibles.

The church nourished them with spiritual food, crowned them with the brightest wreaths; he made them companions of the angels and showed them to the whole universe as bright lamps. With their miracles they shine more than the sun. The prophet announced about them in antiquity, saying: “You have tested us, O God, you have melted us as silver is melted; put men over our heads. We went through fire and water and you set us free. " As they desired this eternal peace, they left behind the beauty of life, houses, wealth, fathers, mothers, sisters and brothers, wife, children, and even despised their lives, according to the Lord's command. That is why the Lord has miraculously shown all His favor to them. Indeed, they were vessels of good use, chosen for the service of the only ruler and our savior, Jesus Christ. Nothing could separate Christ's love from them: no fire, no water, no other suffering.

That is why today we celebrate their memory with respect and, giving them the due praise, we say: "Rejoice, all-honorable and wonderful company of the most glorious army!"

They became like the disembodied forces and surpassed them; for they, being disembodied, stand in their place and enjoy the unspeakable beauty. And the martyrs, having swum the earthly ravaged sea , illuminated the whole world with their blood. With spiritual wings, they flew up and stood before the unspeakable glory of God. They abundantly heal the sick, cast out demons, alleviate suffering, enlighten churches, keep the peace, guide people to good deeds, cast out demons and quickly destroy their cunning, enrich the poor in two ways – mentally and physically – destroy heresies. Shining with the brightest dawns, they became great advocates – martyrs for the faith.


Chapel_of_the_Forty_Martyrs_holy-martyrs-holy-relics-Church-of-Holy-Sepulchre-Jerusalem

Chapel of the Forty Martyrs containing the Holy Relics Church of Holy Sepulchre Jerusalem


So what mouth or which tongue will be able to praise these heavenly lamps, which appeared brighter than the sun? With their pure relics, they illuminated the whole world like stars. They warmed the day's frost, ignited by the Holy Spirit. And fiery flames extinguished them, as once the godly youths in Babylon. With their golden bones they illuminated the streams of the river, adorned all the churches with their fragrant relics, delighted the world with their unspeakable miracles, banished deception, and planted the truth, stepped on the devil, rejoiced Christ! That is why the right hand of the Almighty adorned them with bright wreaths and illuminated them with the rays of the unspeakable light, honored them wonderfully and with the honor to stand before God, clothed them with God-woven clothes, filled them with the power of the Holy Spirit and made them equal to disembodied forces. . That is why God is wonderful among his saints, always glorifying those who glorify him, and miraculously honoring them with unspeakable miracles. I want to tell one of their many miracles, namely how children listen to their noble mother.

Sveti-40_Mychneici-Bylgaria-Holy-40-Martyrs-Manastir_-_Vrachesh-Bulgaria

A Nun Monastery near Vrachesh Village, Bulgaria – Monastic Church

When these blessed martyrs surrendered their holy souls into the hands of the Lord, one of them was still breathing. His mother, seeing that he was left alive, rejected the female weakness, took male audacity, took his beloved son on his shoulders and, following him (after the car loaded with the bodies of the martyrs), said to him: "Do your best, Sufferer for Christ, be courageous and strengthen your heart, and may my soul rejoice for you! Do not fall away, as Judas once fell away from the apostles, nor as one of you has now fallen away, but give God all your hope and your spirit, and he will support you; for, behold, Christ is standing before you, brother, to receive your soul and await your arrival. ” As she spoke this, her son, carried by her, surrendered his soul into the hands of the Lord. She took it, placed it with the saints, and said, "Rest, child, with your holy company, and remember me with them in your holy prayers, so that I may accomplish your martyrdom." Then she returned with joy, praising God. Have you heard, brethren, of the love and boldness of the Christ-loving mother? How she feared neither the king, nor the tormentor, nor the sword, nor the fire, but only the life-giver of God.

Merdanya_monastery_40_Martyrs-after-the-battle-of-Klokotnitsa-by-Bulgarian-ruler-Ivan_Asen-II-near-Lyaskovec

Church of 40 Holy Martyrs in Merdanya Monastery near Lyskovec Veliko Tarnovo, Bulgaria (The monastery in thankfulness to the martyrs for helping the Bulgarian King Ivan Asen II in the Famous Medieval battle of Klokotnitsa which occured on 9th of March year 1230 near the Village of Klokotnitsa – As a result, Bulgaria emerged once again for short time as the most powerful state in South-Eastern Europe)

Therefore, if we reject from ourselves any fear of men, let us make room in ourselves for the fear of God. May he enlighten our souls and hearts! May we always abide in fasting, in purity and sincere love, in meekness and obedience, abstaining from all evil. Let us adorn ourselves with good deeds, like these most holy martyrs, glorifying the Most Holy Trinity, one in three persons – the Father, and the Son, and the Holy Spirit – now and always, and forever. Amen!

Text originally existing in Church Slavonic and translated to Bulgarian language by Archimandrite Dr. Atanasii Bonchev (who was also the Author of the Book the Living of the Saints used in the Bulgarian Orthodox Church even today)
 

The Menaion (one of Liturgy service books) of the Eastern Orthodox Church lists the names of the Forty Martyrs as follows:

  • Hesychius, Meliton, Heraclius, Smaragdus, Domnus, Eunoicus, Valens, Vivianus, Claudius, Priscus, Theodulus, Euthychius, John, Xantheas, Helianus, Sisinius, Cyrion, Angius, Aetius, Flavius, Acacius, Ecditius, Lysimachus, Alexander, Elias, Candidus, Theophilus, Dometian, Gaius, Gorgonius, Eutyches, Athanasius, Cyril, Sacerdon, Nicholas, Valaerius, Philoctimon, Severian, Chudion, and Aglaius.


A curious fact is in the Eastern Orthodox Church, there is a prayer mentioning the Forty Holy Martyrs of Sebaste is also placed in the Orthodox Wedding Service (referred to as a "crowning") to remind the bride and groom that spiritual crowns await them in Heaven also if they remain as faithful to Christ as these saints of long ago.

Hearing on the enormousness of Saintship of the Holy Fourty Martyrs and their endurance. 
Let us ask them for their holy prayers for more peace, love, faith and hope and endurance and patience on the hard trials each one of us face constantly!

Holy 40 Martyrs of Sebastia Pray the Lord Jesus Christ so we find mercy in God!

Fix weird double logging in haproxy.log file due to haproxy.cfg misconfiguration

Tuesday, March 8th, 2022

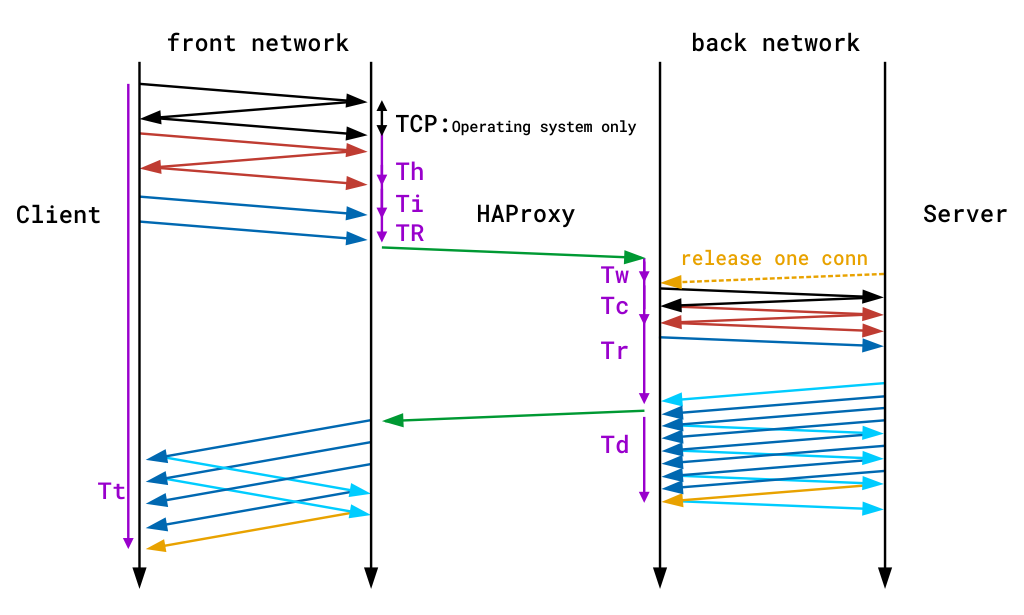
haproxy-logging-front-network-back-network-diagram

While we were building a new machine that will serve as a Haproxy server proxy frontend to tunnel some traffic to a number of backends, 
came across weird oddity. The call requests sent to the haproxy and redirected to backend servers, were being written in the log twice.

Since we have two backend Application servers hat are serving the request, my first guess was this is caused by the fact haproxy
tries to connect to both nodes on each sent request, or that the double logging is caused by the rsyslogd doing something strange on each
received query. The rsyslog configuration configured to send via local6 facility to rsyslog is like that:

$ModLoad imudp
$UDPServerAddress 127.0.0.1
$UDPServerRun 514
#2022/02/02: HAProxy logs to local6, save the messages
local6.*                                                /var/log/haproxy.log


The haproxy basic global and defaults and frontend section config is like that:
 

global
    log          127.0.0.1 local6 debug
    chroot       /var/lib/haproxy
    pidfile      /run/haproxy.pid
    stats socket /var/lib/haproxy/haproxy.sock mode 0600 level admin
    maxconn      4000
    user         haproxy
    group        haproxy
    daemon


defaults
    mode        tcp
    log         global
#    option      dontlognull
#    option      httpclose
#    option      httplog
#    option      forwardfor
    option      redispatch
    option      log-health-checks
    timeout connect 10000 # default 10 second time out if a backend is not found
    timeout client 300000
    timeout server 300000
    maxconn     60000
    retries     3
 

listen FRONTEND1
        bind 10.71.80.5:63750
        mode tcp
        option tcplog
        log global
        log-format [%t]\ %ci:%cp\ %bi:%bp\ %b/%s:%sp\ %Tw/%Tc/%Tt\ %B\ %ts\ %ac/%fc/%bc/%sc/%rc\ %sq/%bq
        balance roundrobin
        timeout client 350000
        timeout server 350000
        timeout connect 35000
        server backend-host1 10.80.50.1:13750 weight 1 check port 15000
        server backend-host2 10.80.50.2:13750 weight 2 check port 15000

After quick research online on why this odd double logging of request ends in /var/log/haproxy.log it turns out this is caused by the 

log global  defined double under the defaults section as well as in the frontend itself, hence to resolve simply had to comment out the log global in Frontend, so it looks like so:

listen FRONTEND1
        bind 10.71.80.5:63750
        mode tcp
        option tcplog
  #      log global
        log-format [%t]\ %ci:%cp\ %bi:%bp\ %b/%s:%sp\ %Tw/%Tc/%Tt\ %B\ %ts\ %ac/%fc/%bc/%sc/%rc\ %sq/%bq
        balance roundrobin
        timeout client 350000
        timeout server 350000
        timeout connect 35000
        server backend-host1 10.80.50.1:13750 weight 1 check port 15000
        server backend-host2 10.80.50.2:13750 weight 2 check port 15000


Next just reloaded haproxy and one request started leaving only one trail inside haproxy.log as expected 🙂
 

How to Install ssh client / server on Windows 10, Windows Server 2019 and Windows Server 2022 using PowerShell commands

Wednesday, March 2nd, 2022

How-to-install-OpenSSH-Client-and-Server-on-Windows-10-Windows-Server-2022-Windows-2019-via-command-line-Powershell

Historically to have a running ssh client on Windows it was required to install CygWin or MobaXterm as told in my previous articles Some Standard software programs to install on Windows to make your Desktop feel  more Linux / Unix Desktop and Must have software on Freshly installed Windows OS.
Interesting things have been developed on the Windows scene since then and as of year 2022 on Windows 10 (build 1809 and later) and on Windows 2019, Windows Server 2022, the task to have a running ssh client to use from cmd.exe (command line) became trivial and does not need to have a CygWin Collection of GNU and Open Source tools installed but this is easily done via Windows embedded Apps & Features GUI tool:

To install it from there on 3 easy steps:


  1. Via  Settings, select Apps > Apps & Features, then select Optional Features.
  2. Find OpenSSH Client, then click Install
  3. Find OpenSSH Server, then click Install


For Windows domain administrators of a small IT company that requires its employees for some automated script to run stuff for example to tunnel encrypted traffic from Workers PC towards a server port for example to secure the 110 POP Email clients to communicate with the remote Office server in encrypted form or lets say because ssh client is required to be on multiple domain belonging PCs used as Windows Desktops by a bunch of developers in the company it also possible to use PowerShell script to install the client on the multiple Windows machines.

Install OpenSSH using PowerShell
 

To install OpenSSH using PowerShell, run PowerShell as an Administrator. To make sure that OpenSSH is available, run the following cmdlet in PowerShell

Get-WindowsCapability -Online | Where-Object Name -like 'OpenSSH*'


This should return the following output if neither are already installed:


Name  : OpenSSH.Client~~~~0.0.1.0
State : NotPresent

Name  : OpenSSH.Server~~~~0.0.1.0
State : NotPresent


Then, install the server or client components as needed:

Copy in PS cmd window

# Install the OpenSSH Client
Add-WindowsCapability -Online -Name OpenSSH.Client~~~~0.0.1.0

# Install the OpenSSH Server
Add-WindowsCapability -Online -Name OpenSSH.Server~~~~0.0.1.0


Both of these should return the following output:
 

Path          :
Online        : True
RestartNeeded : False


If you want to also allow remote access via OpenSSH sshd daemon, this is also easily possible without installing especially an openssh-server Windows variant !

Start and configure OpenSSH Server

To start and configure OpenSSH Server for initial use, open PowerShell as an administrator, then run the following commands to start the sshd service:

# Start the sshd service
Start-Service sshd

# OPTIONAL but recommended:
Set-Service -Name sshd -StartupType 'Automatic'

# Confirm the Firewall rule is configured. It should be created automatically by setup. Run the following to verify
if (!(Get-NetFirewallRule -Name "OpenSSH-Server-In-TCP" -ErrorAction SilentlyContinue | Select-Object Name, Enabled)) {
    Write-Output "Firewall Rule 'OpenSSH-Server-In-TCP' does not exist, creating it…"
    New-NetFirewallRule -Name 'OpenSSH-Server-In-TCP' -DisplayName 'OpenSSH Server (sshd)' -Enabled True -Direction Inbound -Protocol TCP -Action Allow -LocalPort 22
} else {
    Write-Output "Firewall rule 'OpenSSH-Server-In-TCP' has been created and exists."
}


Connect to OpenSSH Server
 

Once installed, you can connect to OpenSSH Server from a Windows 10 or Windows Server 2019 device with the OpenSSH client installed using PowerShell or Command Line tool as Administrator and use the ssh client like you would use it on any *NIX host.

C:\Users\User> ssh username@servername


The authenticity of host 'servername (10.10.10.1)' can't be established.
ECDSA key fingerprint is SHA256:(<a large string>).
Are you sure you want to continue connecting (yes/no)?
Selecting yes adds that server to the list of known SSH hosts on your Windows client.

You are prompted for the password at this point. As a security precaution, your password will not be displayed as you type.

Once connected, you will see the Windows command shell prompt:

Domain\username@SERVERNAME C:\Users\username>