Archive for the ‘Gnome’ Category
Saturday, June 1st, 2013 It is ultra annoying, that in newest Debian and Ubuntu releases with GNOME 3 Desktop environment on every shutdown or restart you need to type in Super User (root) password, to authorize shutdown / restart.
Generally prompting for root password on GNOME restart is obviously a good think from security point of view, but from usability one – especially on notebooks it is useless annoyance…
So after changing this behavior I came up with this tiny article on how to get rid of GNOME Shutdown / Restart password prompt.
There is a click button (on left of Auth prompt on Shutdown showing URL to XML policy rule from where this behavior is controlled. A really good hint to where to look for to change those annoying behavior…
Here is how to change this new annoying behavior to old GNOME 2 default restart with no root password prompt .
linux:~# gedit /usr/share/polkit-1/actions/org.freedesktop.consolekit.policy
Find in XML source sections:
Restart the system when multiple users are logged in System policy prevents restarting the system when other users are logged in no auth_admin_keep
Stop the system when multiple users are logged in System policy prevents stopping the system when other users are logged in no auth_admin_keep
To change Restart and Shutdown GUI behavior to not prompt for password, you need to modify in above code:
auth_admin_keep
To:
yes
After changes both sections should look like so:
<action id="org.freedesktop.consolekit.system.restart">
<description>Restart the system</description>
<message>System policy prevents restarting the system</message>
<defaults>
<allow_inactive>no</allow_inactive>
<allow_active>yes</allow_active>
</defaults>
</action>
<action id="org.freedesktop.consolekit.system.restart-multiple-users">
<description>Restart the system when multiple users are logged in</description>
<message>System policy prevents restarting the system when other users are logged in</message>
<defaults>
<allow_inactive>no</allow_inactive>
<allow_active>yes</allow_active>
</defaults>
</action>
That's all you finally get rid of the annoying prompt for root password. Enjoy 🙂
Tags: annoyance, annoying behavior, desktop environment, Gnome, Linux, multiple users, notebooks, root password, security point, source sections, tiny article, ubuntu linux, usability
Posted in Entertainment, Gnome, Linux and FreeBSD Desktop, Various | No Comments »
Wednesday, November 14th, 2012 
Some time ago, I've blogged how it is possible to dump a PDF individual pages into JPG / PNG etc. pics.
Today interestingly, I've learned it is possible to not only dump single or whole PDF document pages into pictures but also to selectively dump only the pictures contained within PDF file into JPEGs.
Dumping only PDF (contained) images into external JPEG files is doable on GNU / Linux with pdfimages.
1. Extracting pictures from PDF in text console / terminal
pdfimages is part of poppler-utils deb package, if for some reasons you don't have pdfimages on ur system install poppler-utils with;
apt-get install --yes poppler-utils
To extract images of a certain PDF from terminal / console command line it is as simple as:
pdfimages -j pdf-file-name.pdf prefix-of-output-file
pdfimages will extract all pictures, but bear in mind with some PDF versions it might incorrectly dump some text pages thinking it is pictures too. Also with some PDFs which contain scanned very old paper documents (as pictures) trying to force pdfimages to dump it will just provide you with all pages of the PDF in JPGs. Option -j instructs dumping images from PDF in JPEG picture format, whether the second argument will save pictures in files like: prefix-of-output-file-000.jpg, prefix-of-output-file-001.jpg, prefix..-file-002.jpg etc.
2. Adding GNOME nautilus capability to extract images from PDF files
Enabling extracting images in nautilus is possible with one non-default nautilus plugin nautilus-scripts-manager
nautilis-scripts-manager is very nice, but I'm sure many Linux users did not know it yet. It makes possible to add any custom shell script that does an opeartion to be visible in nautilus via one extra menu Scripts. As not normally needed on most Linux distributions, it is not installed by default so you have to install it:
noah:~# apt-get install --yes nautilus-scripts-manager
…
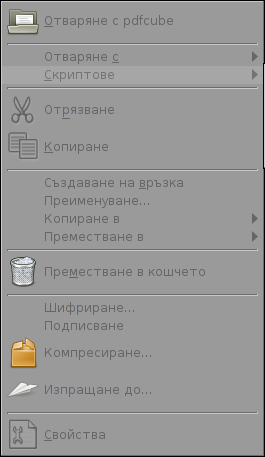
Below is a Screenshot from my nautilus Scripts menu (my locale is in Bulgarian), so Scripts word is in Cyrillic "Скриптове" 🙂
After nautilus-scripts-manager is installed. To use it in your user home directory you will have to create ~/.gnome/nautilus-scripts, i.e.
$ mkdir ~/.gnome2/nautilus-scripts
Any script placed inside can be then invoked via the newly appeared nautilus "Scripts" menu. Thus to use extract_images_from_pdfs.sh from GUI place it there.
Download the following extract_images_from_pdfs.sh shell script
$ cd ~/.gnome2/nautilus-scripts

$ wget -q https://www.pc-freak.net/files/extract_images_from_pdfs.sh

$ chmod +x extract_images_from_pdfs.sh
If you prefer to copy paste script content:
 $ cat ~/.gnome2/nautilus-scripts/extract_images_from_pdf.sh

#!/bin/bash

# Extracts image files from PDF files

# For more information see www.boekhoff.info

## Added check for $1 existence and $1_images dir

existence check by hip0

# https://www.pc-freak.net/blog/

if [ $1 ]; then

if [ ! -d ./$1_images ]; then

mkdir -p ./"$1_images"

fi

pdfimages -j "$1" ./"$1_images"/PDFimage

gdialog --title "Report" --msgbox "Images were successfully extracted!"

exit 0

fi
Well that's all. Once you select a PDF and you click with last mouse button on it selecting Scripts -> extract_images_from_pdf.sh a new directory containing the filename prefix of the selected PDF with _images will appear. For exmpl. if pictures are extracted from PDF named filename.PDF in same directory where the file is present you will get new filename_images folder with all pictures dumped from the PDF.
I've learned about pdfimages existence from Sven Boekhoff's blog which btw has plenty of interesting other stuff
Well that's it hope this helps, someone. Comments are welcome 🙂
Tags: console, extract, Files, Gnome, images, Linux
Posted in Gnome, Linux and FreeBSD Desktop, System Administration | No Comments »
Saturday, March 31st, 2012 I'm currently learning some basic graphic design – reading GIMP's documentation etc. While reading http://docs.gimp.org, I saw a reference to Gthumb and GQView picture viewing apps, so I thought of installing them on my Debian LinuxGQView has a lot of santimental value to me as it reminds me of the the old times when I used gqview as a default picture viewing program on a old machine running Debian Woody Linux with Window Maker as desktop environment.
I wanted to see how GQView looks nowdays so installed it:
noah:~# apt-get --yes install gqview
And onwards launch it:
hipo@noah:~/Desktop$ gqview

This is a compatibility alias for Geeqie!

Please use /usr/bin/geeqie instead!

Creating Geeqie dir:/home/hipo/.config/geeqie

Creating Geeqie dir:/home/hipo/.local/share/geeqie/collections

Creating Geeqie dir:/home/hipo/.cache/geeqie/thumbnails

Creating Geeqie dir:/home/hipo/.local/share/geeqie/metadata

What poped up instead of gqview is Geeqie – a picture viewer nowdays available on a default Slackware Linux install.
Fedora, CentOS users will have to build geekie from its source, as of time of writting there is no available rpm package.
It was new to me Gqview is no longer developed, its dev is forked (because its head developer is not reachable any more). Hence QGView continues to live on nowdays under the hood of Geekie
As you can see from the prior screenshot Geeqie has very similar interface to GQView. Going through the interface, I've found it has much more features than GQView. You see one of the many new nice features is the support for drawing Image Histograms.
There are few type of Histograms to display in Geekiq, available by navigating to:
View -> Image Overlay
Even if you're not familiar with Image histograms, probably you have seen them appear on a digital camera while browsing in menus. Its likely you didn't know what you saw a digital camera display is a histogram.
Anyways being not familiar with histograms is perfectly fine as for most of us (regular) users image historograms doesn't make much sense.
BTW Histograms are very useful for pro Photographers. Photographers can use them as an aid to show the distribution of picture "tones" captured, and whether image detail has been lost to blown-out highlights or blacked-out shadows.
Interesting fact concerning "reading" and understanding Histograms is on a Histogram for a very dark image the majority of data points are on the left side and center of the graph, whether histogram for a very bright image with few dark areas and/or shadows will have most of its data points located on the right side and center of the graph.
With this said in mind, you can see, the above Geeqie picture visibile histogram obviously has most of its data concentrated on the right and the center so this means the histogram belongs to a bright pic. Well, Actually you can see this without a histogram too 😉
Though Image Histograms might seem pretty useles they're very much needed in Professional Graphic Manipulation. For instance for correction of image color gamma or manually adjusting the brightness for each picture pixel brightness.
So Enough with histograms, I will switch now to a short review of Gthumb
Since I haven't used/seen Gthumb "for ages", I was also curious how the program looks nowdays. I did not needed to install gthumb, as I had it installed already on my notebook. I assume gthumb package was installed as some package dependency or I did it install some very long time ago and I forgot.
For people who didn't have it install do:
noah:~# apt-get --yes install gthumb

...
This installs a Gthumb version 2.12.2. The current latest stable Gthumb release is way ahead from the existing deb stable package, the latest available version on sourceforge is 2.7.4
Ubuntu gthumb latest packages would probably be newer than my debian installed one, so Ubuntu users can have the joy to use a newer version of gthumb…
gthumb is also installable for Fedora and CentOS users by default from default assigned package repos:
To install on RPM based Linux distro:
[root@centos:~ ]# yum -y install gthumb

...
Once installed, I ran it via a gnome run application shortcut ALT+F2 and typed:
gthumb
If you're more of a gui user than me you can run it also through GNOME menus:
Applications -> Graphics -> Gthumb Image Viewer
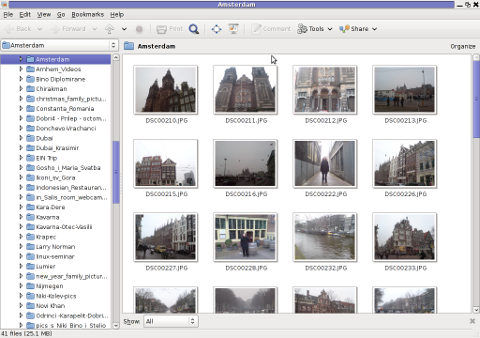
You see gthumb appears, quite similar in "look&feel" to Geeqie.
I went through the program options just for the sake to compare with Geeqie. Based on the fact Geeqie seems to have more functionality it is probably superior and better choice for people looking for professional image vieweing / editting.However there are some other aspects I've noticed, where it lacks behind Gthumb.
Gthumb has few great functionality which unfortunately as of time of writting are missing or hardly achievable in Geeqie
1. Bookmarking pictures.
This allows for your favourite pictures to be bookmarked in the same way as bookmarks work in a browser, really neat feature.
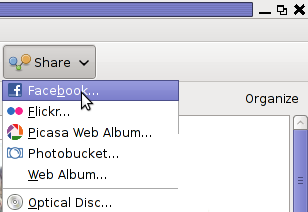
2. Share functionality
Share button is located on the rightest upper corner and makes sharing with major web storage places easy.
Through the Share button, you can export (share) your pictures directly in Picasa, Facebook,Flickr and Photobucket.

Through this share button it is also possible to "share your photos on a CD or DVD", – burn them on a CD/DVD directly from gthumb. This is doable via:
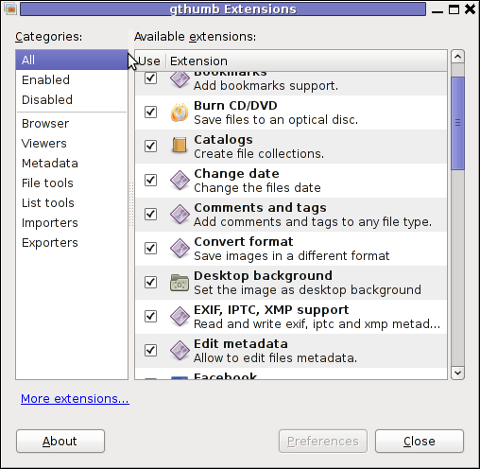
One other Gthumb advantagle is its extensibility. It has a powerful plugin system. Many of the features it has are already there thanks to its enabled extensions.
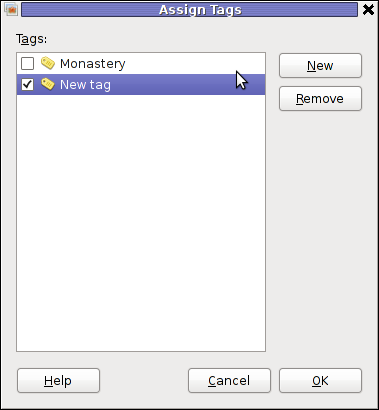
3. Photo Tagging
Nowdays tagging, photos has become so popular with the boom of facebook tagging. Gthumb has a relatively easy to use image tagging integrated.
tagging a picture is done by simply going through the picture and selecting it with the (rightest located mouse button).
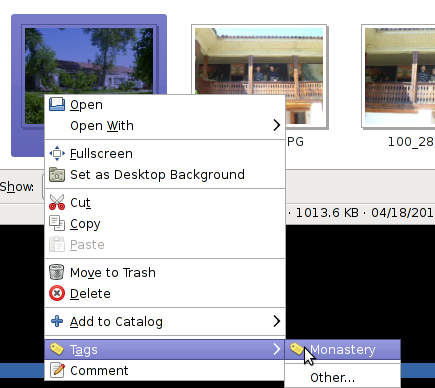
There is a list of few already predefined tags, which can be used to tag images.Assigning more tags is done via menu:
Tags -> Other
4. Organizing pictures
Through the Organize button located right below the Share button, one can easily organize his picture collections, based on few criterias.
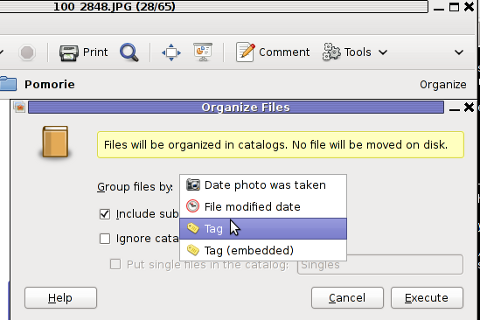
The organize easy feature is not so important for not people, who are not in depth in photographing but for professional photographers this is an absolute necessity. For people who are image freaks and store tens of thousands of pictures organizing pictures for easy later retrieval is really nice.
To sum it, up Geeqie and Gthumb are richer in functionality if compared to GNOME's default pic viewer (eye of the gnome) – eog.
Geeqie, as the name suggests is more for geek oriented and has a lot of great options which can serve well for advanced computer users. For an ordinary desktop user however it will probably be not easy to "digest". Gthumb on the other hand is ideal for anyone who prefers gui convenience. Gthumb is a good option for anyone looking for some similar to Picasa free software program that is feature rich and easy to use.For people who has to review a dozens of pictures daily, associating one of the two as a default picture viewer will probably be useful.
Tags: alias, alternative, Auto, center, CentOS, config, debian woody, default, design reading, Desktop, desktop environment, digital camera, Draft, fedora, geekie, GIMP, GNU, gnu linux, gqview, graphic design, head developer, hipo, histogram, histograms, image overlay, LinuxGQView, machine, meta package, metadata, noah, package, Photographers, picture, poped, quot, reading, rpm, screenshot, time, Ubuntu, value, window, woody linux, writting
Posted in Gnome, Linux and FreeBSD Desktop, News | No Comments »
Wednesday, April 20th, 2011 After some upgrades of Ubuntu from 9.10 to Ubuntu 10.04.2, I faced problems during apt-get upgrade && apt-get dist-upgrade
I had to fix it up with apt-get upgrade -f , however the “fix” which was targetting a fix up to the apt-get dist-upgrade removed about 260 packages, among which were the grub boot loader , xorg-server and even gnome
As in order to fix the package mishap the apt-get update -f was my only possible solution I went by and confirmed that I would like to wipe out all the packages.
Logically afterwards it was required that I install my missing xorg-server and gnome in order to make the Ubuntu desktop work again.
Here is how:
ubuntu:~# apt-get update && apt-get xorg-server ubuntu-desktop
The ubuntu-desktop is a meta package which installs the GNOME environment.
Tags: amp, boot, Desktop, desktop work, environment, fix, Gnome, gnome environment, grub, grub boot loader, loader, Logically, LTS, Lucid, meta, meta package, mishap, order, package, possible solution, server, solution, Ubuntu, update, upgrade, work
Posted in Gnome, Linux and FreeBSD Desktop | 1 Comment »
Wednesday, April 16th, 2008 Today was the last day of the lectures with Joop Vinke. Here is how my day passed. I woke up at 9:00, washed my teeth dressed combed my hair and went to the police station to look for our quarter police officer. I need to renew my personal ID card because it has been expired already for 4 years already. Thanks God everything went smoothly in the police station. After that I went to school we had lectures with Joop Vinke. After the school I went home and played around with my FreeBSD system. I succesfully upgraded gnome 2.20 to 2.22.
Using the binary packages from
http://www.marcuscom.com/tb/packages/7-STABLE-FreeBSD/gnome/. I’m trying to upgrade gnome from source for already almost 3 weeks with portmanager. After all of the required ports rebuilded still gnome wasn’t functioning, so in order to make it working I downloaded packages from http://www.marcuscom.com/tb/packages/7-STABLE-FreeBSD/gnome/ and ran a little loop with
for i in *; do pkg_add -vf $i; done
to make all the .tbz files install I did that yesterday night today at the afternoon everything was installed and gnome ran just fine I only had to link few libraries because they were searched on a different places. All works just fine now I only have to rebuild few of my games because they’re now linked to an old libraries. In the evening we went out with Javor for a coffee. As very often we went to the fountain we had a nice talk and then we went to his apartment to watch a film. He recommended a film called 1984 and we watched that. My impression is that this film is totally psychodelic and freaky, but still interesting to see. After I went home I went to see my grandma and now I’m home tired on a few steps of my bed 🙂 I should also mention that today I upgraded clamav on 3 of the servers I maintain. It seems there are few configuration options which changed in the new clamav release (0.93). It was an easy day as a whole if we don’t count my physical infirmity.
END—–
Tags: bed, binary packages, card, Clamav, coffee, configuration options, count, different places, end, everything, freaky, freebsd system, functioning, Gnome, grandma, impression, infirmity, Javor, Joop, Lectures, libraries, management games, nbsp, night today, personal id card, physical infirmity, pkg, police, police officer, police station, ports, station, tb, tbz, teeth, vf, yesterday
Posted in Entertainment, Gnome | No Comments »
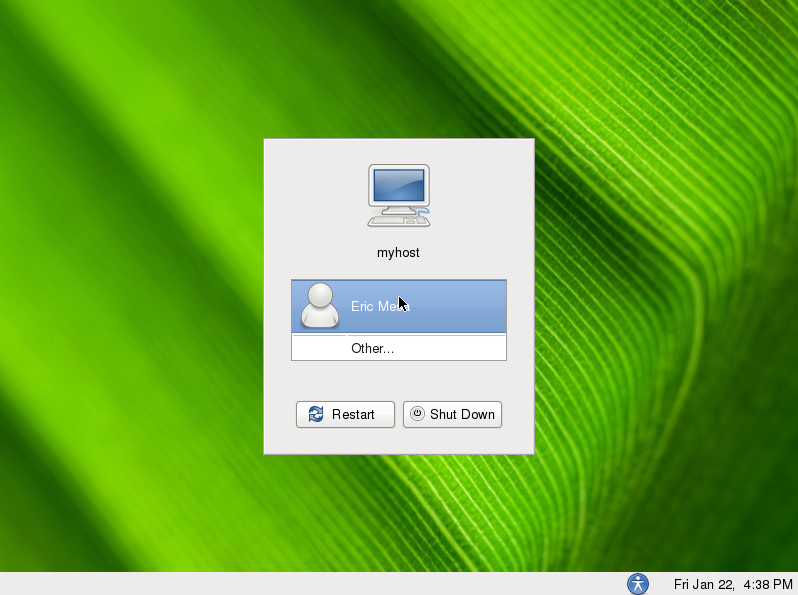
Friday, January 27th, 2012 By default latest Debian GDM does not provide an automatic way to login using user AVATARS (like Windows does).
This is pretty strange, especially if you compare to Ubuntu and many other Linux distributions which already has support for AVATAR login via GDM
The reason for this is that currently Debian is shipped with old version of gdm2 and this gdm version does not have support for clickable login avatars.
Debian looks by default like this:
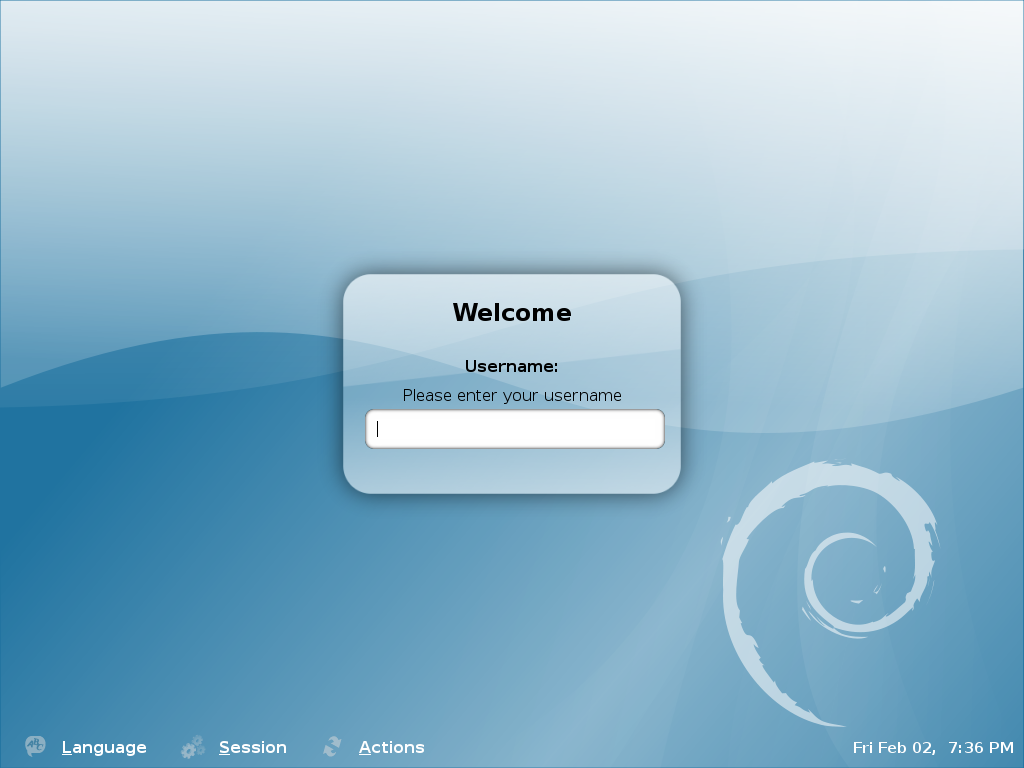
Thanksfully this non-user friendly GNOME login screen behaviour can be changed by simply installing gdm3
root@debian:~# apt-get --yes install gdm3

...
This will remove the old gdm installed package as well as fast-user-switch-applet and install the gdm3.
Having installed the gdm3 with configured a background will look like so:
I was quite stunned that gdm3 does not have included support for themes . As far as I've spoken with some ppl in irc.freenode #gnome the reason for this oddity is it crashed a lot when a theme is configred.
By default the gdm2 themes are provided by a package called gdm-themes, since gdm3 does not support themes (yet), the package gdm3-themes is missing.
Tags: avatar, avatars, behaviour, Debian, debian gnu, freenode, GDM, Gnome, gnu linux, Linux, linux distributions, login, nbsp, non-user, oddity, old version, package, ppl, reason, root, screen, squeeze, support, support themes, Thanksfully, theme, Ubuntu, version, way
Posted in Gnome, Linux, Linux and FreeBSD Desktop, Various | No Comments »
Sunday, January 8th, 2012 I've faced some issues with crappy sound in some of the games I'm playing on my Debian . Also I ometimes, have issues with sound while watching movies with VLC or Totem... Sound issues with Skype are also seldomly occuring during skype calls etc. etc.
Recently I've realized many of this crappy sound issues origins from PulseAudio – the sound server GNOME desktop env uses to manage all sound just before passing it through ALSA.
I've found on the internet many suggested ways on how to workaround these issues. Many of the things suggested as workarounds, however was outdated and referred to old versions of GNOME / Pulseaudio and therefore was unusable on my Debian 6 Squeeze….
What I found most helpful is fixes and workarounds for pulseaudio list compiled by people in the Fedora community on fedorasolved.org's website – http://fedorasolved.org/Members/fenris02/pulseaudio-fixes-and-workarounds
Some of the fixes and work arounds suggeted on the above link, I have already applied, others was not applicable for Debian.
Anyways the things which I found most important and I believe many people who runs Debian need to implement from the list to solve pulseaudio crappy sound issues is concluded in the below 5 steps.
1. Install few packages related to pulseaudio
apt-get install paman padevchooser paprefs pulseaudio pulseaudio-esound-compat pulseaudio-module-x11 pulseaudio-module-zeroconf pulseaudio-utils
2. Edit ~/.asoundrc and include
pcm.pulse { type pulse }
ctl.pulse { type pulse }
Quickest way is by issuing:
echo 'pcm.pulse { type pulse }' >> ~/.asoundrc

echo 'ctl.pulse { type pulse }' >> ~/.asoundrc
3. Change in the pulseaudio server configuration file ( /etc/pulse/daemon.conf ):
debian:~# vim /etc/pulse/daemon.conf
Look up for the lines:
; default-fragments = 4

; default-fragment-size-msec = 25
Substitute this two lines with:
default-fragments = 8

default-fragment-size-msec = 5
4. Enable Simultaneous Output in PulseAudio preferences
Navigate to the GNOME menus:
System -> PulseAudio Preferences
Choose the "Simultaneous Output" tab and select:
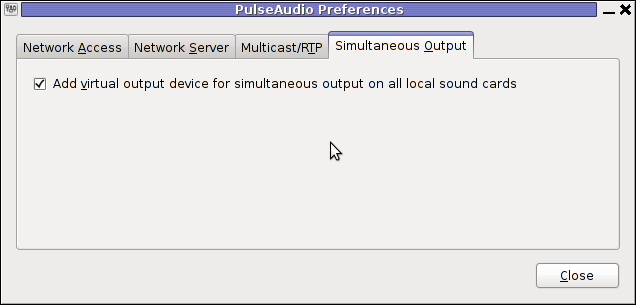
Add virtual output device for simultaneous output on all local sound cards
5. Log Off Gnome and restart PulseAudio
To load the new changed settings in /etc/pulse/daemon.conf restart of pulseaudio server is required, right after a Logoff from the current opened gnome session;
To do so LogOff with the trivial:
System -> Log Out
Login as root in console;
Press CTRL+ALT+F1, login with root and issue:
debian:~# /etc/init.d/pulseaudio restart

...
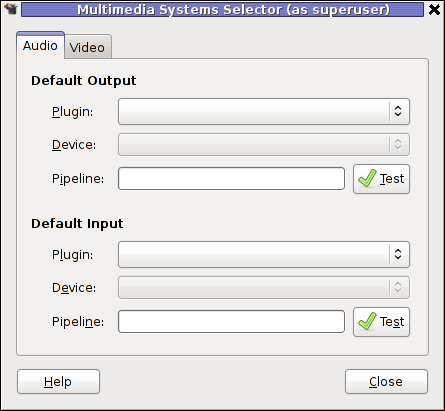
N.B.; In some cases it might be necessery to do some adjustments are made in gstreamer properties , to change settings there launch:
Tampering with gstreamer-properties used to fix for me some problems with ALSA and PulseAudio in the past, so it might be worthy to check it out and experiment a bit with it as well.
debian:~$ gstreamer-properties
Now many of the crappy sound games or applications should start working just fine. Enjoy 😉
Tags: alsa, asoundrc, asoundrcecho, Auto, change, configuration file, crappy, debian gnu, default fragment, Desktop, Draft, fedora, file, fragment size, fragments, games, Gnome, gnome desktop, gnu linux, Install, Linux, login, look, msec, occuring, old versions, org members, origins, OutLogin, Output, padevchooser, Press, pulse type, quot, right, root, server configuration, Skype, sound server, tab, type, vim, VLC, work
Posted in FreeBSD, Gnome, Linux, Linux and FreeBSD Desktop | 1 Comment »
Saturday, January 14th, 2012 Mounting ISO files in Linux is easy with mount cmd, however remembering the exact command one has to issue is a hard task because mounting ISO files is not a common task.
Mounting ISO files directly by clicking on the ISO file is very nice, especially for lazy people uninitiated with the command line 😉
Besides that I'm sure many Windows users are curious if there is an equivallent program to DaemonTools for Linux / BSD*?
The answer to this question is YES!
There are two major programs which can be used as a DaemonTools substitute on Linux:
These are FuriousISOMount and AcetoneISO
AcetoneISO is more known and I've used it some long time ago and if I'm correct it used to be one of the first ISO Mount GUI programs for Linux. There is a project called GMount-ISO / (GMountISO) which of the time of writting this article seems to be dead (at least I couldn't find the source code).
Luckily FuriousISOMount and AcetoneISO are pretty easy to install and either one of the two is nowdays existing in most Linux distributions.
Probably the programs can also be easily run on BSD platform also quite easily using bsd linux emulation.
If someone has tried something to mount GUIs in Free/Net/OpenBSD, I'll be interesting to hear how?
1. Mount ISO files GUI in GNOME with Furius ISO Mount
FuriousISOMount is a simple Gtk+ interface to mount -t iso9660 -o loop command.
To start using the program on Debian / Ubuntu install with apt;
debian:~# apt-get install furiusisomount

The following extra packages will be installed:

fuseiso fuseiso9660 libumlib0

The following NEW packages will be installed:

furiusisomount fuseiso fuseiso9660 libumlib0
…
To access the program in GNOME after install use;
Applications -> Accessories -> Furious ISO Mount
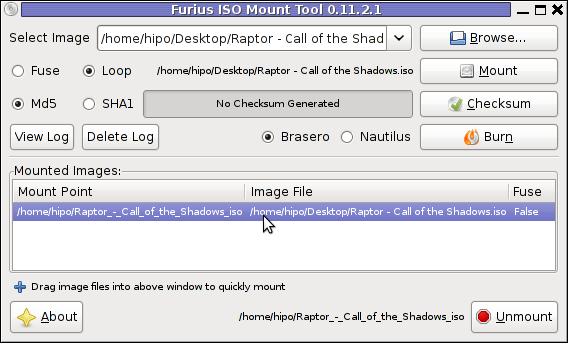
When mounting it is important to choose Loop option to mount the iso instead of Fuse
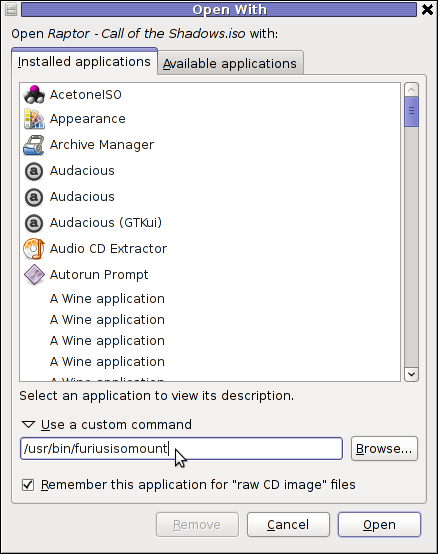
After the program is installed to associate the (.iso) ISO files, to permanently be opened with furiusisomount roll over the .iso file and choose Open With -> Other Application -> (Use a custom command) -> furiusisomount
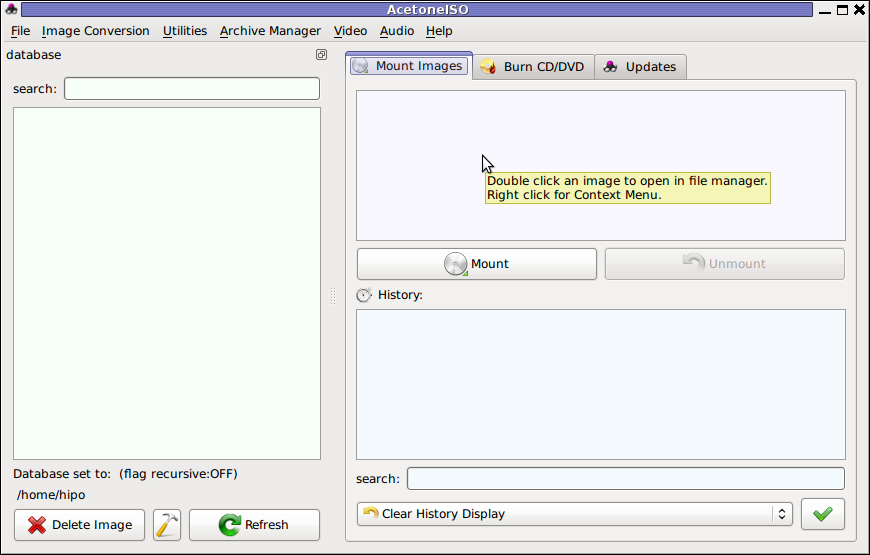
2. Mount ISO Files in KDE Graphical Environment with AcetoneISO
AcetoneISO is build on top of KDE's QT library and isway more feature rich than furiousisomount.
Installing AcetoneISO Ubuntu and Debian is done with:
debian:~# apt-get install acetoneiso

The following NEW packages will be installed:

acetoneiso gnupg-agent gnupg2 libksba8 pinentry-gtk2 pinentry-qt4

0 upgraded, 6 newly installed, 0 to remove and 35 not upgraded.

Need to get 3,963 kB of archives.

After this operation, 8,974 kB of additional disk space will be used.

...
AcetoneISO supports:
- conversion between different ISO formats
- burn images to disc
- split ISO image volumes
- encrypt images
- extract password protected files
Complete list of the rich functionality AcetoneISO offers is to be found on http://www.acetoneteam.org/viewpage.php?page_id=6
To start the program via the GNOME menus use;
Applications -> Accessories -> Sound & Video -> AcetoneISO
I personally don't like AcetoneISO as I'm not a KDE user and I see the functionality this program offers as to rich and mostly unnecessery for the simple purpose of mounting an ISO.
3. Mount ISO image files using the mount command
If you're a console guy and still prefer mounting ISO with the mount command instead of using fancy gui stuff use:
# mount -t iso9660 -o loop /home/binary/someiso.iso /home/username/Iso_Directory_Name
Tags: AcetoneISO, Auto, BSD, cmd, custom, debian gnu, Draft, emulation, exact command, file, Files, Free, GMount-ISO, Gnome, graphical environment, gtk interface, guis, image files, ISO, iso file, iso files, iso9660, libumlib, long time, loop command, most linux distributions, nbsp, Open, OpenBSD, option, platform, roll, someone, something, source code, substitute, time, Ubuntu, windows users, YES
Posted in Gnome, Linux, Linux and FreeBSD Desktop, Linux Audio & Video | No Comments »
Sunday, January 22nd, 2012 Accidently I've removed the Gnome Volume Control while trying to remove an applet nearby from the GNOME main menu panel. Unfortunately in GNOME 2, I couldn't find a way to to return back (restore) Gnome Volume Control to the main panel. After a bit of pondering, I've managed to find a way.
Here is how I managed to restore it back:
1. Navigate to:
System > Preference > Startup Applications
2. Click on Add, then add and type the following:
 Name: Volume control

Command: gnome-volume-control-applet

Comment: Launch volume control applet
Adding the gnome-volume-control-applet will launch it every time a new gnome session (with the same user) is initiated. On next gnome login you will see the icon to appear again in the notification area. Cheers 😉
Tags: applet, area, Auto, Cheers, Click, command, Comment, control, Draft, Gnome, gnu linux, icon, launch, Linux, login, menu, menu panel, Navigate, notification, notification area, panel, preference, startup, startup applications, system, time, type, volume control, way
Posted in FreeBSD, Gnome, Linux, Linux and FreeBSD Desktop | No Comments »
Monday, January 23rd, 2012 Every now and then my gnome keyboard layout switcher hangs. When my keyboard switcher hangs I can't switch between my two defined languages English and my native Bulgarian
The hang up of the language switcher is makes switching between my two defined languages impossible until I logoff and login again or kill the current GNOME session with CTRL+ALT+BACKSPACE.
Sometimes logging off again is not necessery so I have to logoff and login to GNOME few times until finally the gnome keyboard layout switcher reacts to an issued change language via Alt+Shift or by clicking on it.
Unfortunately the gnome keyboard layout switcher is not available as a process so there is no way to simply kill -HUP the process responsible for it.
Just until today I couldn't find a way how to restart the gnome keyboard layout switcher when it hangs.
Now today I finally found a way to restart it without restarting the whole gnome session or killing completely the Xorg server.
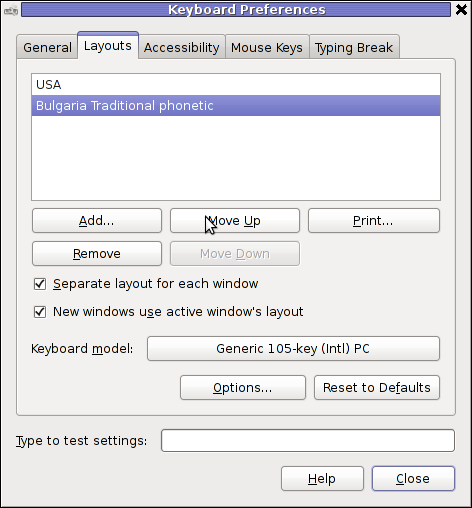
To "fix" up the keyboard switcher when its not responding, I had to issue in gnome-terminal or via ALT+F2:
hipo@noah:~$ gnome-keyboard-properties
As you can see in the screenshot below, one has to press the Move Up button to switch the default order of languages. Once this is done the keyboard layout switcher starts working again. Once working I just used the move up once again to revert back my default language order as it used to be.
I'm not sure what exactly is causing the GNOME 2 keyboard layout switcher to hang (when it does), my guess is it is due to some kind of version incompitability between gnome versions or configurations specific to my computer. In the past I was running Debian Testing/Unstable and then downgraded back to Debian stable, probably this is the reason of the language switcher hangs.
Tags: Button, change, change language, Computer, default language, f2, Gnome, guess, hipo, HUP, incompitability, keyboard layout, keyboard switcher, kind, languages, layout, login, move, necessery, noah, order, reason, revert, screenshot, switch, switcher, testing, today, Unstable, version, way
Posted in Gnome, Linux, Linux and FreeBSD Desktop, Linux Audio & Video | No Comments »


How to restore accidently removed Gnome volume control in GNOME in GNU / Linux
Sunday, January 22nd, 2012Accidently I've removed the Gnome Volume Control while trying to remove an applet nearby from the GNOME main menu panel. Unfortunately in GNOME 2, I couldn't find a way to to return back (restore) Gnome Volume Control to the main panel. After a bit of pondering, I've managed to find a way.
Here is how I managed to restore it back:
1. Navigate to:
System > Preference > Startup Applications
2. Click on Add, then add and type the following:Name: Volume control
Command: gnome-volume-control-applet
Comment: Launch volume control applet
Adding the gnome-volume-control-applet will launch it every time a new gnome session (with the same user) is initiated. On next gnome login you will see the icon to appear again in the notification area. Cheers 😉
Tags: applet, area, Auto, Cheers, Click, command, Comment, control, Draft, Gnome, gnu linux, icon, launch, Linux, login, menu, menu panel, Navigate, notification, notification area, panel, preference, startup, startup applications, system, time, type, volume control, way
Posted in FreeBSD, Gnome, Linux, Linux and FreeBSD Desktop | No Comments »