How to Increse Hard Disk size of VirtualBox Virtual Machine .VDI file to Free Space on root Partition or Howto move /usr large partition to separate new partition?
I just wondered how to increase hard disk size of Virtualbox Virtual Machine image .VDI, because for some stupid reason I've created my initial hard disk size for Linux partition to be the default 10 Gigabytes.
The problem is the packages I need to have installed on the Virtual Machine which will be a testbed for future tests of a production website applications are taking up too much space, once installed so I'm left with no space
in /var/lib/mysql for the database import. So what can I do in that case is to simply free up disk space or Merge ROOT partition with another partition.
Since merging the partition is not a trivial job and would require me to have installable CD with the Linux distro (in my case that's Debian Linux) or have a bootable USB flash drive, I preferred second approach to problem e.g. to free up disk space on ROOT partition by creating a second partition and move the /usr folder to reside there.
Before that it is of course necessery to have extended the .VDI file using VirtualBox, so more space than the default 10GB preconfigured are available, this is easily done on Windows OS as, VBox is provided with GUI clickable option to do it, but for who knows what reason that is not the case with Linux, so Linux users only option to increase VDI file is to manually run command part of the virtualbox package, that is not a hard task really but it requires some typing and basic knowledge on how to run commands in terminal.
To .VDI resize (extend), we first go to default location where VirtualBox stores its image .VDI files (by default as of moment of writting this article – this is ~/"VrtualBox VMs" (or home directory of logged in user dir VirtualBox VMs), the command to use is VBoxManage
root@jericho:/home/hipo# cd VirtualBox VMs/
root@jericho:/home/hipo/VirtualBox VMs# ls
Debian 6 Debian 9 Windows 10
root@jericho:/home/hipo/VirtualBox VMs# cd Debian 6/
root@jericho:/home/hipo/VirtualBox VMs/Debian 6# ls
Debian 6.vbox Debian 6.vbox-prev Debian 6.vdi Logs NewVirtualDisk1.vdi Snapshots
root@jericho:/home/hipo/VirtualBox VMs/Debian 6# VBoxManage modifyhd Debian 6.vdi –resize 20000
0%…10%…20%…30%…40%…50%…60%…70%…80%…90%…100%
root@jericho:/home/hipo/VirtualBox VMs/Debian 6#
Above command does resize the 10GB default created partition for Linux, where I have installed Linux which was 99% full of data, because of the many packages I installed to 20GB size, to make it bigger just use the respective size, be it 30000 (for 30GB) or 100000 (for 100GB) etc.
Even though in this example VBoxManage virtual partition resize command was done for GNU / Linux Operating System, it can be done for any other Operating as well to resize the size of the Virtual .VDI file (Virtual Machine) partition, be it Windows 7 / 8 / 10 or the rest of Free Operating systems FreeBSD / OpenBSD / BSD that are installed in a VM etc.
Next Launch the Virtual Machine with VBox Server client Program and install there Gparted (GNU Parted), as we'll need it to create a new Hard Disk Partition:
$ VirtualBox
Inside virtualmachine's in gnome-terminal / xterm etc. depending on the graphical environment used do install with apt-get:
debian:# apt-get install –yes gparted
…
debian~:# gparted
Notice that gparted has to be ran as a root superuser.
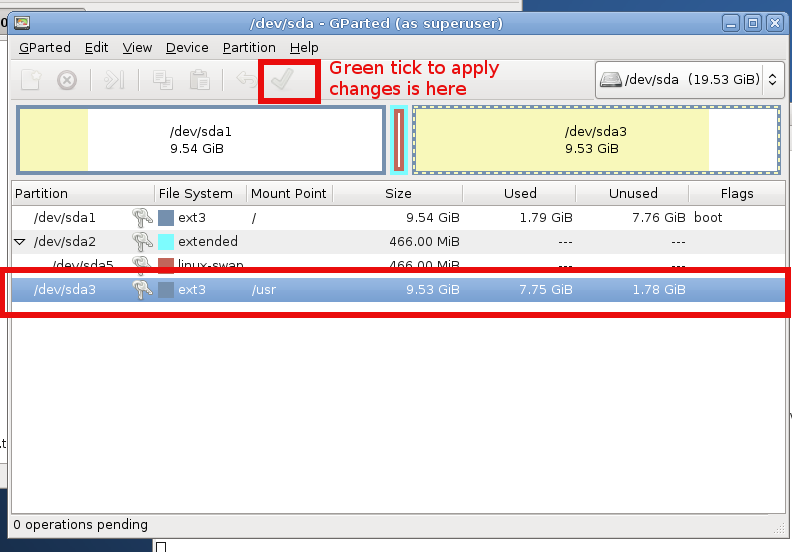
Run GParted and create new EXT3 filesystem that is 10GB (the size of the new created partition).
If you have installed Debian to place all partitions under / (root directory /dev/sda1) then the fresh new partition to create should be
/dev/sda3, anyways just look closely in EXT3 and in your case if the partiition is named differently create according to proper partition /dev/ naming.
I'll not run into details on how to create the partition with GParted as the program interface is very self-explanatory, the only thing is to apply the update to create partition and the ext3 filesystem, that's being done
with a green tick:
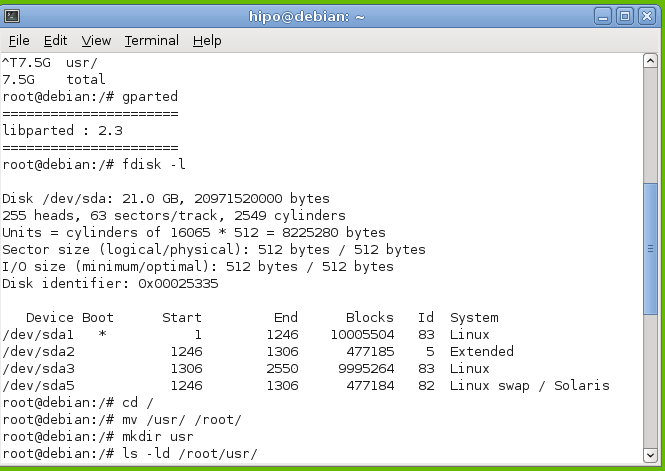
Next step is to check with fdisk whether, we have ext3 properly created filesystem as we've done already with GPARTED:
Once we have the partition created with EXT3 filesystem, we're ready to move /usr temporary to other folder, I use usually /root for the move but you can create anywhere a new folder for that and move to there.
To move to /root directory run again in terminal:
debian:~# mv /usr /root
debian:~# mkdir /usr
Note that during the move operations, your Desktop icons will become without (with broken) pictures and the default Debian background picture is to disappear, that's because the GUI environment will soon realize /usr/ libraries that're periodically reloaded in memory are missing and will be unable to reload them as it does in a cycle.
That should take a few minutes, so grab a coffee or if you're a smoker (hope not as smoking kills 🙂 ), in 5 / 10 minutes time depending on your computer / server configuration, it will be over, so we're ready to create new /usr dir and mount the new partition:
debian:~# mount /dev/sda3 /usr
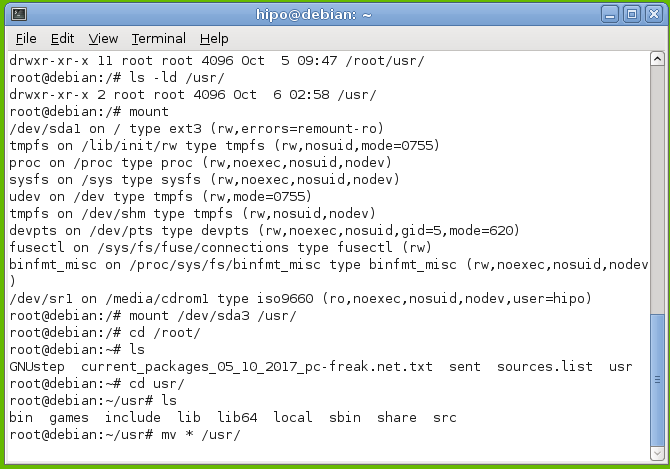
Now we check with mount command whether mount is fine:
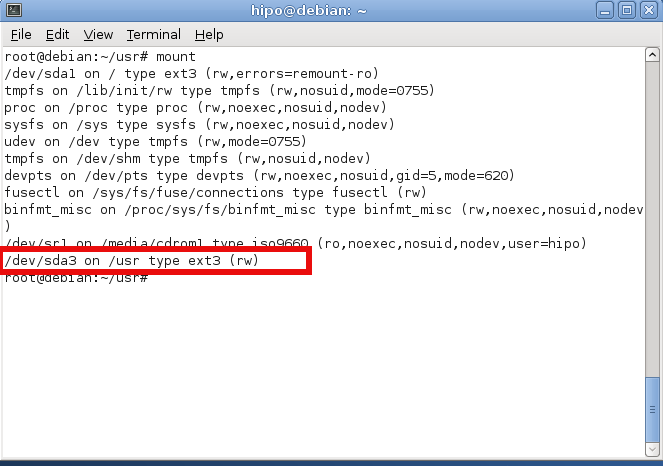
Now /dev/sda3 is mounted under /usr and we have to move back /root/usr directory content back to the newly mounted /usr so we run command:
debian:~# mv /root/usr/* /usr/*
Finally we need to create proper records for the new partition inside /etc/fstab (fstab –FileSystem Tab file – the file which describes instructs the Linux OS what partition to boot where, what)
HOW TO CHECK LINUX UUID FOR A PARTITION??
Before adding anything to /etc/fstab you need to check the UUID of /dev/sda3 (or whatever the partition is called), without proper UUID, the system might fail to boot.
So here is how to check the UUID we'll need for config:
hipo@debian:~$ /sbin/blkid /dev/sda3
/dev/sda3: UUID="2273db4b-3069-4f78-90fc-e7483c0305bd" SEC_TYPE="ext2" TYPE="ext3"hipo@debian:~$ ls -al /dev/disk/by-uuid/
total 0
drwxr-xr-x 2 root root 100 Oct 6 05:16 .
drwxr-xr-x 6 root root 120 Oct 6 05:16 ..
lrwxrwxrwx 1 root root 10 Oct 6 05:16 2273db4b-3069-4f78-90fc-e7483c0305bd -> ../../sda3
lrwxrwxrwx 1 root root 10 Oct 6 05:16 b98d92cd-41aa-4e18-a474-9b8df445dbe5 -> ../../sda1
lrwxrwxrwx 1 root root 10 Oct 6 05:16 f27f7448-f200-4983-b54f-b9e5206f77ac -> ../../sda5
As you can see our /dev/sda3 UUID is 2273db4b-3069-4f78-90fc-e7483c0305bd
Further on lets view and edit /etc/fstab you can also download a copy of my Virtual Machine fstab here
debian:~# cat /etc/fstab
# /etc/fstab: static file system information.
#
# Use 'blkid' to print the universally unique identifier for a
# device; this may be used with UUID= as a more robust way to name devices
# that works even if disks are added and removed. See fstab(5).
#
# <file system> <mount point> <type> <options> <dump> <pass>
proc /proc proc defaults 0 0
# / was on /dev/sda1 during installation
UUID=b98d92cd-41aa-4e18-a474-9b8df445dbe5 / ext3 errors=remount-ro 0 1
# swap was on /dev/sda5 during installation
UUID=f27f7448-f200-4983-b54f-b9e5206f77ac none swap sw 0 0
/dev/scd0 /media/cdrom0 udf,iso9660 user,noauto 0 0
/dev/scd1 /media/cdrom1 udf,iso9660 user,noauto 0 0
We need to add following line to /etc/fstab:
UUID=2273db4b-3069-4f78-90fc-e7483c0305bd /usr ext3 error=remount-ro 0 1
Open the file with your favourite text editor (gedit / nano / pico / vim / joe) etc.
debian:~# vim /etc/fstab
# /etc/fstab: static file system information.
#
# Use 'blkid' to print the universally unique identifier for a
# device; this may be used with UUID= as a more robust way to name devices
# that works even if disks are added and removed. See fstab(5).
#
# <file system> <mount point> <type> <options> <dump> <pass>
proc /proc proc defaults 0 0
# / was on /dev/sda1 during installation
UUID=b98d92cd-41aa-4e18-a474-9b8df445dbe5 / ext3 errors=remount-ro 0 1
# swap was on /dev/sda5 during installation
UUID=f27f7448-f200-4983-b54f-b9e5206f77ac none swap sw 0 0
/dev/scd0 /media/cdrom0 udf,iso9660 user,noauto 0 0
/dev/scd1 /media/cdrom1 udf,iso9660 user,noauto 0 0
UUID=2273db4b-3069-4f78-90fc-e7483c0305bd /usr ext3 error=remount-ro 0 1
Basicly it should be possible to add (for historic reasons) also instead of UUID=2273db4b-3069-4f78-90fc-e7483c0305bd /dev/sda3
So it looks like so but, the better practice is to use UUID line given.
Well that's all folks now /usr directory will contain all your heavy root partition (disk filling) libraries and files, so you can happily use /var/lib/mysql or /var/lib/postgresql /var/www to store your web application files and import your databases.
Big thanks to Ubuntu Forums article – How do I increase the hard disk size of the Virtual Machine article for inspiring this post.
Hope that helps anyone and thanks and other comments are always welcome ! 🙂
More helpful Articles

Tags: CentOS, debian linux, fedora, gentoo increase VBox VM size, GPARTED, Hard Disk Partition, home directory, Hope, linux increase virtual machine size, mount dev, move, need, root directory, usr, UUID, VDI, Virtualbox Virtual Machine, VM free space on disk partition
