Posts Tagged ‘active’

IPFilter firewall basics use for Adding / Removing and Cloning firewall rules

Thursday, June 1st, 2023

ipfilter-bsd-solaris-unix-firewall-short-review-ofLinux_firewalls-BSD_Firewall_logo

Linux users have most definitely used Netfilter (the older from us might remember and have used ipchains) and rest
should know well or at least partially tried iptables or if you have digged into Linux firewalls more professionally, might have tried nftables
and the newer firewalld (firewall-cmd) that is the standard nowadays in CentOS / Fedora and RHEL (again an abstraction over iptables.).
On Debian firewall is organized around custom shell scripts that deal with iptables chains, or if on Ubuntu perhaps you have tried UFW (The Uncomplicated Firewall)
frontend program for managing firewalls again with iptables. For the lazy ones UFW even has another GUI frontend called Gufw (intended to be easy, intuitive,
graphical user interface for managing Uncomlicated firewall.

Different Linux distributions do use a different set of firewall mechanisms preconfigure but there are other firewall solutions on other Unixes such as ipfilter.
That historically were heavily used that is worthy mentioning and if you happen to pop-up working as a network guy inside some large corporations you might face it.

IPFilter (commonly referred to as ipf) is an open-source software package that provides firewall services and network address translation (NAT) for many Unix-like operating systems.
The author and software maintainer is Darren Reed. IPFilter supports both IPv4 and IPv6 protocols, and is a stateful firewall.
IPFilter is delivered with FreeBSD, NetBSD, Solaris 10 & 11, illumos, OpenIndiana and HP-UX.
It used to be a part of OpenBSD, but it was removed by Theo de Raadt in May 2001 due to problems with its license.
It was subsequently replaced in OpenBSD by PF, which was developed by OpenBSD's own developers.
DragonFly BSD removed its support for IPFilter in May 2011.

IPFilter can be installed as a runtime-loadable kernel module or directly incorporated into the operating system kernel, depending on the specifics of each kernel and user preferences.
The software's documentation recommends the module approach, if possible.

Here are some commands for displaying, changing and distributing IP filters with ipfilter.
It will be mostly useful, if you happen to have some obsolete OS infrastructure or OpenBSD.

The commands given below are to add / remove and activate rules on machine with ipfilter:

# ipfilter –clone
# ipfilter –save
# ipfilter –activate
# ipfilter -addrule
# ipfilter -delrule
# help ipfilter

1. Check ipfilter current config

# ipfilter –show
Name: default_ipv4, Type: ipv4, State: active
Rule    Source IP                               Protocol   Dest Port   Action
1     any                                            tcp       22     permit
2     any                                            tcp       23     permit
3     any                                            tcp       80     permit
4     any                                            tcp      443     permit
5     any                                            udp      161     permit
6     any                                            udp      123     permit
7     any                                            tcp      600 – 1023     permit
8     any                                            udp      600 – 1023     permit
Name: default_ipv6, Type: ipv6, State: active
Rule    Source IP                               Protocol   Dest Port   Action
1     any                                            tcp       22     permit
2     any                                            tcp       23     permit
3     any                                            tcp       80     permit
4     any                                            tcp      443     permit
5     any                                            udp      161     permit
6     any                                            udp      123     permit
7     any                                            tcp      600 – 1023     permit
8     any                                            udp      600 – 1023     permit
Name: default_ipv4_new, Type: ipv4, State: defined
Rule    Source IP                               Protocol   Dest Port   Action
1     any                                            tcp       22     permit
2     any                                            tcp       23     permit
3     any                                            tcp       80     permit
4     any                                            tcp      443     permit
5     any                                            udp      161     permit
6     any                                            udp      123     permit
7     any                                            tcp      600 – 1023     permit
8     any                                            udp      600 – 1023     permit

2. Clone and activate ipfilter configuration

# ipfilter –clone default_ipv4_new -from default_ipv4
# ipfilter –activate default_ipv4_new
# ipfilter –show
Name: default_ipv4, Type: ipv4, State: defined
Rule    Source IP                               Protocol   Dest Port   Action
1     any                                            tcp       22     permit
2     any                                            tcp       23     permit
3     any                                            tcp       80     permit
4     any                                            tcp      443     permit
5     any                                            udp      161     permit
6     any                                            udp      123     permit
7     any                                            tcp      600 – 1023     permit
8     any                                            udp      600 – 1023     permit
Name: default_ipv6, Type: ipv6, State: active
Rule    Source IP                               Protocol   Dest Port   Action
1     any                                            tcp       22     permit
2     any                                            tcp       23     permit
3     any                                            tcp       80     permit
4     any                                            tcp      443     permit
5     any                                            udp      161     permit
6     any                                            udp      123     permit
7     any                                            tcp      600 – 1023     permit
8     any                                            udp      600 – 1023     permit
Name: default_ipv4_neu, Type: ipv4, State: active
Rule    Source IP                               Protocol   Dest Port   Action
1     any                                            tcp       22     permit
2     any                                            tcp       23     permit
3     any                                            tcp       80     permit
4     any                                            tcp      443     permit
5     any                                            udp      161     permit
6     any                                            udp      123     permit
7     any                                            tcp      600 – 1023     permit
8     any                                            udp      600 – 1023     permit

3. Modify cloned configuration

Lets say we would like to delete the telnet port accept traffic rule  (port 23)

# ipfilter –delrule default_ipv4_new -rule 2

To permit the rule agian

# ipfilter –addrule default_ipv4_new -rule 2 -sip any -dp 23 -proto tcp -act permit

To save the rule

# ipfilter –save default_ipv4_new                          

Enable zabbix agent to work with SeLinux enabled on CentOS 7 Linux

Wednesday, October 19th, 2022

If you have the task to install and use zabbix-agent or zabbix-proxy to report to zabbix-server on CentOS 7 with enabled SeLinux services for security reasons and you have no mean to disable the selinux which is a common step to take under this circumstances, you will have to add the zabbix services to be exluded as permissive in selinux. In below article I'll show you how this is done in few easy steps.

zabbix-agent-service-selinux-linux-real-time-operating-sytems


1. Check the system sestatus

[root@linux zabbix]# sestatus
SELinux status:                 enabled
SELinuxfs mount:                /sys/fs/selinux
SELinux root directory:         /etc/selinux
Loaded policy name:             targeted
Current mode:                   enforcing
Mode from config file:          enforcing

Policy MLS status:              enabled
Policy deny_unknown status:     allowed
Max kernel policy version:      28


2. Enable zabbix to be permissive in selinux

To be able to set zabbix to be in permissive mode as well as for further troubleshooting if you have to enable other  linux services inside selinux you have to install below RPM packs.

[root@linux zabbix]# yum install setroubleshoot.x86_64 setools.x86_64 setools-console.x86_64 policycoreutils-python.x86_64

Set the zabbix permissive exclude rule in SeLINUX

[root@linux zabbix]# semanage permissive –add zabbix_t

Re-run the zabbix proxy (if you have a local zabbix-proxy running and the zabbix-agent)

[root@linux zabbix]# systemctl start zabbix-proxy.service

[root@linux zabbix]# systemctl start zabbix-agent.service

[root@linux zabbix]# systemctl status zabbix-agent
● zabbix-agent.service – Zabbix Agent
   Loaded: loaded (/usr/lib/systemd/system/zabbix-agent.service; enabled; vendor preset: disabled)
   Active: active (running) since Tue 2022-10-18 09:30:16 CEST; 1 day 7h ago
 Main PID: 962952 (zabbix_agentd)
    Tasks: 6 (limit: 100884)
   Memory: 5.1M
   CGroup: /system.slice/zabbix-agent.service
           ├─962952 /usr/sbin/zabbix_agentd -c /etc/zabbix/zabbix_agentd.conf
           ├─962955 /usr/sbin/zabbix_agentd: collector [idle 1 sec]
           ├─962956 /usr/sbin/zabbix_agentd: listener #1 [waiting for connection]
           ├─962957 /usr/sbin/zabbix_agentd: listener #2 [waiting for connection]
           ├─962958 /usr/sbin/zabbix_agentd: listener #3 [waiting for connection]
           └─962959 /usr/sbin/zabbix_agentd: active checks #1 [idle 1 sec]

Oct 18 09:30:16 linux systemd[1]: Starting Zabbix Agent…
Oct 18 09:30:16 linux systemd[1]: Started Zabbix Agent.

3. Check inside audit logs all is OK

To make sure zabbix is really enabled to be omitted by selinux rules check audit.log

[root@linux zabbix]# grep zabbix_proxy /var/log/audit/audit.log

That's all folks, Enjoy ! 🙂

List and fix failed systemd failed services after Linux OS upgrade and how to get full info about systemd service from jorunal log

Friday, February 25th, 2022

systemd-logo-unix-linux-list-failed-systemd-services

I have recently upgraded a number of machines from Debian 10 Buster to Debian 11 Bullseye. The update as always has some issues on some machines, such as problem with package dependencies, changing a number of external package repositories etc. to match che Bullseye deb packages. On some machines the update was less painful on others but the overall line was that most of the machines after the update ended up with one or more failed systemd services. It could be that some of the machines has already had this failed services present and I never checked them from the previous time update from Debian 9 -> Debian 10 or just some mess I've left behind in the hurry when doing software installation in the past. This doesn't matter anyways the fact was that I had to deal to a number of systemctl services which I managed to track by the Failed service mesage on system boot on one of the physical machines and on the OpenXen VTY Console the rest of Virtual Machines after update had some Failed messages. Thus I've spend some good amount of time like an overall of a day or two fixing strange failed services. This is how this small article was born in attempt to help sysadmins or any home Linux desktop users, who has updated his Debian Linux / Ubuntu or any other deb based distribution but due to the chaotic nature of Linux has ended with same strange Failed services and look for a way to find the source of the failures and get rid of the problems. 
Systemd is a very complicated system and in my many sysadmin opinion it makes more problems than it solves, but okay for today's people's megalomania mindset it matches well.
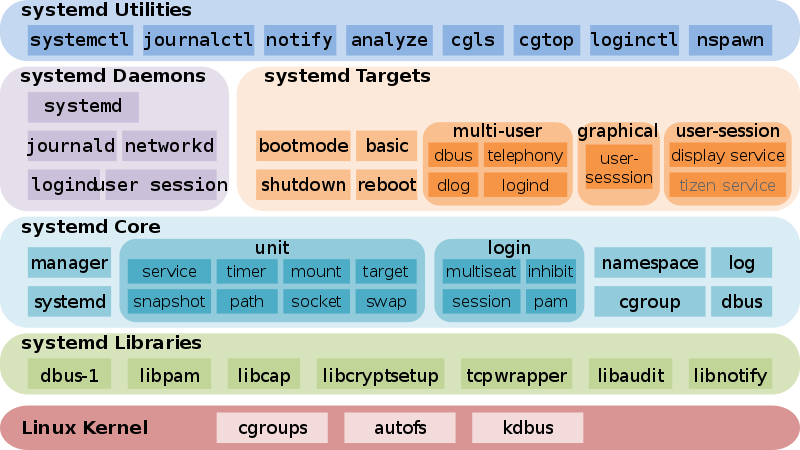
Systemd_components-systemd-journalctl-cgroups-loginctl-nspawn-analyze.svg


1. Check the journal for errors, running service irregularities and so on
 

First thing to do to track for errors, right after the update is to take some minutes and closely check,, the journalctl for any strange errors, even on well maintained Unix machines, this journal log would bring you to a problem that is not fatal but still some process or stuff is malfunctioning in the background that you would like to solve:
 

root@pcfreak:~# journalctl -x
Jan 10 10:10:01 pcfreak CRON[17887]: pam_unix(cron:session): session closed for user root
Jan 10 10:10:01 pcfreak audit[17887]: USER_END pid=17887 uid=0 auid=0 ses=340858 subj==unconfined msg='op=PAM:session_close grantors=pam_loginuid,pam_env,pam_env,pam_permit>
Jan 10 10:10:01 pcfreak audit[17888]: CRED_DISP pid=17888 uid=0 auid=0 ses=340860 subj==unconfined msg='op=PAM:setcred grantors=pam_permit acct="root" exe="/usr/sbin/cron" >
Jan 10 10:10:01 pcfreak CRON[17888]: pam_unix(cron:session): session closed for user root
Jan 10 10:10:01 pcfreak audit[17888]: USER_END pid=17888 uid=0 auid=0 ses=340860 subj==unconfined msg='op=PAM:session_close grantors=pam_loginuid,pam_env,pam_env,pam_permit>
Jan 10 10:10:01 pcfreak audit[17884]: CRED_DISP pid=17884 uid=0 auid=0 ses=340855 subj==unconfined msg='op=PAM:setcred grantors=pam_permit acct="root" exe="/usr/sbin/cron" >
Jan 10 10:10:01 pcfreak CRON[17884]: pam_unix(cron:session): session closed for user root
Jan 10 10:10:01 pcfreak audit[17884]: USER_END pid=17884 uid=0 auid=0 ses=340855 subj==unconfined msg='op=PAM:session_close grantors=pam_loginuid,pam_env,pam_env,pam_permit>
Jan 10 10:10:01 pcfreak audit[17886]: CRED_DISP pid=17886 uid=0 auid=33 ses=340859 subj==unconfined msg='op=PAM:setcred grantors=pam_permit acct="www-data" exe="/usr/sbin/c>
Jan 10 10:10:01 pcfreak CRON[17886]: pam_unix(cron:session): session closed for user www-data
Jan 10 10:10:01 pcfreak audit[17886]: USER_END pid=17886 uid=0 auid=33 ses=340859 subj==unconfined msg='op=PAM:session_close grantors=pam_loginuid,pam_env,pam_env,pam_permi>
Jan 10 10:10:08 pcfreak NetworkManager[696]:  [1641802208.0899] device (eth1): carrier: link connected
Jan 10 10:10:08 pcfreak kernel: r8169 0000:03:00.0 eth1: Link is Up – 100Mbps/Full – flow control rx/tx
Jan 10 10:10:08 pcfreak kernel: r8169 0000:03:00.0 eth1: Link is Down
Jan 10 10:10:19 pcfreak NetworkManager[696]:
 [1641802219.7920] device (eth1): carrier: link connected
Jan 10 10:10:19 pcfreak kernel: r8169 0000:03:00.0 eth1: Link is Up – 100Mbps/Full – flow control rx/tx
Jan 10 10:10:20 pcfreak kernel: r8169 0000:03:00.0 eth1: Link is Down
Jan 10 10:10:22 pcfreak NetworkManager[696]:
 [1641802222.2772] device (eth1): carrier: link connected
Jan 10 10:10:22 pcfreak kernel: r8169 0000:03:00.0 eth1: Link is Up – 100Mbps/Full – flow control rx/tx
Jan 10 10:10:23 pcfreak kernel: r8169 0000:03:00.0 eth1: Link is Down
Jan 10 10:10:33 pcfreak sshd[18142]: Unable to negotiate with 66.212.17.162 port 19255: no matching key exchange method found. Their offer: diffie-hellman-group14-sha1,diff>
Jan 10 10:10:41 pcfreak NetworkManager[696]:
 [1641802241.0186] device (eth1): carrier: link connected
Jan 10 10:10:41 pcfreak kernel: r8169 0000:03:00.0 eth1: Link is Up – 100Mbps/Full – flow control rx/tx

If you want to only check latest journal log messages use the -x -e (pager catalog) opts

root@pcfreak;~# journalctl -xe

Feb 25 13:08:29 pcfreak audit[2284920]: USER_LOGIN pid=2284920 uid=0 auid=4294967295 ses=4294967295 subj==unconfined msg='op=login acct=28696E76616C>
Feb 25 13:08:29 pcfreak sshd[2284920]: Received disconnect from 177.87.57.145 port 40927:11: Bye Bye [preauth]
Feb 25 13:08:29 pcfreak sshd[2284920]: Disconnected from invalid user ubuntuuser 177.87.57.145 port 40927 [preauth]

Next thing to after the update was to get a list of failed service only.


2. List all systemd failed check services which was supposed to be running

root@pcfreak:/root # systemctl list-units | grep -i failed
● certbot.service                                                                                                       loaded failed failed    Certbot
● logrotate.service                                                                                                     loaded failed failed    Rotate log files
● maldet.service                                                                                                        loaded failed failed    LSB: Start/stop maldet in monitor mode
● named.service                                                                                                         loaded failed failed    BIND Domain Name Server


Alternative way is with the –failed option

hipo@jeremiah:~$ systemctl list-units –failed
  UNIT                        LOAD   ACTIVE SUB    DESCRIPTION
● haproxy.service             loaded failed failed HAProxy Load Balancer
● libvirt-guests.service      loaded failed failed Suspend/Resume Running libvirt Guests
● libvirtd.service            loaded failed failed Virtualization daemon
● nvidia-persistenced.service loaded failed failed NVIDIA Persistence Daemon
● sqwebmail.service           masked failed failed sqwebmail.service
● tpm2-abrmd.service          loaded failed failed TPM2 Access Broker and Resource Management Daemon
● wd_keepalive.service        loaded failed failed LSB: Start watchdog keepalive daemon

LOAD   = Reflects whether the unit definition was properly loaded.
ACTIVE = The high-level unit activation state, i.e. generalization of SUB.
SUB    = The low-level unit activation state, values depend on unit type.
7 loaded units listed.


root@jeremiah:/etc/apt/sources.list.d#  systemctl list-units –failed
  UNIT                        LOAD   ACTIVE SUB    DESCRIPTION
● haproxy.service             loaded failed failed HAProxy Load Balancer
● libvirt-guests.service      loaded failed failed Suspend/Resume Running libvirt Guests
● libvirtd.service            loaded failed failed Virtualization daemon
● nvidia-persistenced.service loaded failed failed NVIDIA Persistence Daemon
● sqwebmail.service           masked failed failed sqwebmail.service
● tpm2-abrmd.service          loaded failed failed TPM2 Access Broker and Resource Management Daemon
● wd_keepalive.service        loaded failed failed LSB: Start watchdog keepalive daemon


To get a full list of objects of systemctl you can pass as state:
 

# systemctl –state=help
Full list of possible load states to pass is here
Show service properties


Check whether a service is failed or has other status and check default set systemd variables for it.

root@jeremiah~:# systemctl is-failed vboxweb.service
inactive

# systemctl show haproxy
Type=notify
Restart=always
NotifyAccess=main
RestartUSec=100ms
TimeoutStartUSec=1min 30s
TimeoutStopUSec=1min 30s
TimeoutAbortUSec=1min 30s
TimeoutStartFailureMode=terminate
TimeoutStopFailureMode=terminate
RuntimeMaxUSec=infinity
WatchdogUSec=0
WatchdogTimestampMonotonic=0
RootDirectoryStartOnly=no
RemainAfterExit=no
GuessMainPID=yes
SuccessExitStatus=143
MainPID=304858
ControlPID=0
FileDescriptorStoreMax=0
NFileDescriptorStore=0
StatusErrno=0
Result=success
ReloadResult=success
CleanResult=success

Full output of the above command is dumped in show_systemctl_properties.txt


3. List all running systemd services for a better overview on what's going on on machine
 

To get a list of all properly systemd loaded services you can use –state running.

hipo@jeremiah:~$ systemctl list-units –state running|head -n 10
  UNIT                              LOAD   ACTIVE SUB     DESCRIPTION
  proc-sys-fs-binfmt_misc.automount loaded active running Arbitrary Executable File Formats File System Automount Point
  cups.path                         loaded active running CUPS Scheduler
  init.scope                        loaded active running System and Service Manager
  session-2.scope                   loaded active running Session 2 of user hipo
  accounts-daemon.service           loaded active running Accounts Service
  anydesk.service                   loaded active running AnyDesk
  apache-htcacheclean.service       loaded active running Disk Cache Cleaning Daemon for Apache HTTP Server
  apache2.service                   loaded active running The Apache HTTP Server
  avahi-daemon.service              loaded active running Avahi mDNS/DNS-SD Stack


It is useful thing is to list all unit-files configured in systemd and their state, you can do it with:


root@pcfreak:~# systemctl list-unit-files
UNIT FILE                                                                 STATE           VENDOR PRESET
proc-sys-fs-binfmt_misc.automount                                         static          –            
-.mount                                                                   generated       –            
backups.mount                                                             generated       –            
dev-hugepages.mount                                                       static          –            
dev-mqueue.mount                                                          static          –            
media-cdrom0.mount                                                        generated       –            
mnt-sda1.mount                                                            generated       –            
proc-fs-nfsd.mount                                                        static          –            
proc-sys-fs-binfmt_misc.mount                                             disabled        disabled     
run-rpc_pipefs.mount                                                      static          –            
sys-fs-fuse-connections.mount                                             static          –            
sys-kernel-config.mount                                                   static          –            
sys-kernel-debug.mount                                                    static          –            
sys-kernel-tracing.mount                                                  static          –            
var-www.mount                                                             generated       –            
acpid.path                                                                masked          enabled      
cups.path                                                                 enabled         enabled      


root@pcfreak:~# systemctl list-units –type service –all
  UNIT                                   LOAD      ACTIVE   SUB     DESCRIPTION
  accounts-daemon.service                loaded    inactive dead    Accounts Service
  acct.service                           loaded    active   exited  Kernel process accounting
● alsa-restore.service                   not-found inactive dead    alsa-restore.service
● alsa-state.service                     not-found inactive dead    alsa-state.service
  apache2.service                        loaded    active   running The Apache HTTP Server
● apparmor.service                       not-found inactive dead    apparmor.service
  apt-daily-upgrade.service              loaded    inactive dead    Daily apt upgrade and clean activities
 apt-daily.service                      loaded    inactive dead    Daily apt download activities
  atd.service                            loaded    active   running Deferred execution scheduler
  auditd.service                         loaded    active   running Security Auditing Service
  auth-rpcgss-module.service             loaded    inactive dead    Kernel Module supporting RPCSEC_GSS
  avahi-daemon.service                   loaded    active   running Avahi mDNS/DNS-SD Stack
  certbot.service                        loaded    inactive dead    Certbot
  clamav-daemon.service                  loaded    active   running Clam AntiVirus userspace daemon
  clamav-freshclam.service               loaded    active   running ClamAV virus database updater
..


linux-systemd-components-diagram-linux-kernel-system-targets-systemd-libraries-daemons


4. Finding out more on why a systemd configured service has failed


Usually getting info about failed systemd service is done with systemctl status servicename.service
However, in case of troubles with service unable to start to get more info about why a service has failed with (-l) or (–full) options


root@pcfreak:~# systemctl -l status logrotate.service
● logrotate.service – Rotate log files
     Loaded: loaded (/lib/systemd/system/logrotate.service; static)
     Active: failed (Result: exit-code) since Fri 2022-02-25 00:00:06 EET; 13h ago
TriggeredBy: ● logrotate.timer
       Docs: man:logrotate(8)
             man:logrotate.conf(5)
    Process: 2045320 ExecStart=/usr/sbin/logrotate /etc/logrotate.conf (code=exited, status=1/FAILURE)
   Main PID: 2045320 (code=exited, status=1/FAILURE)
        CPU: 2.479s

Feb 25 00:00:06 pcfreak logrotate[2045577]: 2022/02/25 00:00:06| WARNING: For now we will assume you meant to write /32
Feb 25 00:00:06 pcfreak logrotate[2045577]: 2022/02/25 00:00:06| ERROR: '0.0.0.0/0.0.0.0' needs to be replaced by the term 'all'.
Feb 25 00:00:06 pcfreak logrotate[2045577]: 2022/02/25 00:00:06| SECURITY NOTICE: Overriding config setting. Using 'all' instead.
Feb 25 00:00:06 pcfreak logrotate[2045577]: 2022/02/25 00:00:06| WARNING: (B) '::/0' is a subnetwork of (A) '::/0'
Feb 25 00:00:06 pcfreak logrotate[2045577]: 2022/02/25 00:00:06| WARNING: because of this '::/0' is ignored to keep splay tree searching predictable
Feb 25 00:00:06 pcfreak logrotate[2045577]: 2022/02/25 00:00:06| WARNING: You should probably remove '::/0' from the ACL named 'all'
Feb 25 00:00:06 pcfreak systemd[1]: logrotate.service: Main process exited, code=exited, status=1/FAILURE
Feb 25 00:00:06 pcfreak systemd[1]: logrotate.service: Failed with result 'exit-code'.
Feb 25 00:00:06 pcfreak systemd[1]: Failed to start Rotate log files.
Feb 25 00:00:06 pcfreak systemd[1]: logrotate.service: Consumed 2.479s CPU time.


systemctl -l however is providing only the last log from message a started / stopped or whatever status service has generated. Sometimes systemctl -l servicename.service is showing incomplete the splitted error message as there is a limitation of line numbers on the console, see below


root@pcfreak:~# systemctl status -l certbot.service
● certbot.service – Certbot
     Loaded: loaded (/lib/systemd/system/certbot.service; static)
     Active: failed (Result: exit-code) since Fri 2022-02-25 09:28:33 EET; 4h 0min ago
TriggeredBy: ● certbot.timer
       Docs: file:///usr/share/doc/python-certbot-doc/html/index.html
             https://certbot.eff.org/docs
    Process: 290017 ExecStart=/usr/bin/certbot -q renew (code=exited, status=1/FAILURE)
   Main PID: 290017 (code=exited, status=1/FAILURE)
        CPU: 9.771s

Feb 25 09:28:33 pcfrxen certbot[290017]: The error was: PluginError('An authentication script must be provided with –manual-auth-hook when using th>
Feb 25 09:28:33 pcfrxen certbot[290017]: All renewals failed. The following certificates could not be renewed:
Feb 25 09:28:33 pcfrxen certbot[290017]:   /etc/letsencrypt/live/mail.pcfreak.org-0003/fullchain.pem (failure)
Feb 25 09:28:33 pcfrxen certbot[290017]:   /etc/letsencrypt/live/www.eforia.bg-0005/fullchain.pem (failure)
Feb 25 09:28:33 pcfrxen certbot[290017]:   /etc/letsencrypt/live/zabbix.pc-freak.net/fullchain.pem (failure)
Feb 25 09:28:33 pcfrxen certbot[290017]: 3 renew failure(s), 5 parse failure(s)
Feb 25 09:28:33 pcfrxen systemd[1]: certbot.service: Main process exited, code=exited, status=1/FAILURE
Feb 25 09:28:33 pcfrxen systemd[1]: certbot.service: Failed with result 'exit-code'.
Feb 25 09:28:33 pcfrxen systemd[1]: Failed to start Certbot.
Feb 25 09:28:33 pcfrxen systemd[1]: certbot.service: Consumed 9.771s CPU time.


5. Get a complete log of journal to make sure everything configured on server host runs as it should

Thus to get more complete list of the message and be able to later google and look if has come with a solution on the internet  use:

root@pcfrxen:~#  journalctl –catalog –unit=certbot

— Journal begins at Sat 2022-01-22 21:14:05 EET, ends at Fri 2022-02-25 13:32:01 EET. —
Jan 23 09:58:18 pcfrxen systemd[1]: Starting Certbot…
░░ Subject: A start job for unit certbot.service has begun execution
░░ Defined-By: systemd
░░ Support: https://www.debian.org/support
░░ 
░░ A start job for unit certbot.service has begun execution.
░░ 
░░ The job identifier is 5754.
Jan 23 09:58:20 pcfrxen certbot[124996]: Traceback (most recent call last):
Jan 23 09:58:20 pcfrxen certbot[124996]:   File "/usr/lib/python3/dist-packages/certbot/_internal/renewal.py", line 71, in _reconstitute
Jan 23 09:58:20 pcfrxen certbot[124996]:     renewal_candidate = storage.RenewableCert(full_path, config)
Jan 23 09:58:20 pcfrxen certbot[124996]:   File "/usr/lib/python3/dist-packages/certbot/_internal/storage.py", line 471, in __init__
Jan 23 09:58:20 pcfrxen certbot[124996]:     self._check_symlinks()
Jan 23 09:58:20 pcfrxen certbot[124996]:   File "/usr/lib/python3/dist-packages/certbot/_internal/storage.py", line 537, in _check_symlinks

root@server:~# journalctl –catalog –unit=certbot|grep -i pluginerror|tail -1
Feb 25 09:28:33 pcfrxen certbot[290017]: The error was: PluginError('An authentication script must be provided with –manual-auth-hook when using the manual plugin non-interactively.')


Or if you want to list and read only the last messages in the journal log regarding a service

root@server:~# journalctl –catalog –pager-end –unit=certbot


If you have disabled a failed service because you don't need it to run at all on the machine with:

root@rhel:~# systemctl stop rngd.service
root@rhel:~# systemctl disable rngd.service

And you want to clear up any failed service information that is kept in the systemctl service log you can do it with:
 

root@rhel:~# systemctl reset-failed

Another useful systemctl option is cat, you can use it to easily list a service it is useful to quickly check what is a service, an actual shortcut to save you from giving a full path to the service e.g. cat /lib/systemd/system/certbot.service

root@server:~# systemctl cat certbot
# /lib/systemd/system/certbot.service
[Unit]
Description=Certbot
Documentation=file:///usr/share/doc/python-certbot-doc/html/index.html
Documentation=https://certbot.eff.org/docs
[Service]
Type=oneshot
ExecStart=/usr/bin/certbot -q renew
PrivateTmp=true


After failed SystemD services are fixed, it is best to reboot the machine and check put some more time to inspect rawly the complete journal log to make sure, no error  was left behind.


Closure
 

As you can see updating a machine from a major to a major version even if you follow the official documentation and you have plenty of experience is always more or a less a pain in the ass, which can eat up much of your time banging your head solving problems with failed daemons issues with /etc/rc.local (which I have faced becase of #/bin/sh -e (which would make /etc/rc.local) to immediately quit if any error from command $? returns different from 0 etc.. The  logical questions comes then;
1. Is it really worthy to update at all regularly, especially if you don't know of a famous major Vulnerability 🙂 ?
2. Or is it worthy to update from OS major release to OS major release at all?  
3. Or should you only try to patch the service that is exposed to an external reachable computer network or the internet only and still the the same OS release until End of Life (LTS = Long Term Support) as called in Debian or  End Of Life  (EOL) Cycle as called in RPM based distros the period until the OS major release your software distro has official security patches is reached.

Anyone could take any approach but for my own managed systems small network at home my practice was always to try to keep up2date everything every 3 or 6 months maximum. This has caused me multiple days of irritation and stress and perhaps many white hairs and spend nerves on shit.


4. Based on the company where I'm employed the better strategy is to patch to the EOL is still offered and keep the rule First Things First (FTF), once the EOL is reached, just make a copy of all servers data and configuration to external Data storage, bring up a new Physical or VM and migrate the services.
Test after the migration all works as expected if all is as it should be change the DNS records or Leading Infrastructure Proxies whatever to point to the new service and that's it! Yes it is true that migration based on a full OS reinstall is more time consuming and requires much more planning, but usually the result is much more expected, plus it is much less stressful for the guy doing the job.

How to set up dsmc client Tivoli ( TSM ) release version and process check monitoring with Zabbix

Thursday, December 17th, 2020

zabbix-monitor-dsmc-client-monitor-ibm-tsm-with-zabbix-howto

As a part of Monitoring IBM Spectrum (the new name of IBM TSM) if you don't have the money to buy something like HP Open View monitoring or other kind of paid monitoring system but you use Zabbix open source solution to monitor your Linux server infrastructure and you use Zabbix as a main Services and Servers monitoring platform you will want to monitor at least whether the running Tivoli dsmc backup clients run fine on each of the server (e.g. the dsmc client) runs normally as a backup solution with its common /usr/bin/dsmc process service that connects towards remote IBM TSM server where the actual Data storage is kept.

It might be a kind of weird monitoring to setup to have the tsm version frequently reported to a Zabbix server on a first glimpse, but in reality this is quite useful especially if you want to have a better overview of your multiple servers environment IBM (Spectrum Protect) Storage manager backup solution actual release.
 
So the goal is to have reported dsmc interactive storage manager version as reported from
 

[root@server ~]# dsmc

IBM Spectrum Protect
Command Line Backup-Archive Client Interface
  Client Version 8, Release 1, Level 11.0
  Client date/time: 12/17/2020 15:59:32
(c) Copyright by IBM Corporation and other(s) 1990, 2020. All Rights Reserved.

Node Name: Sub-Hostname.FQDN.COM
Session established with server TSM_SERVER: AIX
  Server Version 8, Release 1, Level 10.000
  Server date/time: 12/17/2020 15:59:34  Last access: 12/17/2020 13:28:01


into zabbix and set reports in case if your sysadmins have changed version of a IBM TSM to a newer version. Thus for non sysadmins and less technical persons as Service Delivery Managers (SDMs) it is much easier to track changes of multiple servers Tivoli version to a newer one.

Enough talk let me next show you how to setup the required with a small UserParameter one liner bash shell script.
 

1. Create TSM Userparameter script


With Userparameter key and content as below:

[root@server ~]# vim /etc/zabbix/zabbix_agentd.d/userparameter_TSM.conf


UserParameter=dsmc.version,cat /var/tsm/sched.log | grep Clie | tail -n 1 | awk '{print $7 " " $8 " " $9 " " $10 " " $11 " " $12 " " $13}'


The script output of TivSM version will be reported as so:

[root@server ~]# cat /var/tsm/sched.log | grep Clie | tail -n 1 | awk '{print $7 " " $8 " " $9 " " $10 " " $11 " " $12 " " $13}'
Client Version 8, Release 1, Level 11.0


If you want to get only a major version report from dsmc:

UserParameter=dsmc.version,cat /var/tsm/sched.log | grep Clie | tail -n 1 | awk '{print $7 " " $8 " " $9}'


The output as a major version you will get is

[root@server ~]# cat /var/tsm/sched.log | grep Clie | tail -n 1 | awk '{print $7 " " $8 " " $9}'
Client Version 8,


2. Restart the zabbix agent to load userparam script

To load above configured Userparameter script we need to restart zabbix-agent client

[root@server ~]# systemctl restart zabbix-agent

[root@server ~]#  systemctl status zabbix-agent
● zabbix-agent.service – Zabbix Agent
   Loaded: loaded (/usr/lib/systemd/system/zabbix-agent.service; enabled; vendor preset: disabled)
   Active: active (running) since Wed 2020-07-22 16:17:17 CEST; 4 months 26 days ago
 Main PID: 7817 (zabbix_agentd)
   CGroup: /system.slice/zabbix-agent.service
           ├─7817 /usr/sbin/zabbix_agentd -c /etc/zabbix/zabbix_agentd.conf
           ├─7818 /usr/sbin/zabbix_agentd: collector [idle 1 sec]
           ├─7819 /usr/sbin/zabbix_agentd: listener #1 [waiting for connection]
           ├─7820 /usr/sbin/zabbix_agentd: listener #2 [waiting for connection]
           ├─7821 /usr/sbin/zabbix_agentd: listener #3 [waiting for connection]
           └─7822 /usr/sbin/zabbix_agentd: active checks #1 [idle 1 sec]


3. Create template for TSM Service check and TSM Version


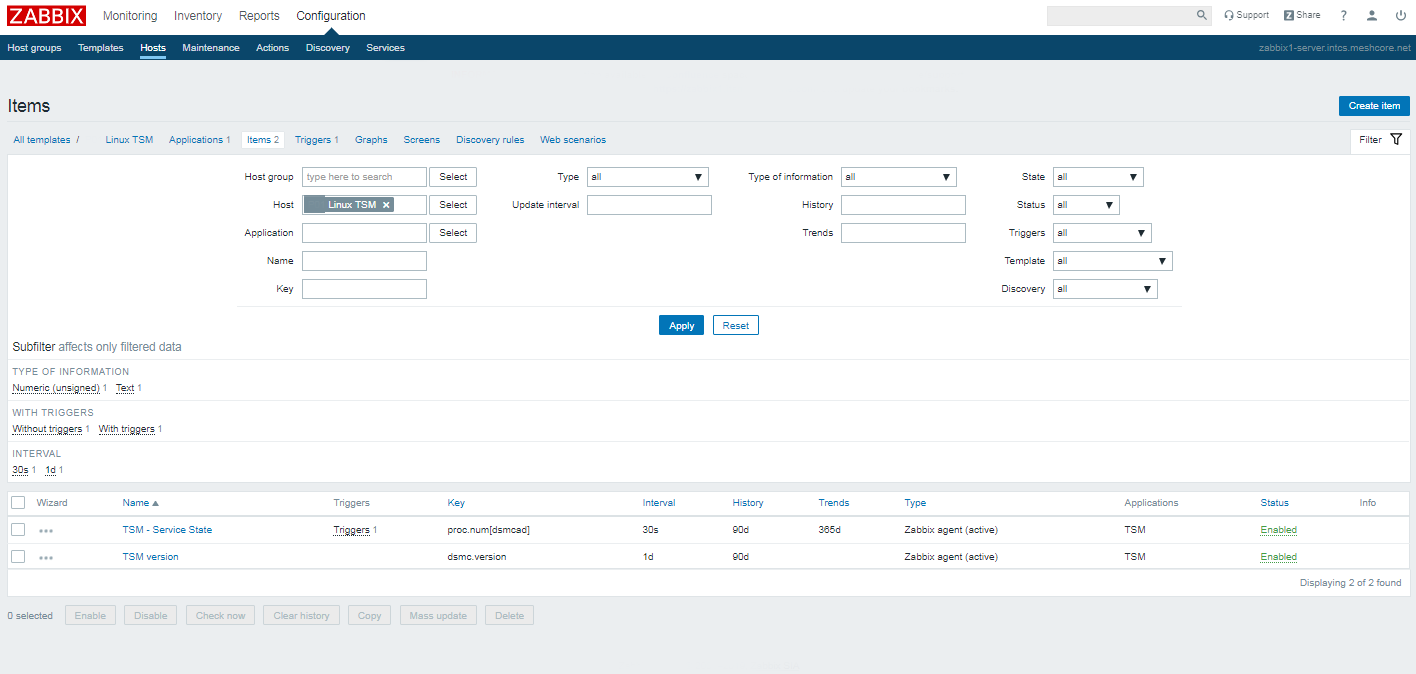
You will need to create 1 Trigger and 2 Items for the Service check and for TSM version reporting

tsm-service-version-screenshot-zabbix
As you see necessery names / keys to create are:

Name / Key: TSM – Service State proc.num{dsmcad}

Name / key: TSM version dmsc.version


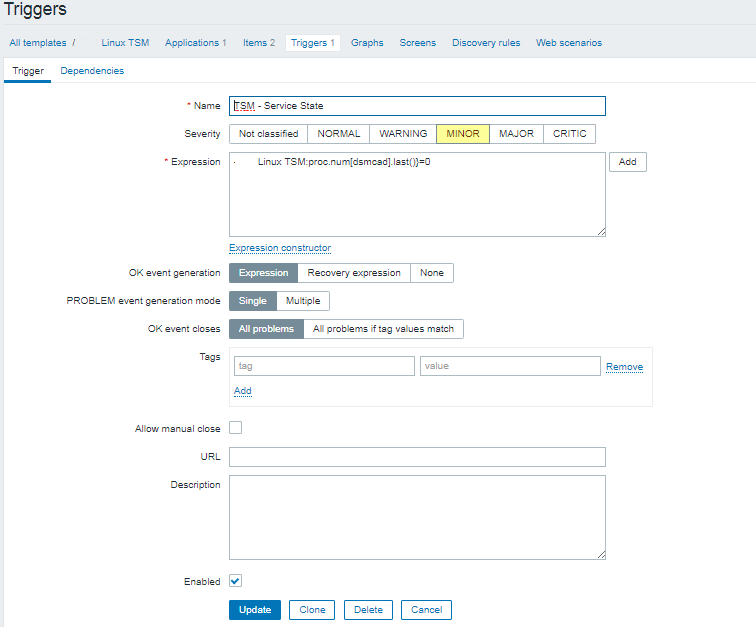
3.1 Create the trigger


Now lets create the trigger that will report the Service State

tsm-service-state-zabbix-screenshot


Linux TSM:proc.num[dsmcad].last()}=0


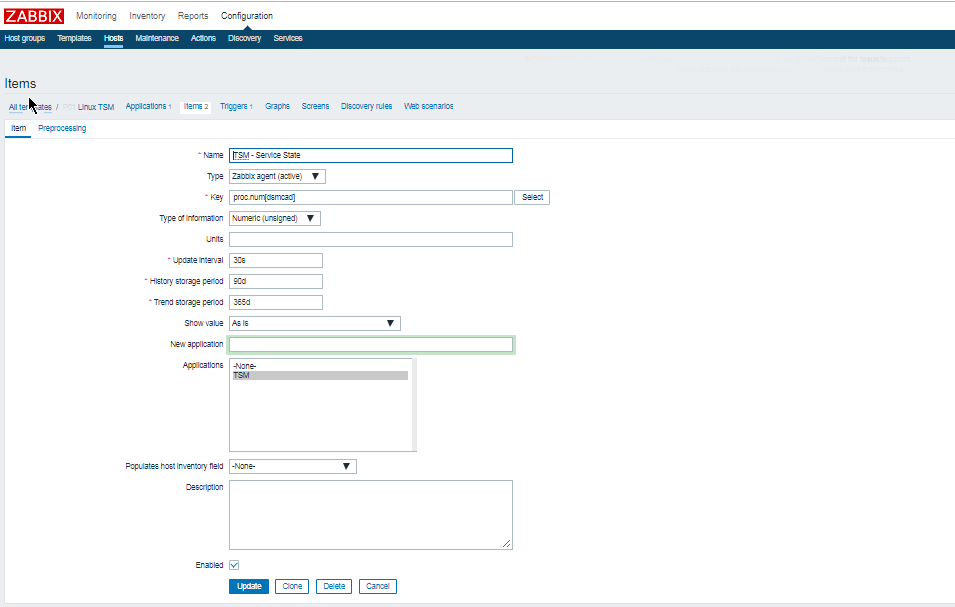
3.2 Create the Items


zabbix-dsmc-proc-num-item-setting-screenshot-linux


Name: dsmcad
Key: proc.num{dsmcad}


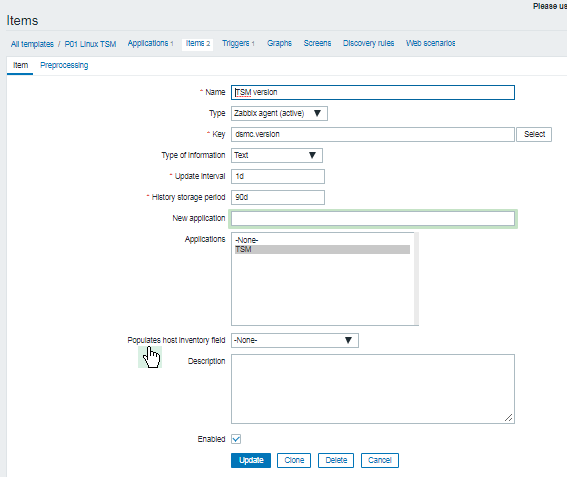
tsm-version-item-zabbix-screenshot
 

Update interval: 1d
History Storage period: 90d
Applications: TSM


3.3 Create Zabbix Action

As usual if you want to receive some Email Alerting or lets say send SMS in case of Trigger is matched create the necessery Action with
instructions on how to solve the problem if there is a Standard Operation Procedure ( SOP ) as often called in the corporate world for that.

That's all folks ! 🙂


Fix Zabbix selinux caused permission issues on CentOS 7 Linux / cannot set resource limit: [13] Permission denied error solution

Tuesday, July 6th, 2021

zabbix-selinux-logo-fix-zabbix-permission-issues-when-running-on-ceontos-linux-change-selinux-to-permissive-howto.

If you have to install Zabbix client that has to communicate towards Zabbix server via a Zabbix Proxy you might be unpleasently surprised that it cannot cannot be start if the selinux mode is set to Enforcing.
Error message like on below screenshot will be displayed when starting proxy client with systemctl.

zabbix-proxy-cannot-be-started-due-to-selinux-permissions

In the zabbix logs you will see error  messages such as:
 

"cannot set resource limit: [13] Permission denied, CentOS 7"


29085:20160730:062959.263 Starting Zabbix Agent [Test host]. Zabbix 3.0.4 (revision 61185).
29085:20160730:062959.263 **** Enabled features ****
29085:20160730:062959.263 IPv6 support: YES
29085:20160730:062959.263 TLS support: YES
29085:20160730:062959.263 **************************
29085:20160730:062959.263 using configuration file: /etc/zabbix/zabbix_agentd.conf
29085:20160730:062959.263 cannot set resource limit: [13] Permission denied
29085:20160730:062959.263 cannot disable core dump, exiting…


Next step to do is to check whether zabbix is listed in selinux's enabled modules to do so run:
 

[root@centos ~ ]# semodules -l

…..
vhostmd    1.1.0
virt    1.5.0
vlock    1.2.0
vmtools    1.0.0
vmware    2.7.0
vnstatd    1.1.0
vpn    1.16.0
w3c    1.1.0
watchdog    1.8.0
wdmd    1.1.0
webadm    1.2.0
webalizer    1.13.0
wine    1.11.0
wireshark    2.4.0
xen    1.13.0
xguest    1.2.0
xserver    3.9.4
zabbix    1.6.0
zarafa    1.2.0
zebra    1.13.0
zoneminder    1.0.0
zosremote    1.2.0


[root@centos ~ ]# sestatus
# sestatusSELinux status:                 enabled
SELinuxfs mount:                /sys/fs/selinux
SELinux root directory:         /etc/selinux
Loaded policy name:             targeted
Current mode:                   enforcing
Mode from config file:          enforcing
Policy MLS status:              enabled
Policy deny_unknown status:     allowed
Max kernel policy version:      28

To get exact zabbix IDs that needs to be added as permissive for Selinux you can use ps -eZ like so:

[root@centos ~ ]# ps -eZ |grep -i zabbix
system_u:system_r:zabbix_agent_t:s0 1149 ?     00:00:00 zabbix_agentd
system_u:system_r:zabbix_agent_t:s0 1150 ?     00:04:28 zabbix_agentd
system_u:system_r:zabbix_agent_t:s0 1151 ?     00:00:00 zabbix_agentd
system_u:system_r:zabbix_agent_t:s0 1152 ?     00:00:00 zabbix_agentd
system_u:system_r:zabbix_agent_t:s0 1153 ?     00:00:00 zabbix_agentd
system_u:system_r:zabbix_agent_t:s0 1154 ?     02:21:46 zabbix_agentd

As you can see zabbix is enabled and hence selinux enforcing mode is preventing zabbix client / server to operate and communicate normally, hence to make it work we need to change zabbix agent and zabbix proxy to permissive mode.

Setting selinux for zabbix agent and zabbix proxy to permissive mode

If you don't have them installed you might neet the setroubleshoot setools, setools-console and policycoreutils-python rpms packs (if you have them installed skip this step).

[root@centos ~ ]# yum install setroubleshoot.x86_64 setools.x86_64 setools-console.x86_64 policycoreutils-python.x86_64

Then to add zabbix service to become permissive either run

[root@centos ~ ]# semanage permissive –add zabbix_t

[root@centos ~ ]# semanage permissive -a zabbix_agent_t


In some cases you might also need in case if just adding the permissive for zabbix_agent_t try also :

setsebool -P zabbix_can_network=1

Next try to start zabbox-proxy and zabbix-agent systemd services 

[root@centos ~ ]# systemctl start zabbix-proxy.service

[root@centos ~ ]# systemctl start zabbix-agent.service

Hopefully all should report fine with the service checking the status should show you something like:

[root@centos ~ ]# systemctl status zabbix-agent
● zabbix-agent.service – Zabbix Agent
   Loaded: loaded (/usr/lib/systemd/system/zabbix-agent.service; enabled; vendor preset: disabled)
   Active: active (running) since Thu 2021-06-24 07:47:42 CEST; 1 weeks 5 days ago
 Main PID: 1149 (zabbix_agentd)
   CGroup: /system.slice/zabbix-agent.service
           ├─1149 /usr/sbin/zabbix_agentd -c /etc/zabbix/zabbix_agentd.conf
           ├─1150 /usr/sbin/zabbix_agentd: collector [idle 1 sec]
           ├─1151 /usr/sbin/zabbix_agentd: listener #1 [waiting for connection]
           ├─1152 /usr/sbin/zabbix_agentd: listener #2 [waiting for connection]
           ├─1153 /usr/sbin/zabbix_agentd: listener #3 [waiting for connection]
           └─1154 /usr/sbin/zabbix_agentd: active checks #1 [idle 1 sec]

Check the Logs finally to make sure all is fine with zabbix being allowed by selinux.

[root@centos ~ ]# grep zabbix_proxy /var/log/audit/audit.log

[root@centos ~ ]# tail -n 100 /var/log/zabbix/zabbix_agentd.log


If no errors are in and you receive and you can visualize the usual zabbix collected CPU / Memory / Disk etc. values you're good, Enjoy ! 🙂

Check when Windows Active Directory user expires and set user password expire to Never

Thursday, January 9th, 2020

micorosoft-windows-10-logo-net-user-command-check-expiry-dates

If you're working for a company that is following high security / PCI Security Standards and you're using m$ Windows OS that belongs to the domain it is useful to know when your user is set to expiry
to know how many days are left until you'll be forced to change your Windows AD password.
In this short article I'll explain how to check Windows AD last password set date / date expiry date and how you can list expiry dates for other users, finally will explain how to set your expiry date to Never
to get rid of annoying change password every 90 days.


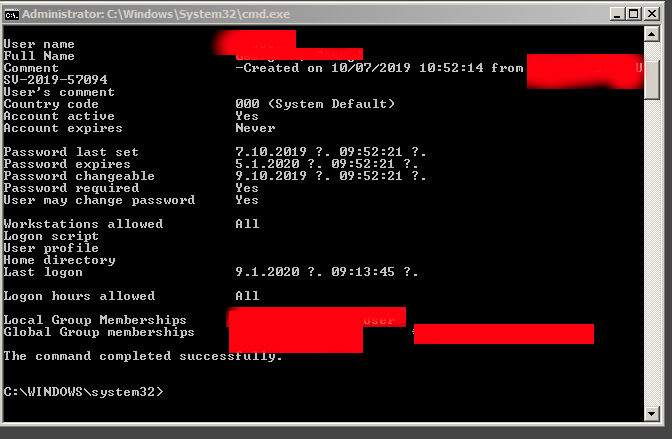
1. Query domain Username for Password set / Password Expires set dates

To know this info you need to know the Password expiration date for Active Directory user account, to know it just open Command Line Prompt cmd.exe

And run command:


NET USER Your-User-Name /domain


net-user-domain-command-check-AD-user-expiry

Note that, many companies does only connect you to AD for security reason only on a VPN connect with something like Cisco AnyConnect Secure Mobility Client whatever VPN connect tool is used to encrypt the traffic between you and the corporate DMZ-ed network

Below is basic NET USER command usage args:

Net User Command Options
 

Item          Explanation

net user    Execute the net user command alone to show a very simple list of every user account, active or not, on the computer you're currently using.

username    This is the name of the user account, up to 20 characters long, that you want to make changes to, add, or remove. Using username with no other option will show detailed information about the user in the Command Prompt window.

password    Use the password option to modify an existing password or assign one when creating a new username. The minimum characters required can be viewed using the net accounts command. A maximum of 127 characters is allowed1.
*    You also have the option of using * in place of a password to force the entering of a password in the Command Prompt window after executing the net user command.

/add    Use the /add option to add a new username on the system.
options    See Additional Net User Command Options below for a complete list of available options to be used at this point when executing net user.

/domain    This switch forces net user to execute on the current domain controller instead of the local computer.

/delete    The /delete switch removes the specified username from the system.

/help    Use this switch to display detailed information about the net user command. Using this option is the same as using the net help command with net user: net help user.
/?    The standard help command switch also works with the net user command but only displays the basic command syntax. Executing net user without options is equal to using the /? switch.


2. Listing all Active Directory users last set date / never expires and expiration dates


If you have the respective Active Directory rights and you have the Remote Server Administration Tools for Windows (RSAT Tools), you are able to do also other interesting stuff,


such as

– using PowerShell to list all user last set dates, to do so use Open Power Shell and issue:
 

get-aduser -filter * -properties passwordlastset, passwordneverexpires |ft Name, passwordlastset, Passwordneverexpires


get-aduser-properties-passwordlastset-passwordneverexpires1

This should show you info as password last set date and whether password expiration is set for account.

– Using PS to get only the password expirations for all AD existing users is with:


Get-ADUser -filter {Enabled -eq $True -and PasswordNeverExpires -eq $False} –Properties "DisplayName", "msDS-UserPasswordExpiryTimeComputed" |
Select-Object -Property "Displayname",@{Name="ExpiryDate";Expression={[datetime]::FromFileTime($_."msDS-UserPasswordExpiryTimeComputed")}}


If you need the output data to get stored in CSV file delimitered format you can add to above PS commands
 

| export-csv YOUR-OUTPUT-FILE.CSV


3. Setting a user password to never Expiry


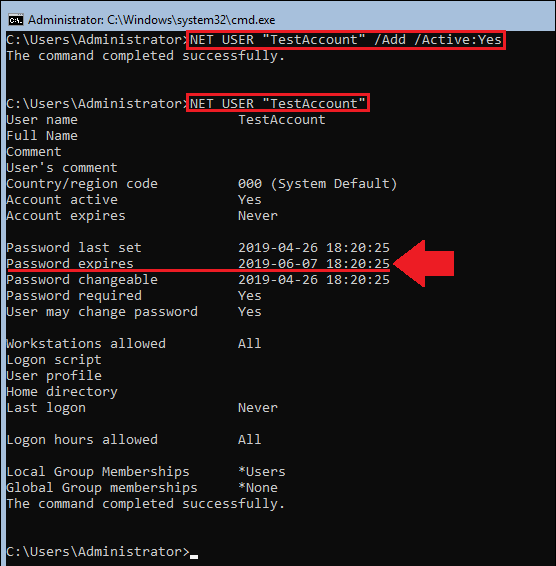
If the user was created with NET USER command by default it will have been created to have a password expiration. 
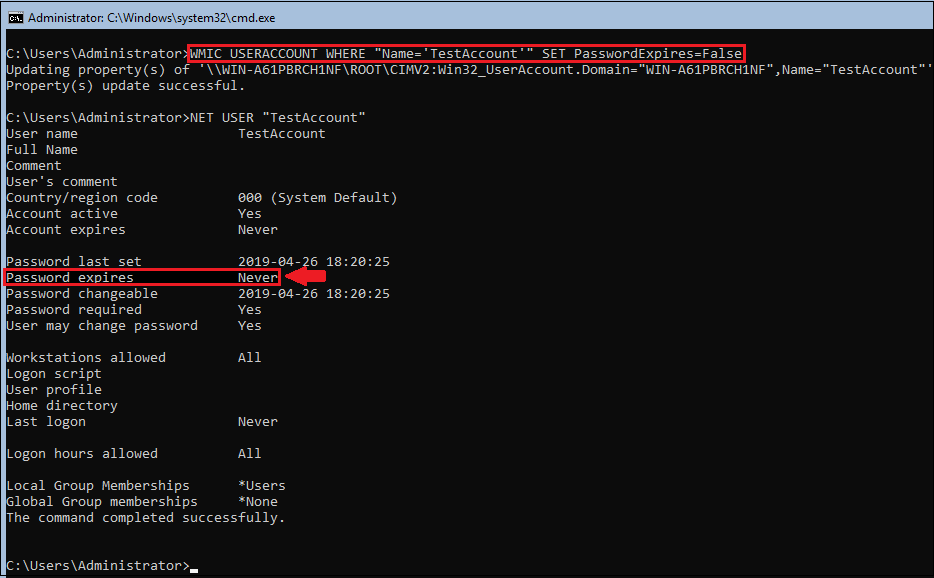
However if you need to create new users for yourself (assuming you have the rights), with passwords that never expire on lets say Windows Server 2016 – (if you don't care about security so much), use:
 

NET USER "Username" /Add /Active:Yes

WMIC USERACCOUNT WHERE "Name='Username' SET PasswordExpires=False


NET-USER-ADD_Active-yes-Microsoft-Windows-screenshot

NET-USER-set-password-policy-to-Never-expiry-MS-Windows

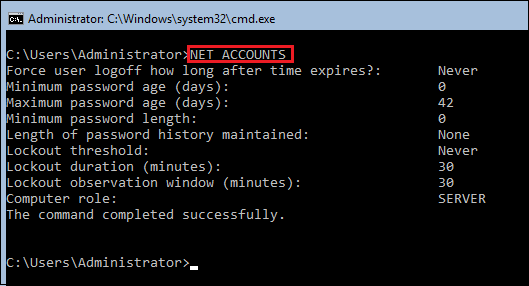
To view the general password policies, type following:
 

NET ACCOUNTS


NET-ACCOUNTS-view-default-Microsoft-Windows-password-policy