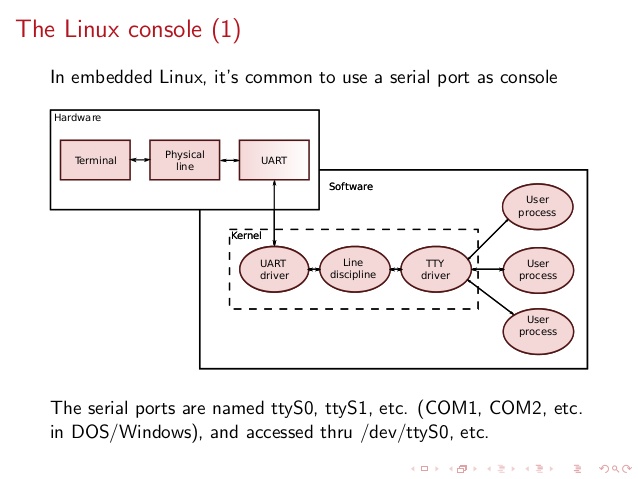
System Console, Command Operation Console or Terminal is a Physical device for text (command) input from keyboard, getting the command output and monitoring the status of a shell or programs I/O operations generated traditionally with attached screen. With the development of Computers, physical consoles has become emulated and the input output is translated on the monitor usually via a data transfer protocol historically mostly over TCP/IP connection to remote IP with telnet or rsh, but due to security limitations Consoles are now accessed over data (encrypted) network protocols with SHA2 / MD5 cryptography algorithm enabled such as over SSH (Secure Shell) network protocol..
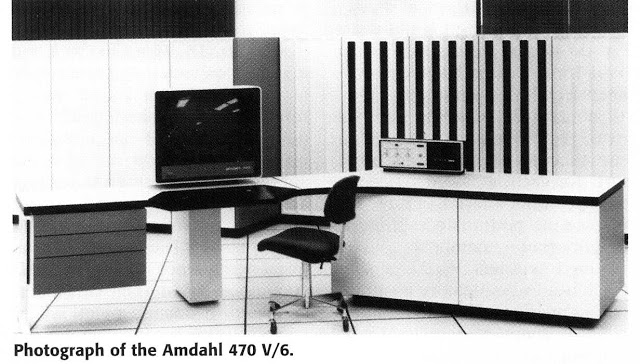
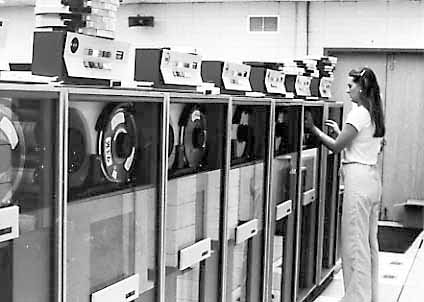
The ancestors of physical consoles which in the past were just a Terminal (Monitoring / Monitor device attached to a MainFrame system computer).
What is Physical Console
A classical TTY (TeleTYpewriter) device looked like so and served the purpose of being just a communication and display deivce, whether in reality the actual computing and storage tape devices were in a separate room and communicating to Terminal.
TTYs are still present in modern UNIX like GNU / Linux distrubions OSes and the BSD berkley 4.4 code based FreeBSD / NetBSD / OpenBSD if you have installed the OS on a physical computer in FreeBSD and Solaris / SunOS there is also tty command. TTY utility in *nix writes the name of the terminal attached to standard input to standard output, in Linux there is a GNU remake of same program part called GNU tty of coreutils package (try man tty) for more.
The physical console is recognizable in Linux as it is indicated with other tree letters pts – (pseudo terminal device) standing for a terminal device which is emulated by an other program (example: xterm, screen, or ssh are such programs). A pts is the slave part of a pts is pseudo there is no separate binary program for it but it is dynamically allocated in memory.
PTS is also called Line consle in Cisco Switches / Router devices, VTY is the physical Serial Console connected on your Cisco device and the network connection emulation to network device is creates with a virtual console session VTL (Virtual Terminal Line). In freebsd the actual /dev/pts* /dev/tty* temporary devices on the OS are slightly different and have naming such as /dev/ttys001.
But the existence of tty and pts emulator is not enough for communicating interrupts to Kernel and UserLand binaries of the Linux / BSD OS, thus to send the commands on top of it is running a System Shell as CSH / TSH / TCSH or BASH which is usually the first program set to run after user logs in over ptty or pseudo tty virtual terminal.
Setting the Bash Prompt in Terminal / Console on GNU / Linux
Bash has system environments to control multiple of variables, which are usually visible with env command, one important variable to change in the past was for example USER / USERNAME which was red by IRC Chat clients such as BitchX / irssi and could be displayed publicly so if not changed to a separate value, one could have known your Linux login username by simple /whois query to the Nickname in question (if no inetd / xinetd service was running on the Linux box and usually inetd was not running).
Below is my custom set USER / USERNAME to separate
hipo@pcfreak:~$ env|grep USER
USERNAME=Attitude
USER=Attitude
There is plenty of variables to tune email such as MAIL store directory, terminal used TERM, EDITOR etc. but there are some
variables that are not visible with env query as they're not globally available for all users but just for the single user, to show this ones you need to use declare command instead, to get a full list of All Single and System Wide defined variables and functions type declare in the bash shell, for readability, below is last 10 returned results:
hipo@pcfreak:~$ declare | tail -10
{
local quoted=${1//\'/\'\\\'\'};
printf "'%s'" "$quoted"
}
quote_readline ()
{
local quoted;
_quote_readline_by_ref "$1" ret;
printf %s "$ret"
}
PS1 is present there virtually on any modern Linux distribution and is installed through user home's directory $HOME/.bashrc , ~/.profile or .bash_profile or System Wide globally for all existing users in /etc/passwd (password database file) from /etc/bash.bashrc
In Debian / Ubuntu / Mint GNU / Linux this system variable is set in user home's .bashrc but in Fedora / RHEL Linux distro,
PS1 is configured from /home/username/.bash_profile to find out where PS1 is located for ur user:
cd ~
grep -Rli PS1 .bash*
Here is one more example:
hipo@pcfreak:~$ declare|grep -i PS1|head -1
PS1='\[\e]0;\u@\h: \w\a\]${debian_chroot:+($debian_chroot)}\u@\h:\w\$ '
hipo@pcfreak:~$ grep PS1 /etc/bash.bashrc
[ -z “$PS1” ] && return
# but only if not SUDOing and have SUDO_PS1 set; then assume smart user.
if ! [ -n “${SUDO_USER}” -a -n “${SUDO_PS1}” ]; then
PS1='${debian_chroot:+($debian_chroot)}\u@\h:\w\$ '
Getting current logged in user shell configured PS1 variable can be done with echo:
hipo@pcfreak:~$ echo $PS1
\[\e]0;\u@\h: \w\a\]${debian_chroot:+($debian_chroot)}\u@\h:\w\$
So lets observe a little bit the meaning of this obscure line of (code) instructions code which are understood by BASH when being red from PS1 var to do so, I'll give a list of meaning of main understood commands, each of which is defined with \.
The ${debian_chroot} shell variable is defined from /etc/bash.bashrc
Easiest way to change PS1 is to export the string you like with the arguments like so:
root@linux:/home/hipo# export PS1='My-Custom_Server-Name# '
My-Custom_Server-Name# echo $PS1
My-Custom_Server-Name#
- \a : an ASCII bell character (07)
- \d : the date in “Weekday Month Date” format (e.g., “Tue May 26”)
- \D{format} : the format is passed to strftime(3) and the result is inserted into the prompt string; an empty format results in a locale-specific time representation. The braces are required
- \e : an ASCII escape character (033)
- \h : the hostname up to the first ‘.’
- \H : the hostname
- \j : the number of jobs currently managed by the shell
- \l : the basename of the shell's terminal device name
- \n : newline
- \r : carriage return
- \s : the name of the shell, the basename of $0 (the portion following the final slash)
- \t : the current time in 24-hour HH:MM:SS format
- \T : the current time in 12-hour HH:MM:SS format
- \@ : the current time in 12-hour am/pm format
- \A : the current time in 24-hour HH:MM format
- \u : the username of the current user
- \v : the version of bash (e.g., 2.00)
- \V : the release of bash, version + patch level (e.g., 2.00.0)
- \w : the current working directory, with $HOME abbreviated with a tilde
- \W : the basename of the current working directory, with $HOME abbreviated with a tilde
- \! : the history number of this command
- \# : the command number of this command
- \$ : if the effective UID is 0, a #, otherwise a $
- \nnn : the character corresponding to the octal number nnn
- \\ : a backslash
- \[ : begin a sequence of non-printing characters, which could be used to embed a terminal control sequence into the prompt
- \] : end a sequence of non-printing characters
The default's PS1 set prompt on Debian Linux is:
echo $PS1
\[\e]0;\u@\h: \w\a\]${debian_chroot:+($debian_chroot)}\u@\h:\w\$
As you can see \u (print username) \h (print hostname) and \W (basename of current working dir) or \w (print $HOME/current working dir)
are the most essential, the rest are bell character, escape character etc.
A very good way to make your life easier and learn the abbreviations / generate exactly the PS1 PROMPT you want to have is with Easy Bash PS1 Generator Web Utility
with which you can just click over buttons that are capable to produce all of the PS1 codes.
1. How to show current hour:minute:seconds / print full date in Prompt Shell (PS)
Here is an example with setting the Bash Shell prompt to include also the current time in format hour:minute:seconds (very useful if you're executing commands on a critical servers and you run commands in some kind of virtual terminal like screen or tmux.
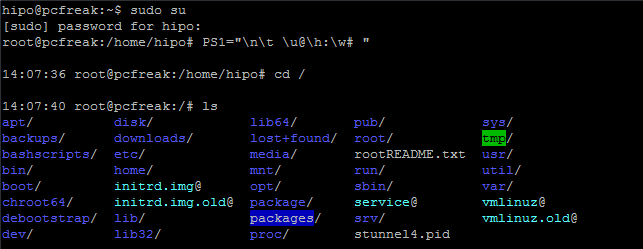
root@pcfreak:~# PS1="\n\t \u@\h:\w# "
14:03:51 root@pcfreak:/home#
export PS1='\u@\H \D{%Y-%m-%d %H:%M;%S%z}] \W ] \$ '

Make superuser appear in RED color (adding PS1 prompt custom color for a User)
root@pcfreak:~$ PS1="\\[$(tput setaf 1)\\]\\u@\\h:\\w #\\[$(tput sgr0)\\]"

In above example the Shell Prompt Color changed is changed for administrator (root) to shebang symbol # in red, green, yellow and blue for the sake to show you how it is done, however this example can be adapted for any user on the system. Setting different coloring for users is very handy if you have to administer Mail Server service like Qmail or other Application that consists of multiple small ones of multiple daemons such as qmail + vpopmail + clamd + mysql etc. Under such circumstances, coloring each of the users in different color like in the example for debugging is very useful.
Coloring the PS1 system prompt on Linux to different color has been a standard practice in Linux Server environments running Redhat Enterprise Linux (RHEL) and SuSE Enterprise Linux and some Desktop distributions such as Mint Linux.
To make The Root prompt Red colored only for system super user (root) on any Linux distribution
, add the following to /etc/bashrc, e.g.
vim /etc/bashrc
# If id command returns zero, you've root access.
if [ $(id -u) -eq 0 ];
then # you are root, set red colour prompt
PS1="\\[$(tput setaf 1)\\]\\u@\\h:\\w #\\[$(tput sgr0)\\]"
else # normal
PS1="[\\u@\\h:\\w] $"
fi
2. How to make the prompt of a System user appear Green
Add to ~/.bashrc following line
PS1="\\[$(tput setaf 2)\\]\\u@\\h:\\w #\\[$(tput sgr0)\\]"
3. Print New line, username@hostname, base PTY, shell level, history (number), newline and full working directory $PWD
export PS1='\n[\u@\h \l:$SHLVL:\!]\n$PWD\$ '
4. Showing the numbert of jobs the shell is currently managing.
This is useful if you run and switch with fg / bg (foreground / background) commands
to switch between jobs and forget some old job.
export PS1='\u@\H \D{%Y-%m-%d %H:%M;%S%z}] \W \$]'
Multi Lines Prompt / Make very colorful Shell prompt full of stats info
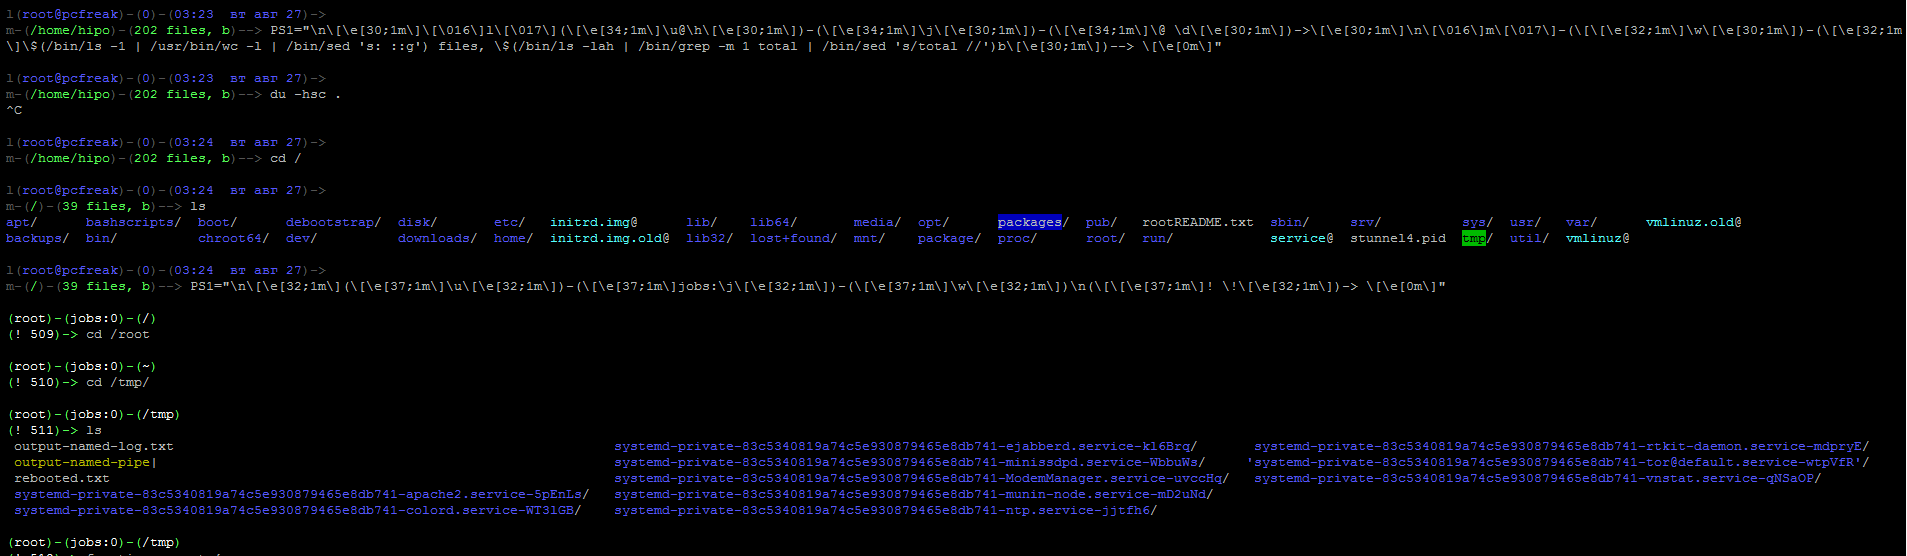
PS1="\n\[\033[35m\]\$(/bin/date)\n\[\033[32m\]\w\n\[\033[1;31m\]\u@\h: \[\033[1;34m\]\$(/usr/bin/tty | /bin/sed -e ‘s:/dev/::’): \[\033[1;36m\]\$(/bin/ls -1 | /usr/bin/wc -l | /bin/sed ‘s: ::g’) files \[\033[1;33m\]\$(/bin/ls -lah | /bin/grep -m 1 total | /bin/sed ‘s/total //’)b\[\033[0m\] -> \[\033[0m\]"
5. Set color change on command failure
If you have a broken command or the command ended with non zero output with some kind of bad nasty message and you want to make, that more appearing making it red heighlighted, here is how:
PROMPT_COMMAND='PS1="\[\033[0;33m\][\!]\`if [[ \$? = “0” ]]; then echo “\\[\\033[32m\\]”; else echo “\\[\\033[31m\\]”; fi\`[\u.\h: \`if [[ `pwd|wc -c|tr -d ” “` > 18 ]]; then echo “\\W”; else echo “\\w”; fi\`]\$\[\033[0m\] “; echo -ne “\033]0;`hostname -s`:`pwd`\007"'
6. Other beautiful PS1 Color Prompts with statistics
PS1="\n\[\e[32;1m\](\[\e[37;1m\]\u\[\e[32;1m\])-(\[\e[37;1m\]jobs:\j\[\e[32;1m\])-(\[\e[37;1m\]\w\[\e[32;1m\])\n(\[\[\e[37;1m\]! \!\[\e[32;1m\])-> \[\e[0m\]"
7. Add Muliple Colors to Same Shell prompt
function prompt { local BLUE="\[\033[0;34m\]” local DARK_BLUE=”\[\033[1;34m\]” local RED=”\[\033[0;31m\]” local DARK_RED=”\[\033[1;31m\]” local NO_COLOR=”\[\033[0m\]” case $TERM in xterm*|rxvt*) TITLEBAR=’\[\033]0;\u@\h:\w\007\]’ ;; *) TITLEBAR=”” ;; esac PS1=”\u@\h [\t]> ” PS1=”${TITLEBAR}\ $BLUE\u@\h $RED[\t]>$NO_COLOR " PS2='continue-> ' PS4='$0.$LINENO+ ' }
8. Setting / Change Shell background Color

export PS1="\[$(tput bold)$(tput setb 4)$(tput setaf 7)\]\u@\h:\w $ \[$(tput sgr0)\]"
tput Color Capabilities:
- tput setab [1-7] – Set a background color using ANSI escape
- tput setb [1-7] – Set a background color
- tput setaf [1-7] – Set a foreground color using ANSI escape
- tput setf [1-7] – Set a foreground color
tput Text Mode Capabilities:
- tput bold – Set bold mode
- tput dim – turn on half-bright mode
- tput smul – begin underline mode
- tput rmul – exit underline mode
- tput rev – Turn on reverse mode
- tput smso – Enter standout mode (bold on rxvt)
- tput rmso – Exit standout mode
- tput sgr0 – Turn off all attributes
Color Code for tput:
- 0 – Black
- 1 – Red
- 2 – Green
- 3 – Yellow
- 4 – Blue
- 5 – Magenta
- 6 – Cyan
- 7 – White
9. Howto Use bash shell function inside PS1 variable
If you administrate Apache or other HTTPD servers or any other server whose processes are forked and do raise drastically at times to keep an eye while actively working on the server.
function httpdcount { ps aux | grep apache2 | grep -v grep | wc -l } export PS1="\u@\h [`httpdcount`]> "
10. PS2, PS3, PS4 little known variables
I'll not get much into detail to PS2, PS3, PS4 but will mention them as perhaps many people are not even aware they exist.
They're rarely used in the daily system administrator's work but useful for Shell scripting purposes of Dev Ops and Shell Scripting Guru Programmers.
- PS2 – Continuation interactive prompt
A very long unix command can be broken down to multiple line by giving \ at the end of the line. The default interactive prompt for a multi-line command is “> “. Let us change this default behavior to display “continue->” by using PS2 environment variable as shown below.
hipo@db-host :~$ myisamchk –silent –force –fast –update-state \
> –key_buffer_size=512M –sort_buffer_size=512M \
> –read_buffer_size=4M –write_buffer_size=4M \
> /var/lib/mysql/bugs/*.MYI
[Note: This uses the default “>” for continuation prompt]
- PS3 – Prompt used by “select” inside shell script (usefulif you write scripts with user prompts)
- PS4 – Used by “set -x” to prefix tracing output
The PS4 shell variable defines the prompt that gets displayed.
You can find example with script demonstrating PS2, PS3, PS4 use via small shell scripts in thegeekstuff's article Take control of PS1, PS2, PS3, PS4 read it here
Summary
In this article, I've shortly reviewed on what is a TTY, how it evolved into Pseudo TTY and how it relates to current shells which are the interface communicating with the modern UNIX like Operating systems's userland and kernel.
Also it was reviewed shortly how the current definitions of shell variables could be viewed with declare cmd. Also I went through on how to display the PS1 variable and on how to modify PS1 and make the prompt different statistics and monitoring parameters straight into the command shell. I've shown some common PS1 strings that report on current date hour, minute, seconds, modify the coloring of the bash prompt shell, show processes count, and some PS1 examples were given that combines beuatiful shell coloring as well as how the Prompt background color can be changed.
Finally was shown how a combination of commands can be executed by exporting to PS1 to update process counf of Apache on every shell prompt iteration.
Other shell goodies are mostly welcome