Posts Tagged ‘apache performance’

Speeding up Apache through apache2-mpm-worker and php5-cgi on Debian / How to improve Apache performance and decrease server memory consumption

Friday, March 18th, 2011

speeding up apache through apache2-mpm-worker and php5-cgi on Debian Linux / how to improve apache performance and decrease server responce time
By default most Apache running Linux servers on the Internet are configured to use with the mpm prefork apache module
Historically prefork apache module is the predecessor of the worker module therefore it's believed to be a way more tested and reliable, if you need a critical reliable webserver configuration.

However from my experience by so far with the Apache MPM Worker I can boldly say that many of the rumors concerning the unreliabity of apache2-mpm-worker are just myths.

The old way Apache handles connections e.g. the mod prefork is the well known way that high amount of the daemons on Linux and BSD are still realying on.
When prefork is a used by Apache, every new TCP/IP connection arriving at your Linux server on the Apache configured port let's say on port 80 is being served by Apache in a way that the Apache process (mother process) parent does fork a new Apache parent copy in order to serve the new request.
Thus by using the prefork Apache needs to fork new process (if it doesn't have already an empty forked one waiting for connections) and serve the HTTP request of the new client, after the request of the client is completed the newly forked Apache usually dies (even though it again depends on the way the Apache server is configured via the Apache configuration – apache2.conf / httpd.conf etc.).

Now you can imagine how slow and memory consuming it is that all the time the parent Apache process spawns new processes, kills old ones etc. in order to fulfill the client requests.

Now just to compare the Apace mpm prefork does not use the old forking way, but relies on a few Apache processes which handles all the requests without constantly being destroyed and recreated like with the prefork module.
This saves operations and system resources, threaded programming has already been proven to be more efficient way to handle tasks and is heavily adopted in GUI programming for instance in Microsoft Windows, Mac OS X, Linux Gnome, KDE etc.

There is plenty of information and statistical data which compares Apache running with prefork and respectively worker modules online.
As the goal of this article is not to went in depths with this kind of information I would not say more on it but let you explore online a bit more about them in case if you're interested.

The purpose of this article is to explain in short how to substitute the Apache2-MPM-Prefork and how your server performance could benefit out of the use of Apache2-MPM-Worker.
On Debian the default Apache process serving module in Apache 1.3x,Apache 2.0x and 2.2x is prefork thus the installation of apache2-mpm-worker is not "a standard way" to install Apache

Deciding to swith from the default Debian apache-mpm-prefork to apache-mpm-worker is quite a serious and responsible decision and in some cases might cause troubles, if you have decided to follow my article be sure to consider all the possible negative consequences of switching to the apache worker !

Now after having said a bunch of info which might be not necessary with the experienced system admin I'll continue on with the steps to install the apache2-mpm-worker.

1. Install the apache2-mpm-worker

debian:~# apt-get install apache2-mpm-worker php5-cgi
Reading state information... Done
The following packages were automatically installed and are no longer required:
The following packages will be REMOVED apache2-mpm-prefork libapache2-mod-php5
The following NEW packages will be installed apache2-mpm-worker
0 upgraded, 1 newly installed, 2 to remove and 46 not upgraded.
Need to get 0B/259kB of archives.After this operation, 6193kB disk space will be freed.

As you can notice in below's text confirmation which will appear you will have to remove the apache2-mpm-prefork and the apache2-mpm-worker modules before you can proceed to install the apache2-mpm-prefork.

You might ask yourself if I remove my installed libphp how would I be able to use my Apache with my PHP based websites? And why does the apt package manager requires the libapache2-mod-php5 to get removed.
The explanation is simple apache2-mpm-worker is not thread safe, in other words scripts which does use the php fork(); function would not work correctly with the Apache worker module and will probably be leading to PHP and Apache crashes.
Therefore in order to install the apache mod worker it's necessary that no libapache2-mod-php5 is existent on the system.
In order to have a PHP installed on the server again you will have to use the php5-cgi deb package, this is the reason in the above apt-get command I'm also requesting apt to install the php5-cgi package next to apache2-mpm-worker.

2. Enable the cgi and cgid apache modules

debian:~# a2enmod cgi
debian:~# a2enmod cgid

3. Activate the mod_actions apache modules

debian:~# cd /etc/apache2/mods-enabled
debian:~# ln -sf ../mods-available/actions.load
debian:~# ln -sf ../mods-available/actions.conf

4. Add configuration options in order to enable mod worker to use the newly installed php5-cgi

Edit /etc/apache2/mods-available/actions.conf vim, mcedit or nano (e.g. your editor of choice and add inside:

&ltIfModule mod_actions.c>
Action application/x-httpd-php /cgi-bin/php5
</IfModule>

After completing all the above instructions, you might also need to edit your /etc/apache2/apache2.conf to tune up, how your Apache mpm worker will serve client requests.
Configuring the <IfModule mpm_worker_module> in apache2.conf is necessary to optimize your newly installed mpm_worker module for performance.

5. Configure the mod_worker_module in apache2.conf One example configuration for the mod worker is:

<IfModule mpm_worker_module>
StartServers 2
MaxClients 150
MinSpareThreads 25
MaxSpareThreads 75
ThreadsPerChild 25
MaxRequestsPerChild 0
</IfModule>

Consider the fact that this configuration is just a sample and it's in no means configured for serving Apache requests for high load Apache servers and you need to further play with the values to have a good results on your server.

6. Check that all is fine with your Apache configurations and no syntax errors are encountered

debian:~# /usr/sbin/apache2ctl -t
Syntax OK

If you get something different from Syntax OK track the error and fix it before you're ready to restart the Apache server.

7. Now restart the Apache server

debian:~# /etc/init.d/apache2 restart

All should run fine and hopefully your PHP scripts should be interpreted just fine through the php5-cgi instead of the libapache2-mod-php5.
Using the /usr/bin/php5-cgi will increase with some percentage your server CPU load but on other hand will drasticly decrease the Webserver memory consumption.
That's quite logical because the libapache2-mod-hp5 is loaded once during apache server whether a new instance of /usr/bin/php5-cgi is invoked during each of Apache requests via the mod worker.

There is one serious security flow coming with php5-cgi, DoS against a server processing scripts through php5-cgi is much easier to be achieved.
An example for a denial attack which could affect a website running with mod worker and php5-cgi, could be simulated from a simple user with a web browser which holds up the f5 or ctrl + r browser page refresh buttons.
In that case whenever php5-cgi is used the CPU load would rise drastic, one possible solution to this denial of service issues is by installing and using libapache2-mod-evasive like so:

8. Install libapache2-mod-evasive

debian:~# apt-get install libapache2-mod-evasive
The Apache mod evasive module is a nice apache module to minimize HTTP DoS and brute force attacks.
Now with mod worker through the php5-cgi, your apache should start serving requests more efficiently than before.
For some performance reasons some might even want to try out the fastcgi with the worker to boost the Apache performance but as I have never tried that I can't say how reliable a a mod worker with a fastcgi would be.

N.B. ! If you have some specific php configurations within /etc/php5/apache2/php.ini you will have to set them also in /etc/php5/cgi/php.ini before you proceed with the above instructions to install Apache otherwise your PHP scripts might not work as expected.

Mod worker is also capable to work with the standard mod php5 Apache module, but if you decide to go this route you will have to recompile your PHP lib manually from source as in Debian this option is not possible with the default php library.
This installation worked fine on Debian Lenny but suppose the same installation should work fine on Debian Squeeze as well as Debian testing/unstable.
Feedback on the afore-described mod worker installation is very welcome!

Tracking graphically MySQL, Apache and Network performance in web with Munin on Debian Linux

Saturday, March 19th, 2011

munin_monitor_cpu_network_hard_drive_apache_mysql_performance-in-web-on-linux_logo

Munin is great software for surveillance software for your MySQL, Apache, Qmail, Postfix and many other of the classical daemon services which most of the Linux, BSD servers online are running on.

1. Munin on Debian Linux is really easy to be installed and comes to executing:

debian:~# apt-get install munin munin-node munin-plugins-extra

2. Link /var/www/munin/ to some VirtualHost or ServerHost
For instance if your munin is to be placed on the domain www.pc-freak.net.net which has the DocumentRoot of /var/www

debian:~# cd /var/www
debian:/var/www# ln -sf /var/www/munin munin

3. Add some extra MySQL related plugins

To check whole list of pmunin plugins you can enable check in /etc/munin/plugins directory

Lets say our Munin will be providing statistics mainly for MySQL, enable this bunch of plugins:

cd /etc/munin/plugins
ln -s /usr/share/munin/plugins/mysql_ mysql_
ln -s /usr/share/munin/plugins/mysql_bytes mysql_bytes
ln -s /usr/share/munin/plugins/mysql_innodb mysql_innodb
ln -s /usr/share/munin/plugins/mysql_isam_space_ mysql_isam_space_
ln -s /usr/share/munin/plugins/mysql_queries mysql_queries
ln -s /usr/share/munin/plugins/mysql_slowqueries mysql_slowqueries
ln -s /usr/share/munin/plugins/mysql_threads mysql_threads


Though above command would enable mysql monitoring it will be not working out of the box. You will find in munin logs error like:

Missing dependency Cache::Cache at /usr/share/munin/plugins/mysql_ line 716."

To fix this install libcache-perl and libcache-cache-perl

apt-get install --yes libcache-perl libcache-cache-perl
 

Then regenerate munin plugin configuration issue cmd:

munin-node-configure --suggest --shell | sh

and restart Munin-node server

service munin-node restart
 

Munin Node should be able login to the MySQL server using the Debian System Maintenance user however if you should need to create a custom user you can add the following configuration to:
 

/etc/munin/plugin-conf.d/munin-node


[mysql*]
    user root
    env.mysqluser muninmonitor
    env.mysqlpassword Your-Secret-Password

4. Edit Munin config

Make sure you have at least the following variables enabled in /etc/munin/munin.conf
 

 dbdir  /var/lib/munin
 htmldir /var/cache/munin/www
 logdir /var/log/munin
 rundir  /var/run/munin

 tmpldir    /etc/munin/templates

includedir /etc/munin/munin-conf.d

[localhost.localdomain]
    address 127.0.0.1
    use_node_name yes


5. Add Munin Alias or Virtualhost

To make Munin Accessible from Webserver you need to at least add an alias create a file
/etc/apache2/conf.d/munin with following content:

vim /etc/apache2/conf.d/munin

Alias /munin /var/cache/munin/www

<Directory /var/cache/munin/www>
        Order allow,deny
        #Allow from localhost 127.0.0.0/8 ::1
        Allow from all
        Options None
        php_value engine off

    <IfModule mod_expires.c>
        ExpiresActive On
        ExpiresDefault M310
    </IfModule>

</Directory>


If you want to access Munin from Apache subdomain create it lets say you want to access it via stats.www.pc-freak.net, use following config file:

vi /etc/apache2/sites-enabled/stats.www.pc-freak.net
 

<VirtualHost *>
   ServerAdmin hipo@www.pc-freak.net
   ServerName stats.www.pc-freak.net
   DocumentRoot /var/cache/munin/www
   <Directory />
       Options FollowSymLinks
       #AllowOverride All
       php_value engine off
   </Directory>
   LogLevel debug
   CustomLog /var/log/apache2/munin/access.log combined
   ErrorLog /var/log/apache2/munin/error.log
   ServerSignature On
<Directory /var/cache/munin/www>
        Order allow,deny
        #Allow from localhost 127.0.0.0/8 ::1
        Allow from all
        Options FollowSymlinks
        #AllowOverride All
        php_value engine off

</Directory>

</VirtualHost>


6. Restart Apache;

debian:~# /etc/init.d/apache2 restart

Now to access the newly installed munin point your favorite browser to (either the subdirectory configured for access or the Virtualhost subdomain):

https://www.pc-freak.net/munin/
or
http://munin.www.pc-freak.net

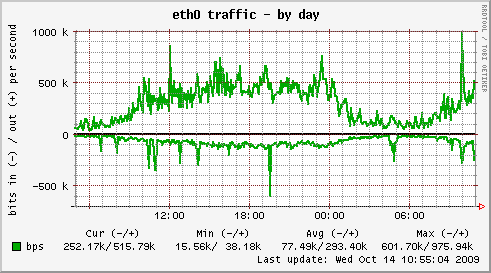
eth0-network-traffic-munin-server-statistics

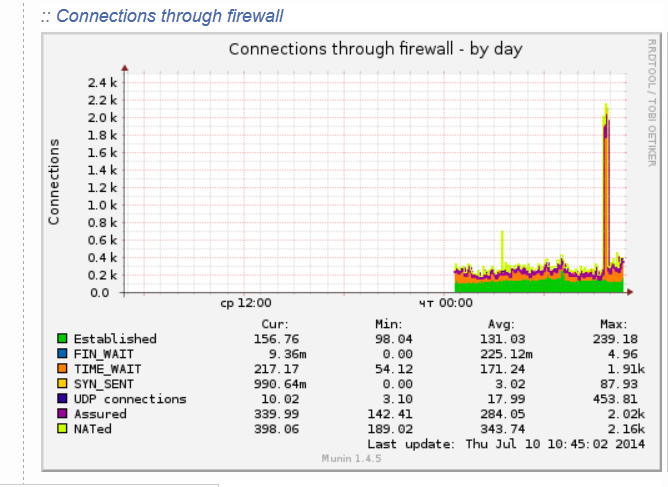
connections_through_firewall-statistics-munin-debian-linux
7. Protecting Munin with a password

As it could be a security leak to expose statistics regarding your server (Disk I/O, Memory, Load Avarage, Apache, MySQL Postfix) operations it is good security practice to protect munin with a password.

I've earlied blogged on how to protect your server munin web-statistics wtih an htaccess password (read it here)


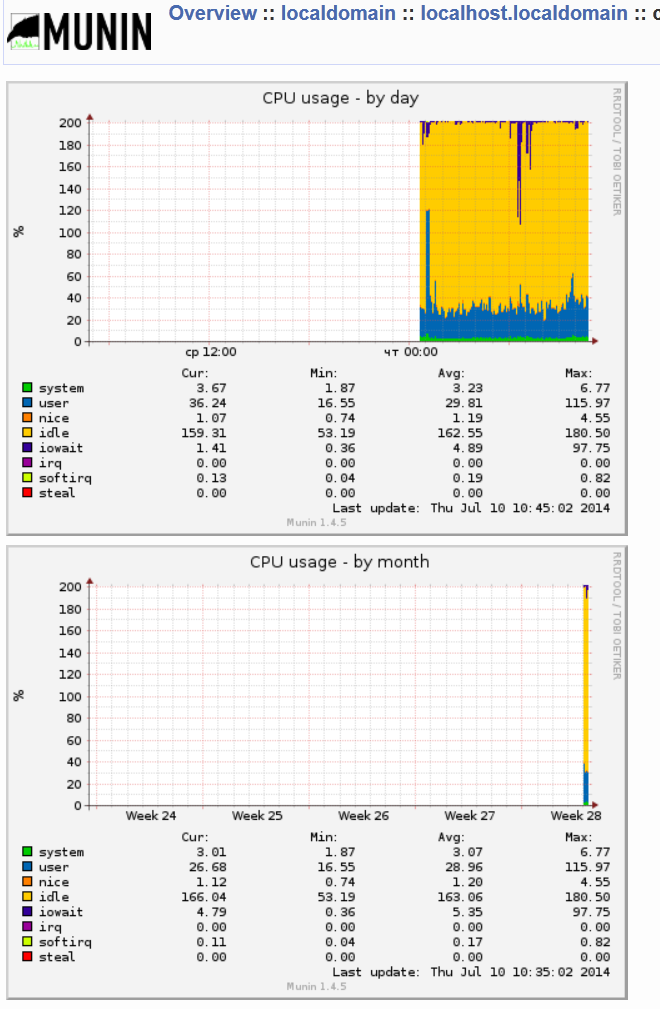
munin-cup-statistics-by-day-and-by-month-screenshot

Happy Monitoring

Some Apache performance optimizations to do on brand new installed Linux servers – Apache performance tuning tips

Wednesday, December 12th, 2012

good tips to optimize Apache webserver on Debian CentOS and RHEL Linux for better performance and faster website openings

It is a good idea, on any productive server which is supposed to run Apache + PHP on Linux to do some initial Apache configurations which will guarantee a better WebServer performance and improved Apache client thoroughput. On every each and other new configured Linux server planned to server as an Apache + some database backend, I routinely make this tune ups even without thinking. The reason I do it is time and experience proofed this optimizations works like a charm and almost in 100% of cases they can only improve situation with the server, decrease the general expected load and thus save costs for potential hardware. Besides that the few config options which I'm about to suggest in this article guarantee improved WebPage opening times and most of times overall Apache response times. The consequence of embedding the optimizations has a straight influence on Google / Yahoo PageRanking as it is not a secret most (if not all) Search Engines, rank with a Higher PageRank webpages which load up for lower opening times.


1. Change values for KeepAlive, Timeout and KeepAliveTimeout

First thing to change in Apache default config is reduce the default value set for KeepAliveTimeout and KeepAlive and TimeOut

a. Reducing  KeepAliveTimeout

  a.In Debian, Ubuntu servers this value has to be changed in /etc/apache2/apache2.conf

b. in RHEL, Fedora and other RPM based distros check in /etc/httpd/conf/httpd.conf

By default KeepAliveTimeout is set to 15 – KeepAliveTimeout 15. 15 Seconds is a long delay and on a by Apache servers it is very likely you will have hundreds if not thousands of Apache forks or internal threads, keeping still open for clients which already navigated off from the website or websites hosted and served by Apache.

Taking this in consideration, most of the times I prefer setting the KeepAliveTimeout value to 7 secs – i.e.;

KeepAliveTimeout 7

even to some hosts, where you have a well tested PHP Code or just serving static files it is a good idea to decrease it to 5 secs (this is much more risky and likely to create problems, I set it to 5 secs in a vary rare occasions, anyhow you might want to experiment)

Bear in mind that in some cases, where page execution (lets say a PHP script) takes longer to execute than 7 seconds clients might end up with empty pages as Apache will drop off the opened TCP / IP connection to remote client. Thus for some people who run badly written websites with PHP scripts which take long time to execute lowering default KeepAliveTimeout might have negative results. Therefore as a rule of thumb if you reduce the KeepAliveTimeout, be sure to monitor closely with the website testers team or via some website feedback form if the website continues to perform okay for end clients, if not just tune up KeepAliveTimeout to a value with which the website works fine. Other reason why KeepAliveTimeout is so good in almost all cases to reduce is by simply closing quicker opened network connections, less Apache childs keeps loaded in memory and therefore more memory is available for eventual new clients  connecting.

Here is also KeepAliveTimeout explained as pasted from a Debian apache2.conf:

#
# KeepAliveTimeout: Number of seconds to wait for the next request from the
# same client on the same connection.
#
#KeepAliveTimeout 15
KeepAliveTimeout 5

b. Turn on KeepAlive

By default most Linux distros came with KeepAlive setting turned off, switch it on;

#
# KeepAlive: Whether or not to allow persistent connections (more than
# one request per connection). Set to "Off" to deactivate.
#
# KeepAlive Off
KeepAlive On

c. Reduce the amount for TimeOut of client inactivity

Default TimeOut setting is set to 300 seconds!
A good value to reduce it to is 40 or 80. 80 value is less likely to create content serving unexpected interrupts. On most servers I just set to 40 as so far this value works well for me.
 

#
# Timeout: The number of seconds before receives and sends time out.
#
#Timeout 300
Timeout 40
 

2. Enable Apache mod-expires – WebServer content caching

debian:~# ln -sf /etc/apache2/mods-available/expires.load /etc/apache2/mods-enabled/expires.load

Depending on Deb or RPM based Linux distro in Apache config (apache2.conf or httpd.conf), add following mod_expires directives;

<IfModule mod_expires.c>
ExpiresActive On
ExpiresDefault A86400
ExpiresByType image/x-icon A2592000
ExpiresByType application/x-javascript A2592000
ExpiresByType text/css A2592000
ExpiresByType image/gif A604800
ExpiresByType image/png A604800
ExpiresByType image/jpeg A604800
</IfModule>

One note to make, here that on some websites based on Smarty, Zend PHP Framework etc. PHP frameworks mod_expires might cause some troubles, however in 70-80% of the cases just enabling it causes no harm to the overall website functionality. Be sure to test it well if you enable it and don't blame me if it cause you issues.


3. Set ServerRoot and  Raise-up ServerLimit and MaxKeepAliveRequests  directives

By default the value set for ServerLimit is too low for productive servers (256 mpm_prefork Apache childs maximum), thus for servers which are expected to get in parallel few hundreds of unique IP clients I usually set it along with ServerRoot like so;

#
# ServerRoot: The top of the directory tree under which the server's
# configuration, error, and log files are kept.
#
# NOTE!  If you intend to place this on an NFS (or otherwise network)
# mounted filesystem then please read the LockFile documentation (available
# at <URL:http://httpd.apache.org/docs/2.2/mod/mpm_common.html#lockfile>);
# you will save yourself a lot of trouble.
#
# Do NOT add a slash at the end of the directory path.
#
#ServerRoot "/etc/apache2"
ServerRoot "/etc/apache2"
ServerLimit 10600

Another good practice is to set MaxKeepAliveRequests which will be handled by Apache forked child to a high value but not to 0 (which will make once forked Apache childs to never die – making them likely to mess up assigned memory due to memory leaks or Apache bugs). On a productive servers I set values from  5000 to 50000.

#
# MaxKeepAliveRequests: The maximum number of requests to allow
# during a persistent connection. Set to 0 to allow an unlimited amount.
# We recommend you leave this number high, for maximum performance.
#
MaxKeepAliveRequests 50000

4. Enable mod_rewrite Apache support

This step is not optimizing Apache performance but it is useful to enable mod_rewrite, as there is almost no website today which doesn't use mod_rewrite via .htaccess passed directives.

debian:~# ln -sf  /etc/apache2/mods-available/rewrite.load /etc/apache2/mods-enabled/rewrite.load

5. Adjusting default values of StartServers, MinSpareServers, MaxSpareServers, MaxClients and MaxRequestsPerChild  for mpm_prefork

Default config values set for mpm_prefork, are for a tiny home server, depending on  the server amount of memory and CPU power – StartServers, MinSpareServers, MaxSpareServers, MaxClients and MaxRequestsPerChild – should be carefully tailored and tested with Apache Benchmark little tool and Siege or any other benchmarking tool before WebServer is made publicly accessible.

Default values from apache2.conf are like so:

<IfModule mpm_prefork_module>
    StartServers          5
    MinSpareServers       5
    MaxSpareServers      10
    MaxClients          150
    MaxRequestsPerChild   0
</IfModule>

A good configuration for a productive server with 24GB of Memory and 8 CPUs x 2.13 Ghz (about 17Ghz Computing Power) would be for exmpl.:

<IfModule mpm_prefork_module>
    StartServers          2000
    MinSpareServers       600
    MaxSpareServers      800
    MaxClients          3600
    MaxRequestsPerChild   10000
</IfModule>

5. Intall and Enable Eaccelerator

On almost all servers I install I install immediately after basic Apache + PHP + MySQL packages, Eaccelerator. Eaccelerator helps utilizing better server free memory and significantly accelerates Apache pages serve time

I've earlier blogged on How to install Eaccelerator to decrease server CPU load and increase page serving performance here

6. Disable Server Side Includes ( SSI ) support

I've earlier blogged how to disable Apache SSI on Debian Linux – you can read here. The change SSI will make whether off is not so big so even leaving it on  is not a big deal.

7. Remove and Purge Suhosin apache module

suhosin is useful module that tightens Apache security, however for me it has earlier create a lot of issues and it is my personal view that life is better without suhosin. I've earlier stumbled on a weird issue causing Apache to mysteriously crash – removing suhosin solved it all. I'm not sure if suhosin is installed by default on Debian, but it is often installed a a package dependency to some php-devel packages, so I find it wise always to check if it is present on the system and remove it if it is.
 

8. Enable Apache mod_deflate (gzip) compression to speed up delivery of CSS and Javascripts

Archiving with gzip and de-archiving CSS, JS and HTML is very useful, as it reduces the size of transferred content. This however might impose a bit of higher CPU load, so I only enable this one whether I target increase in network thoroughput, however for people concerned of CPU load it is better to keep it off as it is by default.

For a bit more on how mod_deflate is enabled on Debian check my previous article – Speeding Apache hosted websites with mod_deflate gzip compression

CentOS and RHEL users who need to enable mod_deflate – check here

9. Change the way logrotate handles log rotation (disable log gzip compession) or disable Apache logging completely

On Linux servers with Apache where 30000 to 50000 of unique IP visitors requests are served, the access.log becomes enormous. Things become even worser as by default Apache logs are configured to be rotated once a week instead of daily. Thus once logrotation takes place, a huge log has to be processed – for instance 20 GB. This puts extra load on the server and often makes the normal Apache operation bloated. To get rid of this problem I suggest you check my previous article – Recommended access.log logrotate practices on heavy loaded servers

Alternatively it is sometimes, better to completely disable Apache access.log logging to reduce a bit the Apache load – though from security and statistical point of view it is bad practice. I've disabled it however, as on some servers logging is implemented on PHP scripts level instead. I've earlier blogged how disabling access.log and error.log is done here

10. Disable Apache version reporting

This is more of a security than performance optimization, but also has neglectful effect, as on requests one line less is reported by Apache 🙂
To disable Apache version reporting check my previous article here

11. Switch from mpm_prefork to  mpm_worker Apache (threaded) engine

For some new Apache configurations, which doesn't need exec(); or system(); or any other PHP embedded external code execution functions, from performance point of view it is much better to just switch to the much more sophisticated performance efficient and less memory hungry Apache2  mpm-worker engine – the downside of it is you will have to configure PHP to be executed via php5-cgi apache module.

12. Tune up (increase) PHP memory_limit variable

This is not Apache optimization, but most servers need it as they run Apache and PHP in a line. Default PHP memory_limit is set to the low 16 Mb it is good to raise it to 64 or 128MB (but be careful as this might make Apache easier to DoS or DDoS)
I've blogged on the topic of memory_limit and timezone issues I experienced earlier here

13. Make sure you have a good quick DNS set in /etc/resolv.conf

An usual /etc/resolv.conf which I use for new servers with Apache looks like so:

debian:~# cat /etc/resolv.conf
nameserver 127.0.0.1
nameserver 8.8.8.8
nameserver 8.8.4.4
nameserver 208.67.222.222
nameserver 208.67.220.220
 

The first line is set to use 127.0.0.1, as I find it very useful and to improve overall system efficiency and make it much fail proof, if the server is configured to run a custom DJBDNS server on localhost.

As you see further DNS set in my usual resolv.conf's are Google's Public DNS 8.8.8.8 and 8.8.4.4 and OpenDNS's 208.67.222.222 and 208.67.220.220

I highly recommend you follow my practice and install DJBDNS local caching DNS to speed up resolving efficiency and hence speed up Apache client interactions (of course this is useful only if Apache or some PHP scripts use DNS requests, but as most do it is a  good practice)

After all changes, to take affect I do the usual Apache restart with;

debian:~# apache2ctl -k restart
.....

That's it, if you know of other optimization tips, Please drop a comment 🙂