Posts Tagged ‘apache’
Wednesday, February 10th, 2010 During my professional experience as a system administrator, it was a common misfortune in newly
configured unix servers mod_rewrite not to be serving .htaccess files.
Everytime I had to fix issue in which mod_rewrite was not working I loosed a lot of my precious time
The same story happened once again I had to check why mod_rewrite is not configured correctly and I cannot
apply some redirection rules in WordPress necessery for me
to exercise some SEO on my wordpress blog .
Therefore this time I decided to blog a step by step check on in order to:
1. Determine if mod_rewrite is installed & loaded correctly in Apache
2. Find out if mod_rewrite is configured to serve .htaccess files correctly
Going through this two scenarios I would be able to determine why I cannot get wordpress SEO optimization
mod_rewrite redirection rules to work as they should.
Okay, so let’s go through the two scenarios:
1. Here is a tiny script in PHP to determine if mod_rewrite is installed and loaded in Apache correctly
To use the script save it somewhere in your Domain document root with a .php extension
Here is the code of the script as well:
< ?phpprint_r(apache_get_modules());?>
If your mod_rewrite module is configured correctly you’ll see it in the php array containing
all your apache loaded modules.
Without PHP from the shell in order to get installed Apache modules on Linux, the following command applies:
apache2ctl -t -D DUMP_MODULES
For apache 2.2.x
httpd (or apache.exe) -M will show static and shared modules loaded via LoadModule.
httpd -l will show only static (compiled in) modules
For apache 2.0.x
httpd (apache.exe) -l is available but -M is not.
You will need to manually check the LoadModule directives and the files.
2. Now we continue, further on with another script that has to be installed somewhere in Apache’s DocumentRoot
I decided to install it in a directory /test/ so in my case it’s installed in www.pc-freak.net/test/
Here is a link to the script you need to find out if mod_rewrite is configured to serve .htaccess files for your preferred domain name’s DocumentRoot.
Now save this file and again make sure it has a .php extension.
Now you need to create an .htaccess file in the directory where you have rewrite.php file stored.
The content of the .htaccess file should be the following:
RewriteEngine OnRewriteOptions InheritRewriteRule ^link([^/]*).html$ rewrite.php?link=$1 [L]
Make sure the permissions of the .htaccess are correct, for example the file should have at least read
permissions for your webserver.
So let’s execute:
chmod a+r .htaccess
to ensure the newly created file has proper permissions
So let’s check if mod_rewrite is enabled for my domain DocumentRoot by visiting:
this link
Hopefully if all is okay you’ll see:
Congratulations!! You are using Apache mod_rewrite whenever you press the TEST2 link
on the upmentioned webpage.
In case if you get a 404 error message, then most probably you don’t have mod_rewrite configured
to serve .htaccess files for your domain.
This often happens because of missing:
AllowOverride All
in your main Directory directives in your webserver configuration file.
In my case I had a problem where mod_rewrite rules were not red from the .htaccess file:
To solve my issue I had to change:
Directory /

AllowOverride None

Order Deny,Allow

Deny from all

/Directory
in my httpd.conf to
Directory /

AllowOverride All

Order Deny,Allow

Deny from all

/Directory
So well, That’s all Folks!
Tags: apache, check, configured, htaccess files, link, need, order, php file, preferred domain name, script, unix servers
Posted in System Administration | 10 Comments »
Thursday, April 7th, 2011 
If you’re a a remote Linux many other Unix based OSes, you have defitenily faced the security threat of many failed ssh logins or as it’s better known a brute force attack
During such attacks your /var/log/messages or /var/log/auth gets filled in with various failed password logs like for example:
Feb 3 20:25:50 linux sshd[32098]: Failed password for invalid user oracle from 95.154.249.193 port 51490 ssh2

Feb 3 20:28:30 linux sshd[32135]: Failed password for invalid user oracle1 from 95.154.249.193 port 42778 ssh2

Feb 3 20:28:55 linux sshd[32141]: Failed password for invalid user test1 from 95.154.249.193 port 51072 ssh2

Feb 3 20:30:15 linux sshd[32163]: Failed password for invalid user test from 95.154.249.193 port 47481 ssh2

Feb 3 20:33:20 linux sshd[32211]: Failed password for invalid user testuser from 95.154.249.193 port 51731 ssh2

Feb 3 20:35:32 linux sshd[32249]: Failed password for invalid user user from 95.154.249.193 port 38966 ssh2

Feb 3 20:35:59 linux sshd[32256]: Failed password for invalid user user1 from 95.154.249.193 port 55850 ssh2

Feb 3 20:36:25 linux sshd[32268]: Failed password for invalid user user3 from 95.154.249.193 port 36610 ssh2

Feb 3 20:36:52 linux sshd[32274]: Failed password for invalid user user4 from 95.154.249.193 port 45514 ssh2

Feb 3 20:37:19 linux sshd[32279]: Failed password for invalid user user5 from 95.154.249.193 port 54262 ssh2

Feb 3 20:37:45 linux sshd[32285]: Failed password for invalid user user2 from 95.154.249.193 port 34755 ssh2

Feb 3 20:38:11 linux sshd[32292]: Failed password for invalid user info from 95.154.249.193 port 43146 ssh2

Feb 3 20:40:50 linux sshd[32340]: Failed password for invalid user peter from 95.154.249.193 port 46411 ssh2

Feb 3 20:43:02 linux sshd[32372]: Failed password for invalid user amanda from 95.154.249.193 port 59414 ssh2

Feb 3 20:43:28 linux sshd[32378]: Failed password for invalid user postgres from 95.154.249.193 port 39228 ssh2

Feb 3 20:43:55 linux sshd[32384]: Failed password for invalid user ftpuser from 95.154.249.193 port 47118 ssh2

Feb 3 20:44:22 linux sshd[32391]: Failed password for invalid user fax from 95.154.249.193 port 54939 ssh2

Feb 3 20:44:48 linux sshd[32397]: Failed password for invalid user cyrus from 95.154.249.193 port 34567 ssh2

Feb 3 20:45:14 linux sshd[32405]: Failed password for invalid user toto from 95.154.249.193 port 42350 ssh2

Feb 3 20:45:42 linux sshd[32410]: Failed password for invalid user sophie from 95.154.249.193 port 50063 ssh2

Feb 3 20:46:08 linux sshd[32415]: Failed password for invalid user yves from 95.154.249.193 port 59818 ssh2

Feb 3 20:46:34 linux sshd[32424]: Failed password for invalid user trac from 95.154.249.193 port 39509 ssh2

Feb 3 20:47:00 linux sshd[32432]: Failed password for invalid user webmaster from 95.154.249.193 port 47424 ssh2

Feb 3 20:47:27 linux sshd[32437]: Failed password for invalid user postfix from 95.154.249.193 port 55615 ssh2

Feb 3 20:47:54 linux sshd[32442]: Failed password for www-data from 95.154.249.193 port 35554 ssh2

Feb 3 20:48:19 linux sshd[32448]: Failed password for invalid user temp from 95.154.249.193 port 43896 ssh2

Feb 3 20:48:46 linux sshd[32453]: Failed password for invalid user service from 95.154.249.193 port 52092 ssh2

Feb 3 20:49:13 linux sshd[32458]: Failed password for invalid user tomcat from 95.154.249.193 port 60261 ssh2

Feb 3 20:49:40 linux sshd[32464]: Failed password for invalid user upload from 95.154.249.193 port 40236 ssh2

Feb 3 20:50:06 linux sshd[32469]: Failed password for invalid user debian from 95.154.249.193 port 48295 ssh2

Feb 3 20:50:32 linux sshd[32479]: Failed password for invalid user apache from 95.154.249.193 port 56437 ssh2

Feb 3 20:51:00 linux sshd[32492]: Failed password for invalid user rds from 95.154.249.193 port 45540 ssh2

Feb 3 20:51:26 linux sshd[32501]: Failed password for invalid user exploit from 95.154.249.193 port 53751 ssh2

Feb 3 20:51:51 linux sshd[32506]: Failed password for invalid user exploit from 95.154.249.193 port 33543 ssh2

Feb 3 20:52:18 linux sshd[32512]: Failed password for invalid user postgres from 95.154.249.193 port 41350 ssh2

Feb 3 21:02:04 linux sshd[32652]: Failed password for invalid user shell from 95.154.249.193 port 54454 ssh2

Feb 3 21:02:30 linux sshd[32657]: Failed password for invalid user radio from 95.154.249.193 port 35462 ssh2

Feb 3 21:02:57 linux sshd[32663]: Failed password for invalid user anonymous from 95.154.249.193 port 44290 ssh2

Feb 3 21:03:23 linux sshd[32668]: Failed password for invalid user mark from 95.154.249.193 port 53285 ssh2

Feb 3 21:03:50 linux sshd[32673]: Failed password for invalid user majordomo from 95.154.249.193 port 34082 ssh2

Feb 3 21:04:43 linux sshd[32684]: Failed password for irc from 95.154.249.193 port 50918 ssh2

Feb 3 21:05:36 linux sshd[32695]: Failed password for root from 95.154.249.193 port 38577 ssh2

Feb 3 21:06:30 linux sshd[32705]: Failed password for bin from 95.154.249.193 port 53564 ssh2

Feb 3 21:06:56 linux sshd[32714]: Failed password for invalid user dev from 95.154.249.193 port 34568 ssh2

Feb 3 21:07:23 linux sshd[32720]: Failed password for root from 95.154.249.193 port 43799 ssh2

Feb 3 21:09:10 linux sshd[32755]: Failed password for invalid user bob from 95.154.249.193 port 50026 ssh2

Feb 3 21:09:36 linux sshd[32761]: Failed password for invalid user r00t from 95.154.249.193 port 58129 ssh2

Feb 3 21:11:50 linux sshd[537]: Failed password for root from 95.154.249.193 port 58358 ssh2
This brute force dictionary attacks often succeed where there is a user with a weak a password, or some old forgotten test user account.
Just recently on one of the servers I administrate I have catched a malicious attacker originating from Romania, who was able to break with my system test account with the weak password tset .
Thanksfully the script kiddie was unable to get root access to my system, so what he did is he just started another ssh brute force scanner to crawl the net and look for some other vulnerable hosts.
As you read in my recent example being immune against SSH brute force attacks is a very essential security step, the administrator needs to take on a newly installed server.
The easiest way to get read of the brute force attacks without using some external brute force filtering software like fail2ban can be done by:
1. By using an iptables filtering rule to filter every IP which has failed in logging in more than 5 times
To use this brute force prevention method you need to use the following iptables rules:
linux-host:~# /sbin/iptables -I INPUT -p tcp --dport 22 -i eth0 -m state -state NEW -m recent -set

linux-host:~# /sbin/iptables -I INPUT -p tcp --dport 22 -i eth0 -m state -state NEW

-m recent -update -seconds 60 -hitcount 5 -j DROP
This iptables rules will filter out the SSH port to an every IP address with more than 5 invalid attempts to login to port 22
2. Getting rid of brute force attacks through use of hosts.deny blacklists
sshbl – The SSH blacklist, updated every few minutes, contains IP addresses of hosts which tried to bruteforce into any of currently 19 hosts (all running OpenBSD, FreeBSD or some Linux) using the SSH protocol. The hosts are located in Germany, the United States, United Kingdom, France, England, Ukraine, China, Australia, Czech Republic and setup to report and log those attempts to a central database. Very similar to all the spam blacklists out there.
To use sshbl you will have to set up in your root crontab the following line:
*/60 * * * * /usr/bin/wget -qO /etc/hosts.deny http://www.sshbl.org/lists/hosts.deny
To set it up from console issue:
linux-host:~# echo '*/60 * * * * /usr/bin/wget -qO /etc/hosts.deny http://www.sshbl.org/lists/hosts.deny' | crontab -u root -
These crontab will download and substitute your system default hosts with the one regularly updated on sshbl.org , thus next time a brute force attacker which has been a reported attacker will be filtered out as your Linux or Unix system finds out the IP matches an ip in /etc/hosts.deny
The /etc/hosts.deny filtering rules are written in a way that only publicly known brute forcer IPs will only be filtered for the SSH service, therefore other system services like Apache or a radio, tv streaming server will be still accessible for the brute forcer IP.
It’s a good practice actually to use both of the methods 😉
Thanks to Static (Multics) a close friend of mine for inspiring this article.
Tags: amanda, apache, brute force, example feb, Failed, fax, ftpuser, hosts, info, invalid user, Linux, log, log messages, logins, logs, majordomo, malicious attacker, mark, maximal protection, oracle, password, peter, port, postgres, protection, root, Secure, secure shell, security, security threat, Shell, sophie, ssh, ssh secure shell, system, temp, test, test1, testuser, threat, tomcat, toto, trac, unix, upload, user1, user2, user3, user5, var, webmaster
Posted in Linux, System Administration | 6 Comments »
Tuesday, February 10th, 2015 
I've been recently writting this Apache webserver / Tomcat / JBoss / Java decomissioning bash script. Part of the script includes extraction from httpd.conf of DocumentRoot variable configured for Apache host.
I was using following one liner to grep and store DocumentRoot set directory into new variable:
documentroot=$(grep -i documentroot /usr/local/apache/conf/httpd.conf | awk '{ print $2 }' |sed -e 's#"##g');
Above line greps for documentroot prints 2nd column of the matchi (which is the Apache server set docroot and then removes any " chars).
However I faced the issue that parsed string contained in $documentroot variable there was mysteriously containing r – return carriage – this is usually Carriage Return (CR) sent by Mac OS and Apple computers. For those who don't know the End of Line of files in UNIX / Linux OS-es is LF – often abreviated as n – often translated as return new line), while Windows PCs use for EOF CR + LF – known as the infamous rn. I was running the script from the server which is running SuSE SLES 11 Linux, meaning the CR + LF end of file is standardly used, however it seem someone has editted the httpd.conf earlier with a text editor from Mac OS X (Terminal). Thus I needed a way to remove the r from CR character out of the variable, because otherwise I couldn't use it to properly exec tar to archive the documentroot set directory, cause the documentroot directory was showing unexistent.
Opening the httpd.conf in standard editor didn't show the r at the end of
"directory", e.g. I could see in the file when opened with vim
DocumentRoot "/usr/local/apache/htdocs/site/www"
However obviously the r character was there to visualize it I had to use cat command -v option (–show-nonprinting):
cat -v /usr/local/apache/conf/httpd.conf
…
DocumentRoot "/usr/local/apache/htdocs/site/wwwr"
…
1. Remove the r CR with bash
To solve that with bash, I had to use another quick bash parsing that scans through $directory and removes r, here is how:
documentroot=${documentroot%$'r'}
It is also possible to use same example to remove "broken" Windows rn Carriage Returns after file is migrated from Windows to Liunx / FreeBSD host:
documentroot=${documentroot%$'rn'}
2. Remove r Carriage Return character with sed
Other way to do remove (del) Windows / Mac OS Carriage Returns in case if Migrating to UNIX is with sed (stream editor).
sed -i s/r// filename >> filename_out.txt
3. Remove r CR character with tr
There is a third way also to do it with (tr) – translate or delete characters old shool *nix command:
tr -d 'r' < file_with_carriagereturns > file_without_carriage_returns
4. Remove r CRs with awk (pattern scanning and processing language)
awk 'sub("$", "r")' inputf_with_crs.txt > outputf_without_crs.txt
5. Delete r CR with VIM editor
:%s/r//g
6. Converting file DOS / UNIX OSes with dos2unix and unix2dos command line tools
For sysadmins who don't want to bother with writting code to convert CR when moving files between Windows and UNIX hosts there are dos2unix and unix2dos installable commands.
All done Cheers ! 🙂
Tags: apache, bash script, bash shell, conf, configured, Delete, directory, documentroot, file, hidden, httpd, vim, Windows
Posted in Curious Facts, Everyday Life, Programming, System Administration, Various | No Comments »
Monday, June 3rd, 2013 
There is plenty of software for monitoring how server performs and whether servers are correctly up and running. There is probably no Debian Linux admin who didn't already worked or at least tried Nagios and Mointor to monitor and notify whether server is unreachable or how server services operate. Nagios and Munin are play well together to prevent possible upcoming problems with Web / Db / E-mail services or get notify whether they are completely inaccessible. One similar "next-generation" and less known software is Icanga.
The reason, why to use Icinga instead of Nagios is more features a list of what does Icinga supports more than Nagios is on its site here
I recently heard of it and decided to try it myself. To try Icanga I followed Icanga's install tutorial on Wiki.Icanga.Org here
In Debian Wheezy, Icinga is already part of official repositories so installing it like in Squeeze and Lenny does not require use of external Debian BackPorts repositories.
1. Install Icinga pre-requirement packages
debian:# apt-get --yes install php5 php5-cli php-pear php5-xmlrpc php5-xsl php5-gd php5-ldap php5-mysql
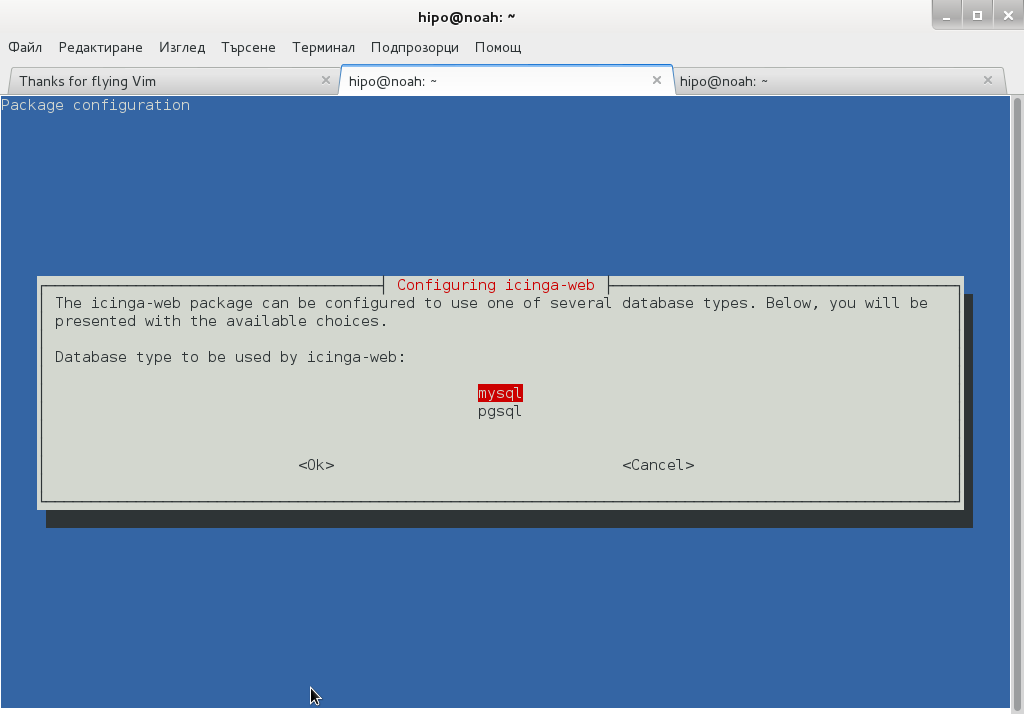
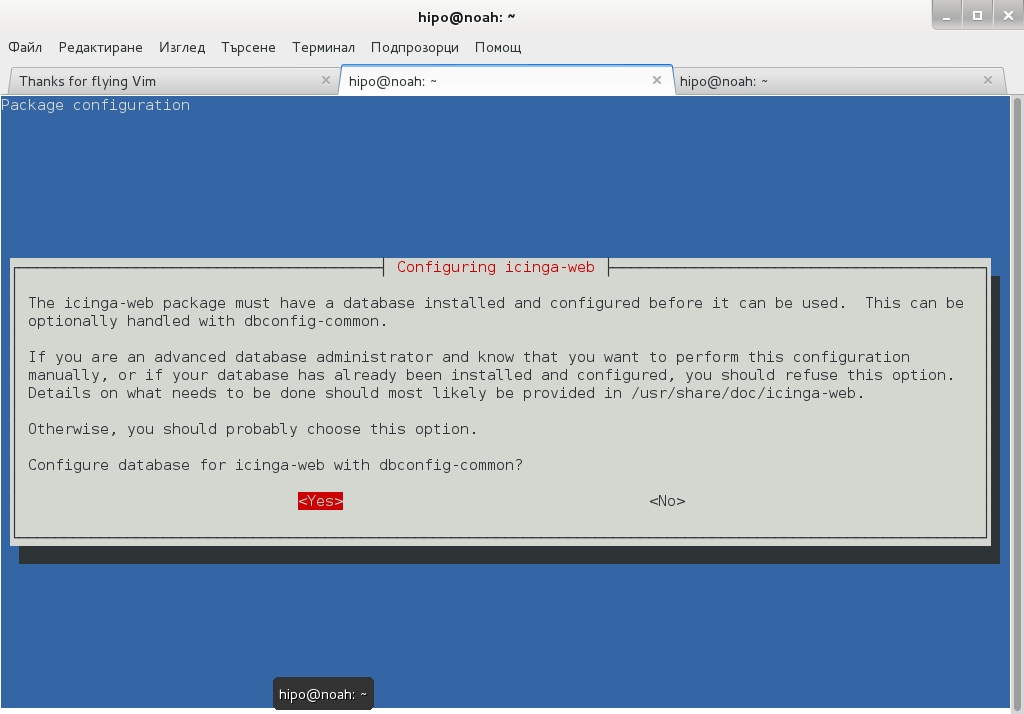
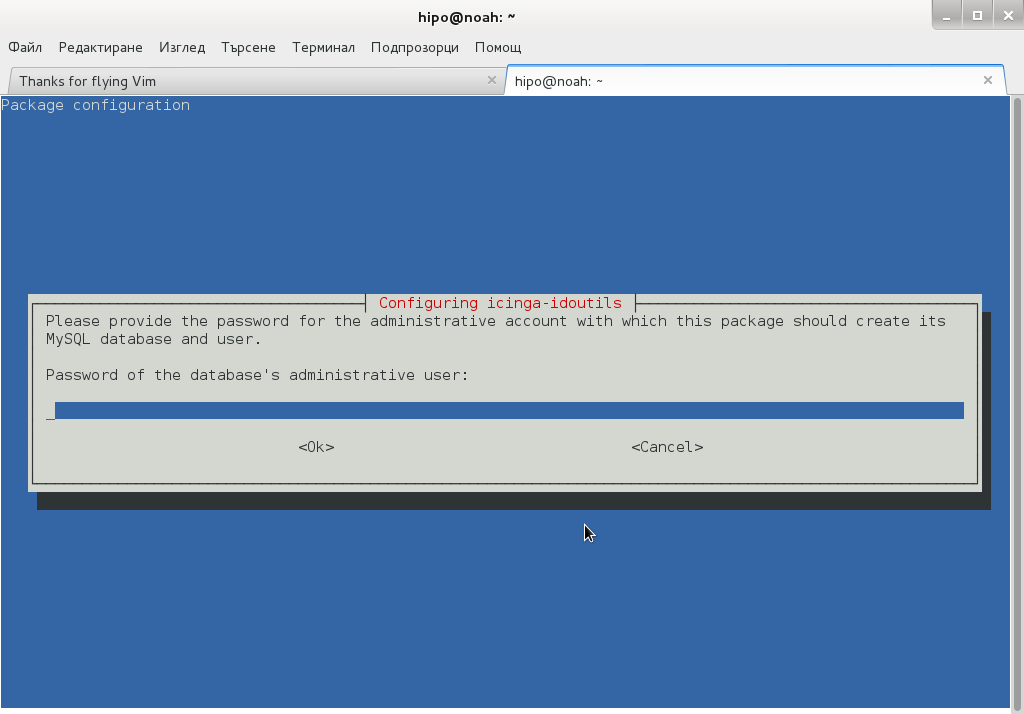
2. Install Icanga-web package
debian:~# apt-get --yes install icinga-web
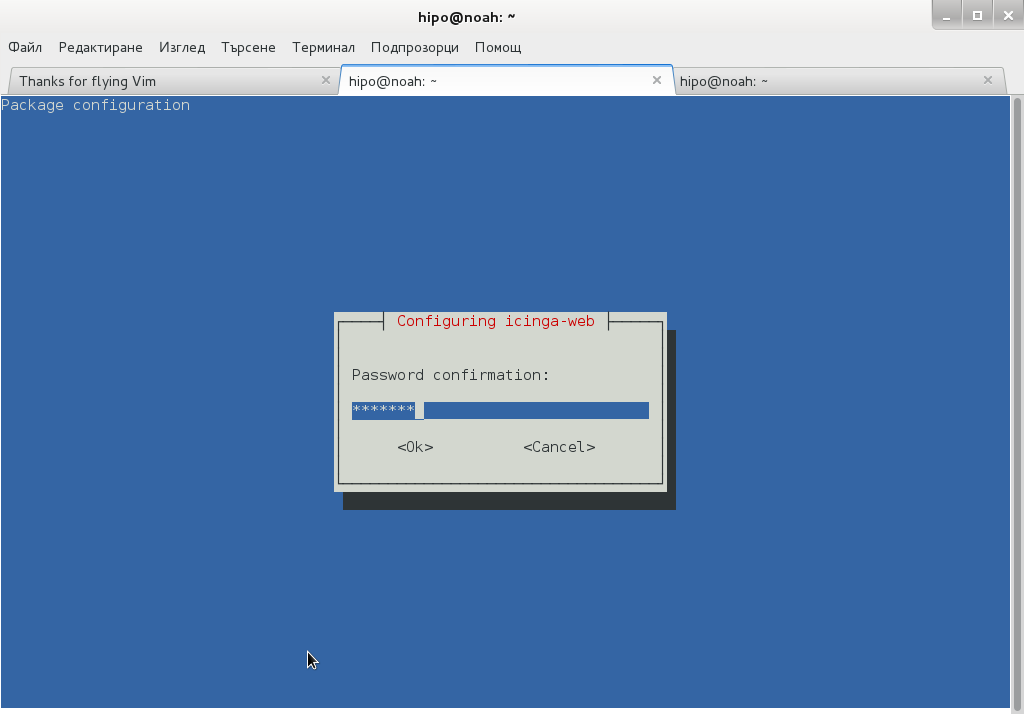
Here you will be prompted a number of times to answer few dialog questions important for security, as well as fill in MySQL server root user / password as well as SQL password that will icinga_web mySQL user use.
….
Setting up icinga-idoutils (1.7.1-6) …
dbconfig-common: writing config to /etc/dbconfig-common/icinga-idoutils.conf
granting access to database icinga for icinga-idoutils@localhost: success.
verifying access for icinga-idoutils@localhost: success.
creating database icinga: success.
verifying database icinga exists: success.
populating database via sql… done.
dbconfig-common: flushing administrative password
Setting up icinga-web (1.7.1+dfsg2-6) …
dbconfig-common: writing config to /etc/dbconfig-common/icinga-web.conf
Creating config file /etc/dbconfig-common/icinga-web.conf with new version
granting access to database icinga_web for icinga_web@localhost: success.
verifying access for icinga_web@localhost: success.
creating database icinga_web: success.
verifying database icinga_web exists: success.
populating database via sql… done.
dbconfig-common: flushing administrative password
Creating config file /etc/icinga-web/conf.d/database-web.xml with new version
database config successful: /etc/icinga-web/conf.d/database-web.xml
Creating config file /etc/icinga-web/conf.d/database-ido.xml with new version
database config successful: /etc/icinga-web/conf.d/database-ido.xml
enabling config for webserver apache2…
Enabling module rewrite.
To activate the new configuration, you need to run:
service apache2 restart
`/etc/apache2/conf.d/icinga-web.conf' -> `../../icinga-web/apache2.conf'
[ ok ] Reloading web server config: apache2 not running.
root password updates successfully!
Basedir: /usr Cachedir: /var/cache/icinga-web
Cache already purged!
3. Enable Apache mod_rewrite
debian:~# a2enmod rewrite
debian:~# /etc/init.d/apache2 restart
4. Icinga documentation files
Some key hints on Enabling some more nice Icinga features are mentioned in Icinga README files, check out, all docs files included with Icinga separate packs are into:
debian:~# ls -ld *icinga*/

drwxr-xr-x 3 root root 4096 Jun  3 10:48 icinga-common/

drwxr-xr-x 3 root root 4096 Jun  3 10:48 icinga-core/

drwxr-xr-x 3 root root 4096 Jun  3 10:48 icinga-idoutils/

drwxr-xr-x 2 root root 4096 Jun  3 10:48 icinga-web/
debian:~# less /usr/share/doc/icinga-web/README.Debian
debian:~# less /usr/share/doc/icinga-idoutils/README.Debian
5. Configuring Icinga
Icinga configurations are separated in two directories:
debian:~# ls -ld *icinga*
drwxr-xr-x 4 root root 4096 Jun 3 10:50 icinga
drwxr-xr-x 3 root root 4096 Jun 3 11:07 icinga-web
>
etc/icinga/ – (contains configurations files for on exact icinga backend server behavior)
/etc/icinga-web – (contains all kind of Icinga Apache configurations)
Main configuration worthy to look in after install is /etc/icinga/icinga.cfg.
6. Accessing newly installed Icinga via web
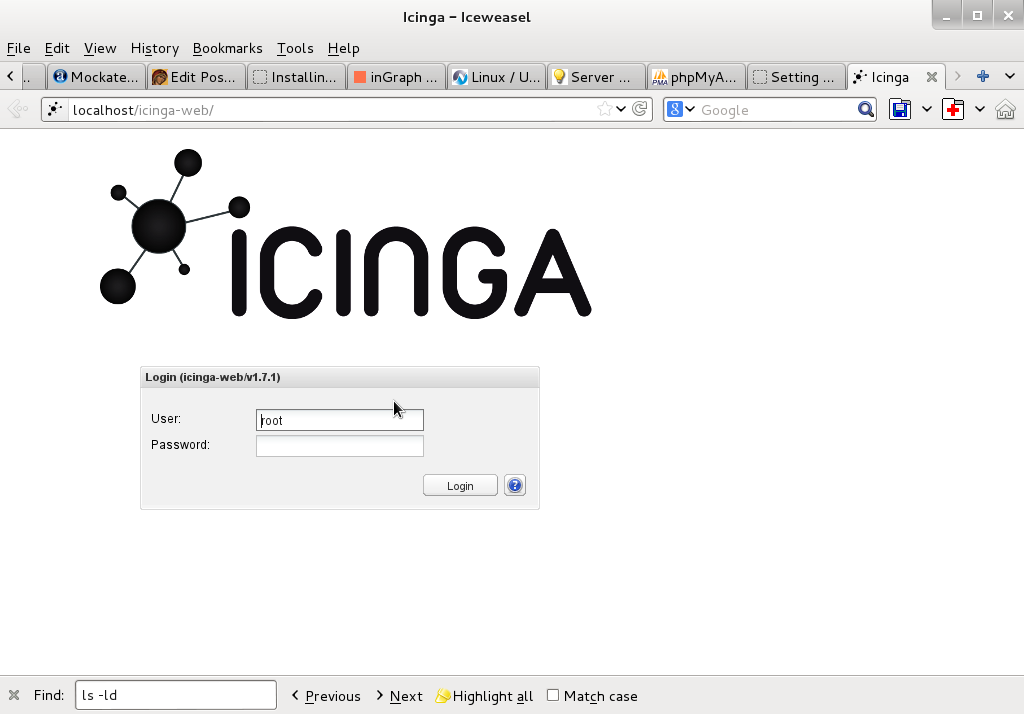
To access just installed Icinga, open in browser URL – htp://localhost/icinga-web

7. Monitoring host services with Icinga (NRPE)
As fork of Nagios. Icinga has similar modular architecture and uses number of external plugins to Monitor external host services list of existing plugins is on Icinga's wiki here.
Just like Nagios Icinga supports NRPE protocol (Nagios Remote Plugin Executor). To setup NRPE, nrpe plugin from nagios is used (nagios-nrpe-server).
To install NRPE on any of the nodes to be tracked;
debian: ~# apt-get install –yes nagios-nrpe-server
…
Then to configure NRPE edit /etc/nagios/nrpe_local.cfg
Once NRPE is supported in Icinga, you can install on Windows or Linux hosts NRPE clients like in Nagios to report on server processes state and easily monitor if server disk space / load or service is in critical state.
Tags: apache, apache2, debian linux, Debian Linux Installing, e mail services, Icanga Nagios, known software, Linux, Monitoring, new software, NRPE, php pear, repo, repositories, repository, root password, root root, server root, server services, servers, squeeze, version, web package, xml
Posted in Everyday Life, Linux, Monitoring, System Administration, Various | 1 Comment »
Friday, January 31st, 2014 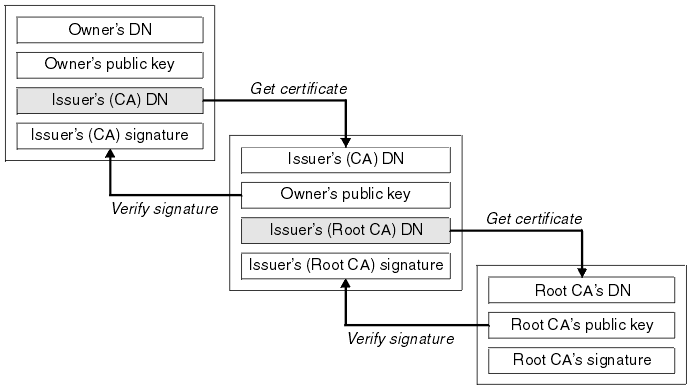
If you work in a big company with large network infrastructure who has to deal with SSL Certificates you will sooner or later will have to learn about existence of SSL Certificate Chains.
Its worthy thus to know what is SSL Certificate Chains and how such a chain is configured in Apache?
Personal SSL certificates (certificates issued to an individual or a company) can be used by clients to uniquely identify themselves when they are involved in starting an SSL connection.
SSL Certificate file contains X.509 certificate, which, in turn, contains a public key used for encryption.
Each personal certificate has zero or more certificate chains of certification authority certificates that extend back to the root certification authority.
Certificate R (Root Certification Authority)
|
| represents issuer of
V
Certificate I1 (Intermediate Certification Authority)
|
| represents issuer of
V
Certificate I2 (A subsidiary Intermediate Certification Authority)
|
| represents issuer of
V
Certificate I3 (A further subsidiary Intermediate Certification Authority)
|
| represents issuer of
V
Certificate P (A personal certificate that is used to identify its owner
on an SSL handshake)
Certificate chains are used to verify the authenticity of each certificate in that chain, including the personal certificate. Each certificate in the chain is validated using its 'parent' certificate, which in turn is validated using the next certificate up the chain, and so on, from the personal certificate up to the root certification authority certificate.
Now after explaining thoroughfully what is SSL Certificate Chain, here is how to configure a SSL Certificate in Apache Webserver.
Open apache2.conf or httpd.conf (depending on GNU / Linux distribution) and add to it;
   SSLEngine On

   SSLCertificateFile conf/cert/webserver-host.crt

   SSLCertificateKeyFile conf/cert/webserver-host.key

   SSLCertificateChainFile conf/cert/internet-v4.crt

   # SSLCertificateChainFile conf/cert/intranet-v3.crt

   SSLOptions +StdEnvVars +OptRenegotiate +ExportCertData
SSLCertificateChainFile conf/cert/chain-cert.crt
loads a chain of separate Personal SSL certificates each signing each other on different levels, chain is leading to top ROOT CA (Certificate Authority).
Tags: apache, apache2, cert, certificate, Certificate Chain, com, company, conf, configured, deal, existence, httpd, individual, installation, key, parent, root, signing, SSL, webserver, www
Posted in Linux, System Administration, Web and CMS | 1 Comment »
Wednesday, August 14th, 2013 I have a busy Linux server with 24 cores each running on ..4 Ghz. Server is configured to server Apache and MySQL queries and a dozen of high traffic websites are hosted on it. Until just recently server worked fine and since about few days I started getting SMS notifications that server is inaccessible few times a day. To check what's wrong I checked in /var/log/apache2/error.log and there I found following error:
[error] [client 95.107.233.2] PHP Warning: Unknown: Input variables exceeded 1000.
To increase the limit change max_input_vars in php.ini. in Unknown on line 0 referer: http://www.site-domain-name.com/predict/2013-08-10
Before I check Apache error.log, I had a guess that ServerLimit of 256 (spawned servers max) is reached so solution would be raise of ServerLimit to more than MaxClients setting defined in /etc/apache2/apache2.conf. After checking /var/log/apache2/error.log I've realized problem is because the many websites hosted on server exceed maximum defined variables possible to assign by libphp in php.ini. maximum possible defined variables before PHP stops servering is set through max_input_vars variable
As I'm running a Debian Squeeze Linux server, here is what is set as default for max_input_vars in /etc/php5/apache2/php.ini:
 ; How many GET/POST/COOKIE input variables may be accepted

; max_input_vars = 1000
So to fix it in php.ini just raised a bit setting to 1500, i.e.:
max_input_vars = 1500
Though I hit the error on Debian I assume same error occurs on Redhat RPM based (Fedora, CentOS, RHEL Linux) servers.
Hence I assume
max_input_vars = 1500
or higher should fix on those servers too. Looking forward to hear if same error is hit on RedHats.
Enjoy 🙂
Tags: apache, CentOS, cores, domain name, few days, guess, input variables, Linux, linux server, max input, notifications, referer, rhel, servers, squeeze, traffic websites
Posted in PHP, Web and CMS | 1 Comment »
Monday, July 15th, 2013 
I have to administer few inherited Linux servers with Ubuntu and Debian Linux. The servers hosts mainly websites with regularly un-updated Joomlas and some custom developed websites which were developed pretty unsecure. To mitigate hacked websites I already disabled some of most insecure functions like system(); eval etc. – I followed literally my previous tutorial PHP Webhosting security disable exec();, system();, open(); and eval();.
Still in logs I see shits like:
[error] [client 66.249.72.100] PHP Warning: mkdir(): No such file or directory in /var/www/site/plugins/system/jfdatabase/intercept.jdatabasemysql.php on line 161
Hence to prevent PHP mkdir(); and chown(); functiosn being active, I had to turn on in /etc/php5/apache2/php.ini – safe_mode . For some reason whoever configured Apache leave it off.
safe_mode = on
Hopefully by disabling this functions will keep cracker bot scripts to not create some weird directory structures on HDD or use it as mean to DoS overflow servers filesystem.
Hope this help others stabilize their servers too. Enjoy ! 🙂
Tags: apache, better security, chown, debian linux, directory structures, exec, Linux, linux servers, logs, overflow, safe mode, scripts, server security, tutorial php, Ubuntu
Posted in Various, Web and CMS | 1 Comment »
Thursday, March 28th, 2013 I had to run a shell script to run automatically in detached screen during Linux system boot up via /etc/rc.local. This is needed because the server uses the tiny shell script to fetch data from remote host database and fill information into local MySQL server.
My idea was to su from root to www-data (Apache) user – the script has requirements to run with Apache user, then it has to run detached using GNU screen (multi terminal emulator. The tiny one line script I imagined would do the trick is like so:
# tty=$(tty); su www-data -c 'cd /home/user/www/enetpulse; screen -d /home/user/www/enetpulse/while_true.sh'; chmod 0720 $tty
I run this as root user to test whether it will work or not before I put it in /etc/rc.local but for my surprise got an error:
Must run suid root for multiuser support.
After a quick investigation on what is causing it I came across the solution which is to include screen arguments (-m -S shared). The working variant that gets around the error – i.e. successfully changes user privileges to Debian Apache user (www-data) and then detach with screen is:
# tty=$(tty); chmod a+rw $tty; su www-data -c 'cd /home/user/www/enetpulse; screen -d -m -S shared /home/user/www/enetpulse/while_true.sh'; chmod 0720 $tty;
That's all now script works out as planned on next server reboot
Tags: apache, chmod, gnu screen, host database, line script, Linux, mysql server, Privileges, root user, shell script, surprise, system boot, terminal emulator, tiny shell
Posted in System Administration | No Comments »
Saturday, April 28th, 2012 When a server hard disk scape gets filled its common that Apache returns empty (no content) pages…
This just happened in one server I administer. To restore the normal server operation I freed some space by deleting old obsolete backups.
Actually the whole reasons for this mess was an enormous backup files, which on the last monthly backup overfilled the disk empty space.
Though, I freed about 400GB of space on the the root filesystem and on a first glimpse the system had plenty of free hard drive space, still restarting the MySQL server refused to start up properly and spit error:
Incorrect key file for table '/tmp/#sql_9315.MYI'; try to repair it" mysql start up error
Besides that there have been corrupted (crashed) tables, which reported next to above error.
Checking in /tmp/#sql_9315.MYI, I couldn't see any MYI – (MyISAM) format file. A quick google look up revealed that this error is caused by not enough disk space. This was puzzling as I can see both /var and / partitions had plenty of space so this shouldn't be a problem. Also manally creating the file /tmp/#sql_9315.MYI with:
server:~# touch /tmp/#sql_9315.MYI
Didn't help it, though the file created fine. Anyways a bit of a closer examination I've noticed a /tmp filesystem mounted besides with the other file system mounts ????
You can guess my great amazement to find this 1 Megabyte only /tmp filesystem hanging on the server mounted on the server.
I didn't mounted this 1 Megabyte filesystem, so it was either an intruder or some kind of "weird" bug…
I digged in Googling to see, if I can find more on the error and found actually the whole mess with this 1 mb mounted /tmp partition is caused by, just recently introduced Debian init script /etc/init.d/mountoverflowtmp.
It seems this script was introduced in Debian newer releases. mountoverflowtmp is some kind of emergency script, which is triggered in case if the root filesystem/ space gets filled.
The script has only two options:
# /etc/init.d/mountoverflowtmp

Usage: mountoverflowtmp [start|stop]
Once started what it does it remounts the /tmp to be 1 megabyte in size and stops its execution like it never run. Well maybe, the developers had something in mind with introducing this script I will not argue. What I should complain though is the script design is completely broken. Once the script gets "activated" and does its job. This 1MB mount stays like this, even if hard disk space is freed on the root partition – / ….
Hence to cope with this unhandy situation, once I had freed disk space on the root partition for some reason mountoverflowtmp stop option was not working,
So I had to initiate "hard" unmount:
server:~# mount -l /tmp
Also as I had a bunch of crashed tables and to fix them, also issued on each of the broken tables reported on /etc/init.d/mysql start start-up.
server:~# mysql -u root -p

mysql> use Database_Name;

mysql> repair table Table_Name extended;

....
Then to finally solve the stupid Incorrect key file for table '/tmp/#sql_XXYYZZ33444.MYI'; try to repair it error, I had to restart once again the SQL server:
Stopping MySQL database server: mysqld.

Starting MySQL database server: mysqld.

Checking for corrupt, not cleanly closed and upgrade needing tables..

root@server:/etc/init.d#
Tadadadadam!, SQL now loads and works back as before!
Tags: amazement, apache, Auto, backup files, backups, Disk, disk space, Draft, drive, emergency, empty space, file, file tmp, first glimpse, format, free hard drive, free hard drive space, google, googling, hard disk, help, Incorrect, init, intruder, key file, mess, MYI, MyISAM, mysql server, mysqld, operation, partition, quot, root, root filesystem, script, server operation, shouldn, size, something, TABLE, tmp, weird bug
Posted in MySQL, System Administration, Web and CMS | 2 Comments »
Friday, July 20th, 2012 I'm running a two servers for a couple of home hosted websites. One of the servers is serving as Apache host1 and has configured MySQL running on it and the second is used just for database host2 – (has another MySQL configured on it).
The MySQL servers are not configured to run as a MySQL MASTER and MySQL SLAVE (no mysql replication), however periodically (daily), I have a tiny shell script that is actualizing the data from the active SQL host2 server to host1.
Sometimes due to electricity problems or CPU overheats the active MySQL host at host2 gets stoned and stops working causing the 2 WordPress based websites and One joomla site inaccessible.
Until I manually get to the machine and restart host2 the 3 sites are down from the net and as you can imagine this has a very negative impact on the existing website indexing (PageRank) in Google.
When I'm at home, this is not a problem as I have physical access to the servers and if somethings gets messy I fix it quickly. The problem comes, whether I'm travelling or in another city far from home and there is no-one at home to give the hanged host hard reboot ….
Lately the problems with hang-ups of host2 happaned 3 times or so for 2 weeks, as a result the websites were inaccessible for hours and since there is nobody to reboot the server for hours; the websites keep hanging until the DB host is restarted ;;;;
To work-around this I came with the idea to write a tiny shell script to check if host2 is ping-able in order to assure the Database host is not down and then if script determines host2 (mysql) host is down it changes wp-config.php (set to use host2) to a wp-config.php (which I have beforehand configured to use) host1.
Using the script is a temporary solution, since I have to actually find the real hang-up causing troubles, but at least it saves me long downtimes. Here is a download link to the script I called change_blog_db.sh .
I've configured the script to be run on the Apache node (host1) via a crontab calling the script every 10 minutes, here is the crontab:
*/10 * * * * /usr/sbin/change_blog_db.sh > /dev/null 2>&1
The script is written in a way so if it determins host2 is reachable a copy of wp-config.php and Joomla's configuration.php tuned to use host2 is copied over the file config originals. In order to use the script one has to configured the head variables script section, e.g.:
host_to_ping='192.168.0.2';

blog_dir='/var/www/blog';

blog_dir2='/var/www/blog1';blog_dir3='/var/www/joomla';

notify_mail='hipo@www.pc-freak.net';

wp_config_orig='wp-config.php';

wp_config_localhost='wp-config-localhost.php';

wp_config_other_host='wp-config-192.168.0.2.php';

joomla_config_orig='configuration.php';

joomla_config_other_host='configuration-192.168.0.2.php';
You will have to manually prepare;;;
wp-config-localhost.php, wp-config-192.168.0.2.php ,configuration-192.168.0.2.php, wp-config-localhost.php to be existing files configured to with proper host1 and host2 IP addresses.
Hope the script will be useful to others, experiencing database downtimes with WordPress or Joomla installs.
Tags: apache, change, city, config, copy, cpu overheats, database host, download, electricity, electricity problems, file, google, hang ups, HEAD, host1, impact, indexing, Master, mysql replication, mysql server, mysql servers, negative impact, nobody, one at home, orig, pagerank, php, ping, replication, second, Shell, shell script, SQL, temporary solution, tiny shell, ups, website indexing, Wordpress
Posted in Joomla, MySQL, Various, Web and CMS, Wordpress | 1 Comment »


