Posts Tagged ‘apps’

How to Fix Windows Update Problems: A Complete Guide

Friday, July 11th, 2025

fix-windows-update-problems-howto-picture

Windows Update is essential for keeping your Windows system secure, stable, and up to date to be on track with latest security patches and (for those working in large corporations) for the PC to be compliant to Company / Corporation / Domain security defined policies and standards. However, users often encounter issues like updates failing to install, being stuck at a certain percentage, or causing error messages. Whether you're using Windows 10 or Windows 11, this guide walks you through proven steps to fix Windows Update problems.

Common Symptoms of Windows Update Issues

Before diving into the solutions, it helps to identify typical signs of update problems:

  • Updates stuck at 0%, 35%, or 100%
  • Update error codes like 0x800700020x800f081f, or 0x8024a105
  • "Windows Update Failed" or "There were problems installing updates"
  • PC crashes or slowdowns after an update
  • Restart loops or repeated update attempts

Step-by-Step Guide to Fix Windows Update Problems

 1. Restart Your PC and rerun updates

Sometimes (very rarely) a simple reboot clears temporary glitches in the update process.

Steps:

  • Click Start > Power > Restart
  • Try running Windows Update again

 2. Run the Windows Update Troubleshooter

Windows includes a built-in tool that can automatically detect and fix common update problems.

Steps:

  1. Open Settings > System > Troubleshoot > Other troubleshooters

  2. Find Windows Update and click Run

  3. Follow the prompts and apply any fixes it suggests

 3. Check Your Internet Connection

A slow or intermittent connection can prevent updates from downloading or installing.

Tips:

  • Ensure a stable connection
  • Avoid using mobile hotspots during large updates
  • Try a wired Ethernet connection if possible

4. Free Up Disk Space

Windows Update needs adequate space to download and install updates.

To free space:

  • Open Settings > System > Storage
  • Use Storage Sense or manually delete:

    • Temporary files
    • Old downloads
    • Unused programs

5. Manually Restart Windows Update Services

Windows Update relies on several background services. Restarting them can resolve stuck updates.

Steps:

  1. Press 

    Windows + R

    , type 

    services.msc

     and press Enter

  2. Find and restart the following:

    • Windows Update
    • Background Intelligent Transfer Service (BITS)
    • Cryptographic Services
  3. Right-click each > Restart

6. Clear the Windows Update Cache (SoftwareDistribution Folder)

Corrupted update files in the SoftwareDistribution folder can cause problems.

Steps:

  1. Press 

    Windows + R (key)

    type 

    Right-click > Run as Administrator


  2. Stop update services:

    net stop wuauserv
    net stop bits


  3. Delete the update cache:  

    Cmd line

    del /f /s /q %windir%\SoftwareDistribution\

  4. Restart services:  

    net start wuauserv net start bits

  5. Try updating again

7. Use the System File Checker (SFC) and DISM Tools

Corrupt system files can interfere with updates.

Steps:

  1. Open Command Prompt as Administrator

  2. Run SFC from cmd line:  

    sfc /scannow

  3. After it completes, run DISM:  

    DISM /Online /Cleanup-Image /RestoreHealth

These commands check for system corruption and repair it.

 8. Install Updates Manually via Microsoft Update Catalog

If a specific update keeps failing, download and install it manually.

Steps:

  1. Go to: https://www.catalog.update.microsoft.com/

  2. Search the KB number of the failed update

  3. Download the correct version for your system

  4. Run the installer

 9. Pause and Resume Updates

This can force Windows to reattempt updates cleanly.

Steps:

  1. Open Settings > Windows Update

  2. Click Pause updates for 1 week

  3. Restart your PC
  4. Go back and click Resume updates

10. Perform an In-Place Upgrade (Repair Install)

If nothing else works, a repair install reinstalls Windows while keeping your files and apps.

Steps:

  1. Download the Media Creation Tool from Microsoft

  2. Choose Upgrade this PC now

  3. Follow prompts and select Keep personal files and apps

This replaces system files and refreshes Windows Update components.

11. Use WuFix.bat script that refreshes services

wufix.bat

SC config trustedinstaller start=auto
net stop bits
net stop wuauserv
net stop msiserver
net stop cryptsvc
net stop appidsvc
Ren %Systemroot%\SoftwareDistribution SoftwareDistribution.old
Ren %Systemroot%\System32\catroot2 catroot2.old
regsvr32.exe /s atl.dll
regsvr32.exe /s urlmon.dll
regsvr32.exe /s mshtml.dll
netsh winsock reset
netsh winsock reset proxy
rundll32.exe pnpclean.dll,RunDLL_PnpClean /DRIVERS /MAXCLEAN
dism /Online /Cleanup-image /ScanHealth
dism /Online /Cleanup-image /CheckHealth
dism /Online /Cleanup-image /RestoreHealth
dism /Online /Cleanup-image /StartComponentCleanup
Sfc /ScanNow
net start bits
net start wuauserv
net start msiserver
net start cryptsvc
net start appidsvc

12. Contact Microsoft or other tech guru Help

If problems persist even after trying the above methods, consider:

  • Contacting Microsoft Support
  • Consulting with a local technician
  • Performing a clean install (as a last resort)

13. Few Final Tips for Smooth Windows Updates

  • Always back up important data before major updates
  • Keep drivers and antivirus software up to date
  • Avoid interrupting the PC during updates
  • Check for known issues on Microsoft’s support site before installing major feature updates

14. Advanced Commands and Additional Ways to Fix Windows Update Problems

These methods go deeper into system-level repairs and are ideal when the basic fixes fail.

14.1. Reset Windows Update Components Manually (Full Command Script)

Instead of just clearing the cache, reset all update-related services and components.

Steps:

Open Command Prompt as Administrator, and run these commands one at a time:

net stop wuauserv
net stop cryptSvc
net stop bits
net stop msiserver

Rename update-related folders:

ren C:/\Windows/\SoftwareDistribution SoftwareDistribution.old ren C:/\Windows/\System32/\catroot2 catroot2.old

Restart the services:

net start wuauserv
net start cryptSvc
net start bits
net start msiserver

This fully resets the update components.

 14.2. Use PowerShell to Re-register Update DLLs

Sometimes DLLs (Dynamic Link Libraries) related to updates become unregistered.

Run this in PowerShell (Admin):

regsvr32 wuaueng.dll regsvr32 wups.dll regsvr32 wups2.dll regsvr32 wuwebv.dll regsvr32 wucltui.dll

 14.3. Use PowerShell to Force Update Scan and Install

Open PowerShell as Administrator, and run:

Install-Module PSWindowsUpdate -Force Import-Module PSWindowsUpdate Get-WindowsUpdate Install-WindowsUpdate -AcceptAll -AutoReboot

 You may be prompted to install NuGet or trust the repository—accept these prompts.

 14.4. Enable Update Services via Registry Editor (Caution)

If your update services are being disabled by group policy or a third-party app, you can reset the registry settings.

Steps:

  1. Press 

    Win + R

     → type 

    regedit

     → Enter

  2. Navigate to:

    HKEY_LOCAL_MACHINE\SOFTWARE\Policies\Microsoft\Windows\WindowsUpdate\AU

  3. Delete values like NoAutoUpdateAUOptions, etc.

  4. Also check:

    HKEY_LOCAL_MACHINE\SYSTEM\CurrentControlSet\Services\wuauserv

    • Ensure Start is set to 2 (automatic)

 Always back up your registry before editing!


 14.5. Check Group Policy Settings (Windows Pro or Enterprise)

Group Policy can block updates.

Steps:

  1. Press 

    Win + R

     → type 

    gpedit.msc

     → Enter

  2. Navigate to:

    Computer Configuration > Administrative Templates > Windows Components > Windows Update

  3. Check and disable any restrictive settings like:

    • No auto-restart with logged on users
    • Configure Automatic Updates
    • Do not connect to any Windows Update Internet locations

 14.6. Use the Windows Update Assistant

Download the latest Windows Update Assistant from the Microsoft website or Windows 11 equivalent.

  • This tool bypasses built-in update problems
  • It can force the latest feature update or build version

 14.7. Delete Windows Update Pending.xml File

Sometimes updates fail due to a corrupted 

Pending.xml

 file.

Steps:

  1. Open Command Prompt as Administrator

  2. Run:

    del %windir%\winsxs\pending.xml

 This is advanced; use only if you're stuck with a failed update loop.

 14.8. Use Event Viewer to Identify Update Errors

Event Viewer can show exactly which update or process is failing.

Steps:

  1. Press 

    Win + X

     → Event Viewer

  2. Navigate to:

    Windows Logs > System

  3. Filter by Error and Warning

  4. Look for sources like:

    • WindowsUpdateClient
    • CBS (Component-Based Servicing)
    • WUSA

Note any error codes or update KB numbers.

 14.9. Use Deployment Image Servicing and Management (DISM) from ISO

DISM can be more powerful when pointed to a known good source like an ISO image.

Steps:

  1. Mount a Windows ISO (right-click > Mount)

  2. Note the drive letter (e.g., D:)

  3. Run in CMD (Admin):

    cmd.exe

    DISM /Online /Cleanup-Image /RestoreHealth /Source:D:\Sources\install.wim /LimitAccess

Replace 

D:\

 with the correct drive.

 14.10. Revert Problematic Updates Using Recovery or Uninstall

If an update caused system problems:

Option A: Uninstall via Settings

  • Go to Settings > Windows Update > Update History > Uninstall updates

Option B: From Advanced Startup

  • Hold 


     while clicking Restart

  • Go to Troubleshoot > Advanced Options > Uninstall Updates 

15.How to install Windows 11 without losing files (Re-install windows with keeping All stored files)

15.1. Download and Use the Media Creation Tool:

  • Download the Media Creation Tool from Microsoft's website.

    a) Go to this website:
    www.microsoft.com/en-us/software-download/windows11

    b) Click Download Now.

    c) Open the file you downloaded.
    Double-click it.

    d) Accept everything.
    Click Accept and Install.

    e) Important:
    When it asks about keeping files, select:

    f) Keep personal files and apps

    Wait until it finishes.

    Your PC will restart many times.

    g) After install:
    Your files and programs will still be there.

  • Run the tool and choose to create installation media for another PC.
  • Select your language, architecture, and edition of Windows.
  • Choose to create either a USB flash drive or an ISO file.
  • Follow the on-screen instructions to complete the process. 

15.2 Perform a Clean Install or In-place Upgrade:

  • Clean Install: This will erase all your personal files, apps, and settings, so be sure to back up your data if you choose this option.
  • In-place Upgrade: This will keep your files, apps, and settings while reinstalling Windows. This is a good option if you want to try and preserve your existing setup.
  • To perform an in-place upgrade, boot from the installation media and choose the "Upgrade" option, according to Microsoft Support

1️⃣ Go to this website:
https://www.microsoft.com/en-us/software-download/windows11

2️⃣ Download “Installation Assistant.
Click Download Now.

3️⃣ Open the file you downloaded.
Double-click it.

4️⃣ Accept everything.
Click Accept and Install.

5️⃣ Important:
When it asks about keeping files, select:
✅ Keep personal files and apps

6️⃣ Wait until it finishes.

Your PC will restart many times.

It can take 1–2 hours.

After install, Your files and programs will still be there. But anyways just in case don't forget to create a full backup of everything important before you started.

Summary of Useful Commands

Purpose Command or Tool
Stop Update Services net stop wuauserv etc.
Delete Update Cache del %windir%\SoftwareDistribution\*.* /s /q
Run SFC sfc /scannow
Run DISM DISM /Online /Cleanup-Image /RestoreHealth
PowerShell Update Module Install-Module PSWindowsUpdate
Force Install Updates Install-WindowsUpdate -AcceptAll
Reset Update Components (Full) See above command sequence
Manual Update via Catalog

Conclusion

Windows Update problems can be frustrating, but they’re usually fixable with a methodical approach. From restarting services to clearing cache and running built-in tools, this guide covers all essential fixes. Staying updated ensures your PC remains secure, efficient, and compatible with the latest software.

Make Viber calls with no smartphone from Mobile to PC and from PC to Mobile – Bluestacks install android mobile apps on PC

Thursday, April 24th, 2014

Viber-for-smartphones-connect-freely-through-internet-voip-on-your-mobile

Since I've bought ZTE smat phone and I have Android on it, decided to install   Viber – iOS, Android and Desktop PC – Free Calls, Text and Picture sharing through the internet app. Viber is used by a lot of my people including many friends already so I installed it as well to be possible to speak for free with close friends …

Why Viber?


What makes this nifty app so great is its capability to make free calls over mobile phones through the Internet Viber.
Viber saves you a lot of money as calls are handled only through the Internet (you need Wifi on your mobile or Mobile 3G Internet access on phone) and you don't need to pay to your mobile operator 0.10 – 0.15 euro / cents per minute. Besides being Free another advantage of Viber is conversations sound quality which is much better than a regular phone call

Viber doesn't need a special registration, but as (login) identificator uses your mobile phone number – you just need to have a working Mobile operator phone num. Once registered under a number even if you change your mobile sim card to other operator (for example moving from country to country) still the Viber account will continue work. Another good reason to use Viber is it makes possible price free calls between different countries (for example if you travel a lot and you want to regularly speak with your wife) – in my case right now I'm in Bulgaria and my wife is in Belarus, so to save money and keep talking daily we use Viber daily.

What Devices and Operating System Viber Supports and what is Viber advantages / disadvantages ?


Another reason why Viber is so great is its multi-platform support it works on iPhone, Blackberry, Windows Phone, Nokia (Symbian), Windows, Mac OS and even (Korean own OS-ed) Bada devices. Some might argue that Viber is inferior to Skype and interms of Voice and Video quality its better because of its enhanced HD voice enhanced codecs, besides that Viber's video is still in Beta. However Viber has one big advantage it makes easy possible to reach people using just their Mobile Phone numbers where in Skype it takes time and effort to register in Skype install application on your Mobile keep yourself logged in in Skype and have all contacts previously added, all this happens automatically in Viber in time of installation of Viber App on your mobile.
 

Which Is Cheaper Viber or Skype?

Skype_VS_Viber-VOIP-Prices-which-is-cheaper-skype-or-viber


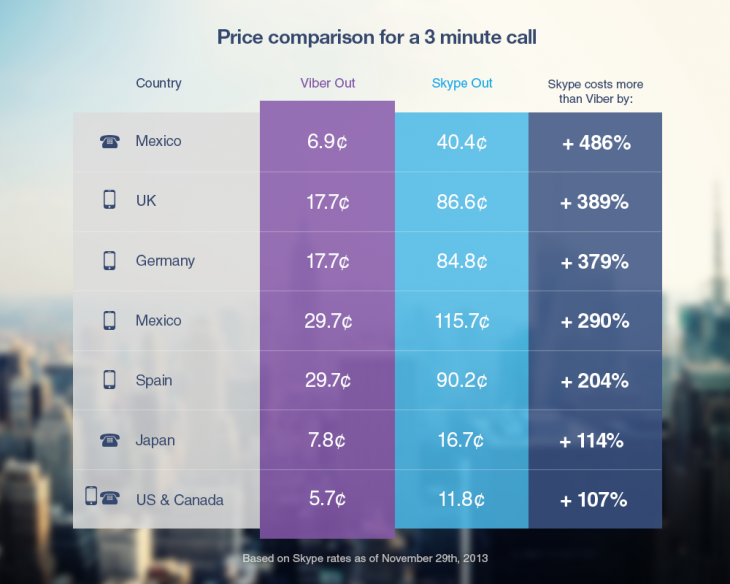
Once installed Viber could integrate itself with rest of your Mobile OS Call Manager and in time of call a friend number you have the opportunity to make it free Viber call. Viber are also selling Viber Credits so if you want to use your Viber Voice Over IP you can call external mobile operator numbers on a very very cheap price. Viber Calls to landline or mobile phones could be up to 400% cheaper than Skype! Whether you own a Smartphone it will be nice to give Viber a try.

Viber – How to make Phone calls between Desktop PC and Smarphone Mobile


One not so standard Viber use is to make Viber calls with no smartphone (at hand) from PC to another Viber equipped Mobile and vice versa.
I needed to make Viber calls from my ZTE Android running mobile to my wife's MacBook Air PC because her mobile is an old Nokia running obscure Symbian version which is not supporting Viber + she doesn't have an Internet access tariff switched on her mobile.

Here is what I had to do to make Phone calls between my Mobile Viber App and my wife's MacbookAir Notebook PC:
 

  • Install BlueStacks Web App Player


    BlueStacks_emulate-google-appstore-on-Windows-and-Mac-OS-android-emulator_Logo
    BlueStacks App Player is a software designed to enable Android applications to run on Windows PC, Apple Macintosh Computers and Windows tablets. BlueStacks is something like (VMware, Qemu) Virtual Machine which allows you to install and run any Android App on your Desktop PC.
    Its curious that app was created by Rosen Sharma in 2008 an ex CTO (Chief Technology Officer) of McAfee
     

  •  A mobile phone with a working SIM card (Nokia 6310 or any old mobile no need to be a smartphone
     
  • Desktop PC with Windows 7, 8 or PC with Mac OS


Install Bluestacks

BlueStacks is needed in order to emulate a smartphone on your PC, therefore once setupped Bluestacks. Launch it and  inside its necessary to login with your Gmail (Google Account) in order to allow access to Google Play Appstore on your PC.
viber with no mobile phone bluestacks
 

Installing and Verifying Viber

This is the most crucial and tricky part in order to make Viber working on any device you need to receive a special Viber verification code, you need to fill in this code to confirm Viber installation on PC. Here I assume you have BlueStacks running with Viber Application installed.

viber-running-under-bluestacks-on-windows-7-8-screenshot

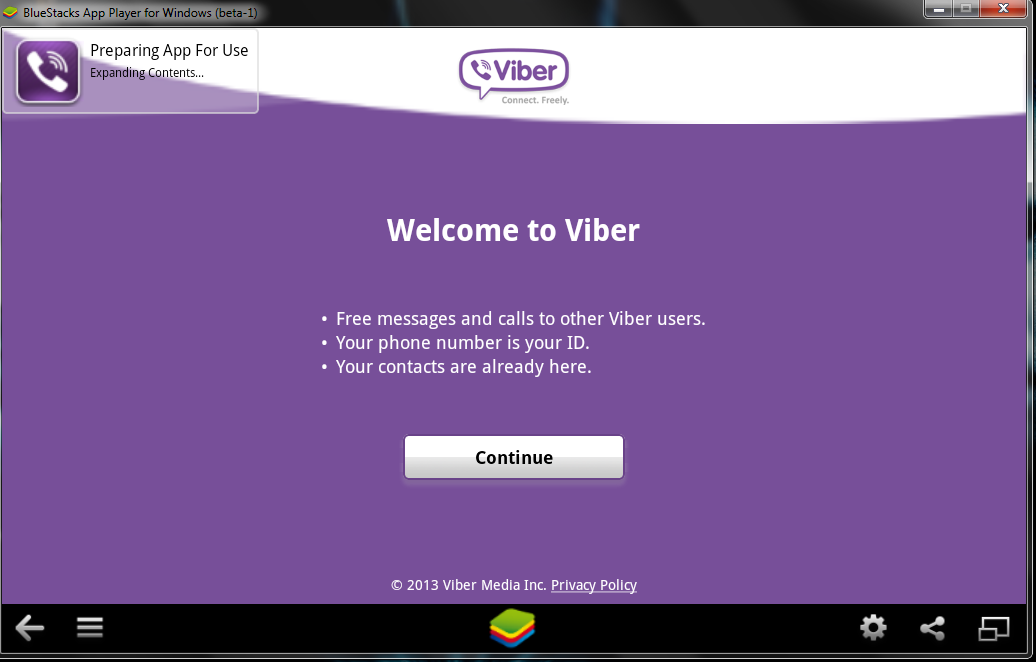
First will be prompted to Agree with Terms and Conditions and provide Mobile Phone number for verification. Tell the Viber app that you have a smartphone with Viber already when prompted. After receving Viber Verification Code you need to fill in this code into BlueStacks Window (inside Viber should be running), go further to next step and you should be done with Desktop PC Viber number registration.

N.B. ! One brackets to open here is you need to have a working Mobile Phone number where you will receive the verification code as SMS, otherwise you cannot get the verification. On your filled in mobile phone number you will get the verification code as SMS.

Making Viber Calls to (Windows Mac) PC without Smartphone

There is no more further need for BlueStacks so you can uninstall it, however I preferred to keep it as its useful to be able to install Android Applications straight on your Desktop PC. To start using Viber on Desktop, just launch Viber application (not through BlueStacks) but the direct install.

Use Viber dial pad to dial your desired remote Smartphone number with Viber equipped.
Enjoy the free Internet calls ! 🙂
 

Adding Listing and Deleting SSL Certificates in keystore Tomcat Application server / What is keystore

Thursday, December 5th, 2013

Apache Tomcat keystore delete import list logo

 I work on ongoing project where Tomtat Application servers configured to run Clustered located behind Apache with mod_proxy configured to use ReverseProxy are used. One of customers which required a java application deployment experienced issues with application's capability to connect to SAP database.

After some investigation I figured out, the application is unable to connect to the SAP db server becuse remote host webserver running some SAP related stuff was not connecting due to expired certificate in Tomcat Keystore known also as JKS / Java Keystore– (.keystore) – which is a file containing multiple remote hosts imported certificates.

The best and shortest definition of keystore is:

Keystore entry = private + public key pair = identified by an alias

The keystore protects each private key with its individual password, and also protects the integrity of the entire keystore with a (possibly different) password.

Managing Java imported certificates later used by Tomcat is done with a command line tool part of JDK (Java Development Kit) called keystore. Keystore is usually located under /opt/java/jdk/bin/keytool. My Java VM is installed in /opt/ anyways usual location of keytool is $JAVA_HOME/bin/

Keytool has capabilities to create / modify / delete or import new SSL certificates and then Java applications can access remote applications which requires Secure Socket Layer handshake . Each certificate kept in .keystore file (usually located somewhere under Tomcat web app server directory tree), lets say – /opt/tomcat/current/conf/.keystore

1. List current existing imported SSL certificates into Java's Virtual Machine

tomcat-server:~# /opt/java/jdk/bin/keytool -list -keystore /opt/tomcat/current/conf/.keystore
password:
Command returns output similar to;

Entry type: trustedCertEntry

Owner: CN=www.yourhost.com, OU=MEMBER OF E.ON GROUP, OU=DEVICES, O=E.GP AG, C=DE
Issuer: CN=E.ON Internal Devices Sub CA V2, OU=CA, O=EGP, C=DE
Serial number: 67460001001c6aa51fd25c0e8320
Valid from: Mon Dec 27 07:05:33 GMT 2010 until: Fri Dec 27 07:05:22 GMT 2013
Certificate fingerprints:
         MD5:  D1:AA:D5:A9:A3:D2:95:28:F1:79:57:25:D3:6A:16:5E
         SHA1: 73:CE:ED:EC:CA:18:E4:E4:2E:AA:25:58:E0:2B:E4:D4:E7:6E:AD:BF
         Signature algorithm name: SHA1withRSA
         Version: 3

Extensions:

#1: ObjectId: 2.5.29.15 Criticality=true
KeyUsage [
  DigitalSignature
  Key_Encipherment
  Key_Agreement
]

#2: ObjectId: 2.5.29.19 Criticality=true
BasicConstraints:[
  CA:false
  PathLen: undefined
]

#3: ObjectId: 1.3.6.1.5.5.7.1.1 Criticality=false
AuthorityInfoAccess [
  [
   accessMethod: 1.3.6.1.5.5.7.48.2
   accessLocation: URIName: http://yourhost.com/cacerts/egp_internal_devices_sub_ca_v2.crt,
   accessMethod: 1.3.6.1.5.5.7.48.2
   accessLocation: URIName: http://www.yourhost1.com/certservices/cacerts/egp_internal_devices_sub_ca_v2.crt]
]

#4: ObjectId: 2.5.29.14 Criticality=false
SubjectKeyIdentifier [
KeyIdentifier [
0000: D3 52 C7 63 0F 98 BF 6E   FE 00 56 5C DF 35 62 22  .R.c…n..V\.5b"
0010: F2 B9 5B 8F                                        ..[.
]

Note that password that will be promtped has is by default changeit (in case if you don't have explicitly changed it from Tomcat's default config server.xml).

2. Delete Old expired SSL host Certificate from Java Keystore
It is good practice to always make backup of old .keystore before modifying, so I ran:

tomcat-server:~# cp -rpf /opt/tomcat/current/conf/.keystore /opt/tomcat/current/conf/.keystore-05-12-2013

In my case first I had to delete old expired SSL certificate with:

tomcat-server:~# /opt/java/jdk/bin/keytool -delete -alias "your-hostname" -v -keystore /opt/tomcat/current/conf/.keystore

Then to check certificate is no longer existent in keystore chain;
tomcat-server:~# /opt/java/jdk/bin/keytool -list -keystore /opt/tomcat/current/conf/.keystore

-keystore – option is obligitory it does specify where keystore file is located
-list – does list the certificate
-v – stands for verbose


3. Finally to import new SSL from already expored via a browser url in keystore

tomcat-server:~# /opt/java/jdk/bin/keytool -importcert -file /tmp/your-hostname.cer -alias your-hostname.com -keystore /opt/tomcat/current/conf/.keystore

More complete information on how to deal with keystore is available from Apache Tomcat's SSL Howto – a must read documentation for anyone managing Tomcat.

How to solve ALSA sound problems with old Linux programs and games depending on (OSS)’s /dev/dsp / fix wine games and pulseaudio problems – My few thoughts on OSS and ALSA

Wednesday, January 11th, 2012


ALSA OSS Pulseaudio ESD Some fixes workaround to gnu linux audio mess
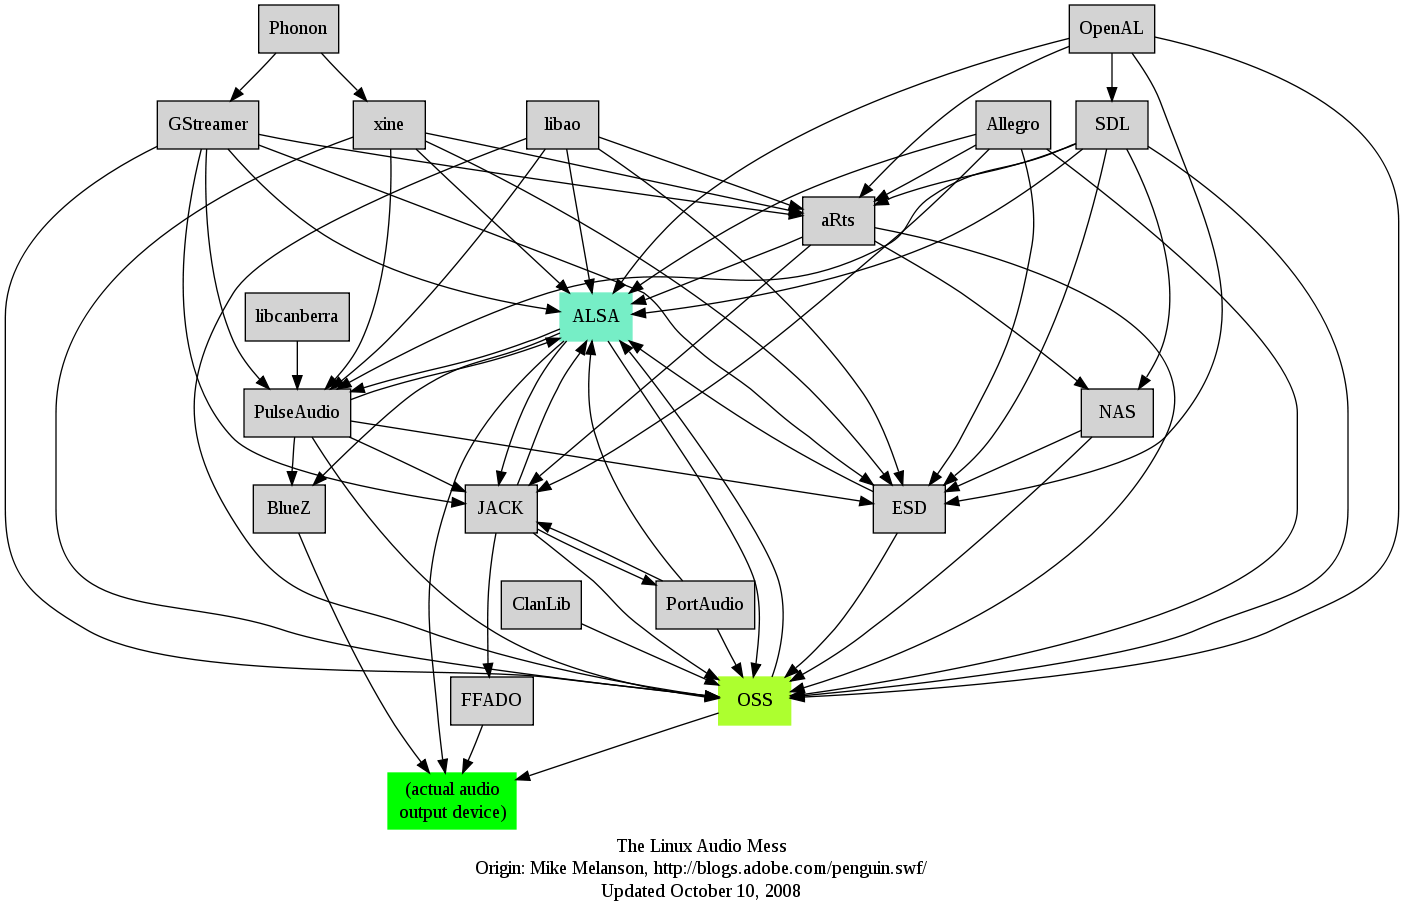
I remember GNU / Linux, 11 years from now, times when ALSA was not standardly shipped with Linux.
Back then ALSA still lacked good support for many SoundCards and was still a "baby project".
In that time what we used to have sound on Linux was OSSOpen Sound System. OSS emerged right after the first ever Linux sound system VoxWare (formerly known as the Linux Sound Driver).

Back in those days OSS was used for multimedia support on both GNU / Linux and BSD based free OSes. It was few years later when I heard and used ALSA for a fist time and it wasn't really a love from first sigth.

One can easily find out by the name ALSA it is a system especially built for the Linux kernel and that's one of the reasosn why *BSD systems has their custom separate sound system.
There is plenty of reasons why OSS was substituted with ALSA. Main reason was its commercial like license, OSS wasn't completely "open source" GPLed (free software), there was resctions on use of OSS for commercial goals.

With its emerge ALSA started to push away OSS slowly. Somewhere in 2003, alsa has officially entered the Linux kernel source and until 2005 it was the default standard for all GNU / Linux operating systems.

As of time of writting ALSA has become the only sound system to have support for multiple sound card devices for Linux.
My experiences with ALSA, however ain't so nice if I take a look in my past experiences.
Since the very beginning of using ALSA, I had plenty of troubles with configuring properly my sound card not to mention, even after configuring it the MIDI support was not there.
Besides all the troubles main problems were stemming from the many applications still written to use OSS as sound system and hence with those sound was impossible with ALSA.The most problematic thing about apps written with OSS in mind was all of them tried to stream sound via /dev/dsp (OSS Digital Sound Processor), since alsa did not used /dev/dsp those programs was soundless.

On the other hand OSS was creating issues as well, one severe problem with OSS was the inability to stream multiple sounds simultaneously, because each sound stream required to pass voice through /dev/dsp and usually there was only one /dev/dsp.

The message;

/dev/dsp: Device or resource busy
and the proceeding irritation that used to annoy us in the early GNU / Linux days had of course some raw workarounds hacks but generally the workaround did not fix problems always.

Introduction of alsa free us from /dev/dsp issues but on the other handy has created a whole ocean of new BIG problems …
ALSA has modular structure and this imposes a great problem nowdays. The modular architecture is generally a good idea, however the way this was implemented within ALSA is far away from clear and easy to understand by the end user and therefore makes it very unintuitive and obscure.
Alsa misses simplicity which somehow was partially in the days of OSS. Thinking over the general situation with Linux multimedia nowdays, I believe it was exactly ALSA Project responsible for the so delayed mass Desktop Linux adoption.

Many long year standing Linux users had certainly had the alsa troubles during new system installs (correct me if I'm wrong).
The only fix to multiple soundcard initialization problems was to download alsa source and compile from source and hence made it hard and discouraging for people giving Linux a try.
This kind of ALSA "brokenness" pattern continues even to this very day (in Debian) Linux and probably building the alsa system from source is among the good practices to have a functional Linux sound system…

With all said the historic reason why ALSA was not quickly adopted and still is not a preferred default system for many applications ported to Free Software OSes by commercial company vendors is clear. Its simply not working out of the box …

Hope some ALSA developers will read this post work on changing the crazy structure of ALSA over complexity. ALSA needs automate way to solve issues with itself, the configuration should be more trivial and unified if Linux has to become more attractive for Desktop adoption.

Anyways, after the few words of history and indicating my pesonal observations on ALSA. I will proceed and explain few things on how ALSA can be configured to support and play nice with OSS dependant programs as well some basic explanations on common incompatibility between esd and pulseaudio and how this can be fixed;.

To assure nowdays OSS API built programs and games would work with Alsa its necessery to have installed;

ALSA wrapper for OSS applications

On Debian, Ubuntu, Fedora and most Linux distributions the Alsa OSS compatability layer comes under a (deb / rpm) package named alsa-oss

To install OSS compatability on Debian, Ubuntu and the like Debian based distributions issue:

debian:~# apt-get install alsa-oss alsaplayer-oss
...

On Fedora and other rpm based distributions install is with:

[root@fedora ~]# yum install alsa-oss alsaplayer-oss
...

alsa-oss provides with a command called aoss that should be used to work around some issues with old applications still depending on OSS:

hipo@debian:~$ aoss programName

Using aoss is helpful especially in situations if you have to run programs which deal with MIDI and others which somehow want to use /dev/dsp

There is also alternative way to enable alsa native support for MIDI and OSS by loading 3 kernel modules:

debian:~# modprobe snd-seq-oss
debian:~# modprobe snd-pcm-oss
debian:~# modprobe snd-mixer-oss

Note! The three modules has to be separately build using kernel source at most cases and does not come with most Linux distributions, so on many installations (including my current), they will be missing. If for you they load properly or you have customly build them add them also to load on system boot, like so:

echo 'snd-seq-oss' >> /etc/modules
echo 'snd-pcm-oss' >> /etc/modules
echo 'snd-mixer-oss' >> /etc/modules

The Linux sound situation becomes even more messy when ESD enters the scene. Many of the novice new Linux users certainly don't remember (Enlightened Sound Daemon) . ESD historically preceded PulseAudio . Hence it will be good to mention ESD was used for few years in GNOME and in around 2006-2007 it was substituted by PulseAudio.
Many applications, however who was ported or written for Linux especially (the proprietary ported ones) was already built to work with ESD and even though newer GNOME releases was fully using pulseaudio, this (non free software apps and games) were still depending on ESD.

The situation was partially fixed by creation of module for pulseaudio which added emulation support for esd . This was done by a module library for pulseaudio called libprotocol-esound.so
The package for almost all Linux distributions which does the esd emulation via pulse is pulseaudio-esound-compat . In latest Fedora Linux pulseaudio-esound-compat is installed by default.
In Debian and other Linux distributions it might need to be installed via apt with;

debian:~# apt-get install pulseaudio-esound-compat
...

pulseaudio-esound-compat solves some of the ESD app incompability but not always …
Handy tool also worthy to mention in solving PulseAudio, OSS incompatibility issues is padsp

padsp is helpful in solving obsolete issues with OSS applications (trying to access /dev/dsp) and therefore unable to communicate with Pulseaudio
padsp – is a PulseAudio OSS Wrapper.

An example where padsp is helpful is in case of /dev/dsp errors like:

/dev/dsp: Device or resource busy
Could not open /dev/dsp

Another common problem with sound on Linux is when running windows applications (running windows games with wine).
Quite often sound fails to work since wine tries to directly communicate with alsa and fails because alsa sound channel is taken by pulseaudio.

To workaround wine issues with pulseaudio, one of the solutions is to temporary stop pulseaudio, before running the wine emulated application:

hipo@debian:~$ pulseaudio --kill

Later on when the windows wine emulation is completed, pulseaudio has to be started once again in order to make Pulseaudio applications produce sound again, e.g. one has to issue:

hipo@debian:~$ pulseaudio --start
Alternative way to workaround wine sound issues is by using a script to kill pulseaudio every second. Here is fix_pulseaudio_wine_sound_probs.sh script

This script was reported by many people as fix to problems with wine games failing to play sounds and music, anyhow I personally prefer using the stop / start pulseaudio method.

The picture below is taken from Wikipedia and illustrates, clearly the intergalactical complexity of sound systems on Gnu / Linux and BSD

I just hope one day this (OSS, ALSA, esd, Pulseaudio) mess will be over! In the mean time I hope my suggested work arounds helps someone. If someone has a better more unified script or solution please share in comments