Posts Tagged ‘BSD’

How to make a mirror of website on GNU / Linux with wget / Few tips on wget site mirroring

Wednesday, February 22nd, 2012

how-to-make-mirror-of-website-on-linux-wget

Everyone who used Linux is probably familiar with wget or has used this handy download console tools at least thousand of times. Not so many Desktop GNU / Linux users like Ubuntu and Fedora Linux users had tried using wget to do something more than single files download.
Actually wget is not so popular as it used to be in earlier linux days. I've noticed the tendency for newer Linux users to prefer using curl (I don't know why).

With all said I'm sure there is plenty of Linux users curious on how a website mirror can be made through wget.
This article will briefly suggest few ways to do website mirroring on linux / bsd as wget is both available on those two free operating systems.

1. Most Simple exact mirror copy of website

The most basic use of wget's mirror capabilities is by using wget's -mirror argument:

# wget -m http://website-to-mirror.com/sub-directory/

Creating a mirror like this is not a very good practice, as the links of the mirrored pages will still link to external URLs. In other words link URL will not pointing to your local copy and therefore if you're not connected to the internet and try to browse random links of the webpage you will end up with many links which are not opening because you don't have internet connection.

2. Mirroring with rewritting links to point to localhost and in between download page delay

Making mirror with wget can put an heavy load on the remote server as it fetches the files as quick as the bandwidth allows it. On heavy servers rapid downloads with wget can significantly reduce the download server responce time. Even on a some high-loaded servers it can cause the server to hang completely.
Hence mirroring pages with wget without explicity setting delay in between each page download, could be considered by remote server as a kind of DoS – (denial of service) attack. Even some site administrators have already set firewall rules or web server modules configured like Apache mod_security which filter requests to IPs which are doing too frequent HTTP GET /POST requests to the web server.
To make wget delay with a 10 seconds download between mirrored pages use:

# wget -mk -w 10 -np --random-wait http://website-to-mirror.com/sub-directory/

The -mk stands for -m/-mirror and -k / shortcut argument for –convert-links (make links point locally), –random-wait tells wget to make random waits between o and 10 seconds between each page download request.

3. Mirror / retrieve website sub directory ignoring robots.txt "mirror restrictions"

Some websites has a robots.txt which restricts content download with clients like wget, curl or even prohibits, crawlers to download their website pages completely.

/robots.txt restrictions are not a problem as wget has an option to disable robots.txt checking when downloading.
Getting around the robots.txt restrictions with wget is possible through -e robots=off option.
For instance if you want to make a local mirror copy of the whole sub-directory with all links and do it with a delay of 10 seconds between each consequential page request without reading at all the robots.txt allow/forbid rules:

# wget -mk -w 10 -np -e robots=off --random-wait http://website-to-mirror.com/sub-directory/

4. Mirror website which is prohibiting Download managers like flashget, getright, go!zilla etc.

Sometimes when try to use wget to make a mirror copy of an entire site domain subdirectory or the root site domain, you get an error similar to:

Sorry, but the download manager you are using to view this site is not supported.
We do not support use of such download managers as flashget, go!zilla, or getright

This message is produced by the site dynamic generation language PHP / ASP / JSP etc. used, as the website code is written to check on the browser UserAgent sent.
wget's default sent UserAgent to the remote webserver is:
Wget/1.11.4

As this is not a common desktop browser useragent many webmasters configure their websites to only accept well known established desktop browser useragents sent by client browsers.
Here are few typical user agents which identify a desktop browser:
 

  • Mozilla/5.0 (Windows NT 6.1; rv:6.0) Gecko/20110814 Firefox/6.0
  • Mozilla/5.0 (X11; Linux i686; rv:6.0) Gecko/20100101 Firefox/6.0
  • Mozilla/6.0 (Macintosh; I; Intel Mac OS X 11_7_9; de-LI; rv:1.9b4) Gecko/2012010317 Firefox/10.0a4
  • Mozilla/5.0 (Windows NT 6.1; Win64; x64; rv:2.2a1pre) Gecko/20110324 Firefox/4.2a1pre

etc. etc.

If you're trying to mirror a website which has implied some kind of useragent restriction based on some "valid" useragent, wget has the -U option enabling you to fake the useragent.

If you get the Sorry but the download manager you are using to view this site is not supported , fake / change wget's UserAgent with cmd:

# wget -mk -w 10 -np -e robots=off \
--random-wait
--referer="http://www.google.com" \--user-agent="Mozilla/5.0 (Windows; U; Windows NT 5.1; en-US; rv:1.8.1.6) Gecko/20070725 Firefox/2.0.0.6" \--header="Accept:text/xml,application/xml,application/xhtml+xml,text/html;q=0.9,text/plain;q=0.8,image/png,*/*;q=0.5" \--header="Accept-Language: en-us,en;q=0.5" \--header="Accept-Encoding: gzip,deflate" \--header="Accept-Charset: ISO-8859-1,utf-8;q=0.7,*;q=0.7" \--header="Keep-Alive: 300"

For the sake of some wget anonimity – to make wget permanently hide its user agent and pretend like a Mozilla Firefox running on MS Windows XP use .wgetrc like this in home directory.

5. Make a complete mirror of a website under a domain name

To retrieve complete working copy of a site with wget a good way is like so:

# wget -rkpNl5 -w 10 --random-wait www.website-to-mirror.com

Where the arguments meaning is:
-r – Retrieve recursively
-k – Convert the links in documents to make them suitable for local viewing
-p – Download everything (inline images, sounds and referenced stylesheets etc.)
-N – Turn on time-stamping
-l5 – Specify recursion maximum depth level of 5

6. Make a dynamic pages static site mirror, by converting CGI, ASP, PHP etc. to HTML for offline browsing

It is often websites pages are ending in a .php / .asp / .cgi … extensions. An example of what I mean is for instance the URL http://php.net/manual/en/tutorial.php. You see the url page is tutorial.php once mirrored with wget the local copy will also end up in .php and therefore will not be suitable for local browsing as .php extension is not understood how to interpret by the local browser.
Therefore to copy website with a non-html extension and make it offline browsable in HTML there is the –html-extension option e.g.:

# wget -mk -w 10 -np -e robots=off \
--random-wait \
--convert-links http://www.website-to-mirror.com

A good practice in mirror making is to set a download limit rate. Setting such rate is both good for UP and DOWN side (the local host where downloading and remote server). download-limit is also useful when mirroring websites consisting of many enormous files (documental movies, some music etc.).
To set a download limit to add –limit-rate= option. Passing by to wget –limit-rate=200K would limit download speed to 200KB.

Other useful thing to assure wget has made an accurate mirror is wget logging. To use it pass -o ./my_mirror.log to wget.
 

Speeding up Apache through apache2-mpm-worker and php5-cgi on Debian / How to improve Apache performance and decrease server memory consumption

Friday, March 18th, 2011

speeding up apache through apache2-mpm-worker and php5-cgi on Debian Linux / how to improve apache performance and decrease server responce time
By default most Apache running Linux servers on the Internet are configured to use with the mpm prefork apache module
Historically prefork apache module is the predecessor of the worker module therefore it's believed to be a way more tested and reliable, if you need a critical reliable webserver configuration.

However from my experience by so far with the Apache MPM Worker I can boldly say that many of the rumors concerning the unreliabity of apache2-mpm-worker are just myths.

The old way Apache handles connections e.g. the mod prefork is the well known way that high amount of the daemons on Linux and BSD are still realying on.
When prefork is a used by Apache, every new TCP/IP connection arriving at your Linux server on the Apache configured port let's say on port 80 is being served by Apache in a way that the Apache process (mother process) parent does fork a new Apache parent copy in order to serve the new request.
Thus by using the prefork Apache needs to fork new process (if it doesn't have already an empty forked one waiting for connections) and serve the HTTP request of the new client, after the request of the client is completed the newly forked Apache usually dies (even though it again depends on the way the Apache server is configured via the Apache configuration – apache2.conf / httpd.conf etc.).

Now you can imagine how slow and memory consuming it is that all the time the parent Apache process spawns new processes, kills old ones etc. in order to fulfill the client requests.

Now just to compare the Apace mpm prefork does not use the old forking way, but relies on a few Apache processes which handles all the requests without constantly being destroyed and recreated like with the prefork module.
This saves operations and system resources, threaded programming has already been proven to be more efficient way to handle tasks and is heavily adopted in GUI programming for instance in Microsoft Windows, Mac OS X, Linux Gnome, KDE etc.

There is plenty of information and statistical data which compares Apache running with prefork and respectively worker modules online.
As the goal of this article is not to went in depths with this kind of information I would not say more on it but let you explore online a bit more about them in case if you're interested.

The purpose of this article is to explain in short how to substitute the Apache2-MPM-Prefork and how your server performance could benefit out of the use of Apache2-MPM-Worker.
On Debian the default Apache process serving module in Apache 1.3x,Apache 2.0x and 2.2x is prefork thus the installation of apache2-mpm-worker is not "a standard way" to install Apache

Deciding to swith from the default Debian apache-mpm-prefork to apache-mpm-worker is quite a serious and responsible decision and in some cases might cause troubles, if you have decided to follow my article be sure to consider all the possible negative consequences of switching to the apache worker !

Now after having said a bunch of info which might be not necessary with the experienced system admin I'll continue on with the steps to install the apache2-mpm-worker.

1. Install the apache2-mpm-worker

debian:~# apt-get install apache2-mpm-worker php5-cgi
Reading state information... Done
The following packages were automatically installed and are no longer required:
The following packages will be REMOVED apache2-mpm-prefork libapache2-mod-php5
The following NEW packages will be installed apache2-mpm-worker
0 upgraded, 1 newly installed, 2 to remove and 46 not upgraded.
Need to get 0B/259kB of archives.After this operation, 6193kB disk space will be freed.

As you can notice in below's text confirmation which will appear you will have to remove the apache2-mpm-prefork and the apache2-mpm-worker modules before you can proceed to install the apache2-mpm-prefork.

You might ask yourself if I remove my installed libphp how would I be able to use my Apache with my PHP based websites? And why does the apt package manager requires the libapache2-mod-php5 to get removed.
The explanation is simple apache2-mpm-worker is not thread safe, in other words scripts which does use the php fork(); function would not work correctly with the Apache worker module and will probably be leading to PHP and Apache crashes.
Therefore in order to install the apache mod worker it's necessary that no libapache2-mod-php5 is existent on the system.
In order to have a PHP installed on the server again you will have to use the php5-cgi deb package, this is the reason in the above apt-get command I'm also requesting apt to install the php5-cgi package next to apache2-mpm-worker.

2. Enable the cgi and cgid apache modules

debian:~# a2enmod cgi
debian:~# a2enmod cgid

3. Activate the mod_actions apache modules

debian:~# cd /etc/apache2/mods-enabled
debian:~# ln -sf ../mods-available/actions.load
debian:~# ln -sf ../mods-available/actions.conf

4. Add configuration options in order to enable mod worker to use the newly installed php5-cgi

Edit /etc/apache2/mods-available/actions.conf vim, mcedit or nano (e.g. your editor of choice and add inside:

&ltIfModule mod_actions.c>
Action application/x-httpd-php /cgi-bin/php5
</IfModule>

After completing all the above instructions, you might also need to edit your /etc/apache2/apache2.conf to tune up, how your Apache mpm worker will serve client requests.
Configuring the <IfModule mpm_worker_module> in apache2.conf is necessary to optimize your newly installed mpm_worker module for performance.

5. Configure the mod_worker_module in apache2.conf One example configuration for the mod worker is:

<IfModule mpm_worker_module>
StartServers 2
MaxClients 150
MinSpareThreads 25
MaxSpareThreads 75
ThreadsPerChild 25
MaxRequestsPerChild 0
</IfModule>

Consider the fact that this configuration is just a sample and it's in no means configured for serving Apache requests for high load Apache servers and you need to further play with the values to have a good results on your server.

6. Check that all is fine with your Apache configurations and no syntax errors are encountered

debian:~# /usr/sbin/apache2ctl -t
Syntax OK

If you get something different from Syntax OK track the error and fix it before you're ready to restart the Apache server.

7. Now restart the Apache server

debian:~# /etc/init.d/apache2 restart

All should run fine and hopefully your PHP scripts should be interpreted just fine through the php5-cgi instead of the libapache2-mod-php5.
Using the /usr/bin/php5-cgi will increase with some percentage your server CPU load but on other hand will drasticly decrease the Webserver memory consumption.
That's quite logical because the libapache2-mod-hp5 is loaded once during apache server whether a new instance of /usr/bin/php5-cgi is invoked during each of Apache requests via the mod worker.

There is one serious security flow coming with php5-cgi, DoS against a server processing scripts through php5-cgi is much easier to be achieved.
An example for a denial attack which could affect a website running with mod worker and php5-cgi, could be simulated from a simple user with a web browser which holds up the f5 or ctrl + r browser page refresh buttons.
In that case whenever php5-cgi is used the CPU load would rise drastic, one possible solution to this denial of service issues is by installing and using libapache2-mod-evasive like so:

8. Install libapache2-mod-evasive

debian:~# apt-get install libapache2-mod-evasive
The Apache mod evasive module is a nice apache module to minimize HTTP DoS and brute force attacks.
Now with mod worker through the php5-cgi, your apache should start serving requests more efficiently than before.
For some performance reasons some might even want to try out the fastcgi with the worker to boost the Apache performance but as I have never tried that I can't say how reliable a a mod worker with a fastcgi would be.

N.B. ! If you have some specific php configurations within /etc/php5/apache2/php.ini you will have to set them also in /etc/php5/cgi/php.ini before you proceed with the above instructions to install Apache otherwise your PHP scripts might not work as expected.

Mod worker is also capable to work with the standard mod php5 Apache module, but if you decide to go this route you will have to recompile your PHP lib manually from source as in Debian this option is not possible with the default php library.
This installation worked fine on Debian Lenny but suppose the same installation should work fine on Debian Squeeze as well as Debian testing/unstable.
Feedback on the afore-described mod worker installation is very welcome!

Restart hung Mac OS application – How to kill programs in Mac OS – alternative of Windows CTRL + ALT + DEL

Friday, May 23rd, 2014

mac-kill-hung-application-killing-freezed-application-on-mac-osx
If you happen to have the rare case of having a hung MAC OS X application and you're coming from a Linux / Windows background you will be certainly wonderhing how to kill Mac OS X hung application.
In Mac OS the 3 golden buttons to kill crashed application are:


COMMAND + OPTION + ESCAPE

Command + Option + Escape

while pressed simultaneously is the Mac Computer equivalent of Windows CTRL + ALT + DEL

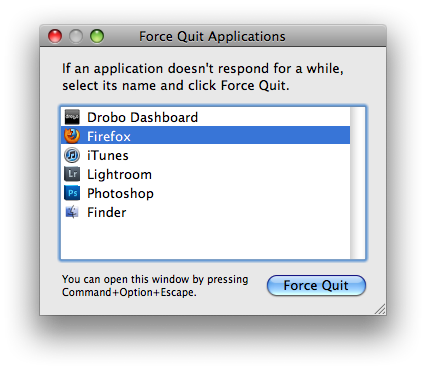
mac-os-force-kill-hung-application-force-program-exit-mac-OSX

Holding together COMMAND  + OPTION + ESCAPE on MAC OS brings up the Force Quit Window showing and letting you choose between the list of open applications. To close freezed MAC application, choose it and Press the Force Quit Button this will kill immediately that application.  

To directly end application without invoking the choose Force Quit Window menu, to force a hanging app quit right click on its icon in Dock (CTRL + Click) and choose "Force Quit” from context menu.

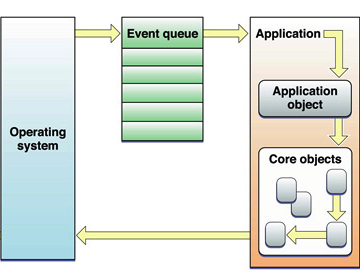
A little bit more on why applications hung in MAC OS. Each application in MAC OS has its event queue. Event queue is created on initial application launch, event queue is buffer that accepts input from system (could be user input from kbd or mouse, messages passed from other programs etc.). Program is hanging when system detects queued events are not being used.

macOSX-EventQueue-reason-for-application-hung-in-macs
Other reasons for Mac OS hanging program is whether you're attaching detaching new hardware peripherals (i.e. problems caused by improper mount / unmounts), same hang issues are often observed on BSD and Linux. Sometimes just re-connecting (mouse, external hdd etc.) resolves it.
Program hungs due to buggy software are much rarer in Macs just like in IPhones and Ipads due to fact mac applications are very well tested until published in appstore.

Issues with program hungs in Mac sometimes happen after "sleep mode" during "system wake" function – closing, opening macbook. If a crashed program is of critical importance and you don't want to "Force Quit" with COMMAND + OPTION + ESC. Try send PC to sleep mode for a minute or 2 by pressing together OPTION + COMMAND + EJECT.

An alternative approach to solve hanging app issue is to Force-quit Finder and Dock to try that, launch Terminal

And type there:

# killall Dock

Other useful to know Mac OS keyboard combination is COMMAND + OPTION + POWERHold together Command and Option and after a while press Power – This is a shortcut to instruct your Mac PC to reboot.

Screenshot expanded menus on GNOME / KDE in Linux and BSD desktop

Thursday, June 19th, 2014

take-screenshot-of-expanded-menu-window-in-linux-and-freebsd-howto

If you're using actively Linux or FreeBSD on Desktop PC and experimenting with software, taking personal notes, developing software for Linux, writting documentation, participating in free software community etc., you will certainly need use screenshot heavily.

Taking a screenshot in Linux is done in same way as in any modern operating system by using the Print Screen (PrtScr) button, however there are few Nuts & Bolts of Linux screenshotting, to take advantage of full power of screenshot creation (i.e. be able to do some screenshot customization) which are not offered by default screenshot utilities (GNOMEgnome-screenshot and KDE's KSnapshot)

Here are few useful Linux /BSD Screenshot Tips and Tricks:


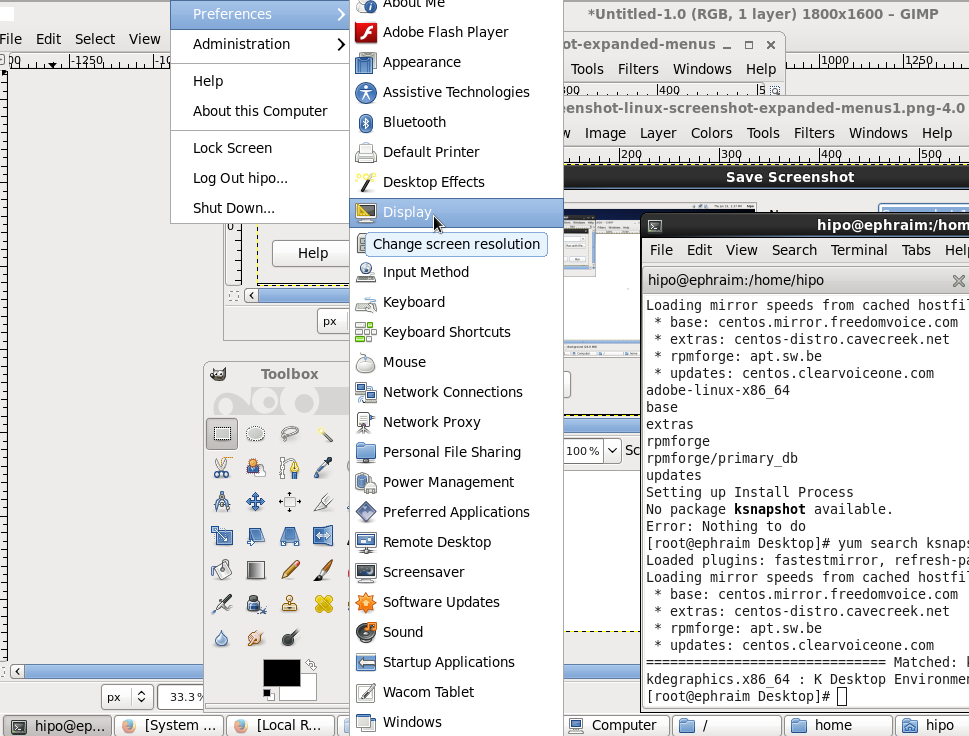
If you have done screenshots of Linux running programs more than few times already, you have probably noticed the usual way to screenshot by pressing Print Screen (PrtScr) button to take snapshot of the expanded GNOME / KDE menu is not working. In that order of thought you probably wondered whether it is possible to take a screenshot of an expanded menus? As a Linux user, I've been asking myself this question too, and feeling irritated that  I cannot prepare screenshot of a GNOME running application expanded menu. I've found two ways (though there are probably many more to make screenshot of an expanded Linux menu). Here is how:
 

Create screenshot of running application expanded menus
 

1. Taking screenshot of expanded menu using the command line

As with everything in Linux, there aremultiple ways to make screenshot of expanded Linux menus.

  • Make timed screenshot of the screen scheduled to screenshot after a set number of seconds.

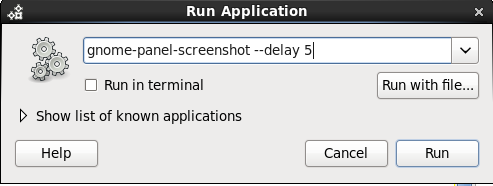
The quickest way for to screenshot expanded menu is to use gnome-panel-screenshot or ksnapshot from command line. It is interesting pressing Prt Sc kbd button in GNOME invokes gnome-screenshot and in KDE uses ksnapshot


gnome-panel-screenshot --delay 5


To not spend time running it from gnome-terminal (in GNOME desktop), press Alt+F2 (simultaneously) and use the Run Application command shortcut.

gnome-panel-screenshot-linux-screenshot-expanded-menus

This will instruct Screenshot utility to wait for 5 seconds before capturing your desktop this should be enough time for you to go to navigate to expanded menu which you want to get screenshotted.

gnome-panel-screenshot-linux-screenshot-expanded-menus1

  • Make timed screenshot of the screen in GUI with GIMP


trisquel-free-software-linux-screenshot-gimp-create-screenshot-with-timing-take-screenshot-of-expanded-menu-on-linux-bsd

(If you're wonderhing what kind of Linux is on screenshot – this is Trisquel – Run Free! GNU / Linux. It is a Spanish distribution focused on providing 100% free software in it – without proprietary firmware or software. Trisquel is based on Debian and uses the dpkg / apt-get package managers. Trisquel is a recommended Linux to use by Richard Stallman and The Free Software Foundation).
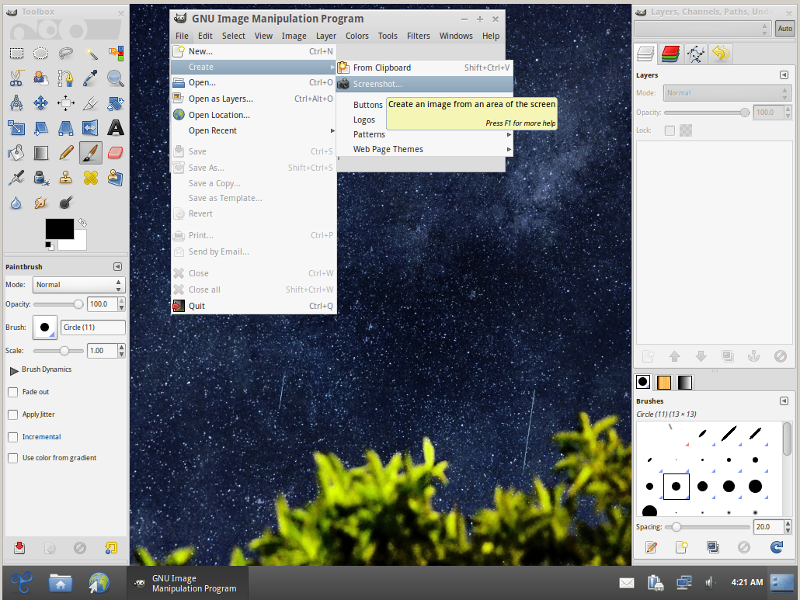
To make timed screenshot with GIMP use menus:


File -> Create -> Screenshot


linux-screenshot-gimp-create-screenshot-of-expanded-menus-in-gnome-kde-on-linux-bsd

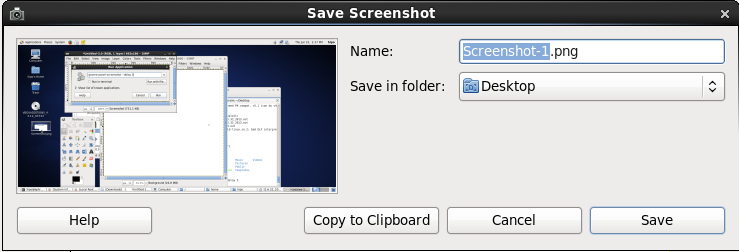
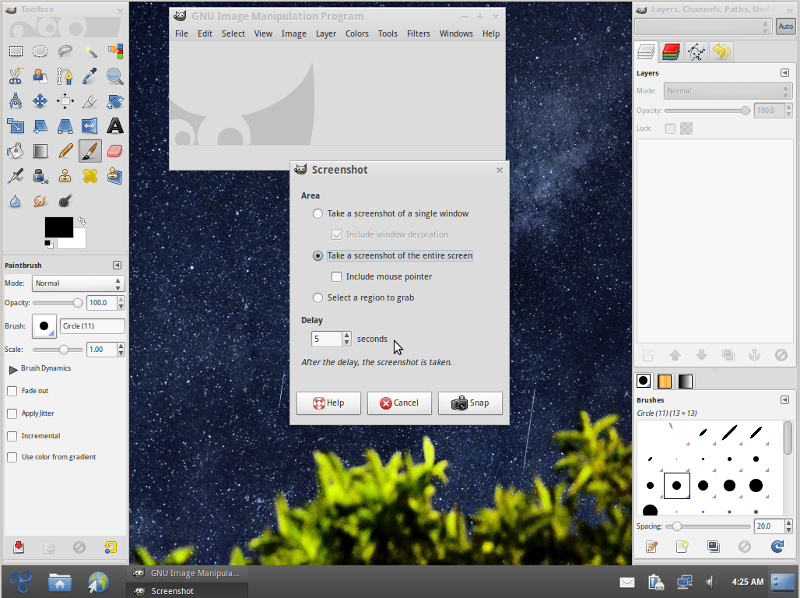
Chosee whether you want to Take screenshot of the entire screen or a Region to Grab and set your wanted Delay

Screenshot will be prepared on $HOME/Desktop, after set time.

How to check if your Linux WebServer is under a DoS attack

Friday, July 22nd, 2011

There are few commands I usually use to track if my server is possibly under a Denial of Service attack or under Distributed Denial of Service

Sys Admins who still have not experienced the terrible times of being under a DoS attack are happy people for sure …

1. How to Detect a TCP/IP Denial of Service Attack This are the commands I use to find out if a loaded Linux server is under a heavy DoS attack, one of the most essential one is of course netstat.
To check if a server is under a DoS attack with netstat, it’s common to use:

linux:~# netstat -ntu | awk '{print $5}' | cut -d: -f1 | sort | uniq -c | sort -n|wc -l

If the output of below command returns a result like 2000 or 3000 connections!, then obviously it’s very likely the server is under a DoS attack.

To check all the IPS currently connected to the Apache Webserver and get a very brief statistics on the number of times each of the IPs connected to my server, I use the cmd:

linux:~# netstat -ntu | awk '{print $5}' | cut -d: -f1 | sort | uniq -c | sort -n
221 80.143.207.107 233 145.53.103.70 540 82.176.164.36

As you could see from the above command output the IP 80.143.207.107 is either connected 221 times to the server or is in state of connecting or disconnecting to the node.

Another possible way to check, if a Linux or BSD server is under a Distributed DoS is with the list open files command lsof
Here is how lsof can be used to list the approximate number of ESTABLISHED connections to port 80.

linux:~# lsof -i TCP:80
litespeed 241931 nobody 17u IPv4 18372655 TCP server.www.pc-freak.net:http (LISTEN)
litespeed 241931 nobody 25u IPv4 18372659 TCP 85.17.159.89:http (LISTEN)
litespeed 241931 nobody 30u IPv4 29149647 TCP server.www.pc-freak.net:http->83.101.6.41:54565 (ESTABLISHED)
litespeed 241931 nobody 33u IPv4 18372647 TCP 85.17.159.93:http (LISTEN)
litespeed 241931 nobody 34u IPv4 29137514 TCP server.www.pc-freak.net:http->83.101.6.41:50885 (ESTABLISHED)
litespeed 241931 nobody 35u IPv4 29137831 TCP server.www.pc-freak.net:http->83.101.6.41:52312 (ESTABLISHED)
litespeed 241931 nobody 37w IPv4 29132085 TCP server.www.pc-freak.net:http->83.101.6.41:50000 (ESTABLISHED)

Another way to get an approximate number of established connections to let’s say Apache or LiteSpeed webserver with lsof can be achieved like so:

linux:~# lsof -i TCP:80 |wc -l
2100

I find it handy to keep track of above lsof command output every few secs with gnu watch , like so:

linux:~# watch "lsof -i TCP:80"

2. How to Detect if a Linux server is under an ICMP SMURF attack

ICMP attack is still heavily used, even though it’s already old fashioned and there are plenty of other Denial of Service attack types, one of the quickest way to find out if a server is under an ICMP attack is through the command:

server:~# while :; do netstat -s| grep -i icmp | egrep 'received|sent' ; sleep 1; done
120026 ICMP messages received
1769507 ICMP messages sent
120026 ICMP messages received
1769507 ICMP messages sent

As you can see the above one liner in a loop would check for sent and recieved ICMP packets every few seconds, if there are big difference between in the output returned every few secs by above command, then obviously the server is under an ICMP attack and needs to hardened.

3. How to detect a SYN flood with netstat

linux:~# netstat -nap | grep SYN | wc -l
1032

1032 SYNs per second is quite a high number and except if the server is not serving let’s say 5000 user requests per second, therefore as the above output reveals it’s very likely the server is under attack, if however I get results like 100/200 SYNs, then obviously there is no SYN flood targetting the machine 😉

Another two netstat command application, which helps determining if a server is under a Denial of Service attacks are:

server:~# netstat -tuna |wc -l
10012

and

server:~# netstat -tun |wc -l
9606

Of course there also some other ways to check the count the IPs who sent SYN to the webserver, for example:

server:~# netstat -n | grep :80 | grep SYN |wc -l

In many cases of course the top or htop can be useful to find, if many processes of a certain type are hanging around.

4. Checking if UDP Denial of Service is targetting the server

server:~# netstat -nap | grep 'udp' | awk '{print $5}' | cut -d: -f1 | sort |uniq -c |sort -n

The above command will list information concerning possible UDP DoS.

The command can easily be accustomed also to check for both possible TCP and UDP denial of service, like so:

server:~# netstat -nap | grep 'tcp|udp' | awk '{print $5}' | cut -d: -f1 | sort |uniq -c |sort -n
104 109.161.198.86
115 112.197.147.216
129 212.10.160.148
227 201.13.27.137
3148 91.121.85.220

If after getting an IP that has too many connections to the server and is almost certainly a DoS host you would like to filter this IP.

You can use the /sbin/route command to filter it out, using route will probably be a better choice instead of iptables, as iptables would load up the CPU more than simply cutting the route to the server.

Here is how I remove hosts to not be able to route packets to my server:

route add 110.92.0.55 reject

The above command would null route the access of IP 110.92.0.55 to my server.

Later on to look up for a null routed IP to my host, I use:

route -n |grep -i 110.92.0.55

Well hopefully this should be enough to give a brief overview on how, one can dig in his server and find if he is under a Distributed Denial of Service, hope it’s helpful to somebody out there.
Cheers 😉

New FreeBSD version is out – Hello FreeBSD 9.2

Tuesday, October 1st, 2013

new version of FreeBSD is out FreeBSD 9.2

FreeBSD 9.2 is out today. There are mostly improvements in FreeBSD's ZFS. As usual BSD packages are updated with new ones. This version of BSD does not include anything revolutionary. Below are all the major changes in the distro. A list of all new introduced supports in that release as usual is in BSD's release notes

To all BSD users – Happy new BSD release 🙂

Tracking I/O hard disk server bottlenecks with iostat on GNU / Linux and FreeBSD

Tuesday, March 27th, 2012

Hard disk overhead tracking on Linux and FreeBSD with iostat

I've earlier wrote an article How to find which processes are causing hard disk i/o overhead on Linux there I explained very rawly few tools which can be used to benchmark hard disk read / write operations. My prior article accent was on iotop and dstat and it just mentioned of iostat. Therefore I've wrote this short article in attempt to explain a bit more thoroughfully on how iostat can be used to track problems with excessive server I/O read/writes.

Here is the command man page description;
iostatReport Central Processing Unit (CPU) statistics and input/output statistics for devices, partitions and network filesystems

I will further proceed with few words on how iostat can be installed on various Linux distros, then point at few most common scenarious of use and a short explanation on the meaning of each of the command outputs.

1. Installing iostat on Linux

iostat is a swiss army knife of finding a server hard disk bottlenecks. Though it is a must have tool in the admin outfut, most of Linux distributions will not have iostat installed by default.
To have it on your server, you will need to install sysstat package:

a) On Debian / Ubuntu and other Debian GNU / Linux derivatives to install sysstat:

debian:~# apt-get --yes install sysstat

b) On Fedora, CentOS, RHEL etc. install is with yum:

[root@centos ~]# yum -y install sysstat

c) On Slackware Linux sysstat package which contains iostat is installed by default. 

d) In FreeBSD, there is no need for installation of any external package as iostat is part of the BSD world (bundle commands).
I should mention bsd iostat and Linux's iostat commands are not the same and hence there use to track down hard disk bottlenecks differs a bit, however the general logic of use is very similar as with most tools in BSD and Linux.

2. Checking a server hard disk for i/o disk bottlenecks on G* / Linux

Once having the sysstat installed on G* / Linux systems, the iostat command will be added in /usr/bin/iostat
a) To check what is the hard disk read writes per second (in megabytes) use:

debian:~# /usr/bin/iostat -m
Linux 2.6.32-5-amd64 (debian) 03/27/2012 _x86_64_ (8 CPU)
avg-cpu: %user %nice %system %iowait %steal %idle
15.34 0.36 2.76 2.66 0.00 78.88
Device: tps MB_read/s MB_wrtn/s MB_read MB_wrtn
sda 63.89 0.48 8.20 6730223 115541235
sdb 64.12 0.44 8.23 6244683 116039483
md0 2118.70 0.22 8.19 3041643 115528074

In the above output the server, where I issue the command is using sda and sdb configured in software RAID 1 array visible in the output as (md0)

The output of iostat should already be easily to read, for anyone who didn't used the tool here is a few lines explanation of the columns:

The %user 15.34 meaning is that 15.34 out of 100% possible i/o load is generad by system level read/write operations.
%nice – >Show the percentage of CPU utilization that occurred while executing at the user level with nice priority.
%iowait – just like the top command idle it shows the idle time when the system didn't have an outstanding disk I/O requests.
%steal – show percentage in time spent in time wait of CPU or virtual CPUs to service another virtual processor (high numbers of disk is sure sign for i/o problem).
%idle – almost the same as meaning to %iowait
tps – HDD transactions per second
MB_read/s (column) – shows the actual Disk reads in Mbytes at the time of issuing iostat
MB_wrtn/s – displays the writes p/s at the time of iostat invocation
MB_read – shows the hard disk read operations in megabytes, since the server boot 'till moment of invocation of iostat
MB_wrtn – gives the number of Megabytes written on HDD since the last server boot filesystem mount

The reason why the Read / Write values for sda and sdb are similar in this example output is because my disks are configured in software RAID1 (mirror)

The above iostat output reveals in my specific case the server is experiencing mostly Disk writes (observable in the high MB_wrtn/s 8.19 md0 in the above sample output).

It also reveals, the I/O reads experienced on that server hard disk are mostly generated as a system (user level load) – see (%user 15.34 and md0 2118.70).

For all those not familiar with system also called user / level load, this is all kind of load which is generated by running programs on the server – (any kind of load not generated by the Linux kernel or loaded kernel modules).

b) To periodically keep an eye on HDD i/o operations with iostat, there are two ways:

– Use watch in conjunction with iostat;

[root@centos ~]# watch "/usr/bin/iostat -m"
Every 2.0s: iostat -m Tue Mar 27 11:00:30 2012
Linux 2.6.32-5-amd64 (centos) 03/27/2012 _x86_64_ (8 CPU)
avg-cpu: %user %nice %system %iowait %steal %idle
15.34 0.36 2.76 2.66 0.00 78.88
Device: tps MB_read/s MB_wrtn/s MB_read MB_wrtn
sda 63.89 0.48 8.20 6730255 115574152
sdb 64.12 0.44 8.23 6244718 116072400
md0 2118.94 0.22 8.20 3041710 115560990
Device: tps MB_read/s MB_wrtn/s MB_read MB_wrtn
sda 55.00 0.01 25.75 0 51
sdb 52.50 0.00 24.75 0 49
md0 34661.00 0.01 135.38 0 270

Even though watch use and -d might appear like identical, they're not watch does refresh the screen, executing instruction similar to the clear command which clears screen on every 2 seconds, so the output looks like the top command refresh, while passing the -d 2 will output the iostat command output on every 2 secs in a row so all the data is visualized on the screen. Hence -d 2 in cases, where more thorough debug is necessery is better. However for a quick routine view watch + iostat is great too.

c) Outputting extra information for HDD input/output operations;

root@debian:~# iostat -x
Linux 2.6.32-5-amd64 (debian) 03/27/2012 _x86_64_ (8 CPU)
avg-cpu: %user %nice %system %iowait %steal %idle
15.34 0.36 2.76 2.66 0.00 78.88
Device: rrqm/s wrqm/s r/s w/s rsec/s wsec/s avgrq-sz avgqu-sz await svctm %util
sda 4.22 2047.33 12.01 51.88 977.44 16785.96 278.03 0.28 4.35 3.87 24.72
sdb 3.80 2047.61 11.97 52.15 906.93 16858.32 277.05 0.03 5.25 3.87 24.84
md0 0.00 0.00 20.72 2098.28 441.75 16784.05 8.13 0.00 0.00 0.00 0.00

This command will output extended useful Hard Disk info like;
r/s – number of read requests issued per second
w/s – number of write requests issued per second
rsec/s – numbers of sector reads per second
b>wsec/s – number of sectors wrote per second
etc. etc.

Most of ppl will never need to use this, but it is good to know it exists.

3. Tracking read / write (i/o) hard disk bottlenecks on FreeBSD

BSD's iostat is a bit different in terms of output and arguments.

a) Here is most basic use:

freebsd# /usr/sbin/iostat
tty ad0 cpu
tin tout KB/t tps MB/s us ni sy in id
1 561 45.18 44 1.95 14 0 5 0 82

b) Periodic watch of hdd i/o operations;

freebsd# iostat -c 10
tty ad0 cpu
tin tout KB/t tps MB/s us ni sy in id
1 562 45.19 44 1.95 14 0 5 0 82
0 307 51.96 113 5.73 44 0 24 0 32
0 234 58.12 98 5.56 16 0 7 0 77
0 43 0.00 0 0.00 1 0 0 0 99
0 485 0.00 0 0.00 2 0 0 0 98
0 43 0.00 0 0.00 0 0 1 0 99
0 43 0.00 0 0.00 0 0 0 0 100
...

As you see in the output, there is information like in the columns tty, tin, tout which is a bit hard to comprehend.
Thanksfully the tool has an option to print out only more essential i/o information:

freebsd# iostat -d -c 10
ad0
KB/t tps MB/s
45.19 44 1.95
58.12 97 5.52
54.81 108 5.78
0.00 0 0.00
0.00 0 0.00
0.00 0 0.00
20.48 25 0.50

The output info is quite self-explanatory.

Displaying a number of iostat values for hard disk reads can be also achieved by omitting -c option with:

freebsd# iostat -d 1 10
...

Tracking a specific hard disk partiotion with iostat is done with:

freebsd# iostat -n /dev/ad0s1a
tty cpu
tin tout us ni sy in id
1 577 14 0 5 0 81
c) Getting Hard disk read/write information with gstat

gstat is a FreeBSD tool to print statistics for GEOM disks. Its default behaviour is to refresh the screen in a similar fashion like top command, so its great for people who would like to periodically check all attached system hard disk and storage devices:

freebsd# gstat
dT: 1.002s w: 1.000s
L(q) ops/s r/s kBps ms/r w/s kBps ms/w %busy Name
0 10 0 0 0.0 10 260 2.6 15.6| ad0
0 10 0 0 0.0 10 260 2.6 11.4| ad0s1
0 10 0 0 0.0 10 260 2.8 12.5| ad0s1a
0 0 0 0 0.0 0 0 0.0 20.0| ad0s1b
0 0 0 0 0.0 0 0 0.0 0.0| ad0s1c
0 0 0 0 0.0 0 0 0.0 0.0| ad0s1d
0 0 0 0 0.0 0 0 0.0 0.0| ad0s1e
0 0 0 0 0.0 0 0 0.0 0.0| acd0

It even has colors if your tty supports colors 🙂

Another useful tool in debugging the culprit of excessive hdd I/O operations is procstat command:

Here is a sample procstat run to track (httpd) one of my processes imposing i/o hdd load:

freebsd# procstat -f 50404
PID COMM FD T V FLAGS REF OFFSET PRO NAME
50404 httpd cwd v d -------- - - - /
50404 httpd root v d -------- - - - /
50404 httpd 0 v c r------- 56 0 - -
50404 httpd 1 v c -w------ 56 0 - -
50404 httpd 2 v r -wa----- 56 75581 - /var/log/httpd-error.log
50404 httpd 3 s - rw------ 105 0 TCP ::.80 ::.0
50404 httpd 4 p - rw---n-- 56 0 - -
50404 httpd 5 p - rw------ 56 0 - -
50404 httpd 6 v r -wa----- 56 25161132 - /var/log/httpd-access.log
50404 httpd 7 v r rw------ 56 0 - /tmp/apr8QUOUW
50404 httpd 8 v r -w------ 56 0 - /var/run/accept.lock.49588
50404 httpd 9 v r -w------ 1 0 - /var/run/accept.lock.49588
50404 httpd 10 v r -w------ 1 0 - /tmp/apr8QUOUW
50404 httpd 11 ? - -------- 2 0 - -

Btw fstat is sometimes helpful in identifying the number of open files and trying to estimate which ones are putting the hdd load.
Hope this info helps someone. If you know better ways to track hdd excessive loads on Linux / BSD pls share 'em pls.
 

How to add support for DJVU file format on M$ Windows, Mac, GNU / Linux and FreeBSD

Thursday, June 14th, 2012

Windjview Format paper Clipper logo / support DjView on Windows and Linux

By default there is no way to see what is inside a DJVU formatted document on both Windows and Linux OS platforms. It was just a few months ago I saw on one computer I had to fix up the DJVU format. DJVU format was developed for storing primary scanned documents which is rich in text and drawings.
Many old and ancient documents for example Church books in latin and some older stuff is only to be found online in DJVU format.
The main advantage of DJVU over lets say PDF which is also good for storing text and visual data is that DJVU's data encoding makes the files much more smaller in size, while still the quality of the scanned document is well readable for human eye.

DJVU is a file format alternative to PDF which we all know has been set itself to be one of the major standard formats for distributing electronic documents.

Besides old books there are plenty of old magazines, rare reports, tech reports newspapers from 1st and 2nd World War etc in DJVU.
A typical DJVU document takes a size of only lets say 50 to 100 KBytes of size just for comparison most a typical PDF encoded document is approximately sized 500 KiloBytes.

1.% Reading DJVU's on M$ Windoze and Mac-s (WinDjView)

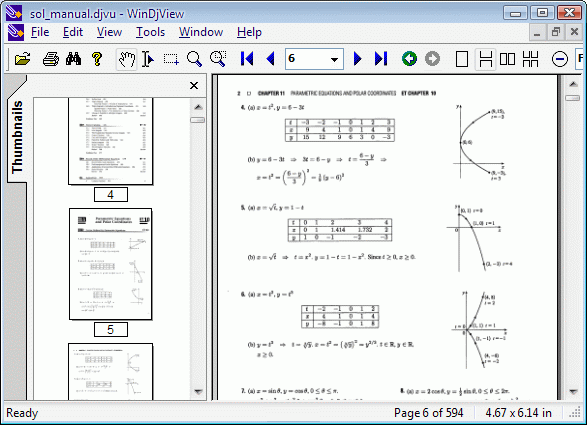
The program reader for DJVU files in Windows is WinDjView WinDjView official download site is here

WinDjView is licensed under GPLv2 is a free software licensed under GPL2.

WinDjView works fine on all popular Windows versions (7, Vista, 2003, XP, 2000, ME, 98, NT4).

WinDjView with opened old document Sol manual ,,,,

I've made a mirror copy of WinDjView for download here (just in case something happens with the present release and someone needs it in future).

For Mac users there is also a port of WinDjView called MacDjView ;;;,

2.% Reading DJVU files on GNU / Linux

The library capable of rendering DJVUs in both Linux and Windows is djviewlibre again free software (A small note to make here is WinDjView also uses djviewlibre to render DJVU file content).

The program that is capable of viewing DJVU files in Linux is called djview4 I have so far tested it only with Debian GNU / Linux.

To add support to a desktop Debian GNU / Linux rel. (6.0.2) Squeeze, had to install following debs ;;;

debian:~# apt-get install --yes djview4 djvulibre-bin djviewlibre-desktop libdjviewlibre-text pdf2djvu
........
...

pdf2djvu is not really necessery to install but I installed it since I think it is a good idea to have a PDF to DJVU converter on the system in case I somedays need it ;;;

djview4 is based on KDE's QT library, so unfortunately users like me who use GNOME for a desktop environment will have the QT library installed as a requirement of above apt-get ;;;

Here is Djview4 screenshot with one opened old times Bulgarian magazine called Computer – for you

DJVU Pravetz Computer for you old school Bulgarian Pravetz magazine

Though the magazine opens fine, every now and then I got some spit errors whether scrolling the pages, but it could be due to improperly encoded DJVU file and not due to the reader. Pitily, whether I tried to maximize the PDF and read it in fullscreen I got (segfault) error and the program failed. Anyways at least I can read the magazine in non-fullscreen mode ;;; ,,,,

3.% Reading DJVU's on FreeBSD and (other BSDs)

Desktop FreeBSD users and other BSD OS enthusiasts could also use djview4 to view DJVUs as there is a BSD port in the ports tree.
To use it on BSD I had to install port /usr/ports/graphics/djview4:

freebsd# cd /usr/ports/graphics/djview4
freebsd# make install clean
,,,,...

For G / Linux users who has to do stuff with DJVU files, there are two other programs which might be useful:
 

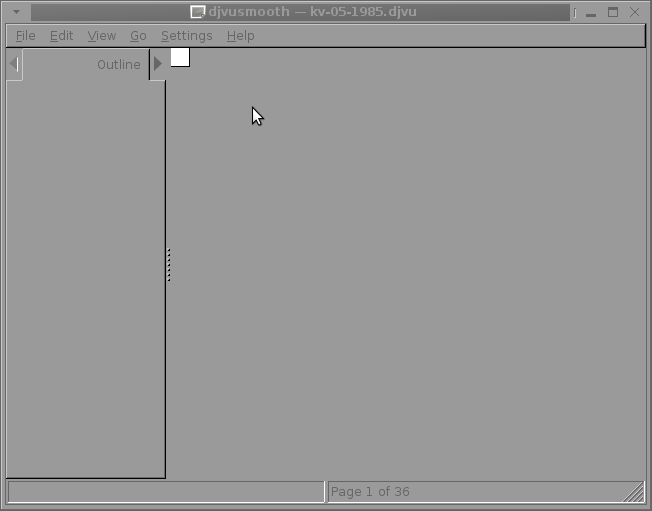
  • a) djvusmooth – graphical editor for DjVu
  • b) gscan2pdf – A GUI to produce PDFs or DjVus from scanned documents

DJVUSmooth Debian GNU / Linux opened prog

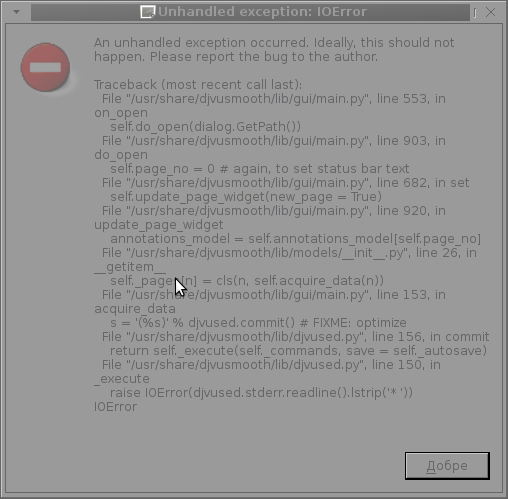
I tried djusmooth to edit the same PDF magazine which I prior opened but I got an Unhandled exception: IOError, as you can in below shot:

DJVUSmooth Unhandled Exception IOError

This is probably normal since djvusmooth is in its very early stage of development – current version is 0.2.7-1

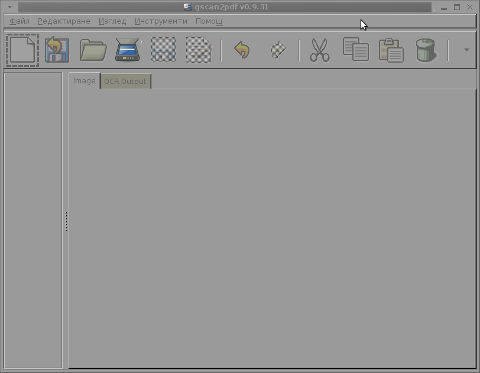
Unfortunately I don't have a scanner at home so I can't test if gscan2pdf produces proper DJVUs from scans, anyways I installed it to at least check the program interface which on a first glimpse looks simplistic:

gscan2pdf 0.9.31 Debian Linux Squeeze screenshot
To sum it up obviously DJVU seems like a great alternative to PDF, however its support for Free Software OSes is still lacking behind.
The Current windows DJVU works way better, though hopefully this will change soon.

Enabling talkd (Console Chat) between logged in users on FreeBSD and other BSDs

Sunday, June 10th, 2012

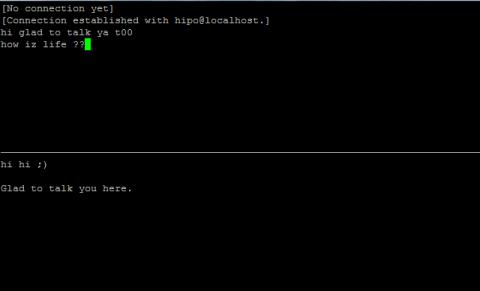
Talk between two useres on FreeBSD 7.2 screenshot, console peer to peer interactive talk program UNIX, Linux, BSD

Those who are in familiar with older UNIXes, UNIX BSD derivatives and GNU Linux should certainly remember the times, when we hackers used to talk to each other using talk service.

Those who don't know what talk command is it is a simple console / ssh utility to talk to another logged in users.

Talk is very similar to write and mesg one liner messasing utilities available for *nixes, the difference is it is intendted to provide interactive chat between the two logged in users. People who came to know UNIX or free software in older times most likely don't know talk, however I still remember how precious this tool was for communication back in the day.

I believe still it can be useful so I dediced to install ot on one FreeBSD host.

In order to have the talk service running on BSD it is necessery to have /usr/libexec/ntalkd installed on the system this however is installed by default with standard BSD OS installs, so no need for any external ports install to run it.

talk doesn't have it's own init script to start is not written to run as it own service but in order to run it is is necessery to enable it via inetd

Enabling it is done by;;;

1 — Editting /etc/inetd.conf

Inside the conf the line::

#ntalk dgram udp wait tty:tty /usr/libexec/ntalkd ntalkd

should be uncommented e.g, become ;;;

ntalk dgram udp wait tty:tty /usr/libexec/ntalkd ntalkd

2 — Restart inetd

freebsd# /etc/rc.d/inetd restart
Stopping inetd.
Starting inetd.

talk is planned to be used for peer to peer conversations over SSH so in a way it is the GRANDFATHER 🙂 of IRC, ICQ and Skype;;;

Here is an example on how talk is used ,, Let's say there are three logged in users

pcfreak# w
12:39PM up 3 days, 16:25, 3 users, load averages: 1.12, 0.91, 0.71
USER TTY FROM LOGIN@ IDLE WHAT
testuser p0 192.168.0.7 10:50AM - bash
hipo p3 192.168.0.8 12:23PM - w
root p4 :ttyp2:S.0 12:24PM - vim /usr/local/www/dat

I'm logged in with my username hipo and I would like to talk to testuser ;;;;

pcfreak% tty
/dev/ttyp3

You see I'm logged in on /dev/ttyp3 (this is the specific naming on BSDs) on Linux equivalent is /dev/tty3So to talk the other user testuser;;;;;-

$ talk testuser ttyp0
[No connection yet]
[Waiting for your party to respond]

The testuser logged in via SSH will then get a message ||;

Message from Talk_Daemon@pcfreak at 12:44 on 2012/06/10 ...
talk: connection requested by hipo@localhost
talk: respond with: talk hipo@localhost

To enter a talk session then the logged in testuser has to type:

$ talk hipo@localhost


How to disable PC Speaker on FreeBSD / Mute PC-Speaker on BSD kernels

Wednesday, May 16th, 2012


old school personal computer pc speaker / freebsd disable Pc-Speaker picture

After finding out How PC Speaker is muted on Linux , I've decided to also disable the annoying beeps on BSD. This is in tandem with the minimalistic philosophy I try to apply to every server I manage.

Also on BSD Desktop machines it is quite annoying especially if csh (C Shell) is used, everytime you press TAB you get the beep sound. On BSD beep sound produced on tab completion is louder than in Linux and that makes it even more annoying …

Disabling pc-speaker beeps on BSDs is done via a sysctl kernel variable:

freebsd# sysctl hw.syscons.bell=0
hw.syscons.bell: 0 -> 0

To further permanently disable on system boot add hw.syscons.bell=0 to /etc/sysctl.conf, e.g.:

freebsd# echo 'hw.syscons.bell=0' >> /etc/sysctl.conf


Well that's it no more mind drilling beeps :)