Posts Tagged ‘check’

OpenVZ enable or disable auto start on Linux Hypervisor host boot for Virtual Machine containers

Wednesday, July 7th, 2021

howto-add-virtual-machine-to-auto-start-with-vz-openvz-linux-containers-4-logo-slogan-vertical-big

To make OpenVZ / Virtuozzo Hypervisor servers and you are not sure whether your configured container virtual machines are configured to automatically boot on Linux Physical OS host boot in case of restart after patch update set or after unexpected shutdown due to Kernel / OS bug a hang or due to some electricity Power outage.

To check what is your current configuration for Virtual Environment on CentOS Linux you need to check inside /etc/sysconfig/vz-scripts/VEID.conf
You need to check the value for inside the file

ONBOOT="" 

To get the exact ID of "VEID.conf of the current openvz guest VM containers exec:

[root@openvz vz-scripts]# vzlist -a
      CTID      NPROC STATUS    IP_ADDR         HOSTNAME
       300         23 running   10.10.10.1     VirtualMachine1
       301         25 running   10.10.10.2     VirtualMachine2

[root@openvz ~]# cd /etc/sysconfig/vz-scripts
[root@gbapp2 vz-scripts]# pwd
/etc/sysconfig/vz-scripts

[root@openvz vz-scripts]# grep -i ONBOOT 300.conf 301.conf
300.conf:ONBOOT="yes"
301.conf:ONBOOT="yes"

If you happen to have configured ONBOOT="no" you will need to the change to respective VEID.conf:

vi /etc/sysconfig/vz-scripts/VEID.conf

search for

ONBOOT=”no”

and change to

ONBOOT=”yes”

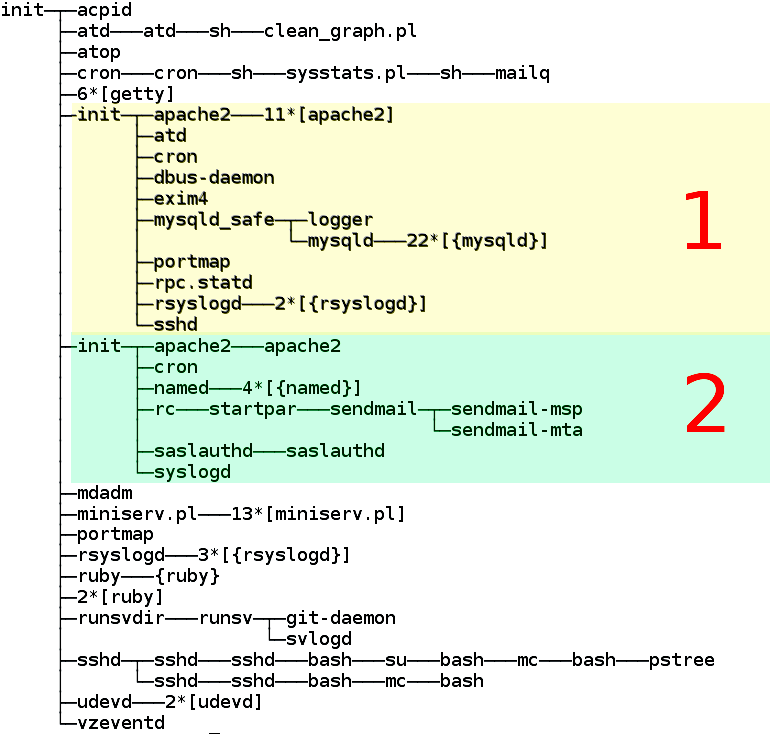
OpenVZ_virtuozzo-standard-process-tree-landscape

OpenVZ server process tree. The colors of the virtual severs are indicated by colors.

OpenVZ Quick cheat sheet commands

This change will auto-start the VPS container next time the host Hypervisor node is rebooted.
If you happen to have daily work with OpenVZ legacy systems like I do you might find also useful the following OpenVZ Cheatsheet pdf document.

A miniature quick cheatsheet for OpenVZ Virtualion, in case if you are like me and you have to use various virtualization technologies and tend to forget is as below:

vzlist                               # List running instances
vzlist -a                            # List all instances


vzctl stop <instance>
vzctl start <instance>
vzctl status <instance>

vzctl exec <instance> <command>      # Run a command

vzctl enter <instance>               # Get console

vzyum <instance> install <package>   # Install a package


# Change properties
vzctl set <instance> –hostname <hostname> –save
vzctl set <instance> –ipadd <IP> –save
vzctl set <instance> –userpasswd root:<password> –save

If need to get more insight on how OpenVZ Virtualization does work on a low level and stretch out its possibilities, an old but useful document you might want to check is OpenVZ-Users-Guide PDF.


If you need it to hava e copy of it openvz_cheat_sheet.txt.

ASCII Art studio – A powerful ASCII art editor for Windows / Playscii a cool looking text editor for Linux

Monday, June 28th, 2021

This post is just informative for Text Geeks who are in love with ASCII Art, it is a bit of rant as I will say nothing new, but I thought it might be of interest to some console maniac out there 🙂

ascii art studio aas program windows xp professional drawing program screenshot

While checking stuff on Internet I've stumbled on interesting ASCII arts freak software – >ASCII Art Studio. ASCII Art Studio is unfortunately needs licensing is not Free Software. But anyways, for anyone willing to draw pro ASCII art pictures it is a must see. Check it out;

Isn't it like a Plain Text pro Photoshop ? 🙂 Its a pity we don't have a Linux / BSD Release of this wonderful piece of software. I've tried with WINE (Windows Emulator) on Linux to make the Ascii Art Studio work but that was a fail. It seems only way to make it work is have Windows as a worst case install a Virtual Machine with VirtualBox / Vmware and run it inside if you don't have a Windows PC at hand.

Of course there are stuff on Linux to ascii art edit you can use if you want to have a native software to edit ASCIIs such as Playscii. Unfortunately Playscii is not an easy one to install and the software doesn't have a prepared rpm or deb binary you can easily roll on the OS and you have to manually build all required python modules and have a working version of python3 to be able to make it work.

I did not have much time to test to install it and since I faced issues with plascii install I just abandoned it. If some geek has some more time anyways I guess it is worse to give it a try below is 2 screenshots from PLAYSCII official download page. 

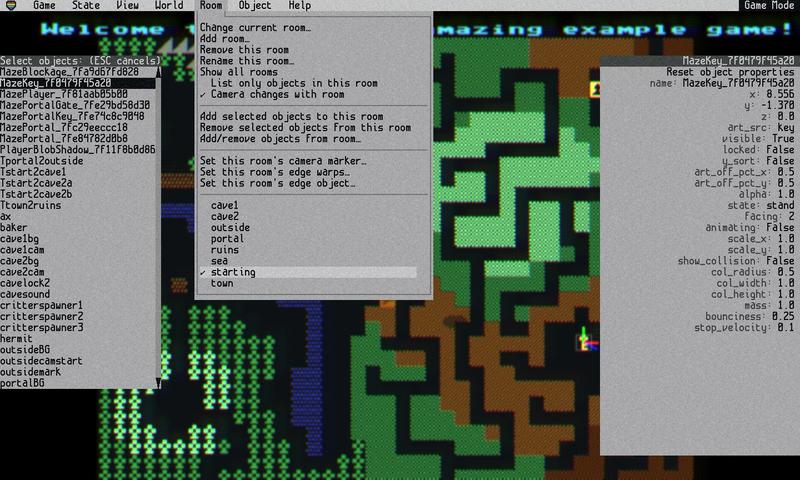
playscii_shot1-official.

As you see authors of the open source playscii whose source is available via github choose to have an amazing looking ascii art text menus, though for daily ASCII art editing it is perhaps much more complicated to use than the simlistic ASCII Art Studio

playscii_shot2-official

There is other stuff for Linux to do ASCII Art files text edit like:
JaVE (this one I don't personally like because it is Java Based),  Ascii Art Maker or Pablow Draw Linux (unfortunately this 2 ones are proprietary).

Christ is Risen – Truly He is Risen – Happy Easter !

Tuesday, May 4th, 2021

admin

One more year the Holy Fire has descended and we have been blessed to great Each other with the All Joyful Paschal Greeting !

Христос възкресе! Воистина възкресе! (Hristos vozkrese! Voistina vozkrese!)


Христос Воскресе – Воистину Воскресе! Христос възкресе! Воистина възкресе! (Hristos vozkrese! Voistina vozkrese!)
Христос васкрсе! Ваистину васкрсе! (Hristos vaskrse! Vaistinu vaskrse!)
Χριστὸς ἀνέστη! Ἀληθῶς ἀνέστη! 

Christus ist auferstanden! Er ist wahrhaftig auferstanden!Christ is Risen ! Truly He is Risen !

For complete list of Paschal Greeting as a referrence to get idea how other weird languages sound like and how it is used in the major Eastern Orthodox Churches all around the world check out my previous article Christ is Risen Eastern Orthodox Resurrection Paschal Greeting in Different Languages

Kh

How to calculate connections from IP address with shell script and log to Zabbix graphic

Thursday, March 11th, 2021

We had to test the number of connections incoming IP sorted by its TCP / IP connection state.

For example:

TIME_WAIT, ESTABLISHED, LISTEN etc.


The reason behind is sometimes the IP address '192.168.0.1' does create more than 200 connections, a Cisco firewall gets triggered and the connection for that IP is filtered out. To be able to know in advance that this problem is upcoming. a Small userparameter script is set on the Linux servers, that does print out all connections from IP by its STATES sorted out.


The script is calc_total_ip_match_zabbix.sh is below:

#!/bin/bash
#  check ESTIMATED / FIN_WAIT etc. netstat output for IPs and calculate total
# UserParameter=count.connections,(/usr/local/bin/calc_total_ip_match_zabbix.sh)
CHECK_IP='192.168.0.1';
f=0; 


for i in $(netstat -nat | grep "$CHECK_IP" | awk '{print $6}' | sort | uniq -c | sort -n); do

echo -n "$i ";
f=$((f+i));
done;
echo
echo "Total: $f"


root@pcfreak:/bashscripts# ./calc_total_ip_match_zabbix.sh 
1 TIME_WAIT 2 ESTABLISHED 3 LISTEN 

Total: 6


root@pcfreak:/bashscripts# ./calc_total_ip_match_zabbix.sh 
2 ESTABLISHED 3 LISTEN 
Total: 5


images/zabbix-webgui-connection-check1

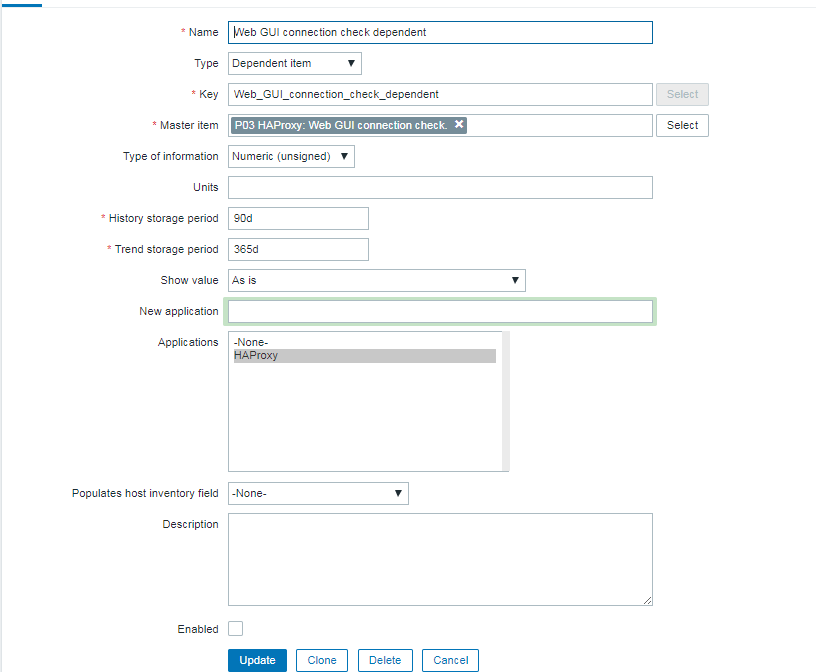
To make process with Zabbix it is necessery to have an Item created and a Depedent Item.


webguiconnection-check1

webguiconnection-check1
 

webgui-connection-check2-item

images/webguiconnection-check1

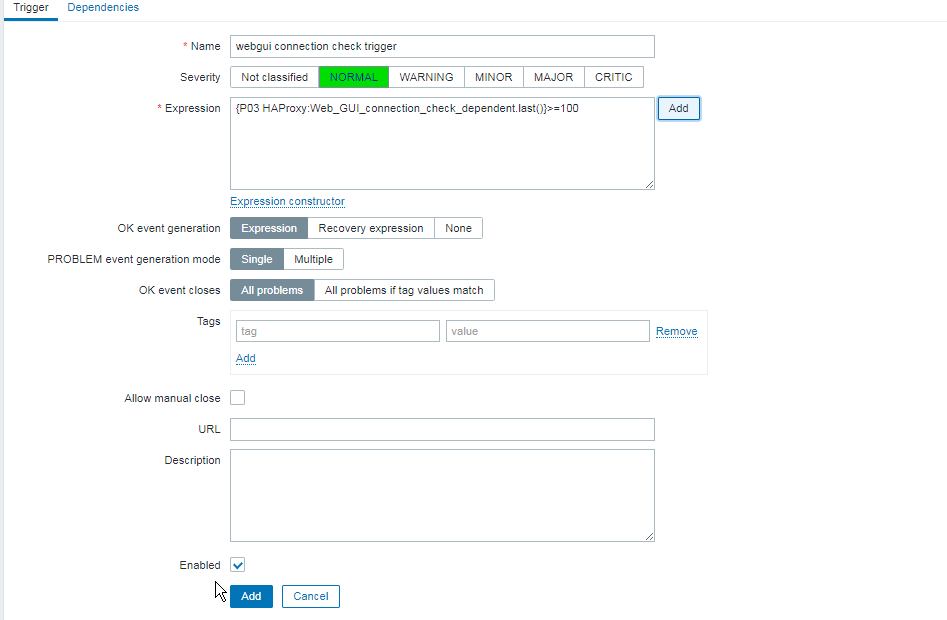
Finally create a trigger to trigger alarm if you have more than or eqaul to 100 Total overall connections.


images/zabbix-webgui-connection-check-trigger

The Zabbix userparameter script should be as this:

[root@host: ~]# cat /etc/zabbix/zabbix_agentd.d/userparameter_webgui_conn.conf
UserParameter=count.connections,(/usr/local/bin/webgui_conn_track.sh)


Some collleagues suggested more efficient shell script solution for suming the overall number of connections, below is less time consuming version of script, that can be used for the calculation.
 

#!/bin/bash -x
# show FIN_WAIT2 / ESTIMATED etc. and calcuate total
count=$(netstat -n | grep "192.168.0.1" | awk ' { print $6 } ' | sort -n | uniq -c | sort -nr)
total=$((${count// /+}))
echo "$count"
echo "Total:" "$total"

      2 ESTABLISHED
      1 TIME_WAIT
Total: 3


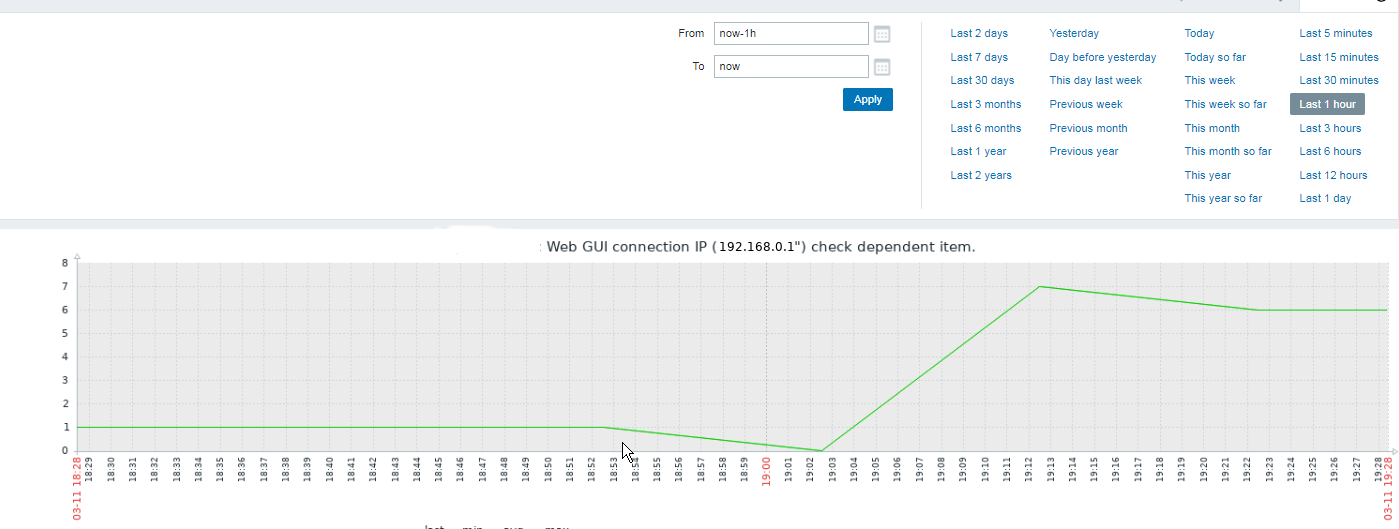
Below is the graph built with Zabbix showing all the fluctuations from connections from monitored IP. ebgui-check_ip_graph


Postfix copy every email to a central mailbox (send a copy of every mail sent via mail server to a given email)

Wednesday, October 28th, 2020

Postfix-logo-always-bcc-email-option-send-all-emails-to-a-single-address-with-postfix.svg

Say you need to do a mail server migration, where you have a local configured Postfix on a number of Linux hosts named:

Linux-host1
Linux-host2
Linux-host3

etc.


all configured to send email via old Email send host (MailServerHostOld.com) in each linux box's postfix configuration's /etc/postfix/main.cf.
Now due to some infrastructure change in the topology of network or anything else, you need to relay Mails sent via another asumably properly configured Linux host relay (MailServerNewHost.com).

Usually such a migrations has always a risk that some of the old sent emails originating from local running scripts on Linux-host1, Linux-Host2 … or some application or anything else set to send via them might not properly deliver emails to some external Internet based Mailboxes via the new relayhost MailServerNewHost.com.

E.g. in /etc/postfix/main.cf Linux-Host* machines, you have below config after the migration:

relayhost = [MailServerNewHost.com]

Lets say that you want to make sure, that you don't end up with lost emails as you can't be sure whether the new email server will deliver correctly to the old repicient emails. What to do then?

To make sure will not end up in undelivered state and get lost forever after a week or so (depending on the mail queue configuration retention period made on Linux sent MTAs and mailrelay MailServerNewHost.com, it is a very good approach to temprorary set all email communication that will be sent via MailServerNewHost.com a BCC emaills (A Blind Carbon Copy) of each sent mail via relay that is set on your local configured Postfix-es on Linux-Host*.

In postfix to achieve that it is very easy all you have to do is set on your MailServerNewHost.com a postfix config variable always_bcc smartly included by postfix Mail Transfer Agent developers for cases exactly like this.

To forward all passed emails via the mail server just place in the end of /etc/postfix/mail.conf after login via ssh on MailServerNewHost.com

always_bcc=All-Emails@your-diresired-redirect-email-address.com


Now all left is to reload the postfix to force the new configuration to get loaded on systemd based hosts as it is usually today do:

# systemctl reload postfix


Finally to make sure all works as expected and mail is sent do from do a testing via local MTAs. 
 

Linux-Host:~# echo -e "Testing body" | mail -s "testing subject" -r "testing@test.com" georgi.stoyanov@remote-user-email-whatever-address.com

Linux-Host:~# echo -e "Testing body" | mail -s "testing subject" -r "testing@test.com" georgi.stoyanov@sample-destination-address.com


As you can see I'm using the -r to simulate a sender address, this is a feature of mailx and is not available on older Linux Os hosts that are bundled with mail only command.
Now go to and open the All-Emails@your-diresired-redirect-email-address.com in Outlook (if it is M$ Office 365 MX Shared mailbox), Thunderbird or whatever email fetching software that supports POP3 or IMAP (in case if you configured the common all email mailbox to be on some other Postfix / Sendmail / Qmail MTA). and check whether you started receiving a lot of emails 🙂

That's all folks enjoy ! 🙂

How to check Microsoft IIS webserver version

Monday, July 21st, 2014

If you have to tune some weirdly behaviour Microsoft IIS (Internet Information Services) webserver, the first thing to do is to collect information about the system you're dealing with – get version of installed Windows and check what kind of IIS version is running on the Windows server?

To get the version of installed Windows on the system you just logged in, the quickest way I use is:
 

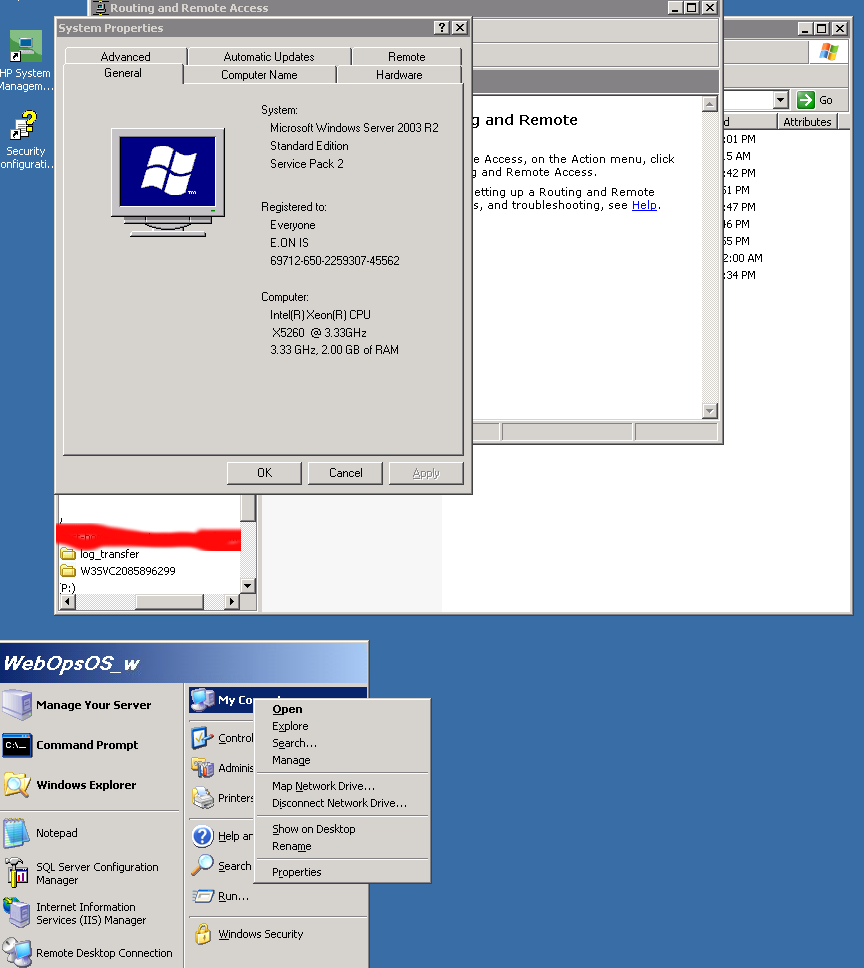
Start -> My Computer (right mouse button) Properties

check-windows-server-version-screenshot-windows-2003-r2

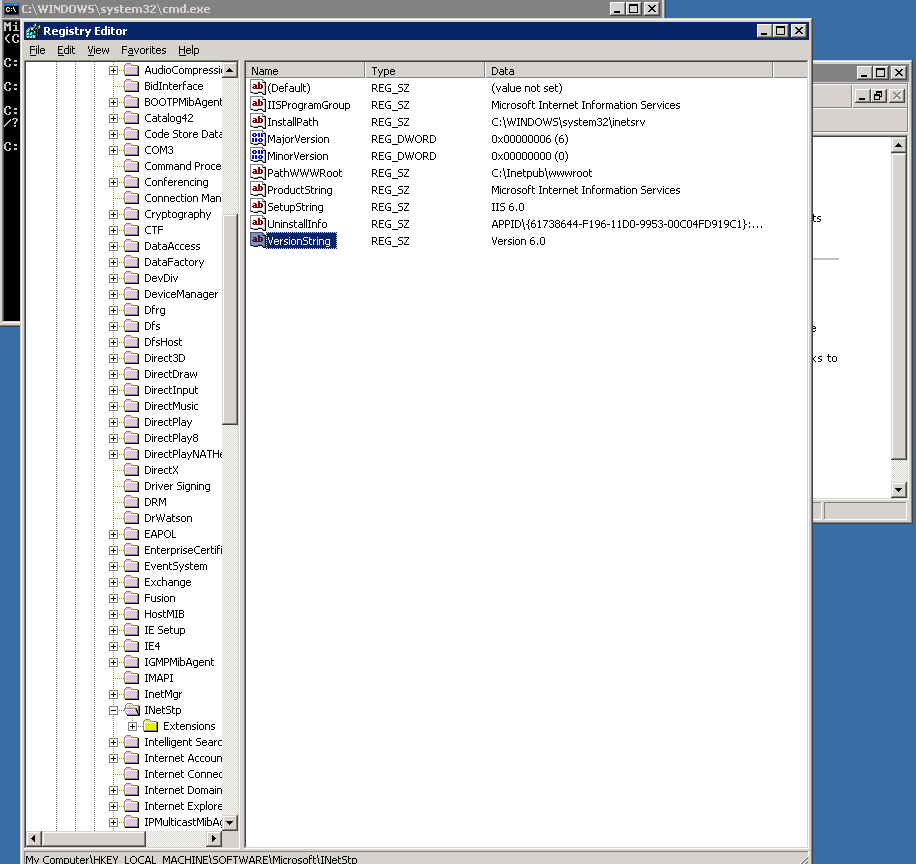
Run regedit from cmd.exe and go and check value of registry value:


HKEY_LOCAL_MACHINE\SOFTWARE\MicrosoftInetStp\VersionString


check-iis-webserver-version-with-windows-registry-screenshot

As you can see in screenshot in this particular case it is IIS version 6.0.

An alternative way to check the IIS version in some cases (if IIS version return is not disabled) is to telnet to webserver:

telnet your-webserver 80


Once connected Send:

HEAD / HTTP/1.0


Also on some Windows versions it is possible to check IIS webserver version from Internet Information Services Management Cosnole:

To check IIS version from IIS Manager:

Start (button) -> Control Panel -> Administrative Tools -> "Internet Information Services" IIS Manager

From IIS Manager go to:

Help -> About Microsoft Management Console


Here is a list with most common IIS version output you will get depending on the version of Windows server:


Windows NT 3.51 1.0
Windows NT 4 2.0-4.0
Windows Server 2000 5.0
Windows XP Professional 5.1
Windows Server 2003 6.0
Windows Vista 7.0
Windows Server 2008 7.0
Windows Server 2008 R2 7.5
Windows 7 7.5
Windows Server 2012 8.0
Windows 8 8.0
Windows Server 2012 R2 8.5
Windows 8.1 8.5

If you have only an upload FTP access to a Folder served by IIS Webserver – i.e. no access to the Win server running IIS, you can also grasp the IIS version with following .ASP code:
 

<%
response.write(Request.ServerVariables("SERVER_SOFTWARE"))
%>


Save the file as anyfile.asp somewhere in IIS docroot and invoke it in browser.

How to check version of most used mail servers Postfix / Qmail / Exim / Sendmail

Wednesday, October 14th, 2020

How to check version of a Linux host's installed Mail server?

Most used mail servers Postfix / Qmail / Exim / Sendmail and usually you have to do a dpkg -l / rpm -qa or whatever package manager to get the package version. But sometimes the package is built to have a different naming convention from the actual installed MTA.

As recently I had to check on a Linux host what kind of version was the installed and used one to the SMTP, below is how to find conrete versions of Postfix / Qmail / Exim / Sendmail.
If none of the 4 is installed and something more cryptic like ssmtp is installed if another one is installed perhaps the best way would be to check with lsof -i :25 command and see  what process has binded and listens on TCP port 25.

mail-server-lsof-linux-screenshot-qmail-vpopmail


1. How to check Postfix exact mail server version

mail-server-exim-check-lsof-screenshot

Once you can find Postfix is the Network listening MTA, you might think you can simply use postfix -v however, but no …
Unlike many other applications, Postfix has no -v or –versions switch. But you can get the version information easily by using the postconf command as shown below:

root@server :~# postconf mail_version

postfix-show-version-postconf-linux

Other approach is to dump all postfix configuration settings (this is useful to get more info on how postfix is configured) and explicitly grep for the version.
 How to check version of a Linux host's installeded webserver?

root@server :~# postconf -d | grep mail_version


2. How to check Exim MTA running version ?

root@exim-mail :/ # exim -bV
Exim version 4.72 #1 built 13-Jul-2010 21:54:55
Copyright (c) University of Cambridge, 1995 – 2007
Berkeley DB: Sleepycat Software: Berkeley DB 4.3.29: (September 19, 2009)
Support for: crypteq iconv() Perl OpenSSL move_frozen_messages Content_Scanning DKIM Old_Demime
Lookups: lsearch wildlsearch nwildlsearch iplsearch cdb dbm dbmnz
Authenticators: cram_md5 plaintext spa
Routers: accept dnslookup ipliteral manualroute queryprogram redirect
Transports: appendfile/maildir/mailstore/mbx autoreply lmtp pipe smtp
Size of off_t: 8
OpenSSL compile-time version: OpenSSL 0.9.8e-fips-rhel5 01 Jul 2008
OpenSSL runtime version: OpenSSL 0.9.8e-fips-rhel5 01 Jul 2008
Configuration file is /etc/exim.conf

how-to-get-exim-version-on-gnu-linux-screenshot


3. How to check Sendmail Mail Transport Agent exact Mail version ?

Though sendmail is rarely used this days and it usually works mostly on obsolete old scrap hosts
or in some old fashioned conservative organizations such as Banks and Payment services providers, you might need to invertise it, just like the configuration m4 format complexity with its annoying macros, getting the version is also not straight forward:

# sendmail -d0.4 -bv root | grep Version
Version 8.14.4

Above commands should be working on most Linux distributions such as Debian / Ubuntu / Fedora / CentOS / SuSE and other Linux derivatives
 

4. How to check Qmail MTA version?

This is a bit of complicated question, as Qmail's base has not been significantly changed for years.
The latest published qmail package is qmail-1.03.tar.gz.  1.03 was released in 1998, Qmail is famous for its unbreakable security. The author of qmail  Daniel J. Bernstein is famous for writting Qmail to make the work installation and configuration of SMTP simple as of the time of writting sendmail was the defacto standard and sendmail was hard to configure.
Also sendmail was famous for a set of Security holes that got a lot of Sendmail MTA's on the Net got hacked. Thus the QMAIL was written as a more security-aware mail transport agent.

In contrast to sendmail, qmail has a modular architecture composed of mutually untrusting components; for instance, the SMTP listener component of qmail runs with different credentials from the queue manager or the SMTP sender. qmail was also implemented with a security-aware replacement to the C standard library, and as a result has not been vulnerable to stack and heap overflows, format string attacks, or temporary file race conditions.

The core qmail package has not been updated for many years. New features were initially provided by third party patches, from which the most important at the time were brought together in a single meta-patch set called netqmail.

The current version of netqmail is at 1.06 netqmail-1.06.tar.gz as of year 2020.

One possible way to get some info about installed qmail or components is to use the documentation look up command apropos

qmail:~# apropos qmail


or check the manual or at worst check for the installation source files that the person that installed the qmail used 🙂

A fun fact about qmail few might know is D. Bernstein offered in 1997 a US$500 reward for the first person to publish a verifiable security hole in the latest version of the software, for many years till 2005 no hole was found security researcher Georgi Guninski found an integer overflow in qmail. On 64-bit platforms, in default configurations with sufficient virtual memory, the delivery of huge amounts of data to certain qmail components may allow remote code execution. Bernstein disputes that this is a practical attack, arguing that no real-world deployment of qmail would be susceptible. Configuration of resource limits for qmail components mitigates the vulnerability.

On November 1, 2007, Bernstein raised the reward to US$1000. At a slide presentation the following day, Bernstein stated that there were 4 "known bugs" in the ten-year-old qmail-1.03, none of which were "security holes." He characterized the bug found by Guninski as a "potential overflow of an unchecked counter." "Fortunately, counter growth was limited by memory and thus by configuration, but this was pure luck.

5. Quick way to check the type of Mail server installed on Debian based Linux that doesn't have telnet installed


As you know simple telnet localhost 25 or a simple ps -ef could reveal at most times general information on the installed server. However there is another way to do it using package manager. by using embedded bash shell type type command like so:
 

# type -p sendmail |
xargs dpkg -S

type-x-bash-command-to-find-out-email-server-version-on-linux

Another hacky way to check whether exim, postfix or sendmail SMTP is installed is with:

hipo@freak:~$ echo $(man sendmail)| grep "exim"|wc -l
1
hipo@freak:~$ echo $(man sendmail)| grep "postfix"|wc -l
0
hipo@freak:~$ echo $(man sendmail)| grep "sendmail"|wc -l
0

I guess there are nice hacks and ways to get versions, so if you're aware of any please share with me.
Enjoy !

How to check how many processor and volume groups IBM AIX eServer have

Monday, July 13th, 2020

how-many-cpus-are-on-commands-Linux-sysadmin-and-user-show-know-AIX-logo
In daily sysadmin duties I have been usually administrating GNU / Linux or FreeBSD servers.
However now in my daily sysadmin jobs I've been added to do some minor sysadmin activities on  a few IBM AIX eServers UNIX machines.

As the eServers were completely unknown to me and I logged in for a first time I needed a way to get idea on what kind of hardware I'm logging in so I wanted to get information about the Central Processing UNIT CPUs on the host.

On Linux I'm used to do a cat /proc/cpuinfo or do dmidecode etc. to get the number of CPUs, however AIX does not have /proc/cpuinfo and has its own way to get information about the system hardware.
As I've red in the IBM AIX's RedBook to get system information on AIX there is the lscfg command.
 

aix:/# lscfg
INSTALLED RESOURCE LIST

The following resources are installed on the machine.
+/- = Added or deleted from Resource List.
*   = Diagnostic support not available.

  Model Architecture: chrp
  Model Implementation: Multiple Processor, PCI bus

+ sys0                                                            System Object
+ sysplanar0                                                      System Planar
* vio0                                                            Virtual I/O Bus
* vscsi3           U8205.E6B.068D6AP-V4-C21-T1                    Virtual SCSI Client Adapter
* vscsi2           U8205.E6B.068D6AP-V4-C20-T1                    Virtual SCSI Client Adapter
* vscsi1           U8205.E6B.068D6AP-V4-C11-T1                    Virtual SCSI Client Adapter
* hdisk1           U8205.E6B.068D6AP-V4-C11-T1-L8100000000000000  Virtual SCSI Disk Drive
* vscsi0           U8205.E6B.068D6AP-V4-C10-T1                    Virtual SCSI Client Adapter
* hdisk0           U8205.E6B.068D6AP-V4-C10-T1-L8100000000000000  Virtual SCSI Disk Drive
* ent3             U8205.E6B.068D6AP-V4-C5-T1                     Virtual I/O Ethernet Adapter (l-lan)
* ent2             U8205.E6B.068D6AP-V4-C4-T1                     Virtual I/O Ethernet Adapter (l-lan)
* ent1             U8205.E6B.068D6AP-V4-C3-T1                     Virtual I/O Ethernet Adapter (l-lan)
* ent0             U8205.E6B.068D6AP-V4-C2-T1                     Virtual I/O Ethernet Adapter (l-lan)
* vsa0             U8205.E6B.068D6AP-V4-C0                        LPAR Virtual Serial Adapter
* vty0             U8205.E6B.068D6AP-V4-C0-L0                     Asynchronous Terminal
+ L2cache0                                                        L2 Cache
+ mem0                                                            Memory
+ proc0                                                           Processor
+ proc4                                                           Processor


To get the number of processors on the host I've had to use:


aix:/# lscfg|grep -i proc
  Model Implementation: Multiple Processor, PCI bus
+ proc0                                                           Processor
+ proc4                                                           Processor


Another way to get the CPU number is with:

aix:/# lsdev -C -c processor
proc0 Available 00-00 Processor
proc4 Available 00-04 Processor


aix:/# lsattr -EH -l proc4
attribute   value          description           user_settable


frequency   3720000000     Processor Speed       False
smt_enabled true           Processor SMT enabled False
smt_threads 4              Processor SMT threads False
state       enable         Processor state       False
type        PowerPC_POWER7 Processor type        False

aix:/# lsattr -EH -l proc0
attribute   value          description           user_settable


frequency   3720000000     Processor Speed       False
smt_enabled true           Processor SMT enabled False
smt_threads 4              Processor SMT threads False
state       enable         Processor state       False
type        PowerPC_POWER7 Processor type        False


As you can see each of the processor is multicore has 2 Cores and each of the cores have for Threads, to get the overall number of CPUs on the system including the threaded Virtual CPUs:

aix:/# bindprocessor -q
The available processors are:  0 1 2 3 4 5 6 7


This specific machine has overall of 8 CPUs cores.

lscfg can be used to get various useful other info of the iron:

aix:/# lscfg -s
INSTALLED RESOURCE LIST


The following resources are installed on the machine.
+/- = Added or deleted from Resource List.
*   = Diagnostic support not available.

  Model Architecture: chrp
  Model Implementation: Multiple Processor, PCI bus

+ sys0
        System Object
+ sysplanar0
        System Planar
* vio0
        Virtual I/O Bus
* vscsi3           U8305…………….
        Virtual SCSI Client Adapter
* vscsi2           U8305…………….
        Virtual SCSI Client Adapter
* vscsi1           U8305…………….
        Virtual SCSI Client Adapter
* hdisk1           U8305…………….
        Virtual SCSI Disk Drive
* vscsi0           U8305……………..
        Virtual SCSI Client Adapter
* hdisk0           U8305…………….
        Virtual SCSI Disk Drive
* ent3             U8305…………….
        Virtual I/O Ethernet Adapter (l-lan)
* ent2             U8305.E6B…………….
        Virtual I/O Ethernet Adapter (l-lan)
* ent1             U8305.E6B…………….
        Virtual I/O Ethernet Adapter (l-lan)
* ent0             U8305.E6B…………….
        Virtual I/O Ethernet Adapter (l-lan)
* vsa0             U8305.E7B…………….
        LPAR Virtual Serial Adapter
* vty0             U8305.E7B…………….
        Asynchronous Terminal
+ L2cache0
        L2 Cache
+ mem0
        Memory
+ proc0
        Processor
+ proc4
        Processor

aix:/# lscfg -p
INSTALLED RESOURCE LIST

The following resources are installed on the machine.

  Model Architecture: chrp
  Model Implementation: Multiple Processor, PCI bus

  sys0                                                            System Object
  sysplanar0                                                      System Planar
  vio0                                                            Virtual I/O Bus
  vscsi3           U8305.E7B…………….V6-C40-T1                    Virtual SCSI Client Adapter
  vscsi2           U8305.E7B…………….V6-C40-T1                     Virtual SCSI Client Adapter
  vscsi1           U8305.E7B…………….V6-C40-T1                    Virtual SCSI Client Adapter
  hdisk1           U8305.E7B…………….V6-C40-T1-L8500000000000000  Virtual SCSI Disk Drive
  vscsi0           U8305.E7B…………….V6-C40-T1                    Virtual SCSI Client Adapter
  hdisk0           U8305.E7B…………….V6-C40-T1-L8500000000000000  Virtual SCSI Disk Drive
  ent3             U8305.E7B…………….V6-C40-T1                     Virtual I/O Ethernet Adapter (l-lan)
  ent2             U8305.E7B…………….V6-C40-T1                     Virtual I/O Ethernet Adapter (l-lan)
  ent1             U8305.E7B…………….V6-C40-T1                     Virtual I/O Ethernet Adapter (l-lan)
  ent0             U8305.E7B…………….V6-C40-T1                     Virtual I/O Ethernet Adapter (l-lan)
  vsa0             U8305.E7B.069D7AP-V5-C1                        LPAR Virtual Serial Adapter
  vty0             U8305.E7B.069D7AP-V5-D1-L0                     Asynchronous Terminal
  L2cache0                                                        L2 Cache
  mem0                                                            Memory
  proc0                                                           Processor
  proc4                                                           Processor

  PLATFORM SPECIFIC

  Name:  IBM,8305-E7B
    Model:  IBM,8305-E7B
    Node:  /
    Device Type:  chrp

  Name:  openprom
    Model:  IBM,AL730_158
    Node:  openprom

  Name:  interrupt-controller
    Model:  IBM, Logical PowerPC-PIC, 00
    Node:  interrupt-controller@0
    Device Type:  PowerPC-External-Interrupt-Presentation

  Name:  vty
    Node:  vty@30000000
    Device Type:  serial
    Physical Location: …………………………………………..

  Name:  l-lan
    Node:  l-lan@30000002
    Device Type:  network
    Physical Location: …………………………………………..

  Name:  l-lan
    Node:  l-lan@30000003
    Device Type:  network
    Physical Location: …………………………………………..

  Name:  l-lan
    Node:  l-lan@30000004
    Device Type:  network
    Physical Location: …………………………………………..

  Name:  l-lan
    Node:  l-lan@30000005
    Device Type:  network
    Physical Location: …………………………………………..

  Name:  v-scsi
    Node:  v-scsi@3000005a
    Device Type:  vscsi
    Physical Location: …………………………………………..

  Name:  v-scsi
    Node:  v-scsi@3000005b
    Device Type:  vscsi
    Physical Location: …………………………………………..

  Name:  v-scsi
    Node:  v-scsi@30000014
    Device Type:  vscsi
    Physical Location: ………………………………..

  Name:  v-scsi
    Node:  v-scsi@30000017
    Device Type:  vscsi
    Physical Location: …………………………………


Another useful command I found is to list the equivalent of Linux's LVM Logical Volumes configured on the system, below is how:

aix:/# lspv hdisk0
00f68c6a84acb0d5 rootvg active hdisk1 00f69d6a85400468 dsvg active

To get more info on a volume group:

aix:/# lspv hdisk0 PHYSICAL VOLUME: hdisk0 VOLUME GROUP: rootvg PV IDENTIFIER: 00f68d6a85acb0d5 VG IDENTIFIER 00f68d6a00004c0000000131353444a5 PV STATE: active STALE PARTITIONS: 0 ALLOCATABLE: yes PP SIZE: 32 megabyte(s) LOGICAL VOLUMES: 12 TOTAL PPs: 959 (30688 megabytes) VG DESCRIPTORS: 2 FREE PPs: 493 (15776 megabytes) HOT SPARE: no USED PPs: 466 (14912 megabytes) MAX REQUEST: 256 kilobytes FREE DISTRIBUTION: 191..00..00..110..192 USED DISTRIBUTION: 01..192..191..82..00 MIRROR POOL: None


You can get which local configured partition is set on which ( PV )Physical Volume

aix:/# lspv -l hdisk0
hdisk0:
LV NAME               LPs     PPs     DISTRIBUTION          MOUNT POINT
lg_dumplv             64      64      00..64..00..00..00    N/A
hd8                   1       1       00..00..01..00..00    N/A
hd6                   16      16      00..16..00..00..00    N/A
hd2                   166     166     00..45..89..32..00    /usr
hd4                   29      29      00..11..18..00..00    /
hd3                   40      40      00..04..04..32..00    /tmp
hd9var                55      55      00..00..37..18..00    /var
hd10opt               74      74      00..37..37..00..00    /opt
hd1                   8       8       00..07..01..00..00    /home
hd5                   1       1       01..00..00..00..00    N/A

Report haproxy node switch script useful for Zabbix or other monitoring

Tuesday, June 9th, 2020

zabbix-monitoring-logo
For those who administer corosync clustered haproxy and needs to build monitoring in case if the main configured Haproxy node in the cluster is changed, I've developed a small script to be integrated with zabbix-agent installed to report to a central zabbix server via a zabbix proxy.
The script  is very simple it assumed DC1 variable is the default used haproxy node and DC2 and DC3 are 2 backup nodes. The script is made to use crm_mon which is not installed by default on each server by default so if you'll be using it you'll have to install it first, but anyways the script can easily be adapted to use pcs cmd instead.

Below is the bash shell script:

UserParameter=active.dc,f=0; for i in $(sudo /usr/sbin/crm_mon -n -1|grep -i 'Node ' |awk '{ print $2 }'); do ((f++)); DC[$f]="$i"; done; \
DC=$(sudo /usr/sbin/crm_mon -n -1 | grep 'Current DC' | awk '{ print $1 " " $2 " " $3}' | awk '{ print $3 }'); \
if [ “$DC” == “${DC[1]}” ]; then echo “1 Default DC Switched to ${DC[1]}”; elif [ “$DC” == “${DC[2]}” ]; then \
echo "2 Default DC Switched to ${DC[2]}”; elif [ “$DC” == “${DC[3]}” ]; then echo “3 Default DC: ${DC[3]}"; fi


To configure it with zabbix monitoring it can be configured via UserParameterScript.

The way I configured  it in Zabbix is as so:


1. Create the userpameter_active_node.conf

Below script is 3 nodes Haproxy cluster

# cat > /etc/zabbix/zabbix_agentd.d/userparameter_active_node.conf

UserParameter=active.dc,f=0; for i in $(sudo /usr/sbin/crm_mon -n -1|grep -i 'Node ' |awk '{ print $2 }'); do ((f++)); DC[$f]="$i"; done; \
DC=$(sudo /usr/sbin/crm_mon -n -1 | grep 'Current DC' | awk '{ print $1 " " $2 " " $3}' | awk '{ print $3 }'); \
if [ “$DC” == “${DC[1]}” ]; then echo “1 Default DC Switched to ${DC[1]}”; elif [ “$DC” == “${DC[2]}” ]; then \
echo "2 Default DC Switched to ${DC[2]}”; elif [ “$DC” == “${DC[3]}” ]; then echo “3 Default DC: ${DC[3]}"; fi

Once pasted to save the file press CTRL + D


The version of the script with 2 nodes slightly improved is like so:
 

UserParameter=active.dc,f=0; for i in $(sudo /usr/sbin/crm_mon -n -1|grep -i 'Node ' |awk '{ print $2 }' | sed -e 's#:##g'); do DC_ARRAY[$f]=”$i”; ((f++)); done; GET_CURR_DC=$(sudo /usr/sbin/crm_mon -n -1 | grep ‘Current DC’ | awk ‘{ print $1 ” ” $2 ” ” $3}’ | awk ‘{ print $3 }’); if [ “$GET_CURR_DC” == “${DC_ARRAY[0]}” ]; then echo “1 Default DC ${DC_ARRAY[0]}”; fi; if [ “$GET_CURR_DC” == “${DC_ARRAY[1]}” ]; then echo “2 Default Current DC Switched to ${DC_ARRAY[1]} Please check “; fi; if [ -z “$GET_CURR_DC” ] || [ -z “$DC_ARRAY[1]” ]; then printf "Error something might be wrong with HAProxy Cluster on  $HOSTNAME "; fi;


The haproxy_active_DC_zabbix.sh script with a bit of more comments as explanations is available here 
2. Configure access for /usr/sbin/crm_mon for zabbix user in sudoers


# vim /etc/sudoers

zabbix          ALL=NOPASSWD: /usr/sbin/crm_mon


3. Configure in Zabbix for active.dc key Trigger and Item

active-node-switch1

Linux: Howto Disable logging for all VirtualHosts on Apache and NGINX Webservers one liner

Wednesday, July 1st, 2020

disable-apache-nginx-logging-for-all-virtualhosts
Did you happen to administer Apache Webservers or NGINX webservers whose logs start to grow so rapidly that are flooding the disk too quickly?
Well this happens sometimes and it also happens that sometimes you just want to stop logging especially, to offload disk writting.

There is an easy way to disable logging for requests and errors (access_log and error_log usually residing under /var/log/httpd or /var/log/nginx ) for  all configured Virtual Domains with a short one liner, here is how.

Before you start  Create backup of /etc/apache2/sites-enabled / or /etc/nginx to be able to revert back to original config.

# cp -rpf /etc/apache2/sites-enabled/ ~/

# cp -rpf /etc/nginx/ ~/


1. Disable Logging for All  Virtual Domains configured for Apache Webserver

First lets print what the command will do to make sure we don't mess something

# find /home/hipo/sites-enabled/* -exec echo sed -i 's/#*[Cc]ustom[Ll]og/#CustomLog/g' {} \;


You will get some output like

find /home/hipo//sites-enabled/* -exec echo sed -i 's/#*[Cc]ustom[Ll]og/#CustomLog/g' {} \;

find /etc/apache2/sites-enabled/* -exec sed -i 's/#*[Cc]ustom[Ll]og/#CustomLog/g' {} \;
find /etc/apache2/sites-enabled/* -exec sed -i 's/#*[Ee]rror[Ll]og/#ErrorLog/g' {} \;

2. Disable Logging for All configured Virtual Domains for NGINX Webserver
 

find /etc/nginx/sites-enabled/* -exec sed -i 's/#*access_log/#access_log/g' {} \;
find /etc/nginx/sites-enabled/* -exec sed -i 's/#*error_log/#error_log/g' {} \;

f course above substituations that will comment out with '#' occurances from file configs of only default set access_log and error_log / access.log, error.log 
for machines where there is no certain convention on file naming and there are multiple domains in custom produced named log files this won't work.

This one liner was inspired from a friend's daily Martin Petrov. Martin blogged initially about this nice tip for those reading Cyrillic check out mpetrov.net, so. Thanks Marto ! 🙂