Posts Tagged ‘cmds’

Simple bash shell Script to easy and quickly automate deploy RHEL Linux Virtual Machines on KVM Virtualization

Friday, November 3rd, 2023

how-to-install-a-kvm-guest-os-from-the-commandline-easily-with-script-virt-install-logo

Earlier I've blogged in about howto build KVM Virtual Machine RHEL 8.3 Linux install on Redhat 8.3 Linux Hypervisor with custom tailored kickstart.cfg as one of the Projects i was involved in my work duty as system administrator, we had the task to build
a KVM virtual machines and build a High Availability Linux  PCS Corosync / Pacemaker / haproxy cluster on it to save some money for the company from purchasing VMWare licenses.

The setup of the KVM Virtual machine on a first glimpse is relatively simple and I thought, this can be done just for 2 / 3 days but it turned out to take up 2 weeks or so to properly prepare the kickstarter file and learn a bit about basic virt-install KVM options and experiment with them until
we can produce a noral working Virtual machines. 

The original developed simple script that I used to bring up a new KVM virtual machines in a bit easier way virt-install-kvm.sh looked like so:
 

#!/bin/sh
# Script to build a new VM based on a kickstart.cfg file template
# with virt-install
# Author Georgi Georgiev hip0
# hipo@Pc-freak.net

KS_FILE='kickstart.cfg';
VM_NAME='RHEL8_3-VirtualMachine';
VM_DESCR='CentOS 8.3 Virtual Machine';
RAM='8192';
CPUS='8';
# size is in Gigabytes
VM_IMG_SIZE='70';
ISO_LOCATION='/vmprivate/rhel-server-8.3-x86_64-dvd.iso';
VM_IMG_FILE_LOC='/vmprivate/RHEL8_3-VirtualMachine.img';

virt-install -n "$VMNAME" –description "$VM_DESCR" –os-type=Linux –os-variant=rhel8.3 –ram=8192 –vcpus=8 –location="$ISO_LOCATION" –disk path=$VM_IMG_FILE,bus=virtio,size=$IMG_VM_SIZE –graphics none –initrd-inject=/root/$KS_FILE –extra-args "console=ttyS0 ks=file:/$KS_FILE"


The script basicly did what it was aimed for but modifying the kickstarter ks.cfg every time with multiple additional parameters, like network configurations as well some additional modifications to ks.cfg for VM parameters was annoying.

Recently as we had to repeat the same task again in order to migrate old customer containing a Linux OpenVZ Virtual machines to a newer  OS installed RHEL versionb with KVM virtual machines, i've took some hours and scripted a small script that would easiy our task to build new KVM Virtual Machines
from scratch relatively easy, if we have to repeat the Linux OS build operation again and again.

Before proceeding to use the script of course one has to use LVM and setup the partitions on the Host which will be the Hypervisor where the KVM VMs will be installed as well you need to download an ISO image of Redhat Enterprise Linux / CentOS / Fedora or whatever kind of RPM based Linux
you would like to setup as well as do the basic configurations regarding the emulated Hardware node "Power" of the new Virtual Machine (CPU / Memory / Disk Partition) as well as choose a proper meaningful VM name (preferrably following some good meaningful crafted naming convention, that will talk a bit about what is inside the KVM VM container).

The script that automates a bit the KVM VM installation which you find below you can also download from here virt-install.sh


#!/bin/bash
virt_install_path=$(which virt-install);
vm_host='vmname01';
boot_iso='/vmprivate/rhel-8.7-x86_64-dvd.iso';
os_version='rhel8.7';
vm_cpus_count='4';
vm_ram='6144';
vm_img_location='/vmprivate/NAME-of-VM.img';
vm_machine_description='Name Production system';
ks_file_location_template='/root/ks.cfg.templ';
ks_file_location='/root/ks.cfg';
ks_vm_read_loc=$(echo $ks_file_location |sed -e 's#root/##g');
vm_main_ip='192.168.23.52';
vm_netmask='255.255.255.192';
vm_gateway='192.168.23.33';
vm_nameserver='172.30.50.2';
#–ip=192.168.233.52 –netmask=255.255.255.192 –gateway=192.168.233.33 –nameserver=172.20.88.2

echo "Checking if defined $vm_host image $vm_img_location is not already present";
if [ ! -f $vm_img_location ]; then
echo
else
echo 'Exiting $vm_img_location is present';
echo "To destroy exiting VM image $vm_img_location run manually cmds:";
echo 'virsh list; virsh destroy $vm_host; virsh undefine $vm_host –remove-all-storage';
exit 1;
fi

alias cp='cp -f';
/usr/bin/cp -rpf $ks_file_location_template $ks_file_location;

echo "Setting  VM Main IP: $vm_main_ip";
echo "Setting  VM netmask: $vm_netmask";
echo "Setting  VM Gateway: $vm_gateway";
echo "Setting  VM Nameserver $vm_nameserver";
/usr/bin/perl -pi -e "s/ip=a1.a2.a3.a4/ip=$vm_main_ip/" $ks_file_location
/usr/bin/perl -pi -e "s/netmask=b1.b2.b3.b4/netmask=$vm_netmask/" $ks_file_location
/usr/bin/perl -pi -e "s/gateway=c1.c2.c3.c4/nameserver=$vm_nameserver/" $ks_file_location
/usr/bin/perl -pi -e "s/nameserver=d1.d2.d3.d4/gateway=$vm_gateway/" $ks_file_location
/usr/bin/perl -pi -e "s/vm-hostname/$vm_host/" $ks_file_location

echo "Running VM install:";
echo $virt_install_path -n $vm_host –description "$vm_machine_description" –os-type=Linux –os-variant=$os_version –ram=$vm_ram –vcpus=$vm_cpus_count –location=$boot_iso –disk path=$vm_img_location,bus=virtio,size=90 –graphics none –initrd-inject=$ks_file_location –extra-args "console=ttyS0 ks=file:$ks_vm_read_loc"

$virt_install_path -n $vm_host –description "$vm_machine_description" –os-type=Linux –os-variant=$os_version –ram=$vm_ram –vcpus=$vm_cpus_count –location=$boot_iso –disk path=$vm_img_location,bus=virtio,size=90 –graphics none –initrd-inject=$ks_file_location –extra-args "console=ttyS0 ks=file:$ks_vm_read_loc"


Modify the script to insert the required parameters of the new VM in the script header session, you will have to provide below options.


vm_host='vmname01';
boot_iso='/vmprivate/rhel-8.7-x86_64-dvd.iso';
os_version='rhel8.7';
vm_cpus_count='4';
vm_ram='6144';
vm_img_location='/vmprivate/NAME-of-VM.img';
vm_machine_description='Name Production system';
ks_file_location_template='/root/ks.cfg.templ';
ks_file_location='/root/ks.cfg';
ks_vm_read_loc=$(echo $ks_file_location |sed -e 's#root/##g');
vm_main_ip='192.168.23.52';
vm_netmask='255.255.255.192';
vm_gateway='192.168.23.33';
vm_nameserver='172.30.50.2';

The automatic Build virtual machine script is tested and works with Redhat Enterprise Linux and of course is pretty primitive as there is so much available online that would do similar, but still I like it because it works for me 🙂

You will need also the ks.cfg.templ file which has the basic kickstarter configuration that will bring up the Virtual machines according to predefined configurations.
Here is the ks.cfg.templ and ks.cfg files as well, you will have to place them under /root/ or some other directory.
Of course this script is just a basic one, it can be easily updated to accept its variable options as arguments if you need to bring up a multitude of virtual machines relatively quickly with few minor modifications. 

Hope the script is helpful to some sysadmin out there. If so don't forget to donate me for a beer in my Patreon account found in the widgets section 🙂

How to RPM update Hypervisors and Virtual Machines running Haproxy High Availability cluster on KVM, Virtuozzo without a downtime on RHEL / CentOS Linux

Friday, May 20th, 2022

virtuozzo-kvm-virtual-machines-and-hypervisor-update-manual-haproxy-logo


Here is the scenario, lets say you have on your daily task list two Hypervisor (HV) hosts running CentOS or RHEL Linux with KVM or Virutozzo technology and inside the HV hosts you have configured at least 2 pairs of virtual machines one residing on HV Host 1 and one residing on HV Host 2 and you need to constantly keep the hosts to the latest distribution major release security patchset.

The Virtual Machines has been running another set of Redhat Linux or CentOS configured to work in a High Availability Cluster running Haproxy / Apache / Postfix or any other kind of HA solution on top of corosync / keepalived or whatever application cluster scripts Free or Open Source technology that supports a switch between clustered Application nodes.

The logical question comes how to keep up the CentOS / RHEL Machines uptodate without interfering with the operations of the Applications running on the cluster?

Assuming that the 2 or more machines are configured to run in Active / Passive App member mode, e.g. one machine is Active at any time and the other is always Passive, a switch is possible between the Active and Passive node.

HAProxy--Load-Balancer-cluster-2-nodes-your-Servers

In this article I'll give a simple step by step tested example on how you I succeeded to update (for security reasons) up to the latest available Distribution major release patchset on one by one first the Clustered App on Virtual Machines 1 and VM2 on Linux Hypervisor Host 1. Then the App cluster VM 1 / VM 2 on Hypervisor Host 2.
And finally update the Hypervisor1 (after moving the Active resources from it to Hypervisor2) and updating the Hypervisor2 after moving the App running resources back on HV1.
I know the procedure is a bit monotonic but it tries to go through everything step by step to try to mitigate any possible problems. In case of failure of some rpm dependencies during yum / dnf tool updates you can always revert to backups so in anyways don't forget to have a fully functional backup of each of the HV hosts and the VMs somewhere on a separate machine before proceeding further, any possible failures due to following my aritcle literally is your responsibility 🙂


0. Check situation before the update on HVs / get VM IDs etc.

Check the virsion of each of the machines to be updated both Hypervisor and Hosted VMs, on each machine run:
 

# cat /etc/redhat-release
CentOS Linux release 7.9.2009 (Core)


The machine setup I'll be dealing with is as follows:
 

hypervisor-host1 -> hypervisor-host1.fqdn.com 
•    virt-mach-centos1
•    virt-machine-zabbix-proxy-centos (zabbix proxy)

hypervisor-host2 -> hypervisor-host2.fqdn.com
•    virt-mach-centos2
•    virt-machine-zabbix2-proxy-centos (zabbix proxy)

To check what is yours check out with virsh cmd –if on KVM or with prlctl if using Virutozzo, you should get something like:

[root@hypervisor-host2 ~]# virsh list
 Id Name State
—————————————————-
 1 vm-host1 running
 2 virt-mach-centos2 running

 # virsh list –all

[root@hypervisor-host1 ~]# virsh list
 Id Name State
—————————————————-
 1 vm-host2 running
 3 virt-mach-centos1 running

[root@hypervisor-host1 ~]# prlctl list
UUID                                    STATUS       IP_ADDR         T  NAME
{dc37c201-08c9-589d-aa20-9386d63ce3f3}  running      –               VM virt-mach-centos1
{76e8a5f8-caa8-5442-830e-aa4bfe8d42d9}  running      –               VM vm-host2
[root@hypervisor-host1 ~]#

If you have stopped VMs with Virtuozzo to list the stopped ones as well.
 

# prlctl list -a

[root@hypervisor-host2 74a7bbe8-9245-5385-ac0d-d10299100789]# vzlist -a
                                CTID      NPROC STATUS    IP_ADDR         HOSTNAME
[root@hypervisor-host2 74a7bbe8-9245-5385-ac0d-d10299100789]# prlctl list
UUID                                    STATUS       IP_ADDR         T  NAME
{92075803-a4ce-5ec0-a3d8-9ee83d85fc76}  running      –               VM virt-mach-centos2
{74a7bbe8-9245-5385-ac0d-d10299100789}  running      –               VM vm-host1

# prlctl list -a


If due to Virtuozzo version above command does not return you can manually check in the VM located folder, VM ID etc.
 

[root@hypervisor-host2 vmprivate]# ls
74a7bbe8-9245-4385-ac0d-d10299100789  92075803-a4ce-4ec0-a3d8-9ee83d85fc76
[root@hypervisor-host2 vmprivate]# pwd
/vz/vmprivate
[root@hypervisor-host2 vmprivate]#


[root@hypervisor-host1 ~]# ls -al /vz/vmprivate/
total 20
drwxr-x—. 5 root root 4096 Feb 14  2019 .
drwxr-xr-x. 7 root root 4096 Feb 13  2019 ..
drwxr-x–x. 4 root root 4096 Feb 18  2019 1c863dfc-1deb-493c-820f-3005a0457627
drwxr-x–x. 4 root root 4096 Feb 14  2019 76e8a5f8-caa8-4442-830e-aa4bfe8d42d9
drwxr-x–x. 4 root root 4096 Feb 14  2019 dc37c201-08c9-489d-aa20-9386d63ce3f3
[root@hypervisor-host1 ~]#


Before doing anything with the VMs, also don't forget to check the Hypervisor hosts has enough space, otherwise you'll get in big troubles !
 

[root@hypervisor-host2 vmprivate]# df -h
Filesystem                       Size  Used Avail Use% Mounted on
/dev/mapper/centos_hypervisor-host2-root   20G  1.8G   17G  10% /
devtmpfs                          20G     0   20G   0% /dev
tmpfs                             20G     0   20G   0% /dev/shm
tmpfs                             20G  2.0G   18G  11% /run
tmpfs                             20G     0   20G   0% /sys/fs/cgroup
/dev/sda1                        992M  159M  766M  18% /boot
/dev/mapper/centos_hypervisor-host2-home  9.8G   37M  9.2G   1% /home
/dev/mapper/centos_hypervisor-host2-var   9.8G  355M  8.9G   4% /var
/dev/mapper/centos_hypervisor-host2-vz    755G   25G  692G   4% /vz


[root@hypervisor-host1 ~]# df -h
Filesystem               Size  Used Avail Use% Mounted on
/dev/mapper/centos-root   50G  1.8G   45G   4% /
devtmpfs                  20G     0   20G   0% /dev
tmpfs                     20G     0   20G   0% /dev/shm
tmpfs                     20G  2.1G   18G  11% /run
tmpfs                     20G     0   20G   0% /sys/fs/cgroup
/dev/sda2                992M  153M  772M  17% /boot
/dev/mapper/centos-home  9.8G   37M  9.2G   1% /home
/dev/mapper/centos-var   9.8G  406M  8.9G   5% /var
/dev/mapper/centos-vz    689G   12G  643G   2% /vz

Another thing to do before proceeding with update is to check and tune if needed the amount of CentOS repositories used, before doing anything with yum.
 

[root@hypervisor-host2 yum.repos.d]# ls -al
total 68
drwxr-xr-x.   2 root root  4096 Oct  6 13:13 .
drwxr-xr-x. 110 root root 12288 Oct  7 11:13 ..
-rw-r–r–.   1 root root  4382 Mar 14  2019 CentOS7.repo
-rw-r–r–.   1 root root  1664 Sep  5  2019 CentOS-Base.repo
-rw-r–r–.   1 root root  1309 Sep  5  2019 CentOS-CR.repo
-rw-r–r–.   1 root root   649 Sep  5  2019 CentOS-Debuginfo.repo
-rw-r–r–.   1 root root   314 Sep  5  2019 CentOS-fasttrack.repo
-rw-r–r–.   1 root root   630 Sep  5  2019 CentOS-Media.repo
-rw-r–r–.   1 root root  1331 Sep  5  2019 CentOS-Sources.repo
-rw-r–r–.   1 root root  6639 Sep  5  2019 CentOS-Vault.repo
-rw-r–r–.   1 root root  1303 Mar 14  2019 factory.repo
-rw-r–r–.   1 root root   666 Sep  8 10:13 openvz.repo
[root@hypervisor-host2 yum.repos.d]#


[root@hypervisor-host1 yum.repos.d]# ls -al
total 68
drwxr-xr-x.   2 root root  4096 Oct  6 13:13 .
drwxr-xr-x. 112 root root 12288 Oct  7 11:09 ..
-rw-r–r–.   1 root root  1664 Sep  5  2019 CentOS-Base.repo
-rw-r–r–.   1 root root  1309 Sep  5  2019 CentOS-CR.repo
-rw-r–r–.   1 root root   649 Sep  5  2019 CentOS-Debuginfo.repo
-rw-r–r–.   1 root root   314 Sep  5  2019 CentOS-fasttrack.repo
-rw-r–r–.   1 root root   630 Sep  5  2019 CentOS-Media.repo
-rw-r–r–.   1 root root  1331 Sep  5  2019 CentOS-Sources.repo
-rw-r–r–.   1 root root  6639 Sep  5  2019 CentOS-Vault.repo
-rw-r–r–.   1 root root  1303 Mar 14  2019 factory.repo
-rw-r–r–.   1 root root   300 Mar 14  2019 obsoleted_tmpls.repo
-rw-r–r–.   1 root root   666 Sep  8 10:13 openvz.repo


1. Dump VM definition XMs (to have it in case if it gets wiped during update)

There is always a possibility that something will fail during the update and you might be unable to restore back to the old version of the Virtual Machine due to some config misconfigurations or whatever thus a very good idea, before proceeding to modify the working VMs is to use KVM's virsh and dump the exact set of XML configuration that makes the VM roll properly.

To do so:
Check a little bit up in the article how we have listed the IDs that are part of the directory containing the VM.
 

[root@hypervisor-host1 ]# virsh dumpxml (Id of VM virt-mach-centos1 ) > /root/virt-mach-centos1_config_bak.xml
[root@hypervisor-host2 ]# virsh dumpxml (Id of VM virt-mach-centos2) > /root/virt-mach-centos2_config_bak.xml


2. Set on standby virt-mach-centos1 (virt-mach-centos1)

As I'm upgrading two machines that are configured to run an haproxy corosync cluster, before proceeding to update the active host, we have to switch off
the proxied traffic from node1 to node2, – e.g. standby the active node, so the cluster can move up the traffic to other available node.
 

[root@virt-mach-centos1 ~]# pcs cluster standby virt-mach-centos1


3. Stop VM virt-mach-centos1 & backup on Hypervisor host (hypervisor-host1) for VM1

Another prevention step to make sure you don't get into damaged VM or broken haproxy cluster after the upgrade is to of course backup 


[root@hypervisor-host1 ]# prlctl backup virt-mach-centos1

or
 

[root@hypervisor-host1 ]# prlctl stop virt-mach-centos1
[root@hypervisor-host1 ]# cp -rpf /vz/vmprivate/dc37c201-08c9-489d-aa20-9386d63ce3f3 /vz/vmprivate/dc37c201-08c9-489d-aa20-9386d63ce3f3-bak
[root@hypervisor-host1 ]# tar -czvf virt-mach-centos1_vm_virt-mach-centos1.tar.gz /vz/vmprivate/dc37c201-08c9-489d-aa20-9386d63ce3f3

[root@hypervisor-host1 ]# prlctl start virt-mach-centos1


4. Remove package version locks on all hosts

If you're using package locking to prevent some other colleague to not accidently upgrade the machine (if multiple sysadmins are managing the host), you might use the RPM package locking meachanism, if that is used check RPM packs that are locked and release the locking.

+ List actual list of locked packages

[root@hypervisor-host1 ]# yum versionlock list  

…..
0:libtalloc-2.1.16-1.el7.*
0:libedit-3.0-12.20121213cvs.el7.*
0:p11-kit-trust-0.23.5-3.el7.*
1:quota-nls-4.01-19.el7.*
0:perl-Exporter-5.68-3.el7.*
0:sudo-1.8.23-9.el7.*
0:libxslt-1.1.28-5.el7.*
versionlock list done
                          

+ Clear the locking            

# yum versionlock clear                               


+ List actual list / == clear all entries
 

[root@virt-mach-centos2 ]# yum versionlock list; yum versionlock clear
[root@virt-mach-centos1 ]# yum versionlock list; yum versionlock clear
[root@hypervisor-host1 ~]# yum versionlock list; yum versionlock clear
[root@hypervisor-host2 ~]# yum versionlock list; yum versionlock clear


5. Do yum update virt-mach-centos1


For some clarity if something goes wrong, it is really a good idea to make a dump of the basic packages installed before the RPM package update is initiated,
The exact versoin of RHEL or CentOS as well as the list of locked packages, if locking is used.

Enter virt-mach-centos1 (ssh virt-mach-centos1) and run following cmds:
 

# cat /etc/redhat-release  > /root/logs/redhat-release-$(hostname)-$(date '+%Y-%m-%d_%H-%M-%S').out
# cat /etc/grub.d/30_os-prober > /root/logs/grub2-efi-$(hostname)-$(date '+%Y-%m-%d_%H-%M-%S').out


+ Only if needed!!
 

# yum versionlock clear
# yum versionlock list


Clear any previous RPM packages – careful with that as you might want to keep the old RPMs, if unsure comment out below line
 

# yum clean all |tee /root/logs/yumcleanall-$(hostname)-$(date '+%Y-%m-%d_%H-%M-%S').out


Proceed with the update and monitor closely the output of commands and log out everything inside files using a small script that you should place under /root/status the script is given at the end of the aritcle.:
 

yum check-update |tee /root/logs/yumcheckupdate-$(hostname)-$(date '+%Y-%m-%d_%H-%M-%S').out
yum check-update | wc -l
yum update |tee /root/logs/yumupdate-$(hostname)-$(date '+%Y-%m-%d_%H-%M-%S').out
sh /root/status |tee /root/logs/status-before-$(hostname)-$(date '+%Y-%m-%d_%H-%M-%S').out


6. Check if everything is running fine after upgrade

Reboot VM
 

# shutdown -r now


7. Stop VM virt-mach-centos2 & backup  on Hypervisor host (hypervisor-host2)

Same backup step as prior 

# prlctl backup virt-mach-centos2


or
 

# prlctl stop virt-mach-centos2
# cp -rpf /vz/vmprivate/92075803-a4ce-4ec0-a3d8-9ee83d85fc76 /vz/vmprivate/92075803-a4ce-4ec0-a3d8-9ee83d85fc76-bak
## tar -czvf virt-mach-centos2_vm_virt-mach-centos2.tar.gz /vz/vmprivate/92075803-a4ce-4ec0-a3d8-9ee83d85fc76

# prctl start virt-mach-centos2


8. Do yum update on virt-mach-centos2

Log system state, before the update
 

# cat /etc/redhat-release  > /root/logs/redhat-release-vorher-$(hostname)-$(date '+%Y-%m-%d_%H-%M-%S').out
# cat /etc/grub.d/30_os-prober > /root/logs/grub2-efi-vorher-$(hostname)-$(date '+%Y-%m-%d_%H-%M-%S').out
# yum versionlock clear == if needed!!
# yum versionlock list


Clean old install update / packages if required
 

# yum clean all |tee /root/logs/yumcleanall-$(hostname)-$(date '+%Y-%m-%d_%H-%M-%S').out


Initiate the update

# yum check-update |tee /root/logs/yumcheckupdate-$(hostname)-$(date '+%Y-%m-%d_%H-%M-%S').out 2>&1
# yum check-update | wc -l 
# yum update |tee /root/logs/yumupdate-$(hostname)-$(date '+%Y-%m-%d_%H-%M-%S').out 2>&1
# sh /root/status |tee /root/logs/status-before-$(hostname)-$(date '+%Y-%m-%d_%H-%M-%S').out


9. Check if everything is running fine after upgrade
 

Reboot VM
 

# shutdown -r now


10. Stop VM vm-host2 & backup
 

# prlctl backup vm-host2


or

# prlctl stop vm-host2

Or copy the actual directory containig the Virtozzo VM (use the correct ID)
 

# cp -rpf /vz/vmprivate/76e8a5f8-caa8-5442-830e-aa4bfe8d42d9 /vz/vmprivate/76e8a5f8-caa8-5442-830e-aa4bfe8d42d9-bak
## tar -czvf vm-host2.tar.gz /vz/vmprivate/76e8a5f8-caa8-4442-830e-aa5bfe8d42d9

# prctl start vm-host2


11. Do yum update vm-host2
 

# cat /etc/redhat-release  > /root/logs/redhat-release-vorher-$(hostname)-$(date '+%Y-%m-%d_%H-%M-%S').out
# cat /etc/grub.d/30_os-prober > /root/logs/grub2-efi-vorher-$(hostname)-$(date '+%Y-%m-%d_%H-%M-%S').out


Clear only if needed

# yum versionlock clear
# yum versionlock list
# yum clean all |tee /root/logs/yumcleanall-$(hostname)-$(date '+%Y-%m-%d_%H-%M-%S').out


Do the rpm upgrade

# yum check-update |tee /root/logs/yumcheckupdate-$(hostname)-$(date '+%Y-%m-%d_%H-%M-%S').out
# yum check-update | wc -l
# yum update |tee /root/logs/yumupdate-$(hostname)-$(date '+%Y-%m-%d_%H-%M-%S').out
# sh /root/status |tee /root/logs/status-before-$(hostname)-$(date '+%Y-%m-%d_%H-%M-%S').out


12. Check if everything is running fine after upgrade
 

Reboot VM
 

# shutdown -r now


13. Do yum update hypervisor-host2


# cat /etc/redhat-release  > /root/logs/redhat-release-vorher-$(hostname)-$(date '+%Y-%m-%d_%H-%M-%S').out
# cat /etc/grub.d/30_os-prober > /root/logs/grub2-efi-vorher-$(hostname)-$(date '+%Y-%m-%d_%H-%M-%S').out

Clear lock   if needed

# yum versionlock clear
# yum versionlock list
# yum clean all |tee /root/logs/yumcleanall-$(hostname)-$(date '+%Y-%m-%d_%H-%M-%S').out


Update rpms
 

# yum check-update |tee /root/logs/yumcheckupdate-$(hostname)-$(date '+%Y-%m-%d_%H-%M-%S').out 2>&1
# yum check-update | wc -l
# yum update |tee /root/logs/yumupdate-$(hostname)-$(date '+%Y-%m-%d_%H-%M-%S').out 2>&1
# sh /root/status |tee /root/logs/status-before-$(hostname)-$(date '+%Y-%m-%d_%H-%M-%S').out


14. Stop VM vm-host1 & backup


Some as ealier
 

# prlctl backup vm-host1

or
 

# prlctl stop vm-host1

# cp -rpf /vz/vmprivate/74a7bbe8-9245-4385-ac0d-d10299100789 /vz/vmprivate/74a7bbe8-9245-4385-ac0d-d10299100789-bak
# tar -czvf vm-host1.tar.gz /vz/vmprivate/74a7bbe8-9245-4385-ac0d-d10299100789

# prctl start vm-host1


15. Do yum update vm-host2
 

# cat /etc/redhat-release  > /root/logs/redhat-release-vorher-$(hostname)-$(date '+%Y-%m-%d_%H-%M-%S').out
# cat /etc/grub.d/30_os-prober > /root/logs/grub2-efi-vorher-$(hostname)-$(date '+%Y-%m-%d_%H-%M-%S').out
# yum versionlock clear == if needed!!
# yum versionlock list
# yum clean all |tee /root/logs/yumcleanall-$(hostname)-$(date '+%Y-%m-%d_%H-%M-%S').out
# yum check-update |tee /root/logs/yumcheckupdate-$(hostname)-$(date '+%Y-%m-%d_%H-%M-%S').out
# yum check-update | wc -l
# yum update |tee /root/logs/yumupdate-$(hostname)-$(date '+%Y-%m-%d_%H-%M-%S').out
# sh /root/status |tee /root/logs/status-before-$(hostname)-$(date '+%Y-%m-%d_%H-%M-%S').out


16. Check if everything is running fine after upgrade

+ Reboot VM

# shutdown -r now


17. Do yum update hypervisor-host1

Same procedure for HV host 1 

# cat /etc/redhat-release  > /root/logs/redhat-release-vorher-$(hostname)-$(date '+%Y-%m-%d_%H-%M-%S').out
# cat /etc/grub.d/30_os-prober > /root/logs/grub2-efi-vorher-$(hostname)-$(date '+%Y-%m-%d_%H-%M-%S').out

Clear lock
 

# yum versionlock clear
# yum versionlock list
# yum clean all |tee /root/logs/yumcleanall-$(hostname)-$(date '+%Y-%m-%d_%H-%M-%S').out

# yum check-update |tee /root/logs/yumcheckupdate-$(hostname)-$(date '+%Y-%m-%d_%H-%M-%S').out
# yum check-update | wc -l
# yum update |tee /root/logs/yumupdate-$(hostname)-$(date '+%Y-%m-%d_%H-%M-%S').out
# sh /root/status |tee /root/logs/status-before-$(hostname)-$(date '+%Y-%m-%d_%H-%M-%S').out


18. Check if everything is running fine after upgrade

Reboot VM
 

# shutdown -r now


Check hypervisor-host1 all VMs run as expected 


19. Check if everything is running fine after upgrade

Reboot VM
 

# shutdown -r now


Check hypervisor-host2 all VMs run as expected afterwards


20. Check once more VMs and haproxy or any other contained services in VMs run as expected

Login to hosts and check processes and logs for errors etc.
 

21. Haproxy Unstandby virt-mach-centos1

Assuming that the virt-mach-centos1 and virt-mach-centos2 are running a Haproxy / corosync cluster you can try to standby node1 and check the result
hopefully all should be fine and traffic should come to host node2.

[root@virt-mach-centos1 ~]# pcs cluster unstandby virt-mach-centos1


Monitor logs and make sure HAproxy works fine on virt-mach-centos1


22. If necessery to redefine VMs (in case they disappear from virsh) or virtuosso is not working

[root@virt-mach-centos1 ]# virsh define /root/virt-mach-centos1_config_bak.xml
[root@virt-mach-centos1 ]# virsh define /root/virt-mach-centos2_config_bak.xml


23. Set versionlock to RPMs to prevent accident updates and check OS version release

[root@virt-mach-centos2 ]# yum versionlock \*
[root@virt-mach-centos1 ]# yum versionlock \*
[root@hypervisor-host1 ~]# yum versionlock \*
[root@hypervisor-host2 ~]# yum versionlock \*

[root@hypervisor-host2 ~]# cat /etc/redhat-release 
CentOS Linux release 7.8.2003 (Core)

Other useful hints

[root@hypervisor-host1 ~]# virsh console dc37c201-08c9-489d-aa20-9386d63ce3f3
Connected to domain virt-mach-centos1
..

! Compare packages count before the upgrade on each of the supposable identical VMs and HVs – if there is difference in package count review what kind of packages are different and try to make the machines to look as identical as possible  !

Packages to update on hypervisor-host1 Count: XXX
Packages to update on hypervisor-host2 Count: XXX
Packages to update virt-mach-centos1 Count: – 254
Packages to update virt-mach-centos2 Count: – 249

The /root/status script

+++

#!/bin/sh
echo  '=======================================================   '
echo  '= Systemctl list-unit-files –type=service | grep enabled '
echo  '=======================================================   '
systemctl list-unit-files –type=service | grep enabled

echo  '=======================================================   '
echo  '= systemctl | grep ".service" | grep "running"            '
echo  '=======================================================   '
systemctl | grep ".service" | grep "running"

echo  '=======================================================   '
echo  '= chkconfig –list                                        '
echo  '=======================================================   '
chkconfig –list

echo  '=======================================================   '
echo  '= netstat -tulpn                                          '
echo  '=======================================================   '
netstat -tulpn

echo  '=======================================================   '
echo  '= netstat -r                                              '
echo  '=======================================================   '
netstat -r


+++

That's all folks, once going through the article, after some 2 hours of efforts or so you should have an up2date machines.
Any problems faced or feedback is mostly welcome as this might help others who have the same setup.

Thanks for reading me 🙂
Install and enable Sysstats IO / DIsk / CPU / Network monitoring console suite on Redhat 8.3, Few sar useful command examples

Tuesday, September 28th, 2021

linux-sysstat-monitoring-logo


Why to monitoring CPU, Memory, Hard Disk, Network usage etc. with sysstats tools?
 

Using system monitoring tools such as Zabbix, Nagios Monit is a good approach, however sometimes due to zabbix server interruptions you might not be able to track certain aspects of system performance on time. Thus it is always a good idea to 
Gain more insights on system peroformance from command line. Of course there is cmd tools such as iostat and top, free, vnstat that provides plenty of useful info on system performance issues or bottlenecks. However from my experience to have a better historical data that is systimized and all the time accessible from console it is a great thing to have sysstat package at place. Since many years mostly on every server I administer, I've been using sysstats to monitor what is going on servers over a short time frames and I'm quite happy with it. In current company we're using Redhats and CentOS-es and I had to install sysstats on Redhat 8.3. I've earlier done it multiple times on Debian / Ubuntu Linux and while I've faced on some .deb distributions complications of making sysstat collect statistics I've come with an article on Howto fix sysstat Cannot open /var/log/sysstat/sa no such file or directory” on Debian / Ubuntu Linux
 

Sysstat contains the following tools related to collecting I/O and CPU statistics:
iostat
Displays an overview of CPU utilization, along with I/O statistics for one or more disk drives.
mpstat
Displays more in-depth CPU statistics.
Sysstat also contains tools that collect system resource utilization data and create daily reports based on that data. These tools are:
sadc
Known as the system activity data collector, sadc collects system resource utilization information and writes it to a file.
sar
Producing reports from the files created by sadc, sar reports can be generated interactively or written to a file for more intensive analysis.

My experience with CentOS 7 and Fedora to install sysstat it was pretty straight forward, I just had to install it via yum install sysstat wait for some time and use sar (System Activity Reporter) tool to report collected system activity info stats over time.
Unfortunately it seems on RedHat 8.3 as well as on CentOS 8.XX instaling sysstats does not work out of the box.

To complete a successful installation of it on RHEL 8.3, I had to:

[root@server ~]# yum install -y sysstat


To make sysstat enabled on the system and make it run, I've enabled it in sysstat

[root@server ~]# systemctl enable sysstat


Running immediately sar command, I've faced the shitty error:


Cannot open /var/log/sysstat/sa18:
No such file or directory. Please check if data collecting is enabled”


Once installed I've waited for about 5 minutes hoping, that somehow automatically sysstat would manage it but it didn't.

To solve it, I've had to create additionally file /etc/cron.d/sysstat (weirdly RPM's post install instructions does not tell it to automatically create it)

[root@server ~]# vim /etc/cron.d/sysstat

# run system activity accounting tool every 10 minutes
0 * * * * root /usr/lib64/sa/sa1 60 59 &
# generate a daily summary of process accounting at 23:53
53 23 * * * root /usr/lib64/sa/sa2 -A &


  • /usr/local/lib/sa1 is a shell script that we can use for scheduling cron which will create daily binary log file.
  • /usr/local/lib/sa2 is a shell script will change binary log file to human-readable form.


[root@server ~]# chmod 600 /etc/cron.d/sysstat

[root@server ~]# systemctl restart sysstat


In a while if sysstat is working correctly you should get produced its data history logs inside /var/log/sa

[root@server ~]# ls -al /var/log/sa 


Note that the standard sysstat history files on Debian and other modern .deb based distros such as Debian 10 (in  y.2021) is stored under /var/log/sysstat

Here is few useful uses of sysstat cmds


1. Check with sysstat machine history SWAP and RAM Memory use


To lets say check last 10 minutes SWAP memory use:

[hipo@server yum.repos.d] $ sar -W  |last -n 10
 

Linux 4.18.0-240.el8.x86_64 (server)       09/28/2021      _x86_64_        (8 CPU)

12:00:00 AM  pswpin/s pswpout/s
12:00:01 AM      0.00      0.00
12:01:01 AM      0.00      0.00
12:02:01 AM      0.00      0.00
12:03:01 AM      0.00      0.00
12:04:01 AM      0.00      0.00
12:05:01 AM      0.00      0.00
12:06:01 AM      0.00      0.00

[root@ccnrlb01 ~]# sar -r | tail -n 10
14:00:01        93008   1788832     95.06         0   1357700    725740      9.02    795168    683484        32
14:10:01        78756   1803084     95.81         0   1358780    725740      9.02    827660    652248        16
14:20:01        92844   1788996     95.07         0   1344332    725740      9.02    813912    651620        28
14:30:01        92408   1789432     95.09         0   1344612    725740      9.02    816392    649544        24
14:40:01        91740   1790100     95.12         0   1344876    725740      9.02    816948    649436        36
14:50:01        91688   1790152     95.13         0   1345144    725740      9.02    817136    649448        36
15:00:02        91544   1790296     95.14         0   1345448    725740      9.02    817472    649448        36
15:10:01        91108   1790732     95.16         0   1345724    725740      9.02    817732    649340        36
15:20:01        90844   1790996     95.17         0   1346000    725740      9.02    818016    649332        28
Average:        93473   1788367     95.03         0   1369583    725074      9.02    800965    671266        29


2. Check system load? Are my processes waiting too long to run on the CPU?

[root@server ~ ]# sar -q |head -n 10
Linux 4.18.0-240.el8.x86_64 (server)       09/28/2021      _x86_64_        (8 CPU)

12:00:00 AM   runq-sz  plist-sz   ldavg-1   ldavg-5  ldavg-15   blocked
12:00:01 AM         0       272      0.00      0.02      0.00         0
12:01:01 AM         1       271      0.00      0.02      0.00         0
12:02:01 AM         0       268      0.00      0.01      0.00         0
12:03:01 AM         0       268      0.00      0.00      0.00         0
12:04:01 AM         1       271      0.00      0.00      0.00         0
12:05:01 AM         1       271      0.00      0.00      0.00         0
12:06:01 AM         1       265      0.00      0.00      0.00         0


3. Show various CPU statistics per CPU use
 

On a multiprocessor, multi core server sometimes for scripting it is useful to fetch processor per use historic data, 
this can be attained with:


[hipo@server ~ ] $ mpstat -P ALL
Linux 4.18.0-240.el8.x86_64 (server)       09/28/2021      _x86_64_        (8 CPU)

06:08:38 PM  CPU    %usr   %nice    %sys %iowait    %irq   %soft  %steal  %guest  %gnice   %idle
06:08:38 PM  all    0.17    0.02    0.25    0.00    0.05    0.02    0.00    0.00    0.00   99.49
06:08:38 PM    0    0.22    0.02    0.28    0.00    0.06    0.03    0.00    0.00    0.00   99.39
06:08:38 PM    1    0.28    0.02    0.36    0.00    0.08    0.02    0.00    0.00    0.00   99.23
06:08:38 PM    2    0.27    0.02    0.31    0.00    0.06    0.01    0.00    0.00    0.00   99.33
06:08:38 PM    3    0.15    0.02    0.22    0.00    0.03    0.01    0.00    0.00    0.00   99.57
06:08:38 PM    4    0.13    0.02    0.20    0.01    0.03    0.01    0.00    0.00    0.00   99.60
06:08:38 PM    5    0.14    0.02    0.27    0.00    0.04    0.06    0.01    0.00    0.00   99.47
06:08:38 PM    6    0.10    0.02    0.17    0.00    0.04    0.02    0.00    0.00    0.00   99.65
06:08:38 PM    7    0.09    0.02    0.15    0.00    0.02    0.01    0.00    0.00    0.00   99.70


sar-sysstat-cpu-statistics-screenshot

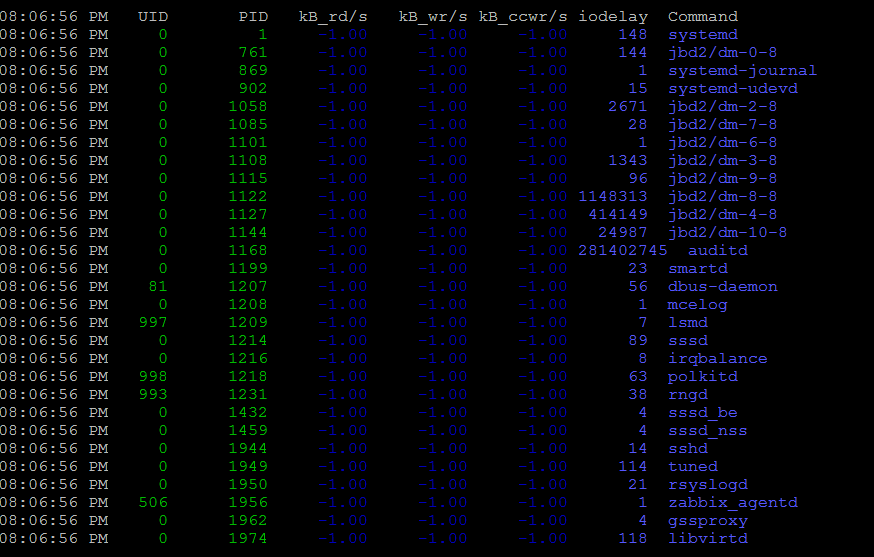
Monitor processes and threads currently being managed by the Linux kernel.

[hipo@server ~ ] $ pidstat

pidstat-various-random-process-statistics

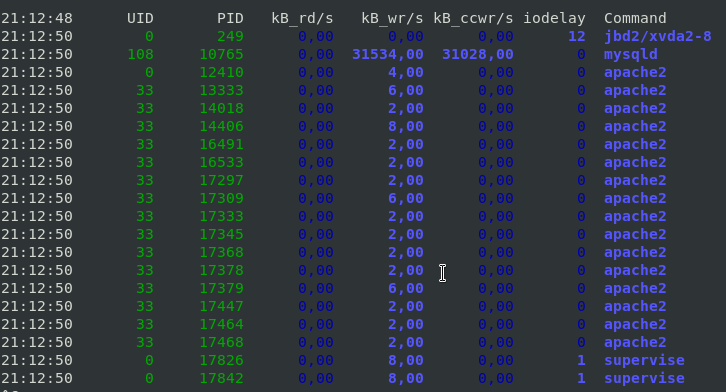
[hipo@server ~ ] $ pidstat -d 2


pidstat-show-processes-with-most-io-activities-linux-screenshot

This report tells us that there is few processes with heave I/O use Filesystem system journalling daemon jbd2, apache, mysqld and supervise, in 3rd column you see their respective PID IDs.

To show threads used inside a process (like if you press SHIFT + H) inside Linux top command:

[hipo@server ~ ] $ pidstat -t -p 10765 1 3

Linux 4.19.0-14-amd64 (server)     28.09.2021     _x86_64_    (10 CPU)

21:41:22      UID      TGID       TID    %usr %system  %guest   %wait    %CPU   CPU  Command
21:41:23      108     10765         –    1,98    0,99    0,00    0,00    2,97     1  mysqld
21:41:23      108         –     10765    0,00    0,00    0,00    0,00    0,00     1  |__mysqld
21:41:23      108         –     10768    0,00    0,00    0,00    0,00    0,00     0  |__mysqld
21:41:23      108         –     10771    0,00    0,00    0,00    0,00    0,00     5  |__mysqld
21:41:23      108         –     10784    0,00    0,00    0,00    0,00    0,00     7  |__mysqld
21:41:23      108         –     10785    0,00    0,00    0,00    0,00    0,00     6  |__mysqld
21:41:23      108         –     10786    0,00    0,00    0,00    0,00    0,00     2  |__mysqld

10765 – is the Process ID whose threads you would like to list

With pidstat, you can further monitor processes for memory leaks with:

[hipo@server ~ ] $ pidstat -r 2


4. Report paging statistics for some old period


[root@server ~ ]# sar -B -f /var/log/sa/sa27 |head -n 10
Linux 4.18.0-240.el8.x86_64 (server)       09/27/2021      _x86_64_        (8 CPU)

15:42:26     LINUX RESTART      (8 CPU)

15:55:30     LINUX RESTART      (8 CPU)

04:00:01 PM  pgpgin/s pgpgout/s   fault/s  majflt/s  pgfree/s pgscank/s pgscand/s pgsteal/s    %vmeff
04:01:01 PM      0.00     14.47    629.17      0.00    502.53      0.00      0.00      0.00      0.00
04:02:01 PM      0.00     13.07    553.75      0.00    419.98      0.00      0.00      0.00      0.00
04:03:01 PM      0.00     11.67    548.13      0.00    411.80      0.00      0.00      0.00      0.00


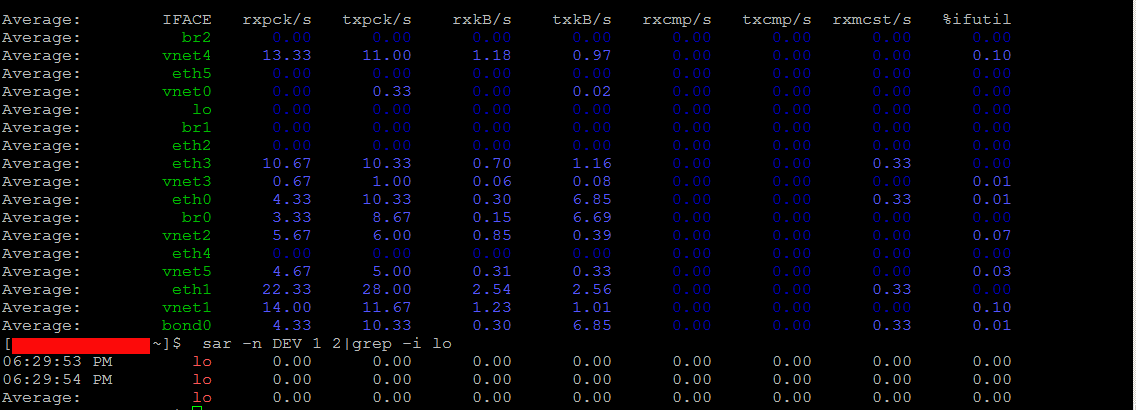
5.  Monitor Received RX and Transmitted TX network traffic perl Network interface real time
 

To print out Received and Send traffic per network interface 4 times in a raw

sar-sysstats-network-traffic-statistics-screenshot
 

[hipo@server ~ ] $ sar -n DEV 1 4


To continusly monitor all network interfaces I/O traffic

[hipo@server ~ ] $ sar -n DEV 1


To only monitor a certain network interface lets say loopback interface (127.0.0.1) received / transmitted bytes

[hipo@server yum.repos.d] $  sar -n DEV 1 2|grep -i lo
06:29:53 PM        lo      0.00      0.00      0.00      0.00      0.00      0.00      0.00      0.00
06:29:54 PM        lo      0.00      0.00      0.00      0.00      0.00      0.00      0.00      0.00
Average:           lo      0.00      0.00      0.00      0.00      0.00      0.00      0.00      0.00


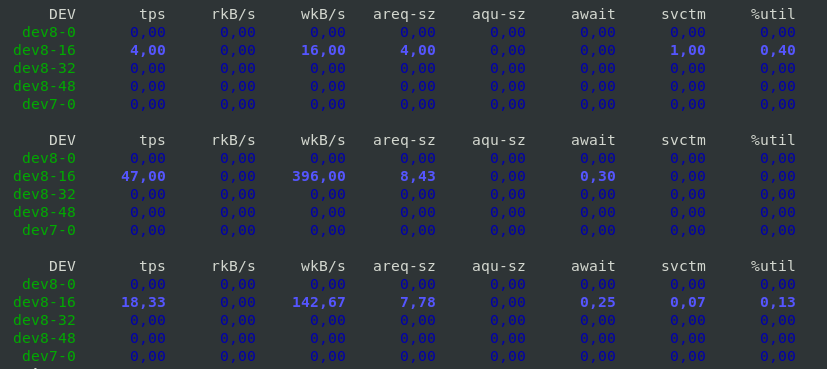
6. Monitor block devices use
 

To check block devices use 3 times in a raw
 

[hipo@server yum.repos.d] $ sar -d 1 3


sar-sysstats-blockdevice-statistics-screenshot
 

7. Output server monitoring data in CSV database structured format


For preparing a nice graphs with Excel from CSV strucuted file format, you can dump the collected data as so:

 [root@server yum.repos.d]# sadf -d /var/log/sa/sa27 — -n DEV | grep -v lo|head -n 10
server-name-fqdn;-1;2021-09-27 13:42:26 UTC;LINUX-RESTART    (8 CPU)
# hostname;interval;timestamp;IFACE;rxpck/s;txpck/s;rxkB/s;txkB/s;rxcmp/s;txcmp/s;rxmcst/s;%ifutil
server-name-fqdn;-1;2021-09-27 13:55:30 UTC;LINUX-RESTART    (8 CPU)
# hostname;interval;timestamp;IFACE;rxpck/s;txpck/s;rxkB/s;txkB/s;rxcmp/s;txcmp/s;rxmcst/s;%ifutil
server-name-fqdn;60;2021-09-27 14:01:01 UTC;eth1;19.42;16.12;1.94;1.68;0.00;0.00;0.00;0.00
server-name-fqdn;60;2021-09-27 14:01:01 UTC;eth0;7.18;9.65;0.55;0.78;0.00;0.00;0.00;0.00
server-name-fqdn;60;2021-09-27 14:01:01 UTC;eth2;5.65;5.13;0.42;0.39;0.00;0.00;0.00;0.00
server-name-fqdn;60;2021-09-27 14:02:01 UTC;eth1;18.90;15.55;1.89;1.60;0.00;0.00;0.00;0.00
server-name-fqdn;60;2021-09-27 14:02:01 UTC;eth0;7.15;9.63;0.55;0.74;0.00;0.00;0.00;0.00
server-name-fqdn;60;2021-09-27 14:02:01 UTC;eth2;5.67;5.15;0.42;0.39;0.00;0.00;0.00;0.00

To graph the output data you can use Excel / LibreOffice's Excel equivalent Calc or if you need to dump a CSV sar output and generate it on the fly from a script  use gnuplot 


What we've learned?


How to install and enable on cron sysstats on Redhat and CentOS 8 Linux ? 
How to continuously monitor CPU / Disk and Network, block devices, paging use and processes and threads used by the kernel per process ?  
As well as how to export previously collected data to CSV to import to database or for later use inrder to generate graphic presentation of data.
Cheers ! 🙂


How to yum Install Gnome GUI, Latest Guest Addition Tools, Google Chrome latest version and rdesktop / xfreerdp / remmina remote RDP VNC clients On CentOS 7 / 8

Thursday, July 29th, 2021

centos7-logo

I've just reinstalled my CentOS 7 Virtual Machine since after I tried to migrate a .vdi Virtual Box image to the new company laptop using a copy of Virtualbox VM via Microsoft OneDrive was a failure.
Thus I have rebuild all my CentOS Linux programs preinstalled on the old Virtual Machines from scratch, I use this virtual machine for a very simple tasks, so basicly most imporant tools I use is a plain SSH and VNC and Remote Desktop clients just to be able to remotely connect to remote Home based server.


1.Install GNOME Graphical Environment from command line on CentOS 7 with yum and configure it to start GUI on next OS boot


I've used a minimal CentOS installation – ISO CentOS-7-x86_64-DVD-1908.iso and this brings up the OS with a text mode only as usually CentOS is used to roll on Servers and rarely and many times admins did not want to have GUI at all, however my case is different since I do like to use Graphical Environment as I use my CentOS for all kind of testing that can be later applied to a Production machines that doesn't have a GUI, hence to install GNOME on CentOS run below cmds:
 

[root@centos ~ ]# yum group list
Loaded plugins: fastestmirror
There is no installed groups file.
Maybe run: yum groups mark convert (see man yum)
Loading mirror speeds from cached hostfile
Available Environment Groups:
 Minimal Install
 Compute Node
 Infrastructure Server
 File and Print Server
 Basic Web Server
 Virtualization Host
 Server with GUI
 GNOME Desktop
 KDE Plasma Workspaces
 Development and Creative Workstation
Available Groups:
 Compatibility Libraries
 Console Internet Tools
 Development Tools
 Graphical Administration Tools
 Legacy UNIX Compatibility
 Scientific Support
 Security Tools
 Smart Card Support
 System Administration Tools
 System Management
Done


[root@centos ~ ]# yum groupinstall "GNOME Desktop" "Graphical Administration Tools" -y


Enable GUI to be automatically start on CentOS VM boot in systemd this is configured with the "targets" instead of the well known classical runlevels (the well known /etc/inittab) is now obsolete in newer Linux distros.

[root@centos ~ ]# ln -sf /lib/systemd/system/runlevel5.target /etc/systemd/system/default.target


2. Install Guest Additions Tools on CentOS


The most basic thing to do once I've had the CentOS Linux release 7.7.1908 (Core) rolled out on the VirtualBox is of course to enable Guest Additions Tools

First I had to install of course Guest Additions Tools to allow myself to have a copy paste in clip board via the Host Machine (Windows 10) and the Guest Machine.
To do I had to:

[root@centos ~ ]# yum install kernel-headers.x86_64 -y

[root@centos ~ ]# rpm -Uvh https://dl.fedoraproject.org/pub/epel/epel-release-latest-7.noarch.rpm

[root@centos ~ ]#  yum install perl gcc dkms kernel-devel kernel-headers make bzip2

To check the required VBoxLinuxAdditions.run script kernel headers are at place:

[root@centos ~ ]# ls -l /usr/src/kernels/$(uname -r)


You should get a list of kernel header files

Then once I've done the Insert Guest Additions CD Image from the VirtualBox VM upper menu. I've had to mount and load the guest additions via the script:
 

[root@centos ~ ]# mkdir /mnt/cdrom
[root@centos ~ ]# mount /dev/cdrom /mnt/cdrom
[root@centos ~ ]# sh VBoxLinuxAdditions.run

After rebooting the Virtual Machine, I've used the full screen functionality to test and configured immediately Shared Clipboard and Drag and Drop to be both set to (Bidirectional) as well as configured a Shared folder to provide my Windows Desktop under /mnt/shared_folder (as read write) as I usually do to be able to easily copy files from the VM and to the Windows.

3. Install Google Chrome on the CentOS Virtual Machine with yum
 

Next I've installed the chrome browser that was pretty trivial it is up to fetching the required 32 or 64 bit latest chrome binary this is usually on URL:

[root@centos ~ ]# wget https://dl.google.com/linux/direct/google-chrome-stable_current_x86_64.rpm

and installing Google Chrome with superuser with command:

[root@centos ~ ]# yum install ./google-chrome-stable_current_*.rpm -y


Loaded plugins: fastestmirror, langpacks
Examining ./google-chrome-stable_current_x86_64.rpm: google-chrome-stable-92.0.4515.107-1.x86_64
Marking ./google-chrome-stable_current_x86_64.rpm to be installed
Resolving Dependencies
–> Running transaction check
—> Package google-chrome-stable.x86_64 0:92.0.4515.107-1 will be installed
–> Processing Dependency: liberation-fonts for package: google-chrome-stable-92.0.4515.107-1.x86_64
Loading mirror speeds from cached hostfile
 * base: mirror.digitalnova.at
 * epel: fedora.ipacct.com
 * extras: mirror.digitalnova.at
 * updates: mirror.digitalnova.at
–> Processing Dependency: libvulkan.so.1()(64bit) for package: google-chrome-stable-92.0.4515.107-1.x86_64
–> Running transaction check
—> Package liberation-fonts.noarch 1:1.07.2-16.el7 will be installed
–> Processing Dependency: liberation-narrow-fonts = 1:1.07.2-16.el7 for package: 1:liberation-fonts-1.07.2-16.el7.noarch
—> Package vulkan.x86_64 0:1.1.97.0-1.el7 will be installed
–> Processing Dependency: vulkan-filesystem = 1.1.97.0-1.el7 for package: vulkan-1.1.97.0-1.el7.x86_64
–> Running transaction check
—> Package liberation-narrow-fonts.noarch 1:1.07.2-16.el7 will be installed
—> Package vulkan-filesystem.noarch 0:1.1.97.0-1.el7 will be installed
–> Finished Dependency Resolution

Dependencies Resolved

================================================================================
 Package                 Arch   Version         Repository                 Size
================================================================================
Installing:
 google-chrome-stable    x86_64 92.0.4515.107-1 /google-chrome-stable_current_x86_64
                                                                          259 M
Installing for dependencies:
 liberation-fonts        noarch 1:1.07.2-16.el7 base                       13 k
 liberation-narrow-fonts noarch 1:1.07.2-16.el7 base                      202 k
 vulkan                  x86_64 1.1.97.0-1.el7  base                      3.6 M
 vulkan-filesystem       noarch 1.1.97.0-1.el7  base                      6.3 k

Transaction Summary
================================================================================
Install  1 Package (+4 Dependent packages)

Total size: 263 M
Total download size: 3.8 M
Installed size: 281 M
Is this ok [y/d/N]: y
Downloading packages:
(1/4): liberation-fonts-1.07.2-16.el7.noarch.rpm           |  13 kB   00:00     
(2/4): liberation-narrow-fonts-1.07.2-16.el7.noarch.rpm    | 202 kB   00:00     
(3/4): vulkan-filesystem-1.1.97.0-1.el7.noarch.rpm         | 6.3 kB   00:00     
(4/4): vulkan-1.1.97.0-1.el7.x86_64.rpm                    | 3.6 MB   00:00     
——————————————————————————–
Total                                              3.0 MB/s | 3.8 MB  00:01     
Running transaction check
Running transaction test
Transaction test succeeded
Running transaction
  Installing : vulkan-filesystem-1.1.97.0-1.el7.noarch                      1/5 
  Installing : vulkan-1.1.97.0-1.el7.x86_64                                 2/5 
  Installing : 1:liberation-narrow-fonts-1.07.2-16.el7.noarch               3/5 
  Installing : 1:liberation-fonts-1.07.2-16.el7.noarch                      4/5 
  Installing : google-chrome-stable-92.0.4515.107-1.x86_64                  5/5 
  Verifying  : vulkan-1.1.97.0-1.el7.x86_64                                 1/5 
  Verifying  : 1:liberation-narrow-fonts-1.07.2-16.el7.noarch               2/5 
  Verifying  : 1:liberation-fonts-1.07.2-16.el7.noarch                      3/5 
  Verifying  : google-chrome-stable-92.0.4515.107-1.x86_64                  4/5 
  Verifying  : vulkan-filesystem-1.1.97.0-1.el7.noarch                      5/5 

Installed:
  google-chrome-stable.x86_64 0:92.0.4515.107-1                                 

Dependency Installed:
  liberation-fonts.noarch 1:1.07.2-16.el7                                       
  liberation-narrow-fonts.noarch 1:1.07.2-16.el7                                
  vulkan.x86_64 0:1.1.97.0-1.el7                                                
  vulkan-filesystem.noarch 0:1.1.97.0-1.el7             


4. Install usable Windows VNC and remote desktop (RDP Client) for CentOS Linux


There is a plenty of clients to choice from if you need to have an RDP client for Linux, but perhaps the most useful ones I usually use are remmina / rdesktop and freerdp. Usually I use remmina on Debian Linux, but under the VM somehow I was not able to make remmina work in Full Screen mode while connected to remote Windows 7 VPS server, thus I've first tried xfreerdp (that comes from default CentOS repositories) and is open source alternative to rdesktop (which is non free distributed binary).
 

[root@centos ~ ]$ sudo yum -y install freerdp


The basic use is:

[hipo@centos ~ ]$ xfreerdp –toggle-fullscreen <remote-server-address>


Unfortunately I did not succeeded to make xfreerdp be able to show me remote desktop in FullScreen mode so had to use additional repository package called nux-dextop to have rdesktop at my disposal.

To install it had to run:

[root@centos ~ ]# rpm –import http://li.nux.ro/download/nux/RPM-GPG-KEY-nux.ro 
[root@centos ~ ]# rpm -Uvh http://li.nux.ro/download/nux/dextop/el7/x86_64/nux-dextop-release-0-1.el7.nux.noarch.rpm    
[root@centos ~ ]# yum install rdesktop

To connect to the remote RDP host in Fullscreen with rdesktop :
 

rdesktop -f <remote-server-address>

windows-7-remote-desktop-screenshot-connected-with-rdesktop

As telnet is not installed by default and it is so useful to check ports

5. Install GNU Image Manipulation Program for better screnshotting and Graphic edits


I usually do install GIMP (GNU Image Manipulation Program) since this is my favourite tool to make screenshot on Linux as well as do some minor graphic edits whenever necessery. I warmly recommend gimp to anyone. If you don't have basic GIMP tool and you plan to be daily working a lot with Linux sooner or later some skills with the program will be of a major use even for the most advanced sysadmin :)_

root@centos ~ ]# yum install -y gimp


6. Install useful administration tools for daily sysadmin work – telnet, nmap, iftop, htop, iotop, iptraf-ng, tcpdump


Having basic analys tools and remote communication port testing, DNS, resolving and connection, cpu, mem statistics I find mostly useful. 

[root@centos .ssh]# yum install telnet nmap iftop htop vnstat sysstat iptraf-ng bind-utils -y


7. Set Open Explorer and SHOW Desktop key binding shortcuts for GNOME (to make daily work easier)


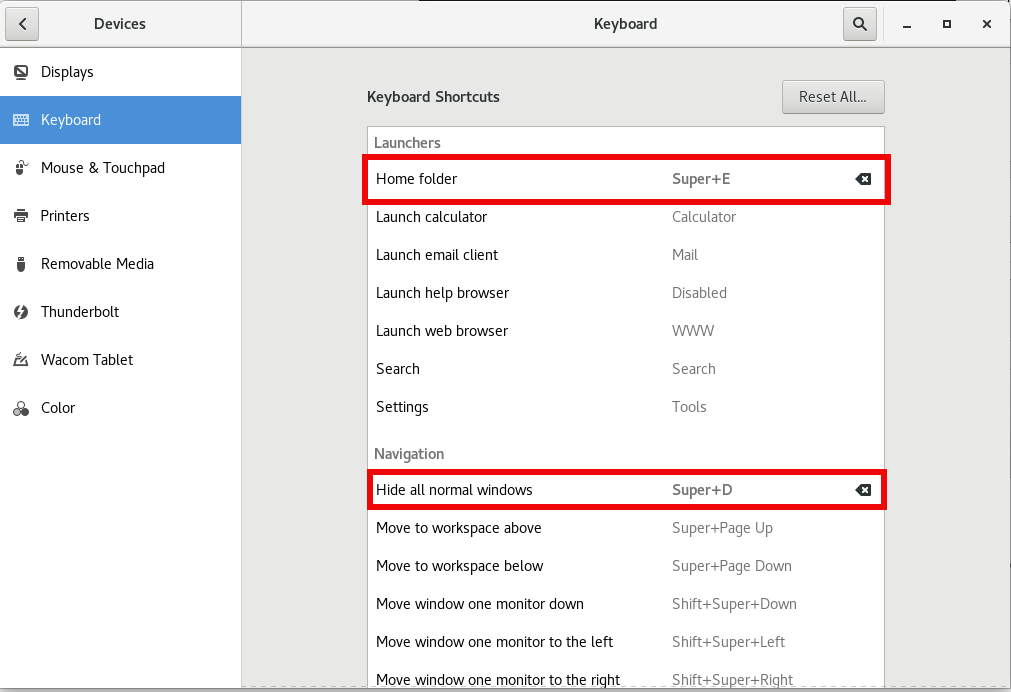
Another useful I do use in my newly installed Virtual Machines is the key combination of Windows (button key) + E – to easily open the GNOME equivalent of Windows Explorer (Nautilus) and Windows (key) + D to hide the active selected Window and Show Desktop. This is configured pretty easy in GNOME through:
 

gnome-control-center

Keyboard (Section)

Perhaps there is other stuff I need to add on the freshly installed Operating System if I remember something else interesting

configure-home-folder-and-hide-all-normal-windows-gnome-key-binding-howto-screenshot


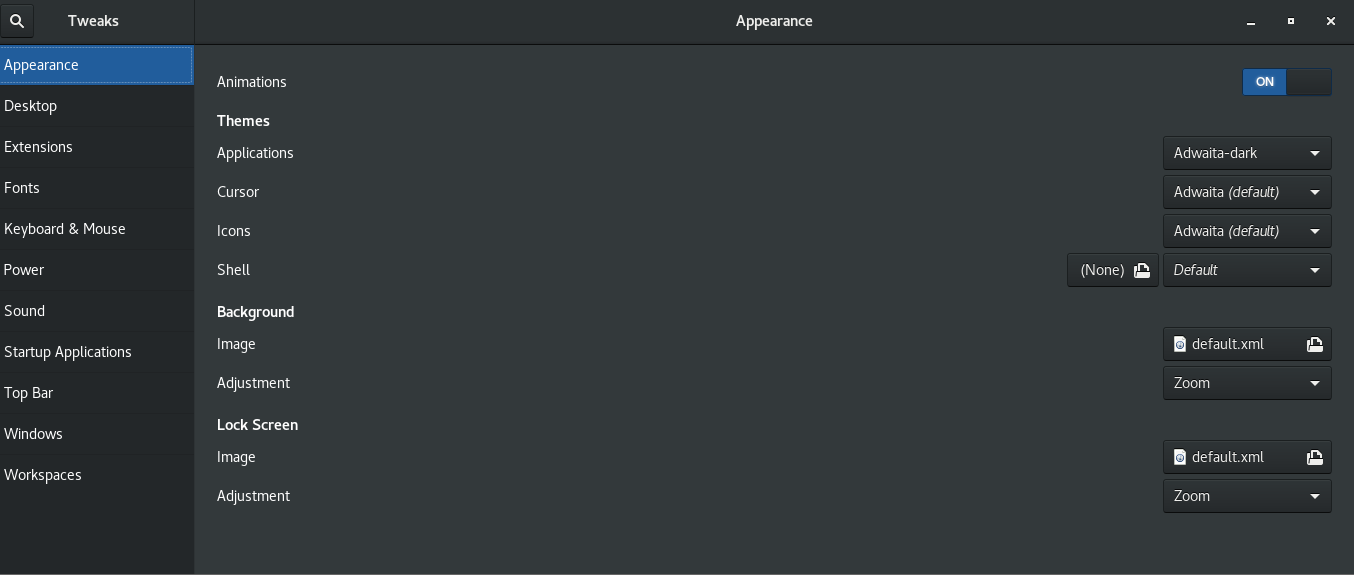
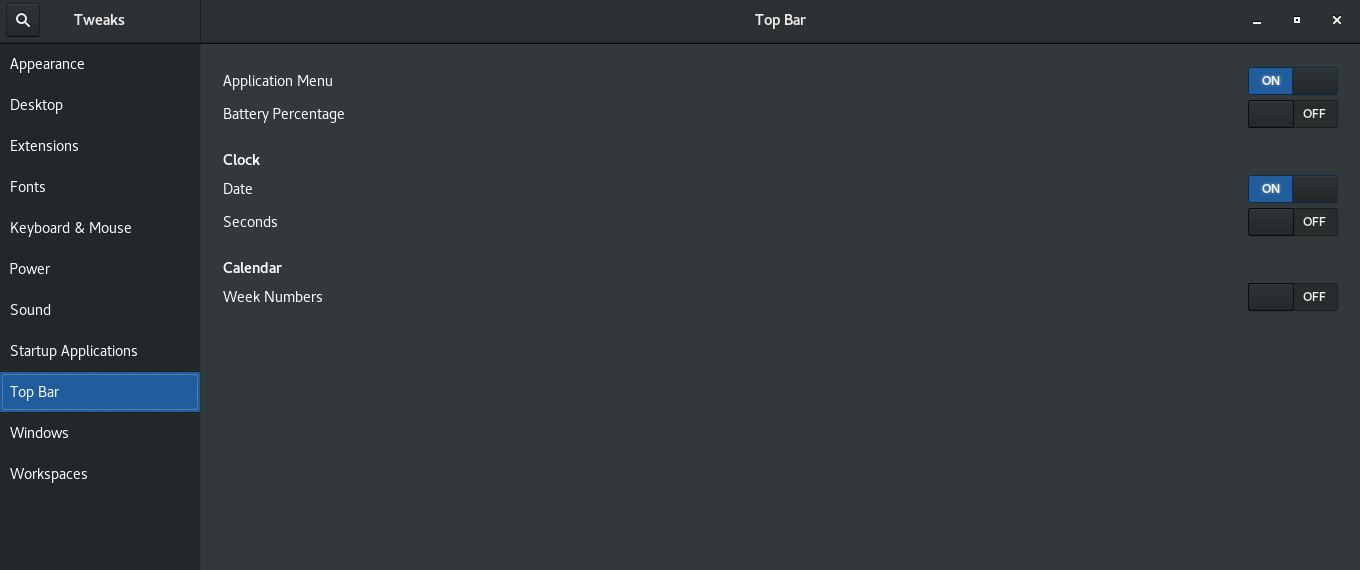
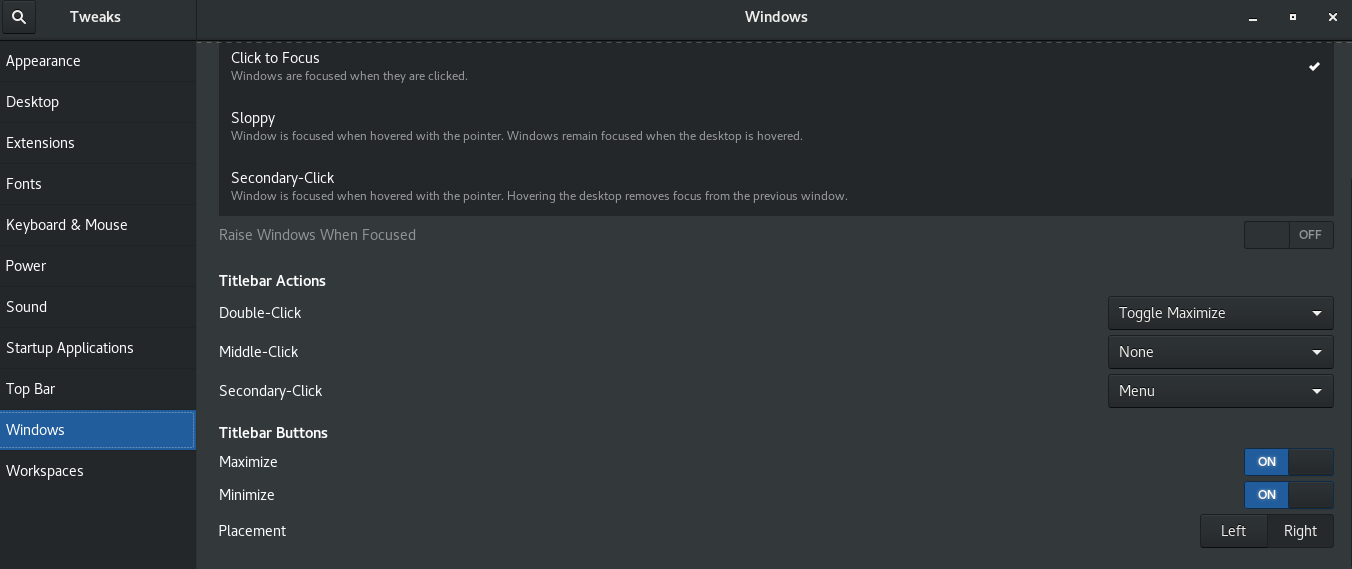
8. Install gnome-tweaks to tweak a bit the desktop icon positionsing and additional gnome-shell extras

[root@centos hipo]# yum install -y gnome-shell-extension-workspace-indicator.noarch gnome-shell-extension-workspace-indicator.noarch gnome-shell-extension-suspend-button.noarch gnome-shell-extension-refresh-wifi.noarch gnome-shell-extension-updates-dialog.noarch gnome-shell-extension-windowoverlay-icons.noarch gnome-shell-extension-places-menu.noarch gnome-shell-extension-drive-menu.noarch gnome-shell-extension-apps-menu.noarch gnome-shell-extension-auto-move-windows.noarch gnome-tweaks gnome-shell-extension-systemMonitor.noarch gnome-shell-extension-openweather.noarch gnome-shell-extension-user-theme.noarch gnome-shell-extension-topicons-plus.noarch


Next step is to use gnome-tweaks to set multiple custom preference stuff you like on the gnome 3.28 GUI 


gnome-tweak-tool1

gnome-tweak-tool2

gnome-tweak-tool3

9. Change ( Fix) timezone to correct time on the Virtual Machine

[root@localhost ~]# timedatectl 
      Local time: Fri 2021-07-30 12:20:51 CEST
  Universal time: Fri 2021-07-30 10:20:51 UTC
        RTC time: Fri 2021-07-30 10:20:48
       Time zone: Europe/Berlin (CEST, +0200)
     NTP enabled: yes
NTP synchronized: yes
 RTC in local TZ: no
      DST active: yes
 Last DST change: DST began at
                  Sun 2021-03-28 01:59:59 CET
                  Sun 2021-03-28 03:00:00 CEST
 Next DST change: DST ends (the clock jumps one hour backwards) at
                  Sun 2021-10-31 02:59:59 CEST
                  Sun 2021-10-31 02:00:00 CET

[root@localhost ~]# ls -l /etc/localtime
lrwxrwxrwx. 1 root root 35 Jul 29 14:03 /etc/localtime -> ../usr/share/zoneinfo/Europe/Berlin


To change to correct timezone, you need to find out the long name for the timezone you want to use. The timezone naming convention usually uses “Region/City” format.

To list all available time zones, you can either list the files in the /usr/share/zoneinfo directory or use the timedatectl command.

[root@centos ~]# timedatectl list-timezones|tail -n 10
Pacific/Pohnpei
Pacific/Port_Moresby
Pacific/Rarotonga
Pacific/Saipan
Pacific/Tahiti
Pacific/Tarawa
Pacific/Tongatapu
Pacific/Wake
Pacific/Wallis
UTC


As I'm situated in Sofia Bulgaria to set the correct timezone to UTC (Universal Time Clock)  + 2 Hrs, i've checked the correct Continent/Country like so:

[root@centos ~]# timedatectl list-timezones|grep -i Sofia
Europe/Sofia

Once I've my Capital / Country time location  identified to set to it:

[root@centos ~]# timedatectl set-timezone your_time_zone


10. Configure remote connection hostname SSH aliases via ssh config ( ~/.ssh/config)


I'm having separate Virtual Machines running on my OpenXen virtualization Hypervisor server at different ports which I remember by heart under different hostnames, this saves me time to always type on command line long commands such as:


#  ssh long-hostname -p Port_number

 to make accessibility to remote machines via a simple Hostname Aliases, that forwards to remote port (that gets forwarded via a Local Network configure Netwrork Address Translation), I use the .ssh/config nice Host / Hostname / User / Port directives like below samples:

[hipo@centos .ssh]$ cat config 
Host pcfreak
User root
Port 2248
HostName 83.228.93.76

Host freak
User root
Port 2249
HostName 213.91.190.233


Host pcfrxenweb
User root
Port 2251
Hostname 83.228.93.76

Host pcfrxen
User root
Port 2250
Hostname 213.91.190.233

Now to connect to pcfrxen for example I simply type:

ssh pcfrxen

type in the password to remote VM and I'm in 🙂

The same could be achieved also with Adding Custom Hostname IP Aliases via ~/.bashrc or iteration script as I've explained earlier that fakes like custom /etc/hosts, but I usuaully prefer to use .ssh/config instead like explained above.

Note that above steps should work also on RHEL / Fedora Linux with a minor modifications, as usually this two distros share the RPM package manager. If someone tries to follow the guide and have success on any of this distros please drop a comment with feedback.

10 must know and extremely useful Linux commands that every sys admin should know

Tuesday, July 30th, 2013

10 must know extremely useful gnu linux command line tools tips and tricks
There are plenty of precious command line stuff every admin should be aware on Linux. In this article I just decided to place some I use often and are interesting to know. Below commands are nothing special and probably many of experienced sys admins already know them. However I'm pretty sure novice admins and start-up Linux enthusiasts will find it useful. I know there much more to be said on the topic. So anyone is mostly welcome to share his used cmds.
 
1. Delete all files in directory except files with certain file extension

It is good trick to delete all files in directory except certain file formats, to do so:

root@linux:~# rm !(*.c|*.py|*.txt|*.mp3)

2. Write command output to multiple files (tee)

The normal way to write to file is by using redirect (to overwrite file) ">" or (to append to file) ">>";. However when you need to write output to multiple files there is a command called tee, i.e.:

root@linux:~# ps axuwwf | tee file1 file2 file3

3. Search for text in plain text file printing number of lines after match

Whether you need to print all number of lines after match of "search_text" use:

root@linux:~# grep -A 5 -i "search_text" text_file.txt

4. Show all files where text string is matched with GREP (Search for text recursively)

Searching for text match is extremely helpful for system administration. I use  grep recursive (capability) almost on daily basis:

root@websrv:/etc/dovecot# grep -rli text *
conf.d/10-auth.conf
conf.d/10-mail.conf
dovecot.conf

-l (instructs to only print file names matching string), -r (stands for recursive search), and -i flag (instructs grep to print all matches  inogoring case-sensitivity ( look for text nomatter if with capital or small letters)

5. Finding files and running command on each file type matched

In Linux with find command it is possible to search for files and run command on each file matched.
Lets say you we want to look in current directory for all files .swp (temporary) files produced so often by VIM and wipe them out:

root@linux:~# find . -iname '*.swp*' -exec rm -f {} \;

6. Convert DOS end of file (EOF) to UNIX with sed

If it happens you not have dos2unix command installed on Linux shell and you need to translate DOS end of file (\r\n – return carriage, new line) to UNIX's (\r – return carriage)), do it with sed:

root@linux:~# sed 's/.$//' filename

7. Remove file duplicate lines with awk:

cat test.txt
test
test
test duplicate
The brown fox jump over ...
Richard Stallman rox

root@linux:~# awk '!($0 in array) { array[$0]; print }' test.txt
test
test duplicate
The brown fox jump over ...
Richard Stallman rox

To remove duplicate text from all files in directory same can be easily scripped with bash for loop:

root@linux:~# for i in *; do
awk '!($0 in array) { array[$0]; print }' $i;
done

8. Print only selected columns from text file

To print text only in 1st and 7th column in plain text file with awk:

root@linux:~# awk '{print $1,$6;}' filename.txt ...

To print only all existing users on Linux with their respective set shell type:

root@linux:~# cat /etc/passwd|sed -e 's#:# #g'|awk '{print $1,$6;}'

9. Open file with VIM text editor starting from line

I use only vim for console text processing, and I often had to edit and fix file which fail to compile on certain line number. Thus use vim to open file for writing from necessary line num. To open file and set cursor to line 35 root@linux:~# vim +35 /home/hipo/current.c

10. Run last command with "!!" bash shorcut

Lets say last command you run is uname -a:

root@websrv:/home/student# uname -a
Linux websrv 3.2.0-4-686-pae #1 SMP Debian 3.2.46-1 i686 GNU/Linux

To re-run it simply type "!!":

root@websrv:/home/student# !!
uname -a
Linux websrv 3.2.0-4-686-pae #1 SMP Debian 3.2.46-1 i686 GNU/Linux

root@websrv:/home/student#