Posts Tagged ‘compression’

Add gzip compression to optimize web server served files in Apache, Nginx and LiteSpeed

Wednesday, November 15th, 2017

Enable-Gzip-Compression-quick-howto-on-apache-nginx-litespeed

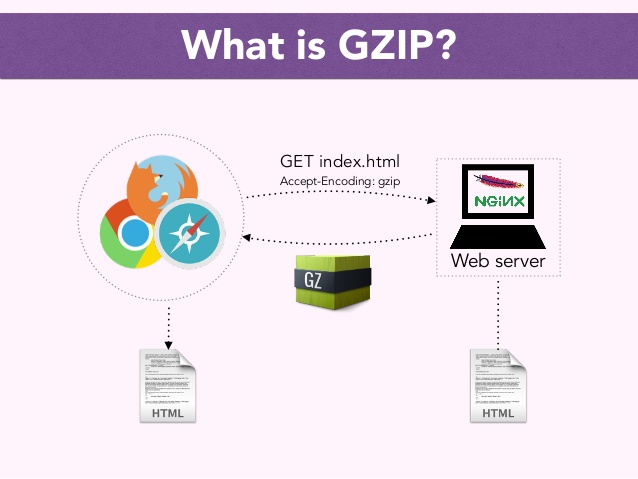
What is GZIP Compression and why you need it?

no-gzip-support-illustration

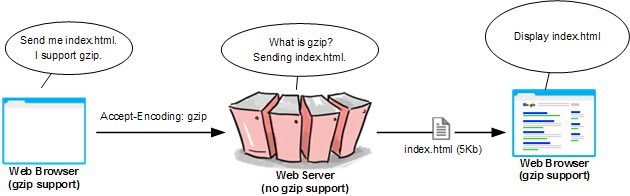
  • What is gzip? – In Linux / Unix gzip of files is used to compress files so they can take less space when they're transferred from server to server via network in order to speed up file transfer.
  • Usually gzipped files are named as filename.gz
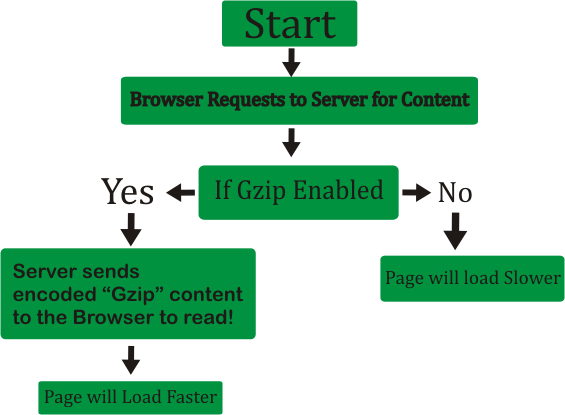
  • Why GZIp compression is important to be enabled on servers, well because that reduces the transferred (served) file by webserver to client browser
  • The effect of this is the faster file transfer of the file and increased overall web user performance


how-gzip-works-with-nginx-illustrated

Most webservers / websites online currently use gzipping of a sort, those who still did not use it has websites which are up to 40% slower than those of competitor websites

How to enable GZIP Compression on Apache Webserver

The easiest way for most people out there who run there websites on a shared hosting is to add the following Apache directives to dynamic loadable .htaccess file:
 

<ifModule mod_gzip.c>
mod_gzip_on Yes
mod_gzip_dechunk Yes
mod_gzip_item_include file .(html?|txt|css|js|php|pl)$
mod_gzip_item_include handler ^cgi-script$
mod_gzip_item_include mime ^text/.*
mod_gzip_item_include mime ^application/x-javascript.*
mod_gzip_item_exclude mime ^image/.*
mod_gzip_item_exclude rspheader ^Content-Encoding:.*gzip.*
</ifModule>


You can put a number of other useful things in .htaccess the file should already be existing in most webhostings with Cpanel or Kloxo kind of administration management interface.

Once the code is included to .htaccess you can reflush site cache.
To test whether the just added HTTP gzip compression works for the Webserver you can use The Online HTTP Compression test

If for some reason after adding this code you don't rip the benefits of gzipped content served by webserver you can try to add altenatively to .htaccess


AddOutputFilterByType DEFLATE text/plain
AddOutputFilterByType DEFLATE text/html
AddOutputFilterByType DEFLATE text/xml
AddOutputFilterByType DEFLATE text/css
AddOutputFilterByType DEFLATE application/xml
AddOutputFilterByType DEFLATE application/xhtml+xml
AddOutputFilterByType DEFLATE application/rss+xml
AddOutputFilterByType DEFLATE application/javascript
AddOutputFilterByType DEFLATE application/x-javascript


Howto Enable GZIP HTTP file compression on NGINX Webserver?

Open NGINX configuration file and add to it the following command parameters:


gzip on;
gzip_comp_level 2;
gzip_http_version 1.0;
gzip_proxied any;
gzip_min_length 1100;
gzip_buffers 16 8k;
gzip_types text/plain text/html text/css application/x-javascript text/xml application/xml application/xml+rss text/javascript;


# Disable for IE < 6 because there are some known problems
gzip_disable "MSIE [1-6].(?!.*SV1)";

# Add a vary header for downstream proxies to avoid sending cached gzipped files to IE6
gzip_vary on;

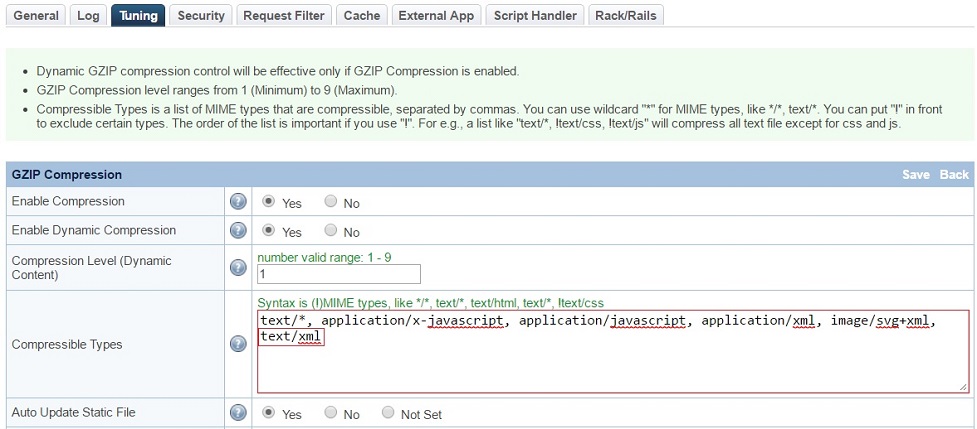
Enable HTTP file Compression on LiteSpeed webserver

In configuration under TUNING section check whether "enable compression" is enabled, if it is not choose "Edit"
and turn it on.

litespeed-how-to-enable-gzip-compressible_type-illustrated

What is the speed benefits of using HTTP gzip compression?

By using HTTP gzip compression you can save your network and clients abot 50 to 70% (e.g. transferred data) of the original file size.
This would mean less time for loading pages and fetched files and decrease in used bandwidth.

effect-of-gzip-compression-diagram-illustrated

A very handy tool to test whether HTTP Compression is enabled as well as how much is optimized for Speed your Website is Google PageSpeed Insights
as well as GTMetrix.com

How to enable output compression (gzipfile content compression) in nginx webserver

Friday, April 8th, 2011

I have recently installed and configured a Debian Linux server with nginx
. Since then I’ve been testing around different ways to optimize the nginx performance.

In my nginx quest, one of the most crucial settings which dramatically improved the end client performance was enabling the so called output compression which in Apache based servers is also known as content gzip compression .
In Apache webservers the content gzip compression is provided by a server module called mod_deflate .

The output compression nginx settings saves a lot of bandwidth and though it adds up a bit more load to the server, the plain text files like html, xml, js and css’s download time reduces drasticly as they’re streamed to the browser in gzip compressed format.
This little improvement in download speed also does impact the overall end user browser experience and therefore improves the browsing speed experience with websites.

If you have already had experience nginx you already know it is a bit fastidious and you have to be very careful with it’s configuration, however thanksfully enabling the gzip compression was actually rather easier than I thought.

Here is what I added in my nginx config to enable output compression:

## Compression
gzip on;
gzip_buffers 16 8k;
gzip_comp_level 9;
gzip_http_version 1.1;
gzip_min_length 0;
gzip_vary on;

Important note here is that need to add this code in the nginx configuration block starting with:

http {
....
## Compression
gzip on;
gzip_buffers 16 8k;
gzip_comp_level 9;
gzip_http_version 1.1;
gzip_min_length 0;
gzip_vary on;

In order to load the gzip output compression as a next step you need to restart the nginx server, either by it’s init script if you use one or by killing the old nginx server instances and starting up the nginx server binary again:
I personally use an init script, so restarting nginx for me is done via the cmd:

debian:~# /etc/init.d/nginx restart
Restarting nginx: nginx.

Now to test if the output gzip compression is enabled for nginx, you can simply use telnet

hipo@linux:~$ telnet your-nginx-webserver-domain.com 80
Escape character is '^]'.

After the Escape character is set ‘^]’ appears on your screen type in the blank space:

HEAD / HTTP/1.0

and press enter twice.
The output which should follow should look like:


HTTP/1.1 200 OK
Server: nginx
Date: Fri, 08 Apr 2011 12:04:43 GMT
Content-Type: text/html
Content-Length: 13
Last-Modified: Tue, 22 Mar 2011 15:04:26 GMT
Connection: close
Vary: Accept-Encoding
Expires: Fri, 15 Apr 2011 12:04:43 GMT
Cache-Control: max-age=604800
Accept-Ranges: bytes

The whole transaction with telnet command issued and the nginx webserver output should look like so:

hipo@linux:~$ telnet your-nginx-webserver-domain.com 80
Trying xxx.xxx.xxx.xxx...
Connected to your-nginx-webserver-domain.com
.Escape character is '^]'.
HEAD / HTTP/1.0

HTTP/1.1 200 OK
Server: nginx
Date: Fri, 08 Apr 2011 12:04:43 GMT
Content-Type: text/html
Content-Length: 13
Last-Modified: Tue, 22 Mar 2011 15:04:26 GMT
Connection: close
Vary: Accept-Encoding
Expires: Fri, 15 Apr 2011 12:04:43 GMT
Cache-Control: max-age=604800
Accept-Ranges: bytes

The important message in the returned output which confirms your nginx output compression is properly configured is:

Vary: Accept-Encoding

If this message is returned by your nginx server, this means your nginx now will distribute it’s content to it’s clients in compressed format and apart from the browsing boost a lot of server and client bandwitdth will be saved.

Recommended logrorate practices on heavy loaded (busy) Apache Linux servers

Wednesday, March 7th, 2012

Apache logrotate Debian good configuration for heavy loaded servers

If you are sys admin of Apache Webserver running on Debian Linux relying on logrorate to rorate logs, you might want to change the default way logroration is done.

Little changes in the way Apache log files are served on busy servers can have positive outcomes on the overall way the server CPU units burden. A good logrotation strategy can also prevent your server from occasional extra overheads or downtimes.

The way Debian GNU / Linux process logs is well planned for small servers, however the default logroration Apache routine doesn't fit well for servers which process millions of client requests each day.

I happen to administrate, few servers which are constantly under a heavy load and have occasionally overload troubles because of Debian's logrorate default mechanism.

To cope with the situation I have made few modifications to /etc/logrorate.d/apache2 and decided to share it here hoping, this might help you too.

1. Rotate Apache acccess.log log file daily instead of weekly

On Debian Apache's logrorate script is in /etc/logrotate.d/apache2

The default file content will be like so like so:

debian:~# cat /etc/logrotate.d/apache2
/var/log/apache2/*.log {
weekly
missingok
rotate 52
size 1G
compress
delaycompress
notifempty
create 640 root adm
sharedscripts
postrotate
if [ -f "`. /etc/apache2/envvars ; echo ${APACHE_PID_FILE:-/var/run/apache2.pid}`" ]; then
/etc/init.d/apache2 reload > /dev/null
fi
endscript
}

To change the rotation from weekly to daily change:

weekly

to

#weekly

2. Disable access.log log file gzip compression

By default apache2 logrotate script is tuned ot make compression of rotated file (exmpl: copy access.log to access.log.1 and gzip it, copy access.log to access.log.2 and gzip it etc.). On servers where logs are many gigabytes, once logrotate initiates its scheduled work it will have to compress an enormous log record of apache requests. On very busy Apache servers from my experience, just for a day the log could grow up to approximately 8 / 10 Gigabytes.
I'm sure there are more busy servers out there, which log files are growing to over 100GB for just a single day.
Gzipping a 100GB file piece takes an enormous load on the CPU, as well as often takes long time. When this logrotation gzipping occurs at a moment where the servers CPU cores are already heavy loaded from Apache serving HTTP requests, Apache server becomes inaccessible to most of the clients.
Then for end clients various oddities are experienced, for example Apache dropped connection errors, webserver returning empty pages, or simply inability to respond to the client browser.
Sometimes as a result of the overload, even secure shell connection to SSHD to the server is impossible …

To prevent your server from this roration overloads remove logrorate's default access.log gzipping by commenting:

compress

to

#comment

3. Change maximum log roration by logrorate to be up to 30

By default logrorate is configured to create and keep up to 52 rotated and gzipped access.log files, changing this to a lower number is a good practice (in my view), in cases where log files grow daily to 10 or more GBs. Doing so will save a lot of disk space and reduce the chance the hard disk gets filled in because of the multiple rorated ungzipped enormous access.log files.

To tune the default keep max rorated logs to 30, change:

rotate 52

to rotate 30

The way logrorate's apache log processing on RHEL / CentOS Linux is working better on high load servers, by default on CentOS logrorate is not configured to do log gzipping at all.

Here is the default /etc/logrorate.d/httpd script for
CentOS release 5.6 (Final)

[hipo@centos httpd]$ cat /etc/logrotate.d/httpd /var/log/httpd/*log {
missingok
notifempty
sharedscripts
postrotate
/bin/kill -HUP `cat /var/run/httpd.pid 2>/dev/null` 2> /dev/null || true
endscript
}


How to make screenshots on Slackware Linux with XFCE graphical environment

Thursday, February 23rd, 2012

1. Install the slackware binary package xfce4-screenshooter.

For the latest Slackware Linux release which as of time of writting is 13.37 xfce4-screenshooter-1.7.9-i486-3sl.txz can be download from here

Install of xfce4-screenshooter-1.7.9-i486-3sl.txz is done with slackware's usual installpkg package manager command:

bash-4.1# /sbin/installpkg xfce4-screenshooter-1.7.9-i486-3sl.txz

By the way, I haven't used slackware for a long time so in the mean time since Slackware 13, the default slackware packages format .tgz is now substituted with the newer .txz (better compressed .txz). The old .tgz was simply a tar archive with DEFLATE gzip. The newer .txz packages bundled with newer slackware releases are using the LZMA2 (XZ) chain algorithm for compression. LZMA implies higher compression than even bzip2 and this is the reason why Patrick Volkerding – the one man army man behind Slackware decided to use it.
The reason Vollerding choose using .txz is slackware network distribution will load up less the networks and will take less time for downloading extra slackware packages via the internet. The .txz also reduces slackware main CD size so more packages can be contained in the same 700MB sized slack install CD.

Anyways now back to the installation of xfce-screenshooter.

Once installed to runit use the Xfce menus:

Xfce Menu -> Accesories -> Screenshot

Next you will see the xfce-screenshooter program to pop-up:

To take a snapshot of the screen use:

Entire Screen -> Save

XFCE screenshooter Slackware Linux take a screenshot dialog

XFCE screenshooter Slackware Linux action Save
 

Few nginx.conf configuration options for Nginx to improve webserver performance

Tuesday, April 12th, 2011

Nginx server main logo with russian star
From my previous two articles How to install nginx webserver from source on Debian Linux / Install Latest Nginx on Debian and How to enable output compression (gzipfile content compression) in nginx webserver , I have explained how the Nginx server can be installed and configured easily.

As I’m continuing my nginx adventures this days, by trying to take the best out of the installed nginx server, I’ve found few configuration options, which does improve nginx’s server performance and thought it might be nice to share it here in hope that some other nginx novice might benefit out if them.
To setup and start using the options you will have of course to place the conf directives in /usr/local/nginx/conf/nginx.conf or wherever your nginx.conf is located.

The configuration options should be placed in nginx’s conf section which starts up with:

http {

Here are the configuration options useful in hastening my nginx’s performance:

1. General options nginx settings

## General Options
ignore_invalid_headers on;
keepalive_requests 2000;
recursive_error_pages on;
server_name_in_redirect off;
server_tokens off;

2. Connection timeout nginx settings

## Timeouts
client_body_timeout 60;
client_header_timeout 60;
keepalive_timeout 60 60;
send_timeout 60;
expires 24h;

3. server options for better nginx tcp/ip performance

## TCP options
tcp_nodelay on;
tcp_nopush on;

4. Increase the number of nginx worker processes

Somewhere near the beginning of nginx.conf file you should have the directive option:

worker_processes 1;

Make sure you change this option to:

worker_processes 4;

This will increase the number of spawned nginx worker processes in a way that more spawned threaded servers will await for client connections:

Being done with all the above settings, as a next step you have to restart the nginx server, in my case via the init script:

debian:~# /etc/init.d/nginx restart
Restarting nginx: nginx.

Now to check everything is fine with nginx and more specific that the worker_processes 4 options has taken place issue the command:

debian:~# ps axu |grep -i nginx|grep -v grep
root 20456 0.0 0.0 25280 816 ? Ss 10:35 0:00 nginx: master process /usr/local/nginx/sbin/nginx
nobody 20457 0.0 0.0 25844 1820 ? S 10:35 0:00 nginx: worker process
nobody 20458 0.0 0.0 25624 1376 ? S 10:35 0:00 nginx: worker process
nobody 20459 0.0 0.0 25624 1376 ? S 10:35 0:00 nginx: worker process
nobody 20460 0.0 0.0 25624 1368 ? S 10:35 0:00 nginx: worker process

Above you notice the 4 nginx processes running with user nobody, they’re the same configured worker_processes I just pointed out above.