Posts Tagged ‘Connected’

How to monitor Postfix Mail server work correct with simple one liner Zabbix user parameter script / Simple way to capture and report SMTP machine issues Zabbix template

Thursday, June 22nd, 2023

setup-zabbix-smtp-mail-monitoring-postfix-qmail-exim-with-easy-userparameter-script-and-template-zabbix-logo

In this article, I'm going to show you how to setup a very simple monitoring if a local running SMTP (Postfix / Qmail / Exim) is responding correctly on basic commands. The check would helpfully keep you in track to know whether your configured Linux server local MTA (Mail Transport Agent) is responding on requests on TCP / IP protocol Port 25, as well as a check for process existence of master (that is the main postfix) proccess, as well as the usual postfix spawned sub-processes qmgr (the postfix queue manager), tsl mgr (TLS session cache and PRNG manager), pickup (Postfix local mail pickup) – or email receiving process.


Normally a properly configured postfix installation on a Linux whatever you like distribution would look something like below:

#  ps -ef|grep -Ei 'master|postfix'|grep -v grep
root        1959       1  0 Jun21 ?        00:00:00 /usr/libexec/postfix/master -w
postfix     1961    1959  0 Jun21 ?        00:00:00 qmgr -l -t unix -u
postfix     4542    1959  0 Jun21 ?        00:00:00 tlsmgr -l -t unix -u
postfix  2910288    1959  0 11:28 ?        00:00:00 pickup -l -t unix -u

At times, during mail server restarts the amount of processes that are sub spawned by postfix, may very and if you a do a postfix restart

# systemctl restart postfix

The amout of spawned processes running as postfix username might decrease, and only qmgr might be available for second thus in the consequential shown Template the zabbix processes check to make sure the Postfix is properly operational on the Linux machine is made to check for the absolute minumum of 

1. master (postfix process) that runs with uid root
2. and one (postfix) username binded proccess 

If the amount of processes on the host is less than this minimum number and the netcat is unable to simulate a "half-mail" sent, the configured Postfix alarm Action (media and Email) will take place, and you will get immediately notified, that the monitored Mail server has issue!

The idea is to use a small one liner connection with netcat and half simulate a normal SMTP transaction just like you would normally do:


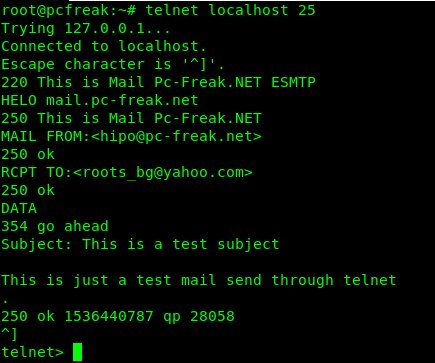
root@pcfrxen:/root # telnet localhost 25
Trying 127.0.0.1…
Connected to localhost.
Escape character is '^]'.
220 This is Mail2 Pc-Freak.NET ESMTP
HELO localhost
250 This is Mail2 Pc-Freak.NET
MAIL FROM:<hipopo@pc-freak.net>
250 ok
RCPT TO:<hip0d@remote-smtp-server.com>


and then disconnect the connection.

1. Create new zabbix userparameter_smtp_check.conf file

The simple userparameter one liner script to do the task looks like this:

# vi /etc/zabbix/zabbix_agent.d/userparameter_smtp_check.conf

UserParameter=smtp.check,(if [[ $(echo -e “HELO localhost\n MAIL FROM: root@$HOSTNAME\n RCPT TO: report-email@your-desired-mail-server.com\n  QUIT\n” | /usr/bin/nc localhost 25 -w 5 2>&1 | grep -Ei ‘220\s.*\sESMTP\sPostfix|250\s\.*|250\s\.*\sOk|250\s\.*\sOk|221\.*\s\w’|wc -l) == ‘5’ ]]; then echo "SMTP OK 1"; else echo "SMTP NOK 0"; fi)

Set the proper permissions so either file is owned by zabbix:zabbix or it is been able to be read from all system users.
 

# chmod a+r /etc/zabbix/zabbix_agent.d/userparameter_smtp_check.conf

2. Create a new Template for the Mail server monitoring
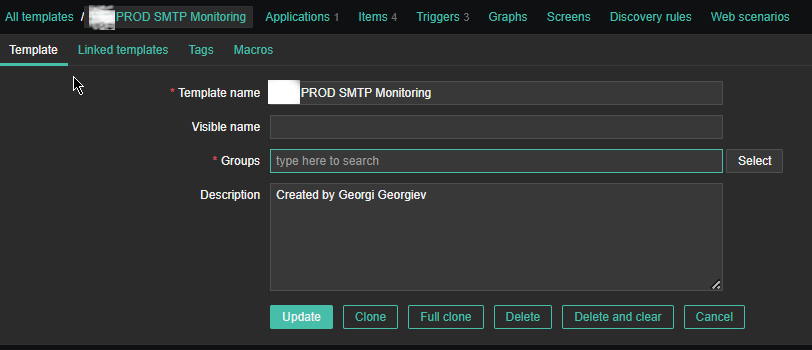


Just like any other template name it with what fits you as you see, I've call it PROD SMTP Monitoring, as the template is prepared to specifically monitor In Production Linux machines, and a separate template is used to monitor the Quality Assurance (QAs) as well as PreProd (Pre Productions).

3. Create the followng Items and Depedent Item to process zabbix-agent received data from the Userparam script
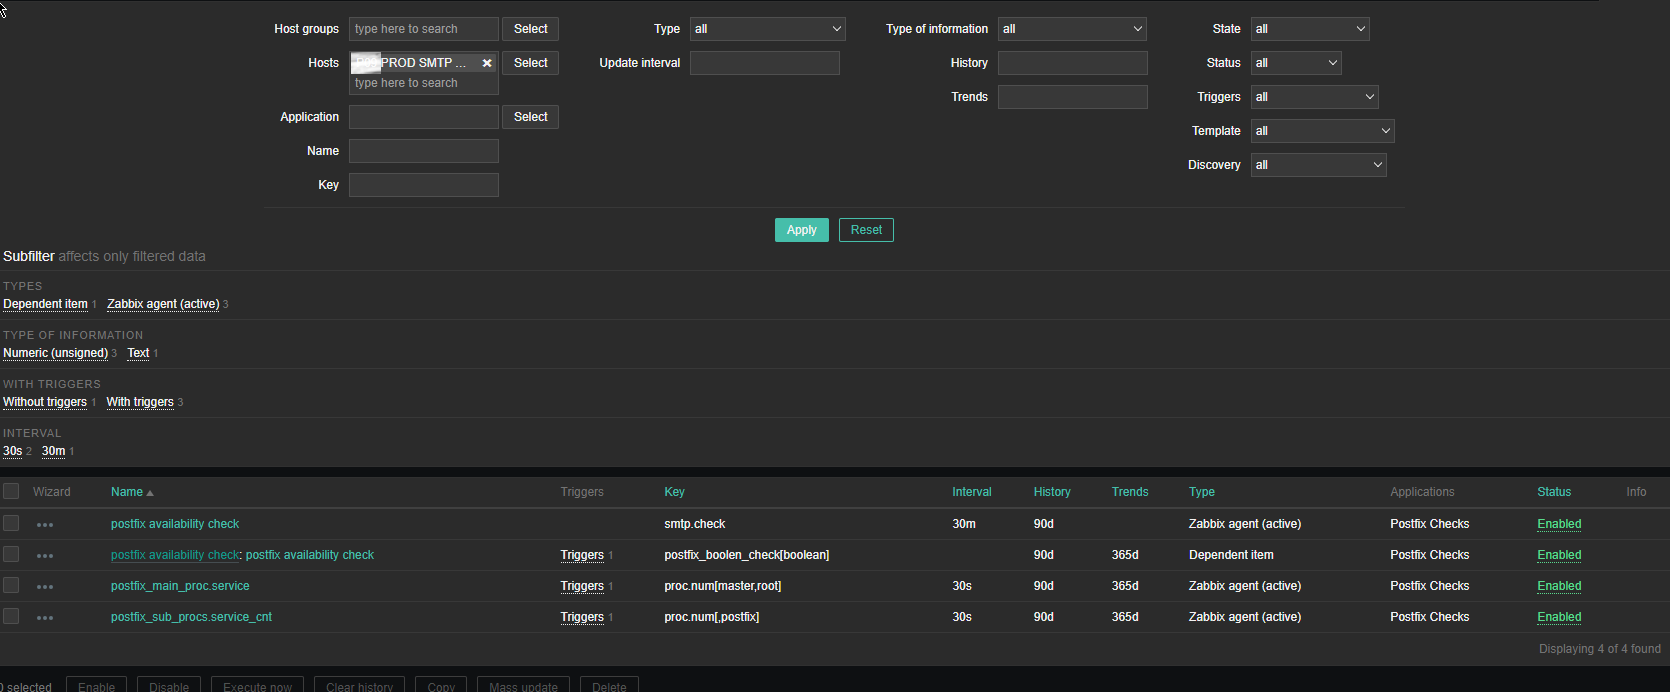
 

Above is the list of basic Items and Dependent Item you will need to configure inside the SMTP Check zabbix Template.

The Items should have the following content and configurations:
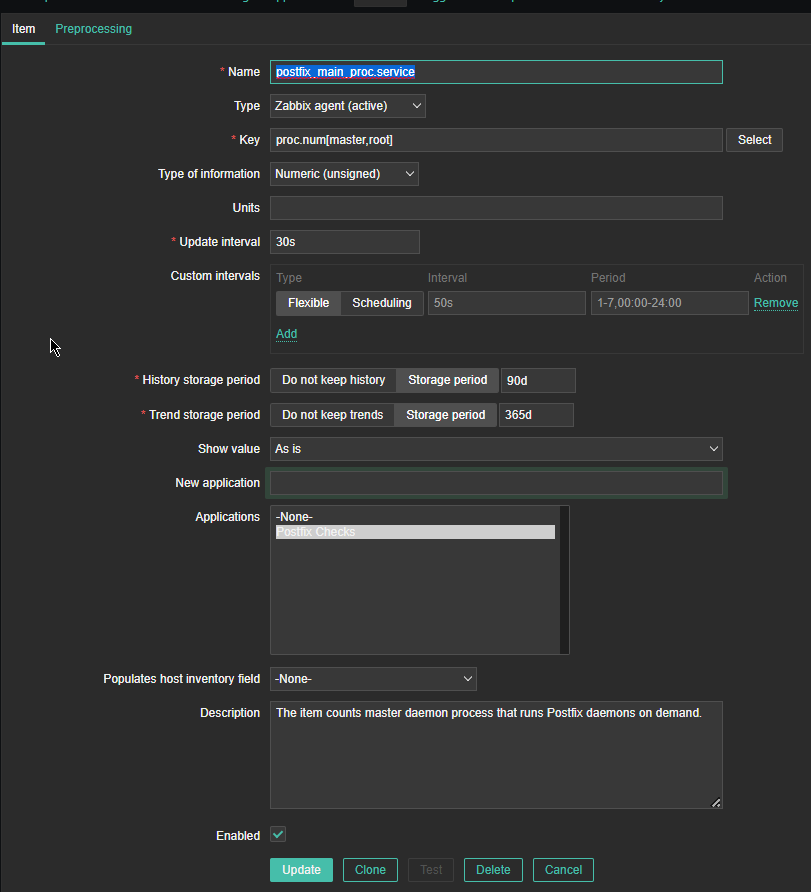
 

/postfix-main-proc-service-item-zabbix-shot


*Name: postfix_main_proc.service
Type: Zabbix agent(active)
*Key: proc.num[master,root]
Type of Information: Numeric (unassigned)
*Update interval: 30s
Custom Intervals: Flexible
*History storage period: 90d
*Trend storage period: 365d
Show Value: as is
Applications: Postfix Checks
Populated host inventory field: -None-
Description: The item counts master daemon process that runs Postfix daemons on demand

Where the arguments pased to proc.num[] function are:
  master is the process that is being looked up for and root is the username with which the the postfix master daemon is running. If you need to adapt it for qmail or exim that shouldn't be a big deal you only have to in advance check the exact processes that are normally running on the machine
and configure a similar process check for it.
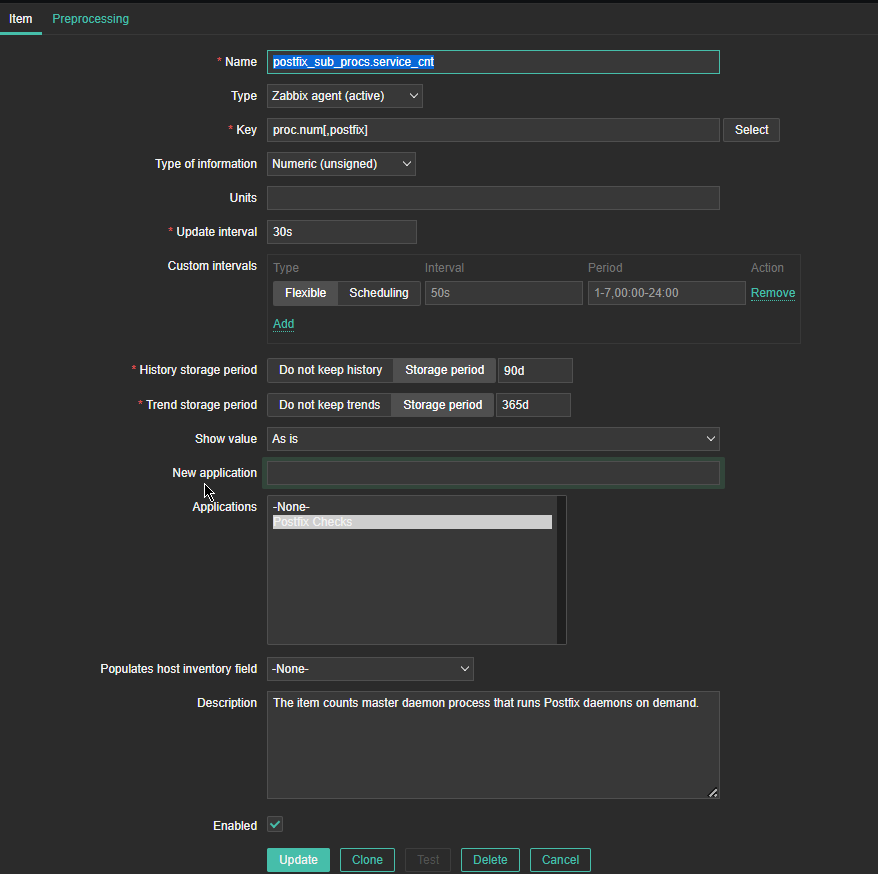
*Name: postfix_sub_procs.service_cnt
Type: Zabbix agent(active)
*Key: proc.num[,postfix]
Type of information: Numeric (unassigned)
Update Interval: 30s
*History Storage period: Storage Period 90d
*Trend storage period: Storage Period 365d
Description: The item counts master daemon processes that runs postfix daemons on demand.

Here the idea with this Item is to check the number of processes that are running with user / groupid that is postfix. Again for other SMPT different from postfix, just set it to whatever user / group 
you would like zabbix to look up for in Linux the process list. As you can see here the check for existing postfix mta process is done every 30 seconds (for more critical environments you can put it to less).
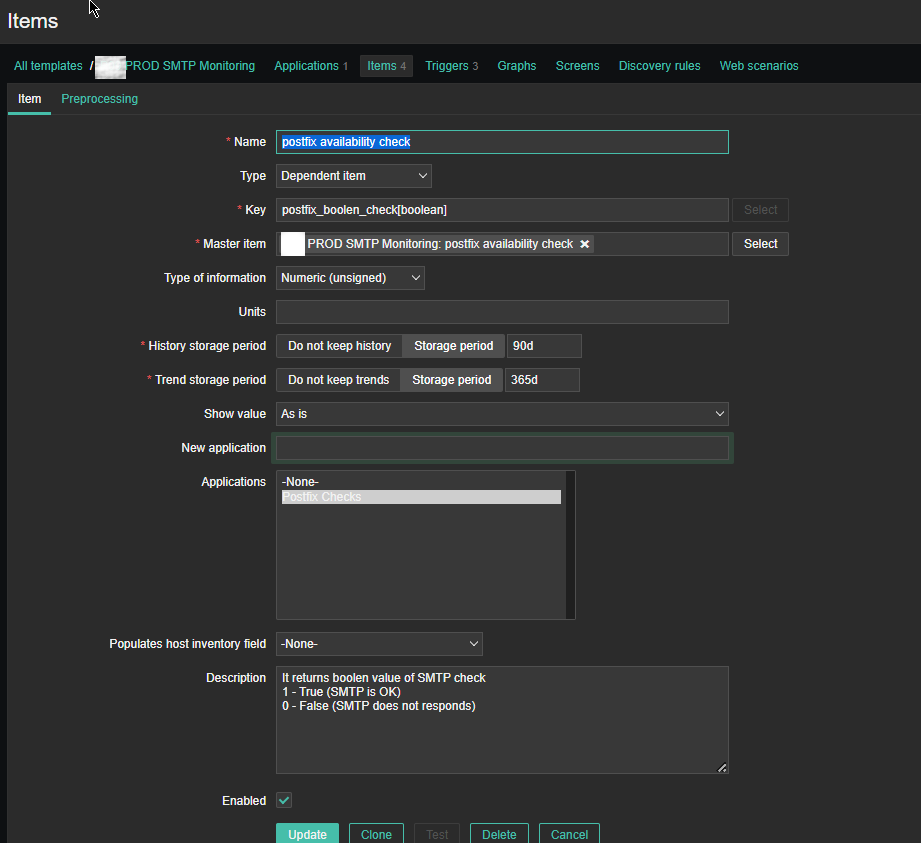
For simple zabbix use this Dependent Item is not necessery required. But as we would like to process more closely the output of the userparameter smtp script, you have to set it up.
If you want to write graphical representation by sending data to Grafana.

*Name: postfix availability check
Key: postfix_boolean_check[boolean]
Master Item: PROD SMTP Monitoring: postfix availability check
Type of Information: Numeric unassigned
*History storage period: Storage period 90d
*Trend storage period: 365d

Applications: Postfix Checks

Description: It returns boolean value of SMTP check
1 – True (SMTP is OK)
0 – False (SMTP does not responds)

Enabled: Tick
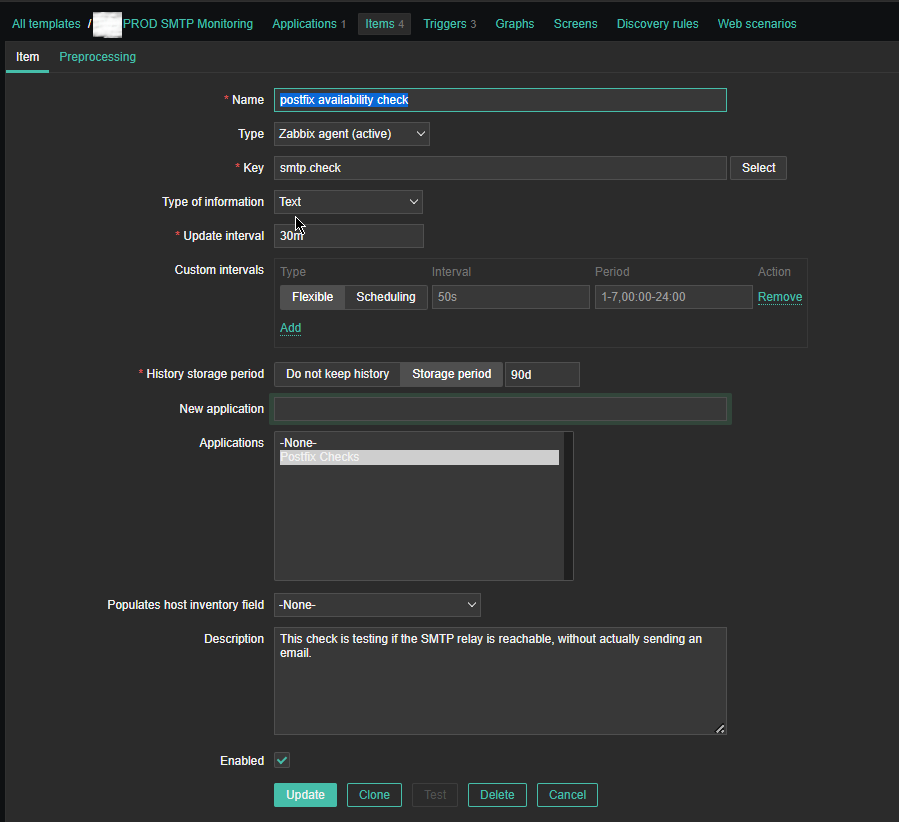
*Name: postfix availability check
*Key: smtp.check
Custom intervals: Flexible
*Update interval: 30 m
History sotrage period: Storage Period 90d
Applications: Postfix Checks
Populates host inventory field: -None-
Description: This check is testing if the SMTP relay is reachable, without actual sending an email
Enabled: Tick

4. Configure following Zabbix Triggers
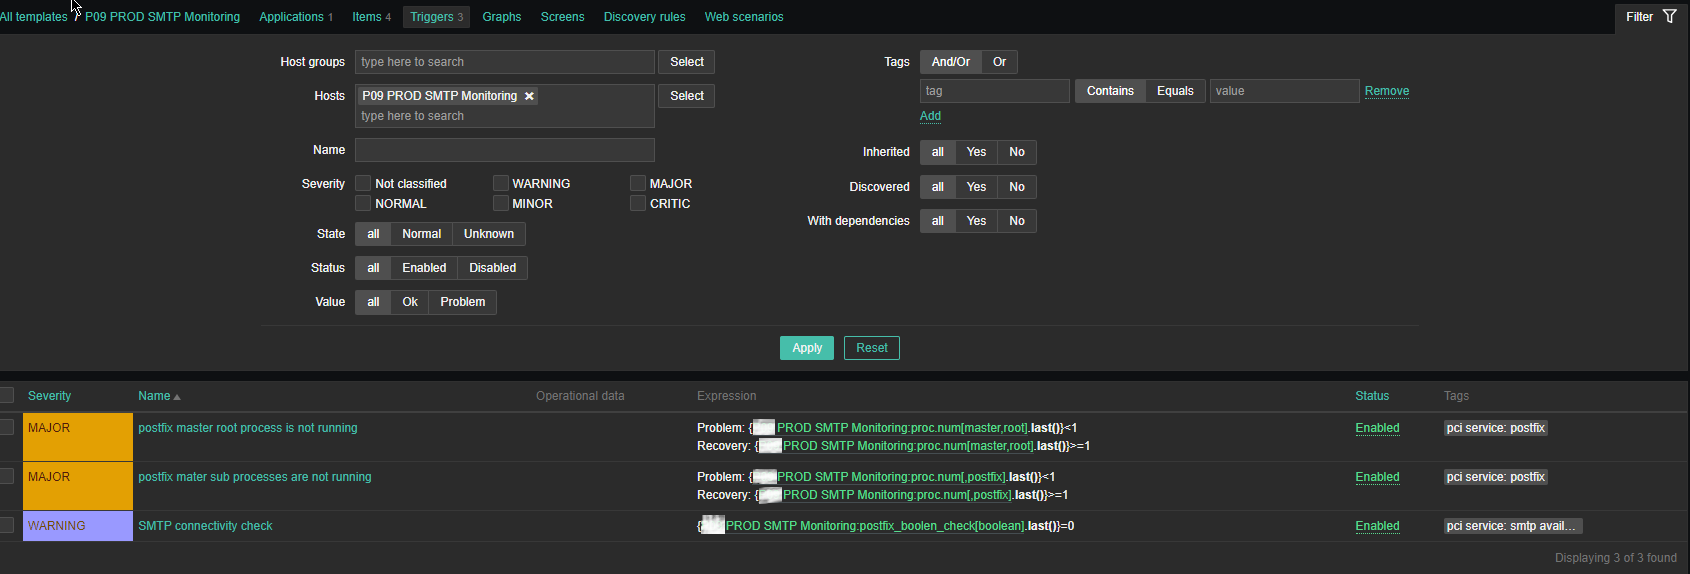
 

Note: The severity levels you should have previosly set in Zabbix up to your desired ones.
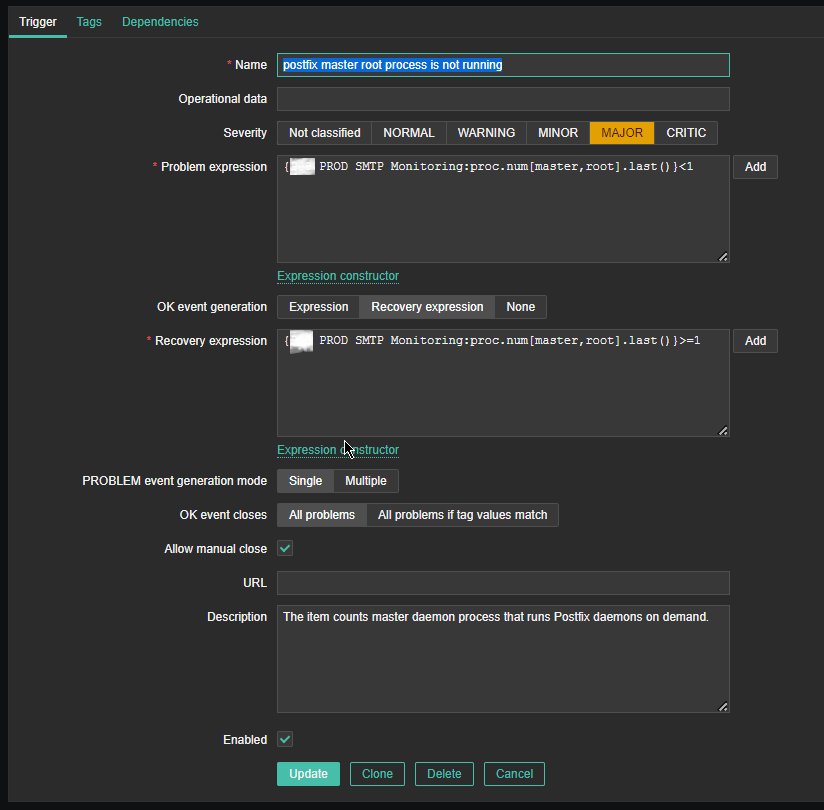
Name: postfix master root process is not running
*Problem Expression: {PROD SMTP Monitoring:proc.num[master,root].last()}<1

OK event generation: Recovery expression
*Recovery Expression: {PROD SMTP Monitoring:proc.num[master,root].last()}>=1
Allow manual close: Tick

Description: The item counts master daemon process that runs Postfix daemon on demand.
Enabed: Tick

I would like to have an AUTO RESOLVE for any detected mail issues, if an issue gets resolved. That is useful especially if you don't have the time to put the Zabbix monitoring in Maintainance Mode during Operating system planned updates / system reboots or unexpected system reboots due to electricity power loss to the server colocated – Data Center / Rack . 
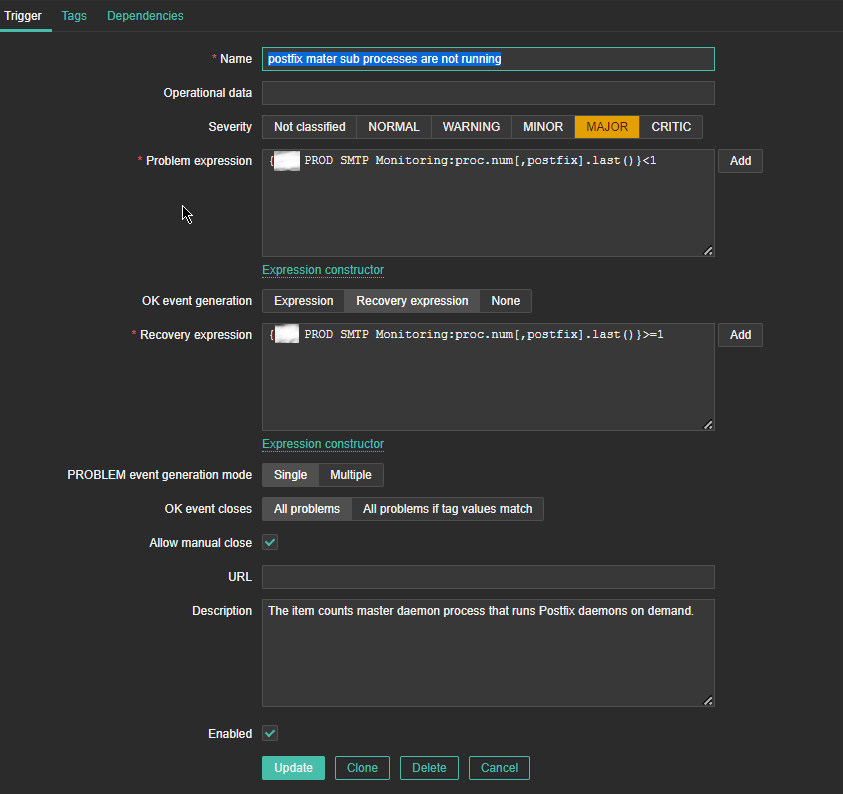

*Name: postfix master sub processes are not running
*Problem Expression: {P09 PROD SMTP Monitoring:proc.num[,postfix].last()}<1
PROBLEM event generation mode: Single
OK event closes: All problems

*Recovery Expression: {P09 PROD SMTP Monitoring:proc.num[,postfix].last()}>=1
Problem event generation mode: Single
OK event closes: All problems
Allow manual close: Tick
Enabled: Tick
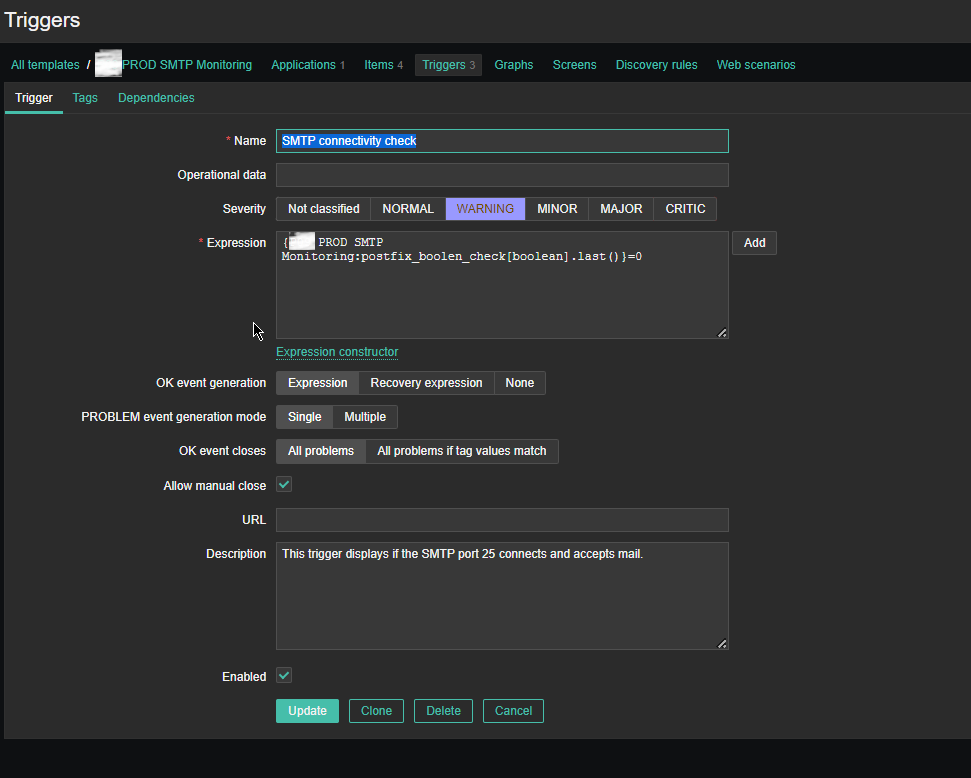
Name: SMTP connectivity check
Severity: WARNING
*Expression: {PROD SMTP Monitoring:postfix_boolen_check[boolean].last()}=0
OK event generation: Expression
PROBLEM even generation mode: SIngle
OK event closes: All problems

Allow manual close: Tick
Enabled: Tick

5. Configure respective Zabbix Action
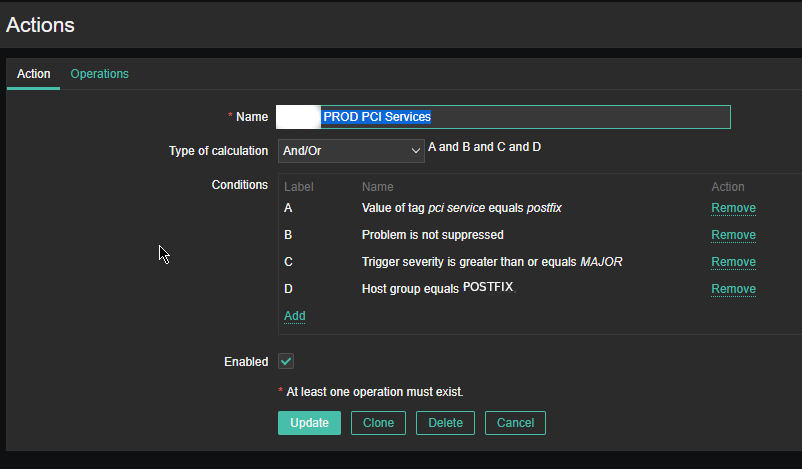
 

zabbix-configure-Actions-screenshotpng
 

As the service is tagged with 'pci service' tag we define the respective conditions and according to your preferences, add as many conditions as you need for the Zabbix Action to take place.

NOTE! :
Assuming that communication chain beween Zabbix Server -> Zabbix Proxy (if zabbix proxy is used) -> Zabbix Agent works correctly you should start receiving that from the userparameter script in Zabbix with the configured smtp.check userparam key every 30 minutes.

Note that this simple nc check will keep a trail records inside your /var/log/maillog for each netcat connection, so keep in mind that in /var/log/maillog on each host which has configured the SMTP Check zabbix template, you will have some records  similar to:

# tail -n 50 /var/log/maillog
2023-06-22T09:32:18.164128+02:00 lpgblu01f postfix/smtpd[2690485]: improper command pipelining after HELO from localhost[127.0.0.1]:  MAIL FROM: root@your-machine-fqdn-address.com\n RCPT TO: your-supposable-receive-addr@whatever-mail-address.com\n  QUIT\n
2023-06-22T09:32:18.208888+02:00 lpgblu01f postfix/smtpd[2690485]: 32EB02005B: client=localhost[127.0.0.1]
2023-06-22T09:32:18.209142+02:00 lpgblu01f postfix/smtpd[2690485]: disconnect from localhost[127.0.0.1] helo=1 mail=1 rcpt=1 quit=1 commands=4
2023-06-22T10:02:18.889440+02:00 lpgblu01f postfix/smtpd[2747269]: connect from localhost[127.0.0.1]
2023-06-22T10:02:18.889553+02:00 lpgblu01f postfix/smtpd[2747269]: improper command pipelining after HELO from localhost[127.0.0.1]:  MAIL FROM: root@your-machine-fqdn-address.com\n RCPT TO: your-supposable-receive-addr@whatever-mail-address.com\n  QUIT\n
2023-06-22T10:02:18.933933+02:00 lpgblu01f postfix/smtpd[2747269]: E3ED42005B: client=localhost[127.0.0.1]
2023-06-22T10:02:18.934227+02:00 lpgblu01f postfix/smtpd[2747269]: disconnect from localhost[127.0.0.1] helo=1 mail=1 rcpt=1 quit=1 commands=4
2023-06-22T10:32:26.143282+02:00 lpgblu01f postfix/smtpd[2804195]: connect from localhost[127.0.0.1]
2023-06-22T10:32:26.143439+02:00 lpgblu01f postfix/smtpd[2804195]: improper command pipelining after HELO from localhost[127.0.0.1]:  MAIL FROM: root@your-machine-fqdn-address.com\n RCPT TO: your-supposable-receive-addr@whatever-mail-address.com\n  QUIT\n
2023-06-22T10:32:26.186681+02:00 lpgblu01f postfix/smtpd[2804195]: 2D7F72005B: client=localhost[127.0.0.1]
2023-06-22T10:32:26.186958+02:00 lpgblu01f postfix/smtpd[2804195]: disconnect from localhost[127.0.0.1] helo=1 mail=1 rcpt=1 quit=1 commands=4
2023-06-22T11:02:26.924039+02:00 lpgblu01f postfix/smtpd[2860398]: connect from localhost[127.0.0.1]
2023-06-22T11:02:26.924160+02:00 lpgblu01f postfix/smtpd[2860398]: improper command pipelining after HELO from localhost[127.0.0.1]:  MAIL FROM: root@your-machine-fqdn-address.com\n RCPT TO: your-supposable-receive-addr@whatever-mail-address.com\n  QUIT\n
2023-06-22T11:02:26.963014+02:00 lpgblu01f postfix/smtpd[2860398]: EB08C2005B: client=localhost[127.0.0.1]
2023-06-22T11:02:26.963257+02:00 lpgblu01f postfix/smtpd[2860398]: disconnect from localhost[127.0.0.1] helo=1 mail=1 rcpt=1 quit=1 commands=4
2023-06-22T11:32:29.145553+02:00 lpgblu01f postfix/smtpd[2916905]: connect from localhost[127.0.0.1]
2023-06-22T11:32:29.145664+02:00 lpgblu01f postfix/smtpd[2916905]: improper command pipelining after HELO from localhost[127.0.0.1]:  MAIL FROM: root@your-machine-fqdn-address.com\n RCPT TO: your-supposable-receive-addr@whatever-mail-address.com\n  QUIT\n
2023-06-22T11:32:29.184539+02:00 lpgblu01f postfix/smtpd[2916905]: 2CF7D2005B: client=localhost[127.0.0.1]
2023-06-22T11:32:29.184729+02:00 lpgblu01f postfix/smtpd[2916905]: disconnect from localhost[127.0.0.1] helo=1 mail=1 rcpt=1 quit=1 commands=4


That's all folks use the :
Configuration -> Host (menu)

and assign the new SMTP check template to as many of the Linux hosts where you have setup the Userparameter script and Enjoy the new mail server monitoring at hand.

How to RPM update Hypervisors and Virtual Machines running Haproxy High Availability cluster on KVM, Virtuozzo without a downtime on RHEL / CentOS Linux

Friday, May 20th, 2022

virtuozzo-kvm-virtual-machines-and-hypervisor-update-manual-haproxy-logo


Here is the scenario, lets say you have on your daily task list two Hypervisor (HV) hosts running CentOS or RHEL Linux with KVM or Virutozzo technology and inside the HV hosts you have configured at least 2 pairs of virtual machines one residing on HV Host 1 and one residing on HV Host 2 and you need to constantly keep the hosts to the latest distribution major release security patchset.

The Virtual Machines has been running another set of Redhat Linux or CentOS configured to work in a High Availability Cluster running Haproxy / Apache / Postfix or any other kind of HA solution on top of corosync / keepalived or whatever application cluster scripts Free or Open Source technology that supports a switch between clustered Application nodes.

The logical question comes how to keep up the CentOS / RHEL Machines uptodate without interfering with the operations of the Applications running on the cluster?

Assuming that the 2 or more machines are configured to run in Active / Passive App member mode, e.g. one machine is Active at any time and the other is always Passive, a switch is possible between the Active and Passive node.

HAProxy--Load-Balancer-cluster-2-nodes-your-Servers

In this article I'll give a simple step by step tested example on how you I succeeded to update (for security reasons) up to the latest available Distribution major release patchset on one by one first the Clustered App on Virtual Machines 1 and VM2 on Linux Hypervisor Host 1. Then the App cluster VM 1 / VM 2 on Hypervisor Host 2.
And finally update the Hypervisor1 (after moving the Active resources from it to Hypervisor2) and updating the Hypervisor2 after moving the App running resources back on HV1.
I know the procedure is a bit monotonic but it tries to go through everything step by step to try to mitigate any possible problems. In case of failure of some rpm dependencies during yum / dnf tool updates you can always revert to backups so in anyways don't forget to have a fully functional backup of each of the HV hosts and the VMs somewhere on a separate machine before proceeding further, any possible failures due to following my aritcle literally is your responsibility 🙂


0. Check situation before the update on HVs / get VM IDs etc.

Check the virsion of each of the machines to be updated both Hypervisor and Hosted VMs, on each machine run:
 

# cat /etc/redhat-release
CentOS Linux release 7.9.2009 (Core)


The machine setup I'll be dealing with is as follows:
 

hypervisor-host1 -> hypervisor-host1.fqdn.com 
•    virt-mach-centos1
•    virt-machine-zabbix-proxy-centos (zabbix proxy)

hypervisor-host2 -> hypervisor-host2.fqdn.com
•    virt-mach-centos2
•    virt-machine-zabbix2-proxy-centos (zabbix proxy)

To check what is yours check out with virsh cmd –if on KVM or with prlctl if using Virutozzo, you should get something like:

[root@hypervisor-host2 ~]# virsh list
 Id Name State
—————————————————-
 1 vm-host1 running
 2 virt-mach-centos2 running

 # virsh list –all

[root@hypervisor-host1 ~]# virsh list
 Id Name State
—————————————————-
 1 vm-host2 running
 3 virt-mach-centos1 running

[root@hypervisor-host1 ~]# prlctl list
UUID                                    STATUS       IP_ADDR         T  NAME
{dc37c201-08c9-589d-aa20-9386d63ce3f3}  running      –               VM virt-mach-centos1
{76e8a5f8-caa8-5442-830e-aa4bfe8d42d9}  running      –               VM vm-host2
[root@hypervisor-host1 ~]#

If you have stopped VMs with Virtuozzo to list the stopped ones as well.
 

# prlctl list -a

[root@hypervisor-host2 74a7bbe8-9245-5385-ac0d-d10299100789]# vzlist -a
                                CTID      NPROC STATUS    IP_ADDR         HOSTNAME
[root@hypervisor-host2 74a7bbe8-9245-5385-ac0d-d10299100789]# prlctl list
UUID                                    STATUS       IP_ADDR         T  NAME
{92075803-a4ce-5ec0-a3d8-9ee83d85fc76}  running      –               VM virt-mach-centos2
{74a7bbe8-9245-5385-ac0d-d10299100789}  running      –               VM vm-host1

# prlctl list -a


If due to Virtuozzo version above command does not return you can manually check in the VM located folder, VM ID etc.
 

[root@hypervisor-host2 vmprivate]# ls
74a7bbe8-9245-4385-ac0d-d10299100789  92075803-a4ce-4ec0-a3d8-9ee83d85fc76
[root@hypervisor-host2 vmprivate]# pwd
/vz/vmprivate
[root@hypervisor-host2 vmprivate]#


[root@hypervisor-host1 ~]# ls -al /vz/vmprivate/
total 20
drwxr-x—. 5 root root 4096 Feb 14  2019 .
drwxr-xr-x. 7 root root 4096 Feb 13  2019 ..
drwxr-x–x. 4 root root 4096 Feb 18  2019 1c863dfc-1deb-493c-820f-3005a0457627
drwxr-x–x. 4 root root 4096 Feb 14  2019 76e8a5f8-caa8-4442-830e-aa4bfe8d42d9
drwxr-x–x. 4 root root 4096 Feb 14  2019 dc37c201-08c9-489d-aa20-9386d63ce3f3
[root@hypervisor-host1 ~]#


Before doing anything with the VMs, also don't forget to check the Hypervisor hosts has enough space, otherwise you'll get in big troubles !
 

[root@hypervisor-host2 vmprivate]# df -h
Filesystem                       Size  Used Avail Use% Mounted on
/dev/mapper/centos_hypervisor-host2-root   20G  1.8G   17G  10% /
devtmpfs                          20G     0   20G   0% /dev
tmpfs                             20G     0   20G   0% /dev/shm
tmpfs                             20G  2.0G   18G  11% /run
tmpfs                             20G     0   20G   0% /sys/fs/cgroup
/dev/sda1                        992M  159M  766M  18% /boot
/dev/mapper/centos_hypervisor-host2-home  9.8G   37M  9.2G   1% /home
/dev/mapper/centos_hypervisor-host2-var   9.8G  355M  8.9G   4% /var
/dev/mapper/centos_hypervisor-host2-vz    755G   25G  692G   4% /vz


[root@hypervisor-host1 ~]# df -h
Filesystem               Size  Used Avail Use% Mounted on
/dev/mapper/centos-root   50G  1.8G   45G   4% /
devtmpfs                  20G     0   20G   0% /dev
tmpfs                     20G     0   20G   0% /dev/shm
tmpfs                     20G  2.1G   18G  11% /run
tmpfs                     20G     0   20G   0% /sys/fs/cgroup
/dev/sda2                992M  153M  772M  17% /boot
/dev/mapper/centos-home  9.8G   37M  9.2G   1% /home
/dev/mapper/centos-var   9.8G  406M  8.9G   5% /var
/dev/mapper/centos-vz    689G   12G  643G   2% /vz

Another thing to do before proceeding with update is to check and tune if needed the amount of CentOS repositories used, before doing anything with yum.
 

[root@hypervisor-host2 yum.repos.d]# ls -al
total 68
drwxr-xr-x.   2 root root  4096 Oct  6 13:13 .
drwxr-xr-x. 110 root root 12288 Oct  7 11:13 ..
-rw-r–r–.   1 root root  4382 Mar 14  2019 CentOS7.repo
-rw-r–r–.   1 root root  1664 Sep  5  2019 CentOS-Base.repo
-rw-r–r–.   1 root root  1309 Sep  5  2019 CentOS-CR.repo
-rw-r–r–.   1 root root   649 Sep  5  2019 CentOS-Debuginfo.repo
-rw-r–r–.   1 root root   314 Sep  5  2019 CentOS-fasttrack.repo
-rw-r–r–.   1 root root   630 Sep  5  2019 CentOS-Media.repo
-rw-r–r–.   1 root root  1331 Sep  5  2019 CentOS-Sources.repo
-rw-r–r–.   1 root root  6639 Sep  5  2019 CentOS-Vault.repo
-rw-r–r–.   1 root root  1303 Mar 14  2019 factory.repo
-rw-r–r–.   1 root root   666 Sep  8 10:13 openvz.repo
[root@hypervisor-host2 yum.repos.d]#


[root@hypervisor-host1 yum.repos.d]# ls -al
total 68
drwxr-xr-x.   2 root root  4096 Oct  6 13:13 .
drwxr-xr-x. 112 root root 12288 Oct  7 11:09 ..
-rw-r–r–.   1 root root  1664 Sep  5  2019 CentOS-Base.repo
-rw-r–r–.   1 root root  1309 Sep  5  2019 CentOS-CR.repo
-rw-r–r–.   1 root root   649 Sep  5  2019 CentOS-Debuginfo.repo
-rw-r–r–.   1 root root   314 Sep  5  2019 CentOS-fasttrack.repo
-rw-r–r–.   1 root root   630 Sep  5  2019 CentOS-Media.repo
-rw-r–r–.   1 root root  1331 Sep  5  2019 CentOS-Sources.repo
-rw-r–r–.   1 root root  6639 Sep  5  2019 CentOS-Vault.repo
-rw-r–r–.   1 root root  1303 Mar 14  2019 factory.repo
-rw-r–r–.   1 root root   300 Mar 14  2019 obsoleted_tmpls.repo
-rw-r–r–.   1 root root   666 Sep  8 10:13 openvz.repo


1. Dump VM definition XMs (to have it in case if it gets wiped during update)

There is always a possibility that something will fail during the update and you might be unable to restore back to the old version of the Virtual Machine due to some config misconfigurations or whatever thus a very good idea, before proceeding to modify the working VMs is to use KVM's virsh and dump the exact set of XML configuration that makes the VM roll properly.

To do so:
Check a little bit up in the article how we have listed the IDs that are part of the directory containing the VM.
 

[root@hypervisor-host1 ]# virsh dumpxml (Id of VM virt-mach-centos1 ) > /root/virt-mach-centos1_config_bak.xml
[root@hypervisor-host2 ]# virsh dumpxml (Id of VM virt-mach-centos2) > /root/virt-mach-centos2_config_bak.xml


2. Set on standby virt-mach-centos1 (virt-mach-centos1)

As I'm upgrading two machines that are configured to run an haproxy corosync cluster, before proceeding to update the active host, we have to switch off
the proxied traffic from node1 to node2, – e.g. standby the active node, so the cluster can move up the traffic to other available node.
 

[root@virt-mach-centos1 ~]# pcs cluster standby virt-mach-centos1


3. Stop VM virt-mach-centos1 & backup on Hypervisor host (hypervisor-host1) for VM1

Another prevention step to make sure you don't get into damaged VM or broken haproxy cluster after the upgrade is to of course backup 


[root@hypervisor-host1 ]# prlctl backup virt-mach-centos1

or
 

[root@hypervisor-host1 ]# prlctl stop virt-mach-centos1
[root@hypervisor-host1 ]# cp -rpf /vz/vmprivate/dc37c201-08c9-489d-aa20-9386d63ce3f3 /vz/vmprivate/dc37c201-08c9-489d-aa20-9386d63ce3f3-bak
[root@hypervisor-host1 ]# tar -czvf virt-mach-centos1_vm_virt-mach-centos1.tar.gz /vz/vmprivate/dc37c201-08c9-489d-aa20-9386d63ce3f3

[root@hypervisor-host1 ]# prlctl start virt-mach-centos1


4. Remove package version locks on all hosts

If you're using package locking to prevent some other colleague to not accidently upgrade the machine (if multiple sysadmins are managing the host), you might use the RPM package locking meachanism, if that is used check RPM packs that are locked and release the locking.

+ List actual list of locked packages

[root@hypervisor-host1 ]# yum versionlock list  

…..
0:libtalloc-2.1.16-1.el7.*
0:libedit-3.0-12.20121213cvs.el7.*
0:p11-kit-trust-0.23.5-3.el7.*
1:quota-nls-4.01-19.el7.*
0:perl-Exporter-5.68-3.el7.*
0:sudo-1.8.23-9.el7.*
0:libxslt-1.1.28-5.el7.*
versionlock list done
                          

+ Clear the locking            

# yum versionlock clear                               


+ List actual list / == clear all entries
 

[root@virt-mach-centos2 ]# yum versionlock list; yum versionlock clear
[root@virt-mach-centos1 ]# yum versionlock list; yum versionlock clear
[root@hypervisor-host1 ~]# yum versionlock list; yum versionlock clear
[root@hypervisor-host2 ~]# yum versionlock list; yum versionlock clear


5. Do yum update virt-mach-centos1


For some clarity if something goes wrong, it is really a good idea to make a dump of the basic packages installed before the RPM package update is initiated,
The exact versoin of RHEL or CentOS as well as the list of locked packages, if locking is used.

Enter virt-mach-centos1 (ssh virt-mach-centos1) and run following cmds:
 

# cat /etc/redhat-release  > /root/logs/redhat-release-$(hostname)-$(date '+%Y-%m-%d_%H-%M-%S').out
# cat /etc/grub.d/30_os-prober > /root/logs/grub2-efi-$(hostname)-$(date '+%Y-%m-%d_%H-%M-%S').out


+ Only if needed!!
 

# yum versionlock clear
# yum versionlock list


Clear any previous RPM packages – careful with that as you might want to keep the old RPMs, if unsure comment out below line
 

# yum clean all |tee /root/logs/yumcleanall-$(hostname)-$(date '+%Y-%m-%d_%H-%M-%S').out


Proceed with the update and monitor closely the output of commands and log out everything inside files using a small script that you should place under /root/status the script is given at the end of the aritcle.:
 

yum check-update |tee /root/logs/yumcheckupdate-$(hostname)-$(date '+%Y-%m-%d_%H-%M-%S').out
yum check-update | wc -l
yum update |tee /root/logs/yumupdate-$(hostname)-$(date '+%Y-%m-%d_%H-%M-%S').out
sh /root/status |tee /root/logs/status-before-$(hostname)-$(date '+%Y-%m-%d_%H-%M-%S').out


6. Check if everything is running fine after upgrade

Reboot VM
 

# shutdown -r now


7. Stop VM virt-mach-centos2 & backup  on Hypervisor host (hypervisor-host2)

Same backup step as prior 

# prlctl backup virt-mach-centos2


or
 

# prlctl stop virt-mach-centos2
# cp -rpf /vz/vmprivate/92075803-a4ce-4ec0-a3d8-9ee83d85fc76 /vz/vmprivate/92075803-a4ce-4ec0-a3d8-9ee83d85fc76-bak
## tar -czvf virt-mach-centos2_vm_virt-mach-centos2.tar.gz /vz/vmprivate/92075803-a4ce-4ec0-a3d8-9ee83d85fc76

# prctl start virt-mach-centos2


8. Do yum update on virt-mach-centos2

Log system state, before the update
 

# cat /etc/redhat-release  > /root/logs/redhat-release-vorher-$(hostname)-$(date '+%Y-%m-%d_%H-%M-%S').out
# cat /etc/grub.d/30_os-prober > /root/logs/grub2-efi-vorher-$(hostname)-$(date '+%Y-%m-%d_%H-%M-%S').out
# yum versionlock clear == if needed!!
# yum versionlock list


Clean old install update / packages if required
 

# yum clean all |tee /root/logs/yumcleanall-$(hostname)-$(date '+%Y-%m-%d_%H-%M-%S').out


Initiate the update

# yum check-update |tee /root/logs/yumcheckupdate-$(hostname)-$(date '+%Y-%m-%d_%H-%M-%S').out 2>&1
# yum check-update | wc -l 
# yum update |tee /root/logs/yumupdate-$(hostname)-$(date '+%Y-%m-%d_%H-%M-%S').out 2>&1
# sh /root/status |tee /root/logs/status-before-$(hostname)-$(date '+%Y-%m-%d_%H-%M-%S').out


9. Check if everything is running fine after upgrade
 

Reboot VM
 

# shutdown -r now


10. Stop VM vm-host2 & backup
 

# prlctl backup vm-host2


or

# prlctl stop vm-host2

Or copy the actual directory containig the Virtozzo VM (use the correct ID)
 

# cp -rpf /vz/vmprivate/76e8a5f8-caa8-5442-830e-aa4bfe8d42d9 /vz/vmprivate/76e8a5f8-caa8-5442-830e-aa4bfe8d42d9-bak
## tar -czvf vm-host2.tar.gz /vz/vmprivate/76e8a5f8-caa8-4442-830e-aa5bfe8d42d9

# prctl start vm-host2


11. Do yum update vm-host2
 

# cat /etc/redhat-release  > /root/logs/redhat-release-vorher-$(hostname)-$(date '+%Y-%m-%d_%H-%M-%S').out
# cat /etc/grub.d/30_os-prober > /root/logs/grub2-efi-vorher-$(hostname)-$(date '+%Y-%m-%d_%H-%M-%S').out


Clear only if needed

# yum versionlock clear
# yum versionlock list
# yum clean all |tee /root/logs/yumcleanall-$(hostname)-$(date '+%Y-%m-%d_%H-%M-%S').out


Do the rpm upgrade

# yum check-update |tee /root/logs/yumcheckupdate-$(hostname)-$(date '+%Y-%m-%d_%H-%M-%S').out
# yum check-update | wc -l
# yum update |tee /root/logs/yumupdate-$(hostname)-$(date '+%Y-%m-%d_%H-%M-%S').out
# sh /root/status |tee /root/logs/status-before-$(hostname)-$(date '+%Y-%m-%d_%H-%M-%S').out


12. Check if everything is running fine after upgrade
 

Reboot VM
 

# shutdown -r now


13. Do yum update hypervisor-host2


# cat /etc/redhat-release  > /root/logs/redhat-release-vorher-$(hostname)-$(date '+%Y-%m-%d_%H-%M-%S').out
# cat /etc/grub.d/30_os-prober > /root/logs/grub2-efi-vorher-$(hostname)-$(date '+%Y-%m-%d_%H-%M-%S').out

Clear lock   if needed

# yum versionlock clear
# yum versionlock list
# yum clean all |tee /root/logs/yumcleanall-$(hostname)-$(date '+%Y-%m-%d_%H-%M-%S').out


Update rpms
 

# yum check-update |tee /root/logs/yumcheckupdate-$(hostname)-$(date '+%Y-%m-%d_%H-%M-%S').out 2>&1
# yum check-update | wc -l
# yum update |tee /root/logs/yumupdate-$(hostname)-$(date '+%Y-%m-%d_%H-%M-%S').out 2>&1
# sh /root/status |tee /root/logs/status-before-$(hostname)-$(date '+%Y-%m-%d_%H-%M-%S').out


14. Stop VM vm-host1 & backup


Some as ealier
 

# prlctl backup vm-host1

or
 

# prlctl stop vm-host1

# cp -rpf /vz/vmprivate/74a7bbe8-9245-4385-ac0d-d10299100789 /vz/vmprivate/74a7bbe8-9245-4385-ac0d-d10299100789-bak
# tar -czvf vm-host1.tar.gz /vz/vmprivate/74a7bbe8-9245-4385-ac0d-d10299100789

# prctl start vm-host1


15. Do yum update vm-host2
 

# cat /etc/redhat-release  > /root/logs/redhat-release-vorher-$(hostname)-$(date '+%Y-%m-%d_%H-%M-%S').out
# cat /etc/grub.d/30_os-prober > /root/logs/grub2-efi-vorher-$(hostname)-$(date '+%Y-%m-%d_%H-%M-%S').out
# yum versionlock clear == if needed!!
# yum versionlock list
# yum clean all |tee /root/logs/yumcleanall-$(hostname)-$(date '+%Y-%m-%d_%H-%M-%S').out
# yum check-update |tee /root/logs/yumcheckupdate-$(hostname)-$(date '+%Y-%m-%d_%H-%M-%S').out
# yum check-update | wc -l
# yum update |tee /root/logs/yumupdate-$(hostname)-$(date '+%Y-%m-%d_%H-%M-%S').out
# sh /root/status |tee /root/logs/status-before-$(hostname)-$(date '+%Y-%m-%d_%H-%M-%S').out


16. Check if everything is running fine after upgrade

+ Reboot VM

# shutdown -r now


17. Do yum update hypervisor-host1

Same procedure for HV host 1 

# cat /etc/redhat-release  > /root/logs/redhat-release-vorher-$(hostname)-$(date '+%Y-%m-%d_%H-%M-%S').out
# cat /etc/grub.d/30_os-prober > /root/logs/grub2-efi-vorher-$(hostname)-$(date '+%Y-%m-%d_%H-%M-%S').out

Clear lock
 

# yum versionlock clear
# yum versionlock list
# yum clean all |tee /root/logs/yumcleanall-$(hostname)-$(date '+%Y-%m-%d_%H-%M-%S').out

# yum check-update |tee /root/logs/yumcheckupdate-$(hostname)-$(date '+%Y-%m-%d_%H-%M-%S').out
# yum check-update | wc -l
# yum update |tee /root/logs/yumupdate-$(hostname)-$(date '+%Y-%m-%d_%H-%M-%S').out
# sh /root/status |tee /root/logs/status-before-$(hostname)-$(date '+%Y-%m-%d_%H-%M-%S').out


18. Check if everything is running fine after upgrade

Reboot VM
 

# shutdown -r now


Check hypervisor-host1 all VMs run as expected 


19. Check if everything is running fine after upgrade

Reboot VM
 

# shutdown -r now


Check hypervisor-host2 all VMs run as expected afterwards


20. Check once more VMs and haproxy or any other contained services in VMs run as expected

Login to hosts and check processes and logs for errors etc.
 

21. Haproxy Unstandby virt-mach-centos1

Assuming that the virt-mach-centos1 and virt-mach-centos2 are running a Haproxy / corosync cluster you can try to standby node1 and check the result
hopefully all should be fine and traffic should come to host node2.

[root@virt-mach-centos1 ~]# pcs cluster unstandby virt-mach-centos1


Monitor logs and make sure HAproxy works fine on virt-mach-centos1


22. If necessery to redefine VMs (in case they disappear from virsh) or virtuosso is not working

[root@virt-mach-centos1 ]# virsh define /root/virt-mach-centos1_config_bak.xml
[root@virt-mach-centos1 ]# virsh define /root/virt-mach-centos2_config_bak.xml


23. Set versionlock to RPMs to prevent accident updates and check OS version release

[root@virt-mach-centos2 ]# yum versionlock \*
[root@virt-mach-centos1 ]# yum versionlock \*
[root@hypervisor-host1 ~]# yum versionlock \*
[root@hypervisor-host2 ~]# yum versionlock \*

[root@hypervisor-host2 ~]# cat /etc/redhat-release 
CentOS Linux release 7.8.2003 (Core)

Other useful hints

[root@hypervisor-host1 ~]# virsh console dc37c201-08c9-489d-aa20-9386d63ce3f3
Connected to domain virt-mach-centos1
..

! Compare packages count before the upgrade on each of the supposable identical VMs and HVs – if there is difference in package count review what kind of packages are different and try to make the machines to look as identical as possible  !

Packages to update on hypervisor-host1 Count: XXX
Packages to update on hypervisor-host2 Count: XXX
Packages to update virt-mach-centos1 Count: – 254
Packages to update virt-mach-centos2 Count: – 249

The /root/status script

+++

#!/bin/sh
echo  '=======================================================   '
echo  '= Systemctl list-unit-files –type=service | grep enabled '
echo  '=======================================================   '
systemctl list-unit-files –type=service | grep enabled

echo  '=======================================================   '
echo  '= systemctl | grep ".service" | grep "running"            '
echo  '=======================================================   '
systemctl | grep ".service" | grep "running"

echo  '=======================================================   '
echo  '= chkconfig –list                                        '
echo  '=======================================================   '
chkconfig –list

echo  '=======================================================   '
echo  '= netstat -tulpn                                          '
echo  '=======================================================   '
netstat -tulpn

echo  '=======================================================   '
echo  '= netstat -r                                              '
echo  '=======================================================   '
netstat -r


+++

That's all folks, once going through the article, after some 2 hours of efforts or so you should have an up2date machines.
Any problems faced or feedback is mostly welcome as this might help others who have the same setup.

Thanks for reading me 🙂

Webserver farm behind Load Balancer Proxy or how to preserve incoming internet IP to local net IP Apache webservers by adding additional haproxy header with remoteip

Monday, April 18th, 2022

logo-haproxy-apache-remoteip-configure-and-check-to-have-logged-real-ip-address-inside-apache-forwarded-from-load-balancer

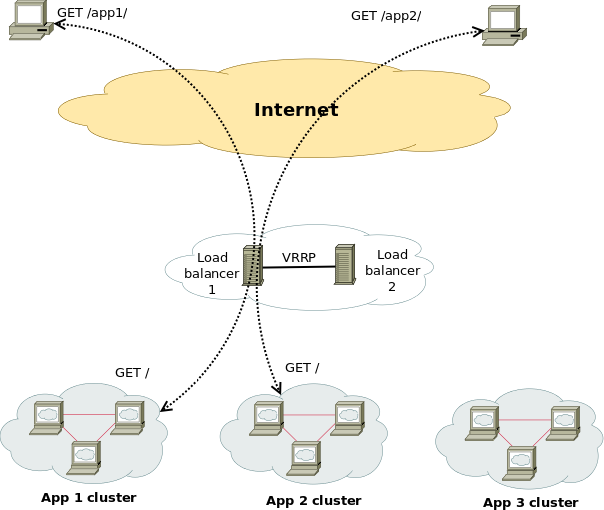
Having a Proxy server for Load Balancing is a common solutions to assure High Availability of Web Application service behind a proxy.
You can have for example 1 Apache HTTPD webservers serving traffic Actively on one Location (i.e. one city or Country) and 3 configured in the F5 LB or haproxy to silently keep up and wait for incoming connections as an (Active Failure) Backup solution

Lets say the Webservers usually are set to have local class C IPs as 192.168.0.XXX or 10.10.10.XXX and living in isolated DMZed well firewalled LAN network and Haproxy is configured to receive traffic via a Internet IP 109.104.212.13 address and send the traffic in mode tcp via a NATTed connection (e.g. due to the network address translation the source IP of the incoming connections from Intenet clients appears as the NATTed IP 192.168.1.50.

The result is that all incoming connections from haproxy -> webservers will be logged in Webservers /var/log/apache2/access.log wrongly as incoming from source IP: 192.168.1.50, meaning all the information on the source Internet Real IP gets lost.

load-balancer-high-availailibility-haproxy-apache
 

How to pass Real (Internet) Source IPs from Haproxy "mode tcp" to Local LAN Webservers  ?
 

Usually the normal way to work around this with Apache Reverse Proxies configured is to use HTTP_X_FORWARDED_FOR variable in haproxy when using HTTP traffic application that is proxied (.e.g haproxy.cfg has mode http configured), you have to add to listen listener_name directive or frontend Frontend_of_proxy

option forwardfor
option http-server-close

However unfortunately, IP Header preservation with X_FORWADED_FOR  HTTP-Header is not possible when haproxy is configured to forward traffic using mode tcp.

Thus when you're forced to use mode tcp to completely pass any traffic incoming to Haproxy from itself to End side, the solution is to
 

  • Use mod_remoteip infamous module that is part of standard Apache installs both on apache2 installed from (.deb) package  or httpd rpm (on redhats / centos).


1. Configure Haproxies to send received connects as send-proxy traffic


The idea is very simple all the received requests from outside clients to Haproxy are to be send via the haproxy to the webserver in a PROXY protocol string, this is done via send-proxy

             send-proxy  – send a PROXY protocol string

Rawly my current /etc/haproxy/haproxy.cfg looks like this:
 

global
        log /dev/log    local0
        log /dev/log    local1 notice
        chroot /var/lib/haproxy
        user haproxy
        group haproxy
        daemon
        maxconn 99999
        nbproc          1
        nbthread 2
        cpu-map         1 0
        cpu-map         2 1


defaults
        log     global
       mode    tcp


        timeout connect 5000
        timeout connect 30s
        timeout server 10s

    timeout queue 5s
    timeout tunnel 2m
    timeout client-fin 1s
    timeout server-fin 1s

                option forwardfor

    retries                 15


frontend http-in
                mode tcp

                option tcplog
        log global

                option logasap
                option forwardfor
                bind 109.104.212.130:80
    fullconn 20000
default_backend http-websrv
backend http-websrv
        balance source
                maxconn 3000

stick match src
    stick-table type ip size 200k expire 30m
        stick on src


        server ha1server-1 192.168.0.205:80 check send-proxy weight 254 backup
        server ha1server-2 192.168.1.15:80 check send-proxy weight 255
        server ha1server-3 192.168.2.30:80 check send-proxy weight 252 backup
        server ha1server-4 192.168.1.198:80 check send-proxy weight 253 backup
                server ha1server-5 192.168.0.1:80 maxconn 3000 check send-proxy weight 251 backup


frontend https-in
                mode tcp

                option tcplog
                log global

                option logasap
                option forwardfor
        maxconn 99999
           bind 109.104.212.130:443
        default_backend https-websrv
                backend https-websrv
        balance source
                maxconn 3000
        stick on src
    stick-table type ip size 200k expire 30m


                server ha1server-1 192.168.0.205:443 maxconn 8000 check send-proxy weight 254 backup
                server ha1server-2 192.168.1.15:443 maxconn 10000 check send-proxy weight 255
        server ha1server-3 192.168.2.30:443 maxconn 8000 check send-proxy weight 252 backup
        server ha1server-4 192.168.1.198:443 maxconn 10000 check send-proxy weight 253 backup
                server ha1server-5 192.168.0.1:443 maxconn 3000 check send-proxy weight 251 backup

listen stats
    mode http
    option httplog
    option http-server-close
    maxconn 10
    stats enable
    stats show-legends
    stats refresh 5s
    stats realm Haproxy\ Statistics
    stats admin if TRUE


After preparing your haproxy.cfg and reloading haproxy in /var/log/haproxy.log you should have the Real Source IPs logged in:
 

root@webserver:~# tail -n 10 /var/log/haproxy.log
Apr 15 22:47:34 pcfr_hware_local_ip haproxy[2914]: 159.223.65.16:58735 [15/Apr/2022:22:47:34.586] https-in https-websrv/ha1server-2 1/0/+0 +0 — 7/7/7/7/0 0/0
Apr 15 22:47:34 pcfr_hware_local_ip haproxy[2914]: 20.113.133.8:56405 [15/Apr/2022:22:47:34.744] https-in https-websrv/ha1server-2 1/0/+0 +0 — 7/7/7/7/0 0/0
Apr 15 22:47:35 pcfr_hware_local_ip haproxy[2914]: 54.36.148.248:15653 [15/Apr/2022:22:47:35.057] https-in https-websrv/ha1server-2 1/0/+0 +0 — 7/7/7/7/0 0/0
Apr 15 22:47:35 pcfr_hware_local_ip haproxy[2914]: 185.191.171.35:26564 [15/Apr/2022:22:47:35.071] https-in https-websrv/ha1server-2 1/0/+0 +0 — 8/8/8/8/0 0/0
Apr 15 22:47:35 pcfr_hware_local_ip haproxy[2914]: 213.183.53.58:42984 [15/Apr/2022:22:47:35.669] https-in https-websrv/ha1server-2 1/0/+0 +0 — 6/6/6/6/0 0/0
Apr 15 22:47:35 pcfr_hware_local_ip haproxy[2914]: 159.223.65.16:54006 [15/Apr/2022:22:47:35.703] https-in https-websrv/ha1server-2 1/0/+0 +0 — 7/7/7/7/0 0/0
Apr 15 22:47:36 pcfr_hware_local_ip haproxy[2914]: 192.241.113.203:30877 [15/Apr/2022:22:47:36.651] https-in https-websrv/ha1server-2 1/0/+0 +0 — 4/4/4/4/0 0/0
Apr 15 22:47:36 pcfr_hware_local_ip haproxy[2914]: 185.191.171.9:6776 [15/Apr/2022:22:47:36.683] https-in https-websrv/ha1server-2 1/0/+0 +0 — 5/5/5/5/0 0/0
Apr 15 22:47:36 pcfr_hware_local_ip haproxy[2914]: 159.223.65.16:64310 [15/Apr/2022:22:47:36.797] https-in https-websrv/ha1server-2 1/0/+0 +0 — 6/6/6/6/0 0/0
Apr 15 22:47:36 pcfr_hware_local_ip haproxy[2914]: 185.191.171.3:23364 [15/Apr/2022:22:47:36.834] https-in https-websrv/ha1server-2 1/1/+1 +0 — 7/7/7/7/0 0/0


2. Enable remoteip proxy protocol on Webservers

Login to each Apache HTTPD and to enable remoteip module run:
 

# a2enmod remoteip


On Debians, the command should produce a right symlink to mods-enabled/ directory
 

# ls -al /etc/apache2/mods-enabled/*remote*
lrwxrwxrwx 1 root root 31 Mar 30  2021 /etc/apache2/mods-enabled/remoteip.load -> ../mods-available/remoteip.load


3. Modify remoteip.conf file and allow IPs of haproxies or F5s


Configure RemoteIPTrustedProxy for every Source IP of haproxy to allow it to send X-Forwarded-For header to Apache,

Here are few examples, from my apache working config on Debian 11.2 (Bullseye):
 

webserver:~# cat remoteip.conf
RemoteIPHeader X-Forwarded-For
RemoteIPTrustedProxy 192.168.0.1
RemoteIPTrustedProxy 192.168.0.205
RemoteIPTrustedProxy 192.168.1.15
RemoteIPTrustedProxy 192.168.0.198
RemoteIPTrustedProxy 192.168.2.33
RemoteIPTrustedProxy 192.168.2.30
RemoteIPTrustedProxy 192.168.0.215
#RemoteIPTrustedProxy 51.89.232.41

On RedHat / Fedora other RPM based Linux distrubutions, you can do the same by including inside httpd.conf or virtualhost configuration something like:
 

<IfModule remoteip_module>
      RemoteIPHeader X-Forwarded-For
      RemoteIPInternalProxy 192.168.0.0/16
      RemoteIPTrustedProxy 192.168.0.215/32
</IfModule>


4. Enable RemoteIP Proxy Protocol in apache2.conf / httpd.conf or Virtualhost custom config
 

Modify both haproxy / haproxies config as well as enable the RemoteIP module on Apache webservers (VirtualHosts if such used) and either in <VirtualHost> block or in main http config include:

RemoteIPProxyProtocol On


5. Change default configured Apache LogFormat

In Domain Vhost or apache2.conf / httpd.conf

Default logging Format will be something like:
 

LogFormat "%h %l %u %t \"%r\" %>s %O \"%{Referer}i\" \"%{User-Agent}i\"" combined


or
 

LogFormat "%v:%p %h %l %u %t \"%r\" %>s %O \"%{Referer}i\" \"%{User-Agent}i\"" combined


Once you find it in /etc/apache2/apache2.conf / httpd.conf or Vhost, you have to comment out this by adding shebang infont of sentence make it look as follows:
 

LogFormat "%v:%p %a %l %u %t \"%r\" %>s %O \"%{Referer}i\" \"%{User-Agent}i\"" vhost_combined
LogFormat "%a %l %u %t \"%r\" %>s %O \"%{Referer}i\" \"%{User-Agent}i\"" combined
LogFormat "%a %l %u %t \"%r\" %>s %O" common
LogFormat "%{Referer}i -> %U" referer
LogFormat "%{User-agent}i" agent


The Changed LogFormat instructs Apache to log the client IP as recorded by mod_remoteip (%a) rather than hostname (%h). For a full explanation of all the options check the official HTTP Server documentation page apache_mod_config on Custom Log Formats.

and reload each Apache server.

on Debian:

# apache2ctl -k reload

On CentOS

# systemctl restart httpd


6. Check proxy protocol is properly enabled on Apaches


remoteip module will enable Apache to expect a proxy connect header passed to it otherwise it will respond with Bad Request, because it will detect a plain HTML request instead of Proxy Protocol CONNECT, here is the usual telnet test to fetch the index.htm page.

root@webserver:~# telnet localhost 80
Trying 127.0.0.1…
Connected to localhost.
Escape character is '^]'.
GET / HTTP/1.1

HTTP/1.1 400 Bad Request
Date: Fri, 15 Apr 2022 19:04:51 GMT
Server: Apache/2.4.51 (Debian)
Content-Length: 312
Connection: close
Content-Type: text/html; charset=iso-8859-1

<!DOCTYPE HTML PUBLIC "-//IETF//DTD HTML 2.0//EN">
<html><head>
<title>400 Bad Request</title>
</head><body>
<h1>Bad Request</h1>
<p>Your browser sent a request that this server could not understand.<br />
</p>
<hr>
<address>Apache/2.4.51 (Debian) Server at grafana.pc-freak.net Port 80</address>
</body></html>
Connection closed by foreign host.


root@webserver:~# telnet localhost 80
Trying 127.0.0.1…
Connected to localhost.
Escape character is '^]'.
HEAD / HTTP/1.1

HTTP/1.1 400 Bad Request
Date: Fri, 15 Apr 2022 19:05:07 GMT
Server: Apache/2.4.51 (Debian)
Connection: close
Content-Type: text/html; charset=iso-8859-1

Connection closed by foreign host.


To test it with telnet you can follow the Proxy CONNECT syntax and simulate you're connecting from a proxy server, like that:
 

root@webserver:~# telnet localhost 80
Trying 127.0.0.1…
Connected to localhost.
Escape character is '^]'.
CONNECT localhost:80 HTTP/1.0

HTTP/1.1 301 Moved Permanently
Date: Fri, 15 Apr 2022 19:13:38 GMT
Server: Apache/2.4.51 (Debian)
Location: https://zabbix.pc-freak.net
Cache-Control: max-age=900
Expires: Fri, 15 Apr 2022 19:28:38 GMT
Content-Length: 310
Connection: close
Content-Type: text/html; charset=iso-8859-1

<!DOCTYPE HTML PUBLIC "-//IETF//DTD HTML 2.0//EN">
<html><head>
<title>301 Moved Permanently</title>
</head><body>
<h1>Moved Permanently</h1>
<p>The document has moved <a href="https://zabbix.pc-freak.net">here</a>.</p>
<hr>
<address>Apache/2.4.51 (Debian) Server at localhost Port 80</address>
</body></html>
Connection closed by foreign host.

You can test with curl simulating the proxy protocol CONNECT with:

root@webserver:~# curl –insecure –haproxy-protocol https://192.168.2.30

<!DOCTYPE HTML PUBLIC "-//W3C//DTD HTML 4.01 Transitional//EN"
"http://w3.org/TR/html4/loose.dtd">
<html>
<head>
<meta name="generator" content="pc-freak.net tidy">
<script src="https://ssl.google-analytics.com/urchin.js" type="text/javascript">
</script>
<script type="text/javascript">
_uacct = "UA-2102595-3";
urchinTracker();
</script>
<script type="text/javascript">
var gaJsHost = (("https:" == document.location.protocol) ? "https://ssl." : "http://");
document.write(unescape("%3Cscript src='" + gaJsHost + "google-analytics.com/ga.js' type='text/javascript'%3E%3C/script%3E"));
</script>
<script type="text/javascript">
try {
var pageTracker = _gat._getTracker("UA-2102595-6");
pageTracker._trackPageview();
} catch(err) {}
</script>


      –haproxy-protocol
              (HTTP) Send a HAProxy PROXY protocol v1 header at the beginning of the connection. This is used by some load balancers and reverse proxies
              to indicate the client's true IP address and port.

              This option is primarily useful when sending test requests to a service that expects this header.

              Added in 7.60.0.


7. Check apache log if remote Real Internet Source IPs are properly logged
 

root@webserver:~# tail -n 10 /var/log/apache2/access.log

213.183.53.58 – – [15/Apr/2022:22:18:59 +0300] "GET /proxy/browse.php?u=https%3A%2F%2Fsteamcommunity.com%2Fmarket%2Fitemordershistogram%3Fcountry HTTP/1.1" 200 12701 "https://www.pc-freak.net" "Mozilla/5.0 (Windows NT 10.0; Win64; x64; rv:98.0) Gecko/20100101 Firefox/98.0"
88.198.48.184 – – [15/Apr/2022:22:18:58 +0300] "GET /blog/iq-world-rank-country-smartest-nations/?cid=1330192 HTTP/1.1" 200 29574 "-" "Mozilla/5.0 (compatible; DataForSeoBot/1.0; +https://dataforseo.com/dataforseo-bot)"
213.183.53.58 – – [15/Apr/2022:22:19:00 +0300] "GET /proxy/browse.php?u=https%3A%2F%2Fsteamcommunity.com%2Fmarket%2Fitemordershistogram%3Fcountry
HTTP/1.1" 200 9080 "https://www.pc-freak.net" "Mozilla/5.0 (Windows NT 10.0; Win64; x64; rv:98.0) Gecko/20100101 Firefox/98.0"
159.223.65.16 – – [15/Apr/2022:22:19:01 +0300] "POST //blog//xmlrpc.php HTTP/1.1" 200 5477 "-" "Mozilla/5.0 (Windows NT 10.0; Win64; x64) AppleWebKit/537.36 (KHTML, like Gecko) Chrome/89.0.4389.114 Safari/537.36"
159.223.65.16 – – [15/Apr/2022:22:19:02 +0300] "POST //blog//xmlrpc.php HTTP/1.1" 200 5477 "-" "Mozilla/5.0 (Windows NT 10.0; Win64; x64) AppleWebKit/537.36 (KHTML, like Gecko) Chrome/89.0.4389.114 Safari/537.36"
213.91.190.233 – – [15/Apr/2022:22:19:02 +0300] "POST /blog/wp-admin/admin-ajax.php HTTP/1.1" 200 1243 "https://www.pc-freak.net/blog/wp-admin/post.php?post=16754&action=edit" "Mozilla/5.0 (Windows NT 6.1; Win64; x64; rv:89.0) Gecko/20100101 Firefox/89.0"
46.10.215.119 – – [15/Apr/2022:22:19:02 +0300] "GET /images/saint-Paul-and-Peter-holy-icon.jpg HTTP/1.1" 200 134501 "https://www.google.com/" "Mozilla/5.0 (Windows NT 10.0; Win64; x64) AppleWebKit/537.36 (KHTML, like Gecko) Chrome/100.0.4896.75 Safari/537.36 Edg/100.0.1185.39"
185.191.171.42 – – [15/Apr/2022:22:19:03 +0300] "GET /index.html.latest/tutorials/tutorials/penguins/vestnik/penguins/faith/vestnik/ HTTP/1.1" 200 11684 "-" "Mozilla/5.0 (compatible; SemrushBot/7~bl; +http://www.semrush.com/bot.html)"

116.179.37.243 – – [15/Apr/2022:22:19:50 +0300] "GET /blog/wp-content/cookieconsent.min.js HTTP/1.1" 200 7625 "https://www.pc-freak.net/blog/how-to-disable-nginx-static-requests-access-log-logging/" "Mozilla/5.0 (compatible; Baiduspider-render/2.0; +http://www.baidu.com/search/spider.html)"
116.179.37.237 – – [15/Apr/2022:22:19:50 +0300] "GET /blog/wp-content/plugins/google-analytics-dashboard-for-wp/assets/js/frontend-gtag.min.js?ver=7.5.0 HTTP/1.1" 200 8898 "https://www.pc-freak.net/blog/how-to-disable-nginx-static-requests-access-log-logging/" "Mozilla/5.0 (compatible; Baiduspider-render/2.0; +http://www.baidu.com/search/spider.html)"


You see from above output remote Source IPs in green are properly logged, so haproxy Cluster is correctly forwarding connections passing on in the Haproxy generated Initial header the Real IP of its remote connect IPs.


Sum it up, What was done?


HTTP_X_FORWARD_FOR is impossible to set, when haproxy is used on mode tcp and all traffic is sent as received from TCP IPv4 / IPv6 Network stack, e.g. modifying any HTTP sent traffic inside the headers is not possible as this might break up the data.

Thus Haproxy was configured to send all its received data by sending initial proxy header with the X_FORWARDED usual Source IP data, then remoteip Apache module was used to make Apache receive and understand haproxy sent Header which contains the original Source IP via the send-proxy functionality and example was given on how to test the remoteip on Webserver is working correctly.

Finally you've seen how to check configured haproxy and webserver are able to send and receive the End Client data with the originator real source IP correctly and those Internet IP is properly logged inside both haproxy and apaches.

How to redirect TCP port traffic from Internet Public IP host to remote local LAN server, Redirect traffic for Apache Webserver, MySQL, or other TCP service to remote host

Thursday, September 23rd, 2021


Linux-redirect-forward-tcp-ip-port-traffic-from-internet-to-remote-internet-LAN-IP-server-rinetd-iptables-redir


1. Use the good old times rinetd – internet “redirection server” service


Perhaps, many people who are younger wouldn't remember rinetd's use was pretty common on old Linuxes in the age where iptables was not on the scene and its predecessor ipchains was so common.
In the raise of mass internet rinetd started loosing its popularity because the service was exposed to the outer world and due to security holes and many exploits circulating the script kiddie communities
many servers get hacked "pwned" in the jargon of the script kiddies.

rinetd is still available even in modern Linuxes and over the last years I did not heard any severe security concerns regarding it, but the old paranoia perhaps and the set to oblivion makes it still unpopular soluttion for port redirect today in year 2021.
However for a local secured DMZ lans I can tell you that its use is mostly useful and I chooes to use it myself, everynow and then due to its simplicity to configure and use.
rinetd is pretty standard among unixes and is also available in old Sun OS / Solaris and BSD-es and pretty much everything on the Unix scene.

Below is excerpt from 'man rinetd':


DESCRIPTION
     rinetd redirects TCP connections from one IP address and port to another. rinetd is a single-process server which handles any number of connections to the address/port pairs
     specified in the file /etc/rinetd.conf.  Since rinetd runs as a single process using nonblocking I/O, it is able to redirect a large number of connections without a severe im‐
     pact on the machine. This makes it practical to run TCP services on machines inside an IP masquerading firewall. rinetd does not redirect FTP, because FTP requires more than
     one socket.
     rinetd is typically launched at boot time, using the following syntax:      /usr/sbin/rinetd      The configuration file is found in the file /etc/rinetd.conf, unless another file is specified using the -c command line option.

To use rinetd on any LInux distro you have to install and enable it with apt or yum as usual. For example on my Debian GNU / Linux home machine to use it I had to install .deb package, enable and start it it via systemd :


server:~# apt install –yes rinetd

server:~#  systemctl enable rinetd


server:~#  systemctl start rinetd


server:~#  systemctl status rinetd
● rinetd.service
   Loaded: loaded (/etc/init.d/rinetd; generated)
   Active: active (running) since Tue 2021-09-21 10:48:20 EEST; 2 days ago
     Docs: man:systemd-sysv-generator(8)
    Tasks: 1 (limit: 4915)
   Memory: 892.0K
   CGroup: /system.slice/rinetd.service
           └─1364 /usr/sbin/rinetd


rinetd is doing the traffic redirect via a separate process daemon, in order for it to function once you have service up check daemon is up as well.

root@server:/home/hipo# ps -ef|grep -i rinet
root       359     1  0 16:10 ?        00:00:00 /usr/sbin/rinetd
root       824 26430  0 16:10 pts/0    00:00:00 grep -i rinet

+ Configuring a new port redirect with rinetd


Is pretty straight forward everything is handled via one single configuration – /etc/rinetd.conf

The format (syntax) of a forwarding rule is as follows:

     [bindaddress] [bindport] [connectaddress] [connectport]


Besides that rinetd , could be used as a primitive firewall substitute to iptables, general syntax of allow deny an IP address is done with (allow, deny) keywords:
 

allow 192.168.2.*
deny 192.168.2.1?


To enable logging to external file ,you'll have to include in the configuration:

# logging information
logfile /var/log/rinetd.log

Here is an example rinetd.conf configuration, redirecting tcp mysql 3306, nginx on port 80 and a second web service frontend for ILO to server reachable via port 8888 and a redirect from External IP to local IP SMTP server.


#
# this is the configuration file for rinetd, the internet redirection server
#
# you may specify global allow and deny rules here
# only ip addresses are matched, hostnames cannot be specified here
# the wildcards you may use are * and ?
#
# allow 192.168.2.*
# deny 192.168.2.1?


#
# forwarding rules come here
#
# you may specify allow and deny rules after a specific forwarding rule
# to apply to only that forwarding rule
#
# bindadress    bindport  connectaddress  connectport


# logging information
logfile /var/log/rinetd.log
83.228.93.76        80            192.168.0.20       80
192.168.0.2        3306            192.168.0.19        3306
83.228.93.76        443            192.168.0.20       443
# enable for access to ILO
83.228.93.76        8888            192.168.1.25 443

127.0.0.1    25    192.168.0.19    25


83.228.93.76 is my external ( Public )  IP internet address where 192.168.0.20, 192.168.0.19, 192.168.0.20 (are the DMZ-ed Lan internal IPs) with various services.

To identify the services for which rinetd is properly configured to redirect / forward traffic you can see it with netstat or the newer ss command
 

root@server:/home/hipo# netstat -tap|grep -i rinet
tcp        0      0 www.pc-freak.net:8888   0.0.0.0:*               LISTEN      13511/rinetd      
tcp        0      0 www.pc-freak.n:http-alt 0.0.0.0:*               LISTEN      21176/rinetd        
tcp        0      0 www.pc-freak.net:443   0.0.0.0:*               LISTEN      21176/rinetd      


+ Using rinetd to redirect External interface IP to loopback's port (127.0.0.1)


If you have the need to redirect an External connectable living service be it apache mysql / privoxy / squid or whatever rinetd is perhaps the tool of choice (especially since there is no way to do it with iptables.

If you want to redirect all traffic which is accessed via Linux's loopback interface (localhost) to be reaching a remote host 11.5.8.1 on TCP port 1083 and 1888, use below config

# bindadress    bindport  connectaddress  connectport
11.5.8.1        1083            127.0.0.1       1083
11.5.8.1        1888            127.0.0.1       1888


For a quick and dirty solution to redirect traffic rinetd is very useful, however you'll have to keep in mind that if you want to redirect traffic for tens of thousands of connections constantly originating from the internet you might end up with some disconnects as well as notice a increased use of rinetd CPU use with the incrased number of forwarded connections.


2. Redirect TCP / IP port using DNAT iptables firewall rules


Lets say you have some proxy, webservice or whatever service running on port 5900 to be redirected with iptables.
The easeiest legacy way is to simply add the redirection rules to /etc/rc.local​. In newer Linuxes rc.local so if you decide to use,
you'll have to enable rc.local , I've written earlier a short article on how to enable rc.local on newer Debian, Fedora, CentOS


# redirect 5900 TCP service 
sysctl -w net.ipv4.conf.all.route_localnet=1
iptables -t nat -I PREROUTING -p tcp –dport 5900 -j REDIRECT –to-ports 5900
iptables -t nat -I OUTPUT -p tcp -o lo –dport 5900 -j REDIRECT –to-ports 5900
iptables -t nat -A OUTPUT -o lo -d 127.0.0.1 -p tcp –dport 5900 -j DNAT  –to-destination 192.168.1.8:5900
iptables -t nat -I OUTPUT –source 0/0 –destination 0/0 -p tcp –dport 5900 -j REDIRECT –to-ports 5900


Here is another two example which redirects port 2208 (which has configured a bind listener for SSH on Internal host 192.168.0.209:2208) from External Internet IP address (XXX.YYY.ZZZ.XYZ) 
 

# Port redirect for SSH to VM on openxen internal Local lan server 192.168.0.209 
-A PREROUTING  -p tcp –dport 2208 -j DNAT –to-destination 192.168.0.209:2208
-A POSTROUTING -p tcp –dst 192.168.0.209 –dport 2208 -j SNAT –to-source 83.228.93.76


3. Redirect TCP traffic connections with redir tool


If you look for an easy straight forward way to redirect TCP traffic, installing and using redir (ready compiled program) might be a good idea.


root@server:~# apt-cache show redir|grep -i desc -A5 -B5
Version: 3.2-1
Installed-Size: 60
Maintainer: Lucas Kanashiro <kanashiro@debian.org>
Architecture: amd64
Depends: libc6 (>= 2.15)
Description-en: Redirect TCP connections
 It can run under inetd or stand alone (in which case it handles multiple
 connections).  It is 8 bit clean, not limited to line mode, is small and
 light. Supports transparency, FTP redirects, http proxying, NAT and bandwidth
 limiting.
 .
 redir is all you need to redirect traffic across firewalls that authenticate
 based on an IP address etc. No need for the firewall toolkit. The
 functionality of inetd/tcpd and "redir" will allow you to do everything you
 need without screwy telnet/ftp etc gateways. (I assume you are running IP
 Masquerading of course.)

Description-md5: 2089a3403d126a5a0bcf29b22b68406d
Homepage: https://github.com/troglobit/redir
Tag: interface::daemon, network::server, network::service, role::program,
 use::proxying
Section: net
Priority: optional


server:~# apt-get install –yes redir

Here is a short description taken from its man page 'man redir'


DESCRIPTION
     redir redirects TCP connections coming in on a local port, [SRC]:PORT, to a specified address/port combination, [DST]:PORT.  Both the SRC and DST arguments can be left out,
     redir will then use 0.0.0.0.

     redir can be run either from inetd or as a standalone daemon.  In –inetd mode the listening SRC:PORT combo is handled by another process, usually inetd, and a connected
     socket is handed over to redir via stdin.  Hence only [DST]:PORT is required in –inetd mode.  In standalone mode redir can run either in the foreground, -n, or in the back‐
     ground, detached like a proper UNIX daemon.  This is the default.  When running in the foreground log messages are also printed to stderr, unless the -s flag is given.

     Depending on how redir was compiled, not all options may be available.


+ Use redir to redirect TCP traffic one time


Lets say you have a MySQL running on remote machine on some internal or external IP address, lets say 192.168.0.200 and you want to redirect all traffic from remote host to the machine (192.168.0.50), where you run your Apache Webserver, which you want to configure to use
as MySQL localhost TCP port 3306.

Assuming there are no irewall restrictions between Host A (192.168.0.50) and Host B (192.168.0.200) is already permitting connectivity on TCP/IP port 3306 between the two machines.

To open redirection from localhost on 192.168.0.50 -> 192.168.0.200:


server:~# redir –laddr=127.0.0.1 –lport=3306 –caddr=192.168.0.200 –cport=3306


If you need other third party hosts to be additionally reaching 192.168.0.200 via 192.168.0.50 TCP 3306.

root@server:~# redir –laddr=192.168.0.50 –lport=3306 –caddr=192.168.0.200 –cport=3306


Of course once you close, the /dev/tty or /dev/vty console the connection redirect will be cancelled.


+ Making TCP port forwarding from Host A to Host B permanent


One solution to make the redir setup rules permanent is to use –rinetd option or simply background the process, nevertheless I prefer to use instead GNU Screen.
If you don't know screen is a vVrtual Console Emulation manager with VT100/ANSI terminal emulation to so, if you don't have screen present on the host install it with whatever Linux OS package manager is present and run:


root@server:~#screen -dm bash -c 'redir –laddr=127.0.0.1 –lport=3306 –caddr=192.168.0.200 –cport=3306'


That would run it into screen session and detach so you can later connect, if you want you can make redir to also log connections via syslog with ( -s) option.

I found also useful to be able to track real time what's going on currently with the opened redirect socket by changing redir log level.

Accepted log level is:


  -l, –loglevel=LEVEL
             Set log level: none, err, notice, info, debug.  Default is notice.


root@server:/ # screen -dm bash -c 'redir –laddr=127.0.0.1 –lport=3308 –caddr=192.168.0.200 –cport=3306 -l debug'


To test connectivity works as expected use telnet:
 

root@server:/ # telnet localhost 3308
Trying 127.0.0.1…
Connected to localhost.
Escape character is '^]'.
g
5.5.5-10.3.29-MariaDB-0+deb10u1-log�+c2nWG>B���o+#ly=bT^]79mysql_native_password

6#HY000Proxy header is not accepted from 192.168.0.19 Connection closed by foreign host.

once you attach to screen session with


root@server:/home #  screen -r


You will get connectivity attempt from localhost logged : .
 

redir[10640]: listening on 127.0.0.1:3306
redir[10640]: target is 192.168.0.200:3306
redir[10640]: Waiting for client to connect on server socket …
redir[10640]: target is 192.168.0.200:3306
redir[10640]: Waiting for client to connect on server socket …
redir[10793]: peer IP is 127.0.0.1
redir[10793]: peer socket is 25592
redir[10793]: target IP address is 192.168.0.200
redir[10793]: target port is 3306
redir[10793]: Connecting 127.0.0.1:25592 to 127.0.0.1:3306
redir[10793]: Entering copyloop() – timeout is 0
redir[10793]: Disconnect after 1 sec, 165 bytes in, 4 bytes out

The downsides of using redir is redirection is handled by the separate process which is all time hanging in the process list, as well as the connection redirection speed of incoming connections might be about at least 30% slower to if you simply use a software (firewall ) redirect such as iptables. If you use something like kernel IP set ( ipsets ). If you hear of ipset for a first time and you wander whta it is below is short package description.


root@server:/root# apt-cache show ipset|grep -i description -A13 -B5
Maintainer: Debian Netfilter Packaging Team <pkg-netfilter-team@lists.alioth.debian.org>
Architecture: amd64
Provides: ipset-6.38
Depends: iptables, libc6 (>= 2.4), libipset11 (>= 6.38-1~)
Breaks: xtables-addons-common (<< 1.41~)
Description-en: administration tool for kernel IP sets
 IP sets are a framework inside the Linux 2.4.x and 2.6.x kernel which can be
 administered by the ipset(8) utility. Depending on the type, currently an
 IP set may store IP addresses, (TCP/UDP) port numbers or IP addresses with
 MAC addresses in a  way which ensures lightning speed when matching an
 entry against a set.
 .
 If you want to
 .
  * store multiple IP addresses or port numbers and match against the
    entire collection using a single iptables rule.
  * dynamically update iptables rules against IP addresses or ports without
    performance penalty.
  * express complex IP address and ports based rulesets with a single
    iptables rule and benefit from the speed of IP sets.

 .
 then IP sets may be the proper tool for you.
Description-md5: d87e199641d9d6fbb0e52a65cf412bde
Homepage: http://ipset.netfilter.org/
Tag: implemented-in::c, role::program
Section: net
Priority: optional
Filename: pool/main/i/ipset/ipset_6.38-1.2_amd64.deb
Size: 50684
MD5sum: 095760c5db23552a9ae180bd58bc8efb
SHA256: 2e2d1c3d494fe32755324bf040ffcb614cf180327736c22168b4ddf51d462522

Mail send from command line on Linux and *BSD servers – useful for scripting

Monday, September 10th, 2018

mail-send-email-from-command-line-on-linux-and-freebsd-operating-systems-logo

Historically Email sending has been very different from what most people use it in the Office, there was no heavy Email clients such as Outlook Express no MX Exchange, no e-mail client capabilities for Calendar and Meetings schedule as it is in most of the modern corporate offices that depend on products such as Office 365 (I would call it a connectedHell 365 days a year !).

There was no free webmail and pop3 / imap providers such as Mail.Yahoo.com, Gmail.com, Hotmail.com, Yandex.com, RediffMail, Mail.com the innumerous lists goes and on.
Nope back in the day emails were doing what they were originally supposed to like the post services in real life simply send and receive messages.

For those who remember that charming times, people used to be using BBS-es (which were basicly a shared set-up home system as a server) or some of the few University Internal Email student accounts or by crazy sysadmins who received their notification and warnings logs about daemon (services) messages via local DMZ-ed network email servers and it was common to read the email directly with mail (mailx) text command or custom written scripts … It was not uncommon also that mailx was used heavily to send notification messages on triggered events from logs. Oh life was simple and clear back then, and even though today the email could be used in a similar fashion by hard-core old school sysadmins and Dev Ops / simple shell scriptings tasks or report cron jobs such usage is already in the deep history.

The number of ways one could send email in text format directly from the GNU / Linux / *BSD server to another remote mail MTA node (assuming it had properly configured Relay server be it Exim or Postifix) were plenty.

In this article I will try to rewind back some of the UNIX history by pinpointing a few of the most common ways, one used to send quick emails directly from a remote server connection terminal or lets say a cheap VPS few cents server, through something like (SSH or Telnet) etc.
 

1. Using the mail command client (part of bsd-mailx on Debian).
 

In my previous article Linux: "bash mail command not found" error fix
I ended the article with a short explanation on how this is done but I will repeat myself one more time here for the sake of clearness of this article.

root@linux:~# echo "Your Sample Message Body" | mail -s "Whatever … Message Subject" remote_receiver@remote-server-email-address.com


The mail command will connect to local server TCP PORT 25 on local configured MTA and send via it. If the local MTA is misconfigured or it doesn't have a proper MX / PTR DNS records etc. or not configure as a relay SMTP remote mail will not get delivered. Sent Email should be properly delivered at remote recipient address.

How to send HTML formatted emails using mailx command on Linux console / terminal shell using remote server through SSH ?

Connect to remote SSH server (VPS), dedicated server, home Linux router etc. and run:


root@linux:~# mailx -a 'Content-Type: text/html'
      -s "This is advanced mailx indeed!" < email_content.html
      "first_email_to_send_to@gmail.com, mail_recipient_2@yahoo.com"


email_content.html should be properly formatted (at best w3c standard compliant) HTML.

Here is an example email_content.html (skeleton file)


    To: your_customer@gmail.com
    Subject: This is an HTML message
    From: marketing@your_company.com
    Content-Type: text/html; charset="utf8"

    <html>
    <body>
    <div style="
        background-color:
        #abcdef; width: 300px;
        height: 300px;
        ">
    </div>
Whatever text mixed with valid email HTML tags here.
    </body>
    </html>


Above command sends to two email addresses however if you have a text formatted list of recipients you can easily use that file with a bash shell script for loop and send to multiple addresses red from lets say email_addresses_list.txt .

To further advance the one liner you can also want to provide an email attachment, lets say the file email_archive.rar by using the -A email_archive.rar argument.


root@linux:~# mailx -a 'Content-Type: text/html'
      -s "This is advanced mailx indeed!" -A ~/email_archive.rar < email_content.html
      "first_email_to_send_to@gmail.com, mail_recipient_2@yahoo.com"


For those familiar with Dan Bernstein's Qmail MTA (which even though a bit obsolete is still a Security and Stability Beast across email servers) – mailx command had to be substituted with a custom qmail one in order to be capable to send via qmail MTA daemon.
 

2. Using sendmail command to send email
 

Do you remember that heavy hard to configure MTA monster sendmail ? It was and until this very day is the default Mail Transport Agent for Slackware Linux.

Here is how we were supposed to send mail with it:


[root@sendmail-host ~]# vim email_content_to_be_delivered.txt


Content of file should be something like:

Subject: This Email is sent from UNIX Terminal Email

Hi this Email was typed in a file and send via sendmail console email client
(part of the sendmail mail server)

It is really fun to go back in the pre-history of Mail Content creation 🙂


[root@sendmail-host ~]# sendmail -v user_name@remote-mail-domain.com  < /tmp/email_content_to_be_delivered.txt


-v argument provided, will make the communication between the mail server and your mail transfer agent visible.
 

3. Using ssmtp command to send mail
 

ssmtp MTA and its included shell command was used historically as it was pretty straight forward you just launch it on the command line type on one line all your email and subject and ship it (by pressing the CTRL + D key combination).

To give it a try you can do:


root@linux:~# apt-get install ssmtp
Reading package lists… Done
Building dependency tree       
Reading state information… Done
The following additional packages will be installed:
  libgnutls-openssl27
The following packages will be REMOVED:
  exim4-base exim4-config exim4-daemon-heavy
The following NEW packages will be installed:
  libgnutls-openssl27 ssmtp
0 upgraded, 2 newly installed, 3 to remove and 1 not upgraded.
Need to get 239 kB of archives.
After this operation, 3,697 kB disk space will be freed.
Do you want to continue? [Y/n] Y
Get:1 http://ftp.us.debian.org/debian stretch/main amd64 ssmtp amd64 2.64-8+b2 [54.2 kB]
Get:2 http://ftp.us.debian.org/debian stretch/main amd64 libgnutls-openssl27 amd64 3.5.8-5+deb9u3 [184 kB]
Fetched 239 kB in 2s (88.5 kB/s)         
Preconfiguring packages …
dpkg: exim4-daemon-heavy: dependency problems, but removing anyway as you requested:
 mailutils depends on default-mta | mail-transport-agent; however:
  Package default-mta is not installed.
  Package mail-transport-agent is not installed.
  Package exim4-daemon-heavy which provides mail-transport-agent is to be removed.


(Reading database … 169307 files and directories currently installed.)
Removing exim4-daemon-heavy (4.89-2+deb9u3) …
dpkg: exim4-config: dependency problems, but removing anyway as you requested:
 exim4-base depends on exim4-config (>= 4.82) | exim4-config-2; however:
  Package exim4-config is to be removed.
  Package exim4-config-2 is not installed.
  Package exim4-config which provides exim4-config-2 is to be removed.
 exim4-base depends on exim4-config (>= 4.82) | exim4-config-2; however:
  Package exim4-config is to be removed.
  Package exim4-config-2 is not installed.
  Package exim4-config which provides exim4-config-2 is to be removed.

Removing exim4-config (4.89-2+deb9u3) …
Selecting previously unselected package ssmtp.
(Reading database … 169247 files and directories currently installed.)
Preparing to unpack …/ssmtp_2.64-8+b2_amd64.deb …
Unpacking ssmtp (2.64-8+b2) …
(Reading database … 169268 files and directories currently installed.)
Removing exim4-base (4.89-2+deb9u3) …
Selecting previously unselected package libgnutls-openssl27:amd64.
(Reading database … 169195 files and directories currently installed.)
Preparing to unpack …/libgnutls-openssl27_3.5.8-5+deb9u3_amd64.deb …
Unpacking libgnutls-openssl27:amd64 (3.5.8-5+deb9u3) …
Processing triggers for libc-bin (2.24-11+deb9u3) …
Setting up libgnutls-openssl27:amd64 (3.5.8-5+deb9u3) …
Setting up ssmtp (2.64-8+b2) …
Processing triggers for man-db (2.7.6.1-2) …
Processing triggers for libc-bin (2.24-11+deb9u3) …


As you see from above output local default Debian Linux Exim is removed …

Lets send a simple test email …


hipo@linux:~# ssmtp user@remote-mail-server.com
Subject: Simply Test SSMTP Email
This Email was send just as a test using SSMTP obscure client
via SMTP server.
^d


What is notable about ssmtp is that even though so obsolete today it supports of STARTTLS (email communication encryption) that is done via its config file


/etc/ssmtp/ssmtp.conf


4. Send Email from terminal using Mutt client
 

Mutt was and still is one of the swiff army of most used console text email clients along with Alpine and Fetchmail to know more about it read here

Mutt supports reading / sending mail from multiple mailboxes and capable of reading IMAP and POP3 mail fetch protocols and was a serious step forward over mailx. Its syntax pretty much resembles mailx cmds.


root@linux:~# mutt -s "Test Email" user@example.com < /dev/null


Send email including attachment a 15 megabytes MySQL backup of Squirrel Webmail


root@linux:~# mutt  -s "This is last backup small sized database" -a /home/backups/backup_db.sql user@remote-mail-server.com < /dev/null


5. Using simple telnet to test and send email (verify existence of email on remote SMTP)
 

As a Mail Server SysAdmin this is one of my best ways to test whether I had a server properly configured and even sometimes for the sake of fun I used it as a hack to send my mail 🙂
telnet is and will always be a great tool for doing SMTP issues troubleshooting.
 

It is very useful to test whether a remote SMTP TCP port 25 is opened or a local / remote server firewall prevents connections to MTA.

Below is an example connect and send example using telnet to my local SMTP on www.pc-freak.net (QMail powered (R) 🙂 )

sending-email-using-telnet-command-howto-screenshot


root@pcfreak:~# telnet localhost 25
Trying 127.0.0.1…
Connected to localhost.
Escape character is '^]'.
220 This is Mail Pc-Freak.NET ESMTP
HELO mail.www.pc-freak.net
250 This is Mail Pc-Freak.NET
MAIL FROM:<hipo@www.pc-freak.net>
250 ok
RCPT TO:<roots_bg@yahoo.com>
250 ok
DATA
354 go ahead
Subject: This is a test subject


This is just a test mail send through telnet
.
250 ok 1536440787 qp 28058
^]
telnet>


Note that the returned messages are native to qmail, a postfix would return a slightly different content, here is another test example to remote SMTP running sendmail or postfix.


root@pcfreak:~# telnet mail.servername.com 25
Trying 127.0.0.1…
Connected to localhost.localdomain (127.0.0.1).
Escape character is '^]'.
220 mail.servername.com ESMTP Sendmail 8.13.8/8.13.8; Tue, 22 Oct 2013 05:05:59 -0400
HELO yahoo.com
250 mail.servername.com Hello mail.servername.com [127.0.0.1], pleased to meet you
mail from: systemexec@gmail.com
250 2.1.0 hipo@www.pc-freak.net… Sender ok
rcpt to: hip0d@yandex.ru
250 2.1.5 hip0d@yandex.ru… Recipient ok
data
354 Enter mail, end with "." on a line by itself
Hey
This is test email only


Thanks
.
250 2.0.0 r9M95xgc014513 Message accepted for delivery
quit
221 2.0.0 mail.servername.com closing connection
Connection closed by foreign host.


It is handy if you want to know whether remote MTA server has a certain Emailbox existing or not with telnet by simply trying to send to a certian email and checking the Email server returned output (note that the message returned depends on the remote MTA version and many qmails are configured to not give information on the initial SMTP handshake but returns instead a MAILER DAEMON failure error sent back to your sender address. Some MX servrers are still vulnerable to this attack yet, historically dreamhost.com. Below attack screenshot is made at the times before dreamhost.com fixed the brute force email issue.

Terminal-Verify-existing-Email-with-telnet

6. Using simple netcat TCP/IP Swiss Army Knife to test and send email in console

netcat-logo-a-swiff-army-knife-of-the-hacker-and-security-expert-logo
Other tool besides telnet of testing remote / local SMTP is netcat tool (for reading and writting data across TCP and UDP connections).

The way to do it is analogous but since netcat is not present on most Linux OSes by default you need to install it through the package manager first be it apt or yum etc.

# apt-get –yes install netcat


First lets create a new file test_email_content.txt using bash's echo cmd.


# echo 'EHLO hostname
MAIL FROM: hip0d@yandex.ru
RCPT TO:   solutions@www.pc-freak.net
DATA
From: A tester <hip0d@yandex.ru>
To:   <solutions@www.pc-freak.net>
Date: date
Subject: A test message from test hostname


Delete me, please
.
QUIT
' >>test_email_content.txt


# netcat -C localhost 25 < test_email_content.txt


220 This is Mail Pc-Freak.NET ESMTP
250-This is Mail Pc-Freak.NET
250-STARTTLS
250-SIZE 80000000
250-PIPELINING
250 8BITMIME
250 ok
250 ok
354 go ahead
451 See http://pobox.com/~djb/docs/smtplf.html.

Because of its simplicity and the fact it has a bit more capabilities in reading / writing data over network it was no surprise it was among the favorite tools not only of crackers and penetration testers but also a precious debug tool for the avarage sysadmin. netcat's advantage over telnet is you can push-pull over the remote SMTP port (25) a non-interactive input.


7. Using openssl to connect and send email via encrypted channel


root@linux:~# openssl s_client -connect smtp.gmail.com:465 -crlf -ign_eof

    ===
               Certificate negotiation output from openssl command goes here
        ===

        220 smtp.gmail.com ESMTP j92sm925556edd.81 – gsmtp
            EHLO localhost
        250-smtp.gmail.com at your service, [78.139.22.28]
        250-SIZE 35882577
        250-8BITMIME
        250-AUTH LOGIN PLAIN XOAUTH2 PLAIN-CLIENTTOKEN OAUTHBEARER XOAUTH
        250-ENHANCEDSTATUSCODES
        250-PIPELINING
        250-CHUNKING
        250 SMTPUTF8
            AUTH PLAIN *passwordhash*
        235 2.7.0 Accepted
            MAIL FROM: <hipo@pcfreak.org>
        250 2.1.0 OK j92sm925556edd.81 – gsmtp
            rcpt to: <systemexec@gmail.com>
        250 2.1.5 OK j92sm925556edd.81 – gsmtp
            DATA
        354  Go ahead j92sm925556edd.81 – gsmtp
            Subject: This is openssl mailing

            Hello nice user
            .
        250 2.0.0 OK 1339757532 m46sm11546481eeh.9
            quit
        221 2.0.0 closing connection m46sm11546481eeh.9
        read:errno=0


8. Using CURL (URL transfer) tool to send SSL / TLS secured crypted channel emails via Gmail / Yahoo servers and MailGun Mail send API service


Using curl webpage downloading advanced tool for managing email send might be  a shocking news to many as it is idea is to just transfer data from a server.
curl is mostly used in conjunction with PHP website scripts for the reason it has a Native PHP implementation and many PHP based websites widely use it for download / upload of user data.
Interestingly besides support for HTTP and FTP it has support for POP3 and SMTP email protocols as well
If you don't have it installed on your server and you want to give it a try, install it first with apt:
 

root@linux:~# apt-get install curl


To learn more about curl capabilities make sure you check cURL –manual arg.
 

root@linux:~# curl –manual


a) Sending Emails via Gmail and other Mail Public services

Curl is capable to send emails from terminal using Gmail and Yahoo Mail services, if you want to give that a try.

gmail-settings-google-allow-less-secure-apps-sign-in-to-google-screenshot

Go to myaccount.google.com URL and login from the web interface choose Sign in And Security choose Allow less Secure Apps to be -> ON and turn on access for less secure apps in Gmail. Though I have not tested it myself so far with Yahoo! Mail, I suppose it should have a similar security settings somewhere.

Here is how to use curl to send email via Gmail.

Gmail-password-Allow-less-secure-apps-ON-screenshot-howto-to-be-able-to-send-email-with-text-commands-with-encryption-and-outlook


root@linux:~# curl –url 'smtps://smtp.gmail.com:465' –ssl-reqd \
  –mail-from 'your_email@gmail.com' –mail-rcpt 'remote_recipient@mail.com' \
  –upload-file mail.txt –user 'your_email@gmail.com:your_accout_password'


b) Sending Emails using Mailgun.com (Transactional Email Service API for developers)

To use Mailgun to script sending automated emails go to Mailgun.com and create account and generate new API key.

Then use curl in a similar way like below example:


curl -sv –user 'api:key-7e55d003b…f79accd31a' \
    https://api.mailgun.net/v3/sandbox21a78f824…3eb160ebc79.mailgun.org/messages \
    -F from='Excited User <developer@yourcompany.com>' \
    -F to=sandbox21a78f824…3eb160ebc79.mailgun.org \
    -F to=user_acc@gmail.com \
    -F subject='Hello' \
    -F text='Testing Mailgun service!' \
   –form-string html='<h1>EDMdesigner Blog</h1><br /><cite>This tutorial helps me understand email sending from Linux console</cite>' \
    -F attachment=@logo_picture.jpg


The -F option that is heavy present in above command lets curl (Emulate a form filled in button in which user has pressed the submit button).
For more info of the options check out man curl.


9. Using swaks command to send emails from


root@linux:~# apt-cache show swaks|grep "Description" -B 10
Package: swaks
Version: 20170101.0-1
Installed-Size: 221
Maintainer: Andreas Metzler <ametzler@debian.org>
Architecture: all
Depends: perl
Recommends: libnet-dns-perl, libnet-ssleay-perl
Suggests: perl-doc, libauthen-sasl-perl, libauthen-ntlm-perl
Description-en: SMTP command-line test tool
 swaks (Swiss Army Knife SMTP) is a command-line tool written in Perl
 for testing SMTP setups; it supports STARTTLS and SMTP AUTH (PLAIN,
 LOGIN, CRAM-MD5, SPA, and DIGEST-MD5). swaks allows one to stop the
 SMTP dialog at any stage, e.g to check RCPT TO: without actually
 sending a mail.
 .
 If you are spending too much time iterating "telnet foo.example 25"
 swaks is for you.
Description-md5: f44c6c864f0f0cb3896aa932ce2bdaa8


root@linux:~# apt-get instal –yes swaks

root@linux:~# swaks –to mailbox@example.com -s smtp.gmail.com:587
      -tls -au <user-account> -ap <account-password>


The -tls argument (in order to use gmail encrypted TLS channel on port 587)

If you want to hide the password not to provide the password from command line so (in order not to log it to user history) add the -a options.

10. Using qmail-inject on Qmail mail servers to send simple emails

Create new file with content like:
 

root@qmail:~# vim email_file_content.text
To: user@mail-example.com
Subject: Test


This is a test message.
 

root@qmail:~# cat email_file_content.text | /var/qmail/bin/qmail-inject


qmail-inject is part of ordinary qmail installation so it is very simple it even doesn't return error codes it just ships what ever given as content to remote MTA.
If the linux host where you invoke it has a properly configured qmail installation the email will get immediately delivered. The advantage of qmail-inject over the other ones is it is really lightweight and will deliver the simple message more quickly than the the prior heavy tools but again it is more a Mail Delivery Agent (MDA) for quick debugging, if MTA is not working, than for daily email writting.

It is very useful to simply test whether email send works properly without sending any email content by (I used qmail-inject to test local email delivery works like so).
 

root@linux:~# echo 'To: mailbox_acc@mail-server.com' | /var/qmail/bin/qmail-inject


11. Debugging why Email send with text tool is not being send properly to remote recipient

If you use some of the above described methods and email is not delivered to remote recipient email addresses check /var/log/mail.log (for a general email log and postfix MTAs – the log is present on many of the Linux distributions) and /var/log/messages or /var/log/qmal (on Qmail installations) /var/log/exim4 (on servers running Exim as MTA).

https://www.pc-freak.net/images/linux-email-log-debug-var-log-mail-output

 Closure

The ways to send email via Linux terminal are properly innumerous as there are plenty of scripted tools in various programming languages, I am sure in this article,  also missing a lot of pre-bundled installable distro packages. If you know other interesting ways / tools to send via terminal I would like to hear it.

Hope you enjoyed, happy mailing !

Fix qmail-scanner-queue.pl: X-Qmail-Scanner-2.08st:[] cannot create /var/spool/qscan/tmp – Permission denied – Finally a working solution and what causes the error

Wednesday, July 22nd, 2015


qmail-fixing-clamdscan-errors-and-qq-errors-qmail-binary-migration-few-things-to-check-out
I've lost a whole day and was angry and irritated after moving (migrating) a Working Qmail installation in a binary form from a Debian Lenny 5.0 to a Debian 7.0 Wheezy Linux. The whole migration exercise was quite of a crazy move and I can tell you it didn't worth the effort as I lost much more time than even if I went on installing the server following Thibs Great Qmail Tutorial.

Yes I know many would say why do you still bother with an old and unsupported Qmail Mail server and not go with Postfix, the logic is correct however the whole issue is the previous installation has a number of domains already running VirtualMail hosting using VPopMail, so migrating all the old mailboxes from Qmail to Postfix are not worthy IMHO. Plus I honestly love qmail for being so stable even today (even without support). After all most of Qmail is secure enough already 🙂
And to be honest I don't so much care about security as in the old days as I know NSA, does already have access to any server on planet 🙂

Almost always when a Qmail migration happens I end up swearing and sweating and generally getting crazy, but anyways …

The overall migration of binaries went quite OK I just copied every binary and all the related libraries from the old Debian 5.0 to Debian 7.0 and installed the following long list of perl deb binaries using apt-get:
 

dh-make-perl
libalgorithm-c3-perl
libalgorithm-diff-perl
libalgorithm-diff-xs-perl
libalgorithm-merge-perl
libapparmor-perl
libapt-pkg-perl
libarray-unique-perl
libclass-accessor-chained-perl
libclass-accessor-perl
libclass-c3-perl
libclass-c3-xs-perl
libclass-factory-util-perl
libclass-inspector-perl
libclass-isa-perl
libclass-load-perl
libclass-singleton-perl
libconfig-file-perl
libconvert-binhex-perl
libcrypt-openssl-bignum-perl
libcrypt-openssl-random-perl
libcrypt-openssl-rsa-perl
libcrypt-passwdmd5-perl
libcrypt-ssleay-perl
libdata-optlist-perl
libdata-section-perl
libdate-manip-perl
libdatetime-format-builder-perl
libdatetime-format-iso8601-perl
libdatetime-format-strptime-perl
libdatetime-locale-perl
libdatetime-perl
libdatetime-timezone-perl
libdbd-mysql-perl
libdbi-perl
libdevel-symdump-perl
libdigest-hmac-perl
libdigest-sha-perl
libdpkg-perl
libemail-address-perl
libemail-date-format-perl
libencode-detect-perl
libencode-locale-perl
libenv-sanctify-perl
liberror-perl
libexporter-lite-perl
libfcgi-perl
libfile-chdir-perl
libfile-fcntllock-perl
libfile-find-rule-perl
libfile-listing-perl
libfile-which-perl
libfont-afm-perl
libhtml-form-perl
libhtml-format-perl
libhtml-parser-perl
libhtml-tagset-perl
libhtml-template-perl
libhtml-tree-perl
libhttp-cookies-perl
libhttp-daemon-perl
libhttp-date-perl
libhttp-message-perl
libhttp-negotiate-perl
libhttp-server-simple-perl
libio-multiplex-perl
libio-socket-inet6-perl
libio-socket-ip-perl
libio-socket-ssl-perl
libio-string-perl
libio-stringy-perl
libip-country-perl
liblist-moreutils-perl
liblocale-gettext-perl
liblwp-mediatypes-perl
liblwp-protocol-https-perl
libmail-dkim-perl
libmail-sendmail-perl
libmail-spf-perl
libmailtools-perl
libmath-round-perl
libmime-tools-perl
libmodule-depends-perl
libmodule-implementation-perl
libmodule-runtime-perl
libmro-compat-perl
libnet-cidr-lite-perl
libnet-cidr-perl
libnet-daemon-perl
libnet-dns-perl
libnet-http-perl
libnet-ident-perl
libnet-ip-perl
libnet-server-perl
libnet-snmp-perl
libnet-ssleay-perl
libnetaddr-ip-perl
libnumber-compare-perl
libossp-uuid-perl
libpackage-deprecationmanager-perl
libpackage-stash-perl
libpackage-stash-xs-perl
libparams-classify-perl
libparams-util-perl
libparams-validate-perl
libparse-debcontrol-perl
libparse-debianchangelog-perl
libparse-syslog-perl
libpcre-ocaml-dev
libpcre3:amd64
libpcre3-dev
libpcrecpp0:amd64
libperl-dev
libperl5.14
libpod-coverage-perl
libregexp-assemble-perl
librpc-xml-perl
librrds-perl
libsoap-lite-perl
libsocket-perl
libsocket6-perl
libsoftware-license-perl
libsub-exporter-perl
libsub-install-perl
libsub-name-perl
libswitch-perl
libsys-hostname-long-perl
libsys-syslog-perl
libtask-weaken-perl
libterm-readkey-perl
libtest-distribution-perl
libtest-pod-coverage-perl
libtest-pod-perl
libtext-charwidth-perl
libtext-glob-perl
libtext-iconv-perl
libtext-template-perl
libtext-wrapi18n-perl
libtie-ixhash-perl
libtimedate-perl
libtry-tiny-perl
liburi-perl
libwww-mechanize-perl
libwww-perl
libwww-robotrules-perl
libxml-namespacesupport-perl
libxml-parser-perl
libxml-sax-base-perl
libxml-sax-expat-perl
libxml-sax-perl
libxml-simple-perl
libyaml-perl
libyaml-syck-perl
perl
perl-base
perl-doc
perl-modules
spamassassin
spf-tools-perl


I've also installed with apt-get daemontools and daemontools-run ucspi and some others to get all the necessery binaries qmail needs the whole list of apt installed packages is here

I've also copied all the old binaries from /usr/local/lib from server1 to server2, some others from /usr/local/share and /usr/share as well as /usr/lib/courier /usr/lib/courier-authlib /usr/local/libexec /usr/local/sbin also had to link a couple of libraries such as /usr/lib/libcrypto* , link  /usr/lib/libperl.so.5.10 to /usr/lib/libperl.so.5.14 and copy /usr/lib/libltdl.so.3 and few others which i don't exactly remember.

Well anyways once I've copied everything Qmail looked fined except I had a couple of permission issues and had to clean up and fix the queue with qfixq, I've also used qmail-scanner*/contrib/test_installation.sh script to test whether qmail-scanner was running fine, e.g.:
 

./test_installation.sh -doit


As well as


qmr_inst_check


script, thanks to which I've captured and resolved few of permission problems 

Finally I've stuck upon this shitty errors (appearing) in /var/log/syslog and /var/log/messages


Jul 21 22:04:19 vps186637 qmail-scanner-queue.pl: X-Qmail-Scanner-2.08st:[] cannot create /var/spool/qscan/tmp – Permission denied
Jul 21 22:08:27 vps186637 qmail-scanner-queue.pl: X-Qmail-Scanner-2.08st:[] cannot create /var/spool/qscan/tmp – Permission denied
Jul 21 22:08:38 vps186637 qmail-scanner-queue.pl: X-Qmail-Scanner-2.08st:[] cannot create /var/spool/qscan/tmp – Permission denied
Jul 21 22:11:17 vps186637 qmail-scanner-queue.pl: X-Qmail-Scanner-2.08st:[] cannot create /var/spool/qscan/tmp – Permission denied
Jul 21 22:16:09 vps186637 qmail-scanner-queue.pl: X-Qmail-Scanner-2.08st:[] cannot create /var/spool/qscan/tmp – Permission denied
Jul 21 22:19:15 vps186637 qmail-scanner-queue.pl: X-Qmail-Scanner-2.08st:[] cannot create /var/spool/qscan/tmp – Permission denied
Jul 21 22:38:59 ns2 qmail-scanner-queue.pl: X-Qmail-Scanner-2.08st:[] cannot create /var/spool/qscan/tmp – Permission denied
Jul 21 22:42:33 ns2 qmail-scanner-queue.pl: X-Qmail-Scanner-2.08st:[] cannot create /var/spool/qscan/tmp – Permission denied
Jul 21 22:43:49 ns2 qmail-scanner-queue.pl: X-Qmail-Scanner-2.08st:[] cannot create /var/spool/qscan/tmp – Permission denied
Jul 21 22:46:05 ns2 qmail-scanner-queue.pl: X-Qmail-Scanner-2.08st:[] cannot create /var/spool/qscan/tmp – Permission denied
Jul 21 22:50:40 ns2 qmail-scanner-queue.pl: X-Qmail-Scanner-2.08st:[] cannot create /var/spool/qscan/tmp – Permission denied
Jul 21 22:53:08 ns2 qmail-scanner-queue.pl: X-Qmail-Scanner-2.08st:[] cannot create /var/spool/qscan/tmp – Permission denied


There is plenty of things written about this:
 

qmail-scanner-queue.pl: X-Qmail-Scanner-2.08st:[] cannot create /var/spool/qscan/tmp – Permission denied


But all written is too obscure and too old already somewhere between 2004 and 2010, I've been digging through Gentoo Forums, Fedora Debian and other Linux installs and everyone used to be pointing a permission issue with /var/spool/qscan/ said theoretically to be causing the error, however all looked perfectly fine with my /var/spool/qscan , e.g.:


roo@ns2:/usr/local/src# ls -ld /var/spool/qscan/
drwxr-s— 6 qscand qscand 4096 Jul 21 23:07 /var/spool/qscan/


ls -al /var/spool/qscan/
total 244904
drwxr-s— 6 qscand qscand      4096 Jul 21 23:07 .
drwxr-xr-x 4 root   root        4096 Jul 20 21:17 ..
drwxrwx— 5 qscand qscand      4096 Oct 12  2011 archives
-rwxr-x— 1 qscand qscand      1434 Oct 12  2011 log-report.sh
-rw——- 1 qscand qscand 249731919 Jul 21 23:11 qmail-queue.log
-rw——- 1 qscand qscand    398225 Oct 28  2011 qmail-queue.log.1
-rw-rw—- 1 root   qscand        74 Jul 21 23:07 qmail-scanner-queue-version.txt
lrwxrwxrwx 1 root   qscand        16 Jul 21 23:07 qscan -> /var/spool/qscan
drwxrwx— 5 qscand qscand      4096 Oct 12  2011 quarantine
-rw-r—– 1 root   qscand     12288 Jul 21 23:07 quarantine-events.db
-rw-r—– 1 qscand qscand     10443 Oct 12  2011 quarantine-events.txt
-rw-rw—- 1 qscand qscand    580033 Jul 21 23:07 quarantine.log
-rw-r—– 1 qscand qscand      2739 Oct 12  2011 settings_per_domain.txt
drwxr-x— 3 qscand qscand      4096 Jul 21 23:11 tmp
drwxrwx— 5 qscand qscand      4096 Oct 12  2011 working


Some suggested that /var/spool/qscan should be owned by qscand:clamav instead so I tried this but it didn't help,
others recommended adding clamav groupid into qscand's but this didn't help either:
 

root@ns2:/usr/local/src# grep -i clamav /etc/group
qscand:x:163:clamav,vpopmail
clamav:x:105:


Besides that I was getting also this shitty error:


Jul 21 20:05:42 vps186637 qmail-scanner-queue.pl: X-Qmail-Scanner-2.08st:[ns2143750194279012466] clamdscan: corrupt or unknown clamd scanner error or memory/resource/perms problem – exit status -1/72057594037927935
Jul 21 20:06:51 vps186637 qmail-scanner-queue.pl: X-Qmail-Scanner-2.08st:[ns2143750201179013125] clamdscan: corrupt or unknown clamd scanner error or memory/resource/perms problem – exit status -1/72057594037927935
Jul 21 20:15:42 vps186637 qmail-scanner-queue.pl: X-Qmail-Scanner-2.08st:[ns214375025407906015] clamdscan: corrupt or unknown clamd scanner error or memory/resource/perms problem – exit status -1/72057594037927935
Jul 21 20:16:06 vps186637 qmail-scanner-queue.pl: X-Qmail-Scanner-2.08st:[ns2143750256579011980] clamdscan: corrupt or unknown clamd scanner error or memory/resource/perms problem – exit status -1/72057594037927935
Jul 21 20:18:54 vps186637 qmail-scanner-queue.pl: X-Qmail-Scanner-2.08st:[ns2143750273479014847] clamdscan: corrupt or unknown clamd scanner error or memory/resource/perms problem – exit status -1/72057594037927935
Jul 21 20:21:03 vps186637 qmail-scanner-queue.pl: X-Qmail-Scanner-2.08st:[ns2143750286379028491] clamdscan: corrupt or unknown clamd scanner error or memory/resource/perms problem – exit status -1/72057594037927935
Jul 21 22:07:47 vps186637 qmail-scanner-queue.pl: X-Qmail-Scanner-2.08st:[ns2143750926779010097] clamdscan: corrupt or unknown clamd scanner error or memory/resource/perms problem – exit status 512/2


All the time in logs, so I thought something might be wrong with clamdscan and followed and tried some suggestions from qms1.net as described here, however none of the fixes described there worked for me …

I also tried to reinstall clamav from source using a bit of modified version of this tutorial

This didn't help either … I saw some suggestions online that the permission issues are caused by some wrong clamd.conf and freshclamd.conf configuration options – failing clamdscan, but this didn't work either. I also tried to remove clamdscan and substitute it with clamscan  as a suggested workaround but this didn't work either …

I spend about 6 hours trying to catch what is causing this issues so finally I went on and re-installed bigger part of Qmail using Thibs tutorial over the old installation.

I've also tried in mean time multiple time to rebuild qmail scanner database with:
 

setuidgid qscand /var/qmail/bin/qmail-scanner-queue.pl -g


Played around with permissions in /etc/clamav e.g.


chown -R qscand:clamav /var/log/clamav /var/lib/clamav /var/run/clamav
chown qscand:qscand /etc/clamav/freshclam.conf


Created:

/etc/cron.daily/qmail-scanner with following content


cat /etc/cron.daily/qmail-scanner
setuidgid qscand /var/qmail/bin/qmail-scanner-queue.pl -z


However in /var/log/qmail/qmail-smtpd/current and /var/log/qmail-send/current I continously got:

Qmail 451 qq temporary problem (#4.3.0) error

Interestingly during looking for a solution to the 451 qq temporary problem and:

status: qmail-todo stop processing asap / status: exiting – I've stumbled to my own blog post here 🙂


Finally, I tried to reinstall qmail-scanner and in mean time update it to  Version: 2.11 – st – patch – 20130319
Just to realized something was wrong with suidperl, e.g. in Debian 7.0.* Wheezy perl-suid binary is no longer in repositories so only way to have suidperl there is either to re-compile perl from source manually which is too much work and I think in most cases not worthy the effort or to use a small suid-wrapper:
 

#include <unistd.h>
#include <errno.h>
 

main( int argc, char ** argv, char ** envp )
{
              if( setgid(getegid()) ) perror( "setgid" );
              if( setuid(geteuid()) ) perror( "setuid" );
              envp = 0; /* blocks IFS attack on non-bash shells */
              system( "/usr/bin/perl", argv, envp );
              perror( argv[0] );
              return errno;
}


Create it into a file lets say suid-wrapperc and compile the file with GNU C Compiler:
 

$ gcc -o suid-wrapper suid-wrapper.c


Then move the suid-wrapper produced binary into /usr/bin/suidperl e.g.


$ mv suid-wrapper /usr/bin/suidperl


Last you will need to edit /var/qmail/bin/qmail-scanner-queue.pl


# vim /var/qmail/bin/qmail-scaner-queue.pl


And substitute


#!/usr/bin/perl -T


with:


#!/usr/bin/suidperl


Note!!! that qmail-scanner-queue.pl permissions should be suid and owned by qscand:qscand as follows:


ls -al /var/qmail/bin/qmail-scanner-queue.pl
-rwsr-sr-x 1 qscand qscand 159727 Jul 21 23:11 /var/qmail/bin/qmail-scanner-queue.pl


Finally to resolve the error I had to restart qmail via qmailctl start / stop script:


root@ns2:/var/qmail/bin# qmailctl restart
Restarting qmail:
* Stopping qmail-smtpdssl.
* Stopping qmail-smtpd.
* Sending qmail-send SIGTERM and restarting.
* Restarting qmail-smtpd.
* Restarting qmail-smtpdssl.


Finally to test emails are sent and receiver properly I used good old mail command part of bsd-mailx deb package


# mail -s "testing 12345678" testemail1234@gmail.com
asdfadf
.
Cc:


I've also tested with plain telnet to verify no errors because often the mail command doesn't return (show) errors on email sent and errors are written only in /var/log/mail.log or /var/log/qmail/* logs


# telnet localhost 25
Trying 127.0.0.1…
Connected to localhost.
Escape character is '^]'.
220 servername.localdomain.tld ESMTP
mail from: <testmail@test.com>
250 ok
rcpt to: <nospam@test.com>
250 ok
data
354 go ahead
From: Test_sender <testmail@test.com>
To: Test_receiver <nospam@test.com>
Subject: Just a stupid SMTP test


Just a test !
.
250 ok 1279384489 qp 3711
quit
221 servername.localdomain.tld
Connection closed by foreign host.

One other thing which probably helped I did was:

# qmailctl doqueue


Thanks God this time, it worked out without any QQ errors 🙂 !


Resume sftp / scp cancelled (interrupted) network transfer – Continue (large) partially downloaded files on Linux / Windows

Thursday, April 23rd, 2015

resume-sftp-scp-cancelled-interrupted-file-transfer-download-upload-network-transfer-continue-large-partially-downloaded-file-howto-linux-windows
I've recentely have a task to transfer some huge Application server long time stored data (about 70GB) of data after being archived between an old Linux host server and a new one to where the new Tomcat Application (Linux) server will be installed to fit the increased sites accessibility (server hardware overload).

The two systems are into a a paranoid DMZ network and does not have access between each other via SSH / FTP / FTPs and even no Web Access on port (80 or SSL – 443) between the two hosts, so in order to move the data I had to use a third HOP station Windows (server) which have a huge SAN network attached storage of 150 TB (as a Mapped drive I:/).

On the Windows HOP station which is giving me access via Citrix Receiver to the DMZ-ed network I'm using mobaxterm so I have the basic UNIX commands such as sftp / scp already existing on the Windows system via it.
Thus to transfer the Chronos Tomcat application stored files .tar.gz archived I've sftp-ed into the Linux host and used get command to retrieve it, e.g.:


sftp UserName@Linux-server.net
Password:
Connected to Linux-server.
sftp> get Chronos_Application_23_04_2015.tar.gz

….


The Secured DMZ Network seemed to have a network shaper limiting my get / Secured SCP download to be at 2.5MBytes / sec, thus the overall file transfer seemed to require a lot of time about 08:30 hours to complete. As it was the middle of day about 13:00 and my work day ends at 18:00 (this meant I would be able to keep the file retrieval session for a maximum of 5 hrs) and thus file transfer would cancel when I logout of the HOP station (after 18:00). However I've already left the file transfer to continue for 2hrs and thus about 23% of file were retrieved, thus I wondered whether SCP / SFTP Protocol file downloads could be resumed. I've checked thoroughfully all the options within sftp (interactive SCP client) and the scp command manual itself however none of it doesn't have a way to do a resume option. Then I thought for a while what I can use to continue the interrupted download and I remembered good old rsync (versatile remote and local file copying tool) which I often use to create customer backup stragies has the ability to resume partially downloaded files I wondered whether this partially downloaded file resume could be done only if file transfer was only initiated through rsync itself and luckily rsync is able to continue interrupted file transfers no matter what kind of HTTP / HTTPS / SCP / FTP program was used to start file retrievalrsync is able to continue cancelled / failed transfer due to network problems or user interaction activity), that turned even pretty easy to continue failed file transfer download from where it was interrupted I had to change to directory where file is located:
 

cd /path/to/interrupted_file/


and issue command:
 

rsync -av –partial username@Linux-server.net:/path/to/file .


the –partial option is the one that does the file resume trick, -a option stands for –archive and turns on the archive mode; equals -rlptgoD (no -H,-A,-X) arguments and -v option shows a file transfer percantage status line and an avarage estimated time for transfer to complete, an easier to remember rsync resume is like so:
 

rsync -avP username@Linux-server.net:/path/to/file .
Password:
receiving incremental file list
chronos_application_23_04_2015.tar.gz
  4364009472   8%    2.41MB/s    5:37:34

To continue a failed file upload with rsync (e.g. if you used sftp put command and the upload transfer failed or have been cancalled:
 

rsync -avP chronos_application_23_04_2015.tar.gz username@Linux-server.net:/path/where_to/upload


Of course for the rsync resume to work remote Linux system had installed rsync (package), if rsync was not available on remote system this would have not work, so before using this method make sure remote Linux / Windows server has rsync installed. There is an rsync port also for Windows so to resume large Giga or Terabyte file archive downloads easily between two Windows hosts use cwRsync.

Quick way to access remotely your GNU / Linux Desktop – Access Linux Desktop from Mac and Windows 7

Tuesday, August 5th, 2014

how-to-access-linux-host-from-microsoft-windows-or-mac-client-xrdp-tightvnc-native-way-logo
For M$ Windows users its always handy to have remote access to your home PC or notebook via Remote Desktop (RDP) protocol.

However in GNU / Linux, there is no native implementation of RDP protocol. So if you're using Linux as your Desktop like me you will probably want to be able to access the Linux system remotely not only via terminal with SSH using (Putty) or MobaXTerm all in one tabbed Windows terminal program but also be able to use your Linux GNOME / KDE Graphical environment from anywhere on the Internet.

This will make you ponder – Is it possible to access Linux Desktop via proprietary RDP protocol and if not how you can achieve remote GUI access to Linux?

1. Using Linux Xorg and Xming Xserver for Windows

Most people should already know of Linux ability to start multiple Xserver sessions remotely which is the native way to access between two Linux hosts or access remotely Linux from other Linux UNIX like OS. It is also possible to use xinit / startx / xhost commands to establish remotely connection to new or running Linux (Xorg) Xserver by using them in combination with XMing – XServer for Windows running on the Windows host and Debian package (x11-xserver-utils) – providing xhost cmd, however this method is a bit complicated and not so convenient.

I used to be using this method XMing (whose mirror is here), earlier in my university years to use remotely my Debian Linux from  Windows 98 and this works perfectly fine.

2. Using RDP emulation with XRDP server

in order to be able to access your desk from any friend or computer club in the world using standard available in MS Windows Remote Desktop client (mstsc.exe).
There is also another alternative way by using Windows Desktop sharing RDP experimental server xrdp:
 

apt-cache show xrdp |grep -i descr -A 3
Description: Remote Desktop Protocol (RDP) server
 Based on research work by the rdesktop project, xrdp uses the Remote
 Desktop Protocol to present a graphical login to a remote client.
 xrdp can connect to a VNC server or another RDP server.

To make your Linux host accessible via RDP:

On Debian / Ubuntu etc. deb based Linux:


apt-get update
apt-get install xrdp

 
$ /etc/init.d/xrdp status
Checking status of Remote Desktop Protocol server xrdp                                             [ OK ]
Checking status of RDP Session Manager sesman

/etc/init.d/xrdp start

On  Fedora Linux:
 

yum -y install xrdp
systemctl enable xrdp.service
systemctl start xrdp.service
systemctl enable xrdp-sesman.service
systemctl start xrdp-sesman.service


It is possible to access remote Linux host using xrdp RDP server, but this will only work in older releases of mstsc.exe (Windows XP / Vista / 2003) and will not work on Windows 7 / 8, because in MS Windows 7 and onwards RDP proto version has changed and the client no longer has compatability with older mstsc releases. There is a work around for this for anyone who stubbornly want to use RDP protocol to access Linux host. If you want to connect to xrdp from Windows 7 you have to copy the old RDP client (mstsc.exe and mstscax.dll) from a WinXP install to the Windows 7 box and run it independently, from the default installed ones, anyways this method is time consuming and not really worthy …

3. Using the VNC withTightVNC server / client


Taking above in consideration, for me personally best way to access Linux host from Windows and Mac is to use simply the good old VNC protocol with TightVNC.

TightVNC is cross-platform free and open source remote Desktop client it uses RFB protocol to control another computer screen remotely.

To use tightvnc to access remote Debian / Ubuntu – deb based Linux screen, tightvncserver package has to be installed:

apt-cache show tightvncserver|grep -i desc -A 7
Description-en: virtual network computing server software
 VNC stands for Virtual Network Computing. It is, in essence, a remote
 display system which allows you to view a computing `desktop' environment
 not only on the machine where it is running, but from anywhere on the
 Internet and from a wide variety of machine architectures.

 .
 This package provides a server to which X clients can connect and the
 server generates a display that can be viewed with a vncviewer.


apt-get –yes install tightvncserver


TightVNCserver package is also available in default repositories of Fedora / CentOS / RHEL and most other RPM based distros, to install there:
 

yum -y install tightvnc-server


Once it is installed to make tightvncserver running you have to start it (preferrably with non-root user), usually this is the user with which you're using the system:

tightvncserver

You will require a password to access your desktops.

Password:
Verify:   
Would you like to enter a view-only password (y/n)? n

New 'X' desktop is rublev:4

Creating default startup script /home/hipo/.vnc/xstartup
Starting applications specified in /home/hipo/.vnc/xstartup
Log file is /home/hipo/.vnc/rublev:4.log


tightvncserver-running-in-gnome-terminal-debian-gnu-linux-wheezy-screenshot

To access now TightVncserver on the Linux host Download and Install TightVNC Viewer client

note that you need to download TightVNC Java Viewer JAR in ZIP archive – don't install 32 / 64 bit installer for Windows, as this will install and setup TightVNCServer on your Windows – and you probably don't want that (and – yes you will need to have Oracle Java VM installed) …
 

tightvnc-viewer-java-client-running-on-microsoft-windows-7-screenshot

Once unzipped run tightvnc-jviewer.jar and type in the IP address of remote Linux host and screen, where TightVNC is listening, as you can see in prior screenshot my screen is :4, because I run tightvnc to listen for connections in multiple X sessions. once you're connected you will be prompted for password, asker earlier when you run  tightvncserver cmd on Linux host.

If you happen to be on a Windows PC without Java installed or Java use is prohibited you can use TightVNC Viewer Portable Binary (mirrored here)

/images/tightvnc-viewer-portable-windows-7-desktop-screenshot

If you have troubles with connection, on Linux host check the exact port on which TightVncServer is running:
 

ps ax |grep -i Tightvnc

 8630 pts/8    S      0:02 Xtightvnc :4 -desktop X -auth /var/run/gdm3/auth-for-hipo-7dpscj/database -geometry 1024×768 -depth 24 -rfbwait 120000 -rfbauth /home/hipo/.vnc/passwd -rfbport 5904 -fp /usr/share/fonts/X11/misc/,/usr/share/fonts/X11/Type1/,/usr/share/fonts/X11/75dpi/,/usr/share/fonts/X11/100dpi/ -co /etc/X11/rgb

Then to check, whether the machine you're trying to connect from doesn't have firewall rules preventing the connection use (telnet) – if installed on the Windows host:
 

telnet www.pc-ferak.net 5904
Trying 192.168.56.101…
Connected to 192.168.56.101.
Escape character is '^]'.
RFB 003.008

telnet> quit
Connection closed.

remote-connection-via-tightvnc-to-linux-host-from-windows-7-using-tightvnc-java-client-screenshot
 

Fix 503 AUTH first (#5.5.1) mail receive errors in Qmail

Friday, September 2nd, 2011

I have one qmail rocks install based on Thibbs Qmalrocks tutorial

I had to do some changes, to:
/etc/service/qmail-smtpd/run and /etc/service/qmail-smtpdssl/run init scripts.

After a qmail restart suddenly qmail stopped receiving any mail messages and my sent messages was returned with an error:

Connected to xx.xxx.xx.xx but sender was rejected.
Remote host said: 503 AUTH first (#5.5.1)

After investigating the issue I finally found, that one value I’ve changed in /etc/service/qmail-smtpd/run and /etc/service/qmail-smtpdssl was causing the whole mess:

The problematic variable was:

REQUIRE_AUTH=1

To solve the issue I had to disable the value which it seems, I have enabled by mistake.

Below is a quote from http://qmail.jms1.net which explains what REQUIRE_AUTH shell variable does:

Setting REQUIRE_AUTH=1 will make the service not accept ANY mail unless the client has sent a valid AUTH command. This also prevents incoming mail from being accepted for your own domains, so do not use this setting if the service is accepting “normal” mail from the outside world.
Restarting via qmailctl restart and qmail started receiving messages normal 😉