Posts Tagged ‘console’

Monitoring network traffic tools to debug network issues in console interactively on Linux

Thursday, December 14th, 2023

transport-layer-fourth-layer-data-transport-diagram


In my last article Debugging and routing network issues on Linux (common approaches), I've given some step by step methology on how to debug a network routing or unreachability issues between network hosts. As the article was mostly targetting a command line tools that can help debugging the network without much interactivity. I've decided to blog of a few other tools that might help the system administrator to debug network issues by using few a bit more interactive tools. Throughout the years of managing multitude of Linux based laptops and servers, as well as being involved in security testing and penetration in the past, these tools has always played an important role and are worthy to be well known and used by any self respecting sys admin or network security expert that has to deal with Linux and *Unix operating systems.
 

1. Debugging what is going on on a network level interactively with iptraf-ng

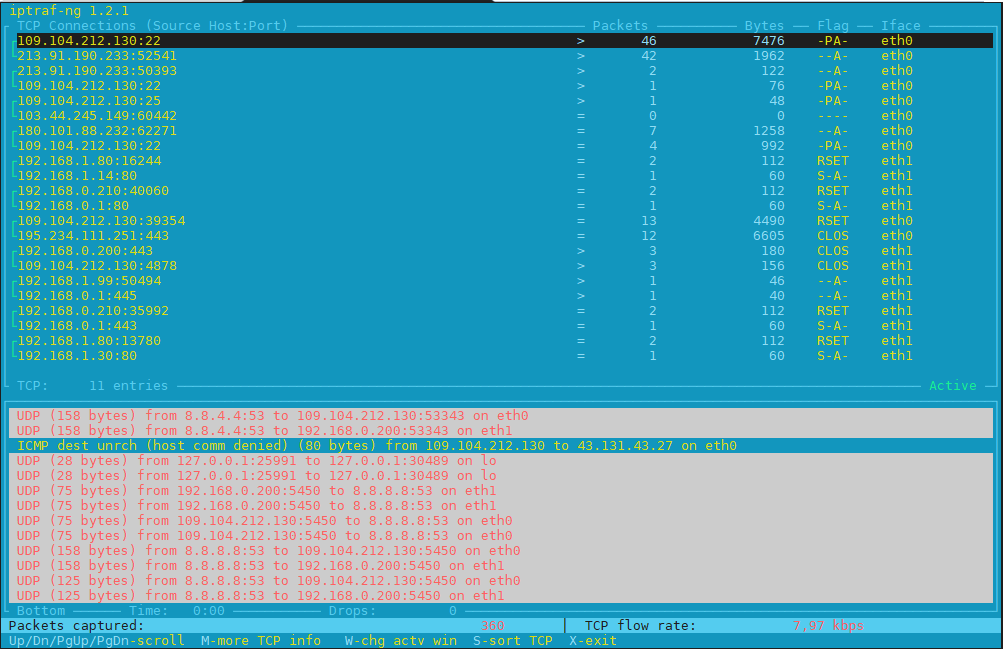
Historically iptraf and today's iptraf is also a great tool one can use to further aid the arsenal debug a network issue or Protocol problem, failure of packets or network interaction issues SYN -> ACK etc. proto interactions and check for Flag states and packets flow.

To use iptraf-ng which is a ncurses based tool just install it and launch it and select the interface you would like to debug trafic on.

To install On Debians distros

# apt install iptraf-ng –yes

# iptraf-ng
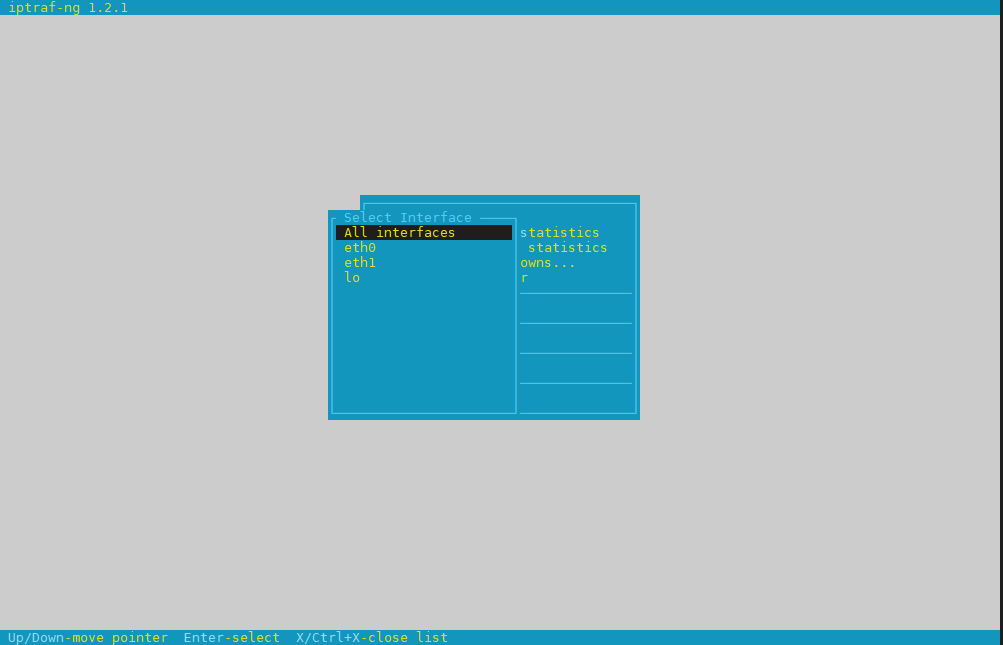

iptraf-ng-linux-select-interface-screen
 

iptraf-ng-listen-all-interfaces-check-tcp-flags-and-packets


Session-Layer-in-OSI-Model-diagram
 

2. Use hackers old tool sniffit to monitor current ongoing traffic and read plain text messages

Those older who remember the rise of Linux to the masses, should remember sniffit was a great tool to snoop for traffic on the network.

root@pcfreak:~# apt-cache show sniffit|grep -i description -A 10 -B10
Package: sniffit
Version: 0.5-1
Installed-Size: 139
Maintainer: Joao Eriberto Mota Filho <eriberto@debian.org>
Architecture: amd64
Depends: libc6 (>= 2.14), libncurses6 (>= 6), libpcap0.8 (>= 0.9.8), libtinfo6 (>= 6)
Description-en: packet sniffer and monitoring tool
 Sniffit is a packet sniffer for TCP/UDP/ICMP packets over IPv4. It is able
 to give you a very detailed technical info on these packets, as SEQ, ACK,
 TTL, Window, etc. The packet contents also can be viewed, in different
 formats (hex or plain text, etc.).
 .
 Sniffit is based in libpcap and is useful when learning about computer
 networks and their security.
Description-md5: 973beeeaadf4c31bef683350f1346ee9
Homepage: https://github.com/resurrecting-open-source-projects/sniffit
Tag: interface::text-mode, mail::notification, role::program, scope::utility,
 uitoolkit::ncurses, use::monitor, use::scanning, works-with::mail,
 works-with::network-traffic
Section: net
Priority: optional
Filename: pool/main/s/sniffit/sniffit_0.5-1_amd64.deb
Size: 61796
MD5sum: ea4cc0bc73f9e94d5a3c1ceeaa485ee1
SHA256: 7ec76b62ab508ec55c2ef0ecea952b7d1c55120b37b28fb8bc7c86645a43c485


Sniffit is not installed by default on deb distros, so to give it a try install it

# apt install sniffit –yes
# sniffit
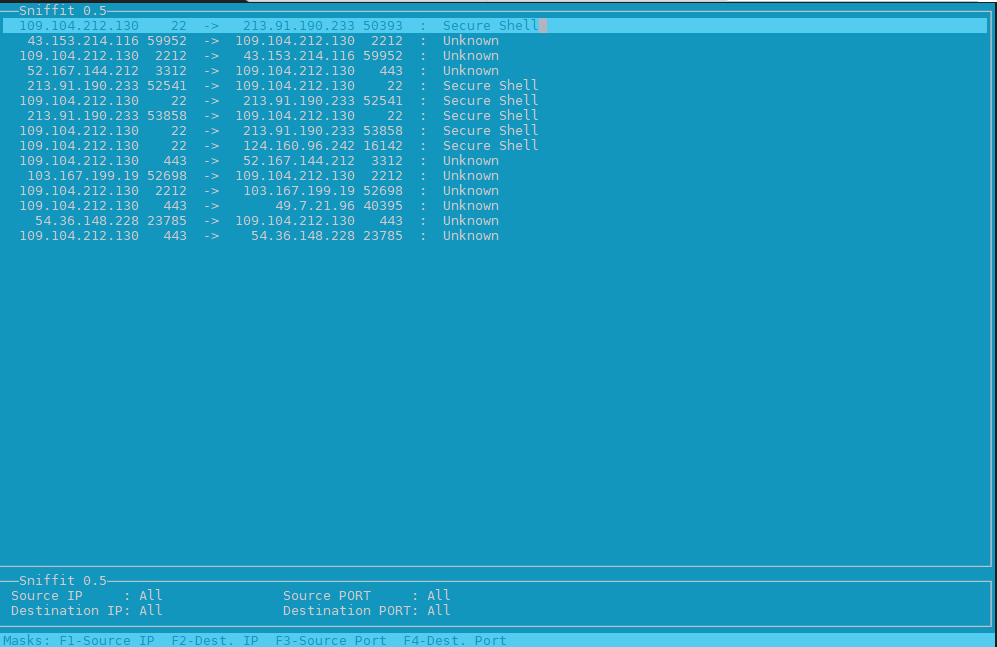

sniffit-linux-check-tcp-traffic-screenshot
 

3. Use bmon to monitor bandwidth and any potential traffic losses and check qdisc pfifo
Linux network stack queues


root@pcfreak:~# apt-cache show bmon |grep -i description
Description-en: portable bandwidth monitor and rate estimator
Description-md5: 3288eb0a673978e478042369c7927d3f
root@pcfreak:~# apt-cache show bmon |grep -i description -A 10 -B10
Package: bmon
Version: 1:4.0-7
Installed-Size: 146
Maintainer: Patrick Matthäi <pmatthaei@debian.org>
Architecture: amd64
Depends: libc6 (>= 2.17), libconfuse2 (>= 3.2.1~), libncursesw6 (>= 6), libnl-3-200 (>= 3.2.7), libnl-route-3-200 (>= 3.2.7), libtinfo6 (>= 6)
Description-en: portable bandwidth monitor and rate estimator
 bmon is a commandline bandwidth monitor which supports various output
 methods including an interactive curses interface, lightweight HTML output but
 also simple ASCII output.
 .
 Statistics may be distributed over a network using multicast or unicast and
 collected at some point to generate a summary of statistics for a set of
 nodes.
Description-md5: 3288eb0a673978e478042369c7927d3f
Homepage: http://www.infradead.org/~tgr/bmon/
Tag: implemented-in::c, interface::text-mode, network::scanner,
 role::program, scope::utility, uitoolkit::ncurses, use::monitor,
 works-with::network-traffic
Section: net
Priority: optional
Filename: pool/main/b/bmon/bmon_4.0-7_amd64.deb
Size: 47348
MD5sum: c210f8317eafa22d9e3a8fb8316e0901
SHA256: 21730fc62241aee827f523dd33c458f4a5a7d4a8cf0a6e9266a3e00122d80645


root@pcfreak:~# apt install bmon –yes

root@pcfreak:~# bmon
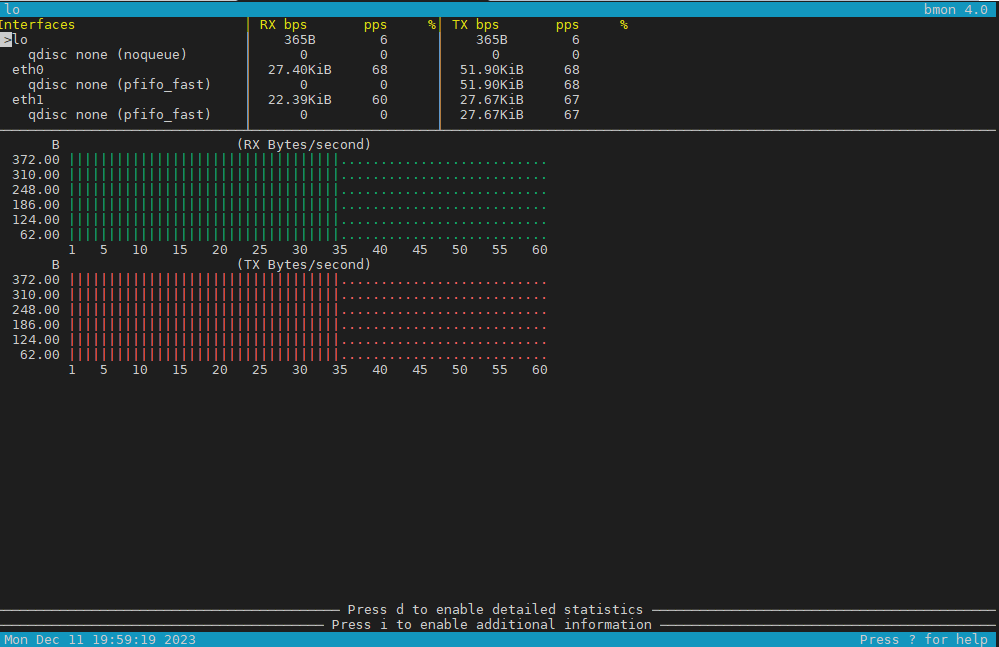
bmon_monitor_qdisc-network-stack-bandwidth-on-linux

4. Use nethogs net diagnosis text interactive tool

NetHogs is a small 'net top' tool. 
Instead of breaking the traffic down per protocol or per subnet, like most tools do, it groups bandwidth by process.
 

root@pcfreak:~# apt-cache show nethogs|grep -i description -A10 -B10
Package: nethogs
Source: nethogs (0.8.5-2)
Version: 0.8.5-2+b1
Installed-Size: 79
Maintainer: Paulo Roberto Alves de Oliveira (aka kretcheu) <kretcheu@gmail.com>
Architecture: amd64
Depends: libc6 (>= 2.15), libgcc1 (>= 1:3.0), libncurses6 (>= 6), libpcap0.8 (>= 0.9.8), libstdc++6 (>= 5.2), libtinfo6 (>= 6)
Description-en: Net top tool grouping bandwidth per process
 NetHogs is a small 'net top' tool. Instead of breaking the traffic down per
 protocol or per subnet, like most tools do, it groups bandwidth by process.
 NetHogs does not rely on a special kernel module to be loaded.
Description-md5: 04c153c901ad7ca75e53e2ae32565ccd
Homepage: https://github.com/raboof/nethogs
Tag: admin::monitoring, implemented-in::c++, role::program,
 uitoolkit::ncurses, use::monitor, works-with::network-traffic
Section: net
Priority: optional
Filename: pool/main/n/nethogs/nethogs_0.8.5-2+b1_amd64.deb
Size: 30936
MD5sum: 500047d154a1fcde5f6eacaee45148e7
SHA256: 8bc69509f6a8c689bf53925ff35a5df78cf8ad76fff176add4f1530e66eba9dc

root@pcfreak:~# apt install nethogs –yes

# nethogs
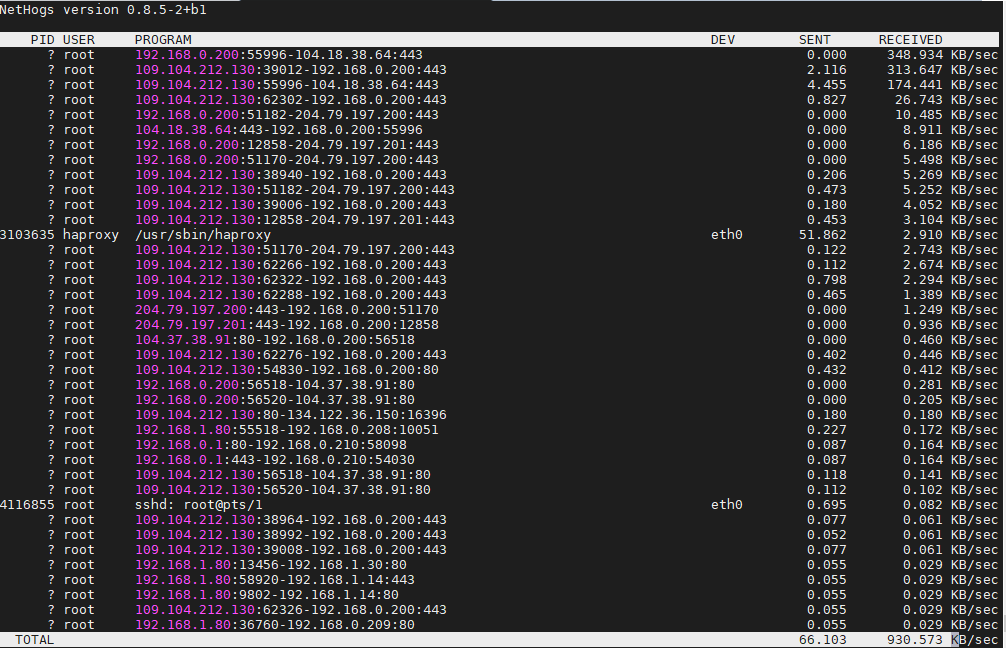

nethogs-tool-screenshot-show-user-network--traffic-by-process-name-ID

5;.Use iftop –  to display network interface usage


root@pcfreak:~# apt-cache show iftop |grep -i description -A10 -B10
Package: iftop
Version: 1.0~pre4-7
Installed-Size: 97
Maintainer: Markus Koschany <apo@debian.org>
Architecture: amd64
Depends: libc6 (>= 2.29), libncurses6 (>= 6), libpcap0.8 (>= 0.9.8), libtinfo6 (>= 6)
Description-en: displays bandwidth usage information on an network interface
 iftop does for network usage what top(1) does for CPU usage. It listens to
 network traffic on a named interface and displays a table of current bandwidth
 usage by pairs of hosts. Handy for answering the question "Why is my Internet
 link so slow?".
Description-md5: f7e93593aba6acc7b5a331b49f97466f
Homepage: http://www.ex-parrot.com/~pdw/iftop/
Tag: admin::monitoring, implemented-in::c, interface::text-mode,
 role::program, scope::utility, uitoolkit::ncurses, use::monitor,
 works-with::network-traffic
Section: net
Priority: optional
Filename: pool/main/i/iftop/iftop_1.0~pre4-7_amd64.deb
Size: 42044
MD5sum: c9bb9c591b70753880e455f8dc416e0a
SHA256: 0366a4e54f3c65b2bbed6739ae70216b0017e2b7421b416d7c1888e1f1cb98b7


root@pcfreak:~# apt install –yes iftop
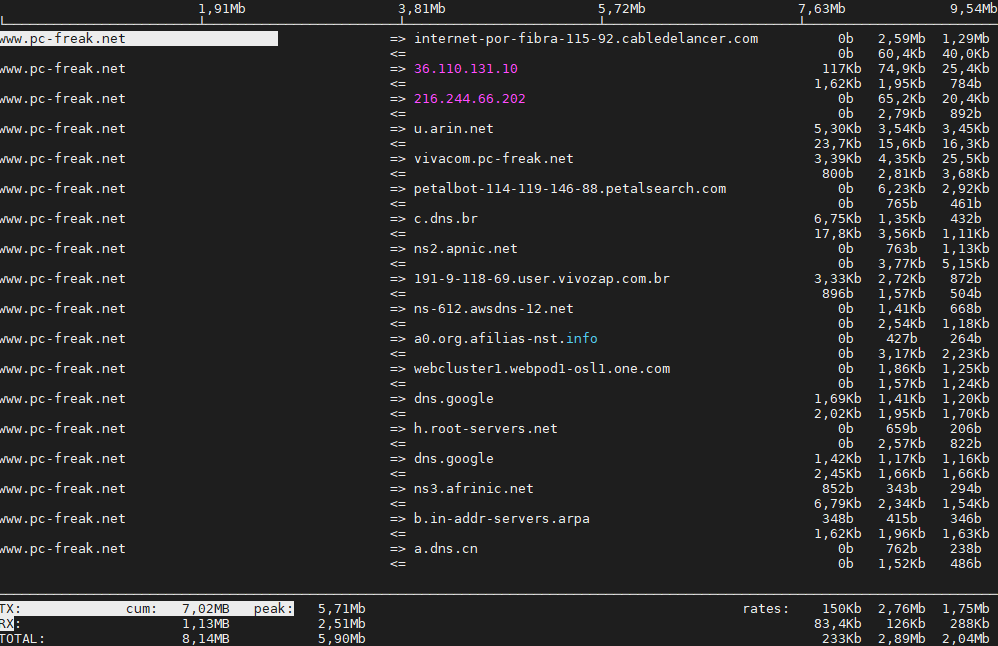
iftop-interactive-network-traffic-output-linux-screenshot


6. Ettercap (tool) to active and passive dissect network protocols for in depth network and host analysis

root@pcfreak:/var/www/images# apt-cache show ettercap-common|grep -i description -A10 -B10
Package: ettercap-common
Source: ettercap
Version: 1:0.8.3.1-3
Installed-Size: 2518
Maintainer: Debian Security Tools <team+pkg-security@tracker.debian.org>
Architecture: amd64
Depends: ethtool, geoip-database, libbsd0 (>= 0.0), libc6 (>= 2.14), libcurl4 (>= 7.16.2), libgeoip1 (>= 1.6.12), libluajit-5.1-2 (>= 2.0.4+dfsg), libnet1 (>= 1.1.6), libpcap0.8 (>= 0.9.8), libpcre3, libssl1.1 (>= 1.1.1), zlib1g (>= 1:1.1.4)
Recommends: ettercap-graphical | ettercap-text-only
Description-en: Multipurpose sniffer/interceptor/logger for switched LAN
 Ettercap supports active and passive dissection of many protocols
 (even encrypted ones) and includes many feature for network and host
 analysis.
 .
 Data injection in an established connection and filtering (substitute
 or drop a packet) on the fly is also possible, keeping the connection
 synchronized.
 .
 Many sniffing modes are implemented, for a powerful and complete
 sniffing suite. It is possible to sniff in four modes: IP Based, MAC Based,
 ARP Based (full-duplex) and PublicARP Based (half-duplex).
 .
 Ettercap also has the ability to detect a switched LAN, and to use OS
 fingerprints (active or passive) to find the geometry of the LAN.
 .
 This package contains the Common support files, configuration files,
 plugins, and documentation.  You must also install either
 ettercap-graphical or ettercap-text-only for the actual GUI-enabled
 or text-only ettercap executable, respectively.
Description-md5: f1d894b138f387661d0f40a8940fb185
Homepage: https://ettercap.github.io/ettercap/
Tag: interface::text-mode, network::scanner, role::app-data, role::program,
 uitoolkit::ncurses, use::scanning
Section: net
Priority: optional
Filename: pool/main/e/ettercap/ettercap-common_0.8.3.1-3_amd64.deb
Size: 734972
MD5sum: 403d87841f8cdd278abf20bce83cb95e
SHA256: 500aee2f07e0fae82489321097aee8a97f9f1970f6e4f8978140550db87e4ba9


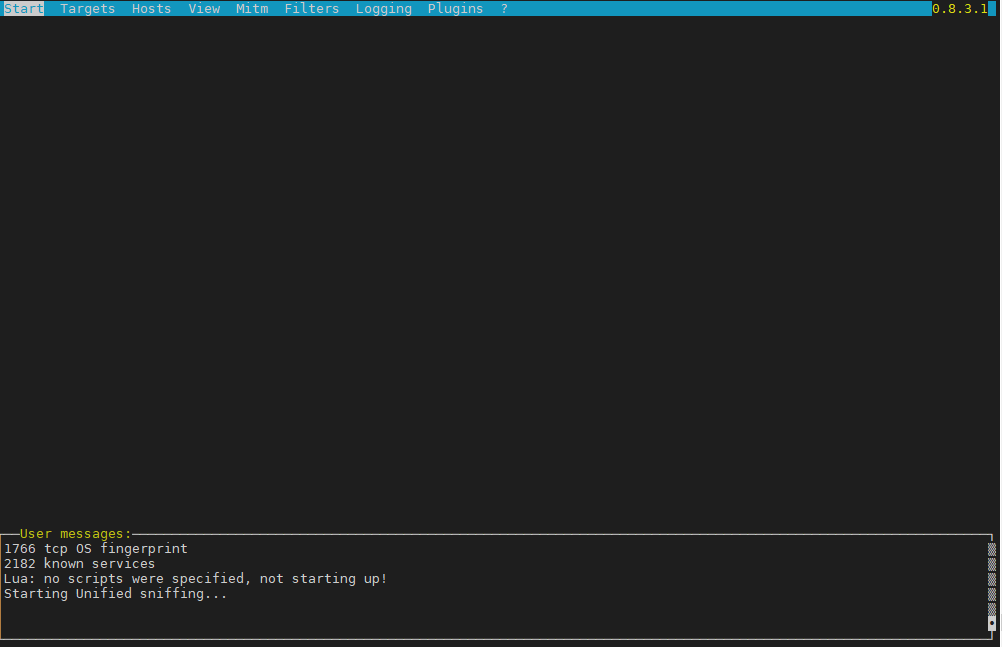
root@pcfreak:/ # apt install ettercap-text-only –yes

root@pcfreak:/ # ettercap -C


ettercap-text-interface-unified-sniffing-screenshot-linux

7. iperf and netperf to measure connecitivity speed on Network LAN and between Linux server hosts

iperf and netperf are two very handy tools to measure the speed of a network and various aspects of the bandwidth. It is mostly useful when designing network infrastructure or building networks from scratch.
 

If you never used netperf in the past here is a description from man netperf

NAME
       netperf – a network performance benchmark

SYNOPSIS
       netperf [global options] — [test specific options]

DESCRIPTION
       Netperf  is  a benchmark that can be used to measure various aspects of
       networking performance.  Currently, its focus is on bulk data  transfer
       and  request/response  performance  using  either  TCP  or UDP, and the
       Berkeley Sockets interface. In addition, tests for DLPI, and  Unix  Do‐
       main Sockets, tests for IPv6 may be conditionally compiled-in.


root@freak:~# netperf
MIGRATED TCP STREAM TEST from 0.0.0.0 (0.0.0.0) port 0 AF_INET to localhost () port 0 AF_INET : demo
Recv   Send    Send
Socket Socket  Message  Elapsed
Size   Size    Size     Time     Throughput
bytes  bytes   bytes    secs.    10^6bits/sec

 87380  65536  65536    10.00    17669.96


Testing UDP network throughput using NetPerf

Change the test name from TCP_STREAM to UDP_STREAM. Let’s use 1024 (1MB) as the message size to be sent by the client.
If you receive the following error send_data: data send error: Network is unreachable (errno 101) netperf: send_omni:

send_data failed: Network is unreachable, add option -R 1 to remove the iptable rule that prohibits NetPerf UDP flow.

$ netperf -H 172.31.56.48 -t UDP_STREAM -l 300 — -R 1 -m 1024
MIGRATED UDP STREAM TEST from 0.0.0.0 (0.0.0.0) port 0 AF_INET to 172.31.56.48 () port 0 AF_INET
Socket Message Elapsed Messages
Size Size Time Okay Errors Throughput
bytes bytes secs # # 10^6bits/sec

212992 1024 300.00 9193386 0 251.04
212992 300.00 9131380 249.35

UDP Throughput in a WAN

$ netperf -H HOST -t UDP_STREAM -l 300 — -R 1 -m 1024
MIGRATED UDP STREAM TEST from (null) (0.0.0.0) port 0 AF_INET to (null) () port 0 AF_INET : histogram : spin interval
Socket Message Elapsed Messages
Size Size Time Okay Errors Throughput
bytes bytes secs # # 10^6bits/sec

9216 1024 300.01 35627791 0 972.83
212992 300.01 253099 6.91


Testing TCP throughput using iPerf


Here is a short description of iperf

NAME
       iperf – perform network throughput tests

SYNOPSIS
       iperf -s [options]

       iperf -c server [options]

       iperf -u -s [options]

       iperf -u -c server [options]

DESCRIPTION
       iperf  2  is  a tool for performing network throughput and latency mea‐
       surements. It can test using either TCP or UDP protocols.  It  supports
       both  unidirectional  and  bidirectional traffic. Multiple simultaneous
       traffic streams are also supported. Metrics are displayed to help  iso‐
       late the causes which impact performance. Setting the enhanced (-e) op‐
       tion provides all available metrics.

       The user must establish both a both a server (to discard traffic) and a
       client (to generate traffic) for a test to occur. The client and server
       typically are on different hosts or computers but need not be.


Run iPerf3 as server on the server:

$ iperf3 –server –interval 30
———————————————————–
Server listening on 5201
———————————————————–


Test TCP Throughput in Local LAN


$ iperf3 –client 172.31.56.48 –time 300 –interval 30
Connecting to host 172.31.56.48, port 5201
[ 4] local 172.31.100.5 port 44728 connected to 172.31.56.48 port 5201
[ ID] Interval Transfer Bandwidth Retr Cwnd
[ 4] 0.00-30.00 sec 1.70 GBytes 488 Mbits/sec 138 533 KBytes
[ 4] 30.00-60.00 sec 260 MBytes 72.6 Mbits/sec 19 489 KBytes
[ 4] 60.00-90.00 sec 227 MBytes 63.5 Mbits/sec 15 542 KBytes
[ 4] 90.00-120.00 sec 227 MBytes 63.3 Mbits/sec 13 559 KBytes
[ 4] 120.00-150.00 sec 228 MBytes 63.7 Mbits/sec 16 463 KBytes
[ 4] 150.00-180.00 sec 227 MBytes 63.4 Mbits/sec 13 524 KBytes
[ 4] 180.00-210.00 sec 227 MBytes 63.5 Mbits/sec 14 559 KBytes
[ 4] 210.00-240.00 sec 227 MBytes 63.5 Mbits/sec 14 437 KBytes
[ 4] 240.00-270.00 sec 228 MBytes 63.7 Mbits/sec 14 516 KBytes
[ 4] 270.00-300.00 sec 227 MBytes 63.5 Mbits/sec 14 524 KBytes
– – – – – – – – – – – – – – – – – – – – – – – – –
[ ID] Interval Transfer Bandwidth Retr
[ 4] 0.00-300.00 sec 3.73 GBytes 107 Mbits/sec 270 sender
[ 4] 0.00-300.00 sec 3.73 GBytes 107 Mbits/sec receiver

Test TCP Throughput in a WAN Network

$ iperf3 –client HOST –time 300 –interval 30
Connecting to host HOST, port 5201
[ 5] local 192.168.1.73 port 56756 connected to HOST port 5201
[ ID] Interval Transfer Bitrate
[ 5] 0.00-30.00 sec 21.2 MBytes 5.93 Mbits/sec
[ 5] 30.00-60.00 sec 27.0 MBytes 7.55 Mbits/sec
[ 5] 60.00-90.00 sec 28.6 MBytes 7.99 Mbits/sec
[ 5] 90.00-120.00 sec 28.7 MBytes 8.02 Mbits/sec
[ 5] 120.00-150.00 sec 28.5 MBytes 7.97 Mbits/sec
[ 5] 150.00-180.00 sec 28.6 MBytes 7.99 Mbits/sec
[ 5] 180.00-210.00 sec 28.4 MBytes 7.94 Mbits/sec
[ 5] 210.00-240.00 sec 28.5 MBytes 7.97 Mbits/sec
[ 5] 240.00-270.00 sec 28.6 MBytes 8.00 Mbits/sec
[ 5] 270.00-300.00 sec 27.9 MBytes 7.81 Mbits/sec
– – – – – – – – – – – – – – – – – – – – – – – – –
[ ID] Interval Transfer Bitrate
[ 5] 0.00-300.00 sec 276 MBytes 7.72 Mbits/sec sender
[ 5] 0.00-300.00 sec 276 MBytes 7.71 Mbits/sec receiver


$ iperf3 –client 172.31.56.48 –interval 30 -u -b 100MB
Accepted connection from 172.31.100.5, port 39444
[ 5] local 172.31.56.48 port 5201 connected to 172.31.100.5 port 36436
[ ID] Interval Transfer Bandwidth Jitter Lost/Total Datagrams
[ 5] 0.00-30.00 sec 354 MBytes 98.9 Mbits/sec 0.052 ms 330/41774 (0.79%)
[ 5] 30.00-60.00 sec 355 MBytes 99.2 Mbits/sec 0.047 ms 355/41903 (0.85%)
[ 5] 60.00-90.00 sec 354 MBytes 98.9 Mbits/sec 0.048 ms 446/41905 (1.1%)
[ 5] 90.00-120.00 sec 355 MBytes 99.4 Mbits/sec 0.045 ms 261/41902 (0.62%)
[ 5] 120.00-150.00 sec 354 MBytes 99.1 Mbits/sec 0.048 ms 401/41908 (0.96%)
[ 5] 150.00-180.00 sec 353 MBytes 98.7 Mbits/sec 0.047 ms 530/41902 (1.3%)
[ 5] 180.00-210.00 sec 353 MBytes 98.8 Mbits/sec 0.059 ms 496/41904 (1.2%)
[ 5] 210.00-240.00 sec 354 MBytes 99.0 Mbits/sec 0.052 ms 407/41904 (0.97%)
[ 5] 240.00-270.00 sec 351 MBytes 98.3 Mbits/sec 0.059 ms 725/41903 (1.7%)
[ 5] 270.00-300.00 sec 354 MBytes 99.1 Mbits/sec 0.043 ms 393/41908 (0.94%)
– – – – – – – – – – – – – – – – – – – – – – – – –
[ ID] Interval Transfer Bandwidth Jitter Lost/Total Datagrams
[ 5] 0.00-300.04 sec 3.45 GBytes 98.94 Mbits/sec 0.043 ms 4344/418913 (1%)

UDP Throughput in a WAN

$ iperf3 –client HOST –time 300 -u -b 7.7MB
Accepted connection from 45.29.190.145, port 60634
[ 5] local 172.31.56.48 port 5201 connected to 45.29.190.145 port 52586
[ ID] Interval Transfer Bandwidth Jitter Lost/Total Datagrams
[ 5] 0.00-30.00 sec 27.4 MBytes 7.67 Mbits/sec 0.438 ms 64/19902 (0.32%)
[ 5] 30.00-60.00 sec 27.5 MBytes 7.69 Mbits/sec 0.446 ms 35/19940 (0.18%)
[ 5] 60.00-90.00 sec 27.5 MBytes 7.68 Mbits/sec 0.384 ms 39/19925 (0.2%)
[ 5] 90.00-120.00 sec 27.5 MBytes 7.68 Mbits/sec 0.528 ms 70/19950 (0.35%)
[ 5] 120.00-150.00 sec 27.4 MBytes 7.67 Mbits/sec 0.460 ms 51/19924 (0.26%)
[ 5] 150.00-180.00 sec 27.5 MBytes 7.69 Mbits/sec 0.485 ms 37/19948 (0.19%)
[ 5] 180.00-210.00 sec 27.5 MBytes 7.68 Mbits/sec 0.572 ms 49/19941 (0.25%)
[ 5] 210.00-240.00 sec 26.8 MBytes 7.50 Mbits/sec 0.800 ms 443/19856 (2.2%)
[ 5] 240.00-270.00 sec 27.4 MBytes 7.66 Mbits/sec 0.570 ms 172/20009 (0.86%)
[ 5] 270.00-300.00 sec 25.3 MBytes 7.07 Mbits/sec 0.423 ms 1562/19867 (7.9%)
– – – – – – – – – – – – – – – – – – – – – – – – –
[ ID] Interval Transfer Bandwidth Jitter Lost/Total Datagrams
[ 5] 0.00-300.00 sec 272 MBytes 7.60 Mbits/sec 0.423 ms 2522/199284 (1.3%)
[SUM] 0.0-300.2 sec 31 datagrams received out-of-order


Sum it up what learned


Debugging network issues and snooping on a Local LAN (DMZ) network on a server or home LAN is useful  to debug for various network issues and more importantly track and know abou tsecurity threads such as plain text passowd communication via insecure protocols a failure of proper communication between Linux network nodes at times, or simply to get a better idea on what kind of network is your new purchased dedicated server living in .It can help you also strenghten your security and close up any possible security holes, or even help you start thinking like a security intruder (cracker / hacker) would do. In this article we went through few of my favourite tools I use for many years quite often. These tools are just part of the tons of useful *Unix free tools available to do a network debug. Tools mentioned up are worthy to install on every server you have to administratrate or even your home desktop PCs, these are iptraf, sniffit, iftop, bmon, nethogs, nmon, ettercap, iperf and netperf.
 If you have some other useful tools used on Linux sys admin tasks please share, I'll be glad to know it and put them in my arsenal of used tools.

Enjoy ! 🙂

Install and enable Sysstats IO / DIsk / CPU / Network monitoring console suite on Redhat 8.3, Few sar useful command examples

Tuesday, September 28th, 2021

linux-sysstat-monitoring-logo


Why to monitoring CPU, Memory, Hard Disk, Network usage etc. with sysstats tools?
 

Using system monitoring tools such as Zabbix, Nagios Monit is a good approach, however sometimes due to zabbix server interruptions you might not be able to track certain aspects of system performance on time. Thus it is always a good idea to 
Gain more insights on system peroformance from command line. Of course there is cmd tools such as iostat and top, free, vnstat that provides plenty of useful info on system performance issues or bottlenecks. However from my experience to have a better historical data that is systimized and all the time accessible from console it is a great thing to have sysstat package at place. Since many years mostly on every server I administer, I've been using sysstats to monitor what is going on servers over a short time frames and I'm quite happy with it. In current company we're using Redhats and CentOS-es and I had to install sysstats on Redhat 8.3. I've earlier done it multiple times on Debian / Ubuntu Linux and while I've faced on some .deb distributions complications of making sysstat collect statistics I've come with an article on Howto fix sysstat Cannot open /var/log/sysstat/sa no such file or directory” on Debian / Ubuntu Linux
 

Sysstat contains the following tools related to collecting I/O and CPU statistics:
iostat
Displays an overview of CPU utilization, along with I/O statistics for one or more disk drives.
mpstat
Displays more in-depth CPU statistics.
Sysstat also contains tools that collect system resource utilization data and create daily reports based on that data. These tools are:
sadc
Known as the system activity data collector, sadc collects system resource utilization information and writes it to a file.
sar
Producing reports from the files created by sadc, sar reports can be generated interactively or written to a file for more intensive analysis.

My experience with CentOS 7 and Fedora to install sysstat it was pretty straight forward, I just had to install it via yum install sysstat wait for some time and use sar (System Activity Reporter) tool to report collected system activity info stats over time.
Unfortunately it seems on RedHat 8.3 as well as on CentOS 8.XX instaling sysstats does not work out of the box.

To complete a successful installation of it on RHEL 8.3, I had to:

[root@server ~]# yum install -y sysstat


To make sysstat enabled on the system and make it run, I've enabled it in sysstat

[root@server ~]# systemctl enable sysstat


Running immediately sar command, I've faced the shitty error:


Cannot open /var/log/sysstat/sa18:
No such file or directory. Please check if data collecting is enabled”


Once installed I've waited for about 5 minutes hoping, that somehow automatically sysstat would manage it but it didn't.

To solve it, I've had to create additionally file /etc/cron.d/sysstat (weirdly RPM's post install instructions does not tell it to automatically create it)

[root@server ~]# vim /etc/cron.d/sysstat

# run system activity accounting tool every 10 minutes
0 * * * * root /usr/lib64/sa/sa1 60 59 &
# generate a daily summary of process accounting at 23:53
53 23 * * * root /usr/lib64/sa/sa2 -A &


  • /usr/local/lib/sa1 is a shell script that we can use for scheduling cron which will create daily binary log file.
  • /usr/local/lib/sa2 is a shell script will change binary log file to human-readable form.


[root@server ~]# chmod 600 /etc/cron.d/sysstat

[root@server ~]# systemctl restart sysstat


In a while if sysstat is working correctly you should get produced its data history logs inside /var/log/sa

[root@server ~]# ls -al /var/log/sa 


Note that the standard sysstat history files on Debian and other modern .deb based distros such as Debian 10 (in  y.2021) is stored under /var/log/sysstat

Here is few useful uses of sysstat cmds


1. Check with sysstat machine history SWAP and RAM Memory use


To lets say check last 10 minutes SWAP memory use:

[hipo@server yum.repos.d] $ sar -W  |last -n 10
 

Linux 4.18.0-240.el8.x86_64 (server)       09/28/2021      _x86_64_        (8 CPU)

12:00:00 AM  pswpin/s pswpout/s
12:00:01 AM      0.00      0.00
12:01:01 AM      0.00      0.00
12:02:01 AM      0.00      0.00
12:03:01 AM      0.00      0.00
12:04:01 AM      0.00      0.00
12:05:01 AM      0.00      0.00
12:06:01 AM      0.00      0.00

[root@ccnrlb01 ~]# sar -r | tail -n 10
14:00:01        93008   1788832     95.06         0   1357700    725740      9.02    795168    683484        32
14:10:01        78756   1803084     95.81         0   1358780    725740      9.02    827660    652248        16
14:20:01        92844   1788996     95.07         0   1344332    725740      9.02    813912    651620        28
14:30:01        92408   1789432     95.09         0   1344612    725740      9.02    816392    649544        24
14:40:01        91740   1790100     95.12         0   1344876    725740      9.02    816948    649436        36
14:50:01        91688   1790152     95.13         0   1345144    725740      9.02    817136    649448        36
15:00:02        91544   1790296     95.14         0   1345448    725740      9.02    817472    649448        36
15:10:01        91108   1790732     95.16         0   1345724    725740      9.02    817732    649340        36
15:20:01        90844   1790996     95.17         0   1346000    725740      9.02    818016    649332        28
Average:        93473   1788367     95.03         0   1369583    725074      9.02    800965    671266        29


2. Check system load? Are my processes waiting too long to run on the CPU?

[root@server ~ ]# sar -q |head -n 10
Linux 4.18.0-240.el8.x86_64 (server)       09/28/2021      _x86_64_        (8 CPU)

12:00:00 AM   runq-sz  plist-sz   ldavg-1   ldavg-5  ldavg-15   blocked
12:00:01 AM         0       272      0.00      0.02      0.00         0
12:01:01 AM         1       271      0.00      0.02      0.00         0
12:02:01 AM         0       268      0.00      0.01      0.00         0
12:03:01 AM         0       268      0.00      0.00      0.00         0
12:04:01 AM         1       271      0.00      0.00      0.00         0
12:05:01 AM         1       271      0.00      0.00      0.00         0
12:06:01 AM         1       265      0.00      0.00      0.00         0


3. Show various CPU statistics per CPU use
 

On a multiprocessor, multi core server sometimes for scripting it is useful to fetch processor per use historic data, 
this can be attained with:


[hipo@server ~ ] $ mpstat -P ALL
Linux 4.18.0-240.el8.x86_64 (server)       09/28/2021      _x86_64_        (8 CPU)

06:08:38 PM  CPU    %usr   %nice    %sys %iowait    %irq   %soft  %steal  %guest  %gnice   %idle
06:08:38 PM  all    0.17    0.02    0.25    0.00    0.05    0.02    0.00    0.00    0.00   99.49
06:08:38 PM    0    0.22    0.02    0.28    0.00    0.06    0.03    0.00    0.00    0.00   99.39
06:08:38 PM    1    0.28    0.02    0.36    0.00    0.08    0.02    0.00    0.00    0.00   99.23
06:08:38 PM    2    0.27    0.02    0.31    0.00    0.06    0.01    0.00    0.00    0.00   99.33
06:08:38 PM    3    0.15    0.02    0.22    0.00    0.03    0.01    0.00    0.00    0.00   99.57
06:08:38 PM    4    0.13    0.02    0.20    0.01    0.03    0.01    0.00    0.00    0.00   99.60
06:08:38 PM    5    0.14    0.02    0.27    0.00    0.04    0.06    0.01    0.00    0.00   99.47
06:08:38 PM    6    0.10    0.02    0.17    0.00    0.04    0.02    0.00    0.00    0.00   99.65
06:08:38 PM    7    0.09    0.02    0.15    0.00    0.02    0.01    0.00    0.00    0.00   99.70


sar-sysstat-cpu-statistics-screenshot

Monitor processes and threads currently being managed by the Linux kernel.

[hipo@server ~ ] $ pidstat

pidstat-various-random-process-statistics

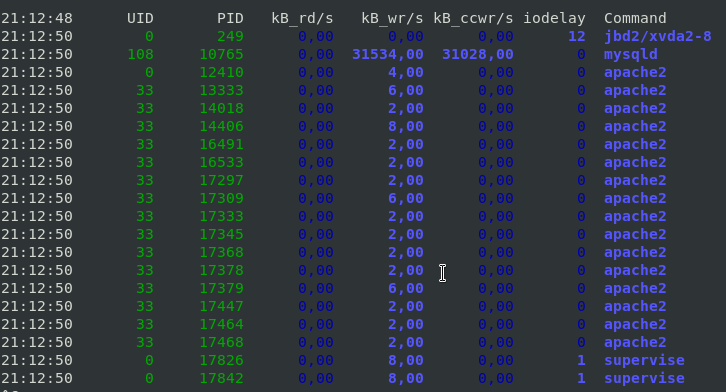
[hipo@server ~ ] $ pidstat -d 2


pidstat-show-processes-with-most-io-activities-linux-screenshot

This report tells us that there is few processes with heave I/O use Filesystem system journalling daemon jbd2, apache, mysqld and supervise, in 3rd column you see their respective PID IDs.

To show threads used inside a process (like if you press SHIFT + H) inside Linux top command:

[hipo@server ~ ] $ pidstat -t -p 10765 1 3

Linux 4.19.0-14-amd64 (server)     28.09.2021     _x86_64_    (10 CPU)

21:41:22      UID      TGID       TID    %usr %system  %guest   %wait    %CPU   CPU  Command
21:41:23      108     10765         –    1,98    0,99    0,00    0,00    2,97     1  mysqld
21:41:23      108         –     10765    0,00    0,00    0,00    0,00    0,00     1  |__mysqld
21:41:23      108         –     10768    0,00    0,00    0,00    0,00    0,00     0  |__mysqld
21:41:23      108         –     10771    0,00    0,00    0,00    0,00    0,00     5  |__mysqld
21:41:23      108         –     10784    0,00    0,00    0,00    0,00    0,00     7  |__mysqld
21:41:23      108         –     10785    0,00    0,00    0,00    0,00    0,00     6  |__mysqld
21:41:23      108         –     10786    0,00    0,00    0,00    0,00    0,00     2  |__mysqld

10765 – is the Process ID whose threads you would like to list

With pidstat, you can further monitor processes for memory leaks with:

[hipo@server ~ ] $ pidstat -r 2


4. Report paging statistics for some old period


[root@server ~ ]# sar -B -f /var/log/sa/sa27 |head -n 10
Linux 4.18.0-240.el8.x86_64 (server)       09/27/2021      _x86_64_        (8 CPU)

15:42:26     LINUX RESTART      (8 CPU)

15:55:30     LINUX RESTART      (8 CPU)

04:00:01 PM  pgpgin/s pgpgout/s   fault/s  majflt/s  pgfree/s pgscank/s pgscand/s pgsteal/s    %vmeff
04:01:01 PM      0.00     14.47    629.17      0.00    502.53      0.00      0.00      0.00      0.00
04:02:01 PM      0.00     13.07    553.75      0.00    419.98      0.00      0.00      0.00      0.00
04:03:01 PM      0.00     11.67    548.13      0.00    411.80      0.00      0.00      0.00      0.00


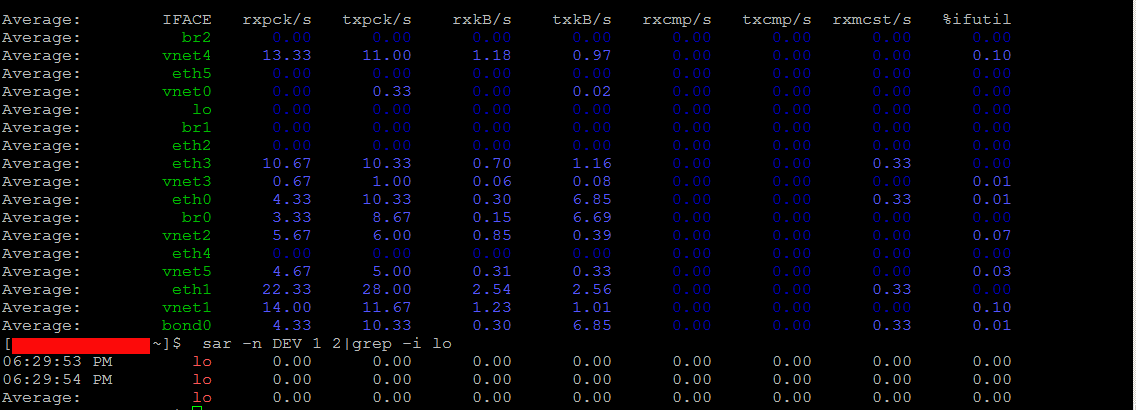
5.  Monitor Received RX and Transmitted TX network traffic perl Network interface real time
 

To print out Received and Send traffic per network interface 4 times in a raw

sar-sysstats-network-traffic-statistics-screenshot
 

[hipo@server ~ ] $ sar -n DEV 1 4


To continusly monitor all network interfaces I/O traffic

[hipo@server ~ ] $ sar -n DEV 1


To only monitor a certain network interface lets say loopback interface (127.0.0.1) received / transmitted bytes

[hipo@server yum.repos.d] $  sar -n DEV 1 2|grep -i lo
06:29:53 PM        lo      0.00      0.00      0.00      0.00      0.00      0.00      0.00      0.00
06:29:54 PM        lo      0.00      0.00      0.00      0.00      0.00      0.00      0.00      0.00
Average:           lo      0.00      0.00      0.00      0.00      0.00      0.00      0.00      0.00


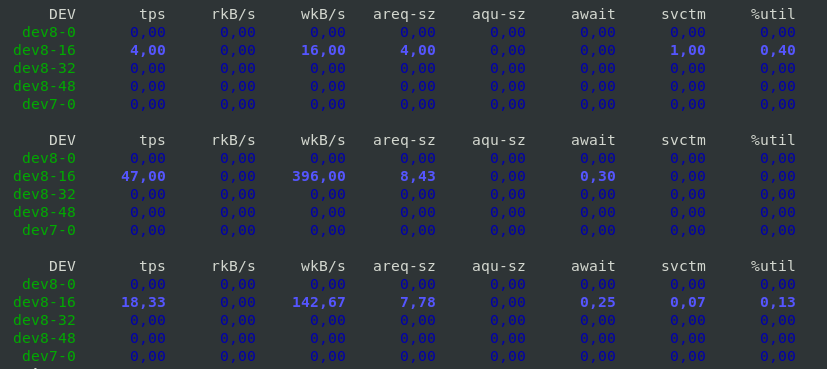
6. Monitor block devices use
 

To check block devices use 3 times in a raw
 

[hipo@server yum.repos.d] $ sar -d 1 3


sar-sysstats-blockdevice-statistics-screenshot
 

7. Output server monitoring data in CSV database structured format


For preparing a nice graphs with Excel from CSV strucuted file format, you can dump the collected data as so:

 [root@server yum.repos.d]# sadf -d /var/log/sa/sa27 — -n DEV | grep -v lo|head -n 10
server-name-fqdn;-1;2021-09-27 13:42:26 UTC;LINUX-RESTART    (8 CPU)
# hostname;interval;timestamp;IFACE;rxpck/s;txpck/s;rxkB/s;txkB/s;rxcmp/s;txcmp/s;rxmcst/s;%ifutil
server-name-fqdn;-1;2021-09-27 13:55:30 UTC;LINUX-RESTART    (8 CPU)
# hostname;interval;timestamp;IFACE;rxpck/s;txpck/s;rxkB/s;txkB/s;rxcmp/s;txcmp/s;rxmcst/s;%ifutil
server-name-fqdn;60;2021-09-27 14:01:01 UTC;eth1;19.42;16.12;1.94;1.68;0.00;0.00;0.00;0.00
server-name-fqdn;60;2021-09-27 14:01:01 UTC;eth0;7.18;9.65;0.55;0.78;0.00;0.00;0.00;0.00
server-name-fqdn;60;2021-09-27 14:01:01 UTC;eth2;5.65;5.13;0.42;0.39;0.00;0.00;0.00;0.00
server-name-fqdn;60;2021-09-27 14:02:01 UTC;eth1;18.90;15.55;1.89;1.60;0.00;0.00;0.00;0.00
server-name-fqdn;60;2021-09-27 14:02:01 UTC;eth0;7.15;9.63;0.55;0.74;0.00;0.00;0.00;0.00
server-name-fqdn;60;2021-09-27 14:02:01 UTC;eth2;5.67;5.15;0.42;0.39;0.00;0.00;0.00;0.00

To graph the output data you can use Excel / LibreOffice's Excel equivalent Calc or if you need to dump a CSV sar output and generate it on the fly from a script  use gnuplot 


What we've learned?


How to install and enable on cron sysstats on Redhat and CentOS 8 Linux ? 
How to continuously monitor CPU / Disk and Network, block devices, paging use and processes and threads used by the kernel per process ?  
As well as how to export previously collected data to CSV to import to database or for later use inrder to generate graphic presentation of data.
Cheers ! 🙂


How to add colorful random ASCII art picture and a bible verse on each SSH server login, joyout sysadmins life with cowsay, fortune, caca-utils and others

Tuesday, November 24th, 2020

Jesus-Christ-loves-the-world-ascii-art

There are pleny of console ASCII stuff out there that can make your console sysadmin boring life a little bit more funny and cherish some memories from the old times of 8 bit computers :).

One of this as I blogged earlier is cowsay and cowthink to generate a ascii picture with a cow with your custom message.
I've earlier blogged about that in my previous article Create ASCII Art Text bannners in Linux console / terminal with figlet and toilet

One of this cool things I'm using daily on my servers  is a cowsay console goodie together with a bash shell script that does visualize a random ASCII picture from a preset of pictures on each and every ssh login to my server.
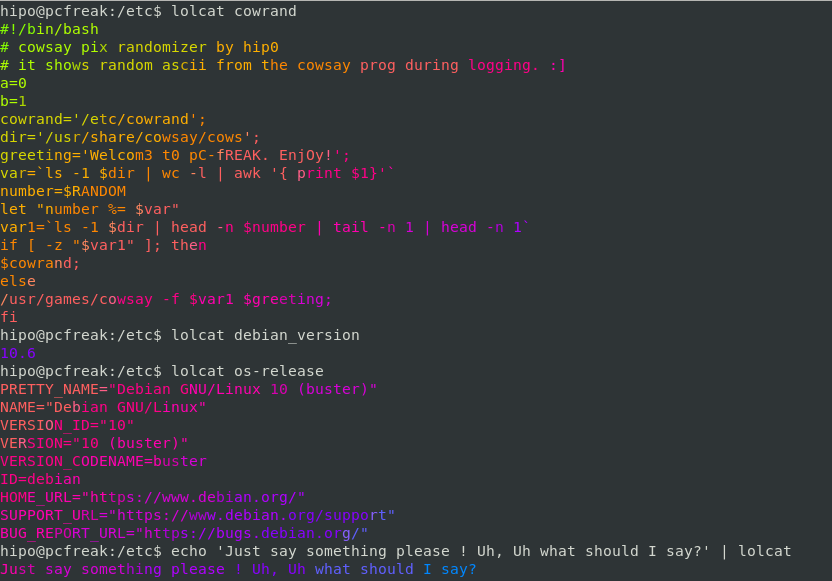
The script I use is cowrand below is code:

#!/bin/bash
# cowsay pix randomizer by hip0
# it shows random ascii from the cowsay prog during logging. :]
a=0
b=1
cowrand='/etc/cowrand';
dir='/usr/share/cowsay/cows';
var=`ls -1 $dir | wc -l | awk '{ print $1}'`
#RANGE=$var
number=$RANDOM
let "number %= $var"
var1=`ls -1 $dir | head -n $number | tail -n 1 | head -n 1`
if [ -z “$var1” ]; then
$cowrand;
else
/usr/bin/cowsay -f $var1 Welc0m3 t0 pC-fREAK … Enj0y.
fi


The script is set as executable under /etc/cowrand

hipo@pcfreak:~$ ls -al /etc/cowrand
-rwxr-xr-x 1 hipo hipo 432 Nov 24 19:21 /etc/cowrand*

I've set this script to my /etc/profile to auto start on every login on my Debian Linux systems right after the comments like so:

hipo@pcfreak:~$ grep -i cowrand -A 2 -B 3 /etc/profile
# /etc/profile: system-wide .profile file for the Bourne shell (sh(1))
# and Bourne compatible shells (bash(1), ksh(1), ash(1), …).
echo '';
/etc/cowrand | lolcat
echo '';
#/usr/bin/verse

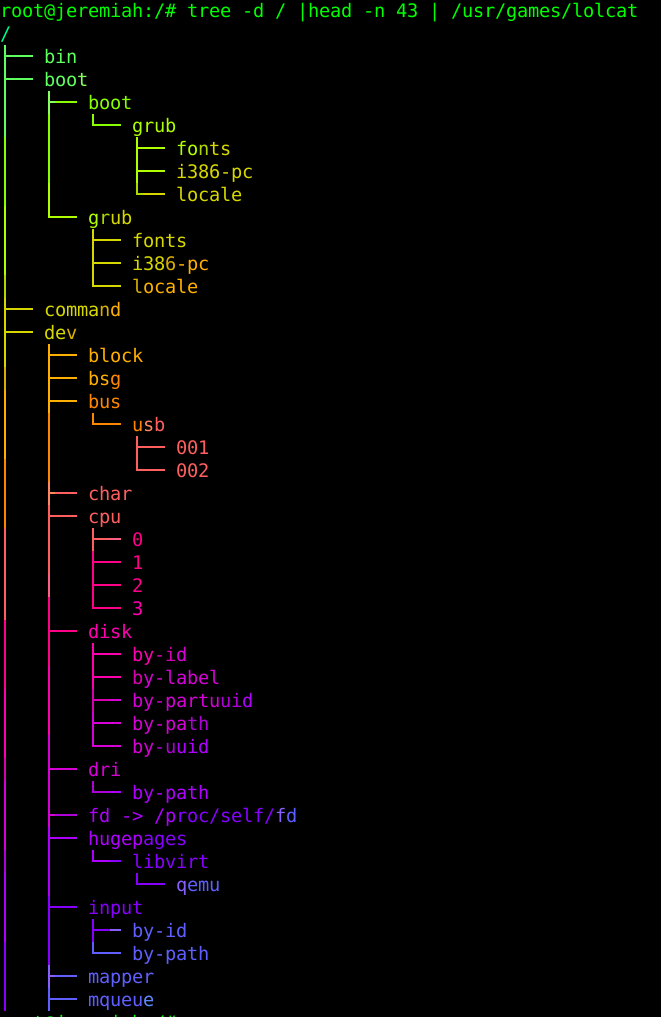
As you can see to make my life even more funnier, I've installed another fun command lolcat

lolcat-screenshot

hipo@pcfreak:~$ apt-cache show lolcat |grep -i desc -A 3
Description-en: colorful `cat`
 lolcat concatenates files like the UNIX `cat` program, but colors it for the
 lulz in a rainbow animation. Terminals with 256 colors and animations are
 supported.

Description-md5: 86f992d66ac74197cda39e0bbfcb549d
Homepage: https://github.com/busyloop/lolcat
Ruby-Versions: all
Section: games


You can think of lolcat as a standard cat command that has been made to print in colors, this gives a funny results.

cowrand-script-lolcat-os-release-how-to-make-your-linux-login-prompt-funnier

To add some spice to everything nice as a recipee for thethe creation of powerpuff girls, I've come up with a way to use fortune
console tool that uses to print quotes out of a database to use as a source a big database containing the Holy Bible books of Old and New Testament Books. The fortune prints me out a quote extract from the bible on each and every remote SSH login to my machine. The content of this bible database for fortune bible_quotes_fortune.tar.gz can be downloaded and used from here.

The command used to print out a verse from the holy bible is:


hipo@pcfreak:~$ /usr/games/fortune -s /usr/local/fortune/
For if thou refuse to let them go, and wilt hold them still,
        — Exodus 9:2
hipo@pcfreak:~$ /usr/games/fortune -s /usr/local/fortune/
And when the queen of Sheba heard of the fame of Solomon concerning
the name of the LORD, she came to prove him with hard questions.
        — 1 Kings 10:1
hipo@pcfreak:~$ /usr/games/fortune -s /usr/local/fortune/
And Shelemiah, and Nathan, and Adaiah,
        — Ezra 10:39
hipo@pcfreak:~$ /usr/games/fortune -s /usr/local/fortune/
For by thee I have run through a troop: by my God have I leaped
over a wall.
        — 2 Samuel 22:30
hipo@pcfreak:~$ /usr/games/fortune -s /usr/local/fortune/
Unto the place of the altar, which he had make there at the first:
and there Abram called on the name of the LORD.
        — Genesis 13:4
hipo@pcfreak:~$ /usr/games/fortune -s /usr/local/fortune/
And there shall dwell in Judah itself, and in all the cities thereof
together, husbandmen, and they that go forth with flocks.
        — Jeremiah 31:24
hipo@pcfreak:~$ /usr/games/fortune -s /usr/local/fortune/
And he hath put a new song in my mouth, even praise unto our God:
many shall see it, and fear, and shall trust in the LORD.
        — Psalms 40:3
hipo@pcfreak:~$ /usr/games/fortune -s /usr/local/fortune/
And Jehoshaphat made peace with the king of Israel.
        — 1 Kings 22:44


The fortune is really awesome as it reminds me often of a verses from Holy Bible I often forget, the database is using the all famous King James Bible famous as (KJB) / (KJV) from 1611 this bible version that is like a protestant standard nowadays takes its name after James VI and I (James Charles Stuart; 19 June 1566 – 27 March 1625 – King of Scotland and Ireland) who was the sponsor of KJV collection and print.

Finally after adding the /usr/games/fortune -s /usr/local/fortune/ to the beginning of /etc/profile together with cowsay and cowrand I got this beautiful and educational result that combines fun with wisdom, below is example of what you will get after you  do a remote ssh login;


ssh your-machine.com

cowrand-script-lolcat-os-release-how-to-make-your-linux-login-prompt-funnier_1

cowrand-script-lolcat-os-release-how-to-make-your-linux-login-prompt-funnier_2

cowrand-script-lolcat-os-release-how-to-make-your-linux-login-prompt-funnier_3

Those who have a Linux Graphical Environment desktop might also enjoy xcowsay

Another must I recommend to the text geeks is the caca-utils package which contains cool things such as aafire (cacafire)

cacaview-fire-screenshot-ascii-art

Or (Image to text converter) img2txt / cacaview (a text console picture viewer) that could give you a raw idea on how a png / jpg picture looks like (or at least the picture shapes) without a need for a GUI picture viewer such as Eye of the Gnome.

bear-for-you-picture-rose

Here is a original bear

cacaview-a-bear-for-you-picture-in-plain-text-ascii

And here is the one you'll see in cacaview 🙂
To read more about cacaview I have and its uses, check my previous article Viewing JPEG,GIF and PNG in ASCII with cacaview in Linux.
If you want to show off even more as a '1337 h4x0r' you might also show your sysadm 1337 5K!11Z to colleagues by showng them how you check weather via console (i've a separate article for how to ASCII art check colorful weather forecast via console / terminal ).

If you're too bored in your daily sys admin job, you might make some fun and take some useless effort to install ASCII Art Aquarium ASCIIQUARIUM

asciiquarium1

asciiquarium2

asciiquarium3

If you're crazy enough and want to torture your other sysadmin colleagues and a get a nice prank, you might install and set asciiquarium to auto run for their specific account on each and every login to some server until they control C or if you're a bit evil you can even set a small auto load on account login via ~/.bashrc shell script to 'Disable CTRL + C' combination 🙂
 

Of course there is plenty of other cool ASCII games and stuff. I've collected some of them by launching the Play Cool Ascii games service on my machine for ASCII art geeks to test out some ASCII games here.


Set all logs to log to to physical console /dev/tty12 (tty12) on Linux

Wednesday, August 12th, 2020

tty linux-logo how to log everything to last console terminal tty12

Those who administer servers from the days of birth of Linux and who used actively GNU / Linux over the years or any other UNIX knows how practical could be to configure logging of all running services / kernel messages / errors and warnings on a physical console.

Traditionally from the days I was learning Linux basics I was shown how to do this on an old Debian Sarge 3.0 Linux without systemd and on all Linux distributions Redhat 9.0 / Calderas and Mandrakes I've used either as a home systems or for servers. I've always configured output of all messages to go to the last easy to access console /dev/tty12 (for those who never use it console switching under Linux plain text console mode is done with key combination of CTRL + ALT + F1 .. F12.

In recent times however with the introduction of systemd pretty much things changed as messages to console are not handled by /etc/inittab which was used to add and refresh physical consoles tty1, tty2 … tty7 (the default added one on Linux were usually 7), but I had to manually include more respawn lines for each console in /etc/inittab.
Nowadays as of year 2020 Linux distros /etc/inittab is no longer there being obsoleted and console print out of INPUT / OUTPUT messages are handled by systemd.
 

1. Enable Physical TTYs from TTY8 till TTY12 etc.


The number of default consoles existing in most Linux distributions I've seen is still from tty1 to tty7. Hence to add more tty consoles and be ready to be able to switch out  not only towards tty7 but towards tty12 once you're connected to the server via a remote ILO (Integrated Lights Out) / IdRAC (Dell Remote Access Controller) / IPMI / IMM (Imtegrated Management Module), you have to do it by telling systemd issuing below systemctl commands:


 # systemctl enable getty@tty8.service Created symlink /etc/systemd/system/getty.target.wants/getty@tty8.service -> /lib/systemd/system/getty@.service.

systemctl enable getty@tty9.service

Created symlink /etc/systemd/system/getty.target.wants/getty@tty9.service -> /lib/systemd/system/getty@.service.

systemctl enable getty@tty10.service

Created symlink /etc/systemd/system/getty.target.wants/getty@tty10.service -> /lib/systemd/system/getty@.service.

systemctl enable getty@tty11.service

Created symlink /etc/systemd/system/getty.target.wants/getty@tty11.service -> /lib/systemd/system/getty@.service.

systemctl enable getty@tty12.service

Created symlink /etc/systemd/system/getty.target.wants/getty@tty12.service -> /lib/systemd/system/getty@.service.


Once the TTYS tty7 to tty12 are enabled you will be able to switch to this consoles either if you have a physical LCD / CRT monitor or KVM switch connected to the machine mounted on the Rack shelf once you're in the Data Center or will be able to see it once connected remotely via the Management IP Interface (ILO) remote console.
 

2. Taking screenshot of the physical console TTY with fbcat


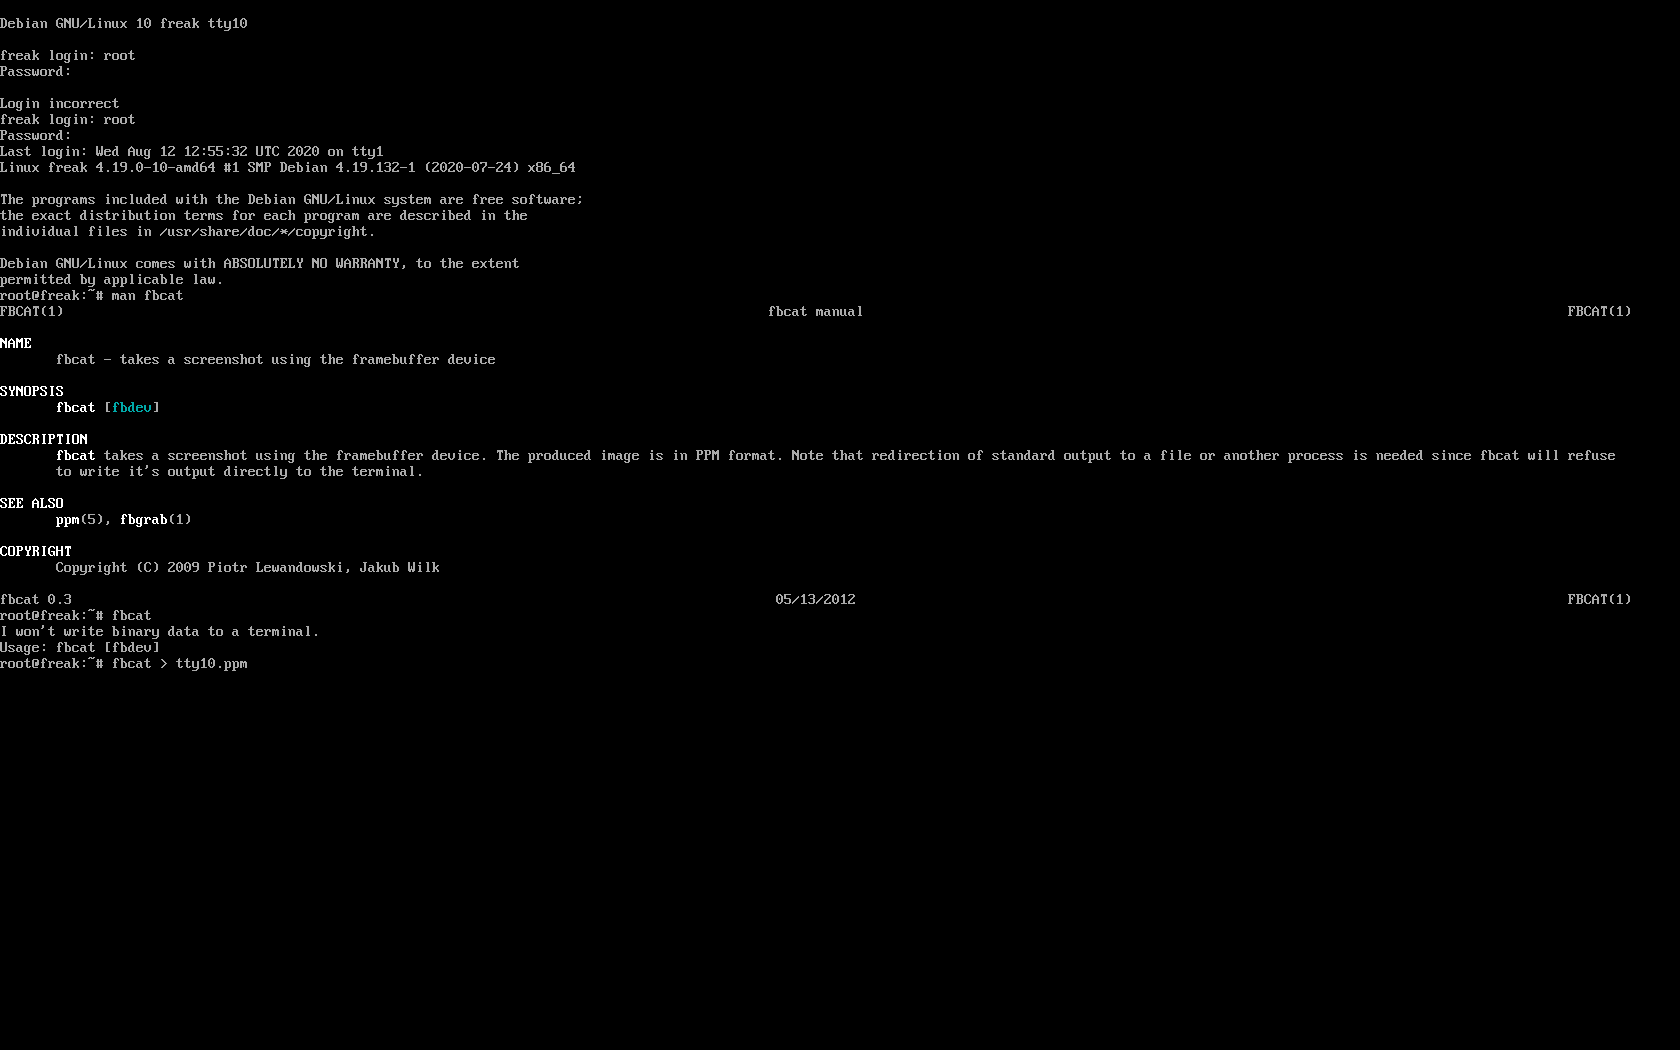
For example below is a screenshot of the 10th enabled tty10:

tty10-linux-screenshot-fbcat-how-to-screenshot-console

As you can in the screenshot I've used the nice tool fbcat that can be used to make a screenshot of remote console. This is very useful especially if remote access via a SSH client such as PuTTY / MobaXterm is not there but you have only a physical attached monitor access on a DCs that are under a heavy firewall that is preventing anyone to get to the system remotely. For example screenshotting the physical console in case if there is a major hardware failure occurs and you need to dump a hardware error message to a flash drive that will be used to later be handled to technicians to analyize it and exchange the broken server hardware part.

Screenshots of the CLI with fbcat is possible across most Linux distributions where as usual.

In Debian you have to first instal the tool via :
 

# apt install –yes fbcat


and on RedHats / CentOS / Fedoras

# yum install -y fbcat


Taking screenshot once tool is on the server of whatever you have printed on console is as easy as

# fbcat > tty_name.ppm


Note that you might want to convert the .ppm created picture to png with any converter such as imagemagick's convert command or if you have a GUI perhaps with GNU Image Manipulation Tool (GIMP).

3. Enabling every rsyslog handled message to log to Physical TTY12


To make everything such as errors, notices, debug, warning messages  become instantly logging towards above added new /dev/tty12.

Open /etc/rsyslog.conf and to the end of the file append below line :
 

daemon,mail.*;\
   news.=crit;news.=err;news.=notice;\
   *.=debug;*.=info;\
   *.=notice;*.=warn   /dev/tty12


To make rsyslog load its new config restart it:


# systemctl status rsyslog


rsyslog.service – System Logging Service
   Loaded: loaded (/lib/systemd/system/rsyslog.service; enabled; vendor preset: enabled)
   Active: active (running) since Mon 2020-08-10 04:09:36 EEST; 2 days ago
     Docs: man:rsyslogd(8)
           https://www.rsyslog.com/doc/
 Main PID: 671 (rsyslogd)
    Tasks: 4 (limit: 4915)
   Memory: 12.5M
   CGroup: /system.slice/rsyslog.service
           └─671 /usr/sbin/rsyslogd -n -iNONE


авг 12 00:00:05 pcfreak rsyslogd[671]:  [origin software="rsyslogd" swVersion="8.1901.0" x-pid="671" x-info="https://www.rsyslo
Warning: Journal has been rotated since unit was started. Log output is incomplete or unavailable.


systemctl restart rsyslog


That's all folks navigate by pressing simultaneously CTRL + ALT + F12 to get to TTY12 or use ALT + LEFT / ALT + RIGHT ARROW (console switch commands) till you get to the console where everything should be now logged.

Enjoy and if you like this article share to tell your sysadmin friends about this nice hack  ! 🙂


IBM TSM dsmc console client use for listing configured backups, checking set scheduled backups and backup and restore operations howto

Friday, March 6th, 2020

tsm-ibm-logo_tivoli-dsmc-console-client-listing-backups-create-backups-and-restore-on-linux-unix-windows

Creating a simple home based backup solution with some shell scripting and rsync is a common use. However as a sysadmin in a middle sized or large corporations most companies use some professional backup service such as IBM Tivoli Storage Manager TSM – recently IBM changed the name of the product to IBM Spectrum.

IBM TSM  is a data protection platform that gives enterprises a single point of control and administration for backup and recovery that is used for Privare Clouds backup and other high end solutions where data criticality is top.
Usually in large companies TSM backup handling is managed by a separate team or teams as managing a large TSM infrastructure is quite a complex task, however my experience as a sysadmin show me that even if you don't have too much of indepth into tsm it is very useful to know how to manage at least basic Incremental backup operations such as view what is set to be backupped, set-up a new directory structure for backup, check the backup schedule configured, check what files are included and which excluded from the backup store etc. 

TSM has multi OS support ans you can use it on most streamline Operating systems Windows / Mac OS X and Linux in this specific article I'll be talking concretely about backing up data with tsm on Linux, tivoli can be theoretically brought up even on FreeBSD machines via the Linuxemu BSD module and the 64-Bit Tivoli Storage Manager RPMs.
Therefore in this small article I'll try to give few useful operations for the novice admin that stumbles on tsm backupped server that needs some small maintenance.
 

1. Starting up the dsmc command line client


Nomatter the operating system on which you run it to run the client run:

# dsmc


tsm-check-backup-schedule-set-time

Note that usually dsmc should run as superuser so if you try to run it via a normal non-root user you will get an error message like:


[ user@linux ~]$ dsmc
ANS1398E Initialization functions cannot open one of the Tivoli Storage Manager logs or a related file: /var/tsm/dsmerror.log. errno = 13, Permission denied


Tivoli SM has an extensive help so to get the use basics, type help
 

tsm> help
1.0 New for IBM Tivoli Storage Manager Version 6.4
2.0 Using commands
  2.1 Start and end a client command session
    2.1.1 Process commands in batch mode
    2.1.2 Process commands in interactive mode
  2.2 Enter client command names, options, and parameters
    2.2.1 Command name
    2.2.2 Options
    2.2.3 Parameters
    2.2.4 File specification syntax
  2.3 Wildcard characters
  2.4 Client commands reference
  2.5 Archive
  2.6 Archive FastBack

Enter 'q' to exit help, 't' to display the table of contents,
press enter or 'd' to scroll down, 'u' to scroll up or
enter a help topic section number, message number, option name,
command name, or command and subcommand:    


2. Listing files listed for backups


A note to make here is as in most corporate products tsm supports command aliases so any command supported described in the help like query, could be
abbreviated with its first letters only, e.g. query filespace tsm cmd can be abbreviated as

tsm> q fi

Commands can be run non-interactive mode also so if you want the output of q fi you can straight use:

tsm> dsmc q fi


tsm-check-included-excluded-files-q-file-if-backupped-list-backup-set-directories

This shows the directories and files that are set for backup creation with Tivoli.


3. Getting included and excluded backup set files


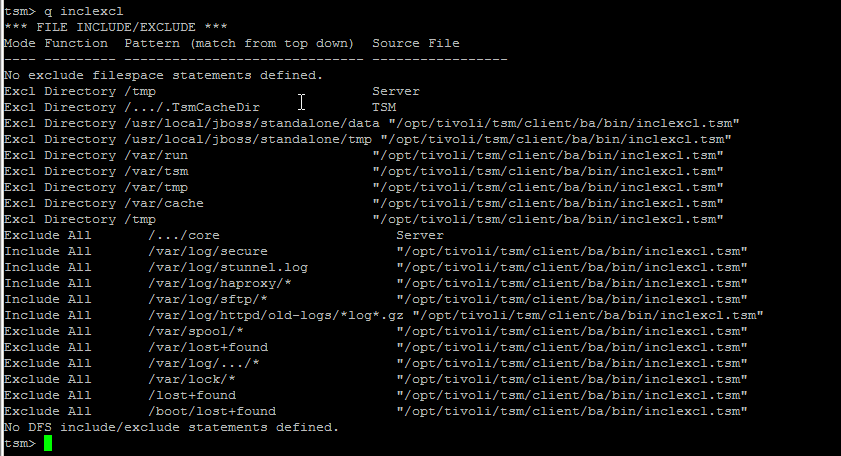
It is useful to know what are the exact excluded files from tsm set backup this is done with query inclexcl

tsm-check-excluded-included-files


4. Querying for backup schedule time

Tivoli as every other backup solution is creating its set to backup files in a certain time slot periods. 
To find out what is the time slot for backup creation use;

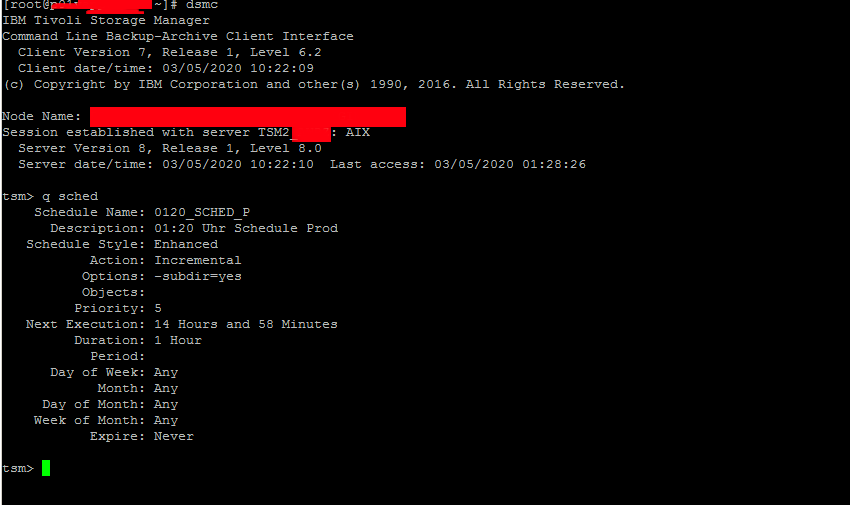
tsm> q sched
Schedule Name: WEEKLY_ITSERV
      Description: ITSERV weekly incremental backup
   Schedule Style: Classic
           Action: Incremental
          Options: 
          Objects: 
         Priority: 5
   Next Execution: 180 Hours and 35 Minutes
         Duration: 15 Minutes
           Period: 1 Week  
      Day of Week: Wednesday
            Month:
     Day of Month:
    Week of Month:
           Expire: Never  


tsm-query-partitions-backupeed-or-not


5. Check which files have been backed up

If you want to make sure backups are really created it is a good to check, which files from the selected backup files have already
a working backup copy.

This is done with query backup like so:

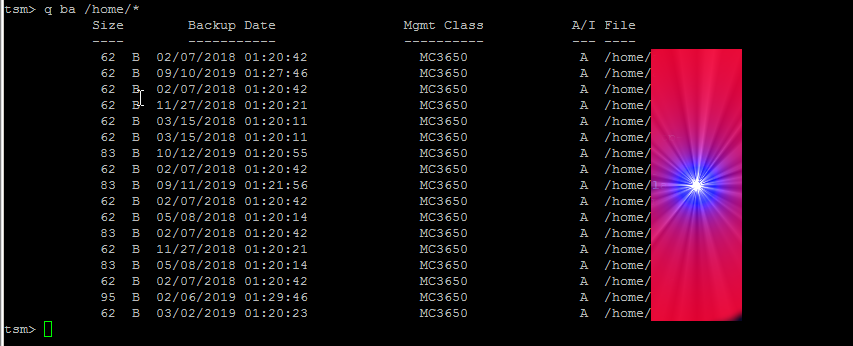
tsm> q ba /home/*


tsm-dsmc-query-user-home-for-backups

If you want to query all the current files and directories backed up under a directory and all its subdirectories you need to add the -subdir=yes option as below:


tsm> q ba /home/hipo/projects/* -subdir=yes
   
Size      Backup Date        Mgmt Class A/I File
   —-      ———–        ———- — —-
    512  12-09-2011 19:57:09    STANDARD    A  /home/hipo/projects/hfs0106
  1,024  08-12-2011 02:46:53    STANDARD    A  /home/hipo/projects/hsm41perf
    512  12-09-2011 19:57:09    STANDARD    A  /home/hipo/projects/hsm41test
    512  24-04-2012 00:22:56    STANDARD    A  /home/hipo/projects/hsm42upg
  1,024  12-09-2011 19:57:09    STANDARD    A  /home/hipo/projects/hfs0106/test
  1,024  12-09-2011 19:57:09    STANDARD    A  /home/hipo/projects/hfs0106/test/test2
 12,048  04-12-2011 02:01:29    STANDARD    A  /home/hipo/projects/hsm41perf/tables
 50,326  30-04-2012 01:35:26    STANDARD    A  /home/hipo/projects/hsm42upg/PMR70023
 50,326  27-04-2012 00:28:15    STANDARD    A  /home/hipo/projects/hsm42upg/PMR70099
 11,013  24-04-2012 00:22:56    STANDARD    A  /home/hipo/projects/hsm42upg/md5check  


  • To make tsm, backup some directories on Linux / AIX other unices:


tsm> incr /  /usr  /usr/local  /home /lib


  • For tsm to backup some standard netware drives, use:


tsm> incr NDS:  USR:  SYS:  APPS:  


  • To backup C:\ D:\ E:\ F:\ if TSM is running on Windows


tsm> incr C:  D:  E: F:  -incrbydate 


  • To back up entire disk volumes irrespective of whether files have changed since the last backup, use the selective command with a wildcard and -subdir=yes as below:


tsm> sel /*  /usr/*   /home/*  -su=yes   ** Unix/Linux


7. Backup selected files from a backup location


It is intuitive to think you can just add some wildcard characters to select what you want
to backup from a selected location but this is not so, if you try something like below
you will get an err.


tsm> incr /home/hipo/projects/*/* -su=yes      
ANS1071E Invalid domain name entered: '/home/hipo/projects/*/*'


The proper way to select a certain folder / file for backup is with:


tsm> sel /home/hipo/projects/*/* -su=yes


8. Restoring tsm data from backup


To restore the config httpd.conf to custom directory use:


tsm> rest /etc/httpd/conf/httpd.conf  /home/hipo/restore/


N!B! that in order for above to work you need to have the '/' trailing slash at the end.

If you want to restore a file under a different name:


tsm> rest /etc/ntpd.conf  /home/hipo/restore/


9. Restoring a whole backupped partition


tsm> rest /home/*  /tmp/restore/ -su=yes


This is using the Tivoli 'Restoring multiple files and directories', and the files to restore '*'
are kept till the one that was recovered (saying this in case if you accidently cancel the restore)


10. Restoring files with back date 


By default the restore function will restore the latest available backupped file, if you need
to recover a specific file, you need the '-inactive' '-pick' options.
The 'pick' interface is interactive so once listed you can select the exact file from the date
you want to restore.

General restore command syntax is:
 

tsm> restore [source-file] [destination-file]


tsm> rest /home/hipo/projects/*  /tmp/restore/ -su=yes  -inactive -pick

TSM Scrollable PICK Window – Restore

     #    Backup Date/Time        File Size A/I  File
   ————————————————————————————————–
   170. | 12-09-2011 19:57:09        650  B  A   /home/hipo/projects/hsm41test/inclexcl.test
   171. | 12-09-2011 19:57:09       2.74 KB  A   /home/hipo/projects/hsm41test/inittab.ORIG
   172. | 12-09-2011 19:57:09       2.74 KB  A   /home/hipo/projects/hsm41test/inittab.TEST
   173. | 12-09-2011 19:57:09       1.13 KB  A   /home/hipo/projects/hsm41test/md5.out
   174. | 30-04-2012 01:35:26        512  B  A   /home/hipo/projects/hsm42125upg/PMR70023
   175. | 26-04-2012 01:02:08        512  B  I   /home/hipo/projects/hsm42125upg/PMR70023
   176. | 27-04-2012 00:28:15        512  B  A   /home/hipo/projects/hsm42125upg/PMR70099
   177. | 24-04-2012 19:17:34        512  B  I   /home/hipo/projects/hsm42125upg/PMR70099
   178. | 24-04-2012 00:22:56       1.35 KB  A   /home/hipo/projects/hsm42125upg/dsm.opt
   179. | 24-04-2012 00:22:56       4.17 KB  A   /home/hipo/projects/hsm42125upg/dsm.sys
   180. | 24-04-2012 00:22:56       1.13 KB  A   /home/hipo/projects/hsm42125upg/dsmmigfstab
   181. | 24-04-2012 00:22:56       7.30 KB  A   /home/hipo/projects/hsm42125upg/filesystems
   182. | 24-04-2012 00:22:56       1.25 KB  A   /home/hipo/projects/hsm42125upg/inclexcl
   183. | 24-04-2012 00:22:56        198  B  A   /home/hipo/projects/hsm42125upg/inclexcl.dce
   184. | 24-04-2012 00:22:56        291  B  A   /home/hipo/projects/hsm42125upg/inclexcl.ox_sys
   185. | 24-04-2012 00:22:56        650  B  A   /home/hipo/projects/hsm42125upg/inclexcl.test
   186. | 24-04-2012 00:22:56        670  B  A   /home/hipo/projects/hsm42125upg/inetd.conf
   187. | 24-04-2012 00:22:56       2.71 KB  A   /home/hipo/projects/hsm42125upg/inittab
   188. | 24-04-2012 00:22:56       1.00 KB  A   /home/hipo/projects/hsm42125upg/md5check
   189. | 24-04-2012 00:22:56      79.23 KB  A   /home/hipo/projects/hsm42125upg/mkreport.020423.out
   190. | 24-04-2012 00:22:56       4.27 KB  A   /home/hipo/projects/hsm42125upg/ssamap.020423.out
   191. | 26-04-2012 01:02:08      12.78 MB  A   /home/hipo/projects/hsm42125upg/PMR70023/70023.tar
   192. | 25-04-2012 16:33:36      12.78 MB  I   /home/hipo/projects/hsm42125upg/PMR70023/70023.tar
        0———10——–20——–30——–40——–50——–60——–70——–80——–90–
<U>=Up  <D>=Down  <T>=Top  <B>=Bottom  <R#>=Right  <L#>=Left
<G#>=Goto Line #  <#>=Toggle Entry  <+>=Select All  <->=Deselect All
<#:#+>=Select A Range <#:#->=Deselect A Range  <O>=Ok  <C>=Cancel
pick> 


To navigate in pick interface you can select individual files to restore via the number seen leftside.
To scroll up / down use 'U' and 'D' as described in the legenda.


11. Restoring your data to another machine


In certain circumstances, it may be necessary to restore some, or all, of your data onto a machine other than the original from which it was backed up.

In ideal case the machine platform should be identical to that of the original machine. Where this is not possible or practical please note that restores are only possible for partition types that the operating system supports. Thus a restore of an NTFS partition to a Windows 9x machine with just FAT support may succeed but the file permissions will be lost.
TSM does not work fine with cross-platform backup / restore, so better do not try cross-platform restores.
 Trying to restore files onto a Windows machine that have previously been backed up with a non-Windows one. TSM created backups on Windows sent by other OS platforms can cause  backups to become inaccessible from the host system.

To restore your data to another machine you will need the TSM software installed on the target machine. Entries in Tivoli configuration files dsm.sys and/or dsm.opt need to be edited if the node that you are restoring from does not reside on the same server. Please see our help page section on TSM configuration files for their locations for your operating system. 

To access files from another machine you should then start the TSM client as below:


# dsmc -virtualnodename=RESTORE.MACHINE      


You will then be prompted for the TSM password for this machine.


You will probably want to restore to a different destination to the original files to prevent overwriting files on the local machine, as below:


  • Restore of D:\ Drive to D:\Restore ** Windows 


tsm> rest D:\*   D:\RESTORE\    -su=yes 


  • Restore user /home/* to /scratch on ** Mac, Unix/Linux


tsm> rest /home/* /scratch/     -su=yes  


  • Restoring Tivoli data on old netware


tsm> rest SOURCE-SERVER\USR:*  USR:restore/   -su=yes  ** Netware


12. Adding more directories for incremental backup / Check whether TSM backup was done correctly?

The easiest way is to check the produced dschmed.log if everything is okay there should be records in the log that Tivoli backup was scheduled in a some hours time
succesfully.
A normally produced backup scheduled in log should look something like:


14-03-2020 23:03:04 — SCHEDULEREC STATUS BEGIN
14-03-2020 23:03:04 Total number of objects inspected:   91,497
14-03-2020 23:03:04 Total number of objects backed up:      113
14-03-2020 23:03:04 Total number of objects updated:          0
14-03-2020 23:03:04 Total number of objects rebound:          0
14-03-2020 23:03:04 Total number of objects deleted:          0
14-03-2020 23:03:04 Total number of objects expired:         53
14-03-2020 23:03:04 Total number of objects failed:           6
14-03-2020 23:03:04 Total number of bytes transferred:    19.38 MB
14-03-2020 23:03:04 Data transfer time:                    1.54 sec
14-03-2020 23:03:04 Network data transfer rate:        12,821.52 KB/sec
14-03-2020 23:03:04 Aggregate data transfer rate:        114.39 KB/sec
14-03-2020 23:03:04 Objects compressed by:                    0%
14-03-2020 23:03:04 Elapsed processing time:           00:02:53
14-03-2020 23:03:04 — SCHEDULEREC STATUS END
14-03-2020 23:03:04 — SCHEDULEREC OBJECT END WEEKLY_23_00 14-12-2010 23:00:00
14-03-2020 23:03:04 Scheduled event 'WEEKLY_23_00' completed successfully.
14-03-2020 23:03:04 Sending results for scheduled event 'WEEKLY_23_00'.
14-03-2020 23:03:04 Results sent to server for scheduled event 'WEEKLY_23_00'.


in case of errors you should check dsmerror.log
 

Conclusion


In this article I've briefly evaluated some basics of IBM Commercial Tivoli Storage Manager (TSM) to be able to  list backups, check backup schedules and how to the files set to be
excluded from a backup location and most importantly how to check that data backed up data is in a good shape and accessible.
It was explained how backups can be restored on a local and remote machine as well as how to  append new files to be set for backup on next incremental scheduled backup.
It was shown how the pick interactive cli interface could be used to restore files at a certain data back in time as well as how full partitions can be restored and how some
certain file could be retrieved from the TSM data copy.

Check weather forecast from console (terminal) on GNU / Linux and FreeBSD howto

Friday, August 23rd, 2019

how to get weather forecast prognosis from command line text terminal / console on Linux and FreeBSD

Doing everything in Linux console / terminal is a question perhaps every Linux / BSD hacker wants to do as Graphical user interface and using web search or using Graphical Environment plugins is an unneded complexity + googling or duckduckgoing for weather to check your next vacation destination city has been more and more of a terrible experience (for me) as I'm not a big fan of using the OS in a GUI.
In that manner of thoughts, as a Linux console geek and hard core ASCII art fan. I was recently happy to find that  possible to check weather forecast in tty console or Linux terminal in a beautiful ascii art way easily through a Web wttr.in service – a web application weather forecast service that supports displaying the current and few days in future, weather forecast either in browser as a plain text or from the command line by simply accessing it with your favourite web access / transfer tool such as;
wget / curl or any of your favourite text browser elinks / lynx / w3m or if on *BSDs use fetch command.


Install Curl data transfer tool if it is not already


Wget is installed by default across most Linux distributions and fetch is present by default on BSDs, displaying it in text browser would perhaps be never used but if you decide to give it a try maybe try with elinks (to get colorful output), w3m and lynx will display a black and white results.

In case if you miss curl, install it:

On Debian distro


aptitude install -y curl


or Fedora

yum install -y curl


Of course to use wttr.in as it is Internet based Weather Forecast service the minimum you need to have is to have Internet connection to your Linux / BSD desktop computer.

Text based Weather Forecast Web App currently supports:

display the current weather as well as a 3-day weather forecast, split into morning, noon, evening and night

  • Temperature is displayed for morning, noon, evening and night (includes temperature range, wind speed and direction, viewing distance, precipitation amount and probability)
  • Provide results for Weather based on City / town / village location
  • Supports display of Moon Phases Forecast in calendar days
  • Supports multilingual names (Bulgarian Phonetic cyrillic / Russian and other exotic UTF-8 encodings such as Chineese and Japanese),  50+ languages are currently supported
  • Has ability for prognosis for hostname (domain) location based on an its IP GeoIP location on the Globe
  • Geographical locations / landmarks such as Lakes / Mountains etc. can be easily queried
  • Query results metrics could be configured, e.g. USCS units or EU and rest of world accepted ones (SI) metric
  • Displayed result could be either in ANSI (if from terminal / console / HTML if queried from browser or in PNG – if needed)


Where wttr.in could be useful ?

The best applications use, I can think of are for server (shell) / perl scripting automation purposes, it could be useful especially in TOO HOT, TOO, COLD, TOO WET location in Small and Middle sized Data Centers Green Energy (Sun Panel) Parks / Wind Energy situated Linux monitoring hosts to track possible problems of overheats or overcolding of servers due to abnormal excessive temperatures such as the ones we experienced this summer here All across in Europe or in too Cold DC locations such as heat locations Deserts in African Countries, Saudi Arabia or Chukotka or Siberia in Russia.
Other application is as a backup option to other normal Weather report services by PHP or Python scripts that fetch data, from multiple places.
Of course since this is a third party controlled service, the downtime is due to excessive connection requests, the service could get flooded and stopped working, but I guess for any Commercial use, wttr.in creator Igor Chubin would be happy to sell a specific crafted service for any end user candidates.


Here is few examples of the beautiful returned ASCII art formatted output of wttr.in.
 

1. Getting a three days Weather Forecast prognosis for city / town location

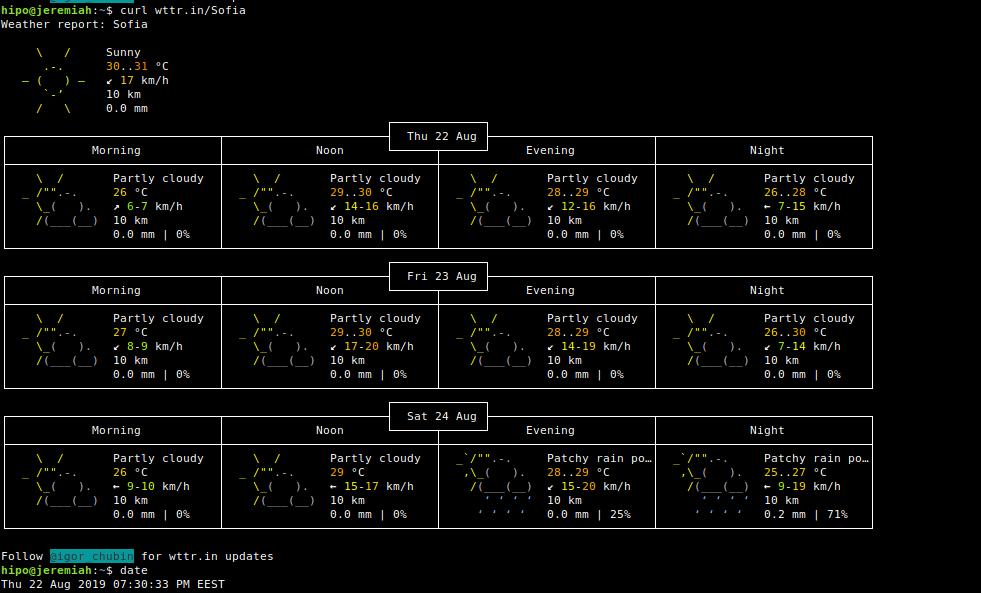
To get what is current weather in my current city of Living, Sofia Bulgaria just pass the city to the URL address

curl http://wttr.in/Sofia

text-console-wttr.in-Weather-forecast-Sofia-for-Linux


links http://wttr.in/Dobrich


curl-Linux-show--Dobrich-Weather-forecast-in-lynx-text-browser


Default links (Linux) www text browser produces ugly black and white

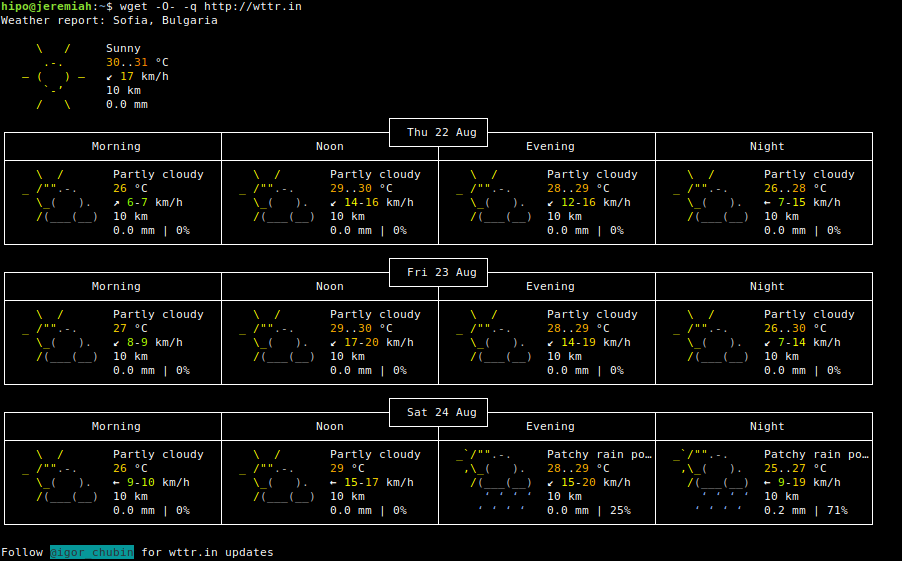
2. Displaying Weather forecast with wget


wget -O- -q http://wttr.in


getting-weather-forecast-on-linux-terminal-console-with-wget-command

If you're lazy you can even omit the http:// as wget will look for HyperText Transmission Protocol by itself


wget -O- -q wttr.in


3. Getting Forecast results for a Tourist Destination


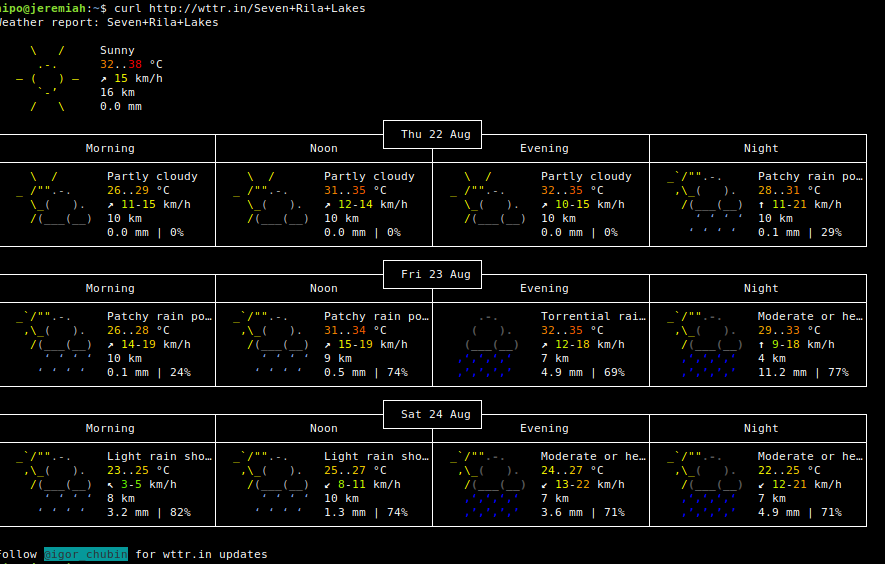
Lets get the weather forecast for the popular tourist Bulgarian destination of the Seven Rila Lakes (near Rila Monastery), situated in the Rila Mountain BG.


curl http://wttr.in/Seven+Rila+Lakes


Console-terminal-Weather-forecast-Linux-Seven-Rila-Lakes


4. Display Forecast for a specific server IP


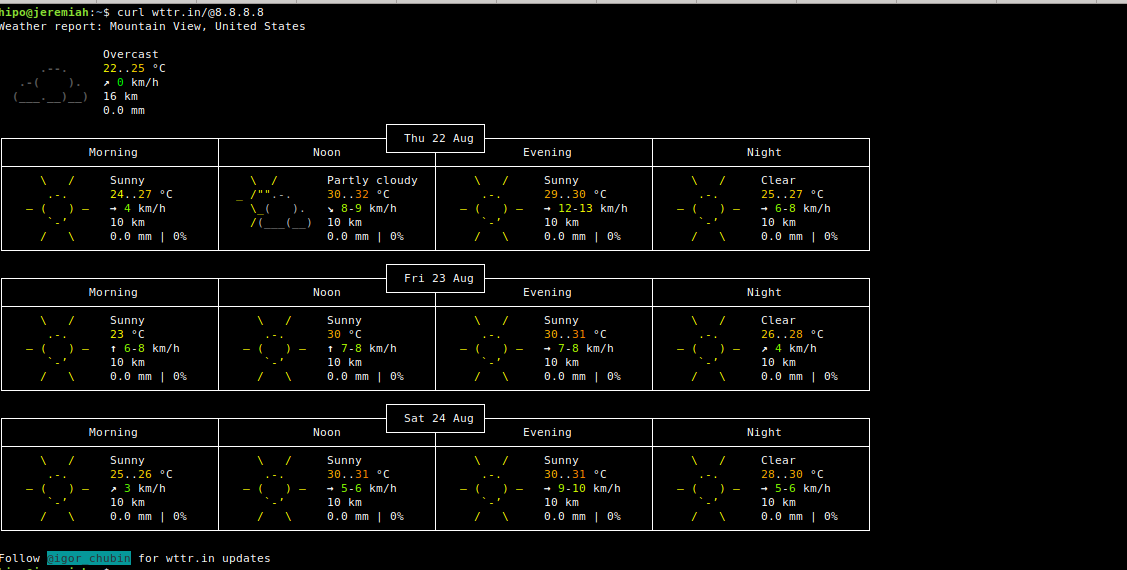
Displaying information on specific server IP address current situated in GeoIP database, of course could be not really true, as the IP could be just a Load Balancer a router that does NAT to some internal DMZ-ed location server, but anyways it is a cool feature.

Lets get information on what is the weather on Google Global's Public DNS server IP 8.8.8.8 so commonly used to guarantee a Windows and Linux Desktop client machines Internet connectivity.
 

curl wttr.in/@8.8.8.8


wttr.in-Linux-text--forecast-service-curl-screenshot Google Public DNS location weather forecast

5. Download PNG image picture from wttr.in service


Lets say you want to get a 3 days standard Weather forecast for the popular Black Sea Resort town in Bulgaria Pomorie (a beautiful sea city which has even a functioning 5 Monks Monastery Pomorie Monastery situated near sea coast)


curl http://wttr.in/Pomorie.png


–2019-08-22 20:15:51–  http://wttr.in/Pomorie.png
Resolving wttr.in (wttr.in)… 5.9.243.187
Connecting to wttr.in (wttr.in)|5.9.243.187|:80… connected.
HTTP request sent, awaiting response… 200 OK
Length: 42617 (42K) [image/png]
Saving to: ‘Pomorie.png’

Pomorie.png                                     100%[=======================================================================================================>]  41.62K  –.-KB/s    in 0.07s   

2019-08-22 20:15:52 (586 KB/s) – ‘Pomorie.png’ saved [42617/42617]


Note: The generated .png is again the ASCII art produced by a direct text fetch bug in pic format


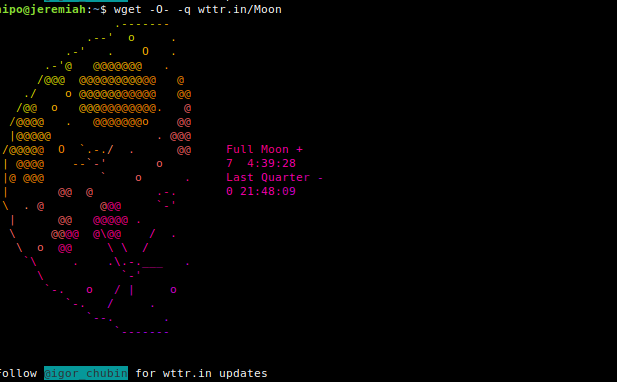
6. Displaying Current Moon Phase


If you want to enjoy a text based Moon phase picture through wttr.in 🙂

wget -O- -q wttr.in/Moon


Display-current-Phase-of-Moon-in-terminal-console-Linux-wttr.in-service

You can also get a Moon Phase prognosis for a current future date or get a previous date phase


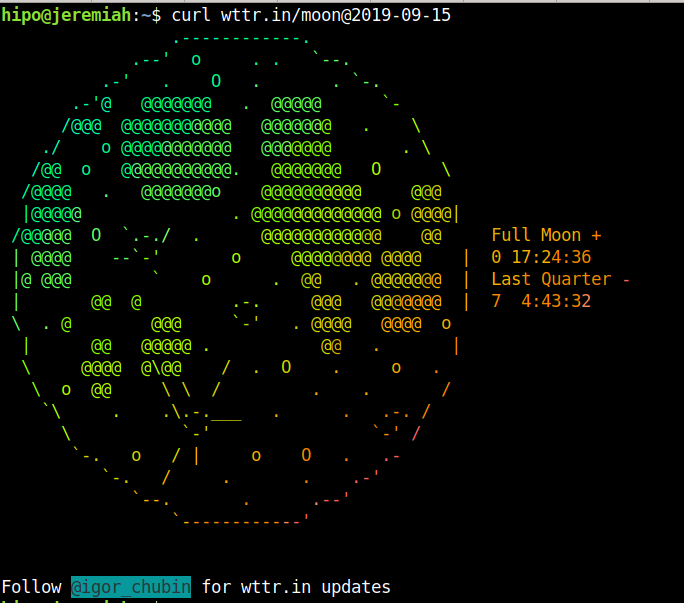
curl wttr.in/moon@2019-09-15

Full-Moon-Weather-forecast-text-console-reporting-via-wttr.in-on-Gnu_Linux


Full Moon Madness !! – Vampires are out beaware and Enjoy the ultra kewl ASCII Colorful Art 🙂
 

7. Getting help for wttr.in terminal Waether Forecast results


$ curl wttr.in/:help
Usage:


    $ curl wttr.in          # current location
    $ curl wttr.in/muc      # weather in the Munich airport

Supported location types:

    /paris                  # city name
    /~Eiffel+tower          # any location
    /Москва                 # Unicode name of any location in any language
    /muc                    # airport code (3 letters)
    /@stackoverflow.com     # domain name
    /94107                  # area codes
    /-78.46,106.79          # GPS coordinates

Special locations:

    /moon                   # Moon phase (add ,+US or ,+France for these cities)
    /moon@2016-10-25        # Moon phase for the date (@2016-10-25)

Units:

    m                       # metric (SI) (used by default everywhere except US)
    u                       # USCS (used by default in US)
    M                       # show wind speed in m/s

View options:

    0                       # only current weather
    1                       # current weather + 1 day
    2                       # current weather + 2 days
    A                       # ignore User-Agent and force ANSI output format (terminal)
    F                       # do not show the "Follow" line
    n                       # narrow version (only day and night)
    q                       # quiet version (no "Weather report" text)
    Q                       # superquiet version (no "Weather report", no city name)
    T                       # switch terminal sequences off (no colors)

PNG options:

    /paris.png              # generate a PNG file
    p                       # add frame around the output
    t                       # transparency 150
    transparency=…        # transparency from 0 to 255 (255 = not transparent)

Options can be combined:

    /Paris?0pq
    /Paris?0pq&lang=fr
    /Paris_0pq.png          # in PNG the file mode are specified after _
    /Rome_0pq_lang=it.png   # long options are separated with underscore

Localization:

    $ curl fr.wttr.in/Paris
    $ curl wttr.in/paris?lang=fr
    $ curl -H "Accept-Language: fr" wttr.in/paris

Supported languages:

    af da de el et fr fa hu id it nb nl pl pt-br ro ru tr uk vi (supported)
    az be bg bs ca cy cs eo es fi ga hi hr hy is ja jv ka kk ko ky lt lv mk ml nl fy nn pt pt-br sk sl sr sr-lat sv sw th te uz zh zu he (in progress)

Special URLs:

    /:help                  # show this page
    /:bash.function         # show recommended bash function wttr()
    /:translation           # show the information about the translators


8. Comparing two cities weather from command line


One useful use of wttr.in if you plan to travel from Location city A to Location city B is to compare the temperatures with a simple bash one liner script:


diff -Naur <(curl -s http://wttr.in/Sofia ) <(curl -s http://wttr.in/Beograd )


9. Using ansiweather command to get Weather Temperature / Wind / Humidity in one line beuatiful text


If you go and install answeather Linux package


apt-get install –yes ansiweather


You will get a shell script wrapper with ANSI colors and Unicode symbols support. Weather data comes from OpenWeatherMap, this is useful if wttr.in is not working due to some URL malfunction (due to service is DoS-ed) etc.


ansiweather -l Atina


ansiweather-Atina-weather-forecast-result-linux-text-console

Lets use ansiweather to print the weather prognosis for upcoming 5 days for near port of Burgas, BG
 

ansiweather -F -l Burgas

ansiweather-print-weather-forecast-prognosis-for-5-days-in-Linux-text-terminal


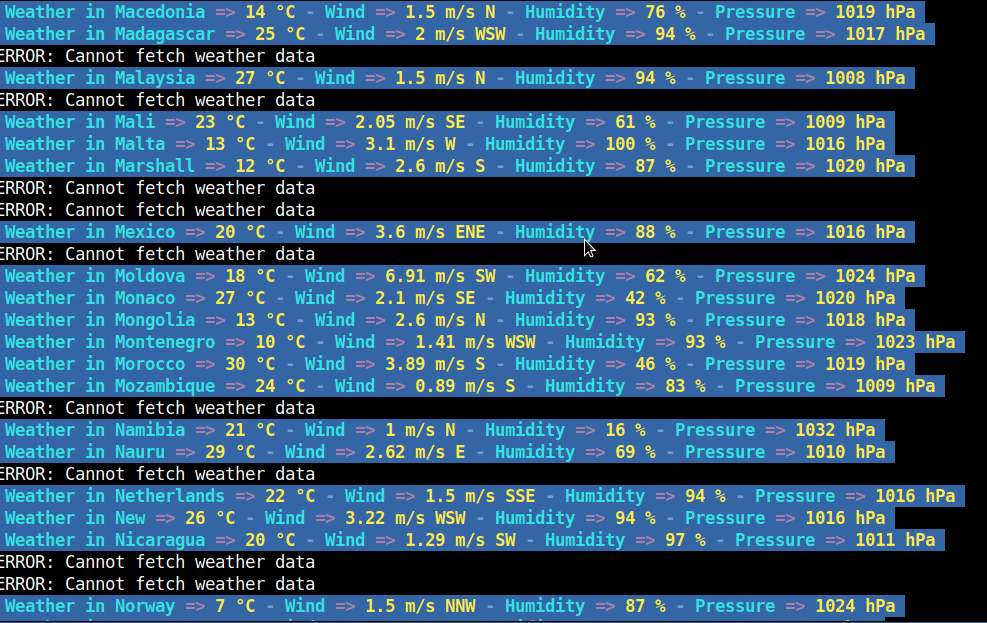
10. Get all Weather current forecast for each Capital in the world


You can download and use this simple plain text file list of All Country Capitals in the World (country-capitals-all-world.txt) with ansiweather and a bash loop to get displayed each and every current day Weather Forecast in the World, here is how:


while read line; do ansiweather -l $line; sleep 3; done < country-capitals-all-world.txt


ansiweather-all-countires-capitals-result

As you can see some of the very exotic third world capitals does not return data so 'ERROR: Cannot fetch weather data' is returned.


You can also substitute ansiweather with curl wttr.in/$line to do get the beautiful ASCII art 3 days weather forecast via wttr.in


while read line; do curl http://wttr.in/$line; sleep 3; done < country-capitals-all-world.txt


I'll be happy to know other nice ASCII Art supporting Web service to enjoy from text terminal on Linux (nomatter useful or) just funny joyful prank maniacal pranks such as Watching text ASCII version remake of Star Wars Classic Movie by simply telnetting to towel.blinkenlights.nl (if you haven't so just telnet and enjoy the streamed ASCIIs ! 🙂


telnet towel.blinkenlights.nl


watch-star-wars-ascii-art-version-remake-online-with-telnet-on-linux-console-terminal


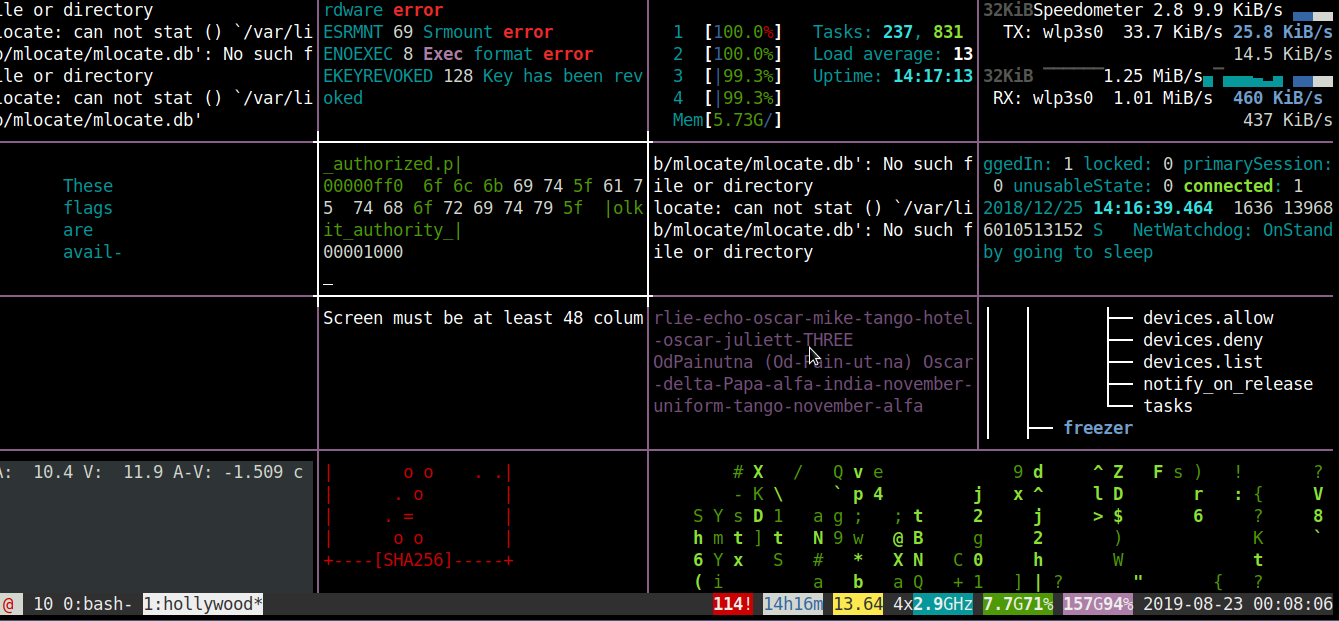
Talking about fun and ASCII, its worthy to mention hollywood Linux package

hipo@jeremiah:~/Desktop$ apt-cache show hollywood|grep -i desc -A 3
Description-en: fill your console with Hollywood melodrama technobabble
 This utility will split your console into a multiple panes of genuine
 technobabble, perfectly suitable for any Hollywood geek melodrama.
 It is particularly suitable on any number of computer consoles in the


Description-md5: 768f44c76220ea2b35f855ea34c8bc35
Homepage: http://launchpad.net/hollywood
Section: games
Priority: optional


Once installed on Debian with:

aptitude install -y hollywood

You can get in a rapid manner plenty of tmux (screen like – virtual console emulator) split screen statistics about your notebook / workstation / server CPU usage, mlocate.db status, info about plugged in machine voltage, Speedometer (statistics about Network bandwidth usage), System load avarage (CPU Count, Memory Utilization) and some other random info coming out of dmesg kernel log and more. The information displayed in splitted windows changes rapidly and (assuming you run it at home Desktop with a soundblaster) and not remotely, a james bond Agent 007 soundtrack is played on the back, that brings up one's adrenaline and makes it look even cooler.

hollywood-melodrama-technobubble-split-console-multiple-panes-for-genuine-technobubble

To give you an idea what to expect, here is shot of /usr/games/hollywood (the program start binary location) on Debian GNU / Linux running, Enjoy! 🙂
 

Howto create Linux Music Audio CD from MP3 files / Create playable WAV format Audio CD Albums from MP3s

Tuesday, July 16th, 2019

cdburning-audio-music-cd-from-mp3-on-linuxcomapct-disc-tux-linux-logo

Recently my Mother asked me to prepare a Music Audio CD for her from a popular musician accordionist Stefan Georgiev from Dobrudja who has a unique folklore Bulgarian music.

As some of older people who still remember the age of the CD and who had most likely been into the CD burning Copy / Piracy business so popular in the countries of the ex-USSR so popular in the years 1995-2000 audio ,  Old CD Player Devices were not able to play the MP3 file format due to missing codecs (as MP3 was a proprietary compression that can't be installed on every device without paying the patent to the MP3 compression rights holder.

The revolutionary MP3 compression used to be booming standard for transferring Music data due to its high compression which made an ordinary MP3 of 5 minutes of 5MB (10+ times more compression than an ordinary classic WAV Audio the CPU intensiveness of MP3 files that puts on the reading device, requiring the CD Player to have a more powerful CPU.

Hence  due to high licensing cost and requirement for more powerful CPU enabled Audio Player many procuders of Audio Players never introduced MP3 to their devices and MP3 Neve become a standard for the Audio CD that was the standard for music listening inside almost every car out there.

Nowdays it is very rare need to create a Audio CD as audio CDs seems to be almost dead (As I heard from a Richard Stallman lecture In USA nowadays there is only 1 shop in the country where you can still buy CD or DVD drives) and only in third world as Africa Audio CDs perhaps are still in circulation.

Nomatter that as we have an old Stereo CD player on my village and perhaps many others, still have some old retired CD reading devices being able to burn out a CD is a useful thing.

Thus to make mother happy and as a learning excercise, I decided to prepare the CD for her on my Linux notebook.
Here I'll shortly describe the takes I took to make it happen which hopefully will be useful for other people that need to Convert and burn Audio CD from MP3 Album.


1. First I downloaded the Album in Mp3 format from Torrent tracker

My homeland Bulgaria and specific birth place place the city of Dobrich has been famous its folklore:  Galina Durmushlijska and Stefan Georgiev are just 2 of the many names along with Оркестър Кристал (Orchestra Crystal) and the multitude of gifted singers. My mother has a santiment for Stefan Georgiev, as she listened to this gifted accordinist on her Uncle's marriage.

Thus In my case this was (Стефан Георгиев Хора и ръченици от Добруджа) the album full song list here If you're interested to listen the Album and Enjoy unique Folklore from Dobrudja (Dobrich) my home city, Stefan Georgiev's album Hora and Rachenica Dances is available here


Stefan_Georgiev-old-audio-Music-CD-Hora-i-Rychenici-ot-Dobrudja-Horos-and-Ruchenitsas-from-Dobrudja-CD_Cover
I've downloaded them from Bulgarian famous torrent tracker zamunda.net in MP3 format.
Of course you need to have a CD / DVD readed and write device on the PC which nowdays is not present on most modern notebooks and PCs but as a last resort you can buy some cheap External Optical CD / DVD drive for 25 to 30$ from Amazon / Ebay etc.


2. You will need to install a couple of programs on Linux host (if you don't have it already)


To be able to convert from command line from MP3 to WAV you will need as minimum ffmpeg and normalize-audio packages as well as some kind of command line burning tool like cdrskin  wodim which is
the fork of old good known cdrecord, so in case if you you're wondering what happened with it just
use instead wodim.

Below is a good list of tools (assuming you have enough HDD space) to install:


root@jeremiah:/ # apt-get install –yes dvd+rw-tools cdw cdrdao audiotools growisofs cdlabelgen dvd+rw-tools k3b brasero wodim ffmpeg lame normalize-audio libavcodec58


Note that some of above packages I've installed just for other Write / Read operations for DVD drives and you might not need that but it is good to have it as some day in future you will perhaps need to write out a DVD or something.
Also the k3b here is specific to KDE and if you're a GNOME user you could use Native GNOME Desktop app such brasero or if you're in a more minimalistic Linux desktop due to hardware contrains use XFCE's native xfburn program.

If you're a console / terminal geek like me you will definitely enjoy to use cdw
 

root@jeremiah:/ # apt-cache show cdw|grep -i description -A 1
Description-en: Tool for burning CD's – console version
 Ncurses-based frontend for wodim and genisoimage. It can handle audio and

Description-md5: 77dacb1e6c00dada63762b78b9a605d5
Homepage: http://cdw.sourceforge.net/


3. Selecting preferred CD / DVD / BD program to use to write out the CD from Linux console


cdw uses wodim (which is a successor of good old known console cdrecord command most of use used on Linux in the past to burn out new Redhat / Debian / different Linux OS distro versions for upgrade purposes on Desktop and Server machines.

To check whether your CD / DVD drive is detected and ready to burn on your old PC issue:


root@jeremiah:/# wodim -checkdrive
Device was not specified. Trying to find an appropriate drive…
Detected CD-R drive: /dev/cdrw
Using /dev/cdrom of unknown capabilities
Device type    : Removable CD-ROM
Version        : 5
Response Format: 2
Capabilities   :
Vendor_info    : 'HL-DT-ST'
Identification : 'DVDRAM GT50N    '
Revision       : 'LT20'
Device seems to be: Generic mmc2 DVD-R/DVD-RW.
Using generic SCSI-3/mmc   CD-R/CD-RW driver (mmc_cdr).
Driver flags   : MMC-3 SWABAUDIO BURNFREE
Supported modes: TAO PACKET SAO SAO/R96P SAO/R96R RAW/R16 RAW/R96P RAW/R96R

You can also use xorriso (whose added value compared to other console burn cd tools is is not using external program for ISO9660 formatting neither it use an external or an external burn program for CD, DVD or BD (Blue Ray) drive but it has its own libraries incorporated from libburnia-project.org libs.

Below output is from my Thinkpad T420 notebook. If the old computer CD drive is there and still functional in most cases you should not get issues to detect it.

cdw ncurses text based CD burner tool's interface is super intuitive as you can see from below screenshot:

cdw-burn-cds-from-console-terminal-on-GNU-Linux-and-FreeBSD-old-PC-computer

CDW has many advanced abilities such as “blanking” a disk or ripping an audio CD on a selected folder. To overcome the possible problem of CDW not automatically detecting the disk you have inserted you can go to the “Configuration” menu, press F5 to enter the Hardware options and then on the first entry press enter and choose your device (by pressing enter again). Save the setting with F9.
 

4. Convert MP3 / MP4 Files or whatever format to .WAV to be ready to burn to CD


Collect all the files you want to have collected from the CD album in .MP3 a certain directory and use a small one liner loop to convert files to WAV with ffmpeg:
 

cd /disk/Music/Mp3s/Singer-Album-directory-with-MP3/

for i in $( ls *.mp3); do ffmpeg -i $i $i.wav; done


If you don't have ffmpeg installed and have mpg123 you can also do the Mp3 to WAV conversion with mpg123 cmd like so:


for i in $( ls ); do mpg123 -w $i.wav $i.mp3; done


Another alternative for conversion is to use good old lame (used to create Mp3 audio files but abling to also) decode
mp3 to wav.


lame –decode somefile.mp3 somefile.wav


In the past there was a burn command tool that was able to easily convert MP3s to WAV but in up2date Linux modern releases it is no longer available most likely due to licensing issues, for those on older Debian Linux 7 / 8 / 9 / Ubuntu 8 to 12.XX / old Fedoras etc. if you have the command you can install burn and use it (and not bother with shell loops):

apt-get install burn

or

yum install burn


Once you have it to convert


$ burn -A -a *.mp3


5. Fix file naming to remove empty spaces such as " " and substitute to underscores as some Old CD Players are
unable to understand spaces in file naming with another short loop.


for f in *; do mv "$f" `echo $f | tr ' ' '_'`; done


6. Normalize audio produced .WAV files (set the music volume to a certain level)


In case if wondering why normalize audio is needed here is short extract from normalize-audio man page command description to shed some light.

"normalize-audio  is  used  to  adjust  the volume of WAV or MP3 audio files to a standard volume level.  This is useful for things like creating mp3 mixes, where different recording levels on different albums can cause the volume to  vary  greatly from song to song."
 

cd /disk/Music/Mp3s/Singer-Album-directory-with-MP3/

normalize-audio -m *.wav


7. Burn the produced normalized Audio WAV files to the the CD


wodim -v -fix -eject dev='/dev/sr0' -audio -pad *.wav


Alternatively you can conver all your MP3 files to .WAV with anything be it audacity
or another program or even use 
GNOME's CDBurn tool brasero (if gnome user) or KDE's CDBurn which in my opinion is
the best CD / DVD burning application for Linux K3B.

Burning Audio CD with K3b is up to few clicks and super easy and even k3b is going to handle the MP3 to WAV file Conversion itself. To burn audio with K3B just run it and click over 'New Audio CD Project'.

k3b-on-debian-gnu-linux-burn-audio-cd-screenshot

For those who want to learn a bit more on CD / DVD / Blue-Ray burning on GNU / Linux good readings are:
Linux CD Burning Mini Howto, is Linux's CD Writing Howto on ibiblio (though a bit obsolete) or Debian's official documentation on BurnCD.
 

8. What we learned here


Though the accent of this tutorial was how to Create Audio Music CD from MP3 on GNU / Linux, the same commands are available in most FreeBSD / NetBSD / OpenBSD ports tree so you can use the same method to build prepare Audio Music CD on *BSDs.

In this article, we went through few basic ways on how to prepare WAV files from MP3 normalize the new created WAV files on Linux, to prepare files for creation of Audio Music CD for the old mom or grandma's player or even just for fun to rewind some memories. For GUI users this is easily done with  k3b,  brasero or xfburn.

I've pointed you to cdw a super useful text ncurses tool that makes CD Burninng from plain text console (on servers) without a Xorg / WayLand  GUI installed super easy. It was shortly reviewed what has changed over the last few years and why and why cdrecord was substituted for wodim. A few examples were given on how to handle conversion through bash shell loops and you were pointed to some extra reading resources to learn a bit more on the topic.
There are plenty of custom scripts around for doing the same CD Burn / Covnersion tasks, so pointing me to any external / Shell / Perl scripts is mostly welcome.

Hope this learned you something new, Enjoy ! 🙂
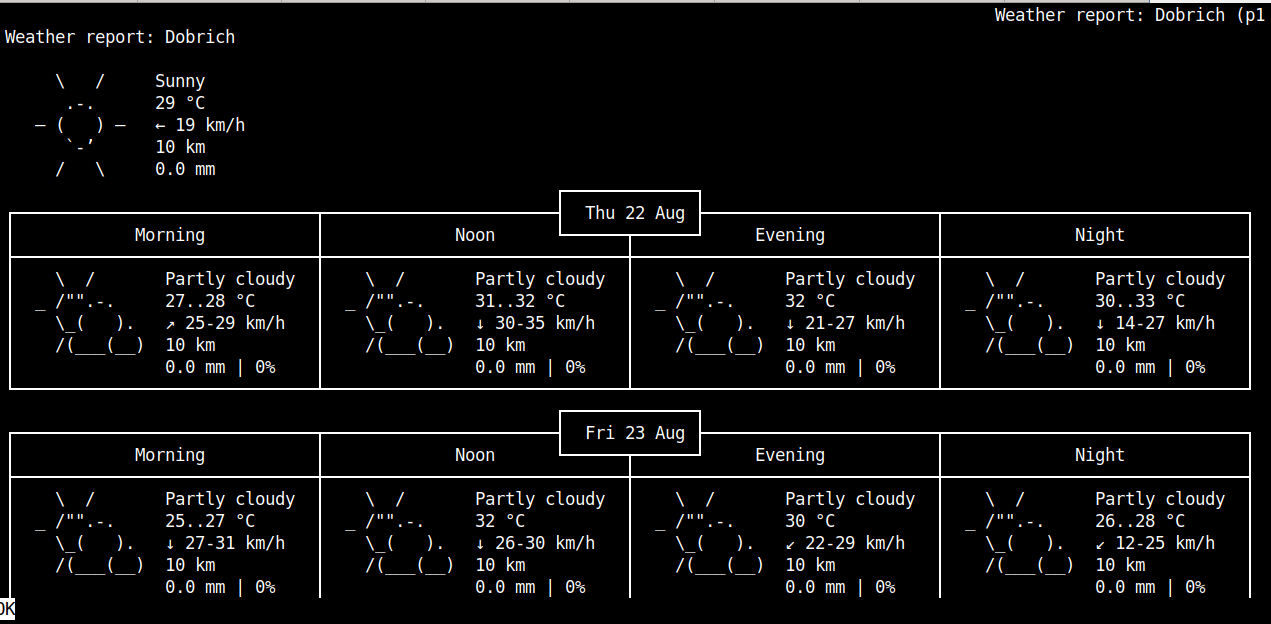
Play Colorful console Tetris for Linux Mac and BSD ( bastet )

Tuesday, November 7th, 2017

console-terminal-linux-ascii-game-colorful-tetris-really-cool-way-to-kill-time-as-linux-systemadministrator

Do you remember the bsdgames package which had the good old tetris-bsd – an ASCII tetris for terminal / console along with nethack, hunt and number of other cool ascii games? If you don't you can give a try to install the package if you don't have it yet, install it on Debian Linux / Ubuntu with.

linux:~# apt-get install –yes tetris-bsd

Then launch tetris-bsd like so:

$ /usr/games/tetris-bsd

tetris-bsd-console-tetris-for-linux-and-freebsd

But wait there is more just recently I found out there is a modern colorful version remake of bsd-tetris called bastet

To give it a try install it with apt-get on Deb based Linuces

linux:~# apt-get install bastet
Четене на списъците с пакети… Готово
Изграждане на дървото със зависимости       
Четене на информацията за състоянието… Готово
Следните допълнителни пакети ще бъдат инсталирани:
  libboost-program-options1.55.0
Следните НОВИ пакети ще бъдат инсталирани:
  bastet libboost-program-options1.55.0
0 актуализирани, 2 нови инсталирани, 0 за премахване и 1 без промяна.
Необходимо е да се изтеглят 219 kB архиви.
След тази операция ще бъде използвано 858 kB допълнително дисково пространство.
Искате ли да продължите? [Y/n] Y
Изт:1 http://ftp.uk.debian.org/debian/ jessie/main libboost-program-options1.55.0 amd64 1.55.0+dfsg-3 [143 kB]
Изт:2 http://ftp.uk.debian.org/debian/ jessie/main bastet amd64 0.43-3+b1 [75,7 kB]
Изтеглени 219 kB за 0с (220 kB/сек)     
Предварително настройване на пакети …
Selecting previously unselected package libboost-program-options1.55.0:amd64.
(Reading database … 172280 files and directories currently installed.)
Preparing to unpack …/libboost-program-options1.55.0_1.55.0+dfsg-3_amd64.deb …
Unpacking libboost-program-options1.55.0:amd64 (1.55.0+dfsg-3) …
Selecting previously unselected package bastet.
Preparing to unpack …/bastet_0.43-3+b1_amd64.deb …
Unpacking bastet (0.43-3+b1) …
Processing triggers for hicolor-icon-theme (0.13-1) …
Processing triggers for man-db (2.7.0.2-5) …
Processing triggers for desktop-file-utils (0.22-1) …
Processing triggers for mime-support (3.58) …
Setting up libboost-program-options1.55.0:amd64 (1.55.0+dfsg-3) …
Setting up bastet (0.43-3+b1) …
Processing triggers for libc-bin (2.19-18+deb8u10) …

linux:~$ /usr/games/bastet

bastet-linux-ascii-colorful-console-terminal-tetris-start-screen

FreeBSD users can also install it either via freebsd ports :

freebsd#  cd /usr/ports/games/bastet/ && make install clean

or through binary package with:


freebsd# pkg install bastet

linux-macos-freebsd-play-game-ascii-colorful-tetris-in-console-bsd-bastet

Mac OS X users can also enjoy it but you need to install Mac OS X home brew package manager

Once having brew command install the tiny ASCII tetris game through Mac OS X terminal with:

$ brew install basket

Enjoy bastet 🙂
 

Email Linux alternative text console clients to Thunderbird, fetchmail, Mutt, fetchmail + Alpine how to

Saturday, November 4th, 2017

linux-email-alternatives-for-text-console-email-fetching-gathering-alternative-to-thunderbird-and-evolution-howto

As a GNU / Linux user you might end up searching for the best email client to satisfy your needs, for those who used so far Outlook Express on M$ Windows first switch to GNU / Linux the most likely one to choose is either Mozilla Thunderbird or GNOME's Evolution default Mail Clientbut what more text / console programs are there that will allow you to easily check email via POP3 and IMAP on Linux?


1. Install Fetchmail and use to collect and copy your emails from remote server to your local machine
 

 SSL enabled POP3, APOP, IMAP mail gatherer/forwarder
 fetchmail is a free, full-featured, robust, and well-documented remote mail
 retrieval and forwarding utility intended to be used over on-demand TCP/IP
 links (such as SLIP or PPP connections).  It retrieves mail from remote mail
 servers and forwards it to your local (client) machine's delivery system, so
 it can then be read by normal mail user agents such as mutt, elm, pine,
 (x)emacs/gnus, or mailx.  The fetchmailconf package includes an interactive
 GUI configurator suitable for end-users.

To install it, issue:
 

apt-get install –yes fetchmail procmail


To configure fetchmail to gather your mail from your POP3 / IMAP mailbox, create below
.fetchmailrc configuratoin and modify according to your account


# vim .fetchmailrc


#### .fetchmailrc
 set daemon 600
 set logfile fetchmail.log

 poll the_mail_server_hostname proto POP3

  user "Remote_Username" pass "PASSWORD=" is "local_username" preconnect "date >> fetchmail.log"
 #ssl
  fetchall
  #no keep
  no rewrite
  mda "/usr/bin/procmail -f %F -d %T";


Here is also few words on each of the .fetchmailrc config options

set daemon 600 The fetchmail binary with run in the background in daemon mod and fetch mail from the server every 600 seconds or 10 minutes.

set logfile fetchmail.log This will set the directory and file name of the fetchmail user log file. Eveytime fetchmail recieves an email, checks the pop3 server or errors out you will find an entry here.

poll the_isp_mail_server proto POP3 This line tells fetchmail what mail server to contact, in theis case "the_isp_mail_server" and to use the "POP3" protocol.

user "remote_user_name" pass "PASSWORD" is "local_username" preconnect "date >> fetchmail.log The user directive tells fetchmail what the name of the user on the remote mail server is for example "remote_user_name". The pass directive is simply the password you will use for the remote user on the mail server. The "is" directive is optional. It tells fetchmail to deliver mail to a diferent user name if the user on the remote mail server and the local machine are different. For example, I may be using the name "joe.doe" on the mail server, but my local user name is "jdoe". I would use a line like user "joe.doe" pass "PASSWORD" is "jdoe". The preconnect command simply adds the current time and date to the fetchmail log file every time fetchmail checks for new mail.

ssl The "ssl" directive tells fetchmail to use encryption when connecting to the pop3 mail server. Fetchmail will use port 995 instead of port 110 for un-encypted mail communication. In order to use ssl the remote mail server must be able to use ssl. Comment out this directive if you do _not_ use pop3s.

fetchall Fetchall just means to fetch all of the mail on the mail server no matter what the "read" flag is. It is possibly to read mail through many different processes. If you use another mail client from another location, for example you could have read you mail and kept it ont he server, but marked it with the "read" flag. At this point if you did _not_ use the "fetchall" flag then only mail marked as new would be downloaded.

no keep Once the mail is downloded from the mail server fetchmail is to tell the server to remove it from the server. You may choose to comment this option out if you want to leave all mail on the server.

no rewrite Do not rewrite headers. When fetchmail recieves the mail you do not want any of the headers mangled in any way. This directive tells fetchmail to leave the headers alone.

mda "/usr/bin/procmail -f %F -d %T"; The mda is your "mail delivery agent. Procmail is the program that fetchmail will hand the mail off to once it is downloaded. The argument "-f %F" logs who the mail if from and "-d %T" turns on explicit delivery mode, delivery will be to the local user recipient.

For configuring multiple mailboxes email to be gathered to local machine through fetchmail add to above configuration, some more config similar to this:

 poll mail.example.com protocol pop3:
       username "admin" password "your-plain-text-password" is "username" here;
       username "what-ever-user-name" password "Just-another-pass#" is "foreman" here;

  poll mail.example.org protocol pop3 with option sslproto '':
       user "whatever-user1" password "its-my-pass" mda "/usr/bin/procmail -d %T":   user "whatever-user1" password "its-my-pass" mda "/usr/bin/procmail -d %T


Because as you can see fetchmail keeps password in plaintext it is a best security practice to set some good file permissions on .fetchmailrc just to make sure some other local user on the same Linux / Unix machine will not be able to read your plaintext password, to do so issue below command.
 

chmod 600 ~/.fetchmailrc


For the purpose of logging as we have it into the config you will also need to create new blank file fetchmail.log
 

touch fetchmail.log


Once fetchmail all your emails you can use mail command to view your messages or further configure alpine or mutt to read the downloaded messages.


2. Use Alpine text based email client to check your downloaded email with fetchmail
 

Alpine is Text-based email client, friendly for novices but powerful
 Alpine is an upgrade of the well-known PINE email client.  Its name derives
 from the use of the Apache License and its ties to PINE.

In other words what Alpine is it is a rewritten and improved version of the good old PINE Unix email client (for those who remember it).

To give alpine a try on Debian / Ubuntu install it with:


apt-get install –yes alpine pilot


Mutt-text-console-linux-email-client


3. Use MuTT advanced and much more colorful text email client to view your emailbox

mutt-text-email-client-logo-dog

 Mutt is a sophisticated text-based Mail User Agent. Some highlights:
 .
  * MIME support (including RFC1522 encoding/decoding of 8-bit message
    headers and UTF-8 support).
  * PGP/MIME support (RFC 2015).
  * Advanced IMAP client supporting SSL encryption and SASL authentication.
  * POP3 support.
  * ESMTP support.
  * Message threading (both strict and non-strict).
  * Keybindings are configurable, default keybindings are much like ELM;
    Mush and PINE-like ones are provided as examples.
  * Handles MMDF, MH and Maildir in addition to regular mbox format.
  * Messages may be (indefinitely) postponed.
  * Colour support.
  * Highly configurable through easy but powerful rc file.


To install MuTT:


linux:~# apt-get install –yes mutt

Configuring mutt if you don't have priorly set-up with fetchmail to collect your remote e-mails, you might want to try out .mutt's email fetch features to do so you will need a .muttrc configuration like that:
 

# Automatically log in to this mailbox at startup
set spoolfile="imaps://User_Name:Your-Secret-Password@mail.example.com/"
# Define the = shortcut, and the entry point for the folder browser (c?)
set folder="imaps://mail.example.com/"
set record="=Sent"
set postponed="=Drafts"

You might also omit placing the password inside .muttrc configuration as storing the password in plaintext might be a big security hole if someone is able to read it at certain point, but the downside of that is you'll be asked by mutt to fill in your email password on every login which at a point becomes pretty annoying.
 

If you face problems with inability of mutt to connect to remote mail server due to TLS problems, you can also try to play with below configurations:
 

# activate TLS if available on the server
 set ssl_starttls=yes
 # always use SSL when connecting to a server
 set ssl_force_tls=yes
 # Don't wait to enter mailbox manually
 unset imap_passive        
 # Automatically poll subscribed mailboxes for new mail (new in 1.5.11)
 set imap_check_subscribed
 # Reduce polling frequency to a sane level
 set mail_check=60
 # And poll the current mailbox more often (not needed with IDLE in post 1.5.11)
 set timeout=10
 # keep a cache of headers for faster loading (1.5.9+?)
 set header_cache=~/.hcache
 # Display download progress every 5K
 set net_inc=5


Once you have the emails downloaded with fetchmail for your mailbox mutt should be showing your email stuff like in below screenshot
 

linux:~$ mutt


Mutt-text-console-linux-email-client

Of course a very handy thing to have is w3m-img text browser that displays images as it might be able to open your pictures attached to email if you're on a physical console tty.

I'll be curious to hear, if you know of better and easier solutions to check mail in console, so if you know such please drop a comment explaining how you check your mail text.


Converting .odt (Open Office Document) to (MS Word) .doc in console / terminal on Linux and FreeBSD

Thursday, November 15th, 2012

Convert .odt open office document to Microsoft Office Word .doc format on GNU / Linux and FreeBSD unoconv - the universal console all open office supported file format to any other supported
If you need to convert from command line .ODT to .DOC on Linux or FreeBSD without installing the clumsy OpenOffice (particularly useful on older computers on which OpenOffice works too slow and takes too much of useless disk space), check  unoconv

Besides from supporting convert from .DOC to .PDF and a bunch of other formats convertion, I've just learned it supports also convert .ODT to .DOC. 

unoconv is also very simple to use, below is an example of converting .ODT previously created with LibreOffice to .DOC

hipo@noah:~$ unoconv -f doc Document_To_Convert.odt

hipo@noah:~$ ls -al Document_To_Convert.doc
-rw-r--r-- 1 hipo hipo 9885184 14 ное 21,22 Document_To_Convert.doc

hipo@noah:~$ file Document_To_Convert.doc 
Document_To_Convert.doc: CDF V2 Document, Little Endian, Os: Windows, Version 1.0, Code page: -535, Author: HBB, Last Saved By: HBB, Revision Number: 2, Total Editing Time: 04:00, Create Time/Date: Fri Feb 16 14:25:00 2007, Last Saved Time/Date: Fri Feb 16 14:25:00 2007

Here is also a full list of all formats to which unoconv supports convert

hipo@noah:~$ unoconv –show
The following list of document formats are currently available:

bib – BibTeX [.bib]
doc – Microsoft Word 97/2000/XP [.doc]
doc6 – Microsoft Word 6.0 [.doc]
doc95 – Microsoft Word 95 [.doc]
docbook – DocBook [.xml]
html – HTML Document (OpenOffice.org Writer) [.html]
odt – Open Document Text [.odt]
ott – Open Document Text [.ott]
ooxml – Microsoft Office Open XML [.xml]
pdb – AportisDoc (Palm) [.pdb]
pdf – Portable Document Format [.pdf]
psw – Pocket Word [.psw]
rtf – Rich Text Format [.rtf]
latex – LaTeX 2e [.ltx]
sdw – StarWriter 5.0 [.sdw]
sdw4 – StarWriter 4.0 [.sdw]
sdw3 – StarWriter 3.0 [.sdw]
stw – Open Office.org 1.0 Text Document Template [.stw]
sxw – Open Office.org 1.0 Text Document [.sxw]
text – Text Encoded [.txt]
txt – Plain Text [.txt]
vor – StarWriter 5.0 Template [.vor]
vor4 – StarWriter 4.0 Template [.vor]
vor3 – StarWriter 3.0 Template [.vor]
xhtml – XHTML Document [.html]

The following list of graphics formats are currently available:

bmp – Windows Bitmap [.bmp]
emf – Enhanced Metafile [.emf]
eps – Encapsulated PostScript [.eps]
gif – Graphics Interchange Format [.gif]
html – HTML Document (OpenOffice.org Draw) [.html]
jpg – Joint Photographic Experts Group [.jpg]
met – OS/2 Metafile [.met]
odd – OpenDocument Drawing [.odd]
otg – OpenDocument Drawing Template [.otg]
pbm – Portable Bitmap [.pbm]
pct – Mac Pict [.pct]
pdf – Portable Document Format [.pdf]
pgm – Portable Graymap [.pgm]
png – Portable Network Graphic [.png]
ppm – Portable Pixelmap [.ppm]
ras – Sun Raster Image [.ras]
std – OpenOffice.org 1.0 Drawing Template [.std]
svg – Scalable Vector Graphics [.svg]
svm – StarView Metafile [.svm]
swf – Macromedia Flash (SWF) [.swf]
sxd – OpenOffice.org 1.0 Drawing [.sxd]
sxd3 – StarDraw 3.0 [.sxd]
sxd5 – StarDraw 5.0 [.sxd]
tiff – Tagged Image File Format [.tiff]
vor – StarDraw 5.0 Template [.vor]
vor3 – StarDraw 3.0 Template [.vor]
wmf – Windows Metafile [.wmf]
xhtml – XHTML [.xhtml]
xpm – X PixMap [.xpm]

The following list of presentation formats are currently available:

bmp – Windows Bitmap [.bmp]
emf – Enhanced Metafile [.emf]
eps – Encapsulated PostScript [.eps]
gif – Graphics Interchange Format [.gif]
html – HTML Document (OpenOffice.org Impress) [.html]
jpg – Joint Photographic Experts Group [.jpg]
met – OS/2 Metafile [.met]
odd – OpenDocument Drawing (Impress) [.odd]
odg – OpenOffice.org 1.0 Drawing (OpenOffice.org Impress) [.odg]
odp – OpenDocument Presentation [.odp]
otp – OpenDocument Presentation Template [.otp]
pbm – Portable Bitmap [.pbm]
pct – Mac Pict [.pct]
pdf – Portable Document Format [.pdf]
pgm – Portable Graymap [.pgm]
png – Portable Network Graphic [.png]
pot – Microsoft PowerPoint 97/2000/XP Template [.pot]
ppm – Portable Pixelmap [.ppm]
ppt – Microsoft PowerPoint 97/2000/XP [.ppt]
pwp – PlaceWare [.pwp]
ras – Sun Raster Image [.ras]
sda – StarDraw 5.0 (OpenOffice.org Impress) [.sda]
sdd – StarImpress 5.0 [.sdd]
sdd3 – StarDraw 3.0 (OpenOffice.org Impress) [.sdd]
sdd4 – StarImpress 4.0 [.sdd]
sti – OpenOffice.org 1.0 Presentation Template [.sti]
stp – OpenDocument Presentation Template [.stp]
svg – Scalable Vector Graphics [.svg]
svm – StarView Metafile [.svm]
swf – Macromedia Flash (SWF) [.swf]
sxi – OpenOffice.org 1.0 Presentation [.sxi]
tiff – Tagged Image File Format [.tiff]
vor – StarImpress 5.0 Template [.vor]
vor3 – StarDraw 3.0 Template (OpenOffice.org Impress) [.vor]
vor4 – StarImpress 4.0 Template [.vor]
vor5 – StarDraw 5.0 Template (OpenOffice.org Impress) [.vor]
wmf – Windows Metafile [.wmf]
xhtml – XHTML [.xml]
xpm – X PixMap [.xpm]

The following list of spreadsheet formats are currently available:

csv – Text CSV [.csv]
dbf – dBase [.dbf]
dif – Data Interchange Format [.dif]
html – HTML Document (OpenOffice.org Calc) [.html]
ods – Open Document Spreadsheet [.ods]
ooxml – Microsoft Excel 2003 XML [.xml]
pdf – Portable Document Format [.pdf]
pts – OpenDocument Spreadsheet Template [.pts]
pxl – Pocket Excel [.pxl]
sdc – StarCalc 5.0 [.sdc]
sdc4 – StarCalc 4.0 [.sdc]
sdc3 – StarCalc 3.0 [.sdc]
slk – SYLK [.slk]
stc – OpenOffice.org 1.0 Spreadsheet Template [.stc]
sxc – OpenOffice.org 1.0 Spreadsheet [.sxc]
vor3 – StarCalc 3.0 Template [.vor]
vor4 – StarCalc 4.0 Template [.vor]
vor – StarCalc 5.0 Template [.vor]
xhtml – XHTML [.xhtml]
xls – Microsoft Excel 97/2000/XP [.xls]
xls5 – Microsoft Excel 5.0 [.xls]
xls95 – Microsoft Excel 95 [.xls]
xlt – Microsoft Excel 97/2000/XP Template [.xlt]
xlt5 – Microsoft Excel 5.0 Template [.xlt]
xlt95 – Microsoft Excel 95 Template [.xlt]


unoconv is said to support convertion between any to any document format that is already supported by OpenOffice / LibreOffice. The script is written by Dag Wieers (users of Fedora, RHEL and other RPM based distros should remember him well. DGW repositories always were of great help where some kind of not main stream software has to be installed on RPM based Linux. You might want to check unoconv's official website which gives good overview on it.

Though the tool is written for Linux, there is a BSD users port in freshports.