Posts Tagged ‘consuming’
Thursday, March 11th, 2021 We had to test the number of connections incoming IP sorted by its TCP / IP connection state.
For example:
TIME_WAIT, ESTABLISHED, LISTEN etc.
The reason behind is sometimes the IP address '192.168.0.1' does create more than 200 connections, a Cisco firewall gets triggered and the connection for that IP is filtered out. To be able to know in advance that this problem is upcoming. a Small userparameter script is set on the Linux servers, that does print out all connections from IP by its STATES sorted out.
The script is calc_total_ip_match_zabbix.sh is below:
#!/bin/bash
# check ESTIMATED / FIN_WAIT etc. netstat output for IPs and calculate total
# UserParameter=count.connections,(/usr/local/bin/calc_total_ip_match_zabbix.sh)
CHECK_IP='192.168.0.1';
f=0;
for i in $(netstat -nat | grep "$CHECK_IP" | awk '{print $6}' | sort | uniq -c | sort -n); do
echo -n "$i ";
f=$((f+i));
done;
echo
echo "Total: $f"
root@pcfreak:/bashscripts# ./calc_total_ip_match_zabbix.sh
1 TIME_WAIT 2 ESTABLISHED 3 LISTEN
Total: 6
root@pcfreak:/bashscripts# ./calc_total_ip_match_zabbix.sh
2 ESTABLISHED 3 LISTEN
Total: 5

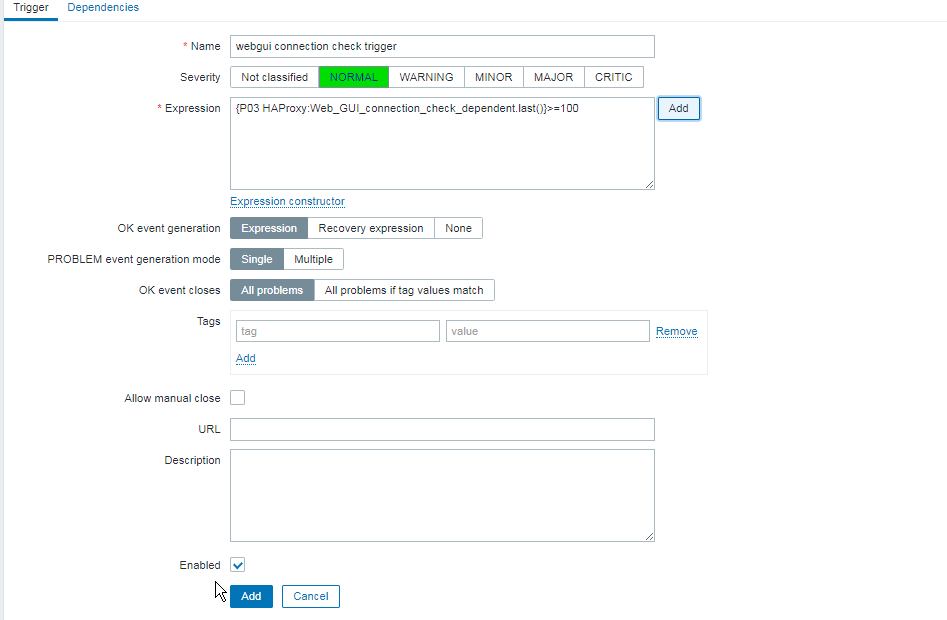
To make process with Zabbix it is necessery to have an Item created and a Depedent Item.
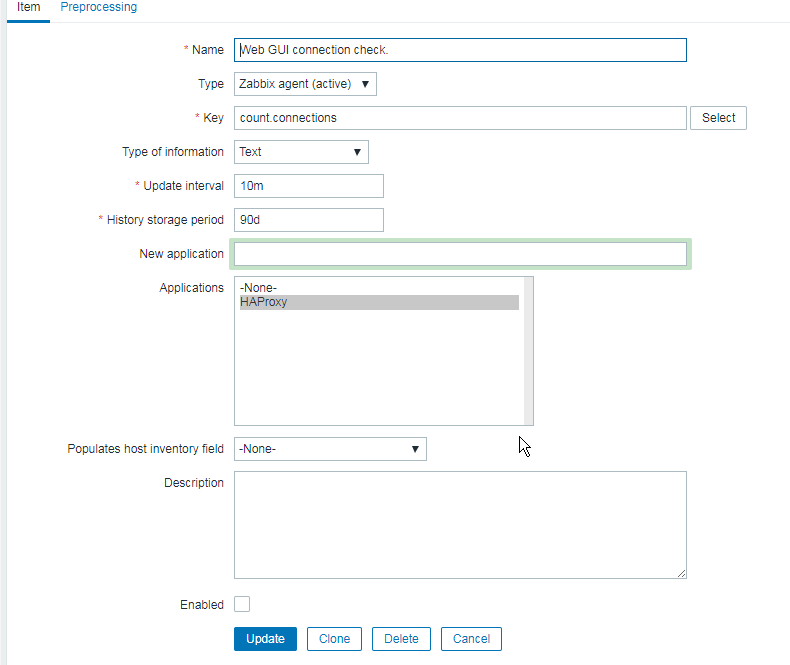

Finally create a trigger to trigger alarm if you have more than or eqaul to 100 Total overall connections.
The Zabbix userparameter script should be as this:
[root@host: ~]# cat /etc/zabbix/zabbix_agentd.d/userparameter_webgui_conn.conf
UserParameter=count.connections,(/usr/local/bin/webgui_conn_track.sh)
Some collleagues suggested more efficient shell script solution for suming the overall number of connections, below is less time consuming version of script, that can be used for the calculation.
#!/bin/bash -x
# show FIN_WAIT2 / ESTIMATED etc. and calcuate total
count=$(netstat -n | grep "192.168.0.1" | awk ' { print $6 } ' | sort -n | uniq -c | sort -nr)
total=$((${count// /+}))
echo "$count"
echo "Total:" "$total"
2 ESTABLISHED
1 TIME_WAIT
Total: 3
Below is the graph built with Zabbix showing all the fluctuations from connections from monitored IP. 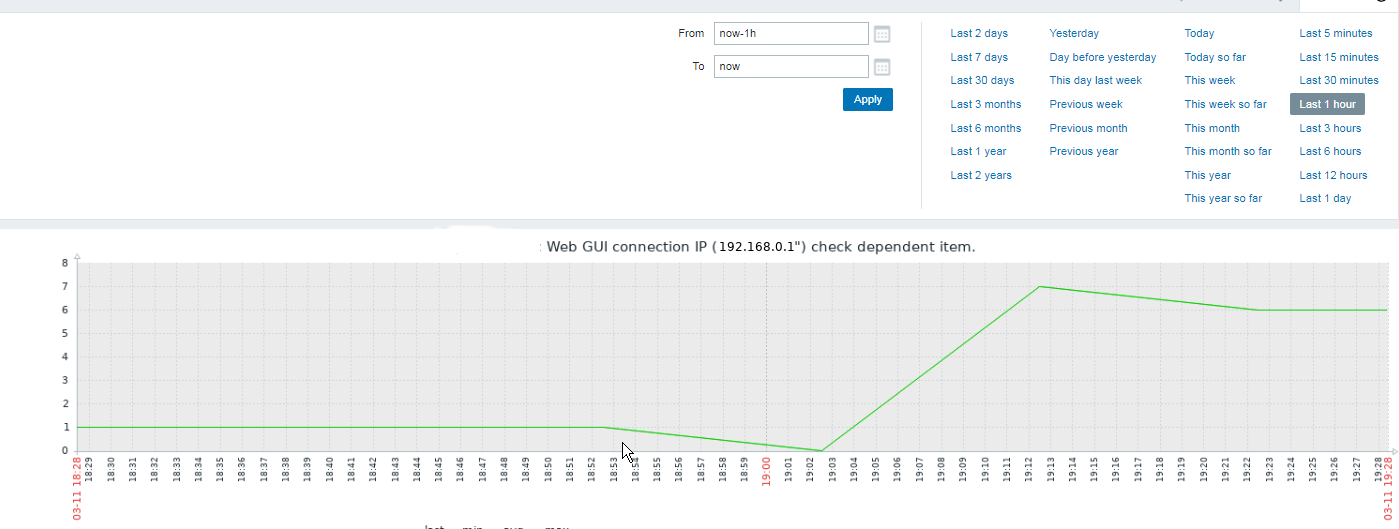
Tags: ALL, and, awk, Below, bin, calculation, cat, check, cisco, conf, connection, connections, consuming, count, create, created, Done, How to, log, shell script
Posted in Linux, Various, Web and CMS, Zabbix | 2 Comments »
Tuesday, May 8th, 2012 
I believe, the quickest way to take notes on Linux and BSD and later view the notes is to use the command line.
A very easy simple way to keep record of various short notes is just to use a simple text editor like (vim) and store each note in a separate file in lets say ~/notes/ directory.
Actually, I'm using this way to take notes and store sensitive info for various important information I need for further reference, since 5 years or so..
Opening a new text editor for each note and then doing cd ~/notes/; ls |grep -i 'string' is a bit time consuming.
Fortunately there is a quick two shell functions hack that shortens time for note taking. The following two bash functions has to be added in ~/.bashrc:
n() {

vim ~/notes/"$*".txt

}

nls() {

ls -c ~/notes/ | grep "$1"

}
Copy / Paste this two functions in the beginning or the end of ~/.bashrc in order to use them.
Also if ~/notes directory is not existing, yet create it:
hipo@noah:~$ mkdir notes
To make the two new input functions active across opened bash shells on console or terminal either re-login or reread the .bashrc by "sourcing it", e.g.
hipo@noah:~$ source ~/.bashrc
Afterwards, note taking becomes a piece of cake to store a new note with login credentials (user/password) for a new registration to a random named website, type something like:
hipo@noah:~$ n my_website_name-user-pass
This will open for editting ~/.notes/my_website_name-user-pass.txt, type the new desired note content and do save and exit from vim (press esc and type :x!.
Then to get a quick list of all previously stored notes use:
hipo@noah:~$ nls website

my_website_name-user-pass.txt
If you already have a directory containing subdirectories with various taken notes (like me), you will need to use an improved version nls written by Jason Ryan, the nls improved is like this:
nls () { tree -CR --noreport ~/notes | awk '{

if ((NR >) gsub(/.txt/,"")); if

(NF==1) print $1; else if (NF==2)

print $2; else if (NF==3)

printf " %s\n", $3}';

}
This two functions, were not my creation but was suggested in Linux Magazine issue 135 article entitled Command-line task managers and note-taking tools written by Dmitri Popov.
Hope this two functions, will be helpful to console geeks out there.
Tags: Auto, BSD, cake, consuming, copy paste, cr, Draft, file, freebsd, gnu linux, hack, hipo, important information, info, information, input functions, jason ryan, Linux, login, login credentials, mkdir, need, nls, noah, opening, password, piece, piece of cake, sensitive info, Shell, shell functions, shells, something, store, subdirectories, terminal, text, time, time consuming, Tip Quick Note, txtIf, type, use, vim, websitemy
Posted in Curious Facts, Linux, System Administration, vim editor | 2 Comments »
Friday, April 15th, 2011 
If you're on Linux the questions like, how can I convert between video and audio formats, how to do photo editing etc. etc. have always been a taugh question as with it's diversity Linux often allows too many ways to do the same things.
In the spirit of questioning I have been recently curious, how can a subtitles be added to a flash video (.flv) video?
After some research online I've come up with the below suggested solution which uses mplayer to do the flash inclusion of the subtitles file.
mplayer your_flash_movie.flv -fs -subfont-text-scale 3
While including the subtitles to the .flv file, it's best to close up all the active browsers and if running something else on the desktop close it up.
Note that above's mplayer example for (.srt and .sub) subtitle files example is only appropriate for a .flv movie files which already has a third party published subtitle files.
What is interesting is that often if you want to make custom subtitles to let's say a video downloaded from Youtube on Linux the mplayer way pointed above will be useless. Why?
Well the Linux programs that allows a user to add custom subtitles to a movie does not support the flv (flash video) file format.
My idea on how to create custom subtitles and embed them into a flv movie file is very simple and it goes like this:
1. Convert the .flv file format to let's say .avi or .mpeg
2. Use gnome-subitles or subtitleeditor to create the subtitles for the .avi or .mpeg file
3. Convert back the .avi/.mpeg file with included subtitles to .flv (flash video format)
This methodology is really long and time consuming, but pitily as far as my understanding goes it's the only way to do that on your Linux until now.
To make the conversations between .flv and .avi format you will need to use the ffmpeg – (FFMpeg command line tool video converter), here is how:
– Convert .flv to .avi
debian:~# /usr/bin/ffmpeg -i input_flvfilename.flv output_avifilename.avi
– Convert .avi file to .flv
debian:~# /usr/bin/ffmpeg -y -i /path/to/your/avi/input_avifilename.avi -acodec mp3 -ar 22050 -f flv

/path/to/your/flv/output_flvfilename.flv
The required overall tools which you will have to have installed on your Debian or Ubuntu Linux are:
1. ffmpeg
2. gnome-subtitles
3. subtitleeditor
4. mplayer
You will also have to spend some time to get to know gnome-subtitles or subtitleeditor, but it won't be that long until you get the idea on how to use them.
Tags: and, avi, avi file, avi format, avi mpeg, close, command line tool, consuming, conversations, Convert, custom, Desktop, editing, editor, ffmpeg, file, Flash, flv file format, format, Gnome, How to, inclusion, Linux, linux programs, methodology, movie file, movie files, mpeg, mpeg file, mplayer, party, photo editing, something, subtitle editor, subtitle files, subtitles, taugh, time, time consuming, tool, Ubuntu, use, video, video converter, video file, youtube
Posted in Linux, Linux and FreeBSD Desktop, Linux Audio & Video | 1 Comment »
Saturday, April 28th, 2012 
If there is necessity to look for a string in all hidden files with all sub-level subdirectories (be aware this will be time consuming and CPU stressing) use:
hipo@noah:~$ grep -rli 'PATH' .*
./.gftp/gftprc
./.gftp/cache/cache.OOqZVP
….
Sometimes its necessery to only grep for variables within the first-level directories (lets say you would like to grep a 'PATH' variable set, string within the $HOME directory, the command is:
hipo@noah:~$ grep PATH .[!.]*
.profile:PATH=/bin:/usr/bin/:${PATH}
.profile:export PATH
.profile:# set PATH so it includes user's private bin if it exists
.profile: PATH="$HOME/bin:$PATH"
.profile.language-env-bak:# set PATH so it includes user's private bin if it exists
.profile.language-env-bak: PATH="$HOME/bin:$PATH"
.viminfo:?/PATH.xcyrillic: XNLSPATH=/usr/X11R6/lib/X11/nls
.xcyrillic: export XNLSPATH
The regular expression .[!.]*, means exclude any file or directory name starting with '..', e.g. match only .* files
Note that to use the grep PATH .[!.]* on FreeBSD you will have to use this regular expression in bash shell, the default BSD csh or tsch shells will not recognize the regular expression, e.g.:
grep PATH '.[!.]*'
grep: .[!.]*: No such file or directory
Hence on BSD, if you need to look up for a string within the home directory, hidden files: .profile .bashrc .bash_profile .cshrc run it under bash shell:
freebsd# /usr/local/bin/bash
[root@freebsd:/home/hipo]# grep PATH .[!.]*
.bash_profile:# set PATH so it includes user's private bin if it exists
.bash_profile:# PATH=~/bin:"${PATH}"
.bash_profile:# do the same with …
Another easier to remember, alternative grep cmd is:
hipo@noah:~$ grep PATH .*
.profile:PATH=/bin:/usr/bin/:${PATH}
.profile:export PATH
.profile:# set PATH so it includes user's private bin if it exists
.profile: PATH="$HOME/bin:$PATH"
….
Note that grep 'string' .* is a bit different in meaning, as it will not prevent grep to match filenames with names ..filename1, ..filename2 etc.
Though grep 'string' .* will work note that it will sometimes output some unwanted matches if filenames with double dot in the beginning of file name are there …
That's all folks 🙂
Tags: Auto, bash shell, bit, BSD, cache cache, cmd, consuming, csh, cshrc, directory name, Draft, export path, expression, file, freebsd, gftp, grep, hipo, home directory, How to, level directories, Linux, MANPATHAnother, nbsp, necessery, noah, note, Path, path profile, private bin, profile path, quot, regular expression, rli, root, set path, Shell, shrc, text, text strings, time, time consuming, tsch, value, XNLSPATH, XNLSPATHThe, zcompdump
Posted in FreeBSD, Linux, System Administration | 2 Comments »
Friday, March 18th, 2011 
By default most Apache running Linux servers on the Internet are configured to use with the mpm prefork apache module
Historically prefork apache module is the predecessor of the worker module therefore it's believed to be a way more tested and reliable, if you need a critical reliable webserver configuration.
However from my experience by so far with the Apache MPM Worker I can boldly say that many of the rumors concerning the unreliabity of apache2-mpm-worker are just myths.
The old way Apache handles connections e.g. the mod prefork is the well known way that high amount of the daemons on Linux and BSD are still realying on.
When prefork is a used by Apache, every new TCP/IP connection arriving at your Linux server on the Apache configured port let's say on port 80 is being served by Apache in a way that the Apache process (mother process) parent does fork a new Apache parent copy in order to serve the new request.
Thus by using the prefork Apache needs to fork new process (if it doesn't have already an empty forked one waiting for connections) and serve the HTTP request of the new client, after the request of the client is completed the newly forked Apache usually dies (even though it again depends on the way the Apache server is configured via the Apache configuration – apache2.conf / httpd.conf etc.).
Now you can imagine how slow and memory consuming it is that all the time the parent Apache process spawns new processes, kills old ones etc. in order to fulfill the client requests.
Now just to compare the Apace mpm prefork does not use the old forking way, but relies on a few Apache processes which handles all the requests without constantly being destroyed and recreated like with the prefork module.
This saves operations and system resources, threaded programming has already been proven to be more efficient way to handle tasks and is heavily adopted in GUI programming for instance in Microsoft Windows, Mac OS X, Linux Gnome, KDE etc.
There is plenty of information and statistical data which compares Apache running with prefork and respectively worker modules online.
As the goal of this article is not to went in depths with this kind of information I would not say more on it but let you explore online a bit more about them in case if you're interested.
The purpose of this article is to explain in short how to substitute the Apache2-MPM-Prefork and how your server performance could benefit out of the use of Apache2-MPM-Worker.
On Debian the default Apache process serving module in Apache 1.3x,Apache 2.0x and 2.2x is prefork thus the installation of apache2-mpm-worker is not "a standard way" to install Apache
Deciding to swith from the default Debian apache-mpm-prefork to apache-mpm-worker is quite a serious and responsible decision and in some cases might cause troubles, if you have decided to follow my article be sure to consider all the possible negative consequences of switching to the apache worker !
Now after having said a bunch of info which might be not necessary with the experienced system admin I'll continue on with the steps to install the apache2-mpm-worker.
1. Install the apache2-mpm-worker
debian:~# apt-get install apache2-mpm-worker php5-cgi

Reading state information... Done

The following packages were automatically installed and are no longer required:

The following packages will be REMOVED apache2-mpm-prefork libapache2-mod-php5

The following NEW packages will be installed apache2-mpm-worker

0 upgraded, 1 newly installed, 2 to remove and 46 not upgraded.

Need to get 0B/259kB of archives.After this operation, 6193kB disk space will be freed.
As you can notice in below's text confirmation which will appear you will have to remove the apache2-mpm-prefork and the apache2-mpm-worker modules before you can proceed to install the apache2-mpm-prefork.
You might ask yourself if I remove my installed libphp how would I be able to use my Apache with my PHP based websites? And why does the apt package manager requires the libapache2-mod-php5 to get removed.
The explanation is simple apache2-mpm-worker is not thread safe, in other words scripts which does use the php fork(); function would not work correctly with the Apache worker module and will probably be leading to PHP and Apache crashes.
Therefore in order to install the apache mod worker it's necessary that no libapache2-mod-php5 is existent on the system.
In order to have a PHP installed on the server again you will have to use the php5-cgi deb package, this is the reason in the above apt-get command I'm also requesting apt to install the php5-cgi package next to apache2-mpm-worker.
2. Enable the cgi and cgid apache modules
debian:~# a2enmod cgi

debian:~# a2enmod cgid
3. Activate the mod_actions apache modules
debian:~# cd /etc/apache2/mods-enabled

debian:~# ln -sf ../mods-available/actions.load

debian:~# ln -sf ../mods-available/actions.conf
4. Add configuration options in order to enable mod worker to use the newly installed php5-cgi
Edit /etc/apache2/mods-available/actions.conf vim, mcedit or nano (e.g. your editor of choice and add inside:
<IfModule mod_actions.c>
Action application/x-httpd-php /cgi-bin/php5
</IfModule>
After completing all the above instructions, you might also need to edit your /etc/apache2/apache2.conf to tune up, how your Apache mpm worker will serve client requests.
Configuring the <IfModule mpm_worker_module> in apache2.conf is necessary to optimize your newly installed mpm_worker module for performance.
5. Configure the mod_worker_module in apache2.conf One example configuration for the mod worker is:
<IfModule mpm_worker_module>

StartServers 2

MaxClients 150

MinSpareThreads 25

MaxSpareThreads 75

ThreadsPerChild 25

MaxRequestsPerChild 0

</IfModule>
Consider the fact that this configuration is just a sample and it's in no means configured for serving Apache requests for high load Apache servers and you need to further play with the values to have a good results on your server.
6. Check that all is fine with your Apache configurations and no syntax errors are encountered
debian:~# /usr/sbin/apache2ctl -t

Syntax OK
If you get something different from Syntax OK track the error and fix it before you're ready to restart the Apache server.
7. Now restart the Apache server
debian:~# /etc/init.d/apache2 restart
All should run fine and hopefully your PHP scripts should be interpreted just fine through the php5-cgi instead of the libapache2-mod-php5.
Using the /usr/bin/php5-cgi will increase with some percentage your server CPU load but on other hand will drasticly decrease the Webserver memory consumption.
That's quite logical because the libapache2-mod-hp5 is loaded once during apache server whether a new instance of /usr/bin/php5-cgi is invoked during each of Apache requests via the mod worker.
There is one serious security flow coming with php5-cgi, DoS against a server processing scripts through php5-cgi is much easier to be achieved.
An example for a denial attack which could affect a website running with mod worker and php5-cgi, could be simulated from a simple user with a web browser which holds up the f5 or ctrl + r browser page refresh buttons.
In that case whenever php5-cgi is used the CPU load would rise drastic, one possible solution to this denial of service issues is by installing and using libapache2-mod-evasive like so:
8. Install libapache2-mod-evasive
debian:~# apt-get install libapache2-mod-evasive
The Apache mod evasive module is a nice apache module to minimize HTTP DoS and brute force attacks.
Now with mod worker through the php5-cgi, your apache should start serving requests more efficiently than before.
For some performance reasons some might even want to try out the fastcgi with the worker to boost the Apache performance but as I have never tried that I can't say how reliable a a mod worker with a fastcgi would be.
N.B. ! If you have some specific php configurations within /etc/php5/apache2/php.ini you will have to set them also in /etc/php5/cgi/php.ini before you proceed with the above instructions to install Apache otherwise your PHP scripts might not work as expected.
Mod worker is also capable to work with the standard mod php5 Apache module, but if you decide to go this route you will have to recompile your PHP lib manually from source as in Debian this option is not possible with the default php library.
This installation worked fine on Debian Lenny but suppose the same installation should work fine on Debian Squeeze as well as Debian testing/unstable.
Feedback on the afore-described mod worker installation is very welcome!
Tags: Activate, amount, apache configuration, apache mod worker speed up, apache module, apache performance, apache processes, apache server, apache2, boost apache performance, BSD, cause, cgi, cgid, client, client requests, configured, configured port, connection, consuming, consumption, copy, daemons, fine, Gnome, historically, HTTP, httpd, information, installation, instance, libapache, linux server, linux servers, memory consumption, mpm, myths, new processes, package, php, php5, predecessor, request, server memory, speed up apache, speed up apache debian, Speeding up Apache through apache2-mpm-worker and php5-cgi on Debian / How to improve Apache performance and decrease server memory consumption, system resources, tcp ip connection, time, unreliabity
Posted in Linux, System Administration, Various, Web and CMS | 12 Comments »
Wednesday, June 15th, 2011 
Many joomla CMS installations are for Non-profit organizations or Non Government organizations. These are organizations which are not officially making profit and therefore this instituations are interested into donations to support their activities.
In this occasions adding Joomla paypal capabilities is very essential. There are plenty of modules which enables Joomla to support paypal monetary payments, however many of them are either paid or requires registration and thus it’s quite time consuming to set up a decent PayPal supporting module for Joomla.
After a bit of investigation thanks God, I’ve come across a module that is free of charge, easily downloadable (wihtout registration) and is also relatively easy to configure, these module is called PAYPAL DONATION MODULE
I’ve mirored the module to my server, just in case if the module disappears in the future.
Here are a very brief explanation on how the module can be downloaded installed and configured:
First Download (mod_ojdonation_pp) Paypal Donation Module here
Install it as joomla module via:
Extensions -> Install/Uninstall
menu
Afterwards, go to:
Extensions -> Module Manager
In the list of modules you will notice the Donate module which will be disabled. Use the Enable button to enable it.
Next by clicking on the Donate Module Name, one can configure the module, where the most essential configuration values that needs to be filled in are:
1. Title: – The title of the donation form:
2. Donation Title: – Title of donation picture to show in the webpage
3. Donation Amount: – Default donation amount user will donate with paypal by clicking on Donate button
4. Currency – Default currency the donators will use to donate to configured paypal account
5. Paypal ID: – The email address of paypal account your donators will donate to (This was a bit hard to understand since Paypal ID is not a number ID but the email address configured as an username in PayPal).
6. Donation Description: – Description text to appear before the Donate button
7. Donation Footer: – Text to appear after the Donate button
There are two ways one could add the donation module to show the donation form, on the joomla website:
a. One is to enable the donation button on every joomla webpage (I don’t like this kind of behaviour).
To use this kind of donate button display approach, you will have to select from the Donation module, conf options:
– Show on FrontPage: and Show Title:
Also make sure the Enabled: option is set to Yes
b. Second approach is to set the PayPal Donation form only to appear on a single menu, to do so:
While in Paypal Donation Module configuration in Menu Assignment section, select:
Select Menu Item(s) from the List
instead of the default All value set for Menus.
The last setting to be choosen is the paypal donation form page location (where exactly on the selected pages the form will appear).
The form location is set from the Position: dropdown menu, the option which I found to be the best one for me was the bottom option. However just play with the Position setting and choose the one that will be best for you.
Then scroll on in the Menu Selection: and choose only the menus where you want a paypal donation form to appear.
Finally to save all the recent made settings, click on Apply and refreshing in a new page should show you paypal’s money donation form in joomla
If all is configured fine with Joomla’s – Paypal Donation Module you should get on your webpage:
Tags: amount, Button, buttonThere, capabilities, cms, configuration values, configure, configured, consuming, currency, default, DONATION, Donation Amount, Donation Description, Donation Footer, Donation Title, donations, donators, explanation, footer, form, future, government organizations, How to, Install, investigation, Joomla, location, menu, mod, monetary payments, number id, occasions, ojdonation, option, page, paypal id, profit organizations, show, Show Title, time, username, webpage
Posted in Joomla, Various, Web and CMS | No Comments »
Friday, July 29th, 2011 
I had to change my mysql root password for one of the servers since during the install I mispasted the password in the MySQL password prompt I needed the pwd to be changed.
Here is how I changed it to my desired one:
linux:~# /usr/bin/mysqladmin -u root -p'OLD_PASSWORD_STRING' password NEW_PASSWORD_STRING

linux:~#
The password gets changed immediately 😉
If a new password has to be set to a passwordless mysql server, the command to be issued is:
linux:~# /usr/bin/mysqladmin -u root password PASSWORD_STRING
Changing the MySQL password is also possible with mysql cli, after connecting to the sql server, though this method is a bit more time consuming. Here is how to do it from mysql console:
linux:~# mysql -u root -p

Server version: 5.1.49-3 (Debian)
Copyright (c) 2000, 2010, Oracle and/or its affiliates. All rights reserved.
This software comes with ABSOLUTELY NO WARRANTY. This is free software,
and you are welcome to modify and redistribute it under the GPL v2 license
Type ‘help;’ or ‘h’ for help. Type ‘c’ to clear the current input statement.
mysql> use mysql;
mysql> update user set password=PASSWORD(“NEW_PASSWORD”) where User=’root’;mysql> flush privileges;
Of course it’s possible to do change the root pass via phpmyadmin
Cheers 😉
Tags: Cheers, cli, command, consuming, Copyright, course, free software, gpl v2, help, input statement, licenseType, Linux, mysqladmin, Old, oracle, password, password string, phpmyadmin, Privileges, pwd, root, root password, server root, servers, software, sql server, string password, time, time consuming, type, use, usr, usr bin, version, warranty
Posted in Linux, MySQL, System Administration | No Comments »
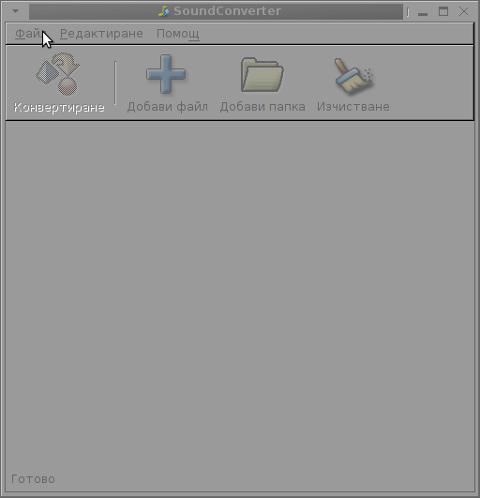
Friday, July 27th, 2012 I’ve used K3B just recently to RIP an Audio CD with music to MP3. K3b has done a great job ripping the tracks, the only problem was By default k3b RIPs songs in OGG Vorbis (.ogg) and not mp3. I personally prefer OGG Vorbis as it is a free freedom respecting audio format, however the problem was the .ogg-s cannot be read on many of the audio players and it could be a problem reading the RIPped oggs on Windows. I’ve done the RIP not for myself but for a Belarusian gfriend of mine and she is completely computer illiterate and if I pass her the songs in .OGG, there is no chance she succed in listening the oggs. I’ve seen later k3b has an option to choose to convert directly to MP3 Using linux mp3 lame library this however is time consuming and I have to wait another 10 minutes or so for the songs to be ripped to shorten the time I decided to directly convert the existing .ogg files to .mp3 on my (Debian Linux). There are probably many ways to convert .ogg to mp3 on linux and likely many GUI frontends (like SoundConverter) to use in graphic env.
I however am a console freak so I preferred doing it from terminal. I’ve done quick research on the net and figured out the good old ffmpeg is capable of converting .oggs to .mp3s. To convert all mp3s just ripped in the separate directory I had to run ffmpeg in a tiny bash loop.
A short bash shell script 1 liner combined with ffmpeg does it, e.g.;
for f in *.ogg; do ffmpeg -i "$f" "`basename "$f" .ogg`.mp3"; done.....
The loop example is in bash so in order to make the code work on FreeBSD it is necessery it is run in a bash shell and not in BSDs so common csh or tcsh.
Well, that’s all oggs are in mp3; Hip-hip Hooray 😉
Tags: audio cd, Auto, basename, bash shell script, BSDs, chance, code, consuming, csh, debian linux, Draft, ffmpeg, format, freak, freebsd, freedom, frontends, GNU, gnu linux, job, k3b, Linux, necessery, Ogg, ogg files, oggs, option, RIPs, script, Shell, soundconverter, terminal, time, time consuming, vorbis ogg, work
Posted in Everyday Life, FreeBSD, Linux and FreeBSD Desktop, Linux Audio & Video | No Comments »
Tuesday, July 17th, 2012 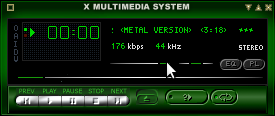
I use Debian Linux for my desktop for quite some time; Even though there are plenty of MP3 / CD players around in Debian, I’m used to the good old XMMS, hence I often prefer to use XMMS to play my music instead of newer players like RhythmBox or audacious.
Actually audacious is not bad substitute for XMMS and is by default part of Debian but to me it seems more buggy and tends to crash during playing some music formats more than xmms ….
As most people might know, XMMS is no longer supported in almost all modern Linux distributions, so anyone using Debian, Ubuntu or other deb derivative Linux would have to normally compile it from source.
Compiling from source is time consuming and I think often it doesn’t pay back the effort. Thanksfully, though not officially supported by Debian crew XMMS still can be installed using a deb xmms prebuilt package repository kindly provided by a hacker fellow knuta.
Using the pre-build deb packages, installing xmms on new Debian installs comes to:
debian:~# echo 'deb http://www.pvv.ntnu.no/~knuta/xmms/squeeze ./' >> /etc/apt/sources.list
debian:~# echo 'deb-src http://www.pvv.ntnu.no/~knuta/xmms/squeeze ./' >> /etc/apt/sources.list
debian:~# apt-get update && apt-get -y install xmms
There are also deb xmms built for Ubuntu, so Ubuntu users could install xmms using repositories:
deb http://www.pvv.ntnu.no/~knuta/xmms/karmic ./
deb-src http://www.pvv.ntnu.no/~knuta/xmms/karmic ./
That’s all now xmms is ready to use. Enjoy 🙂
Tags: amp, Auto, buggy, Compiling, consuming, Crew, deb, deb packages, Debian, Desktop, Draft, fellow, hacker, Installing, Linux, linux distributions, mp3 cd players, music, music formats, package, pvv, quite some time, repositories, repository, RhythmBox, squeeze, substitute, Thanksfully, time, time consuming, Ubuntu, update, way, XMMS, xmmsThere
Posted in System Administration | No Comments »
Sunday, June 12th, 2011 I’ve been assigned the task to add on one of the qmail powered servers I administrate about 50 email addresses via command line.
Each email addresses was required to be configured to have the same mail password.
Adding the email addresses via an interface would be a killing time consuming task and will probably require at least 1 hour of time to add the emails with qmailwebmin, qadmin, qubit or the other vpopmail qmail web administration interfaces available nowdays.
To solve the task, I’ve used a line oner bash shell script which reads all my 80 emails from a file and adds them with vpopmail’s command line tool vpasswd on the mail server.
Here is the one liner shell script I’ve written to solve the task:
debian:~# while read line; do vadduser $line Email_Pass_Phrase; done < email_list_file.txt
In above’s code I’ve used the email_list_file.txt file is a text file on the server and contains list of all my 50 email addresses, where each line in the file contains one email. The Email_Pass_Phrase is actually the password I’ve set for all the new email addresses being created with vpasswd
That’s all now the 50 email addresses on the server are created and I’ve saved at least one hour of boring repeating actions in the browser 😉
Tags: administrate, bash shell script, browser, command, command line tool, consuming, email accounts, email addresses, email list, file, file txt, interface, killing time, line, little shell, lt, mail password, mail server, new email, nowdays, password, phrase, qadmin, Qmail, qubit, read, servers, Shell, ssh, time, time consuming task, tool, TXT, vadduser, vpasswd, vpopmail, web administration
Posted in Qmail, System Administration | No Comments »


