Posts Tagged ‘create’

Linux: Howto Disable logging for all VirtualHosts on Apache and NGINX Webservers one liner

Wednesday, July 1st, 2020

disable-apache-nginx-logging-for-all-virtualhosts
Did you happen to administer Apache Webservers or NGINX webservers whose logs start to grow so rapidly that are flooding the disk too quickly?
Well this happens sometimes and it also happens that sometimes you just want to stop logging especially, to offload disk writting.

There is an easy way to disable logging for requests and errors (access_log and error_log usually residing under /var/log/httpd or /var/log/nginx ) for  all configured Virtual Domains with a short one liner, here is how.

Before you start  Create backup of /etc/apache2/sites-enabled / or /etc/nginx to be able to revert back to original config.

# cp -rpf /etc/apache2/sites-enabled/ ~/

# cp -rpf /etc/nginx/ ~/


1. Disable Logging for All  Virtual Domains configured for Apache Webserver

First lets print what the command will do to make sure we don't mess something

# find /home/hipo/sites-enabled/* -exec echo sed -i 's/#*[Cc]ustom[Ll]og/#CustomLog/g' {} \;


You will get some output like

find /home/hipo//sites-enabled/* -exec echo sed -i 's/#*[Cc]ustom[Ll]og/#CustomLog/g' {} \;

find /etc/apache2/sites-enabled/* -exec sed -i 's/#*[Cc]ustom[Ll]og/#CustomLog/g' {} \;
find /etc/apache2/sites-enabled/* -exec sed -i 's/#*[Ee]rror[Ll]og/#ErrorLog/g' {} \;

2. Disable Logging for All configured Virtual Domains for NGINX Webserver
 

find /etc/nginx/sites-enabled/* -exec sed -i 's/#*access_log/#access_log/g' {} \;
find /etc/nginx/sites-enabled/* -exec sed -i 's/#*error_log/#error_log/g' {} \;

f course above substituations that will comment out with '#' occurances from file configs of only default set access_log and error_log / access.log, error.log 
for machines where there is no certain convention on file naming and there are multiple domains in custom produced named log files this won't work.

This one liner was inspired from a friend's daily Martin Petrov. Martin blogged initially about this nice tip for those reading Cyrillic check out mpetrov.net, so. Thanks Marto ! 🙂

Create SFTP CHROOT Jail User for data transfer to better Linux shared web hosting server security

Monday, December 3rd, 2018

Adding user SFTP access to a Linux system is often required and therefore a must for multi users or web hosting environments it is an absolute requirement to have SFTP  user space separation ( isolation ) out of the basic Linux system environment this is done using a fake CHROOT Jail.

Purpose of this article is to show how to create SFTP Chroot JAIL in few easy configurations.

By isolating each user into his own space you will protect the users to not eventually steal or mistakenly leak information such as user credentials / passwords etc.

Besides that it is useful to restrict the User to his own File / Web Space to have granted only access to Secure FTP (SFTP) only and not SSH login access and togheter with the chroot jail environment to protect your server from being attempted to be hacked (rooted / exploited) through some (0day) zero-day kernel 1337 vulnerability.

1. Setup Chrooted file system and do the bind mount in /etc/fstab
 

# chown root:root /mnt/data/share
# chmod 755 /mnt/data/share
# mkdir -p /sftp/home
# mount -o bind /mnt/data/share /sftp/home

Next add to /etc/fstab (e.g. vim /etc/fstab) and add following line:
 

/mnt/data/share /sftp/home  none   bind   0   0


To mount it next:
 

# mount -a


/mnt/data/share is a mounted HDD in my case but could be any external attached storage


2. Create User and sftpgroup group and add your new SFTP Jailed user accounts to it

To achieve SFTP only CHROOT Jail environment you need some UNIX accounts new group created such as sftpgroup and use it to assign proper ownership / permissions to newly added SFTP restricted accounts.
 

# groupadd sftpgroup


Once the group exists, next step is to create the desired username / usernames with useradd command and assign it to sftpgroup:


# adduser sftp-account1 -s /sbin/nologin -d /sftp/home
# passwd sftp-account1


usermod -G sftpgroup sftp-account1


Above both commands could be also done in one line with adduser


# adduser sftp-account1 -g sftpgroup -s /sbin/nologin -d /sftp/home

Note the /sbin/nologin which is set to prevent SSH logins but still allow access via sftp / scp data transfer clients Once the user exists it is a good idea to prepare the jailed environment under a separate directory under root File system system lets say in /sftp/home/

3. Set proper permissions to User chrooted /home folder

# mkdir -p /sftp/home
# mkdir /sftp/home/sftp-account1
# chown root:root /sftp/
# chown sftp-account1:sftpgroup /sftp/home/sftp-account1

For each new created uesr (in this case sftp-account1) make sure the permissions are properly set to make the files readable only by the respective user.

# chmod 700 -R /sftp/home/sftp-account1

For every next created user don't forget to do the same 3. Modify SSHD configuration file to add Chroot match rules Edit /etc/ssh/sshd_config file and to the end of it add below configuration:

# vim /etc/ssh/sshd_config
Subsystem sftp internal-sftp     
Match Group sftpgroup   
ChrootDirectory /sftp/home   
ForceCommand internal-sftp   
X11Forwarding no   
AllowTcpForwarding no


Restart sshd to make the new settings take effect, to make sure you don't ed up with no access (if it is a remote server) run the sshd daemon on a secondary port like so:
 

# /usr/sbin/sshd -p 2208 &

Then restart sshd – if it is old Linux with Init V support

# /etc/init.d/sshd restart

– For systemd Linux systems

# systemctl restart sshd


4. Verify Username (sftp-account1) could login only via SFTP and his environment is chrooted


ssh sftp-account1@www.pc-freak.net

This service allows sftp connections only.
Connection to 83.228.93.76 closed.


sftp sftp-account1@www.pc-freak.net Connected to 83.228.93.76. sftp>


5. Closure

The quick summary of What we have achieved with below is:

restrict Linux users from having no /bin/shell access but still have Secure FTP copy in few steps to summarize them

a. create new user and group for SFTP chrooted restricted access only
b. set proper permissions to make folder accessible only by user itself
c. added necessery sshd config and restarted sshd to make it working d. tested configuration

This short guide was based on documentation on Arch Linux's wiki SFTP chroot you can check it here.

Putty load as default session another session – Save other Putty session configuration to default howto

Thursday, November 29th, 2018

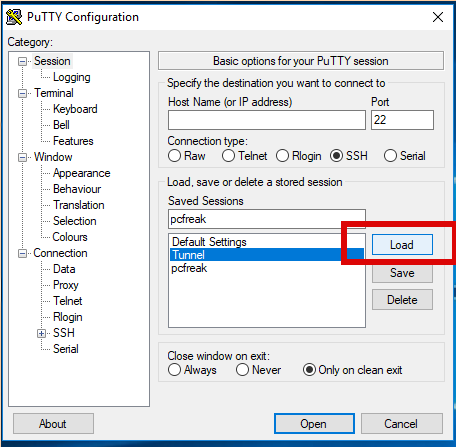
putty-load-button-screenshot

Recently I had to use PuTTY which I haven't used for years to open a number of SSH Pernanent Tunnels necessery for my daily work as a SAP Consultant.

I've saved them under a certain new profile and saved the set SSH Tunnel configuration not in the default Session but in separate named one, therefore had to press Load button every time after clicking over my Putty shortcut icon. 

That was annoying and took few seconds out of my life every next morning for about a week, so finally I found osme time to google it and it seemed it is pretty easy to have any Putty sessoin loaded you like.

Here is how:

1. Create a new Putty Shortcut

putty-screenshot1

putty-shortcut-screenshot-windows

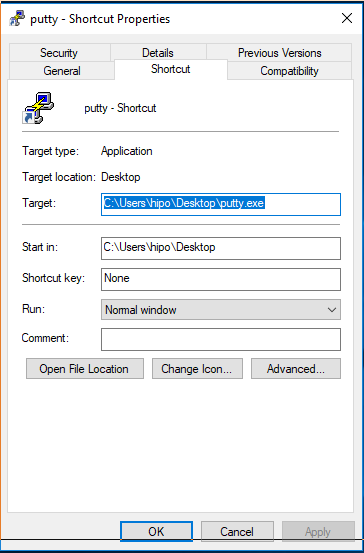
Click over Putty icon while holding CTRL + SHIFT (Control SHIFT keys simultaneously ) and move the mouse somewhere on the desktop to create the shortcut.
 

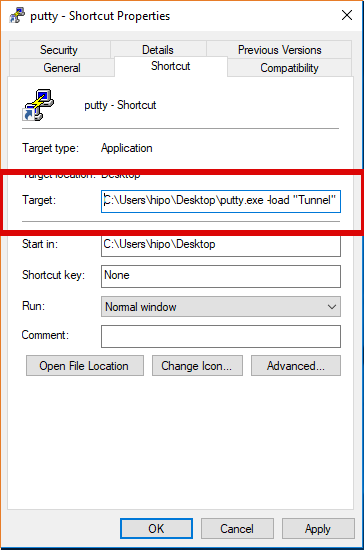
2. Right click on Putty Shortcut

putty-target-screenshot-windows1

putty-target-screenshot-windows2


"C:\Program Files\PuTTY\putty.exe" -load "your_saved_session" "username@your_server_address" -pw "your_password"


fill out "target" field of shortcut using above code (alter to your own properties).
click Apply button.

If you need to pass a user and password from Shortcut itself (which is a bad practice for security but sometimes useful, for not so important Tunnels – for example a tunnel to an Open Proxy), do it by typing in the target field like so:
 

"C:\Program Files\PuTTY\putty.exe" -load "your_saved_session" "username@your_server_address" -pw "your_password"


And Hooray !!! After that when you click on PuTTy shortcut it loads your session automatically using given username and password.

Howto resolve issues with “Call to undefined function xslt_create()” and my QmailAlizer bitter experience / IsoqLog a good alternative to QmailAlizer

Wednesday, March 31st, 2010

Today I got the intention to install some software that would report Statistics for Qmail in a Web Interface.
In other words I wanted to have Web qmail statistics that would report information about the sent and received emails per domain name from the Vpopmail.
Some time ago I used a project called qmailalizer . I modified it a bit back then because all it’s interface was in German and the install was a hell so I added up a little install.sh script that simplifies the installation project with qmailalizer.
Therefore I decided to install and test the software on debian 2.6.26-2-amd64 (64 bit) platform. The build failed ofcourse and thereforeI needed to install some packages which included the required header files by the qmailalizer source code. This are:

debian:~# apt-get install libgd2-xpm-dev libxml2-dev libxslt1-dev php5-xsl libxslt1-dev libxml2-dev
sablotron libsablot0

Hopefully afterwards your build won’t fail, but whenever you install the software you’re about to face another unsavoury,error caused by the old PHP code which was dedicated to run on top of PHP4 and this days most of us uses PHP5 on our Debians.So whenever I tried to access qmailalizer I received the ugly php error:

Call to undefined function xslt_create()

In order to fix that error I used a code from a nice article by Alexandre Alapetite titled XSL transition from PHP4 xslt to PHP5 xsl . All that is necessery to be done to weed out the erroris:

Copy paste the following code:

if ((PHP_VERSION>='5')&&extension_loaded('xsl'))
require_once('xslt-php4-to-php5.php');

inside the php that breaks with the error “Call to undefined function xslt_create()”

And then download xslt-php4-to-php5.php and save the file with a php extension.
That’s it now your “Call to undefined function xslt_create()” shouldn’t bug you any more.

Now back to the qmaializer, though I was able to succesfully compile the qmaializer. I couldn’t make the qmaializer binary work. Whenever I execute the qmaializer binary it crashes with Segmentation Fault like that:

debian:~# qmailalizer
Qmailalizer version 0.32, Copyright (C) 2001 Wolfgang Pichler
I/O warning : failed to load external entity "/var/www/qmailalizer/results.xml"
Parsing file ....
Parsing file: @400000004bb33dfc09e78f84.s
Segmentation fault

I tried using debugging what exactly procudes the segmnentation fault with Qmaializer using strace .All I can found out was that it has something to do with /etc/localtime.
A bit of googling revealed that Debian has some issue with the rrdtool binary package compiled for 64 bit architectures that dates back from the year 2007.
The exact thread concerning rrdtool and a 64 bit architecture can be red here .
This bug report advices that rrdtool is recompiled with a change in CFLAGS in debian/rules from the debian rrdtool source package whether the change should be like follows:

Change CFLAGS from debian/rules from
CFLAGS := -O2
to
CFLAGS := -g3 -ggdb3

I experimented changing the CFLAGS compile time options in the source of qmaializer but that didn’t do any good.

I’ve decided to drop qmailalizer for the moment and use it’s substitute called isoqlog .The main motive to choose drop out with qmaializer though I really like this piece of archaic soft, is that it no longer supported since the ’2004.
Luckily isoqlog is a supported piece of software and is capable of producing most of the reports produced by qmailalizer if not all of them.
So in case if you’re looking for good alternatives to QmailAlizer you should definitely check isoqlog.
Some other possibilities to Calculate and Report from your qmail logfiles is awstast, I’ve found the following article called Calculate Statistics From your Qmail logfiles an interesting reading and a good learning point.
Hope it’s gonna be helpful for you too. Maybe I’m gonna try a bit more to fix up the broken isoqlog but it depends if I’ll have enough time.
If I eventually succeed and fix it. I’ll share the working copy of qmailalizer with the world.