Posts Tagged ‘dedicated server’

Check your Server Download / Upload Internet Speed from Console on Linux / BSD / Unix howto

Tuesday, March 17th, 2015

tux-check-internet-network-download-upload-speed-on-linux-console-terminal-linux-bsd-unix
If you've been given a new dedicated server from a New Dedicated-Server-Provider or VPS with Linux and you were told that a certain download speed to the Server is guaranteed from the server provider, in order to be sure the server's connection to the Internet told by service provider is correct it is useful to run a simple measurement console test after logging in remotely to the server via SSH.

Testing connection from Terminal is useful because as you probably know most of Linux / UNIX servers doesn't have a GUI interface and thus it is not possible to test Internet Up / Down Bandwidth through speedtest.net.
 

1. Testing Download Internet Speed given by ISP / Dedi-Server Provider from Linux Console

For the download speed (internet) test the historical approach was to just try downloading the Linux kernel source code from www.kernel.org with some text browser such as lynx or links count the seconds for which the download is completed and then multiple the kernel source archive size on the seconds to get an approximate bandwidth per second, however as nowdays internet connection speeds are much higher, thus it is better to try to download some Linux distribution iso file, you can still use kernel tar archive but it completed too fast to give you some good (adequate) statistics on Download bandwidth.

If its a fresh installed Linux server probably you will probably not have links / elinks and lynx text internet browers  installed so install them depending on deb / rpm distro with:

If on Deb Linuz distro:


root@pcfreak:/root# apt-get install –yes links elinks lynx


On RPM Based Linuz distro:


[root@fedora ~]# yum install -y lynx elinks links


Conduct Internet  Download Speed with links
root@pcfreak:/root# links https://www.kernel.org/pub/linux/kernel/v3.x/linux-3.19.1.tar.xz
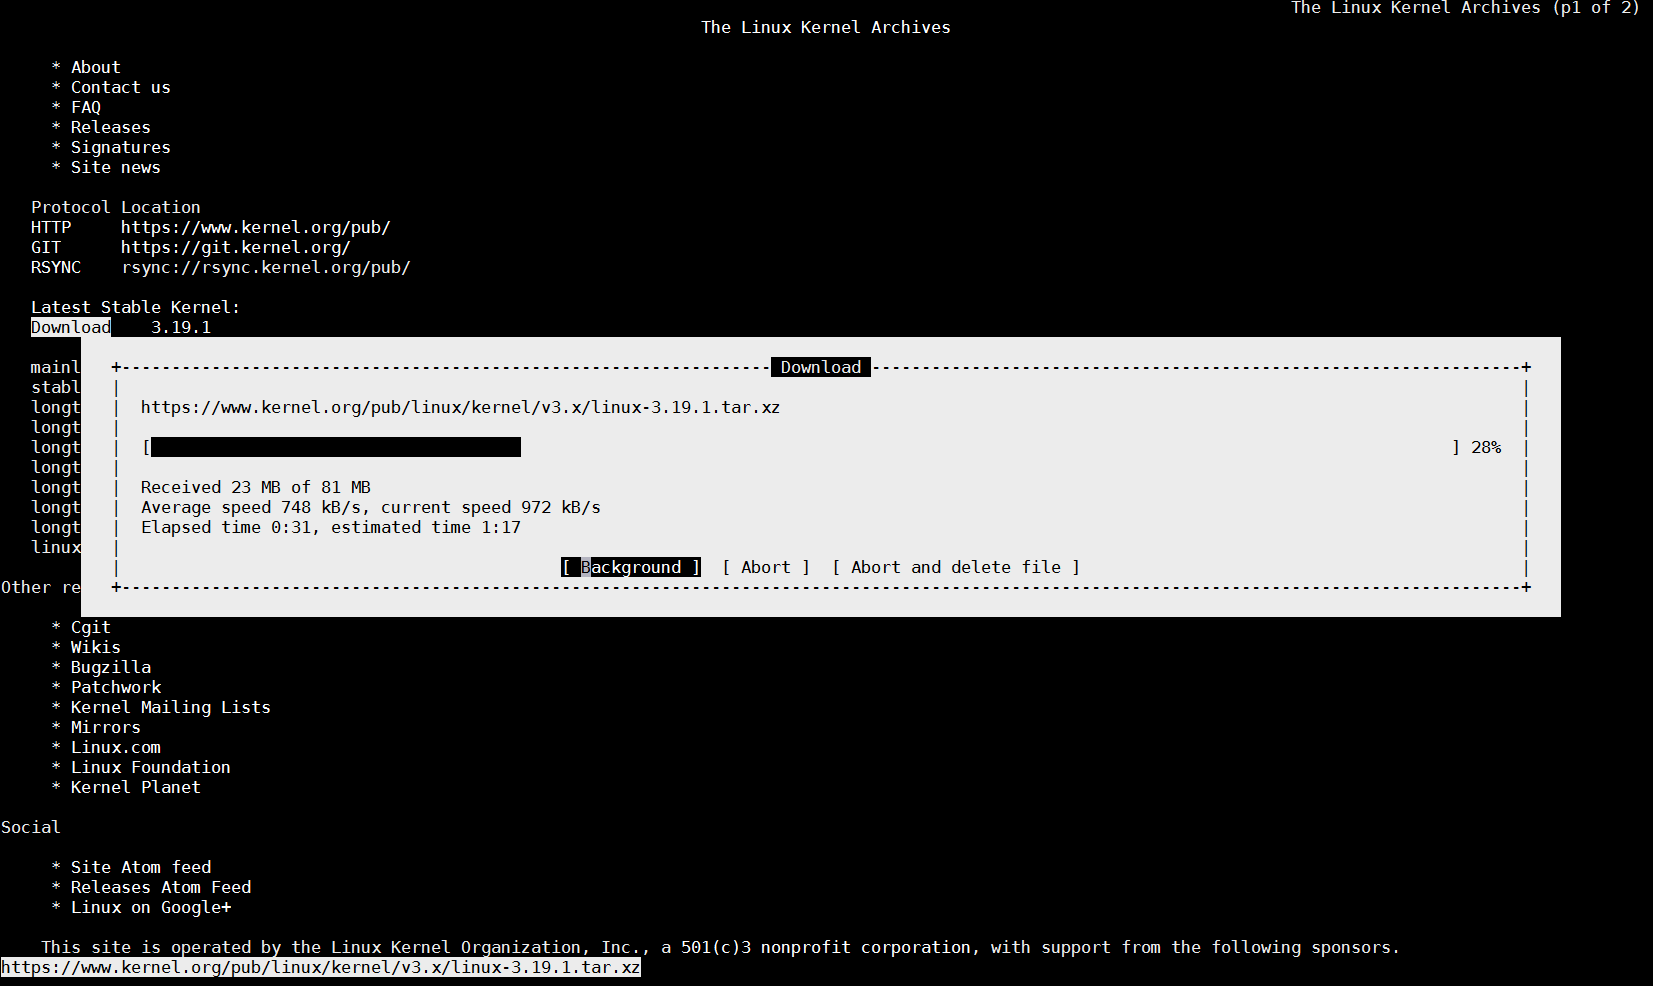
check_your_download_speed-from-console-linux-with-links-text-browser

(Note that the kernel link is current latest stable Kernel source code archive in future that might change, so try with latest archive.)

You can also use non-interactive tool such as wget curl or lftp to measure internet download speed

To test Download Internet Speed with wget without saving anything to disk set output to go to /dev/null 


root@pcfreak:~# wget -O /dev/null https://www.pc-freak.net//~hipo/hirens-bootcd/HirensBootCD15/Hirens.BootCD.15.0.zip


check_bandwidth_download-internet-speed-with-wget-from-console-non-interactively-on-linux

You see the Download speed is 104 Mbit/s this is so because I'm conducting the download from my local 100Mbit network.

For the test you can use my mirrored version of Hirens BootCD

2. Testing Uplink Internet speed provided by ISP / Server Provider from Linux (SSH) Console

To test your uplink speed you will need lftp or iperf command tool.


root@pcfreak:~# apt-cache show lftp|grep -i descr -A 12
Description: Sophisticated command-line FTP/HTTP client programs
 Lftp is a file retrieving tool that supports FTP, HTTP, FISH, SFTP, HTTPS
 and FTPS protocols under both IPv4 and IPv6. Lftp has an amazing set of
 features, while preserving its interface as simple and easy as possible.
 .
 The main two advantages over other ftp clients are reliability and ability
 to perform tasks in background. It will reconnect and reget the file being
 transferred if the connection broke. You can start a transfer in background
 and continue browsing on the ftp site. It does this all in one process. When
 you have started background jobs and feel you are done, you can just exit
 lftp and it automatically moves to nohup mode and completes the transfers.
 It has also such nice features as reput and mirror. It can also download a
 file as soon as possible by using several connections at the same time.


root@pcfreak:/root# apt-cache show iperf|grep -i desc -A 2
Description: Internet Protocol bandwidth measuring tool
 Iperf is a modern alternative for measuring TCP and UDP bandwidth performance,
 allowing the tuning of various parameters and characteristics.


To test Upload Speed to Internet connect remotely and upload any FTP file:


root@pcfreak:/root# lftp -u hipo www.pc-freak.net -e 'put Hirens.BootCD.15.0.zip; bye'
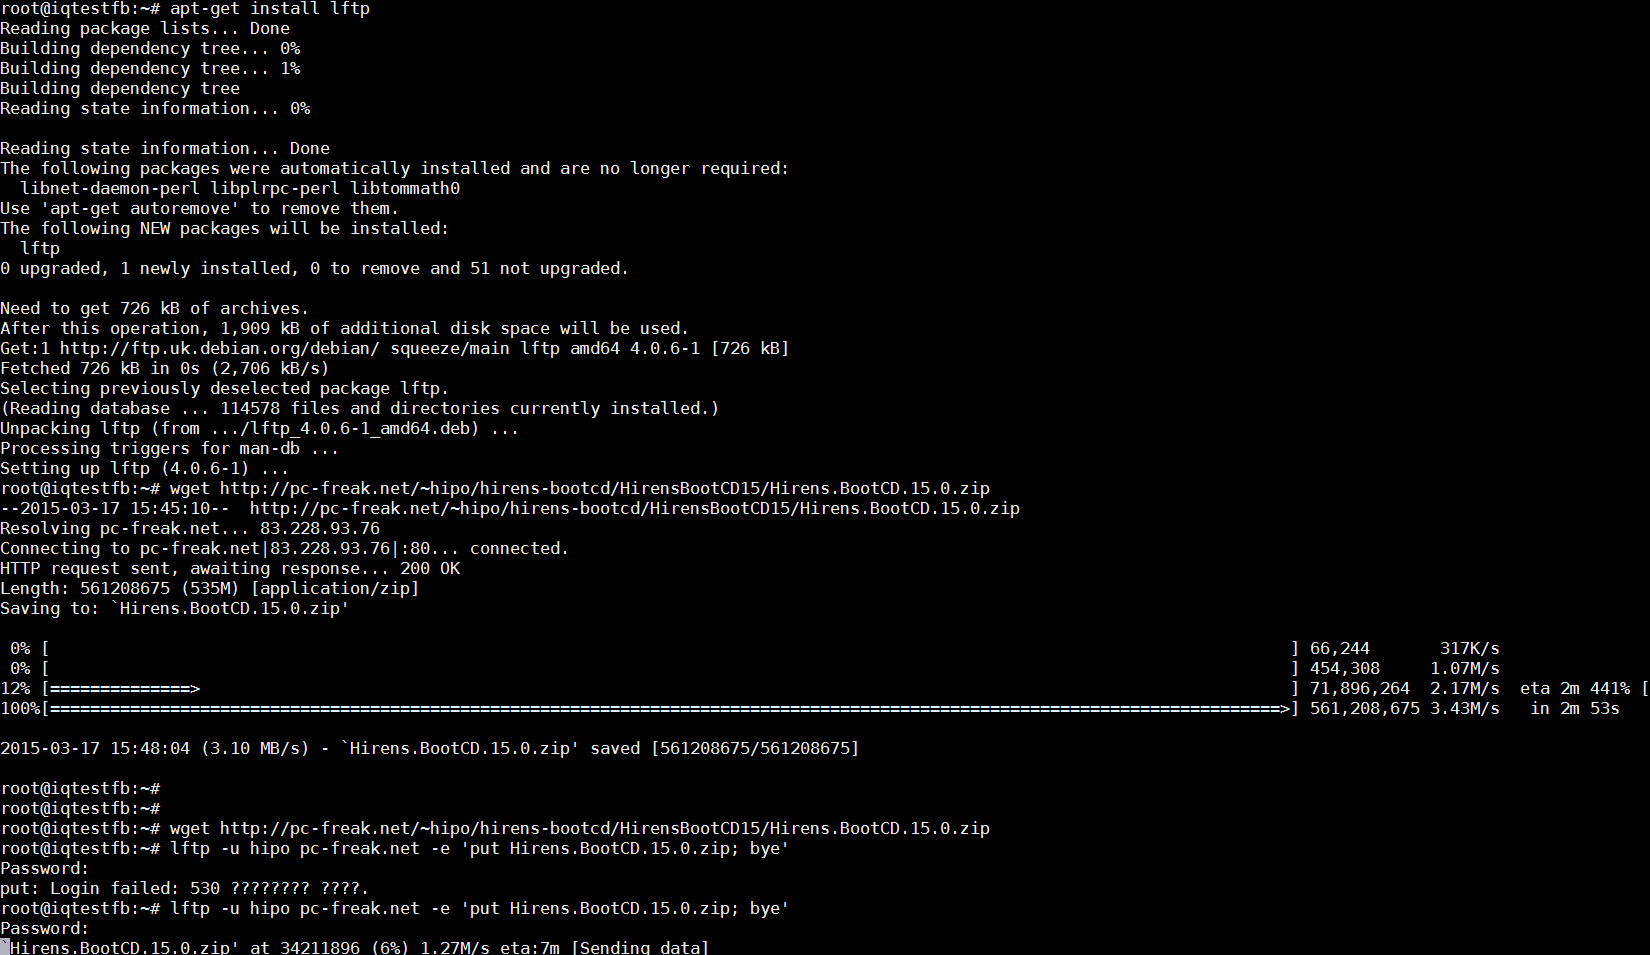
 

uploading-file-with-lftp-screenshot-test-upload-internet-speed-linux

On Debian Linux to install iperf:


root@pcfreak:/root# apt-get install –yes iperf


On latest CentOS 7 and Fedora (and other RPM based) Linux, you will need to add RPMForge repository and install with yum


[root@centos ~]# rpm -ivh  rpmforge-release-0.5.3-1.el7.rf.x86_64.rpm

[root@centos ~]# yum -y install iperf


Once having iperf on the server the easiest way currently to test it is to use
serverius.net speedtest server –  located at the Serverius datacenters, AS50673 and is running on a 10GE connection with 5GB cap.


root@pcfreak:/root# iperf -c speedtest.serverius.net -P 10
————————————————————
Client connecting to speedtest.serverius.net, TCP port 5001
TCP window size: 16.0 KByte (default)
————————————————————
[ 12] local 83.228.93.76 port 54258 connected with 178.21.16.76 port 5001
[  7] local 83.228.93.76 port 54252 connected with 178.21.16.76 port 5001
[  5] local 83.228.93.76 port 54253 connected with 178.21.16.76 port 5001
[  9] local 83.228.93.76 port 54251 connected with 178.21.16.76 port 5001
[  3] local 83.228.93.76 port 54249 connected with 178.21.16.76 port 5001
[  4] local 83.228.93.76 port 54250 connected with 178.21.16.76 port 5001
[ 10] local 83.228.93.76 port 54254 connected with 178.21.16.76 port 5001
[ 11] local 83.228.93.76 port 54255 connected with 178.21.16.76 port 5001
[  6] local 83.228.93.76 port 54256 connected with 178.21.16.76 port 5001
[  8] local 83.228.93.76 port 54257 connected with 178.21.16.76 port 5001
[ ID] Interval       Transfer     Bandwidth
[  9]  0.0-10.2 sec  4.05 MBytes  3.33 Mbits/sec
[ 10]  0.0-10.2 sec  3.39 MBytes  2.78 Mbits/sec
[ 11]  0.0-10.3 sec  3.75 MBytes  3.06 Mbits/sec
[  4]  0.0-10.3 sec  3.43 MBytes  2.78 Mbits/sec
[ 12]  0.0-10.3 sec  3.92 MBytes  3.18 Mbits/sec
[  3]  0.0-10.4 sec  4.45 MBytes  3.58 Mbits/sec
[  5]  0.0-10.5 sec  4.06 MBytes  3.24 Mbits/sec
[  6]  0.0-10.5 sec  4.30 MBytes  3.42 Mbits/sec
[  8]  0.0-10.8 sec  3.92 MBytes  3.03 Mbits/sec
[  7]  0.0-10.9 sec  4.03 MBytes  3.11 Mbits/sec
[SUM]  0.0-10.9 sec  39.3 MBytes  30.3 Mbits/sec


You see currently my home machine has an Uplink of 30.3 Mbit/s per second, that's pretty nice since I've ordered a 100Mbits from my ISP (Unguaranteed Bandwidth Connection Speed) and as you might know it is a standard practice for many Internet Proviers to give Uplink speed of 1/4 from the ISP provided overall bandwidth 1/4 would be 25Mbi/s, meaning my ISP (Bergon.NET) is doing pretty well providing me with even more than promised (ordered) bandwidth.

Iperf is probably the choice of most sysadmins who have to do regular bandwidth in local networks speed between 2 servers or test  Internet Bandwidth speed on heterogenous network with Linux / BSDs / AIX / HP-UX (UNIXes). On HP-UX and AIX and other UNIXes for which iperf doesn't have port you have to compile it yourself.

If you don't have root /admin permissions on server and there is python language enterpreter installed you can use speedtest_cli.py script to test internet throughput connectivity
speedtest_cli uses speedtest.net to test server up / down link just in case if script is lost in future I've made ownload mirror of speedtest_cli.py is here

Quickest way to test net speed with speedtest_cli.py:


$ lynx -dump https://raw.github.com/sivel/speedtest-cli/master/speedtest_cli.py > speedtest_cli.py
$ chmod +x speedtest_cli.py
python speedtest_cli.py
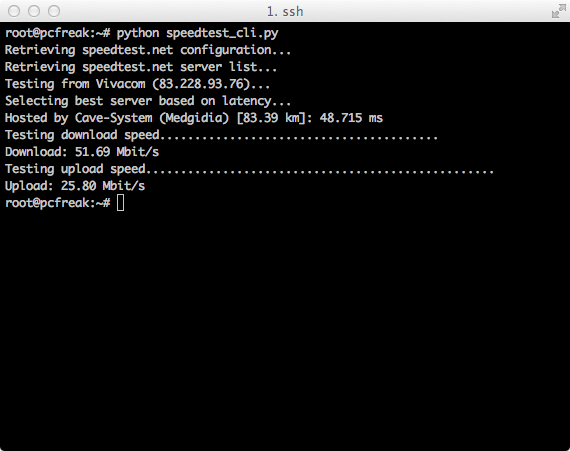
speedtest_cli_pyhon_script_screenshot-on-gnu-linux-test-internet-network-speed-on-unix

Fix FTP client error 425 Unable to build data connection: No route to host (Cause and Solution)

Monday, July 8th, 2013

ftp fix client 425 unable to-build data connection no route to host Linux
I just configured new dedicated server. One of requirement was dedicated server to support connections via FTP transfer protocol and few users to have access via it.
I added users with required permissions to directory structure and went on to test it with Linux ftp command, i.e.:


hipo@pcfreak:~$ ftp remote-host-name

Connected to remote-host-name.com
220 ProFTPD 1.3.3a Server (Matusala) [xx.xxx.xxx.xxx.xx]
Name (Matusala:hipo): testing-user
331 Password required for testing-user
Password:
230 User testing-user logged in

Remote system type is UNIX.
Using binary mode to transfer files.


ftp> ls


200 PORT command successful
425 Unable to build data connection: No route to host

ftp> exit


221 Goodbye.


As you see from above FTP paste even simple commands like "ls" failed to work with error:

425 Unable to build data connection: No route to host

I thought somehow I have configured on server some paranoid firewall, so tested same connection with iptables rules flushed, e.g.: matusala:~# iptables -F
matusala:~# iptables -t nat -F

Even after flushing firewall message persisted, so I googled around to see the what causes the error. The same error was hit by many users, and as I read, understand what causes is FTP server host is located behind some DMZ or firewall (as it was not my firewall I suppose, the dedicated provider has some firewall rules which are blocking FTP traffic on standard FTP TCP / UDP ports, port 20 and 21 ).
Fix is to enable in Linux kernel ip_nat_ftp or in newer Linux kernels module nf_nat_ftp:

matusala:~# modprobe ip_nat_ftp
matusala:~# modprobe nf_nat_ftp

or
To make ip_nat_ftp load permanently on Debian and Ubuntu servers:

matusala:~# echo 'ip_nat_ftp' >> /etc/modules
matusala:~# echo 'nf_nat_ftp' >> /etc/modules

One important note to make here is if you're testing the connection between two Linux servers it is possible the server from which you're running the client to have missing nf_nat_ftp loaded, so if error persist and you're testing remote FTP server from local ftp client on linux load same modules on localhost and you're done 🙂

How to resolve (fix) WordPress wp-cron.php errors like “POST /wp-cron.php?doing_wp_cron HTTP/1.0″ 404” / What is wp-cron.php and what it does

Monday, March 12th, 2012

fix wordpress wp-cron.php 404 HTTP error, what is wp-cron.php schedule logo

One of the WordPress websites hosted on our dedicated server produces all the time a wp-cron.php 404 error messages like:

xxx.xxx.xxx.xxx - - [15/Apr/2010:06:32:12 -0600] "POST /wp-cron.php?doing_wp_cron HTTP/1.0

I did not know until recently, whatwp-cron.php does, so I checked in google and red a bit. Many of the places, I've red are aa bit unclear and doesn't give good exlanation on what exactly wp-cron.php does. I wrote this post in hope it will shed some more light on wp-config.php and how this major 404 issue is solved..
So

what is wp-cron.php doing?


  • wp-cron.php is acting like a cron scheduler for WordPress.
  • wp-cron.php is a wp file that controls routine actions for particular WordPress install.
  • Updates the data in SQL database on every, request, every day or every hour etc. – (depending on how it's set up.).
  • wp-cron.php executes automatically by default after EVERY PAGE LOAD!
  • Checks all pending comments for spam with Akismet (if akismet or anti-spam plugin alike is installed)
  • Sends all scheduled emails (e.g. sent a commentor email when someone comments on his comment functionality, sent newsletter subscribed persons emails etc.)
  • Post online scheduled articles for a day and time of particular day

Suppose you're writting a new post and you want to take advantage of WordPress functionality to schedule a post to appear Online at specific time:

What is wordpress wp-cron.php, Scheduling wordpress post screenshot

The Publish Immediately, field execution is being issued on the scheduled time thanks to the wp-cron.php periodic invocation.

Another example for wp-cron.php operation is in handling flushing of WP old HTML Caches generated by some wordpress caching plugin like W3 Total Cache
wp-cron.php takes care for dozens of other stuff silently in the background. That's why many wordpress plugins are depending heavily on wp-cron.php proper periodic execution. Therefore if something is wrong with wp-config.php, this makes wordpress based blog or website partially working or not working at all.
 

Our company wp-cron.php errors case

In our case the:
212.235.185.131 – – [15/Apr/2010:06:32:12 -0600] "POST /wp-cron.php?doing_wp_cron HTTP/1.0" 404
is occuring in Apache access.log (after each unique vistor request to wordpress!.), this is cause wp-cron.php is invoked on each new site visitor site request.
This puts a "vain load" on the Apache Server, attempting constatly to invoke the script … always returning not found 404 err.

As a consequence, the WP website experiences "weird" problems all the time. An illustration of a problem caused by the impoper wp-cron.php execution is when we are adding new plugins to WP.

Lets say a new wordpress extension is download, installed and enabled in order to add new useful functioanlity to the site.

Most of the time this new plugin would be malfunctioning if for example it is prepared to add some kind of new html form or change something on some or all the wordpress HTML generated pages.
This troubles are result of wp-config.php's inability to update settings in wp SQL database, after each new user request to our site.
So the newly added plugin website functionality is not showing up at all, until WP cache directory is manually deleted with rm -rf /var/www/blog/wp-content/cache/

I don't know how thi whole wp-config.php mess occured, however my guess is whoever installed this wordpress has messed something in the install procedure.

Anyways, as I researched thoroughfully, I red many people complaining of having experienced same wp-config.php 404 errs. As I red, most of the people troubles were caused by their shared hosting prohibiting the wp-cron.php execution.
It appears many shared hostings providers choose, to disable the wordpress default wp-cron.php execution. The reason is probably the script puts heavy load on shared hosting servers and makes troubles with server overloads.

Anyhow, since our company server is adedicated server I can tell for sure in our case wordpress had no restrictions for how and when wp-cron.php is invoked.
I've seen also some posts online claiming, the wp-cron.php issues are caused of improper localhost records in /etc/hosts, after a thorough examination I did not found any hosts problems:

hipo@debian:~$ grep -i 127.0.0.1 /etc/hosts
127.0.0.1 localhost.localdomain localhost

You see from below paste, our server, /etc/hosts has perfectly correct 127.0.0.1 records.

Changing default way wp-cron.php is executed

As I've learned it is generally a good idea for WordPress based websites which contain tens of thousands of visitors, to alter the default way wp-cron.php is handled. Doing so will achieve some efficiency and improve server hardware utilization.
Invoking the script, after each visitor request can put a heavy "useless" burden on the server CPU. In most wordpress based websites, the script did not need to make frequent changes in the DB, as new comments in posts did not happen often. In most wordpress installs out there, big changes in the wordpress are not common.

Therefore, a good frequency to exec wp-cron.php, for wordpress blogs getting only a couple of user comments per hour is, half an hour cron routine.

To disable automatic invocation of wp-cron.php, after each visitor request open /var/www/blog/wp-config.php and nearby the line 30 or 40, put:

define('DISABLE_WP_CRON', true);

An important note to make here is that it makes sense the position in wp-config.php, where define('DISABLE_WP_CRON', true); is placed. If for instance you put it at the end of file or near the end of the file, this setting will not take affect.
With that said be sure to put the variable define, somewhere along the file initial defines or it will not work.

Next, with Apache non-root privileged user lets say www-data, httpd, www depending on the Linux distribution or BSD Unix type add a php CLI line to invoke wp-cron.php every half an hour:

linux:~# crontab -u www-data -e

0,30 * * * * cd /var/www/blog; /usr/bin/php /var/www/blog/wp-cron.php 2>&1 >/dev/null

To assure, the php CLI (Command Language Interface) interpreter is capable of properly interpreting the wp-cron.php, check wp-cron.php for syntax errors with cmd:

linux:~# php -l /var/www/blog/wp-cron.php
No syntax errors detected in /var/www/blog/wp-cron.php

That's all, 404 wp-cron.php error messages will not appear anymore in access.log! 🙂

Just for those who can find the root of the /wp-cron.php?doing_wp_cron HTTP/1.0" 404 and fix the issue in some other way (I'll be glad to know how?), there is also another external way to invoke wp-cron.php with a request directly to the webserver with short cron invocation via wget or lynx text browser.

– Here is how to call wp-cron.php every half an hour with lynxPut inside any non-privileged user, something like:
01,30 * * * * /usr/bin/lynx -dump "http://www.your-domain-url.com/wp-cron.php?doing_wp_cron" 2>&1 >/dev/null

– Call wp-cron.php every 30 mins with wget:

01,30 * * * * /usr/bin/wget -q "http://www.your-domain-url.com/wp-cron.php?doing_wp_cron"

Invoke the wp-cron.php less frequently, saves the server from processing the wp-cron.php thousands of useless times.

Altering the way wp-cron.php works should be seen immediately as the reduced server load should drop a bit.
Consider you might need to play with the script exec frequency until you get, best fit cron timing. For my company case there are only up to 3 new article posted a week, hence too high frequence of wp-cron.php invocations is useless.

With blog where new posts occur once a day a script schedule frequency of 6 up to 12 hours should be ok.


Possible way to Improve wordpress performance with wp-config.php 4 config variables

Tuesday, March 6th, 2012

Wordpress improve performance wp-config.php logo chromium effect GIMP

Nowdays WordPress is ran by million of blogs and websites all around the net. I myself run wordpress for this blog in general wordpress behaves quite well in terms of performance. However as with time the visitors tend to increase, on frequently updated websites or blogs. As a consequence, the blog / website performance slowly starts to decrease as result of the MySQL server read / write operations creating I/O and CPU load overheads. Buying a new hardware and migrating the wordpress database is a possible solution, however for many small or middle size wordpress blogs en sites like mine this is not easy task. Getting a dedicated server or simply upgrading your home server hardware is expensive and time consuming process… In my efforts to maximize my hardware utilization and increase my blog decaying performance I've stumbled on the article Optimize WordPress performance with wp-config.php

According to the article there are 4 simple wp-config.php config directvies useful in decreasing a lot of queries to the MySQL server issued with each blog visitor.

define('WP_HOME','http://www.yourblog-or-siteurl.com');
define('WP_SITEURL','http://www.yourblog-or-siteurl.com');
define('TEMPLATEPATH', '/var/www/blog/wp-content/themes/default');
define('STYLESHEETPATH', '/var/www/blog/wp-content/themes/default');

1. WP_HOME and WP_SITEURL wp-config.php directvies

The WP_HOME and WP_SITEURL variables are used to hard-code the address of the wordpress blog or site url, so wordpress doesn't have to check everytime in the database on every user request to know it is own URL address.

2. TEMPLATEPATH and TEMPLATEPATH wp variables

This variables will surely improve performance to Wodpress blogs which doesn't implement caching. On wp install with enabled caching plugins like WordPress Super Cache, Hyper Cache or WordPress Db Cache is used, I don't know if this variables will have performance impact …

So far I have tested the vars on a couple of wordpress based installs with caching enabled and even on them it seems the pages load faster than before, but I cannot say this for sure as I did not check the site loading time in advance before hardcoding the vars.

Anyways even if the suggested variables couldn't make positive impact on performance, having the four variables in wp-config.php is a good practice for blogs or websites which are looking for extra clarity.
For multiple wordpress installations living on the same server, having defined the 4 vars in different wordpress seems like a good idea too.

How to configure and enable Xen Linux dedicated server’s Virtual machines Internet to work / Enable multipe real IPs and one MAC only in (SolusVM) through NAT routed and iptables

Saturday, June 4th, 2011

Xen Linux Virtual Machine Logo

I’ve been hired as a consultant recently to solve a small task on a newly bought Xen based dedicated server.
The server had installed on itself SolusVM

The server was a good hard-iron machine running with CentOS Linux with enabled Xen virtualization support.
The Data Center (DC) has provided the client with 4 IP public addresses, whether the machine was assigned to possess only one MAC address!

The original idea was the dedicated server is supposed to use 4 of the IP addresses assigned by the DC whether only one of the IPs has an external internet connected ethernet interface with assigned MAC address.

In that case using Xen’s bridging capabilities was pretty much impossible and therefore Xen’s routing mode has to be used, plus an Iptables Network Address Translation or an IP MASQUERADE .

In overall the server would have contained 3 virtual machines inside the Xen installed with 3 copies of:

  • Microsoft Windows 2008

The scenario I had to deal with is pretty much explained in Xen’s Networking wiki Two Way Routed Network

In this article I will describe as thoroughfully as I can how I configured the server to be able to use the 3 qemu virtual machines (running inside the Xen) with their respective real interner visible public IP addresses.

1. Enable Proxyarp for the eth0 interface

To enable proxyarp for eth0 on boot time and in real time on the server issue the commands:

[root@centos ~]# echo 1 > /proc/sys/net/ipv4/conf/eth0/proxy_arp[root@centos ~]# echo 'net.ipv4.conf.all.proxy_arp = 1' >> /etc/sysctl.conf

2. Enable IP packet forwarding for eth interfaces

This is important pre-requirement in order to make the iptables NAT to work.

[root@centos ~]# echo 'net.ipv4.ip_forward = 1' >> /etc/sysctl.conf
[root@centos ~]# echo 'net.ipv6.conf.all.forwarding=1' >> /etc/sysctl.conf

If you get errors during execution of /etc/init.d/xendomains , like for example:

[root@centos ~]# /etc/init.d/xendomains restart
/etc/xen/scripts/network-route: line 29: /proc/sys/net/ipv4/conf/eth0/proxy_arp: No such file or directory
/etc/xen/scripts/network-route: line 29: /proc/sys/net/ipv6/conf/eth0/proxy_arp: No such file or directory

in order to get rid of the message you will have to edit /etc/xen/scripts/network-route and comment out the lines:

echo 1 >/proc/sys/net/ipv4/conf/${netdev}/proxy_arp
echo 1 > /proc/sys/net/ipv6/conf/eth0/proxy_arp
e.g.
#echo 1 >/proc/sys/net/ipv4/conf/${netdev}/proxy_arp
#echo 1 > /proc/sys/net/ipv6/conf/eth0/proxy_arp

3. Edit /etc/xen/xend-config.sxp, disable ethernet bridging and enable eth0 routing (route mode) and NAT for Xen’s routed mode

Make absolutely sure that in /etc/xen/xend-config.sxp the lines related to bridging are commented.
The lines you need to comment out are:

(network-script network-bridge)
(vif-script vif-bridge)

make them look like:

#(network-script network-bridge)
#(vif-script vif-bridge)br />

Now as bridging is disabled let’s enable Xen routed network traffic as an bridged networking alternative.

Find the commented (network-script network-route) and (vif-script vif-route) lines and uncomment them:

#(network-script network-route)
#(vif-script vif-route)

The above commented lines should become:

(network-script network-route)
(vif-script vif-route)

Next step is to enable NAT for routed traffic in Xen (necessery to make routed mode work).
Below commented two lines in /etc/xen/xend-config.sxp, should be uncommented e.g.:

#(network-script network-nat)
#(vif-script vif-nat)

Should become:

(network-script network-nat)
(vif-script vif-nat)

4. Restart Xen control daemon and reload installed Xen’s Virtual Machines installed domains

To do so invoke the commands:

[root@centos ~]# /etc/init.d/xend
[root@centos ~]# /etc/init.d/xendomains restart

This two commands will probably take about 7 to 10 minutes (at least they took this serious amount of time in my case).
If you think this time is too much to speed-up the procedure of restarting Xen and qemu attached virtual machines, restart the whole Linux server, e.g.:

[root@centos ~]# restart

5. Configure iptables NAT rules on the CentOS host

After the server boots up, you will have to initiate the following ifconfig & iptables rules in order to make the Iptables NAT to work out:

echo > > /proc/sys/net/ipv4/conf/tap1.0/proxy_arp
/sbin/ifconfig eth0:1 11.22.33.44 netmask 255.255.252.0
/sbin/ifconfig eth0:2 22.33.44.55 netmask 255.255.252.0
/sbin/ifconfig eth0:3 33.44.55.66 netmask 255.255.252.0

/sbin/iptables -t nat -A PREROUTING -d 11.22.33.44 -i eth0 -j DNAT --to-destination 192.168.1.2
/sbin/iptables -t nat -A PREROUTING -d 22.33.44.55 -i eth0 -j DNAT --to-destination 192.168.1.3
/sbin/iptables -t nat -A PREROUTING -d 33.44.55.66 -i eth0 -j DNAT --to-destination 192.168.1.4
/sbin/iptables -t nat -A POSTROUTING -s 192.168.1.2 -o eth0 -j SNAT --to-source 11.22.33.44
/sbin/iptables -t nat -A POSTROUTING -s 192.168.1.3 -o eth0 -j SNAT --to-source 22.33.44.55
/sbin/iptables -t nat -A POSTROUTING -s 192.168.1.4 -o eth0 -j SNAT --to-source 33.44.55.66

In the above ifconfig and iptables rules the IP addresses:

11.22.33.44, 22.33.44.55, 33.44.55.66 are real IP addresses visible from the Internet.
In the above rules eth0:1, eth0:2 and eth0:3 are virtual ips assigned to the main eth0 interface.

This ifconfig and iptables setup assumes that the 3 Windows virtual machines running inside the Xen dedicated server will be configured to use (local) private network IP addresses:

192.168.1.2, 192.168.1.3 and 192.168.1.4

You will have also to substitute the 11.22.33.44, 22.33.44.55 and 33.44.55.66 with your real IP addreses.

To store the iptables rules permanently on the fedora you can use the iptables-save command:

[root@centos ~]# /sbin/iptables-save

However I personally did not use this approach to save my inserserted iptable rules for later boots but I use my small script set_ips.sh to add virtual interfaces and iptables rules via the /etc/rc.local invokation:

If you like the way I have integrated my virtual eths initiation and iptables kernel firewall inclusion, download my script and set it to run in /etc/rc.local, like so:

[root@centos ~]# cd /usr/sbin
[root@centos sbin]# wget https://www.pc-freak.net/bshscr/set_ips.sh
...
[root@centos ~]# chmod +x /usr/sbin/set_ips.sh
[root@centos ~]# mv set_ips.sh /usr/sbin
[root@centos ~]# echo '/usr/sbin/set_ips.sh' >> /etc/rc.local

Note that you will have to modify my set_ips.sh script to substitute the 11.22.33.44, 22.33.44.55 and 33.44.55.66 with your real IP address.

So far so good, one might think that all this should be enough for the Virtual Machines Windows hosts to be able to connect to the Internet and Internet requests to the virtual machines to arrive, but no it’s not!!

6. Debugging Limited Connectivity Windows LAN troubles on the Xen dedicated server

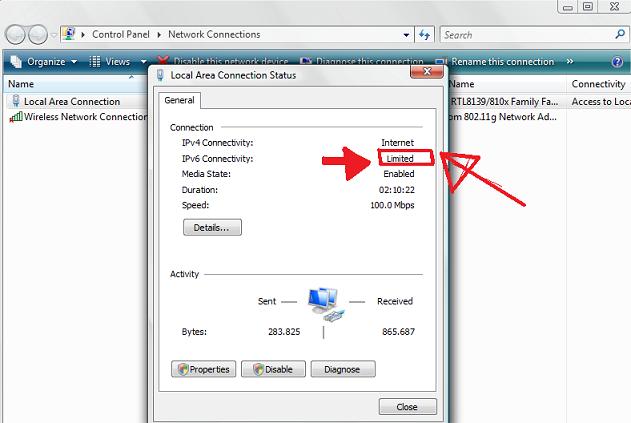
Even though the iptables rules were correct and the vif route and vif nat was enabled inside the Xen node, as well as everything was correctly configured in the Windows 2008 host Virtual machines, the virtual machines’s LAN cards were not able to connect properly to connect to the internet and the Windows LAN interface kept constantly showing Limited Connectivity! , neither a ping was available to the gateway configured for the Windows VM host (which in my case was: 192.168.1.1).

You see the error with Limited connectivity inside the Windows on below’s screenshot:

Limited Connectivty Windows error Lan Interface, status screenshot

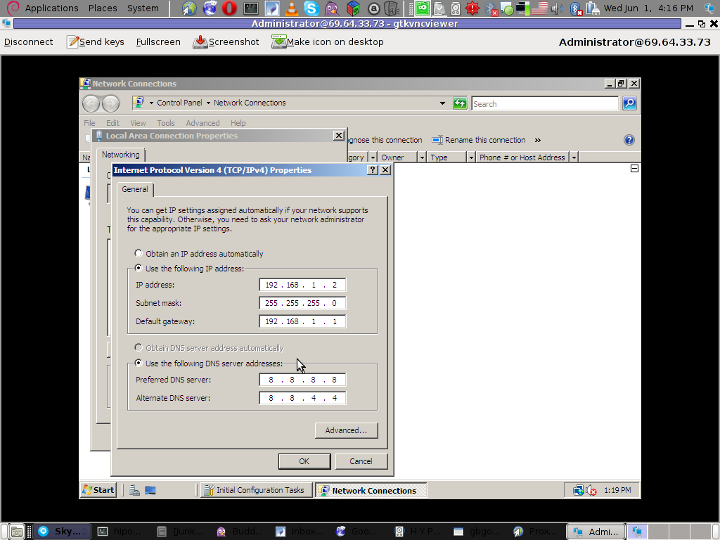
Here is also a screenshot of my VNC connection to the Virtual machine with the correct IP settings – (TCP/IPv4) Properties Window:

Windows Xen Network Connections Windows VNC TCP/IPv4 Properties Window

This kind of Limited Connectivity VM Windows error was really strange and hard to diagnose, thus I started investigating what is wrong with this whole situation and why is not able the Virtualized Windows to connect properly to the Internet, through the Iptables NAT inbound and outbound traffic redirection.

To diagnose the problem, I started up with listing the exact network interfaces showing to be on the Xen Dedicated server:


[root@centos ~]# /sbin/ifconfig |grep -i 'Link encap' -A 1
eth0 Link encap:Ethernet HWaddr 00:19:99:9C:08:3A
inet addr:111.22.33.55 Bcast:111.22.33.255
Mask:255.255.252.0
--
eth0:1 Link encap:Ethernet HWaddr 00:19:99:9C:08:3A
inet addr:11.22.33.44 Bcast:11.22.33.255
Mask:255.255.252.0
--
eth0:2 Link encap:Ethernet HWaddr 00:19:99:9C:08:3A
inet addr:22.33.44.55 Bcast:22.33.44.255
Mask:255.255.252.0
--
eth0:3 Link encap:Ethernet HWaddr 00:19:99:9C:08:3A
inet addr:33.44.55.66 Bcast:33.44.55.255
Mask:255.255.252.0
--
lo Link encap:Local Loopback
inet addr:127.0.0.1 Mask:255.0.0.0
--
tap1.0 Link encap:Ethernet HWaddr FA:07:EF:CA:13:31
--
vifvm101.0 Link encap:Ethernet HWaddr FE:FF:FF:FF:FF:FF
inet addr:111.22.33.55 Bcast:111.22.33.55
Mask:255.255.255.255

I started debugging the issue, using the expelling logic.
In the output concerning my interfaces via ifconfig on eth0, I have my primary server IP address 111.22.33.55 , this one is working for sure as I was currently connected to the server through it.

The other virtual IP addresses assigned on the virtual network interfaces eth0:1, eth0:2 and eth0:3 were also assigned correctly as I was able to ping this ips from my Desktop machine from the Internet.

The lo , interface was also properly configured as I could ping without a problem the loopback ip – 127.0.0.1

The rest of the interfaces displayed by my ifconfig output were: tap1.0, vifvm101.0

After a bit of ressearch, I’ve figured out that they’re virtual interfaces and they belong to the Xen domains which are running qemu virtual machines with the Windows host.

I used tcpdump to debug what kind of traffic does flow through the tap1.0 and vifvm101.0 interfaces, like so

[root@centos ~]# tcpdump -i vifvm101.0
tcpdump: verbose output suppressed, use -v or -vv for full protocol decode
listening on vifvm101.0, link-type EN10MB (Ethernet), capture size 96 bytes
^C
0 packets captured
0 packets received by filter
0 packets dropped by kernel
[root@centos ~]# tcpdump -i tap1.0
cpdump: verbose output suppressed, use -v or -vv for full protocol decode
listening on tap1.0, link-type EN10MB (Ethernet), capture size 96 bytes
^C
08:55:52.490249 IP 229.197.34.95.customer.cdi.no.15685 > 192.168.1.2.12857: UDP, length 42

I’ve figured out as it’s also observable in above’s two tcpdump commands output, that nothing flows through the vifvm101.0 interface, and that there was some traffic passing by tap1.0 interface.

7. Solving the Limited Connectivy Windows Internet network connection problems

As below’s ifconfig output reveals, there is no IP address assigned to tap1.0 interface, using some guidelines and suggestions from guys in irc.freenode.net’s #netfilter irc channel, I’ve decided to give a go to set up an IP address of 192.168.1.1 to tap1.0 .

I choose for a reason as this IP address is configured to be my Gateway’s IP Address inside the Emulated Windows 2008 hosts

To assign the 192.168.1.1 to tap1.0, I issued:

[root@centos ~]# /sbin/ifconfig tap1.0 192.168.1.1 netmask 255.255.255.0
To test if there is difference I logged in to the Virtual Machine host with gtkvncviewer (which by the way is a very nice VNC client for Gnome) and noticed there was an established connection to the internet inside the Virtual Machine 😉

I issued a ping to google which was also returned and opened a browser to really test if everything is fine with the Internet.
Thanks God! I could browse and everything was fine 😉

8. Making tap1.0 192.168.1.1 (VM hosts gateway to be set automatically, each time server reboots)

After rebooting the server the tap1.0 assignmend of 192.168.1.1 disappeared thus I had to make the 192.168.1.1, be assigned automatically each time the CentoS server boots.

To give it a try, I decided to place /sbin/ifconfig tap1.0 192.168.1.1 netmask 255.255.255.0 into /etc/rc.local, but this worked not as the tap1.0 interface got initialized a while after all the xendomains gets initialized.

I tried few times to set some kind of sleep time interval with the sleep , right before the /sbin/ifconfig tap1.0 … ip initialization but this did not worked out, so I finally completely abandoned this methodology and make the tap1.0 get initialized with an IP through a cron daemon.
For that purpose I’ve created a script to be invoked, every two minutes via cron which checked if the tap1.0 interface is up and if not issues the ifconfig command to initialize the interface and assign the 192.168.1.1 IP to it.

Here is my set_tap_1_iface.sh shell script

To set it up on your host in /usr/sbin issue:

[root@centos ~]# cd /usr/sbin/
[root@centos sbin]# wget https://www.pc-freak.net/bshscr/set_tap_1_iface.sh
...
In order to set it on cron to make the tap1.0 initialization automatically every two minutes use the cmd:

[root@centos ~]# crontab -u root -e

After the cronedit opens up, place the set_tap_1_iface.sh cron invokation rules:

*/2 * * * * /usr/sbin/set_tap_1_iface.sh >/dev/null 2>&1

and save.

That’s all now your Xen dedicated and the installed virtual machines with their public internet IPs will work 😉
If this article helped you to configure your NAT routing in Xen drop me a thanks message, buy me a beer or hire me! Cheers 😉